
IAN 73594 - Sport kite CRIVIT - Free user manual and instructions
Find the device manual for free IAN 73594 CRIVIT in PDF.

| Product type | Stunt kite without frame (parafoil) |
| Brand | Crivit |
| Model | IAN 73594 |
| Wingspan | 160 cm |
| Recommended wind range | 2 to 6 Beaufort (Bft) |
| Flying line length | 25 meters each (2 lines included) |
| Material | Durable synthetic fabric |
| Recommended age | 14 years and older |
| Usage | Outdoor leisure, open areas |
| Main functions | Directional control, loops, stable flight in wind window |
| Included accessories | Control bar, 2 flying lines, transport straps, storage bag |
| Launch | Assistance recommended: one person holds the kite facing the wind, the pilot tensions the lines |
| Landing | Direct the kite towards the edges of the wind window to reduce speed |
| Storage | Fold and store in the transport bag after thorough drying |
| Maintenance | Clean with a damp cloth, do not use harsh chemicals |
| Storage conditions | In a dry, dark place |
| Safety | Do not fly within 200 m of roads, 5 km of airports, avoid power lines and thunderstorms |
| Warranty | 3 years from purchase date |
| Spare parts | Available from customer service; use only original parts |
| Terms of use | For private use only, comply with local regulations |
Frequently Asked Questions - IAN 73594 CRIVIT
User questions about IAN 73594 CRIVIT
0 question about this device. Answer the ones you know or ask your own.
Ask a new question about this device
Download the instructions for your Sport kite in PDF format for free! Find your manual IAN 73594 - CRIVIT and take your electronic device back in hand. On this page are published all the documents necessary for the use of your device. IAN 73594 by CRIVIT.
USER MANUAL IAN 73594 CRIVIT
Balance rounding, held out the illustration page and got to know all of the locations of your unit.
SPORT-LENKMATTE
DE AT CH
SPORT-LENKMATTE
Bedienungsanleitung
FR CH
CERF-VOLANT
GR Instructions are Safety Notice
Page 29
DELTA-SPORT HANDELSKONTOR GMBH
Wangkong
D-22397 Horking
Verm 34:20:2
Dolfsosin: LN-1419
GB
SPORTS STUNT KITE
Instructions for use
IAN 73594IAN 73594
DH AT CH TR
B NL G-

@ AufbauÜbersicht
① Schleparte
① Wavelength
© Rosgeinn
© Jankovspunl der Huglaine
④ ugkin
①
zu Bevätigkeit der
Hankiew
②
© ARMINI KONCHING
in the right
letkstinge
② Suchknow
Verbindungen
⑤ Interdisciplinary
c. 1984, 2013, 6:15
②
⑫ Le Kirado
O u#kanners
m Apercu de la structure
©01 ① Bere de ful
② Bridgans
© Enixes
© Point d'ebuch
[Unreadable]
④ E###
© Percent disclosure
1.
- Paquena
© Bords d'entra
① Camere d'aria
NL Overzicht opbauw
① Shinker
① Kafarge Lises
VH10:16 1947
② Anthropart
-legimen
④ Vioglinet
①
Flying line binding point
② Flying Inc
② Handle stops by
● 10.3.2.2
②
Hyng
② Handle
① Lacks head knot
vending point
① Tepenertischer
① Transch. Schy. Shop
① Locating edge
① Celk
GB Instructions for use
Intended Use 28
Safety Notices 28 - 29
Technical Specifications 29
General Information about Flying Parafoil Kites .. 29
Before Launching 30
Larks head knot 30
Launching 30
Directing 31
Landing 31
Storing the Parafoil Kite 31 - 32
Wind Forces 32
Maintenance / Cleaning / Storage 32
About disposal 32
3 Years Warranty 33
natural_image
Diagram of a structural support system with triangular supports and a downward arrow, no text or symbols present
natural_image
Diagram of a structural support structure with triangular supports and a downward arrow indicator (no text or symbols)Landen
natural_image
Diagram of a cable or wire being inserted into a plug, showing internal strands and insulation (no text or labels)
natural_image
Diagram of a cylindrical object with internal bands and a loop, showing directional arrows (no text or symbols)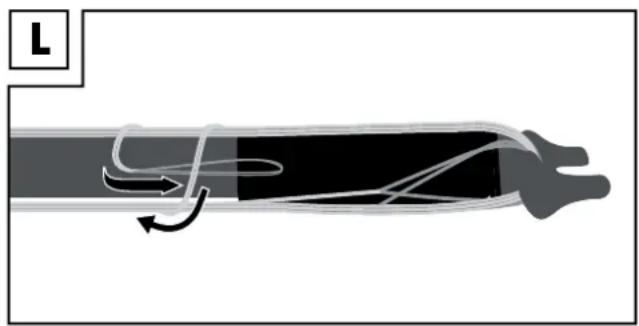
natural_image
Diagram of a fluid flow path through a pipe with directional arrows indicating flow direction (no text or labels)Windstärken
Bft = Beaufort
Windstille
0 bft; 0-0,8 km/h; 0-0,5 Knoten
natural_image
Five abstract geometric line patterns with no text or symbolsnatural_image
Diagram of a structural support system with triangular supports and a downward arrow, no text or symbols present
natural_image
Diagram of a structural support structure with triangular supports and a downward arrow indicator (no text or symbols)Atterissage
natural_image
Diagram of a cable or wire with exposed internal components and connecting wires (no text or symbols)
natural_image
Diagram of a cylindrical object with internal bands and directional arrows, labeled 'K' in top-left corner (no text or symbols on the object itself)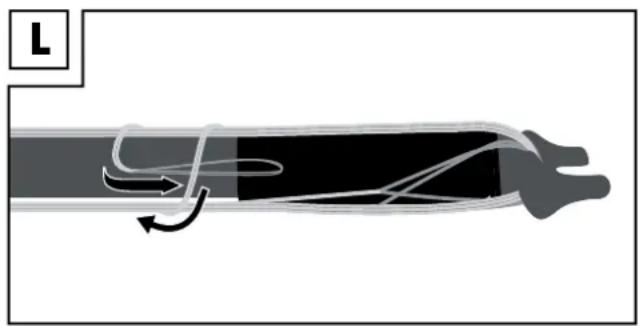
natural_image
Diagram of a fluid or material flow path with directional arrows indicating movement (no text or symbols)Forces du vent
Bft = Beaufort
Aucun vent
0 Bft; 0-0,8 km/h; 0-0,5 noeuds
natural_image
Diagram of a structural support structure with triangular supports and a downward arrow, no text or symbols present
natural_image
Diagram of a structural support structure with triangular supports and a downward arrow indicating force or displacement (no text or symbols)Atterrare
natural_image
Diagram of a cable or wire with exposed internal structure and connecting wires (no text or symbols)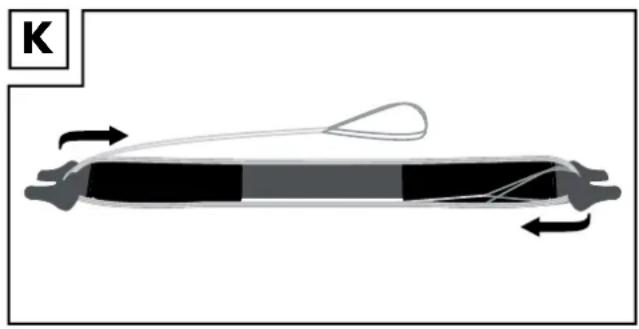
natural_image
Diagram of a cylindrical object with internal bands and a loop, showing directional arrows (no text or symbols)
natural_image
Diagram of a fluid flow path through a pipe with directional arrows indicating flow direction (no text or labels)Forza del vento
Bft = Beaufort
Vento calmo
0 Bft; 0-0,8 km/h; 0-0,5 nodi
natural_image
Diagram of a structural support system with triangular supports and a downward arrow, no text or symbols present
natural_image
Diagram of a structural support structure with triangular supports and a downward arrow indicator (no text or labels)Landen
natural_image
Diagram of a cable or wire being inserted into a plug, showing internal components and connecting wires (no text or labels)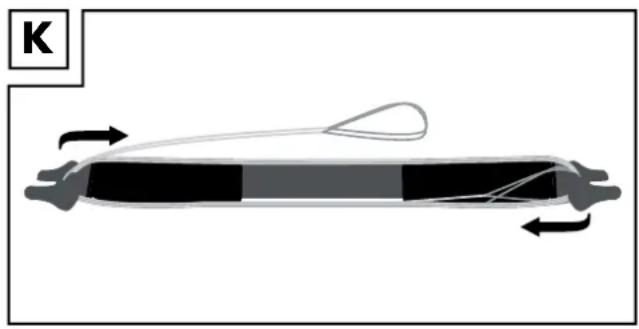
natural_image
Diagram of a cylindrical object with internal bands and a loop, showing directional arrows (no text or symbols)
natural_image
Diagram of a fluid flow path through a pipe with directional arrows indicating flow direction (no text or labels)Windsterktes
Bft = Beaufort
Windstil
0 Bft; 0-0,8 km/h; 0-0,5 knopen
natural_image
Five abstract geometric line patterns with no text or symbolsWith your purchase you have decided on a high-quality product. Get to know the product before you start to use it. Carefully read the following operating instructions. Use the product only as described and only for the given areas of application. Keep these instructions safe. When passing the product on to a third party, always make sure that the documentation is included.
Intended Use
This product is a sporting good for personal use and is not suitable for children under age 14 years.
Suitable for wind forces 2 - 6 (Beaufort).

Safety Notices:
This is a sporting good, not a toy, as the use of this product requires a lot of caution and practice. Please note even small parafoil kites can reach high speeds and considerable pull in high winds.

WARNING!
Life-Threatening Situation
Never fly this product:
- above persons or animals and avoid collision with the kite and the lines!
- less than 200m from streets, trails, railroad tracks or busy areas.
- less than 5km from airports, glider fields, helipads and military low-altitude flight zones.
- higher than 100m.
- less than 500m from utility poles and high voltage lines.
- in thunderstorms.
- in no-fly zones.
When using the parafoil kite abroad be sure to inquire about the country's local regulations.
Risk of Injury
Never fly this product:
- in wind forces in excess of your strength. Stop flying this product if winds are too strong.
- in conservancies, nature preserves or bird sanctuaries or where flying is prohibited.
- When using the assistance of another person for launching the kite this person must leave the danger area backwards immediately after releasing the kite to prevent injury from a crashing parafoil kite.
- Never fly this product holding the line itself in your hands, and avoid touching the line during flight. The line may cause deep cuts.
- If you are unable to control this product and too much pull builds before you are able to land it, release the line to avoid injury or being lifted off the ground.
- Do not add to the included line. This product will otherwise be virtually impossible to control.
• Always check this product for damage such as tears, etc. before launching it.
• Discontinue use if damaged. - Only use genuine parts and lines to avoid damage to the product.
- Do not attach loads to the product.
- Always observe the approved maximum wind force for this product.
- Only fly in wind forces which are manageable based on your skills and strength.
- Novices should gradually attempt higher wind speeds.
Avoiding Property Damage
Never fly this product:
- near trees.
- near other parafoil kites or stunt kites.
Maintain a safe distance!
Please verify whether your personal liability insurance provides sufficient coverage for flying parafoil kites! We assume no liability for damage due to crashes!
Technical Specifications
Wing span: 160cm
Wind range: 2-6Bft (see also page 32)
2 x line, length: 25m
General Information about Flying Parafoil Kites
Introduction to parafoil kites
Parafoil kites are kites without spars which develop a flight shape similar to paragliders in air stream. Since they consist only of fabric and lines they fold to a small size and can easily be packed for air travel. Parafoil kits haven upper and lower sail with connectors to give them a wing shape. These cells either all or some feature an opening on the inflow side.
The cells themselves are interconnected so that pressure differences can be balanced inside. When air streams into the front edge the cells fill with back pressure higher than the pressures on the outer surface. This stabilises the shape of the kite. The lift generated by the low pressure on the top face is deflected from the lower side onto the two flying lines through a complex bridle of lines.
Wind Window (fig. A)
A parafoil kite is flown in the so-called wind window. The pilot stands with his back downwind, the wind window in front of the pilot. Depending on the wind force the wind window is so to speak a large quarter round.
The parafoil kite can't be flown outside of this wind window as the air cells would not be filled with sufficient air stream.
Power Zone (fig. A)
At the centre of the wind window is the so-called power zone. In this area straight ahead of the pilot the strongest air stream should be expected.
A: direction of wind
B: power zone
The Airfield
Verify the suitability of the airfield (see safety notices). This area should be free from large obstacles such as trees or houses. The airfield must be free from tripping points. These could not only cause swirling wind but also interfere with the parafoil kite and also damage it. Large, open fields or sandy beaches are ideal.
Crashes
Crashes are unavoidable and are part of flying kites. Many of them appear much worse than they truly are. However: the stronger the wind the more violent the crashes! Try to avoid these if possible. We assume no liability for damage caused by crashes.
Before Launching
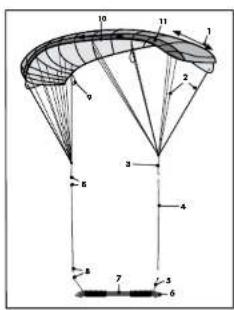
Securing the flying line to the handle (see assembly overview)
Remove the handle (7) from the storage pouch. Completely unwind both flying lines (4) from the handle. Now secure one flying line to the right strap on the handle (5) and the other flying line to the left strap of the handle. Secure using the larks head knot (description larks head knot).
Securing the flying line to the para- foil kite (see assembly overview)
The parafoil kite must be completely unfolded. First remove the binding point of the flying line (3) from the transport safety loop (9) on the trailing edge (1). Now attach one flying line to each binding point. Secure using the larks head knot (description larks head knot).
Attention!
Before storing the parafoil kite after use, reattach the binding point of the flying line to the transport strap to avoid twisting.
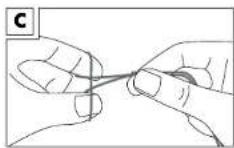
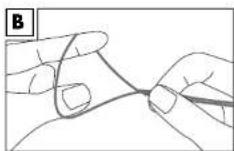
Larks head knot
Place your thumb and index finger inside the knot of the flying line, see fig. B.
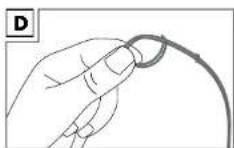
Take the loop behind and under, see fig. C.
Push the side ends down, see fig. D.
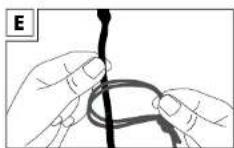
Securing the flying line to the handle/parafoil kite: Now place the line to be connected (flying line binding point or handle strap), see fig. E.
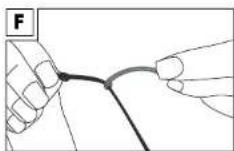
Slide the larks head knot down to tighten, see fig. F.
Launching
ATTENTION! Always verify the suitability of the field (see safety notices, page 28-29), determine the wind direction and force (using e.g. special wind gauges – not included – available at speciality retailers). Also note the description of wind forces page 32.
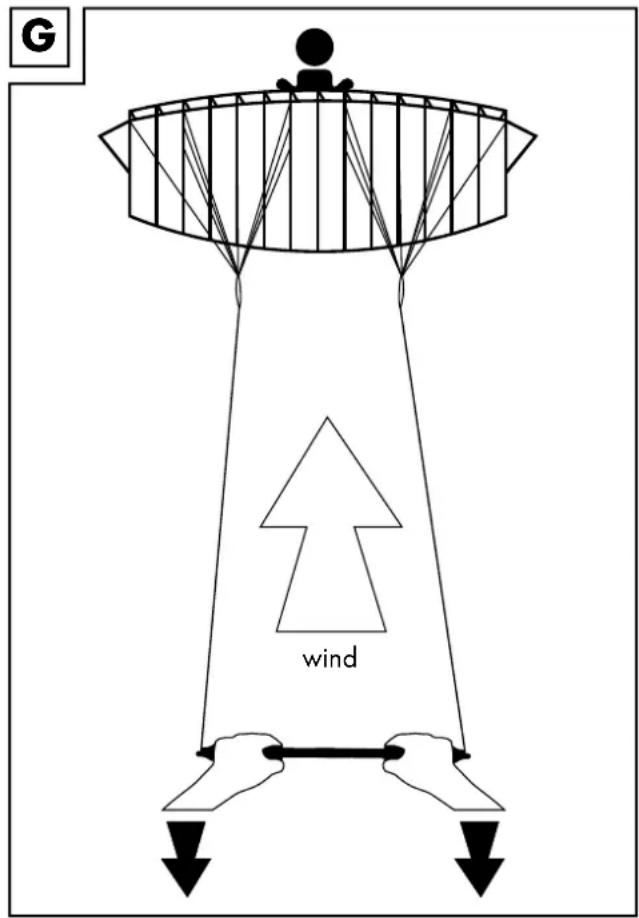
Ideally, have an assistant hold the parafoil kite with the bottom facing the wind. The air cell openings should be facing upward (fig. G). Now step backwards against the wind until the flying line is taut. Your assistant should still be holding on to the kite. Once you give the command your assistant will release the parafoil kite. Do not toss the parafoil kite into the air! In sufficient wind you will only need to firmly jerk the flying line now, and perhaps another step backwards. Pay attention to other persons or obstacles.
Directing
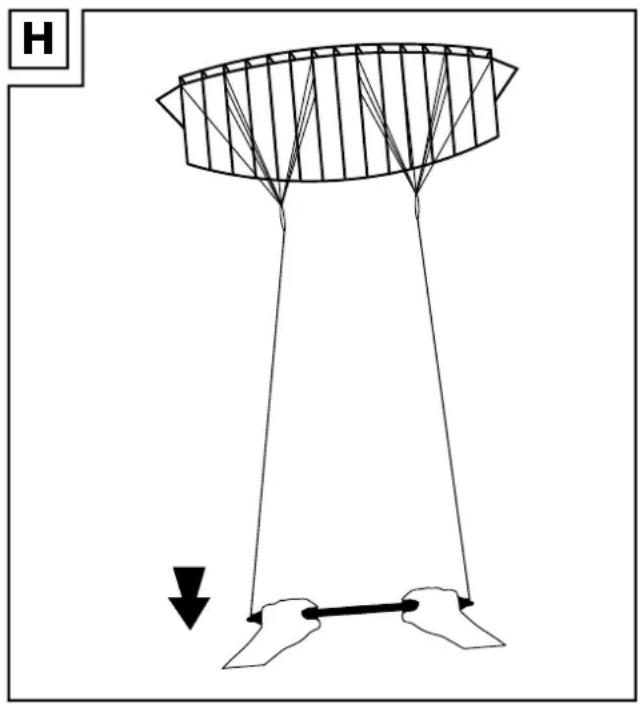
Fly your parafoil kite as if riding a bicycle. Slightly pulling the left end of the handle will make your parafoil kite turn left, pulling the right side of the handle will make it turn right (see fig. H and fig. I). Maintaining the turns longer will have your parafoil kite fly entire loops.
The closer you pull the flying line to your body the smaller the loops.
natural_image
Diagram of a structural support system with triangular supports and a downward arrow, no text or symbols present
natural_image
Diagram of a structural support structure with triangular load distribution and directional arrow (no text or labels)Landing
To land the kite simply guide the parafoil kite far right or left, i.e. out of the wind window (see fig. A). It will slow down and slowly touch down.
After landing immediately retrieve the parafoil kite, most importantly the flying lines to avoid damage or injury.
In strong winds the parafoil kite may again begin to fill with air and lift off.
Storing the Parafoil Kite
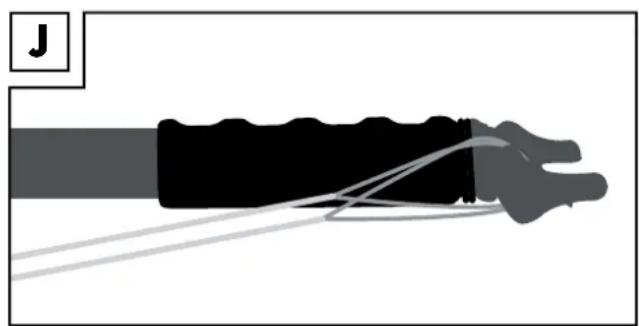
Once you have secured the parafoil kite on the ground, remove the larks head knot between the two binding points of the flying line and the flying line itself (see assembly overview). Now secure the right binding point to the right transport strap, and the left binding point to the left transport strap of the trailing edge. This will avoid the line from tangling before the next use. Now remove any sand and dirt from the parafoil kite. Be sure the parafoil kite is completely dry. Now return the product to inside the transport pouch. Also remove the larks head knots between the flying lines and the guide handle. To prevent the flying line from tangling hook each end of the end strap over the flange of a winder (fig. J). Now use the winder to wind the flying line around the handle (fig. K). To secure wind the last 20cm of the flying line diagonally across the handle and slide the end straps under the diagonal winding (fig. L).
natural_image
Diagram of a human hand holding a cable with wires, labeled 'J' in the top-left corner (no text or symbols on the diagram itself)
natural_image
Diagram of a cylindrical object with internal bands and directional arrows, labeled 'K' in top-left corner (no text or symbols on the object itself)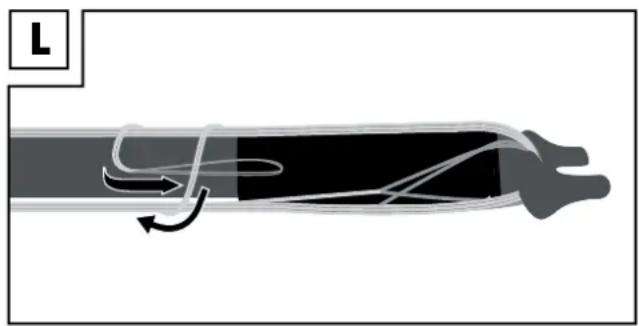
natural_image
Diagram of a fluid flow path with arrows indicating direction and flow direction (no text or labels)Wind Forces
Bft = Beaufort
Calm
0 Bft; 0-0.8km/h; 0-0.5 knots
- Smoke from chimneys rises straight up
- Lakes are smooth as glass
- Kites only fly with support
Light breeze
1 Bft; 0.9-5.5km/h; 0.6-3.0 knots
- Smoke rising from chimneys moves
- Surface of waters moves slightly
- Only suitable for super light kites
Light wind
2 Bft; 5.6-12.1 km/h; 3.1-6.5 knots
- Rustling leaves, wind can be felt against the skin
- Small, comb-shaped waves
- Good wind for experienced pilot
Gentle wind
3 Bft; 12.2-19.6km/h; 6.6-10.5 knots
- Smaller branches move
- Larger comb-shaped waves which start to break
- Great wind for beginners
Moderate wind
4 Bft; 19.7-28.5km/h; 10.6-15.5 knots
- Twigs move
- Smaller waves, some whitecaps
- Better for medium sized kites
Fresh wind
5 Bft; 28.6-38.8km/h; 15.6-20.9 knots
- Smaller trees and large branches are bending
- Moderate waves, many whitecaps
- Large kites could be damaged
Strong wind
6 Bft; 38.9-49.8km/h; 21.0-26.9 knots
- Large twigs move, whooshing wind
- Large waves
- Limit for all rigid kites
Storm (the parafoil kite is not suitable for these conditions)
7 Bft; 49.9-61.8km/h; 27.0-33.3 knots
- Trees are moving
- Giant waves, lots of foaming
- Only power kites with experienced pilots
Maintenance / Cleaning / Storage
Routinely check your parafoil kite and the flying lines for damage and if applicable discontinue use until the parafoil kite has been repaired.
Use a damp sponge to remove any dirt. Do not use harsh cleaners. Store the dry parafoil kite in a dry and dark location.

About disposal
Dispose of the parafoil kite through a permitted waste disposal service or your municipal waste management. Be sure to observe applicable local ordinances. When in doubt contact your waste management facilities for environmentally friendly disposal.
3 Years Warranty
The product was produced with great care and under constant supervision. You receive a three-year warranty for this product from the date of purchase. Please retain your receipt.
The warranty applies only to material and workmanship and does not apply to misuse or improper handling. Your statutory rights, especially the warranty rights, are not affected by this warranty.
With regard to complaints, please contact the following service hotline or contact us by e-mail.
Our service employees will advise as to the subsequent procedure as quickly as possible.
We will be personally available to discuss the situation with you.
Any repairs under the warranty, statutory guarantees or through goodwill do not extend the warranty period. This also applies to replaced and repaired parts.
Repairs after the warranty are subject to a charge.
IAN: 73594
GB Service Great Britain
Tel.: 0871 5000 720 (£ 0.10/Min.)
E-Mail: deltasport@lidl.co.uk

- SPORT-LENKMATTE
- @ AufbauÜbersicht
- m Apercu de la structure
- NL Overzicht opbauw
- GB Instructions for use
- Landen
- Windstärken
- Bft = Beaufort
- Windstille
- Atterissage
- Forces du vent
- Aucun vent
- Atterrare
- Forza del vento
- Vento calmo
- Windsterktes
- Windstil
- Intended Use
- Safety Notices:
- WARNING!
- Life-Threatening Situation
- Risk of Injury
- Avoiding Property Damage
- Technical Specifications
- General Information about Flying Parafoil Kites
- Introduction to parafoil kites
- Wind Window (fig. A)
- Power Zone (fig. A)
- The Airfield
- Crashes
- Before Launching
- Securing the flying line to the handle (see assembly overview)
- Securing the flying line to the para- foil kite (see assembly overview)
- Attention!
- Larks head knot
- Launching
- Directing
- Landing
- After landing immediately retrieve the parafoil kite, most importantly the flying lines to avoid damage or injury.
- Storing the Parafoil Kite
- Wind Forces
- Calm
- Light breeze
- Light wind
- Gentle wind
- Moderate wind
- Fresh wind
- Strong wind
- Storm (the parafoil kite is not suitable for these conditions)
- Maintenance / Cleaning / Storage
- About disposal
- Years Warranty
Brand : CRIVIT
Model : IAN 73594
Category : Sport kite