PLBS 2 A1 - Laser spirit level POWERFIX - Free user manual and instructions
Find the device manual for free PLBS 2 A1 POWERFIX in PDF.
User questions about PLBS 2 A1 POWERFIX
0 question about this device. Answer the ones you know or ask your own.
Ask a new question about this device
Download the instructions for your Laser spirit level in PDF format for free! Find your manual PLBS 2 A1 - POWERFIX and take your electronic device back in hand. On this page are published all the documents necessary for the use of your device. PLBS 2 A1 by POWERFIX.
USER MANUAL PLBS 2 A1 POWERFIX
text_image
PDF online www.lidl-service.com POWERFIX 15LINE LASER PLBS 2 A1
GB IE
LINE LASER
Translation of the original instructions
NL BE
LIJNLASER
Before reading, unfold the page containing the illustrations and familiarise yourself with all functions of the device.
FR BE
GB / IE Translation of the original instructions Page 1
natural_image
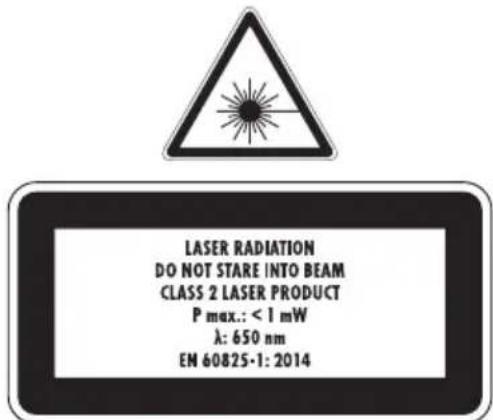
Close-up of a transparent plastic electronic device with labeled parts (11, 15), no readable text or symbols beyond labelsContents
Introduction 2
Intended use 2
Features 2
Package contents 2
Technical details 2
Safety information 3
Safety in the workplace 3
Electrical safety 3
Personal safety and rules for working with lasers 3
Appliance use and handling 4
Battery use and care 4
Appliance-specific safety instructions 5
Before use 5
Inserting/replacing the batteries 5
Using the protective cover/wall bracket 5
Getting started 6
Operation 6
Switching the line laser on and off 6
Aligning the line laser 6
Using the drill dust collector 6
Emptying the drill dust collector 6
Appliance suction function 7
Detaching the appliance 7
Troubleshooting....7
Maintenance and cleaning 8
Storage 8
Disposal 8
Kompernass Handels GmbH warranty 8
Service 9
Importer 10
LINE LASER PLBS 2 A1
Introduction

tulations on the purchase of your new appliance. You have selected a high-quality product. The operating instructions are part of this product. They contain important information about safety, usage and disposal. Before using the product, please familiarise yourself with all operating and safety instructions. Use the product only as described and for the range of applications specified. Please also pass these operating instructions on to any future owner.
Intended use
This line laser with a drill dust collector is a battery-operated appliance that uses vacuum technology to create a suction mounting on standard interior wall surfaces. The appliance can be used to project a laser line onto a wall and collect the drill dust created when drilling a hole of up to 10 mm in diameter. Do not use the appliance for overhead work. Any other usage of or modification to the appliance is deemed to be improper and carries a significant risk of accidents. The manufacturer accepts no responsibility for damage(s) attributable to misuse. The appliance is not intended for commercial use.
Features
1 Line laser
2 Horizontal level
3 Vertical level
4 ON/OFF switch for line laser
5 Vacuum button
6 Battery compartment vacuum pump
7 Drill dust collector/cover for drill dust collector
8 Protective plate/drill opening
⑨ Battery compartment for line laser
10 Vacuum pump seal
⑪ Release (drill dust collector)
12 ON/OFF switch for vacuum pump
13 Seal (drill dust collector)
14 Protective cover/wall bracket
15 Tab/centring rib
Package contents
1 line laser PLBS 2 A1 2 x 1.5 V AA batteries 3 x 1.5 V LR44 batteries 1 set of operating instructions
Technical details
Line laser:
Laser wavelength: 650 nm
Laser output: < 1 mW
Laser class: 2
Batteries: 3 x 1.5 V ===, type LR44 (direct current)
Levels (horizontal and vertical)
Accuracy: 0.3°
Drill dust collector:
Max. drill diameter: 10 mm
Vacuum pump:
Battery: 2 x 1.5 V ===, type AA (direct current)
Safety information

WARNING!
▶ Read all safety warnings and all instructions. Failure to follow the warnings and instructions may result in electric shock, fire and/or serious injury.

WARNING!
■ Do not allow children to play with packaging materials. There is a risk of suffocation.
NOTE
▶ Check the package for completeness and signs of visible damage.
▶ If the delivery is incomplete or damage has occurred as a result of defective packaging or during transport, contact the Service hotline (see section Service).
Save all warnings and instructions for future reference.
Do not remove any identification marks or labels from the appliance.
Safety in the workplace
■ Do not work with the appliance in areas where there is a risk of explosions, or in the presence of flammable liquids, gases or dusts.
- Keep children and bystanders away while operating the appliance. Distractions can cause you to lose control.
- Observe all safety instructions, guidelines, work safety and accident prevention regulations relevant to your activity and workplace.
Electrical safety
■ Do not use this appliance in wet or moist environments.
■ Remove the batteries if you do not intend to use the appliance for a long time.
Personal safety and rules for working with lasers
■ Stay alert, watch what you are doing and use common sense when operating the appliance. Do not use the appliance while you are tired or under the influence of drugs, alcohol or medication. A moment of inattention while operating the appliance may result in serious personal injury.
■ Caution! If operating and adjustment equipment or procedures other than those specified here are used, this may result in hazardous radiation exposure.
A laser is an extremely intensive beam of light. Improper use can lead to severe and permanent injuries to the eyes and the retinas.
■ Do not aim the laser at people or animals!
- Do not aim the laser at reflective surfaces. These can deflect the laser beam and put people at risk.
■ Do not work with the appliance at eye level.
■ Never look into the direct or reflected beam.
If the beam hits your eye, close your eyes immediately and turn your head away from the beam.
■ Do not use any optical instruments such as magnifying glasses, binoculars, spectacles or other optical lenses to observe the source of the beam or to deflect the laser.
■ Manipulations (modifications) to the direction of the laser are not permitted.
■ Store these operating instructions safely and pass them on to any future owner of the laser appliance.
- Keep out of reach of children.
- Do not allow persons unfamiliar with the appliance or these instructions to operate the appliance. This appliance is not a toy and can be dangerous in hands of inexperienced users.
■ Avoid any abnormal posture. Keep proper footing and balance at all times. This enables better control of the appliance in unexpected situations.

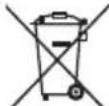
WARNING! Protect yourself from laser radiation!
There are warning labels by the laser discharge opening and on the underside of the appliance which draw attention to the dangers. To ensure proper recognition of the potential dangers, these warning labels may not be removed or defaced.
text_image
LASER RADIATION DO NOT STARE INTO BEAM CLASS 2 LASER PRODUCT P max.: < 1 mW λ: 650 nm EN 60825-1: 2014Appliance use and handling
■ No parts of this appliance need to be serviced by the user. Do not dismantle the appliance.
■ Do not drop the appliance and do not use force.
■ Do not expose the appliance to corrosive substances.
- Check the appliance and accessories for damage before each use.
- Do not use any damaged parts. Replace damaged parts only with replacement parts that are equal to the original in function and quality.
- Keep the appliance out of the reach of children.
■ Use the appliance, the accessories, etc. in accordance with proper use and these instructions. Take into account the operating conditions and the task to be performed. The use of electrical appliances for purposes other than those intended can result in hazardous situations.
- Keep the appliance away from electromagnetic sources such as induction cookers or electric welding machines. Avoid static charges and also excessively high or low ambient temperatures. They can damage the appliance.
■ Treat the appliance with care. Check for misalignment or binding of moving parts, breakage of parts and any other damage that may impair the appliance's operation. If damaged, have the power tool repaired before use. Many accidents are caused by poorly maintained or defective appliances.
Battery use and care
Please note the following safety instructions when handling the batteries. Batteries can leak or explode. The poisonous or caustic substances they contain may leak out. This can cause significant property damage, personal injury or damage to health.
■ Never try to charge non-rechargeable batteries. There is a risk of explosion and damage due to leaking acids.
■ Use only the supplied batteries with the electrical appliances. The use of other battery units may lead to a risk of injury or fire. Do not use any other types of batteries and do not use any other power sources.
■ When they are not being used, store batteries away from paper clips, coins, keys, nails, screws or other small metal objects that could cause the contacts to be bridged. Short-circuiting the contacts of a battery may result in burns and/or fire.
■ Do not use batteries that are leaking, discoloured, deformed or damaged in any other way.
■ Leaking or damaged batteries must be properly disposed of in compliance with the usual precautions (protective gloves).
- Do not open, dismantle, pierce, modify or throw batteries and avoid unnecessary impacts.
Do not expose batteries to naked flames or temperatures of above 50°C. Do not store batteries in hot locations and do not expose them to direct sunlight.
■ Never immerse batteries in water or other liquids.
■ Never place batteries in a microwave or high-or low-pressure container.
■ Improper use may cause fluid to leak out of the battery. If this happens, avoid contact with the fluid. If contact occurs, flush the affected area with water. Seek additional medical help if any of the fluid gets into your eyes. Leaking battery fluid can cause skin irritations or burns.
■ Incorrect use can cause vapours to escape that can cause damage to health and respiratory irritation. Ventilate the area immediately with fresh air and obtain medical advice.
■ Incorrect handling can lead to a short-circuit or an explosion!
■ Dispose of used batteries and defective appliances in compliance with legal requirements.
Appliance-specific safety instructions
- Keep the appliance away from wet or dampness. Water getting into the appliance may lead to an electric shock.
■ Do not work with this appliance in water or other liquids.
- Keep firm hold of the appliance and do not drop it.
■ Avoid unintended switching on. Check that the appliance is switched off when you insert a battery. Inserting batteries into the appliance while it is switched on can cause accidents.
■ Do not block off the openings on the appliance.
Before use
Inserting/replacing the batteries
Vacuum pump
To insert batteries, open the battery compartment 6 by turning the cover anticlockwise and removing it.
◆ Insert the supplied batteries or two equivalent AA batteries. Observe correct polarity when inserting batteries to avoid damage!
◆ Replace the cover and close it by turning it in a clockwise direction until it clicks firmly into place.
Line laser
To insert the batteries, first remove the appliance from the protective cover 14.
◆ Open the battery compartment cover⑨ on the underside of the line laser and remove it.
- Insert the supplied button cells or three equivalent type LR44 button cells. Observe correct polarity when inserting batteries to avoid damage.
◆ Replace the battery compartment cover ^9 and close it so that it clicks firmly into place.
Using the protective cover/wall bracket
The protective cover 14s intended primarily to protect the soft seals 10 f13m damage when the appliance is not in use.
◆ After use, always replace the protective cover ^14 .
You can attach the protective cover to a predetermined attachment point on the wall with a screw and use it as a wall bracket.
Getting started
■ After inserting the batteries, the appliance is ready for use.
■ Remove the protective cover/wall bracket from the appliance.
■ Fully grip the appliance with one or, ideally, both hands. The appliance is suitable for either hand.
Operation

CAUTION!
▶ Use the appliance only for its intended use.
▶ Check the appliance for damage before use. Do not use the appliance if its operational safety cannot be guaranteed.
Switching the line laser on and off
◆ To switch the line laser on and off, press the ON/OFF switch 4
■ To make the level 2 easier to read, these are illuminated.
♦ Switch the laser off again by pressing the ON/OFF switch 4.
Aligning the line laser
♦ Align the appliance using the horizonta② and vertical levels ③ by changing the tilt angle of the appliance. Centre the air bubble in one of the levels between the two marking lines.
For diagonal alignment of the laser, mark two points in the desired alignment and line up the laser with these markings.
♦ Switch on the vacuum pump (see section Appliance suction function).
To use the line laser without the suction function, you can release it from the mount by pulling it in a horizontal direction.
◆ Replace the line laser on the guide and push it in the direction of the battery compartment ⑥ until it clicks audibly into place.
Using the drill dust collector
Mark the spot on the wall where you want to drill the holes.
◆ Push the loaded drill through the opening on the protective plate 8 until it comes out of the other side of the seal 13
◆ Put the tip of the drill bit onto the marking.
◆ Hold the drill vertically to the wall.
♦ Push the drill dust collecto⑦ up against the wall so that the seals ⑩ ⑪ ⑫ up against the wall.
NOTE
▶ To ensure that the drill dust collects the dusts optimally, it should always be aligned vertically.
♦ Switch on the vacuum pump (see section Appliance suction function).
Hold the drill firmly in both hands and follow the manufacturer's operating and safety instructions.
◆ Use only suitable drills up to a max. 10 mm in diameter.
◆ Wear your personal protective equipment (safety goggles)!
◆ Pull the drill out of the drill dust collecto⑦ before you switch off the vacuum pump.
Emptying the drill dust collector
- Point the drill dust collector ^7 downwards. Press the release buttons ^11 together on both sides between your thumb and index finger and swing the cover of the drill dust collector ^7 upwards.
◆ Empty the drill dust collecto⑦
◆ Place the outer tab of the cover 15 back on the centring rib 15 of the cover.
♦ Swing the cover back until the release button click audibly into place on both sides.
◆ Ensure that the cover is firmly in place on the drill dust collector. This is the only way to prevent dust escaping.
Appliance suction function
After you have aligned the laser or put the drill dust collector/drill against the wall, switch on the vacuum pump at the switch 12
◆ Push the appliance briefly firmly against the wall. After a short time, the appliance will be firmly sucked against the wall.
- Ensure that the seal of the appliance is fully against the wall.
◆ Check that the appliance stays in place by trying gently to pull it off or slide it across the surface.
Leave the vacuum pump switched on the whole time you are working with the line laser and/or the drill dust collector. Otherwise, the appliance will not be able to maintain a sufficient vacuum and the appliance could come off the wall.
Do not use the appliance for overhead work.
If the appliance does not remain on the wall, it may be because the surface structure of the wall is simply too rough, and the appliance is unable to generate a sufficient vacuum. In this case, you will need a second person to hold the appliance in place.
- Ensure that the seal10 is not damaged or cut by rough surfaces, edges or corners.
Detaching the appliance
- First, finish your work with the line laser and/or the drill and then remove the drill from the appliance.
◆ Hold the appliance firmly in place to prevent it from falling down.
♦ Switch off the vacuum pump at the switch ^12 and press the vacuum button ^5
◆ Remove the appliance from the surface.
Use the protective cover to protect the appliance and the seals 10 13
Troubleshooting
- The laser is not working Battery is dead > replace battery.
-Appliance does not grip onto the surface Battery is dead or too weak > replace battery.
Seal 10 damaged > Hold the appliance by hand.
Wall structure is too rough > Hold the appliance by hand.
Maintenance and cleaning

NING! RISK OF INJURY! Always switch the appliance off and remove the battery before carrying out any work on the appliance.
- The appliance is maintenance-free. - The appliance should only be opened for repairs by a qualified technician.
■ Heed the safety instructions for batteries.
- Keep the appliance clean to ensure fault-free operation.
■ Remove any dirt from the housing with a soft cloth.
■ Use only water with a little washing-up liquid, to prevent any possible damage.
- Do not allow any moisture to penetrate into the appliance during cleaning.
■ Wear protective gloves when cleaning the appliance.
If, despite careful manufacturing and examination procedures, the appliance does not function, contact Customer Service.
Storage
If you decide not to use the appliance for a long period, remove the batteries and store them in a clean, dry place away from direct sunlight.
Disposal

ckaging is made from environmen- tally friendly material and can be dis- posed of at your local recycling plant.

't dispose of power tools in normal household waste!
European Directive 2012/19/EU requires that worn-out power tools be collected separately and recycled in an environmentally compatible manner.
Do not dispose of batteries with the normal household waste!
Defective or worn-out batteries must be according to Directive 2006/66/EC.
Take the batteries and/or appliance to a nearby collection facility for disposal.
Please consult your local authorities regarding suitable disposal of worn-out power tools.
This appliance has a 3-year warranty valid from the date of purchase. If this product has any faults, you, the buyer, have certain statutory rights. Your statutory rights are not restricted in any way by the warranty described below.
Warranty conditions
The validity period of the warranty starts from the date of purchase. Please keep your original receipt in a safe place. This document will be required as proof of purchase.
If any material or production fault occurs within three years of the date of purchase of the product, we will either repair or replace the product for you at our discretion. This warranty service is dependent on you presenting the defective appliance and the proof of purchase (receipt) and a short written description of the fault and its time of occurrence.
If the defect is covered by the warranty, your product will either be repaired or replaced by us. The repair or replacement of a product does not signify the beginning of a new warranty period.
Warranty period and statutory claims for defects
The warranty period is not prolonged by repairs effected under the warranty. This also applies to replaced and repaired components. Any damage and defects present at the time of purchase must be reported immediately after unpacking. Repairs carried out after expiry of the warranty period shall be subject to a fee.
Scope of the warranty
This appliance has been manufactured in accordance with strict quality guidelines and inspected meticulously prior to delivery.
The warranty covers material faults or production faults. The warranty does not extend to product parts subject to normal wear and tear or fragile parts such as switches, batteries, baking moulds or parts made of glass.
The warranty does not apply if the product has been damaged, improperly used or improperly maintained. The directions in the operating instructions for the product regarding proper use of the product are to be strictly followed. Uses and actions that are discouraged in the operating instructions or which are warned against must be avoided.
This product is intended solely for private use and not for commercial purposes. The warranty shall be deemed void in cases of misuse or improper handling, use of force and modifications/repairs which have not been carried out by one of our authorised Service centres.
Warranty claim procedure
To ensure quick processing of your case, please observe the following instructions:
- Please have the till receipt and the item number (e.g. IAN 12345) available as proof of purchase.
- You will find the item number on the type plate, an engraving on the front page of the instructions (bottom left), or as a sticker on the rear or bottom of the appliance.
- If functional or other defects occur, please contact the service department listed either by telephone or by e-mail.
- You can return a defective product to us free of charge to the service address that will be provided to you. Ensure that you enclose the proof of purchase (till receipt) and information about what the defect is and when it occurred.
You can download these instructions along with many other manuals, product videos and software on www.lidl-service.com.
Service
GB Service Great Britain
Tel.: 0871 5000 720 (£ 0.10/Min.)
E-Mail: kompernass@lidl.co.uk
IE Service Ireland
Tel.: 1890 930 034
(0,08 EUR/Min., (peak))
(0,06 EUR/Min., (off peak))
E-Mail: kompernass@lidl.ie
IAN 277698
Importer
Please note that the following address is not the service address. Please use the service address provided in the operating instructions.
KOMPERNASS HANDELS GMBH
BURGSTRASSE 21
44867 BOCHUM
GERMANY
www.kompernass.com
Table des matières
Introduction....12
KOMPERNASS HANDELS GMBH
BURGSTRASSE 21
44867 BOCHUM
GERMANY
www.kompernass.com
Inhoud
Inleiding 22
Vermogen laser: < 1 mW
Laserklasse: 2
Batterij: 3 x 1,5 V ---, type LR44
(gelijkstroom)
KOMPERNASS HANDELS GMBH
BURGSTRASSE 21
44867 BOCHUM
GERMANY
www.kompernass.com
KOMPERNASS HANDELS GMBH
BURGSTRASSE 21
44867 BOCHUM

KOMPERNASS HANDELS GMBH
BURGSTRASSE 21
44867 BOCHUM
DEUTSCHLAND / GERMANY
www.kompernass.com
Last Information Update · Version des informations
Stand van de informatie · Stand der Informationen:
06 / 2016 · Ident.-No.: PLBS2A1-062016-2