
IAN 324589 - Connected LED lighting Livarno Lux - Free user manual and instructions
Find the device manual for free IAN 324589 Livarno Lux in PDF.

| Product type | Connected LED strip |
| Model | IAN 324589 / 14139706L |
| Length | 3 m (sectionable) |
| Power supply | Power adapter: 230-240 V~, 50 Hz; Output: 12 V=, 1.5 A |
| Rated power | LED: 15 W max. (3 × 3.8 W) |
| Protection rating | IP20 (indoor use, dry rooms) |
| Protection class | Power adapter: II; LED: III |
| Bulb type | Non-replaceable LED module |
| Colors | RGB + White (RVB+W) |
| Functions | Color change, dimming, timer, music mode, 11 preprogrammed scenes, 4 customizable scenes |
| Control | Remote control (included) and Briloner Control app (smartphone) |
| Bluetooth range | 9 m (version 4.0) |
| Remote control battery | 1 × CR2032 (included) |
| Maintenance | Dry, lint-free cloth; disconnect before cleaning |
| Safety | Do not look directly at the LEDs; do not use as main lighting; disconnect before any intervention |
| Warranty | 36 months |
| Manufacturer | Livarno Lux |
| Included accessories | Remote control, power adapter, receiver unit, adhesive tape, cable holder, screws, manual |
| App compatibility | Android and iOS |
| Sectionable | Yes, at marked points (approximately every 3 LEDs) |
Frequently Asked Questions - IAN 324589 Livarno Lux
User questions about IAN 324589 Livarno Lux
0 question about this device. Answer the ones you know or ask your own.
Ask a new question about this device
Download the instructions for your Connected LED lighting in PDF format for free! Find your manual IAN 324589 - Livarno Lux and take your electronic device back in hand. On this page are published all the documents necessary for the use of your device. IAN 324589 by Livarno Lux.
USER MANUAL IAN 324589 Livarno Lux
RUBAN LED 3 M CONNECTÉ
Assembly, operating and safety instructions
NL BE
LED-LICHTBAND 3 M MET APP-REGELING
Before reading, unfold the page containing the illustrations and familiarise yourself with all functions of the device.
FR BE
GB / IE Assembly, operating and safety instructions Page 15
text_image
Diagram showing a device with an arrow indicating direction and a magnified view of its internal structure with +12V and -12V labels.Intended use....Page 17
Scope of delivery....Page 17
Parts description......Page 17
Technical data......Page 17
Safety Page 18
Safety instructions....Page 18
Safety instructions for batteries/rechargeable batteries Page 19
Initial use Page 20
Inserting / replacing batteries....Page 20
Trimming / connecting the LED strip Page 20
Installing the LED strip Page 20
Installing the Briloner Control App....Page 21
Operation Page 21
Switching the LED strip on/off......Page 21
Controlling light effects with the remote control....Page 22
Maintenance and cleaning......Page 22
Disposal Page 22
Warranty and service....Page 23
Warranty Page 23
Service address......Page 23
Declaration of conformity....Page 23
Manufacturer......Page 23
| List of pictograms used | |||
 | Please read the operating instructions! Dan  explosion! explosion! | ||
 | This light is only suitable for indoor use in dry and enclosed spaces. |  | Wear safety gloves! |
 | The RGB LEDs are decorative lights. Do not use the RGB LEDs for room lighting or as a night light. These RGB LEDs are a specialist product, as the chromaticity values lie outside the ranges stated in brackets. Chromaticity values: (x<0.270 or x > 0.530); (y<-2.172 x2 or y >-2.3172 x2 + 2.3653 x -0.1595). |  | For your safety |
 | Short-circuit proof safety transformer | ||
 | Separate control unit | ||
 | Volt (AC) Polarity of the power supply |  | |
 | Hertz (frequency) |  | Direct current D.C. |
 | Watt (effective power) |  | Dispose of the packaging and product in an environmentally-friendly manner! |
 | Protection class II |  | The packaging is made from 100 % recycled paper. |
 | Protection class III Operating life |  | |
 | Protection type |  F F | Switching cycles |
 | Observe the warnings and safety notices! |  | Ambient temperature |
 | Danger to life and risk of accidents for infants and children |  | Housing temperature at stated point |
 | Environmental damage through incorrect disposal of the batteries / rechargeable batteries! |  | Warning!Risk of electric shock |
 | Keep batteries out of the reach of children! |  | Includes LED light bulb |
3m Smart LED Light Strip
- Introduction
Please be sure to carefully read the complete instructions for use. These instructions are part of the product and contain imimportant information on setup and handling. Always follow all safety instructions. Before using this product for the first time verify the correct voltage and that all parts are properly installed. If you have any questions or you are unsure about operating the product, please contact the distributor or service centre. Please keep these instructions in a safe place and pass them on to third parties if necessary.
Intendeduse
This luminaire is only suitable for indoor use, in dry and enclosed rooms. This product is suitable for indoors and outdoor use. This device is only intended for use in a private domestic environment, not for commercial use. Any use other than that described above is prohibited and will result in product damage. It is further associated with dangers, e.g. short circuit, fire, electric shock, etc.
The RGB LEDs are decorative lights. Do not use the RGB LEDs for room lighting or as a night light. These RGB LEDs are a specialist product, as the chromaticity values lie outside the ranges stated in brackets. Chromaticity values: (x<0.270 or x>0.530); (y<-2.172 x² or y>-2.3172 x² + 2.3653 x -0.1595).
- Scope of delivery
Check immediately after unpacking that the parts are complete and that the product is in proper condition.
1 LED strip, model 14139706L
1 Power supply (incl. mains cable)
1 Remote control (incl. battery)
1 Receiver
2 Screws for receiver
1 Cable holder
1 Adhesive strip
1 Set of assembly instructions and instructions for use
Partsdescription
1 Remote control
2 Plug
3 LED strip
4 Socket
5 Receiver
6 Mains cable
7 Power supply
8 Screw
9 Cable holder
10 Battery drawer
11 Battery
13 Adhesive strip
12 Battery compartment
- Technicaldata
Light:
Item number: 14139706L
Operating voltage: 230-240V \~, 50Hz
Max. rated power: LED; 15 W
Protection class: II/
IP rating: IP20
LED:
Item number: 14139706L-1
Light bulb: LED module
(not replaceable)
Rated power max.: 12 V ===, 3 x 3.8 W
Protection class: III/

Power supply:
Operating voltage: 220-240V\~, 50/60Hz
Output power: 12V=, 1.5A
Protection class: II/
IP rating: IP20
Bluetooth:
Version: 4.0
Range: 9 m
Frequency range: 2.4 GHz band
Max. transmitting power: 6.1 dBm
Remote control:
Battery: 1 x CR 2032
Safety

Safety instructions
Damage due to failure to comply with these instructions for use will void the warranty! We assume no liability for consequential damages! We assume no liability for property damage or personal injury due to improper handling or failure to comply with the safety instructions!
RISK OF PATA WARNING!

INJURY AND ACCIDENT HAZ- ARD FOR TODDLERS AND
SMALLCHILDREN!
Never leave children unsupervised with the packaging material. The packaging material poses a suffocation hazard. Children frequently underestimate the dangers. Please always keep the product out of the reach of children.
This device may be used by children aged 8 years and up, as well as by persons with reduced physical, sensory or mental capacities, or lacking experience and/or knowledge, so long as they are supervised or instructed in the safe use of the device and understand the associated risks. Do not allow children to play with the product. Cleaning and user maintenance must not be performed by children without supervision.

Avoid the risk of fatal injury from electric shock
- Check the LED strip for damage before every use. Never use the LED strip if any damage is detected.
WARNING!
A damaged mains cable poses a risk of fatal injury from electrical shock. In the case of damage, repairs or other problems, please contact the service centre or a qualified electrician. The supply cable of this appliance cannot be replaced. If the cable is damaged, the appliance must be disposed of. The appliance contains no parts which may be serviced by the consumer.
■ Make sure before use that the available supply voltage corresponds to the required operating voltage of the item (see "Technical data").
■ Never allow the live power leads and contacts to come into contact with water or other liquids.
■ Never open any of the components of the electrical equipment or insert any objects into the same components. This will pose a risk of fatal injury from electric shock.
- Do not use the LED strip if it is covered with objects or is inlaid into a surface.
- Do not install the lamp on damp or conductive surfaces.
This LED strip must not be connected electronically with other LED strips.
- Do not secure with sharp staples or nails.
■ Always unplug the mains plug from the socket before assembly, disassembly or cleaning.
- Never catch hold of the mains plug or the LED strip with wet hands.
■ Only use the individual parts supplied, otherwise all warranty claims will become invalid.
- Never connect the LED strip to the power supply while it is in the packaging. Lay out the item completely before you connect it to the power supply. Lay out the item completely before you connect it to the power supply.
For some people, this can lead to epileptic seizures or disturbances of consciousness if they are exposed to certain flashes or light effects. Immediately visit a doctor if you experience epileptic symptoms.

Prevent fire and injury hazards
This product does not contain any parts that can be serviced by the user. The LEDs cannot be replaced.
If the LEDs cease to function at the end of their operational life, the entire item must be replaced.
Do not look into the LED from a close distance during operation.
Do not look at the LED with an optical instrument (e.g. magnifier).

Safe working
- Install the light so that it is protected from dirt and excessive heating.
■ Always be attentive! Always pay attention to what you are doing and use common sense. Never use the LED strip if you are having difficulty concentrating or do not feel well.
Before use, familiarise yourself with all the instructions and diagrams in these instructions, as well as with the LED strip itself. - To completely disconnect the LED strip from the power supply, the mains adapter must be removed from the mains socket.

Safety instructions for batteries/rechargeable batteries


KEEP BATTERIES OUT OF THE REACH OF CHILDREN!
Swallowing batteries can cause chemical burns, perforation of soft tissue, and death. Severe burns may occur within 2 hours of swallowing batteries. Seek immediate medical attention.

DANGER OF EXPLOSION!

Never recharge non-rechargeable batteries. Do not short-circuit batteries / rechargeable
batteries and / or open them. Overheating, fire or bursting can be the result.
■ Never throw batteries / rechargeable batteries into fire or water.
Do not exert mechanical loads to batteries / rechargeable batteries.
Risk of leakage of batteries / rechargeable batteries
Avoid extreme environmental conditions and temperatures, which could affect batteries / rechargeable batteries, e.g. radiators / direct sunlight.
If batteries / rechargeable batteries have leaked, avoid contact with skin, eyes and mucous membranes with the chemicals! Flush immediately the affected areas with fresh water and seek medical attention!

WEAR PROTECTIVE GLOVES!

Leaked or damaged batteries / rechargeable batteries can cause burns on contact with the skin. Wear suitable protective gloves at all times if such an event occurs.
In the event of a leakage of batteries / rechargeable batteries, immediately remove them from the product to prevent damage.
Only use the same type of batteries / rechargeable batteries. Do not mix used and new batteries/rechargeable batteries.
■ Remove batteries / rechargeable batteries if the product will not be used for a longer period.
Risk of damage of the product
Only use the specified type of battery / rechargeable battery!
Insert batteries / rechargeable batteries according to polarity marks (+) and (-) on the battery / rechargeable battery and the product.
Clean the contacts on the battery / rechargeable battery and in the battery compartment before inserting!
■ Remove exhausted batteries/rechargeable batteries from the product immediately.
- Initial use
☐ Remove all packaging materials before first use.
□ Never connect the LED strip to the mains power supply whilst in the packaging.
Note: Ensure that a plug socket is located in close proximity to the installation area.
- Inserting / replacing batteries (fig. E)
Note: Before first use, pull the insulating strip out of the battery compartment 12.
☐ If the range of the remote control 1 reduces, the battery 11 needs to be replaced. To do so, slide the battery drawer 10 out of the remote control 1. Remove the old battery 11 and insert a new one.
Note: The correct polarity is indicated on the reverse side of the remote control 1.
☐ Slide the battery drawer 10 back into the remote control 1.
- Trimming / connecting the LED strip
The LED strip 3 may be trimmed to size and connected.
WARNING! DANGER TO LIFE FROM ELECTRIC SHOCK!
Disconnect the lights from the power supply before performing any work on the LED strip 3. Unplug the power supply 7 from the socket.
☐ Choose the desired LED strip length.
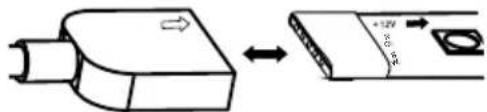
Note: ensure that you cut the LED strip 3 at the right place. The cutting point is exactly in the middle of the poles and is marked with a
black line (scissors) (+ 12 V, red, green, blue, white) (see fig. B).
☐ Shorten the LED strip 3 using a pair of scissors.
☐ Then press both ends of the LED strip 3 onto the displacement contact of the plug connection. Ensure the correct polarity of the connector when connecting the LED strip 3 (14139706L: +12V, blue, red, green <> +12 V, blue, red, green).
□ Verify it is positioned correctly.
☐ Be sure to cover the open end of the LED strip 3 with the adhesive strip 13 if you do not wish to connect the end after trimming the strip (see below figs. 1-4).
- Installing the LED strip
Note: Ensure that the installation area is clean, grease-free and dry. Otherwise the functionality of the adhesive strip may be impaired.
Note: Ensure that a plug socket is located in close proximity to the installation area.
Connect the mains cable 6 with the receiver 5 using the plug 2 and socket 4, if these have not been pre-installed (see fig. D).
Now connect the receiver 5 with the LED strip 3 (see fig. C).
Ensure the correct polarity of the connector when connecting the LED strip 3 (see below, <> +12 V, red, green, blue, white).
text_image
Diagram showing a device with an arrow indicating direction and a magnified view of its internal structure with +12V and -5V labels.☐ Choose a suitable installation area.
☐ Remove the protective film from the reverse side of the LED strip 3.
☐ Stick the LED strip 3 with the adhesive strip onto the installation area and press it on firmly.
☐ Remove the protective film from the reverse side of the cable holder 9.

flowchart
graph TD
    A["1. 13"] --> B["2."]
    B --> C["3."]
    C --> D["4."]
☐ Stick the cable holder 9 onto the desired position.
☐ Stick and screw the receiver 5 to the desired location using the screws 8.
☐ Clamp the mains cable 6 in the cable holder 9.
☐ Plug the power supply 7 into the socket.
Your light is now ready to use.
- Installing the Briloner Control App
☐ Ensure that you have sufficient internet connection.
Open the Google Play Store or the Apple Store.
☐ Search for "Briloner Control" in the App Store / Play Store and install the app.
☐ Switch on Bluetooth on your smartphone.
Open the app.
☐ To connect the light with your smartphone, please follow the app instructions.
□ After you have installed the app, you can control the light using the app.
Note:
Make sure that you are always operating the current version of the app on your smartphone. Update the app if necessary.
You can choose from the following modes:
□Devices
- Add devices
- List of connected devices
□Group
- Combine multiple lights to make a group.
- A maximum of 16 groups can be created.
Scene
- To save individual settings.
□Service
- Information on the version of the app
Modes for adjusting the individual lights:
□Light
- Colour of light continuously adjustable using the touch field
- Brightness continuously adjustable
- Switch speaker on / off
- Switch light on / off
□Scenarios(pre-programmed)
- 11 pre-programmed lighting arrangements
- 4 user-defined scenarios where you can save individual light settings
□Timer
- Time programming to turn light on / off or to start scenarios.
□ Music (Android only)
- Setting: music – light reacts to music which is played from the smartphone.
- Setting: disco – light reacts to the smartphone's microphone.
□ Disco (Apple only)
- Setting: disco – light reacts to music which is played from the smartphone.
Operation
- Switching the LED strip on / off
☐ Press the ON button on the remote control 1 to switch on the LED strip 3. Press the OFF button on the remote control 1 to switch off the LED strip 3.
Note: the OFF button on the remote control is only suitable to temporarily switch off the LED strip 3. Unplug the power supply 7 from the socket to switch off the LED strip 3 permanently.
- Controlling light effects with the remote control
Note: The transmitter for the remote control 1 is located on the opposite end of the battery compartment 12.
Ensure there are no obstacles between the transmitter and the receiver.
The range of the remote control is approx. 3 m.
Choose from the following functions:
: increase brightness / increase speed of colour changes
decrease brightness / decrease speed of colour changes
ON: switch on LED strip
OFF: switch off LED strip
R: set red light
G: set green light
B: set blue light
W: set white light
Flash: colour change (3 colours)
Smooth: slow, flowing colour change
DIY1: Memory program - select a colour of your choice; hold the DIY1 button pressed. The light will flicker to confirm your colour selection.
DIY2: Memory program - select a colour of your choice; hold the DIY2 button pressed. The light will flicker to confirm your colour selection.
Note: The LED strip 3 has a memory function. It saves the setting last selected. If the LED strip 3 is
separated from the power network, the last setting selected is deleted.
● Maintenance and cleaning
WARNING! DANGER TO LIFE FROM ELECTRIC SHOCK!
Disconnect the lights from the power supply before performing any work on the LED strip 3. Unplug the plug 7 from the socket.
Do not use solvents, petrol, etc. These would damage the lamp.
☐ Use a dry, lint-free cloth to clean the LED strip 3.
●Disposal
The packaging is made entirely of recyclable materials, which you may dispose of at local recycling facilities.
Observe the marking of the packaging materials for waste separation, which are marked with abbreviations (a) and numbers (b) with following meaning: 1-7: plastics / 20-22: paper and fibre-board/80-98: composite materials.

The product and packaging materials are recyclable, dispose of it separately for better waste treatment. The Triman logo is valid in France only.

To help protect the environment, please dispose of the product properly when it has reached the end of its useful life and not in the household waste. Information on collection points and their opening hours can be obtained from your local authority.
Faulty or used batteries / rechargeable batteries must be recycled in accordance with Directive 2006/66/EC and its amendments. Please return the batteries/rechargeable batteries and/or the product to the available collection points.

Environmental damage through incorrect disposal of the batteries / rechargeable batteries!
Batteries / rechargeable batteries may not be disposed of with the usual domestic waste. They may contain toxic heavy metals and are subject to hazardous waste treatment rules and regulations. The chemical symbols for heavy metals are as follows: Cd = cadmium, Hg = mercury, Pb = lead. That is why you should dispose of used batteries / rechargeable batteries at a local collection point.
● Warranty and Service
Warranty
You receive a 36 month warranty on this product, valid from the date of purchase. The appliance has been carefully produced under strict quality control. Within the warranty period we shall rectify without charge all material and manufacturing defects. In the event of a defect during the warranty period, please send the appliance to the listed Service Centre address, referencing the following item number: 14139706L.
Wear parts (such as bulbs) and damage caused by improper handling, non-observance of the operating instructions or unauthorised interference are excluded from the warranty. The performance of services under the warranty does not extend or renew the warranty period.
Serviceaddress
Please have your receipt and the product number (e.g. IAN 123456_7890) available for all queries as proof of purchase.
• Declaration of conformity CE
This product fulfils the requirements of the applicable European and national directives. Conformity has been demonstrated. The relevant declarations and documents are held by the manufacturer.
Manufacturer
flowchart
graph TD
    A["Step 1: Internal components with arrows indicating motion"] --> B["Step 2: Internal components with arrows indicating motion"]
    B --> C["Step 3: Internal components with arrows indicating motion"]
    C --> D["Step 4: Internal components with arrows indicating motion"]
    D --> E["Final step"]
text_image
Diagram showing a device with an arrow indicating direction and a magnified view of its internal structure with labeled dimensions.flowchart
graph TD
    A["Step 1: Internal components with arrows indicating motion"] --> B["Step 2: Internal components with arrows indicating motion"]
    B --> C["Step 3: Internal components with arrows indicating motion"]
    C --> D["Step 4: Internal components with arrows indicating motion"]

text_image
Diagram showing a plug-in connector transforming into a device with labeled ports and polarity indicatorsflowchart
graph TD
    A["Step 1: Internal components with arrows indicating motion"] --> B["Step 2: Internal components with arrows indicating rotation"]
    B --> C["Step 3: Internal components with arrows indicating clockwise rotation"]
    C --> D["Step 4: Internal components with arrows indicating clockwise rotation"]
text_image
Diagram showing a device with an arrow indicating direction and a magnified view of its internal structure with +12V and -5V labels.NOSTE OCHRANNÉ RUKAVICE!
text_image
Diagram showing a device with an arrow indicating direction and a magnified view of a component labeled +12V.flowchart
graph TD
    A["Step 1: Initial state"] --> B["Step 2: Internal winding"]
    B --> C["Step 3: Internal loop with arrows indicating motion"]
    C --> D["Step 4: Final state with internal components and directional arrows"]
NOSTE OCHRANNÉ RUKAVICE!
text_image
Diagram showing a device with an arrow indicating direction and a magnified view of its internal structure with +12V and -12V labels.flowchart
graph TD
    A["Step 1: Internal components with arrows indicating motion"] --> B["Step 2: Internal components with arrows indicating motion"]
    B --> C["Step 3: Internal components with arrows indicating motion"]
    C --> D["Step 4: Internal components with arrows indicating motion"]