
DigitRadio 1990 - Cd player/recorder TECHNISAT - Free user manual and instructions
Find the device manual for free DigitRadio 1990 TECHNISAT in PDF.

| Brand | TechniSat |
| Model | DigitRadio 1990 |
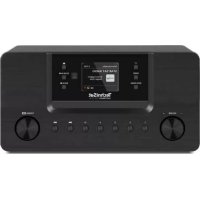
| Product type | Portable DAB+/FM radio with CD player and Bluetooth |
| Dimensions (W x D x H) | 270 x 212 x 116 mm |
| Weight | 1.23 kg |
| Mains power supply | 100-240 V ~50/60 Hz, 18 W |
| Battery power supply | 6 batteries R14/C (1.5 V) |
| Standby power consumption | 0.3 W |
| Max operating power consumption | 10 W |
| Typical power consumption | 2.5 W (medium volume) |
| DAB+ radio | Band III (174-240 MHz) |
| FM radio | 87.5-108 MHz |
| CD player | Audio CD, MP3 CD, CD-R, CD-RW |
| Bluetooth | Version 4.2, A2DP and AVRCP profiles, range 8 m |
| USB port | MP3 playback, charging 5V/1A |
| AUX input | 3.5 mm jack socket |
| Headphone output | 3.5 mm jack socket |
| Speakers | 2 x 1.5 W RMS |
| Station memory | 30 DAB+ and 30 FM stations |
| Additional functions | Alarm, sleep timer, equalizer (Classic, Jazz, Rock, Pop, Flat), brightness dimmer |
| Cleaning | Soft dry cloth, do not use harsh chemicals |
| Safety | Do not expose to water, do not open the casing |
| Package contents | Device, mains cable, instruction manual |
Frequently Asked Questions - DigitRadio 1990 TECHNISAT
User questions about DigitRadio 1990 TECHNISAT
0 question about this device. Answer the ones you know or ask your own.
Ask a new question about this device
Download the instructions for your Cd player/recorder in PDF format for free! Find your manual DigitRadio 1990 - TECHNISAT and take your electronic device back in hand. On this page are published all the documents necessary for the use of your device. DigitRadio 1990 by TECHNISAT.
USER MANUAL DigitRadio 1990 TECHNISAT
19 CD-Mode: Wiedergabemode/Zufallswiedergabe (Shuffle)/Equalizer.
natural_image
Symbol of a trash bin with crossed lines indicating no waste or restriction, and a solid black rectangle below (no text or symbols)
WARNUNG
DAB+ Radio, FM Radio, CD, USB, Audio In, Bluetooth.
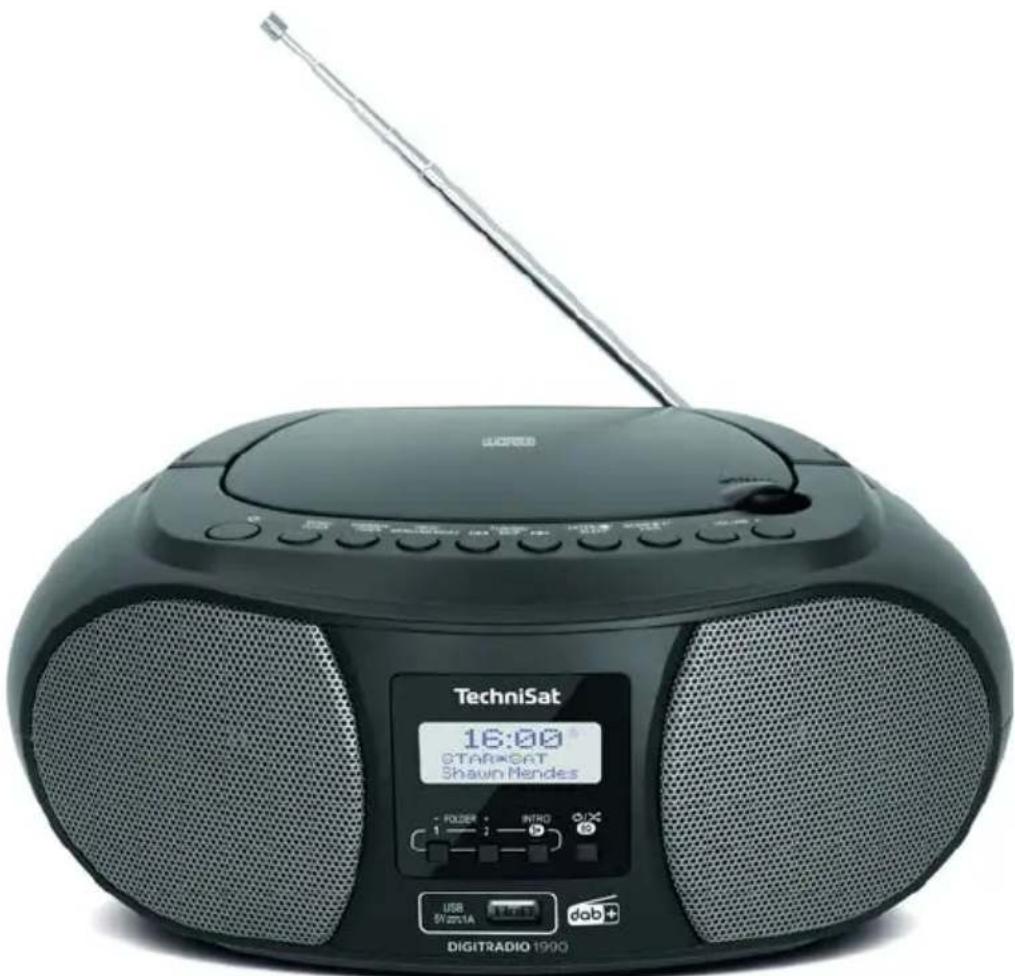
Portable DAB+/FM radio with CD player und Bluetooth music streaming
TechniSat
Preface
Dear Customer,
Thank you for choosing the DIGITRADIO 1990 from TechniSat.
This instruction manual is intended to help you get to know the extensive functions that your new unit offers and to make the best use of them. It will help you to use the product as intended and safely. It is intended for anyone who is installing, operating, cleaning or disposing of the unit.
Store the instruction manual in a safe place for later use.
A current version of the instruction manual can be found in the download area for your product on the TechniSat website at www.technisat.de.
We hope you enjoy your
TechniSat DIGITRADIO 1990!
The
TechniSat Team
19 Contents
1 Contents 37
2 Illustrations....39
3 Safety advice 42
3.1 Intended use 42
3.2 Operating the DIGITRADIO 1990 correctly 42
3.3 Scope of use....43
3.4 Setting up the device.... 44
4 Disposal....45
5 Legal notices....46
5.1 Servicing notes....47
6 Description of the device 48
6.1 Scope of delivery 48
6.2 Features of the radio 48
7 Preparing the device for use....48
7.1 Improving antenna reception 48
7.2 Connecting to the mains 48
7.3 Battery mode....49
8 Basic operation....49
8.1 Switching the television on/off....49
8.2 Menu navigation 49
8.3 Adjusting the volume....50
8.4 Using headphones....50
8.5 Playback modes....50
9 DAB+ (digital radio) function....51
9.1 What is DAB+? 51
9.2 DAB+ (digital radio) reception 51
9.3 Station search (auto) 51
9.4 Selecting stations 52
9.5 Storing DAB+ stations on a memory slot....52
9.6 Retrieving DAB+ stations from a memory slot....52
9.7 Overwriting/Deleting a station memory slot....53
9.8 Adjusting the display....53
9.9 Volume adjustment (DRC)....53
9.10 Deleting inactive stations....19
10 FM radio....53
10.1 Setting the frequency manually....53
10.2 Searching for stations automatically....54
10.3 Saving FM stations on a memory slot....54
10.4 Retrieving FM stations from a memory slot 54
10.5 Overwriting/Deleting a station memory slot....54
10.6 Adjusting the display 55
10.7 Scan settings....55
10.8 Audio settings 55
11 CD player....55
11.1 Selecting CD mode....55
11.2 Inserting the CD 55
11.3 Playing audio CDs....56
11.4 Playing MP3 CDs....57
11.5 Programmed playback....58
12 USB playback....58
12.1 Selecting USB mode 58
12.2 Playing from USB media....58
13 Bluetooth playback....59
13.1 Selecting Bluetooth mode....59
13.2 Pairing with external devices....59
14 AUDIO IN....60
14.1 AUX IN playback 60
15 Other functions....61
15.1 Sleep timer....61
15.2 Alarm function....61
15.3 Equaliser....62
15.4 Dimmer....62
15.5 Setting the time....62
15.6 Language....62
15.7 Software version....63
15.8 Factory settings....63
16 Cleaning the device....63
17 Troubleshooting guide....63
17.1 Problems with the radio....63
17.2 Problems with the device 64
18 Technical specifications....65
1 Illustrations
Top and front
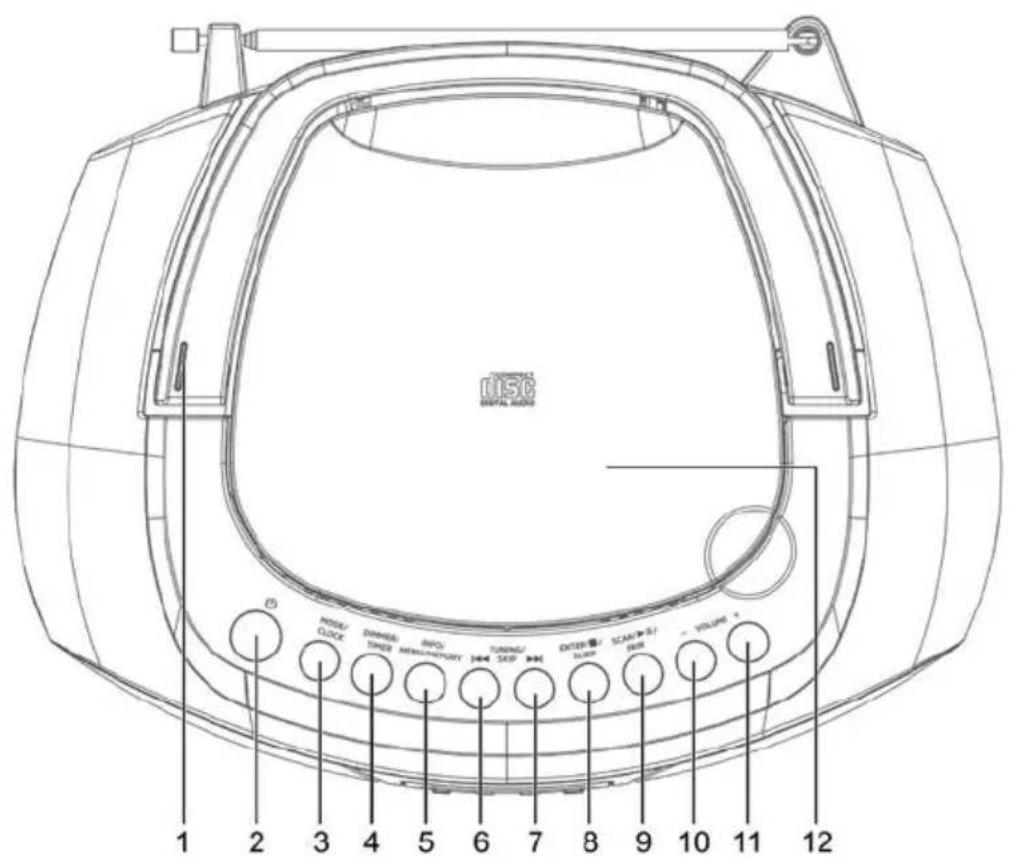
Carry handle
On/Standby (Hold down to switch on in battery mode)
MODE/CLOCK - During operation: Switch sources;
In standby mode: Set time manually.
DIMMER/TIMER - During operation: Adjust display brightness;
In standby mode: Set timer.
INFO/MENU/MEMORY - Press briefly to select display;
hold down to access the main menu;
in CD mode: programming

TUNING/SKIP - Menu selection/Search for track/Previous track (CD)

TUNING/SKIP - Menu selection/Search for track/Next track (CD)

ENTER/STOP/SLEEP - Confirm selection/Stop (CD);
Hold down: Sleeptimer

SCAN/Play/Pause/PAIR -
In radio mode: Search for stations;
CD: Play/Pause;
Bluetooth: Pair a device.
Volume -
Volume +
CD compartment cover
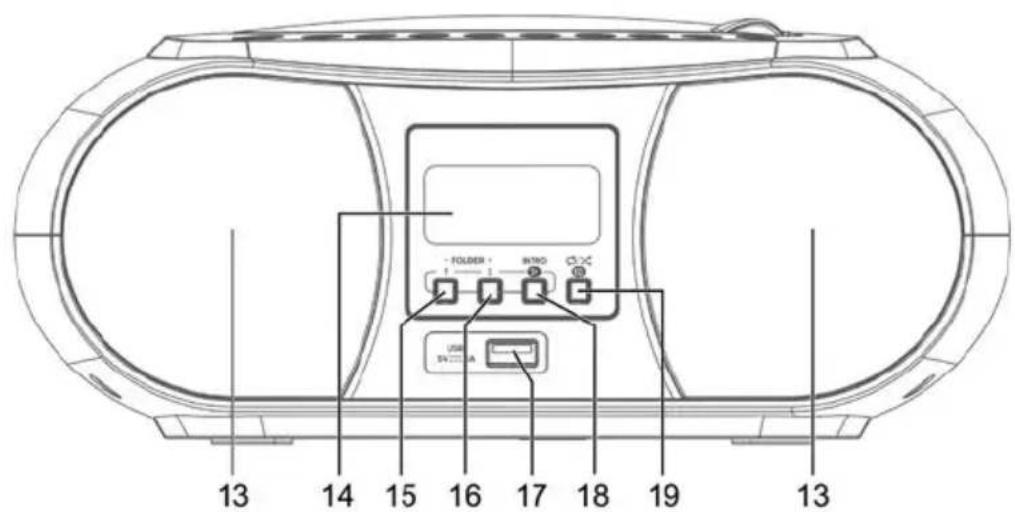
Stereo speakers
Display
One-touch button1/Favourites memory (radio mode), Folder - (CD)
One-touch button2/Favourites memory (radio mode), Folder + (CD)
USB port for charging external devices.
One-touch buttons 3 - 30/Favourites memory (radio mode);
Play intro (CD)
CD mode: Playback mode/Random (Shuffle)/Equaliser.
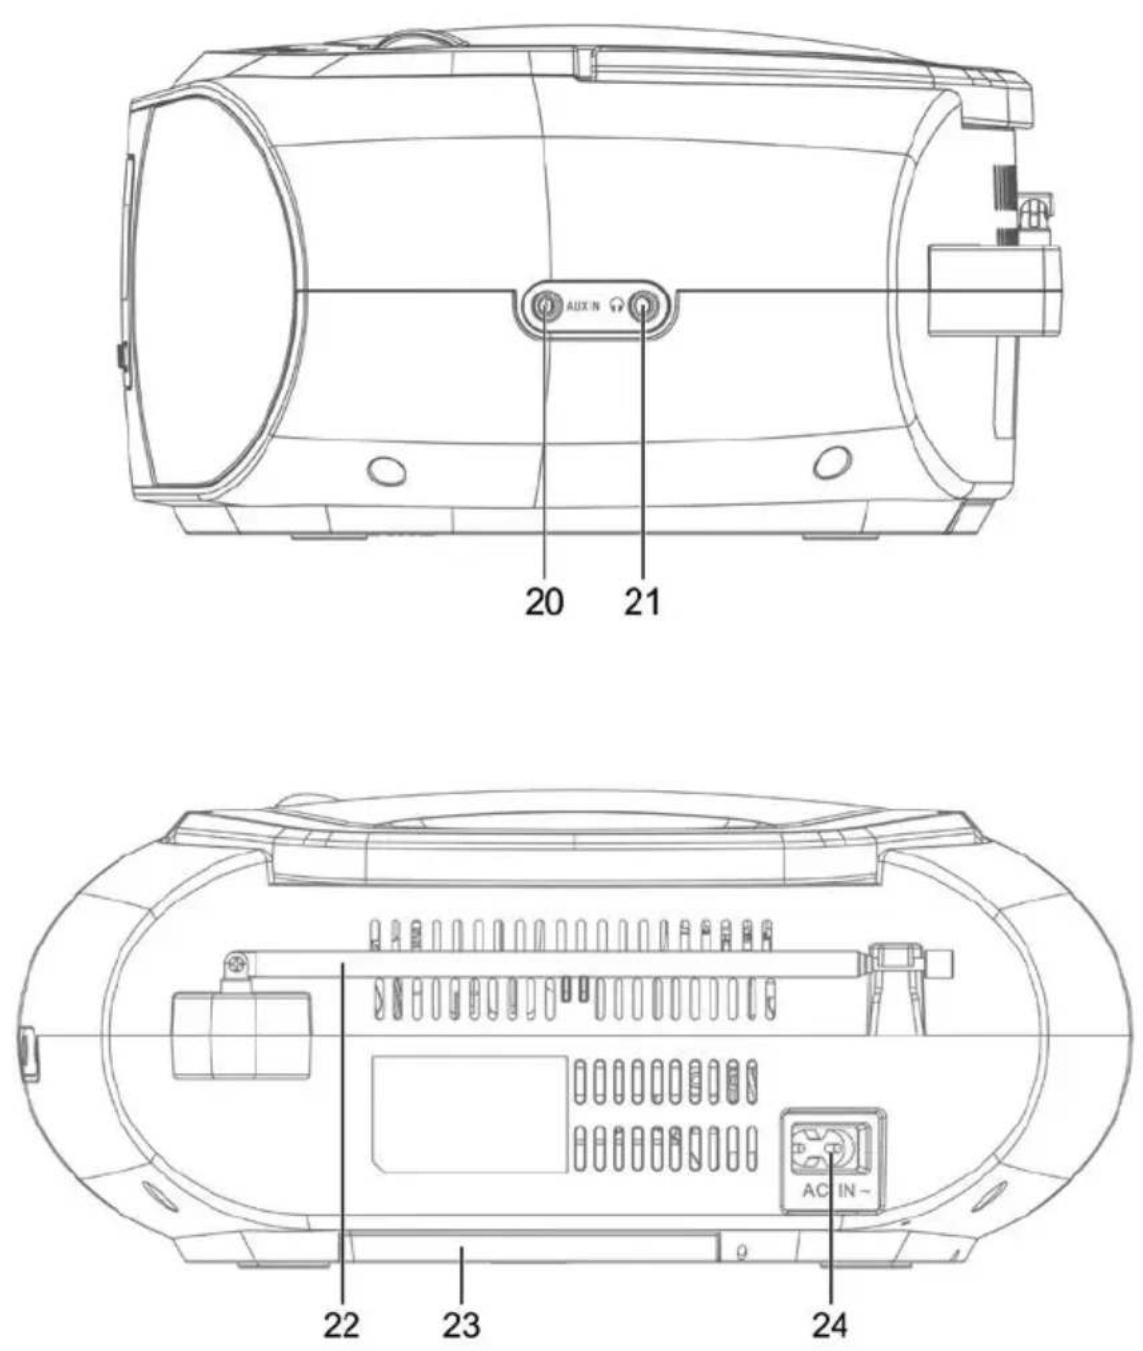
Audio In (3.5 mm)
Headphone socket (3.5 mm)
Telescopic antenna
Battery compartment cover
Mains connection
2 Safety instructions
2.1 Intended use
This device is designed to play radio broadcasts via DAB+ and FM. It can also play audio CDs and MP3 CDs. It is also possible to play from audio sources connected via Bluetooth. The device can be operated either via the mains or using batteries.
2.2 Operating the DIGITRADIO 1990 correctly
Please take note of the following information to minimise safety risks, to prevent damage to the device and to make a contribution to environmental protection. Please read all of the safety information carefully and keep it for future reference. Always follow all warnings and instructions in this instruction manual and on the rear of the device.
Explanation of symbols:

Indicates a safety instruction which can lead to serious injuries or death if not observed. Note the following signal words:
DANGER - Serious risk of fatal injury
WARNING - Serious injury, possibly fatal
CAUTION - Injuries

This identifies information that must always be observed to prevent defects, data loss/misuse and undesired operation. It also describes other functions of your unit.

Beware of electrical voltage. Follow all safety instructions to avoid an electric shock. Do not open the device under any circumstances.

Indoor use - Devices with this symbol are only suitable for indoor use.

Protection class II - Electrical devices of protection class II are electrical devices with continuous double and/or reinforced insulation and no connection options for a protective conductor. The casing of an electrical device of protection class II, which is enclosed in an insulating material, can form part or all of the additional or reinforced insulation.
2.3 Scope of use

WARNING!
Never open the device!
Touching live parts can be fatal!

Observe all of the following instructions for the intended use of the device and to prevent damage to the device and injury to persons.
- In the event of damage resulting from incorrect connection, no warranty claim can be made.
- Any required intervention may only be performed by qualified staff.
- The device must only be operated in an appropriate climate.
- Do not expose the device to dripping or splashing water. If water has penetrated the device, switch it off and inform the Service department
- Do not expose the device to heat sources which could heat it up more than normal use will.
- If you detect a device defect, odour or smoke, a major malfunction, or damage to the housing, switch off the device and inform the Service department.
- Never try to operate the device using a voltage other than that specified for the device.
- If the device or mains cable shows signs of damage, it may not be put into operation.
- Do not put the device into operation in the vicinity of baths, showers, swimming pools or running/splashing water. There is a risk of electric shock and/or device defects.
- Never try to repair a faulty device yourself. Always contact one of our customer service locations.
- Foreign bodies, e.g. nails, coins, etc. must not be allowed to fall inside the device. Do not touch the connection contacts with metal objects or your fingers. This could lead to short-circuits.
- Never allow children to use the device unsupervised.
- Even when switched off and on standby, the device is still connected to the mains power supply.
- Modifications to the device are prohibited.
- Damaged devices or damaged accessories must not continue to be used.
- Do not listen to the radio/music at too high a volume. Doing so can cause permanent hearing impairment. This also applies to connected headphones.
- The CD player uses an invisible laser beam. If used incorrectly, this can injure your eyes. Never look directly into the open CD compartment.

• This devices has been classified as a CLASS 1 LASER.
2.4 Setting up the device
- Place the device on a firm, secure and horizontal base. Make sure the area is well ventilated.
- Do not place the radio on soft surfaces such as carpets and blankets, or near to curtains and wall hangings. These could obstruct the ventilation openings. The necessary flow of air could be interrupted as a result. This could potentially lead to fire in the device.
- Do not cover the radio with curtains, blankets or newspapers.
- Do not place the device near to sources of heat, such as radiators. Avoid direct sunlight and very dusty environments.
- Do not select a location for the device with a high air humidity, e.g. a kitchen or sauna, as the precipitation of condensation water could damage the device. The device is intended for use in a dry environment and in a moderate climate and must not be exposed to dripping or splashing water.
- You may only operate the device in a horizontal position.
- Do not place any heavy objects on the device.
- If you move the device from a cold environment to a hot environment, moisture could accumulate inside the device. In this case, wait for around an hour before using the radio.
- Route the mains cable in such a way that nobody can trip over it.
- The power outlet should be as close to the device as possible.
- To ensure a connection to the mains, insert the plug fully into the socket.
- Use a suitable, easy-to-access mains connection and avoid using multiple socket strips.
- Do not handle the mains adapter or power cord with wet hands, as there is a risk of electric shock!
- In the case of malfunctions or detecting smoke or odour from the housing, remove the plug from the power outlet immediately.
- Remove the plug before a storm starts.
- Remove the plug if the device is not going to be used for a prolonged period, e.g. before going away on a long trip.
- Do not set up the device in the vicinity of equipment which emits intense magnetic fields (e.g. motors, speakers, transformers).
3 Disposal
The device packaging is exclusively comprised of recyclable materials. Please sort the components appropriately, and dispose of them in line with your local waste disposal regulations. At the end of its service life, this device must not be disposed of with your regular household waste. It must be taken to a recycling collection point for electrical and electronic equipment.
This is indicated by the symbol on the product, the instruction manual or the packaging.
The materials are recyclable according to their identification.
An important contribution is made to protecting our environment by recycling, recovery of materials and other kinds of recycling of old devices.

Please ask the local authority for the location of the relevant disposal point. Ensure that used batteries/rechargeable batteries, as well as electronic waste, are not disposed of with household waste, but are properly disposed of (returned to the specialist dealer, hazardous waste).

natural_image
Symbol of a trash bin crossed with no text or numbers, representing waste sorting or disposal (no text present)WARNING Risk of suffocation from films and other packaging materials. Keep packaging and parts thereof away from children.
i Disposal of packaging:
- Your new device was protected by packaging on its way to you. All materials used are environmentally-friendly and recyclable. Please collaborate and dispose of the packaging in an environmentally-friendly way. Ask for information from your dealer regarding current disposal means or your local disposal facility.
- Risk of suffocation! Keep packaging and parts thereof away from children. Risk of suffocation from films and other packaging materials.

Device disposal:
- Old devices constitute valuable waste. Valuable raw materials can be recovered by environmentally-friendly disposal. Consult your town or local authority as to the possibilities for environmentally-friendly and proper disposal of the device.
- This device is identified in accordance with the Waste Electrical and Electronic Equipment (WEEE) Directive 2012/19/EU.
- At the end of its service life, this device must not be disposed of with your regular household waste. It must be taken to a recycling collection point for electrical and electronic equipment. The symbol on the product, the instruction manual or the packaging indicates this. The materials are recyclable according to their identification. An important contribution is made to protecting our environment by recycling, recovery of materials and other kinds of recycling of old devices.
4 Legal notices

TechniSat herewith declares that the radio system model DIGITRADIO 1990 corresponds to Directive 2014/53/EU. The complete text of the EU Declaration of Conformity is available at the following web address:
TechniSat accepts no liability for product damage as a result of external influences, wear or improper handling, unauthorised repairs, modifications or accidents.

Your device bears the CE symbol and complies with all requisite EU standards. Changes and printing errors reserved. Version 12/19. Copying and reproduction are subject to the publisher's consent. The respective current version of the instructions can be downloaded in PDF format in the download area of the TechniSat Homepage at www.technisat.de.

TechniSat and DIGITRADIO 1990 are registered trademarks of:
D-54550 Daun/Eifel, Germany
www.technisat.de
The names of the companies, institutions or brands referred to are trademarks or registered trademarks of the respective owners.
4.1 Service instructions

This product is quality-tested and provided with the legally-specified warranty period of 24 months from the date of purchase. Please keep your receipt as proof of purchase. In the event of warranty claims, please contact the product dealer.

Note!
Should you experience a problem with this unit, or for queries and information, our Technical Hotline is available:
Mon. - Fri. 8:00 am - 6:00 pm on:
+49 (0) 3925 9220 1800.

Repairs can also be ordered directly online at www.technisat.de/reparatur.
If the device needs to be returned, please use the following address only:
39418 Stassfurt, Germany
CE
5 Description of the device
5.1 Scope of delivery
Please ensure that all of the following accessories are present:
- DIGITRADIO 1990, mains cable, instruction manual.
5.2 Features of the radio
- This digital DAB+ radio uses a new digital format that delivers a crystal-clear sound CD quality.
- The radio can receive the following frequencies: FM 87.5-108 MHz (analogue) and DAB / DAB+ 174-240 MHz (digital).
- You can save 30 stations as favourites in each different mode (DAB and FM).
- CD player (Audio/MP3)
- External source via AUX IN
- MP3 playback via USB and Bluetooth
- Battery mode
6 Preparing the device for use
6.1 Improving the antenna reception
The number and quality of the stations to be received depend on the reception conditions at the installation location. Excellent reception can be achieved with the DAB / FM telescopic antenna (22).
The antenna must be extended to its full length and positioned for best reception. Note:
To receive digital radio stations (DAB/DAB+ operation) the telescopic antenna should be extended to its full length.

Possibly try to find another installation location.
6.2 Connecting to the mains
Insert the mains cable into the mains socket (24) on the DIGITRADIO 1990 and attach the plug to a wall outlet (100 - 240 V \~, 50/60 Hz)
Ensure that the operating voltage of the power adapter matches the mains voltage before you insert it into the wall socket.

When the device is not being used, remove the plug from the socket. Pull the plug and not on the cable. Remove the plug before a storm starts. Remove the plug if the device is not going to be used for a prolonged period, e.g. before going away on a long trip. The heat generated during operation must be dissipated by means of sufficient air circulation. Therefore the device must not be covered or installed in a closed cupboard. Ensure there is a free space of at least 10 cm around the device.
6.3 Battery mode
The battery compartment is located on the underside of the DIGITRADIO 1990.
Slide the battery compartment cover (23) in the direction of the arrow and remove it.
6 R14/C batteries are required for battery operation. Insert them with the polarity as indicated in the battery compartment.

Incorrectly inserted batteries can lead to device defects. Always check that the polarity is correct. Promptly replace batteries that are losing power.

Batteries can contain poisonous substances which harm the environment. Batteries are subject to European Directive 2006/66/EC. They must not be disposed of with normal domestic waste.

Several functions will not work in battery mode, or will work differently than in mains mode. Refer to the relevant section for more details.
7 Basic operation
7.1 Switching the radio on/off
To turn on your DIGITRADIO 1990, press the ⏻ On / Standby button (2). Press the button again to switch it off.

To turn the DIGITRADIO 1990 on in battery mode, you will need to press and hold the On/Standby button.

After switching on for the first time, a station scan of all DAB+ channels is automatically launched.
7.2 Menu navigation
To carry out advanced settings, or to change existing ones, you will generally need to do so via the menu.
To navigate through the menu, use the function buttons on the device.
Please note that not all options are available in all modes. The main menu can only be accessed in DAB+ or FM mode.
- Access menu - Keep the INFO/MENU/MEMORY button (5) pressed.
- Navigate through the menu - TUNING/SKIP button (6, 7).
- Save/Confirm changes - ENTER/STOP/SLEEP button (8).
- Exit menu - Keep the INFO/MENU/MEMORY button (5)
The currently selected function/option is shown in square brackets < >. The currently active function/option is shown with an asterisk *.
To exit the menu, wait for a short time or press the INFO/MENU/MEMORY button.
7.3 Adjusting the volume
To change the volume, use the buttons marked Volume on the device. To increase the volume, press VOLUME + (11); to reduce it, press VOLUME - (10).
7.4 Using headphones
WARNING!
Do not listen to the radio at high volume with headphones. Doing so can cause permanent hearing impairment. Turn down the radio volume to the lowest volume before using headphones.
When you attach headphones (not in the scope of delivery), the device's speakers are muted.
Only use headphones with a 3.5 mm stereo jack plug.
Insert the headphone plug into the headphone jack (21) on the side of the device. Sound is now played exclusively through the headphones.
If you would wish to use the speakers again, unplug the headphones from the headphone jack on the device.
7.5 Playback modes
Your device has different possible reception routes for playback. These are described below.
To switch between the individual modes, briefly press the MODE/CLOCK button (3).
The currently active playback mode is shown in the display.
The modes are:
DAB+ radio, FM radio, CD, USB, Audio In, Bluetooth.
8 DAB+ (Digital Radio) function
8.1 What is DAB+?
DAB+ is a new digital format through which crystal clear sound with no noise can be heard. In contrast to conventional analogue radio stations, DAB+ can be used to broadcast multiple stations on one and the same frequency. This is referred to as an ensemble or multiplex.
An ensemble is comprised of the radio station, as well as several service components or data services which are broadcast individually by the radio stations. For further information, please visit e.g. www.dabplus.de or www.dabplus.ch.
8.2 DAB+ (digital radio) reception
Press the MODE button until [DAB Radio] is shown in the display.
If DAB+ is being started for the first time, a complete scan will be performed. After the scan is complete, the first station is played back in alphanumeric order.
8.3 Station search (auto)
8.3.1 Automatic Scan
The automatic scan (Complete scan) scans all DAB+ band III channels and thereby finds all stations being broadcast within the reception area.
i After the scan is complete, the first station is played back in alphanumeric order.
To carry out an automatic station scan, press the SCAN/Play/Pause/PAIR button (9).
Alternatively:
Open the main menu by holding down the INFO/MENU/MEMORY button (5) and use the TUNING/SKIP buttons (6, 7) to select the
item. Press the ENTER/STOP/SLEEP button (8) to start the scan.
i During the scan a progress bar and the number of stations found is displayed.
If no stations are detected, check the telescopic antenna and, if required, change the installation location.
8.3.2 Manual scan
This menu item is used to check the reception channels and can be used to align the antenna. Furthermore, stations can be added manually.
Open the main menu by holding down the INFO/MENU/MEMORY button (5) and use the TUNING/SKIP buttons (6, 7) to select the
item. Press the ENTER/STOP/SLEEP button (8).
Use the TUNING/SKIP buttons (6, 7) to select a channel (5A to 13F) and then press the ENTER/STOP/SLEEP button (8). The signal intensity will now be shown in the display. If a DAB+ station is being received on a channel, the station ensemble name is displayed. The antenna can now be aligned to the maximum signal intensity.
i Stations with a signal intensity below the required minimum signal intensity are not transmitting a strong enough signal. Readjust the antenna position if required.
If there are stations on the set frequency or channel that have not yet been stored in the station list, they will now also be saved.
8.4 Selecting stations
By pressing the TUNING/SKIP buttons (6, 7), the station list can be accessed and you can switch between the available stations. Press the ENTER/STOP/SLEEP button (8) to play the station.
8.5 Storing DAB+ stations on a memory slot
The programme memory can save up to 30 stations in the DAB+ range.
Now select the desired station.
In order to store this station on a memory slot, hold down the 3+ (18) button during playback until [Save P3] appears in the display. Then use the TUNING/SKIP buttons (6, 7) to select a favourites memory slot (1-30). Press the ENTER/STOP/SLEEP button (8) to save.
Repeat this process to save additional stations.
You can also save stations to one of the One-Touch buttons (1 or 2 - 15, 16) by holding down the corresponding button for a bit longer.
8.6 Retrieving DAB+ stations from a memory slot
To retrieve a station that you have already stored in the favourites memory, briefly press the 3+ (18) button and select a station slot (1 - 30) using the TUNING/SKIP buttons (6,7). Press the ENTER/STOP/SLEEP button (8) to play the station.
If no station is saved on the selected station slot, [(empty)] appears in the display.
Alternatively One-Touch button 1 or 2 (15, 16) can also be used.
8.7 Overwriting/deleting a station memory slot
Simply save a new station on a favourite memory slot as described.
i When retrieving the factory settings all memory slots are deleted.
8.8 Adjusting the display
Press the INFO/MENU/MEMORY button (5) multiple times to scroll through the various display modes.
The following display modes are possible in DAB mode: Ensemble, Frequency, Date, Time, Signal Strength, Signal Error, Transfer Rate, Genre, Additional Info.
8.9 Volume adjustment (DRC)
The DRC menu item is used to set the compression rate, which compensates for dynamic fluctuations and the associated volume variations.
Open the main menu by holding down the INFO/MENU/MEMORY button (5) and use the TUNING/SKIP buttons (6, 7) to select the
item. Press the ENTER/STOP/SLEEP button (8). Now use TUNING/SKIP (6,7) to select a compression rate:
DRC high - High compression
DRC low - Low compression
DRC off - Compression switched off.
Confirm the setting with ENTER/STOP/SLEEP (8).
8.10 Deleting inactive stations
This menu item is for removing old stations and those no longer being received from the station list.
Open the main menu by holding down the INFO/MENU/MEMORY button (5) and use the TUNING/SKIP buttons (6, 7) to select the
item. Press the ENTER/STOP/SLEEP button (8).
This is followed by the [Delete] prompt asking if the inactive stations are to be deleted.
Use TUNING/SKIP (6, 7) to select the [Yes] item and confirm by pressing the ENTER/STOP/SLEEP button (8).
9 FM radio
Press the MODE button until [FM Radio] appears in the display.
9.1 Setting the frequency manually
Use the TUNING/SKIP buttons (6, 7) to change the signal frequency. In this way you can set a specific frequency to receive the desired station. If the frequency is set correctly, the preset station will be indicated by name, if this RDS information is transmitted. Each pressing of the TUNING/SKIP (6, 7) buttons increases the broadcasting frequency by 0.05 Mhz.
9.2 Searching for stations automatically
As an alternative to manual setting of the reception frequency, you can also search for stations automatically. To do so, access the settings you have set up under Scan Settings.
Press the SCAN/Play/Pause/PAIR button (9). Scan appears in the display...
The device now searches for the next station it can receive, and then plays it.
Repeat the procedure to search for another station.
Alternatively:
Hold down the TUNING/SKIP button (6, 7) to search for the next station that can be received.
9.3 Saving FM stations to a memory slot
i The station memory can store up to 30 stations in the FM range.
Now select the desired station.
In order to store this station on a memory slot, hold down the 3+ (18) button during playback until [Save P3] appears in the display. Then use the TUNING/SKIP buttons (6, 7) to select a favourites memory slot (1-30). Press the ENTER/STOP/SLEEP button (8) to save.
Repeat this process to save additional stations.
You can also save stations to one of the One-Touch buttons (1 or 2 - 15, 16) by holding down the corresponding button for a bit longer.
9.4 Retrieving FM stations from a memory slot
To retrieve a station that you have already stored in the favourites memory, briefly press the 3+ (18) button and select a station slot (1 - 30) using the TUNING/SKIP buttons (6,7). Press the ENTER/STOP/SLEEP button (8) to play the station.
i If no station is saved on the selected station slot, [(empty)] appears in the display.
Alternatively One-Touch button 1 or 2 (15, 16) can also be used.
9.5 Overwriting/deleting a station memory slot
Simply save a new station on a favourite memory slot as described.
i When retrieving the factory settings all memory slots are deleted.
9.6 Adjusting the display
Press the INFO/MENU/MEMORY button (5) multiple times to scroll through the various display modes.
The following display modes are possible in FM mode: Frequency, Date, Time, Genre, Sound Info, Additional Info.
9.7 Scan settings
Open the main menu by holding down the INFO/MENU/MEMORY button (5) and use the TUNING/SKIP (6, 7) buttons to select the
item. Press the ENTER/STOP/SLEEP button (8).
Now select whether weak stations [All stations] are to be detected during the scan or Only Strong Stations and confirm your selection by pressing the ENTER/STOP/SLEEP button (8).
9.8 Audio settings
Depending on the signal quality, stations can be played in stereo or mono.
Open the main menu by holding down the INFO/MENU/MEMORY button (5) and use the TUNING/SKIP buttons (6, 7) to select the
i If the signal quality is too weak, the station is always played in mono mode.
10 CD player
10.1 Selecting CD mode
Press the MODE button until [CD] appears in the display.
10.2 Inserting a CD
i You can play audio or MP3 CDs in the CD player.
To insert a CD, simply lift up the cover using the tab (LIFT TO OPEN).
Once the cover has been opened, place the CD on the spindle with the label side up and press down gently on the centre of the CD until it audibly clicks into place.
Close the cover by pushing it down until it sits on the housing.
If the CD cannot be read (e.g. if it is dirty), [No CD] appears in the display. If this happens, clean the underside of the CD with a soft, lint-free cloth.
10.3 Playing audio CDs
Use the SCAN/Play/Pause/PAIR (9), TUNING/SKIP (6, 7) and ENTER/STOP/SLEEP (8) play buttons to control audio CD playback. The

track number (T) and track playing time now appears in the display.
Play:

Pause (during playback):

Next track:

Previous track: 2x

Current track from the beginning: 1x

Fast forward: hold down

Fast rewind: hold down

Stop playing: (the total number of tracks T on the disk appears in the display)
Furthermore, the play modes Repeat Track, Repeat All, Shuffle and INTRO are available. Briefly press the INTRO button (18) or Playback Mode/Shuffle (19) to select the playback mode. The selected playback mode is shown in the display.
[Repeat Track]: The current track is played repeatedly.
[Repeat All]: All tracks are played repeatedly.
[Shuffle]: The tracks are played in a random sequence.
[INTRO]: Only the first 10 seconds are played.
[DISC]: A standard mode in which playback is ended when all the tracks have been played.
10.4 MP3 CD playback
Playback of MP3 CDs is the same as for audio CDs.

The folder number (F) followed by the track number and track playing time appear in the display.
Play:

Pause (during playback):

Next track:

Previous track: 2x

Current track from the beginning: 1x

Fast forward: hold down

Fast rewind: hold down

Stop playback:

You can use the FOLDER +/- buttons (15, 16) to select a folder/album.
Furthermore, the play modes Repeat Track, Repeat Album, Repeat All, Shuffle and INTRO are available. Briefly press the INTRO button (18) or Playback Mode/Shuffle (19) to select the playback mode. The selected playback mode is shown in the display.
[Repeat Track]: The current track is played repeatedly.
[Repeat Album]The current album/folder is repeated.
[Repeat All]: All tracks are played repeatedly.
[Shuffle]: The tracks are played in a random sequence.
[INTRO]: Only the first 10 seconds are played.
[DISC]: A standard mode in which playback is ended when all the tracks have been played.
10.4.1 Show ID3 tags
Briefly press the INFO/MENU/MEMORY button (5) to switch the ID3 tag display on or off.

ID3 tags are only displayed when they are present on the MP3 CD or the current track.
10.5 Program playback
You can program the playback sequence for audio CDs (32) and MP3 CDs (64).
First stop any track that is playing by pressing the ENTER/STOP/SLEEP button (8).
- Hold down the INFO/MENU/MEMORY button (5) until [MEMP-01] appears in the display.
- Select the first track to be played using the TUNING/SKIP buttons (6, 7).
- Press INFO/MENU/MEMORY (5) to store the first track.
- Use the TUNING/SKIP buttons (6, 7) again to select the second track to be played.
- Press INFO/MENU/MEMORY (5) again to store it.
i Proceed in this way with all of the tracks you want to program.
- To play the program, press the SCAN/Play/Pause/PAIR button (9).
If you want to program playback for an MP3 CD, you must select the folder in which the track is located before selecting each track. Select the folder using the FOLDER +/- buttons (15, 16) and confirm with INFO/MENU/MEMORY (5). You can then use TUNING/SKIP (6, 7) to select the track you want in this folder and likewise confirm with INFO/MENU/MEMORY (5).
To end the programmed playback, press the ENTER/STOP/SLEEP button (8) twice or open the CD compartment lid.
11 USB playback
MP3 tracks that are located on a USB mass storage device such as a USB stick can be played on the DIGITRADIO 1990. Insert the USB mass storage device into the USB port (17) on the front of the DIGITRADIO 1990.
The USB port can also be used to charge external devices such as smartphones. Note the power rating on the device.
11.1 Selecting USB mode
Press the MODE button until [USB] appears in the display.
11.2 Playing from USB media
Playing MP3 tracks on USB mass storage devices works in the same way as playing from MP3 CDs.
The folder number (F) followed by the track number and track playing time appear in the display.
Play:

Pause (during playback):

Next track:

Previous track: 2x

Current track from the beginning: 1x

Fast forward: hold down

Fast rewind: hold down

Stop playback:

You can use the FOLDER +/- buttons (15, 16) to select a folder/album.
Furthermore, the play modes Repeat Track, Repeat Album, Repeat All, Shuffle and INTRO are available. To select the playback mode, briefly press the INTRO (18) or Play/Shuffle (19) button. The selected playback mode is shown in the display.
[Repeat Track]: The current track is played repeatedly.
[Repeat Album] The current album/folder is repeated.
[Repeat All]: All tracks are played repeatedly.
[Shuffle]: The tracks are played in a random sequence.
[INTRO]: Only the first 10 seconds are played.
[USB]: Standard mode where playback ends when all tracks have been played.
12 Bluetooth playback
When an external playback device such as a smartphone is connected, you can play music tracks on the DIGITRADIO 1990. When doing so, you can control the playback on your external playback device.

The maximum range in Bluetooth mode is 8 metres. If disruptive noise or dropouts occur during playback, reduce the distance between the external device and the DIGITRADIO 1990.
12.1 Selecting Bluetooth mode
Press the MODE button until [BLUETOOTH] appears in the display.
12.2 Pairing with external devices

Refer to the notes in the instruction manual for your external device regarding the process for pairing with other devices.
Select Bluetooth mode as described. [BT Connection] now flashes in the display if no device has yet been paired with the DIGITRADIO 1990.
Open the Bluetooth scan for other devices on your external device.
In the list of discovered devices, select DIGITRADIO 1990 by tapping it.
i If required, enter a password, or use "0000" (4 zeros).
A confirmation tone is heard on the DIGITRADIO 1990 when a successful connection is made.
Start playing music on your external device...
To pair with another device after successful pairing, hold down the SCAN/Play/Pause/PAIR button (9) to launch the pairing mode.
13 AUDIO IN
External devices such as smartphones can be connected with the DIGITRADIO 1990 via the analogue audio input AUX IN (20). Music can then be played on the DIGITRADIO 1990 via the headphone socket or audio output of your external device.
13.1 AUX IN playback
Press the MODE button until [AUDIO IN] appears in the display.
Connect an audio cable (3.5 mm jack plug) to the audio output of your external device and insert it into the AUX IN socket (20) on the side of the device.
To set the volume to the optimum level, use both the volume control on the DIGITRADIO 1990 and on the connected device. Set the volume on the connected device as high as possible and then regulate the volume on the DIGITRADIO 1990. If the volume on the connected device is set too low, you will probably hear interference in the sound on the DIGITRADIO 1990.
If no music is played for 4 hours, the DIGITRADIO 1990 automatically switches to standby mode.
14 Other functions
14.1 Sleep timer
The sleep timer automatically switches the DIGITRADIO 1990 to standby after a specified time.
Press and hold the ENTER/STOP/SLEEP button (8) until [SLEEP] appears in the display.
You can use the TUNING/SKIP buttons (6, 7) to enter a period after which the DIGITRADIO 1990 should switch off.
Confirm by pressing the ENTER/STOP/SLEEP button (8).

When the sleep timer is enabled, an "S" appears in the display next to the time.
Select Sleep Timer > Off to switch off an active sleep timer.
14.2 Alarm function
The DIGITRADIO 1990 has an internal alarm that you can program.

The alarm is only available when the DIGITRADIO 1990 is connected to the mains. The alarm will not work in battery mode.
Switch the DIGITRADIO 1990 to standby mode.
Press the DIMMER/TIMER button (4). Timer On appears in the display and the hour numbers flash.
Enter the hours using the TUNING/SKIP buttons (6, 7) and confirm with DIMMER/TIMER (4). The minutes now flash.Set the minutes using the TUNING/SKIP buttons (6, 7) and confirm with DIMMER/TIMER (4).
You then need to enter the Timer Off time as described.
You then enter the source. Use the TUNING/SKIP buttons (6, 7) to select one of the available playback sources and confirm using the DIMMER/TIMER button (4) again.
Finally, set the alarm sound volume. Select the volume using the TUNING/SKIP buttons (6, 7) and save the alarm using the DIMMER/TIMER button (4).

The alarm is now active and a clock icon appears in the display. To switch off an alarm, hold down the DIMMER/TIMER button (4) until the clock icon is no longer displayed.

If DAB+ or FM is selected as the alarm sound, the last-set station is always played.
14.3 Equaliser
The DIGITRADIO 1990 has multiple sound presets.
Hold down the EQ button (19).
Use the TUNING/SKIP buttons (6, 7) to select from the CLASSIC - JAZZ - ROCK - POP - FLAT sound curves.
Press the ENTER/STOP/SLEEP button (8) to confirm the setting.
14.4 Dimmer
The display brightness can be adjusted in 4 steps.
Switch the DIGITRADIO 1990 on.
Press the DIMMER/TIMER button (4) multiple times to scroll through the various brightness settings (Bright, Medium, Dark and Off).
i The same brightness settings apply in standby mode as in normal operation.
In battery mode, the display is always dimmed and only becomes brighter by pressing a button. It is dimmed again after 10 seconds, to save battery power.
14.5 Setting the time
The DIGITRADIO 1990 basically derives the current time from the DAB+ signal. If you are operating the device for the first time, it may take some time until the clock is synchronised. If you want to set the time manually (if no DAB+ signal is available), please proceed as follows:
Switch the DIGITRADIO 1990 to standby mode.
Briefly press the MODE/CLOCK button (3).
Use the TUNING/SKIP buttons (6, 7) to enter the time format. Press the MODE/CLOCK button (3) to accept the setting.
The hour numbers now flash. Use the TUNING/SKIP buttons (6, 7) to enter the hours and confirm with MODE/CLOCK (3).
The minute numbers then flash. Use the TUNING/SKIP buttons (6, 7) to enter the minutes and confirm with MODE/CLOCK (3). The time is saved.
14.6 Language
Select DAB+ or FM radio mode.
Open the main menu by holding down the INFO/MENU/MEMORY button (5) and use the TUNING/SKIP buttons (6, 7) to select theitem. Press the ENTER/STOP/SLEEP button (8). Use the TUNING/SKIP buttons (6, 7) to select one of the available languages and confirm with ENTER/STOP/SLEEP (8).
14.7 Software version
Select DAB+ or FM radio mode.
Open the main menu by holding down the INFO/MENU/MEMORY button (5) and use the TUNING/SKIP buttons (6, 7) to select theitem. Press the ENTER/STOP/SLEEP button (8).
The software version currently installed will now be displayed.
14.8 Factory settings
If you want to reset the DIGITRADIO 1990 to the delivery status, proceed as follows:
i Doing so will delete all settings, stations and favourites.
- Select DAB+ radio mode.
- Open the CD compartment cover.
- Hold down the Folder +/2 button (16) on the front until [Restart] appears in the display.
15 Cleaning the device

WARNING Electric shock!
To prevent the risk of an electric shock, you must not clean the device using a wet cloth or under running water. Before cleaning, disconnect from the mains and remove any inserted batteries.
You may not use scouring pads, scouring powder and solvents such as alcohol or petrol.
Clean the housing using a soft, moist cloth.
16 Troubleshooting
16.1 Problems with the radio
| Symptom Possible cause/remedy | |
| No radio stations are being received. Change the orientation of the antenna if necessary. Check whether DAB or FM mode has been selected. | |
| No DAB signal is being received. Check whether DAB reception is possible in your region. Realign the antenna. Try to receive other stations. |
| Symptom Possible cause/remedy | |
| The sound is weak or of poor quality. | Other devices such as televisions are disrupting reception. Move the unit further away from these devices. |
| The antenna is not extended or correctly orientated. Extend the antenna. Rotate the antenna to improve reception. | |
16.2 Problems with the device
| Symptom Possible cause/remedy | |
| The device cannot be switched on. Connect the mains lead to the radio.Insert new batteries. | |
| No sound can be heard. Increase the volume. Remove the headphone jack from the device if you want to listen via the speakers. Possibly the wrong source has been selected. | |
| Distorted sound can be heard. In the vicinity of the device, a mobile phone or other device is emitting disruptive radio waves.Remove the mobile phone or device from the vicinity of the radio. | |
| Other operational malfunctions, loud noises or a malfunctioning display are occurring. | Electronic components in the device are malfunctioning. Remove the mains plug. Keep the device separated from the power source for approx. 10 sec.Reconnect the device. |
| CD or MP3 CD is not detected or music skips when played. | Carefully clean the underneath of the CD.Use another CD. |
| Malfunction with reception via a Bluetooth connection | The two devices must only be a maximum of 8 metres away from each other. Limit the distance. |
| The display does not switch on. Switch the device off. Remove the mains plug, reinsert it and switch the device on.Check the display brightness setting. | |
17 Technical data
| Model DIGITRADIO 1990 | |
| Power supply AC 100-240 V ~50/60 Hz, | 18 W |
| Power consumption Standby (without display lighting): 0.3 WOperating max.: 10 WTypical (medium volume): 2.5 W | |
| Battery mode 6 x R14/C cells, 1.5 V | |
| Bluetooth V4.2 | Audio profile: A2DP, AVRCPFrequencies: 2402MHz ~ 2480MHz,transmission capacity: 4dBm |
| Output power (music) 2 x 1.5 W RMS | |
| USB Output power: 5 V, 1 A, 5 W | USB 1.1 and 2.0 |
| Radio frequencies DAB 174 - 240 MHz | FM 87.5 - 108 MHz |
| CD Media: CD-DA, CD-ROM, CD-R, CD-RW | |
| MP3 decoder Bit rate (kbps) 32-320 constant & variable bit rate (VBR) | |
| Operating conditions | Temperature: 0°C ~ +35°CHumidity: 5% - 90% |
| Storage conditions | Temperature: 0°C ~ +35°CHumidity: 5% - 90% |
| Dimensions approx. 270 mm (B) x 212 mm (D) x 116mm (H) | |
| Weight approx. 1.23 kg | |
Mode d'emploi
DIGITRADIO 1990
2 Illustrations....71
natural_image
Symbol of a trash bin with crossed lines indicating no waste or restriction, and a solid black rectangle below (no text or symbols)14 AUDIO IN (INGRESSO AUDIO)....124
natural_image
Symbol of a trash bin crossed with a diagonal line, no text or numbers present
AVVERTENZA
radio DAB+, radio FM, CD, USB, Audio In, Bluetooth.
- WARNUNG
- Preface
- Dear Customer,
- Contents
- CD player....55
- USB playback....58
- Bluetooth playback....59
- AUDIO IN....60
- Other functions....61
- Cleaning the device....63
- Troubleshooting guide....63
- Technical specifications....65
- Illustrations
- Carry handle
- Volume -
- Safety instructions
- Intended use
- Operating the DIGITRADIO 1990 correctly
- Explanation of symbols:
- Scope of use
- WARNING!
- Setting up the device
- Disposal
- i Disposal of packaging:
- Device disposal:
- Legal notices
- Service instructions
- Description of the device
- Scope of delivery
- Features of the radio
- Preparing the device for use
- Improving the antenna reception
- Connecting to the mains
- Battery mode
- Basic operation
- Switching the radio on/off
- Menu navigation
- Adjusting the volume
- Using headphones
- Playback modes
- DAB+ (Digital Radio) function
- What is DAB+?
- DAB+ (digital radio) reception
- Station search (auto)
- Automatic Scan
- Manual scan
- Selecting stations
- Storing DAB+ stations on a memory slot
- Retrieving DAB+ stations from a memory slot
- Overwriting/deleting a station memory slot
- Adjusting the display
- Volume adjustment (DRC)
- Deleting inactive stations
- FM radio
- Setting the frequency manually
- Searching for stations automatically
- Saving FM stations to a memory slot
- Retrieving FM stations from a memory slot
- Overwriting/deleting a station memory slot
- Adjusting the display
- Scan settings
- Audio settings
- CD player
- Selecting CD mode
- Inserting a CD
- Playing audio CDs
- MP3 CD playback
- Show ID3 tags
- Program playback
- USB playback
- Selecting USB mode
- Playing from USB media
- Bluetooth playback
- Selecting Bluetooth mode
- Pairing with external devices
- AUDIO IN
- AUX IN playback
- Other functions
- Sleep timer
- Alarm function
- Equaliser
- Dimmer
- Setting the time
- Language
- Software version
- Factory settings
- Cleaning the device
- WARNING Electric shock!
- Troubleshooting
- Mode d'emploi
- AUDIO IN (INGRESSO AUDIO)....124
- AVVERTENZA
Brand : TECHNISAT
Model : DigitRadio 1990
Category : Cd player/recorder