
KM 200 - Alarm system OLYMPIA - Free user manual and instructions
Find the device manual for free KM 200 OLYMPIA in PDF.

| Product type | Carbon monoxide (CO) detector alarm |
| Brand | Olympia |
| Model | KM 200 |
| Dimensions | 68 x 35 mm |
| Weight | 140 g |
| Power supply | 2 AAA microcell batteries 1.5 V |
| Sensor type | FIGARO electrochemical sensor |
| Visual signal | 3 LEDs (green: Power, yellow: Error, red: Alarm) |
| Sound signal | 85 dB at 1 meter |
| Applicable standards | EN 50291-1:2010+A1:2012 |
| Lifespan | 10 years |
| Main functions | CO detection, audible and visual alarm, self-test every 10 seconds, memory function, silence mode, battery charge indicator |
| Self-test | Every 10 seconds; error signal if malfunction |
| Battery charge indicator | Alarm LED flashes every 40 seconds + beep; replace within 30 days |
| Silence mode | Activated by pressing Test/Hush twice; lasts 2 minutes or until a new alarm |
| Maintenance and cleaning | Clean the surface with a soft damp cloth; clean the gas inlet openings with a brush; test operation at least once a month; do not paint or glue the openings |
| Safety | In case of alarm: ventilate, evacuate, call firefighters; do not cause sparks; keep out of reach of children; do not use in caravans or boats; follow installation instructions |
| Spare parts and repairability | No detachable parts; replace the device after 10 years or in case of malfunction |
| Ambient conditions | -10 °C to +40 °C, 15% to 90% relative humidity |
| Box contents | KM 200 CO detector, base with 2 screws and 2 wall plugs, 2 AAA batteries, instruction manual |
Frequently Asked Questions - KM 200 OLYMPIA
User questions about KM 200 OLYMPIA
0 question about this device. Answer the ones you know or ask your own.
Ask a new question about this device
Download the instructions for your Alarm system in PDF format for free! Find your manual KM 200 - OLYMPIA and take your electronic device back in hand. On this page are published all the documents necessary for the use of your device. KM 200 by OLYMPIA.
USER MANUAL KM 200 OLYMPIA
natural_image
Simple icon of a person using a device (no text or symbols)natural_image
Simple line drawing of a light bulb with radiating lines (no text or symbols)natural_image
Simple line drawing of a light bulb with radiating lines (no text or symbols)natural_image
Simple line drawing of a light bulb with radiating lines (no text or symbols)natural_image
Diagram of two batteries with one moving right and the other with a plus sign, enclosed in a circular frame (no text or symbols)natural_image
Simple line drawing of a light bulb with radiating lines (no text or symbols)natural_image
Diagram of a computer monitor showing the internal components and light path, with no visible text or symbols.natural_image
Simple line drawing of a light bulb with radiating lines (no text or symbols)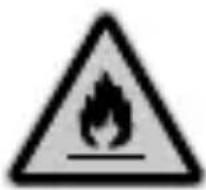
natural_image
Simple line drawing of a light bulb with radiating lines (no text or symbols)Batterie-Warnhinweis
natural_image
Simple line drawing of a light bulb with radiating lines (no text or symbols)natural_image
Simple line drawing of a light bulb with radiating lines (no text or symbols)
natural_image
Simple line drawing of a light bulb with radiating lines (no text or symbols)natural_image
Simple line drawing of a light bulb with radiating lines (no text or symbols)natural_image
Simple line drawing of a glowing light bulb with radiating lines (no text or symbols)natural_image
Symbol of a trash bin crossed with no text or symbols, representing discarded waste (no text present)natural_image
Recycling symbol with three chasing arrows forming a triangle (no text or labels)English

Contents
In the Event of an Alarm ....27
Safety Instructions .....28
Important Information and Preventive Measures .....30
Intended Use ....31
Package Contents ....31
General View 32
Inserting the Batteries ....33
Selecting the Installation Location ....34
Assembling the CO Alarm ....35
Following an Alarm....36
Switching the Alarm Off ....36
Memory Function 37
Low Battery Charge Warning ....37
CO Alarm Function Test ....38
Self-Test....38
End of Service Life ....39
Activating Hush Mode ....39
What You Also Need to Know ....40
Symptoms Following Carbon Monoxide Poisoning .....40
Reaction Times of the CO Alarm ....42
Disposal....43
Technical Data 44
Maintenance and Service 45
Guarantee 45
Declaration of Conformity 45
In the Event of an Alarm
Danger! Risk of suffocation through carbon monoxide! Carbon monoxide is a highly flammable, invisible, odourless gas.

Open doors and windows to ventilate areas affected.
Clear the source of the danger where this is immediately obvious and you do not put your own life at risk.
You and others at risk must move away from the danger area.
Inform the fire service and wait for any instructions.
Do not enter the building or residence in which the carbon monoxide alarm has been triggered until the fire service has inspected the affected area.
Take advantage of medical help for persons suffering from headache, drowsiness, nausea or other symptoms which indicate carbon monoxide poisoning.
Safety Instructions

natural_image
Simple icon of a person using a device (no text or symbols)Read the operating manual thoroughly and observe all the information contained when using the carbon monoxide alarm. Keep the operating manual in a safe place for future reference.

natural_image
Simple line drawing of a light bulb with radiating lines (no text or symbols)Pay attention to this symbol. This symbol indicates passages of text providing useful information.
Warning! Carbon monoxide can have fatal effects. Carbon monoxide concentrations in the blood interfere with the capability of the body's oxygen supply. Depending on the concentration level, carbon monoxide can have fatal effects within minutes. Observe the information in Sections In the Event of an Alarm on Page 27, Important Information and Preventive Measures on Page 30 and What You Also Need to Know on Page 40.
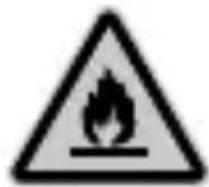
Warning! Carbon monoxide is a highly flammable, invisible, odourless gas. Take any alarm seriously. Avoid producing sparks or flames should you hear the alarm! If the alarm is triggered, do not smoke or light a candle. Do not switch on any lights and do not unplug any electrical connections. Follow the instructions provided in Section In the Event of an Alarm on Page 27.

Warning! Risk of suffocation! Children can swallow small parts, packaging and protective foils. Keep the product and packaging out of reach of children!

Warning! Risks to health and the environment from batteries! Improper handling of batteries can put your health and the environment at risk. Never open, damage or swallow batteries or allow them to pollute the environment. Batteries may contain toxic, ecologically hazardous heavy metals.

Caution! Hearing damage through loud alarm signal! The alarm signal is loud and could cause hearing damage. Only use the device in the recommended installation locations. Do not remain in the vicinity of the acoustic alarm for a longer period when it has been triggered.
Important! Property damage through environmental influences! Harmful environmental influences, such as exposure to smoke, dust, vibration, chemicals, moisture, heat and direct sunlight, could damage the device or impair the function. Prevent exposing the device to environmental influences such as smoke, dust, vibration, chemicals, moisture, heat or direct sunlight.
Important! For technical reasons, the sensors must not be operated in excess of ten years.
As a result of chemical wear of the sensor, the CO alarm does not work properly after the service life of ten years specified. Replace the device after ten years even if the outer appearance does not indicate any signs of wear. Avoid direct contact with vapours emanating from adhesives, paints and cleaning agents to prevent the sensor ageing or deteriorating more quickly.
Important Information and Preventive Measures
Throughout this operating manual, carbon monoxide is abbreviated to CO.
- The CO alarm does not detect smoke, fire or gases other than CO. Install other appropriate alarms to provide protection from smoke or heat development.
- The most frequent sources of CO development are gas devices, vehicle engines, electricity generators, heat-producing appliances, such as ovens or fireplaces, which do not work properly or are not used correctly and the use of grilling devices in closed rooms.
- Have gas thermostats, gas boilers and other devices and heaters run on gas, as well as air supplies and exhausts, serviced at regular intervals by specialists.
Intended Use
The KM 200 carbon monoxide alarm - subsequently referred to as CO alarm - serves for detecting different concentrations of carbon monoxide in the ambient air. A condition for complying with the intended use is that the equipment is installed correctly and the information in the manual is observed and maintained. Any other use is considered unintended use. Unauthorised modifications or reconstructions are not permitted.
Only use the CO alarm indoors. The CO alarm is not intended for use in industrial environments, business offices, boats, caravans and camping vans.
Package Contents
Please check the contents of the package carefully. If anything is missing or has been damaged during transport, DO NOT put the CO alarm into operation!
- KM 200 CO alarm
- Assembly material (2 screws, 2 dowels)
• 2 batteries (AAA cell, 1.5 V) - Operating Instructions
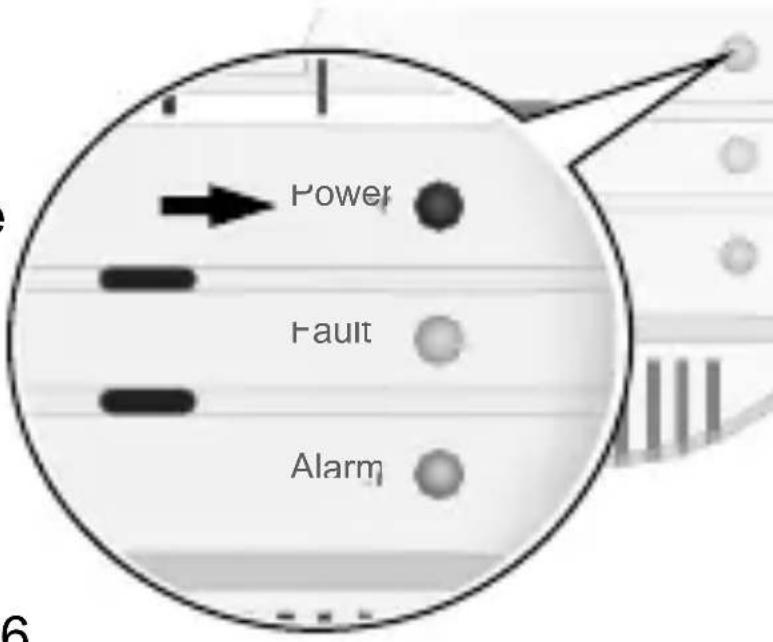
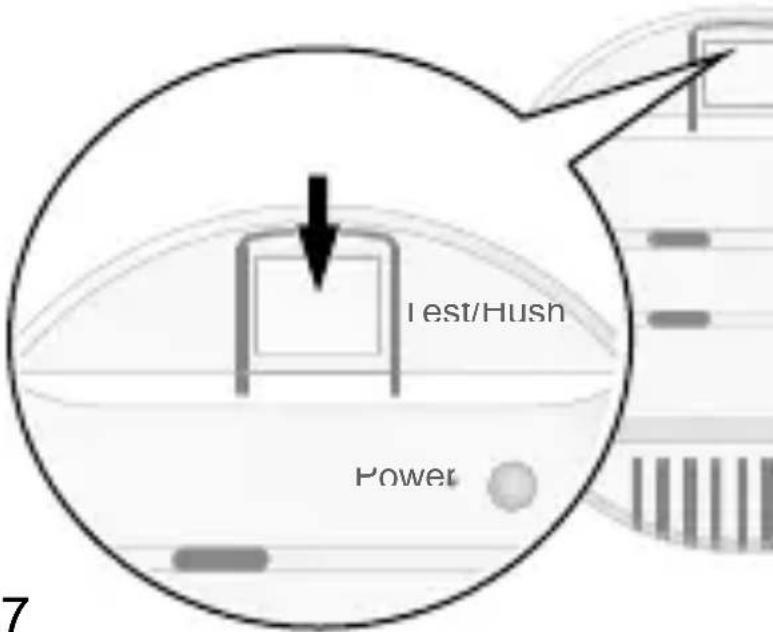
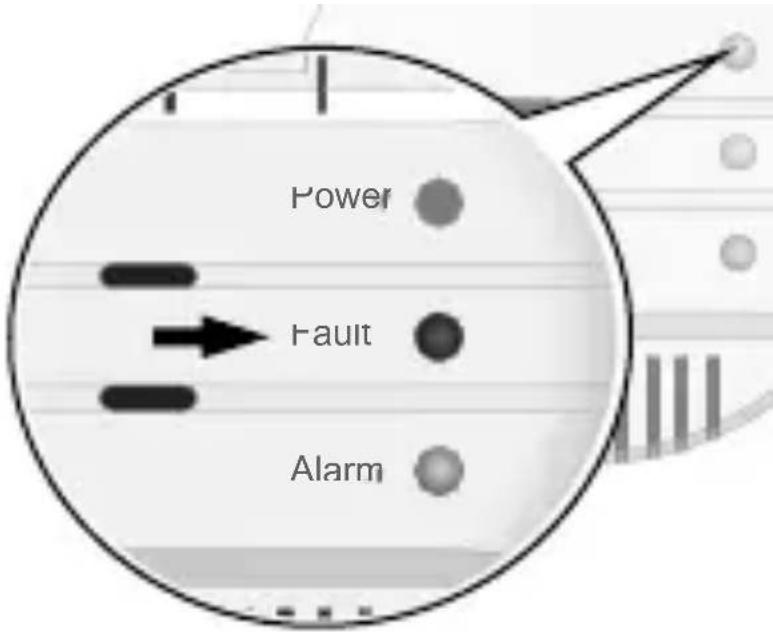
General View
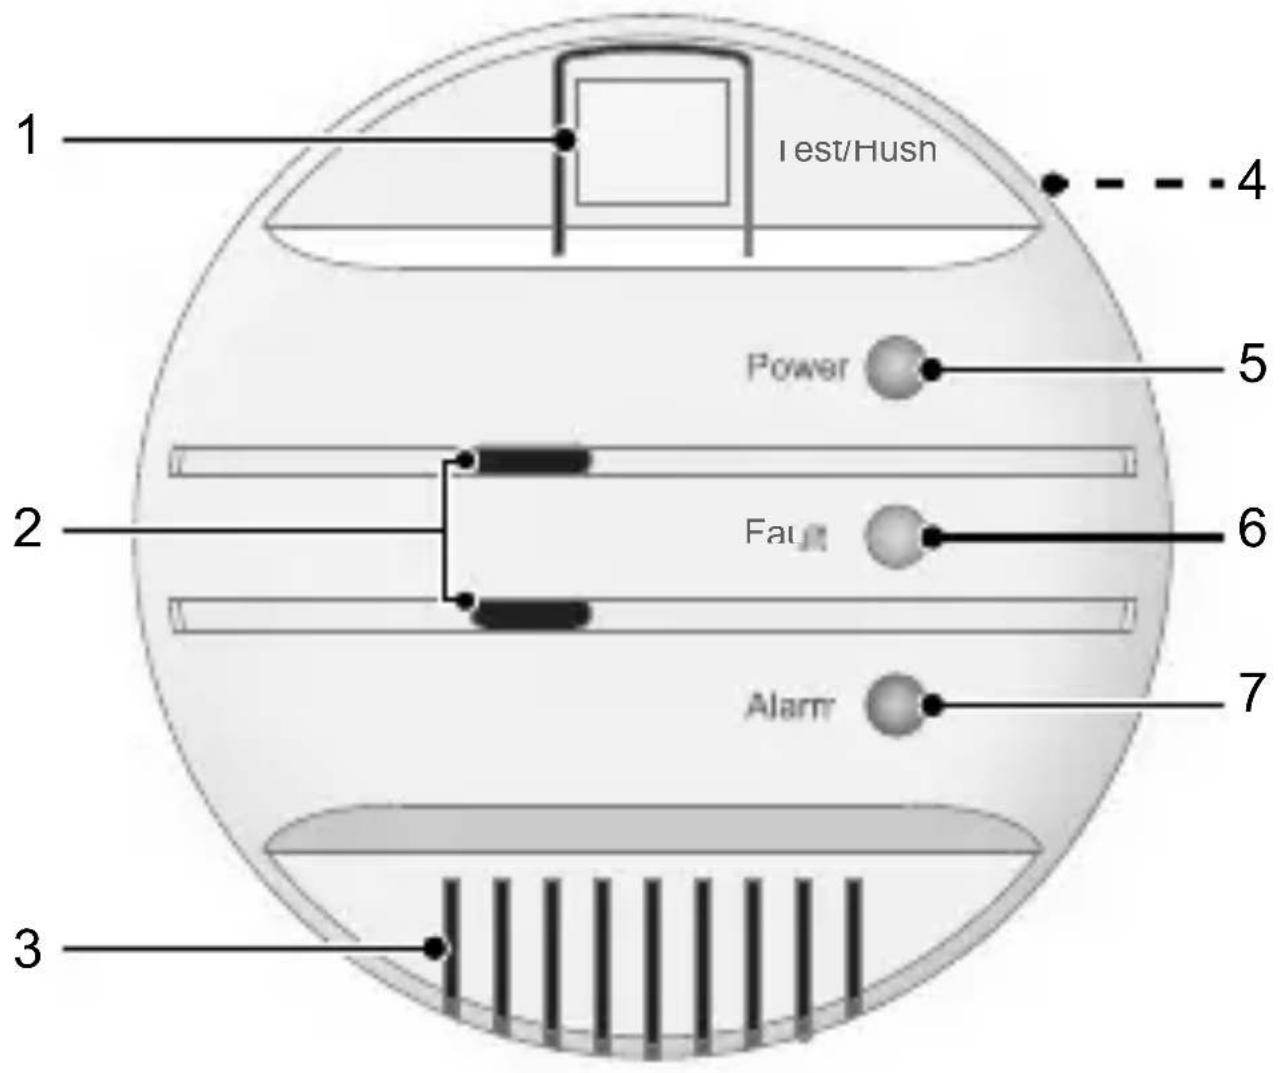
1 Test/Hush button
2 Gas inlets
3 Loudspeaker
4 Base
5 Power LED
6 Fault LED
7 Alarm LED
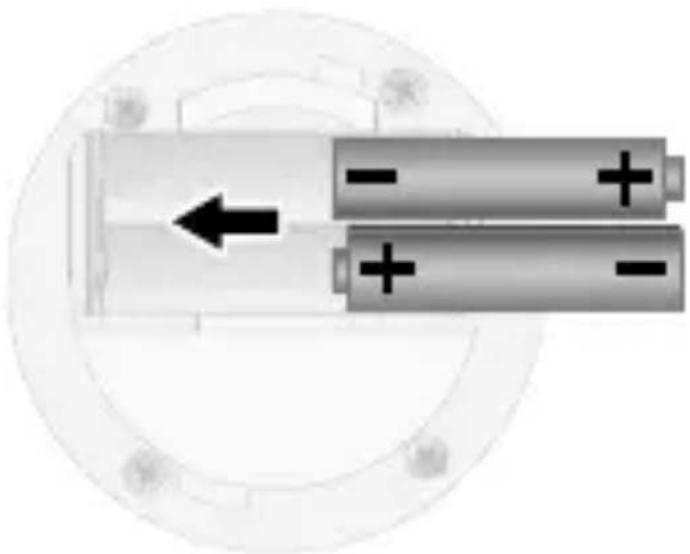
Inserting the Batteries
The battery compartment of the CO alarm can only be opened when you have removed the base from the CO alarm.
1 Turn the base counter-clockwise to disconnect it from the CO alarm.
2 Open the battery compartment.
3 Insert two appropriate batteries in the battery compartment, ensuring correct polarity.

natural_image
Simple line drawing of a light bulb with radiating lines (no text or symbols)After inserting the batteries, the CO alarm is automatically switched on and ready to operate. The Power LED fl ashes every 50 seconds.
4 Close the battery compartment.
5 Assemble the CO alarm.

natural_image
Simple line drawing of a light bulb with radiating lines (no text or symbols)Pay attention to the information in Sections Important Information and Preventive Measures on Page 30 and Selecting the Installation Location on Page 34.
natural_image
Diagram of two batteries with one moving right and the other with a plus sign, enclosed in a circular frame (no text or symbols)Selecting the Installation Location
A CO alarm should be assembled
• at least in every bedroom
- in every room with a heating appliance (pay particular attention to the information below)
- at the room height at which it is normally breathed (applies to rooms without a heating appliance, otherwise see below)
- so that the LEDs are visible and the Test/Hush button can be operated

natural_image
Simple line drawing of a light bulb with radiating lines (no text or symbols)Although carbon monoxide has a similar density as the ambient air, it is normally expelled as part of a hot gas mixture and therefore tends to ascend until it cools down.
Assemble CO alarms in rooms containing a heating appliance
- at a height above windows and doors
- at least 300 mm from a wall and 150 mm from the ceiling
- at a distance of between 1 and 3 ~m to potential sources of carbon monoxide
Do not assemble CO alarms
- near a window or door because fresh air flowing in could cause a delay in the alarm triggering
• in the direct vicinity of a cooking area
• in closed containers or concealed areas
• in the vicinity of extractor fans - in wet or damp areas
• directly above sources of heat - outside the permissible ambient conditions (refer to Technical Data)
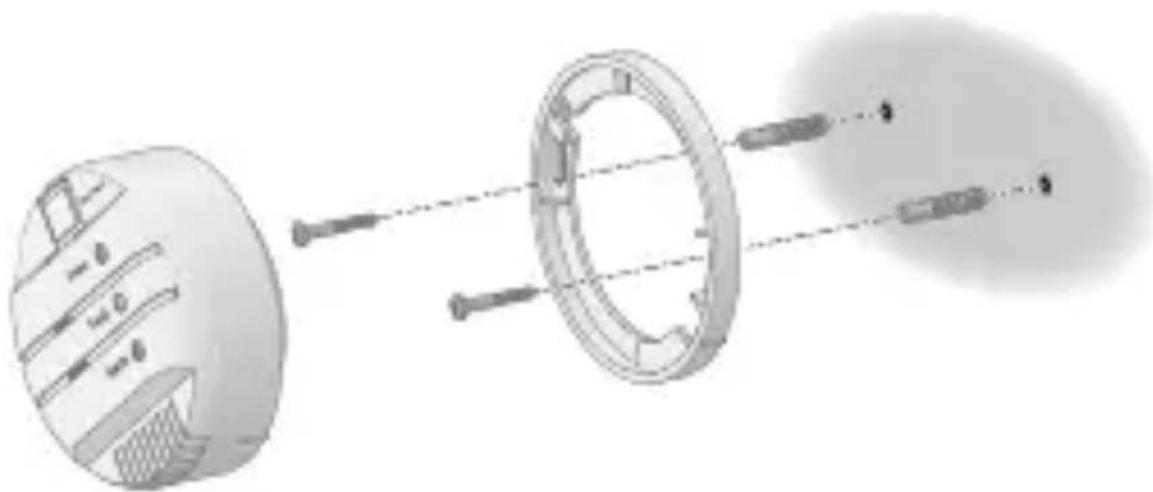
Assembling the CO Alarm
When assembling the device, pay attention to maintaining at least 100 cm distance to doors, windows or ventilation ducts.
natural_image
Diagram of a mechanical assembly showing a circular component being processed into a ring, with no visible text or symbols.1 Carefully turn the base counterclockwise and remove the base from the CO alarm.

natural_image
Simple line drawing of a light bulb with radiating lines (no text or symbols)Assemble the base so that the inlet of the sensor points downwards after assembly. This prevents dust or other dirt particles impairing the function of the CO alarm.
2 Screw the base at the intended installation location with two screws.
3 Fit the CO alarm on the base and screw the CO alarm clockwise until firmly fixed.
Following an Alarm
If the CO alarm detects a critical concentration of carbon monoxide, the alarm is triggered and the Alarm LED fl ashes.
Switching the Alarm Off
1 Press the Test/Hush button to switch the alarm off. The CO alarm now works normally again, the Power LED fl ashes every 50 seconds and the Alarm LED goes out.
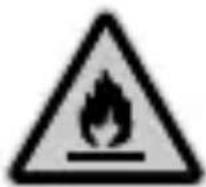
natural_image
Warning symbol of a flame inside a triangle (no text or numbers)Warning! Carbon monoxide is a highly fl ammable, invisible, odourless gas. Take every alarm seriously. Follow the instructions provided in Section In the Event of an Alarm on Page 27.

natural_image
Simple line drawing of a glowing light bulb with radiating lines (no text or symbols)The alarm stops automatically when the concentration of carbon monoxide drops below a safe threshold value.
Memory Function
If the CO alarm has detected carbon monoxide and triggered an alarm in your absence, the Alarm LED fl ashes every 15 seconds followed by two short acoustic signals.
1 Press the Test/Hush button. The CO alarm is ready to operate, the Power LED fl ashes every 50 seconds, the Alarm LED is off.
2 Take appropriate measures to identify and clear sources of danger which have lead to an alarm being triggered in your absence.
Low Battery Charge Warning
When the batteries in the CO alarm are almost empty, the Alarm LED fl ashes every 40 seconds followed by a short acoustic signal. The CO alarm continues to operate without any limitations during this period.
1 Change the batteries in the CO alarm within 30 days, installed new ones of the same type.

natural_image
Simple line drawing of a light bulb with radiating lines (no text or symbols)Further information is available in Sections Inserting the Batteries on Page 33 and Technical Data on Page 44.
CO Alarm Function Test
Complete a function test of the CO alarm at regular intervals - at least once a month.
1 Press the Test/Hush button. The Alarm flashes quickly and you will hear a longer acoustic signal.

natural_image
Simple line drawing of a light bulb with radiating lines (no text or symbols)If the function test indicates that the CO alarm is not working properly, there is no guarantee that the CO concentration is being monitored adequately. Replace the CO alarm immediately in such cases.
Self-Test
The CO alarm performs a self-test every 10 seconds. If the CO alarm detects a fault, the Fault LED flashes every 15 seconds followed by a short acoustic signal.

natural_image
Simple line drawing of a light bulb with radiating lines (no text or symbols)If the self-test indicates that the CO alarm is not working properly, there is no guarantee that the CO concentration is being monitored adequately. Replace the CO alarm immediately in such cases.
End of Service Life
The CO alarm automatically detects and signals the end of its useful service life.
In this case, the Fault LED fl ashes every 60 seconds followed by three short acoustic signals.

natural_image
Simple line drawing of a light bulb with radiating lines (no text or symbols)When the CO alarm indicates the end of its service life, replace the CO alarm immediately.
Activating Hush Mode
You can activate Hush mode when you want to switch off the alarm signal of the CO alarm for a time.
1 Press the Test/Hush button twice. The Power LED and Alarm LED flash simultaneously every 10 seconds.
2 If you want to deactivate Hush mode manually, press the Test/Hush button. You will hear a short acoustic signal and the Power LED fl ashes every 50 seconds. Hush mode is deactivated.
Hush mode is also deactivated if
- the CO alarm detects a critical concentration of carbon monoxide while Hush mode is active or
• after two minutes without any incidents occurring.
What You Also Need to Know
Please pay attention to this section in order to find out more about the risks of carbon monoxide poisoning or the reaction times of the CO alarm.
Symptoms Following Carbon Monoxide Poisoning
The following table indicates the symptoms which frequently occur according to the exposure to carbon monoxide.

natural_image
Simple line drawing of a light bulb with radiating lines (no text or symbols)The symptoms could occur more quickly in the case of unborn children, infants, pregnant women, senior citizens and people with heart or respiratory problems.
Concentration\* Exposure and Symptoms
30 ppm Maximum permissible concentration to which one may be exposed, uninterrupted, for 8 hours ("maximum allowable concentration")
150 ppm Slight headache after approx. 1.5 hours
200 ppm Slight headache, tiredness, dizziness, nausea after approx. 2 to 3 hours
Concentration\* Exposure and Symptoms
400 ppm Headache in the forehead after 1 to 2 hours, life-threatening after 3 hours
800 ppm Dizziness, nausea and cramp after approx. 45 minutes, unconsciousness within 2 hours, fatal within 2 to 3 hours
1600 ppm Severe headache, dizziness and nausea within 20 minutes, fatal within 1 hour
3200 ppm Severe headache, dizziness and nausea within 5 to 10 minutes, fatal within 25 to 30 minutes
6400 ppm Severe headache, dizziness and nausea within 1 to 2 minutes, fatal within 10 to 15 minutes
12800 ppm Fatal within 1 to 3 minutes
* The concentration indicates the levels of carbon monoxide in the ambient air in ppm (parts per million).
Reaction Times of the CO Alarm
The following table indicates the reaction times of the CO alarm according to the levels of carbon monoxide.
Take each alarm seriously and follow the instructions in Section In the Event of an Alarm on Page 27.
Concentration* Time Until CO Alarm is Triggered
Up to 50 ppm Approx. 2 hours
Up to 100 ppm Approx. 1 to 1.5 hours
Up to 300 ppm Approx. 10 to 40 minutes
From 300 ppm Max. 3 minutes
* The concentration indicates the levels of carbon monoxide in the ambient air in ppm (parts per million).
Disposal

In order to dispose of your device, take it to a collection point provided by your local public waste authorities (e.g. recycling centre).
According to laws on the disposal of electronic and electrical devices, owners are obliged to dispose of old electronic and electrical devices in a separate waste container. The symbol indicates that the device must not be disposed of in normal domestic waste! Risks to health and the environment from batteries! Never open, damage or swallow batteries or allow them to pollute the environment. Batteries may contain toxic, ecologically hazardous heavy metals.
Remove the batteries from the equipment before disposing of the device. You are legally obliged to dispose of batteries at shops which sell batteries or at collection points provided by the public waste authorities. Disposal is free of charge. The symbol indicates that batteries must not be disposed of in normal domestic waste and that they must be brought to collection points provided by local public waste authorities.

natural_image
Recycling symbol with three chasing arrows forming a triangle (no text or labels)Packaging materials must be disposed of according to local regulations.
Technical Data
Feature
Batteries 2 x AAA, 1.5 V
Sensor type FIGARO sensor (electrochemical)
Visual indicator 3 LEDs (green: Power, yellow: Fault, red: Alarm)
Applicable standards EN 50291-1:2010+A1:2012
Volume (alarm) 85 dB (at a distance of 1 m)
Service life 10 years
Special features Regular self-test, acoustic and optical signal for low battery charge
Permissible ambient conditions -10 °C to +40 °C at 15% to 90% rel. humidity
Dimensions 68 x 35 mm
Weight 140 g
Maintenance and Service
Precipitations of dust and such could impair the function of the CO alarm and lead to malfunctions.
1 Clean the surface of the housing regularly with a soft, moistened, lint-free cloth.
2 Clean the gas inlets with a brush.
3 Complete a function test at regular intervals, once a month at the latest.
4 Pay attention that the gas inlets are not covered with paint or obstructed by anything being stuck over them.
Guarantee
Dear Customer,
we are pleased that you have chosen this equipment.
In the case of a defect, please return the device together with the receipt and original packing material to the point-of-sale.
Declaration of Conformity
The CE Mark on the device confirms conformity. The Declaration of Conformity for this product, together with other information, is available at
http://productip.com/?f=57d21

Français

Table de matières
natural_image
Simple icon of a person using a device (no text or symbols)natural_image
Simple line drawing of a light bulb with radiating lines (no text or symbols)natural_image
Simple line drawing of a light bulb with radiating lines (no text or symbols)natural_image
Simple line drawing of a light bulb with radiating lines (no text or symbols)natural_image
Diagram of two batteries with one moving left and the other with one moving right, enclosed in a circular frame (no text or symbols)natural_image
Simple line drawing of a light bulb with radiating lines (no text or symbols)natural_image
Diagram of a mechanical assembly showing a circular component being processed into a ring, with no visible text or symbols.natural_image
Simple line drawing of a light bulb with radiating lines (no text or symbols)Avertissement !
natural_image
Simple line drawing of a light bulb with radiating lines (no text or symbols)natural_image
Simple line drawing of a light bulb with radiating lines (no text or symbols)natural_image
Simple line drawing of a light bulb with radiating lines (no text or symbols)natural_image
Simple line drawing of a light bulb with radiating lines (no text or symbols)natural_image
Simple line drawing of a light bulb with radiating lines (no text or symbols)natural_image
Simple line drawing of a light bulb with radiating lines (no text or symbols)natural_image
Recycling symbol icon with three chasing arrows forming a triangle (no text or labels)Italiano

Indice
natural_image
Simple icon of a person using a device (no text or symbols)natural_image
Simple line drawing of a light bulb with radiating lines (no text or symbols)natural_image
Simple line drawing of a light bulb with radiating lines (no text or symbols)natural_image
Simple line drawing of a light bulb with radiating lines (no text or symbols)natural_image
Diagram of two batteries with one moving left and the other with one moving right, enclosed in a circular frame (no text or symbols)Punto di ubicazione
natural_image
Simple line drawing of a light bulb with radiating lines (no text or symbols)natural_image
Diagram of a mechanical assembly showing a circular component being processed into a ring, with no visible text or symbols.natural_image
Simple line drawing of a light bulb with radiating lines (no text or symbols)natural_image
Simple line drawing of a light bulb with radiating lines (no text or symbols)natural_image
Simple line drawing of a light bulb with radiating lines (no text or symbols)natural_image
Simple line drawing of a light bulb with radiating lines (no text or symbols)
natural_image
Simple line drawing of a light bulb with radiating lines (no text or symbols)natural_image
Simple line drawing of a glowing light bulb with radiating lines (no text or symbols)natural_image
Simple line drawing of a light bulb with radiating lines (no text or symbols)natural_image
Symbol of a trash bin crossed with no text or numbers, representing waste sorting or disposal (no text present)natural_image
Recycling symbol with three chasing arrows forming a triangle (no text or labels)Operating Manual for
KM 200 Carbon Monoxide Alarm

- Batterie-Warnhinweis
- English
- Contents
- In the Event of an Alarm
- Safety Instructions
- Important Information and Preventive Measures
- Intended Use
- Package Contents
- Inserting the Batteries
- Selecting the Installation Location
- Do not assemble CO alarms
- Assembling the CO Alarm
- Following an Alarm
- Switching the Alarm Off
- Memory Function
- Low Battery Charge Warning
- CO Alarm Function Test
- Self-Test
- End of Service Life
- Activating Hush Mode
- What You Also Need to Know
- Symptoms Following Carbon Monoxide Poisoning
- Concentration\* Exposure and Symptoms
- Reaction Times of the CO Alarm
- Disposal
- Technical Data
- Feature
- Maintenance and Service
- Guarantee
- Declaration of Conformity
- Français
- Table de matières
- Avertissement !
- Italiano
- Indice
- Punto di ubicazione
Brand : OLYMPIA
Model : KM 200
Category : Alarm system