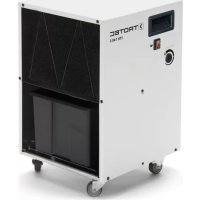
TTK 140 S - Humidifier TROTEC - Free user manual and instructions
Find the device manual for free TTK 140 S TROTEC in PDF.


| Product type | Condensation dehumidifier |
| Brand | Trotec |
| Model | TTK 140 S |
| Dehumidification capacity (30 °C / 80 % RH) | 28.5 l / 24 h |
| Operating temperature range | 5 °C to 32 °C |
| Operating relative humidity range | 30 % to 90 % RH |
| Power supply | 220 – 240 V / 50 Hz |
| Max. power consumption | 0.6 kW |
| Rated current | 2.7 A |
| Protection class | IPX1 (protected against dripping water) |
| Water tank capacity | 6 l |
| Refrigerant | R290 (propane) – 150 g |
| Sound pressure level (at 1 m) | 52 dB(A) |
| Dimensions (L × W × H) | 400 × 400 × 605 mm |
| Weight | 27.5 kg |
| Minimum distances from walls/objects | 50 cm on each side (top, back, sides, front) |
| Airflow rate | 580 m³/h |
| Main functions | Automatic condensation dehumidification, automatic defrost, continuous operation, drainage via tank or hose, condensate pump option |
| Maintenance and cleaning | Clean the air filter at least every 2 weeks, empty the water tank, clean the exterior with a damp cloth |
| Safety | Flammable refrigerant (R290) – use only in a room > 4 m², do not pierce the circuit, automatic defrost, IPX1 protection |
| Spare parts and repairability | Air filter, casters, water tank, compressor, fan, etc. – refrigerant circuit maintenance only by a qualified professional |
Frequently Asked Questions - TTK 140 S TROTEC
User questions about TTK 140 S TROTEC
0 question about this device. Answer the ones you know or ask your own.
Ask a new question about this device
Download the instructions for your Humidifier in PDF format for free! Find your manual TTK 140 S - TROTEC and take your electronic device back in hand. On this page are published all the documents necessary for the use of your device. TTK 140 S by TROTEC.
USER MANUAL TTK 140 S TROTEC

https://hub.trotec.com/?id=42763
TTK 170 S

https://hub.trotec.com/?id=42764
TK 350 S

https://hub.trotec.com/?id=42765
TTK 650 S
https://hub.trotec.com/?id=42766
Sicherheit
STANDARD MODELS ARE NOT EQUIPED WITH ANY OF THE COUNTERS REPRESENTED IN THE DIAGRAMS!
Wiring diagram with full tank switch & pressure switch reseing the PCB
With the LED in JP12, the ambient temperature monitoring probe is not active and in this mode no delay for is set during startup
Hour counter just counting the compressor operation time (optional)
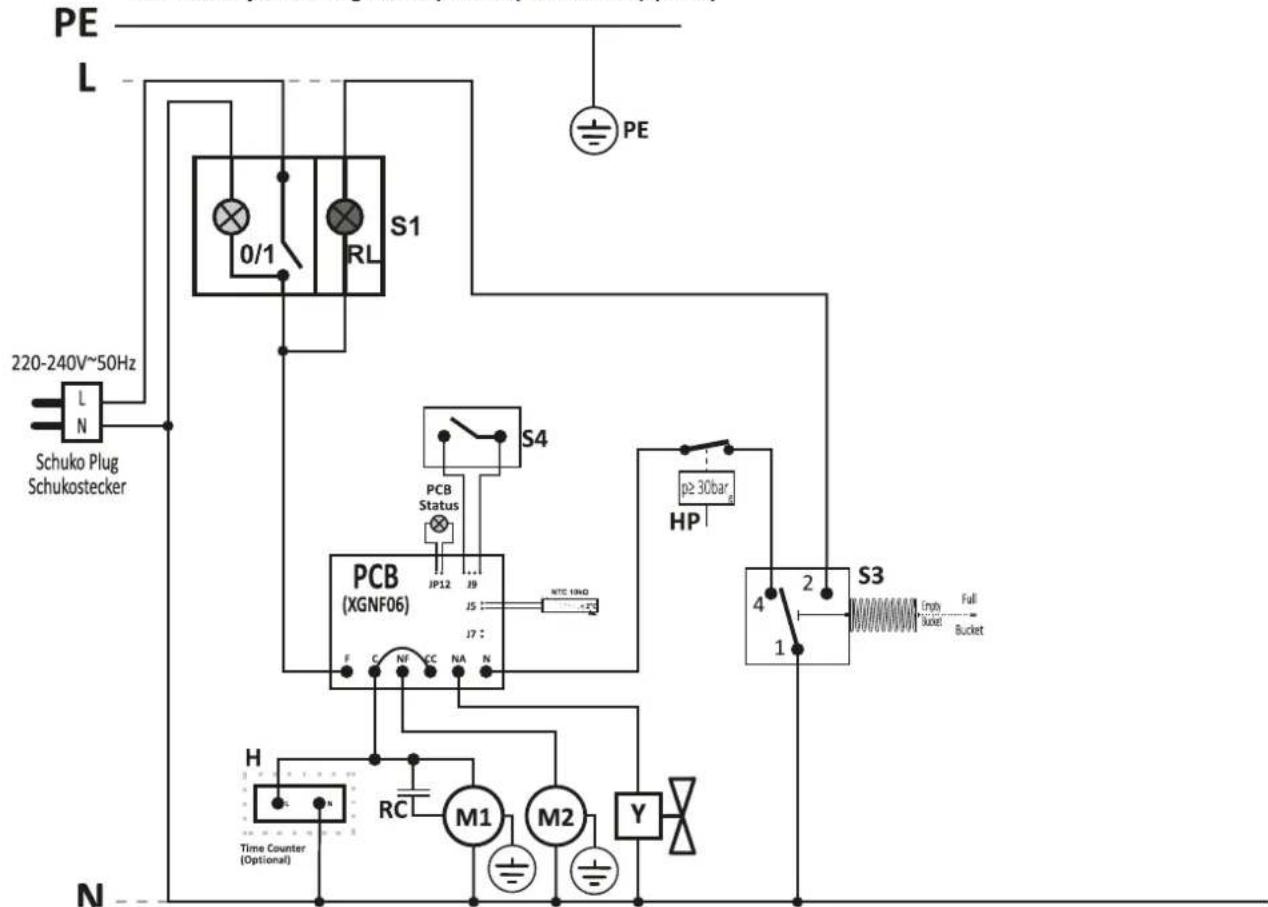
NOTE: Wiring is prepared to connect both Time Counter as well as Time & Energy Counter
STANDARD MODELS ARE NOT EQUIPED WITH ANY OF THE COUNTERS REPRESENTED IN THE DIAGRAMS!
Wiring diagram with full tank switch & pressure switch resetting the PCB
With the LED in JP12, the ambient temperature monitoring probe is not active and in this mode no delay for is set during startup
Counter counting energy and time downstream the main switch
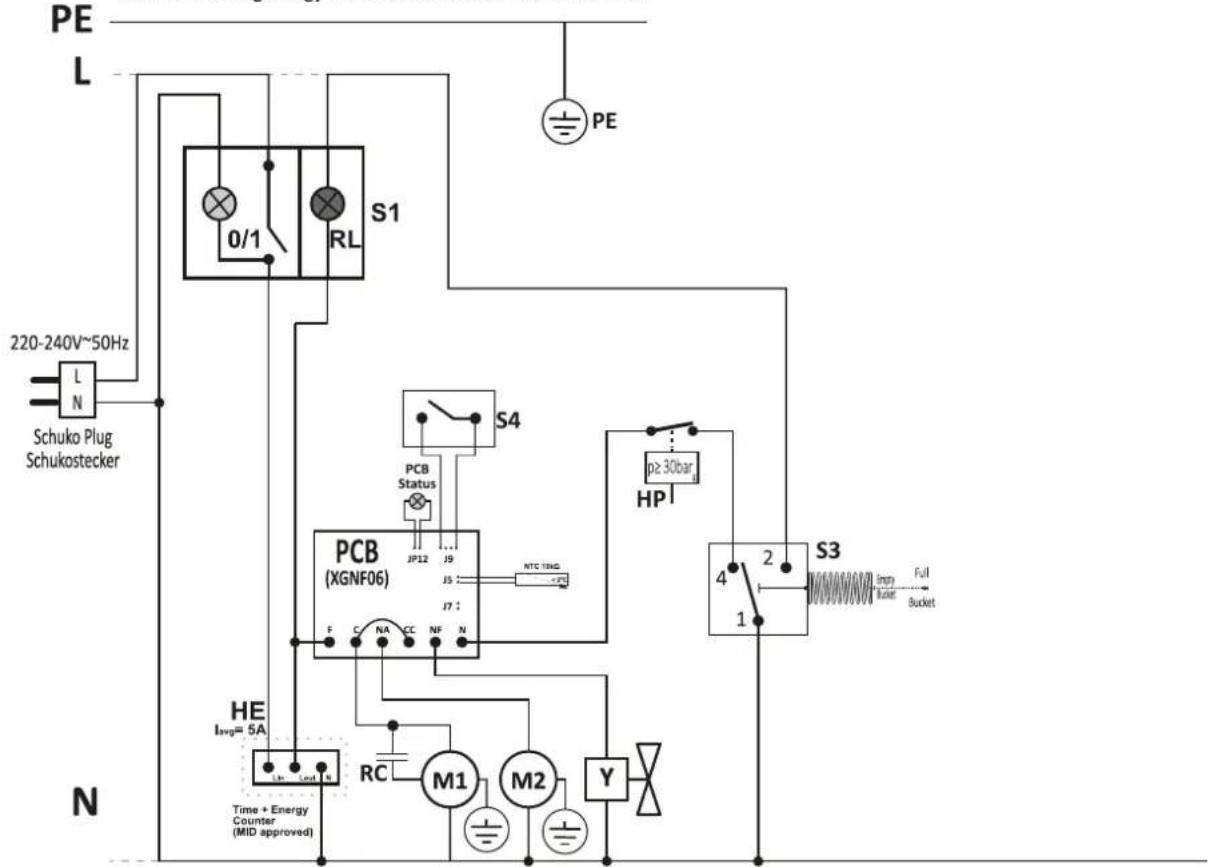
NOTE: Wiring is prepared to connect both Time Counter as well as Time & Energy Counter
STANDARD MODELS ARE NOT EQUIPED WITH ANY OF THE COUNTERS REPRESENTED IN THE DIAGRAMS!
Hour counter just counting the compressor operation time (optional)
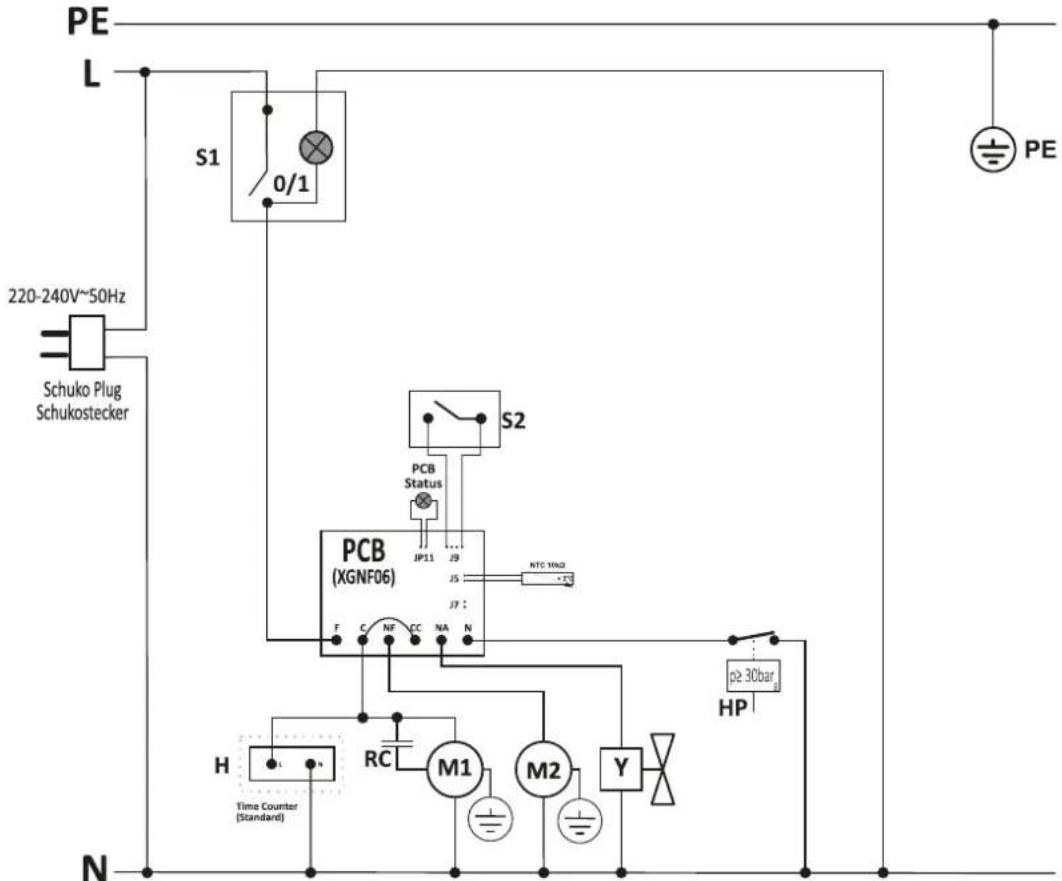
NOTE: Wiring is prepared to connect both Time Counter as well as Time & Energy Counter
STANDARD MODELS ARE NOT EQUIPED WITH ANY OF THE COUNTERS REPRESENTED IN THE DIAGRAMS!
Counter counting energy and time downstream the main switch (optional)
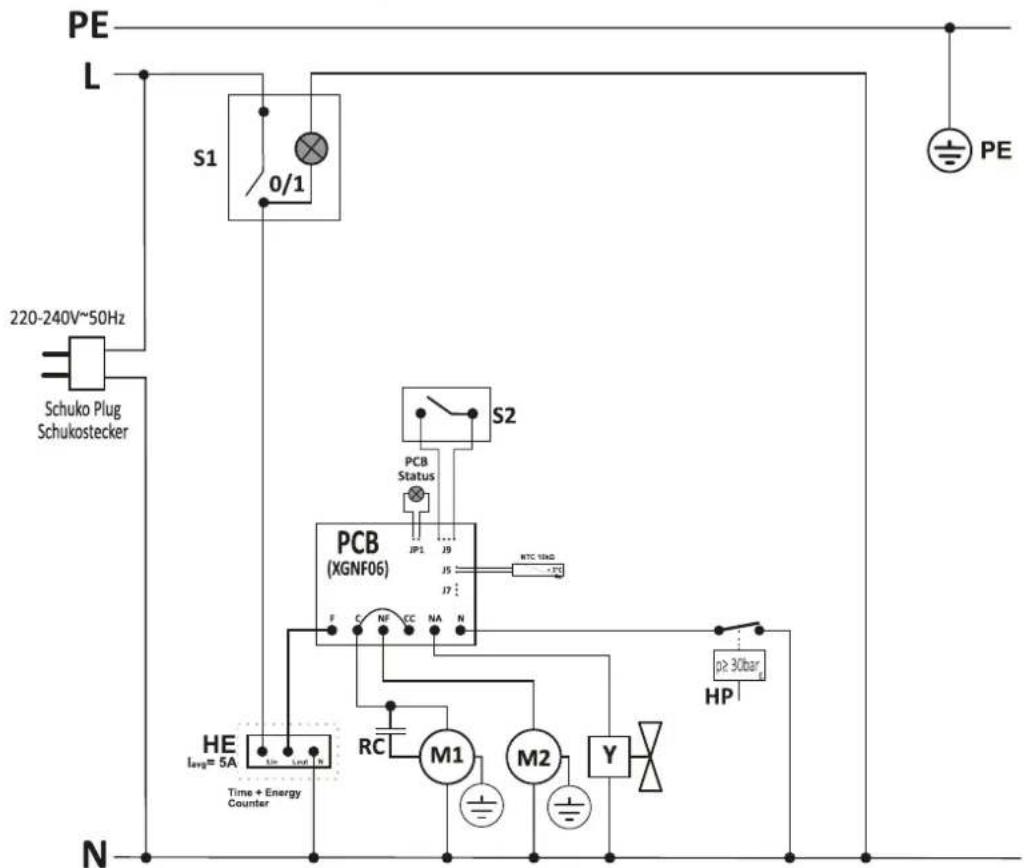
NOTE: Wiring is prepared to connect both Time Counter as well as Time & Energy Counter
Information on the use of these instructions.. B - 28
Safety B-29
Information about the device. B-32
Transport and storage. B-34
Assembly and start-up B-35
Operation B-36
Available accessories.. B-38
Errors and faults.. B-39
Maintenance B-40
Technical annex. B-44
Disposal B-52
EU Declaration of Conformity. B-53
Information on the use of these instructions
Symbols

Danger
This symbol indicates dangers to the life and health of persons due to extremely flammable gas.

Danger
This symbol indicates dangers to the life and health of persons due to flammable refrigerants.

Warning of electrical voltage
This symbol indicates dangers to the life and health of persons due to electrical voltage.

Warning
This signal word indicates a hazard with an average risk level which, if not avoided, can result in serious injury or death.

Caution
This signal word indicates a hazard with a low risk level which, if not avoided, can result in minor or moderate injury.
Notice
This signal word indicates important information (e.g. material damage), but does not indicate hazards.

Info
Information marked with this symbol helps you to carry out your tasks quickly and safely.

Follow the manual
Information marked with this symbol indicates that the instructions must be observed.
You can download the current version of these instructions via the following link:
TTK 140 S

https://hub.trotec.com/?id=42763
TTK 170 S

https://hub.trotec.com/?id=42764


https://hub.trotec.com/?id=42765
TTK 650 S

https://hub.trotec.com/?id=42766
Safety
Read this manual carefully before starting or using the device. Always store the manual in the immediate vicinity of the device or its site of use.

Warning
Read all safety warnings and all instructions.
Failure to follow the warnings and instructions may result in electric shock, fire and/or serious injury.
Save all warnings and instructions for future reference.
- In the scope of European normative requirements (EN 60335-1):
This appliance can be used by children aged from 8 years and above and persons with reduced physical, sensory or mental capabilities or lack of experience and knowledge if they have been given supervision or instruction concerning use of the appliance in a safe way and understand the hazards involved. Children shall not play with the appliance. Cleaning and user maintenance shall not be done by children without supervision. - In the scope of International normative requirements (IEC 60335-1):
This appliance is not intended for use by persons (including children) with reduced physical sensory or mental capabilities, or lack of experience and knowledge, unless they have been given supervision or instruction concerning use of the appliance by a person responsible for their safety. Children should be supervised to ensure that they do not play with the appliance. - Do not use the device in potentially explosive rooms or areas and do not install it there.
- Do not use the device in an aggressive atmosphere.
- Place the device in an upright and stable position on a horizontal and stable surface.
- Let the device dry out after a wet clean. Do not operate it when wet.
- Do not use the device with wet or damp hands.
- Do not expose the device to directly squirting water.
- Do not cover the device during operation.
- Do not sit on the device.
- This appliance is not a toy. Keep away from children and animals.
- Check the device occasionally during operation.
-
Check accessories and connection parts for possible damage prior to every use of the device. Do not use any defective devices or device parts.
-
Ensure that all electric cables outside of the device are protected from damage (e.g. caused by animals). Never use the device if electric cables or the power connection are damaged!
- The mains connection must correspond to the specifications in the Technical annex.
- Insert the mains plug into a properly fused mains socket.
- Observe the device's power input, cable length and intended use when selecting extensions to the power cable. Completely unroll extension cables. Avoid electrical overload.
- Do not under any circumstances use the device if you detect damages on the mains plug or power cable. If the supply cord is damaged, it must be replaced by a special cord or assembly available from the manufacturer or its service agent.
Defective power cables pose a serious health risk!
- Before carrying out maintenance, care or repair work on the device, remove the mains plug from the mains socket. Hold onto the mains plug while doing so.
- Switch the device off and disconnect the power cable from the mains socket when the device is not in use.
- When positioning the device, observe the minimum distances from walls and other objects as well as the storage and operating conditions specified in the Technical annex.
- Make sure that the air inlet and outlet are not obstructed.
- Make sure that the suction side is kept free of dirt and loose objects.
- Never insert any objects or limbs into the device.
- Do not remove any safety signs, stickers or labels from the device. Keep all safety signs, stickers and labels in legible condition.
- Only transport the device in an upright position with an emptied condensation tank/tray or drain hose.
- Discharge the collected condensate before transport and storage. Do not drink it. Health hazard!
- Only use original spare parts, for otherwise safe and functional operation cannot be ensured.

Safety warnings for devices containing flammable refrigerants
- Only position the device in rooms where potentially leaking refrigerant cannot accumulate. Unventilated rooms in which the device is installed, operated or stored must be built in a way to ensure that potentially leaking refrigerant cannot accumulate. This serves to avoid fire or explosion hazards resulting from an ignition of the refrigerant by an electric furnace, cooking stove or another ignition source.
- Only position the device in rooms where there is no source of ignition (e.g. open flames, an active gas appliance or an electric heater).
- Please note that the refrigerant is odourless.
- Only install the device in compliance with the national installation regulations.
- Please observe the local regulations.
- Observe the national regulations for gas installations.
- Only install, operate and store the device in a room measuring more than 4m2
- Store the device in a way that no mechanical damage can occur.
- Please note that the connected air ducts must not contain any sources of ignition.
- R290 is a refrigerant that complies with European environmental regulations. No part of the cooling circuit may be perforated.
- R454C comes with a low GWP factor (Global Warning Potential) of 148 and an ODP (ozone depletion potential) of 0.
- Observe the maximum refrigerant capacity in the technical data.
- Do not drill into or burn.
- Do not use any means other than those recommended by the manufacturer for accelerating the defrosting process.
- Every person working with or at the refrigerant circuit must be able to provide a certificate of qualification issued by a body accredited by the industry, demonstrating their competence in the safe use of refrigerants based on a procedure well-known in the industry.
- Service work may only be carried out in accordance with the manufacturer's specifications. If maintenance and repair work require the support of additional persons, the person trained in handling flammable refrigerants shall continuously supervise the work carried out.
- The entire refrigerant circuit is a maintenance-free, hermetically sealed system and may only be maintained or repaired by specialist companies for cooling and air-conditioning or by the manufacturer.
Intended use
Only use the device for drying and dehumidifying room air, while adhering to and following the technical data.
Intended use comprises:
- dehumidifying and drying:
building shells
premises e. g. after water damage (water damage restoration)
- maintaining the dryness of:
storage spaces, archives, laboratories, garages
- holiday homes
- changing rooms etc.
Any use other than the intended use is regarded as misuse.
Reasonably foreseeable misuse
- Do not place the device on wet or flooded ground, e.g. near floor drains.
- Do not use this device in immediate vicinity of swimming pools and showers.
- Do not place any objects, e.g. clothing, on the device.
- Do not use outdoors.
- Never immerse the device in water.
- Do not make any unauthorised modifications, alterations or structural changes to the device.
Personnel qualification
People who use this device must:
- be aware of the dangers that occur when working with electric devices in damp areas.
have read and understood the instructions, especially the Safety chapter.
Maintenance tasks which require the housing to be opened must only be carried out by specialist companies for cooling and air-conditioning or by the manufacturer.
Safety signs and labels on the device
Notice
Do not remove any safety signs, stickers or labels from the device. Keep all safety signs, stickers and labels in legible condition.
The following safety signs and labels are attached to the device:
TTK 140 S / TTK 170 S
WARNING · WARNING · ATTENTION
EN Appliance shall be installed, operated and stored in a room
with floor area larger than 4m2
EN Appliance shall be installed, operated and stored in a room with floor area larger than 4m2
This symbol indicates that the instructions must be observed.

Follow the repair manual
Disposal, maintenance and repair work of the refrigerant circuit may only be carried out in accordance with the manufacturer's specifications and by persons having a certificate of qualification. A corresponding repair manual is available from the manufacturer upon request.
Residual risks

Danger
Natural refrigerant propane (R290)!
H220 - Extremely flammable gas.
H280 - Contains gas under pressure; may explode if heated.
P210 - Keep away from heat, sparks, open flames and other ignition sources. No smoking.
P377 - Leaking gas fire: Do not extinguish, unless leak can be stopped safely.
P410+P403 - Protect from sunlight. Store in a well-ventilated place.

Danger
Refrigerant R454C!
H221 - Flammable gas.
H280 - Contains gas under pressure; may explode if heated.
P377 - Leaking gas fire; Do not extinguish, unless leak can be stopped safely.
P381 - Eliminate all ignition sources if safe to do so.
P410 and P403 - Protect from sunlight. Store in a well-ventilated place.

Warning of electrical voltage
Work on the electrical components must only be carried out by an authorised specialist company!

Warning of electrical voltage
Risk of electric shock!
Risk of an electric shock if the device comes into contact with water!
Do not use this device in the immediate vicinity of bathtubs, showers or swimming pools!

Warning of electrical voltage
Before any work on the device, remove the mains plug from the mains socket!
Do not touch the mains plug with wet or damp hands.
Hold onto the mains plug while pulling the power cable out of the mains socket.

Warning
Dangers can occur at the device when it is used by untrained people in an unprofessional or improper way! Observe the personnel qualifications!

Warning
The device is not a toy and does not belong in the hands of children.

Warning
Risk of suffocation!
Do not leave the packaging lying around. Children may use it as a dangerous toy.
Notice
Do not operate the device without an air filter inserted into the air inlet!
Without the air filter, the inside of the device will be heavily contaminated. This can reduce the performance and result in damage to the device.
Notice
When operated with condensation tank, make sure that the condensation tank is inserted correctly! If the condensation tank is removed or not installed correctly, the device cannot be switched on.
Behaviour in the event of an emergency
- Switch the device off.
- Disconnect the device from the mains by removing the mains plug from the socket. When doing so, be sure to hold the plug, not the cable.
- Do not reconnect a defective device to the mains.
Information about the device
Device description
The device uses the principle of condensation to automatically dehumidify rooms.
The fan sucks damp room air through the air inlet, the air filter, the evaporator and to the condenser located behind it. The air is cooled at the cold evaporator until it is below the dew point. Water vapour contained in the room air precipitates on the evaporator fins as condensation or rime. The dehumidified, cooled air is slightly warmed at the condenser and blown out again. The drier air thus conditioned mixes with the air in the room. The humidity in the room where the device is positioned is reduced as air constantly circulates through the device.
The condensation is fed from the device through the condensation drain hose connected to the hose connector into an external container or drain.
Optionally, the condensed water can also be discharged from the device by means of a retrofitted condensate pump (see chapter Installing the condensate pump).
For easy operation and transport, the device is fitted with an on / off switch, an operating hours counter, a transport handle and wheels. Two feet with rubber buffers prevent the device from rolling away.
The device can reduce the relative humidity of a room to approx. 32% . Due to the heat radiation generated during operation, the room temperature may rise by approx. 1 - 4°C
The device is protected against dripping water (IPX1).
Models
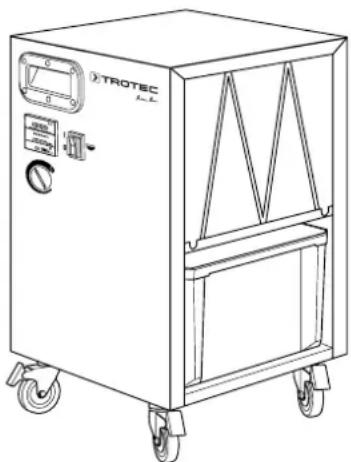
The TTK S series comprises the following devices:
TTK 140 S
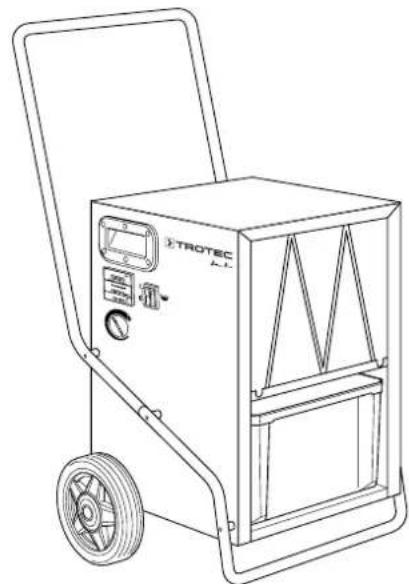
TTK 170 S / TTK 350 S

TTK 650 S
Notice
For simplification purposes the figures used in this documentation only depict one device, which can deviate from the actual version. The factual information content remains unaffected. If necessary in case of relevant differences the respective devices will be shown.
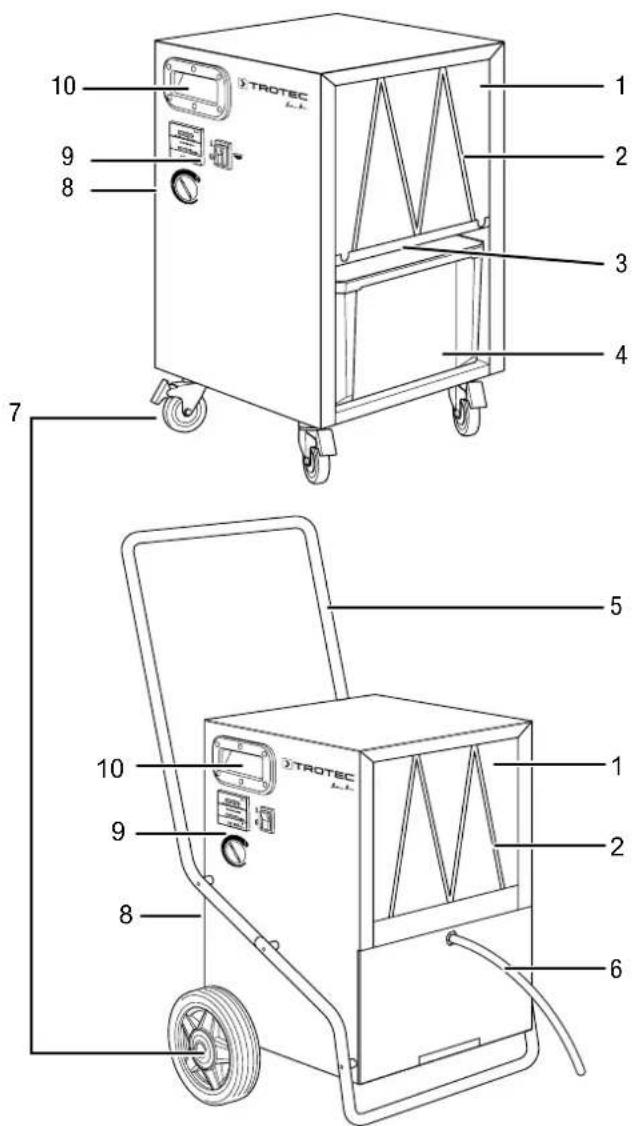
Device depiction
No. Designation
1 Air filter at air inlet
2 Fixing bar of the air filter
3 Hose connector for condensation drain hose
(TTK 140 S, TTK 170 S and TTK 350 S only)
4 Condensation tank
(TTK 140 S, TTK 170 S and TTK 350 S only)
5 Transport handle
(TTK 170 S, TTK 350 S and TTK 650 S only)
6 Condensation drain hose
(TTK 650 S only)
7 Castor (TTK 140 S)
Wheel (TTK 170 S / TTK 350 S / TTK 650 S)
8 Air outlet
9 Operating elements
10 Carrying handle
Transport and storage
Notice
If you store or transport the device improperly, the device may be damaged.
Note the information regarding transport and storage of the device.
Transport
Please note that additional transport regulations might apply to devices containing flammable refrigerants. The equipment's arrangement and the maximum number of components to be transported together can be gathered from the applicable transport regulations.
To make the device easier to transport, it is fitted with a transport handle and wheels.
Before transporting the device, observe the following:
- Set the on/off switch (11) to position 0 to switch the device off.
- Disconnect the device from the mains by removing the mains plug from the socket. When doing so, be sure to hold the plug, not the cable.
- Drain the remaining condensate from the device and the condensation drain hose (see chapter Maintenance).
- Do not use the power cable to drag the device.
- After unpacking the devices, mount the transport handle as described in the chapter Assembly and installation.
- Only wheel the device on firm and level surfaces.
After transporting the device, proceed as follows:
- Set up the device in an upright position after transport.
- Lock the castors of the TTK 140 S.
Storage
Before storing the device, observe the following:
- Drain the remaining condensate from the device and the condensation drain hose (see chapter Maintenance).
- Disconnect the device from the mains by removing the mains plug from the socket. When doing so, be sure to hold the plug, not the cable.
- Drain any possibly remaining condensate.
When the device is not being used, observe the following storage conditions:
- Only store the device in a room measuring more than 4m2
- Only position the device in rooms where there is no source of ignition (e.g. open flames, an active gas appliance or an electric heater).
- Store the device in a dry location and protected from frost and heat.
- Store the device in an upright position where it is protected from dust and direct sunlight.
- If required, use a cover to protect the device from invasive dust.
- Place no further devices or objects on top of the device to prevent it from being damaged.
Assembly and start-up
Scope of delivery
- 1 x Device
- 1 x Transport handle (TTK 170 S / TTK 350 S / TTK 650 S)
- 1 x Condensation drain hose, 19 mm diameter
- 1 x Air filter
- 1 x Hose adapter
- 1 x Manual
Unpacking the device
- Open the cardboard box and take the device out.
- Completely remove the packaging.
- Fully unwind the power cable. Make sure that the power cable is not damaged and that you do not damage it during unwinding.
Assembly
Use tools suitable for the intended task.
Mounting the transport handle
(TTK 170 S / TTK 350 S / TTK 650 S)
Prior to initial start-up, the transport handle must be attached to the device. To do so, please proceed as follows:

Info
After unpacking the device, the two lower screws must be unscrewed and the transport handle remounted using only one screw (i.e. one screw remains).
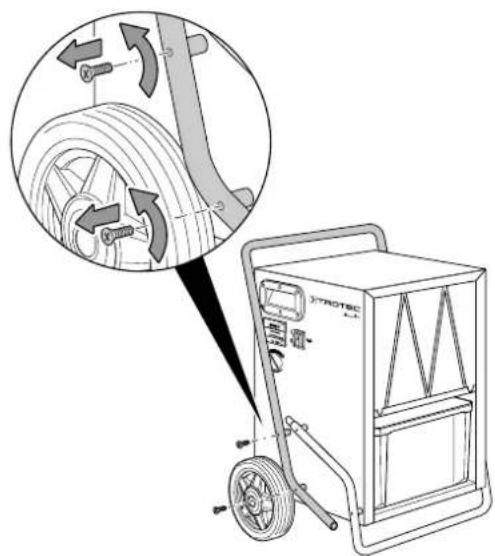
A.
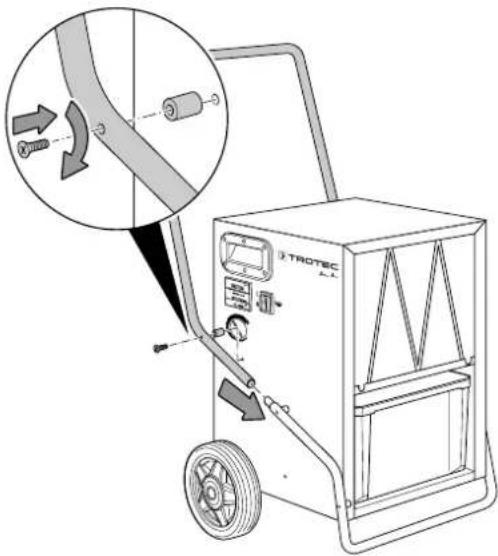
B.
Start-up
When positioning the device, observe the minimum distance from walls or other objects as described in the chapter Technical annex.
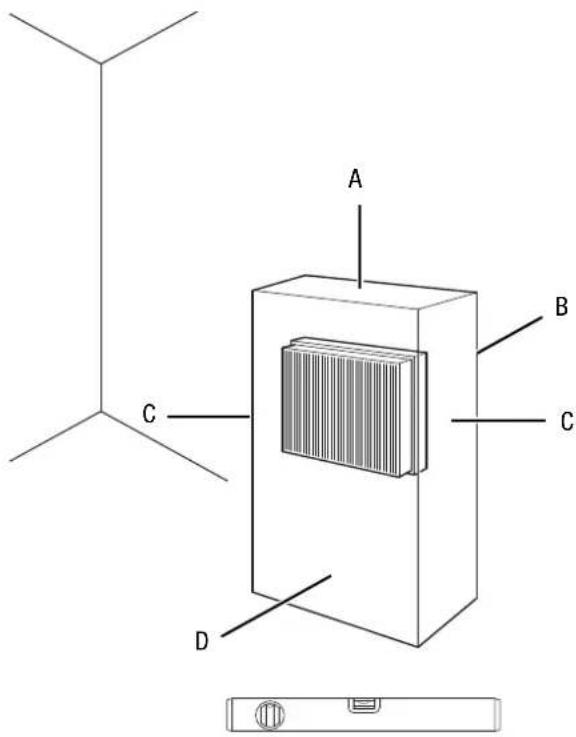
- Before restarting the device, check the condition of the power cable. If there are doubts as to the sound condition, contact the customer service.
- Only position the device in rooms where potentially leaking refrigerant cannot accumulate.
-
Only position the device in rooms where there is no source of ignition (e.g. open flames, an active gas appliance or an electric heater).
-
Place the device in an upright and stable position on a horizontal and stable surface.
- Do not create tripping hazards when laying the power cable or other electric cables, especially when positioning the device in the middle of the room. Use cable bridges.
- Make sure that extension cables are completely unrolled.
- When positioning the device, keep a sufficient distance to heat sources.
- Make sure that no curtains or other objects interfere with the air flow.
- When positioning the device, secure the device locally with an RCD (Residual Current Device) which complies with the appropriate regulations.
Inserting the air filter
Notice
Do not operate the device without an air filter inserted into the air inlet!
Without the air filter, the inside of the device will be heavily contaminated. This can reduce the performance and result in damage to the device.
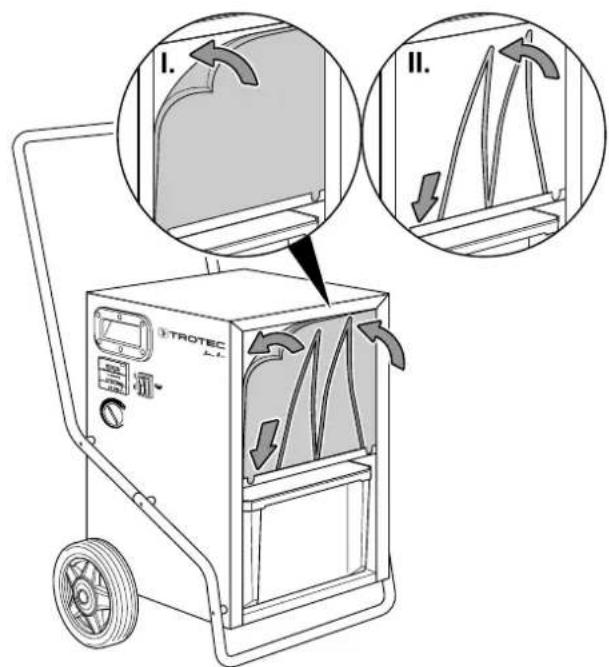
Connecting the power cable
- Insert the mains plug into a properly secured mains socket.
Operation
Operating elements
TTK 140/170/350 S
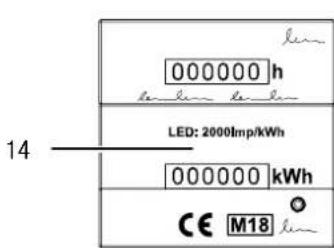

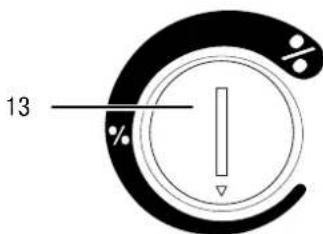
TTK 650 S
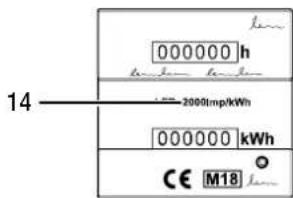
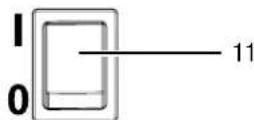
| No. | Designation Meaning | |
| 11 | On/off switch Switching the | device on and off; Is illuminated when the device is switched on |
| 12 | Condensation tank indicator light (TTK 140 S, TTK 170 S and TTK 350 S only) | Illuminated when the condensation tank is full. |
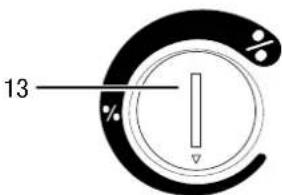
| 13 | Rotary switch Selection of relative room humidity Min: minimum drying level Max: maximum drying level | |
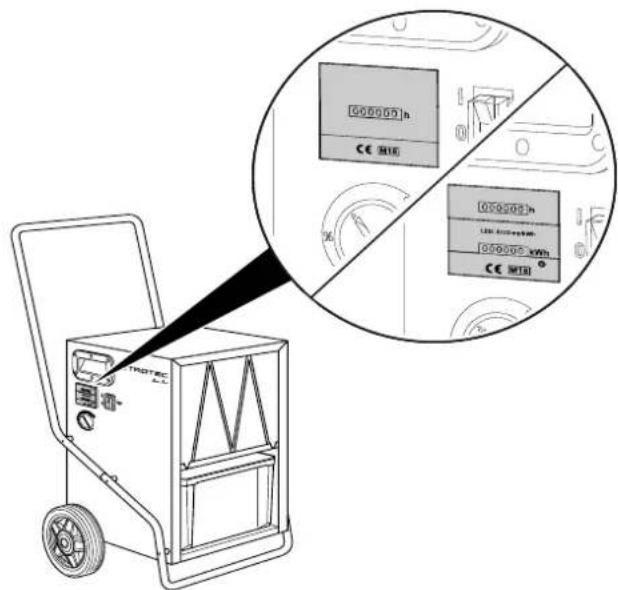
| 14 | Counter Indication of operating hours or indication of operating hours and power consumption (optional) | |
Operating hours/ power consumption counter
The device is also available with a simple operating hours counter or with a combined operating hours and power consumption counter (optional, see fig.). Contact your Trotec customer service.
Switching the device on
Once you have completely installed the device as described in the chapter Assembly and start-up, you can switch it on.
- Carry out the following inspections prior to switch-on:
The following only applies to TTK 140 S, TTK 170 S and TTK 350 S:
Ensure that the condensation tank is empty and inserted correctly.
The following only applies to the TTK 650 S:
Ensure that the condensation drain hose has been laid and mounted properly.
- Insert the mains plug into a properly secured mains socket.
- Set the on/off switch (11) to I to switch the device on.
- Ensure that the on/off switch (11) is lit.
- The following only applies to TTK 140 S, TTK 170 S and TTK 350 S:
Check whether the condensation tank indicator light (12) is out. Otherwise, empty the condensation tank.
- Adjust the relative room humidity level with the rotary switch (13).
Continuous operation mode
In continuous operation mode, the device dehumidifies the air constantly, regardless of the humidity. To start continuous operation mode, set the rotary switch (13) to the Max position.
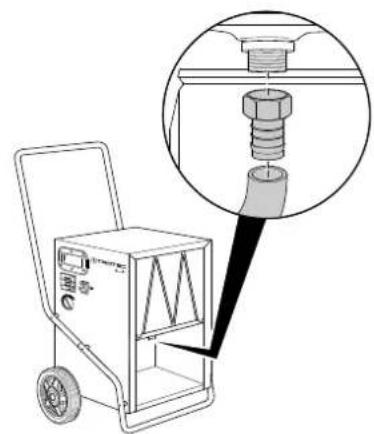
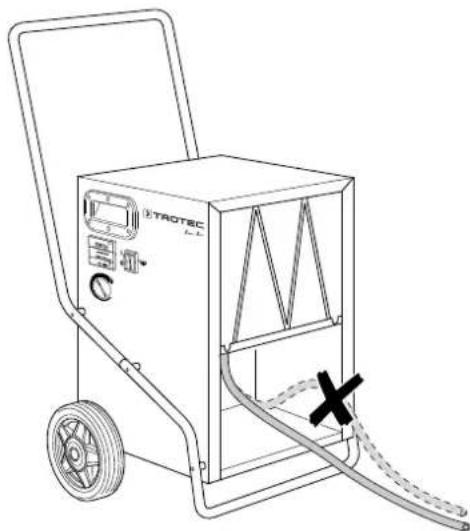
Connecting the condensation drain hose (TTK 140 S / TTK 170 S / TTK 350 S)
For continuous operation or unattended dehumidification, please connect a suitable condensation drain hose to the device.
1.
2.
Connecting the condensation drain hose (TTK 650 S)
For continuous operation or unattended dehumidification, please connect a suitable condensation drain hose to the device.
1.
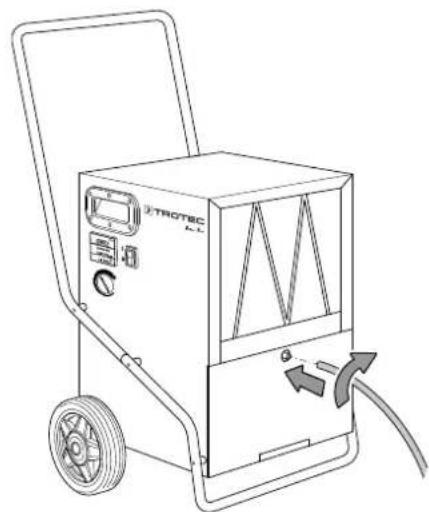
2.
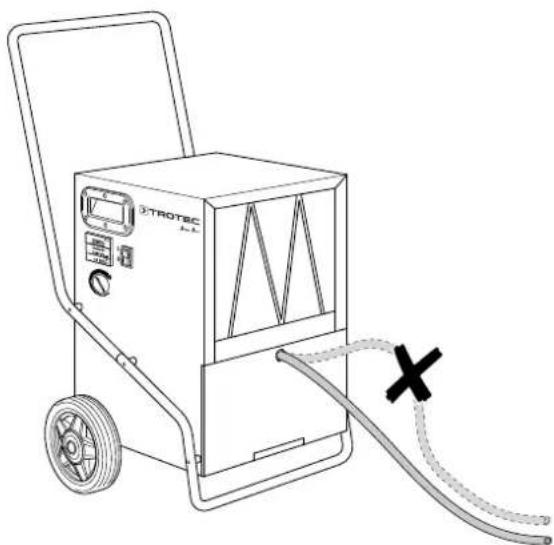
Automatic defrosting
If the room temperature is below 11°C , the evaporator will freeze during dehumidification. The device will then perform automatic defrosting. The duration of defrosting can vary.
- Do not switch off the device during automatic defrosting.
- Do not remove the mains plug from the mains socket.
Operation with condensate pump (optional)
Notice
The connection for the hose adapter is located in the inside of the device.
Optionally, the condensed water can also be discharged from the device by means of a retrofitted condensate pump (see chapter Available accessories). With a pump performance of up to 50m and a maximum pump height of 4m , the condensate can even be continuously discharged across storeys of a building.
Shutdown

Warning of electrical voltage
Do not touch the mains plug with wet or damp hands.
- Set the on/off switch (11) to position 0 to switch the device off.
- Disconnect the device from the mains by removing the mains plug from the socket. When doing so, be sure to hold the plug, not the cable.
- Empty the condensation tank, if need be.
- If required, clean the device according to the "Maintenance" chapter.
- Store the device according to the Transport and storage chapter.
Available accessories

Warning
Only use accessories and additional equipment specified in the instructions.
Using insertion tools or accessories other than those specified in the instructions may cause a risk of injury.
| Designation Article number | |
| Air filter TTK 140 S 7.710.000.332 | |
| Air filter TTK 170 S 7.710.000.332 | |
| Air filter TTK 350 S 7.710.000.334 | |
| Air filter TTK 650 S 7.710.000.335 | |
| Condensate pump 6.100.003.020 |
Errors and faults
The device has been checked for proper functioning several times during production. If malfunctions occur nonetheless, check the device according to the following list.
Notice
Wait for at least 3 minutes after maintenance and repair work. Only then switch the device back on.
The device does not start:
- Check the power connection.
- Check the power cable and mains plug for damage.
- Check the on-site fusing.
- Check the filling level of the condensation tank and empty it if necessary. The condensation tank indicator light (12) must not light up.
The device is running, but there is no formation of condensate:
- When using the condensate pump: Check the condensation tank and hoses for dirt.
- Ensure that the relative room humidity complies with the technical data.
- Check the air filter for dirt. If necessary, clean or replace the air filter.
- The device might carry out an automatic defrost. During automatic defrost, the device does not dehumidify.
The device is loud or vibrates:
- Check whether the device is set up in a stable and upright position.
Condensate is leaking:
- Check the device for leaks.
The compressor does not start:
- Check the room temperature. Observe the device's permissible operating range according to the technical data.
- Check whether the overheating protection of the compressor has tripped. Disconnect the device from the mains and let it cool down for approx. 10 minutes before reconnecting it.
- The device might carry out an automatic defrost. During automatic defrost, the device does not dehumidify.
The device gets very warm, is loud or is losing power:
- Check the air inlet and air filter for dirt. Remove external dirt.
- From the outside, check the device for dirt (see chapter Maintenance). If the inside of the device is dirty, have it cleaned by a specialist company for cooling and air-conditioning or by the manufacturer.
The device still does not operate correctly after these checks:
Please contact the customer service. If necessary, bring the device to a specialist company for cooling and air-conditioning or to the manufacturer for repair.
Maintenance
Maintenance intervals
Maintenance and care log
| Maintenance and care interval before every start-up | as needed at least every 2 weeks | at least every 4 weeks | at least every 6 months | at least annually |
| Check the air inlets and outlets for dirt and foreign objects and clean if necessary | ||||
| Clean the exterior | X | |||
| Visually check the inside of the device for dirt | X | |||
| Check the air filter for dirt and foreign objects and clean or replace if necessary | X | X | ||
| Replace the air filter | X | |||
| Check for damage | X | |||
| Check the attachment screws | X | |||
| Test run | ||||
| Empty the condensation tank and/ or drain hose | X |
Device type: Device number:
| Maintenance and care interval | 1 2 3 4 5 6 | 7 8 9 10 | 11 12 | 13 14 | 15 16 | ||||||||||
| Check air inlets and outlets for dirt and foreign objects and clean if necessary | |||||||||||||||
| Clean the exterior | |||||||||||||||
| Visually check the inside of the device for dirt | |||||||||||||||
| Check the air filter for dirt and foreign objects and clean or replace if necessary | |||||||||||||||
| Replace the air filter | |||||||||||||||
| Check for damage | |||||||||||||||
| Check the attachment screws | |||||||||||||||
| Test run | |||||||||||||||
| Empty the condensation tank and/ or drain hose | |||||||||||||||
| Comments | |||||||||||||||
| 1. Date: Signature: | 2. Date: Signature: | 3. Date: Signature: | 4. Date: Signature: |
| 5. Date: Signature: | 6. Date: Signature: | 7. Date: Signature: | 8. Date: Signature: |
| 9. Date: Signature: | 10. Date: Signature: | 11. Date: Signature: | 12. Date: Signature: |
| 13. Date: Signature: | 14. Date: Signature: | 15. Date: Signature: | 16. Date: Signature: |
Activities required before starting maintenance

Warning of electrical voltage
Do not touch the mains plug with wet or damp hands.
- Set the on/off switch (11) to position 0 to switch the device off.
- Disconnect the device from the mains by removing the mains plug from the socket. When doing so, be sure to hold the plug, not the cable.

Warning of electrical voltage
Tasks which require the device to be opened must only be carried out by authorised specialist companies or by the manufacturer.
Running capacitor
Notice
Replace the running capacitor after 10,000 operating hours!
Refrigerant circuit
TTK 140 S / TTK 170 S

Danger
Natural refrigerant propane (R290)!
H220 - Extremely flammable gas.
H280 - Contains gas under pressure; may explode if heated.
P210 - Keep away from heat, sparks, open flames and other ignition sources. No smoking.
P377 - Leaking gas fire: Do not extinguish, unless leak can be stopped safely.
P410+P403 - Protect from sunlight. Store in a well-ventilated place.
TTK 350 S / TTK 650 S

Danger
Refrigerant R454C!
H221 - Flammable gas.
H280 - Contains gas under pressure; may explode if heated.
P377 - Leaking gas fire; Do not extinguish, unless leak can be stopped safely.
P381 - Eliminate all ignition sources if safe to do so.
P410 and P403 - Protect from sunlight. Store in a well-ventilated place.
- The entire refrigerant circuit is a maintenance-free, hermetically sealed system and may only be maintained or repaired by specialist companies for cooling and air-conditioning or by the manufacturer.
Safety signs and labels on the device
Check the safety signs and labels attached to the device at regular intervals. Replace illegible safety signs!
Cleaning the housing
Clean the housing with a soft, damp and lint-free cloth. Make sure that no moisture enters the housing. Protect electrical components from moisture. Do not use any aggressive cleaning agents such as cleaning sprays, solvents, alcohol-based or abrasive cleaners to dampen the cloth.
Visual inspection of the inside of the device for dirt
- Remove the air filter.
- Use a torch to illuminate the openings of the device.
- Check the inside of the device for dirt.
- If you see a thick layer of dust, have the inside of the device cleaned by a specialist company for cooling and air-conditioning or by the manufacturer.
- Put the air filter back in.
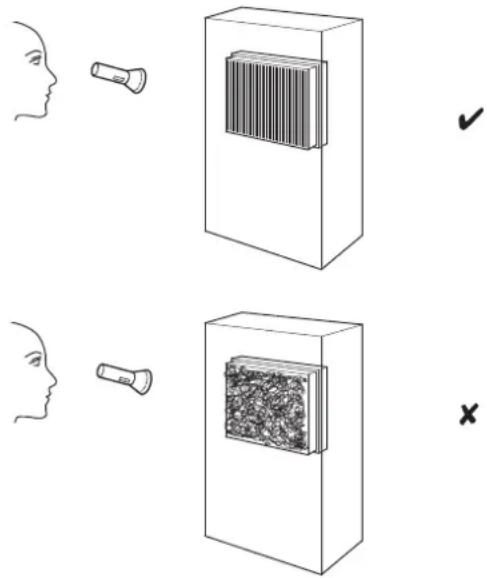
Cleaning the air filter
Notice
Ensure that the air filter is not worn or damaged. The corners and edges of the air filter must not be deformed or rounded. Before reinserting the air filter, make sure that it is undamaged and dry!
The air filter has to be cleaned as soon as it is dirty. This is brought to light e.g. by a reduced capacity (see chapter Errors and faults).
- Remove the air filter from the device.
- Clean the filter using a slightly damp, soft, lint-free cloth. If the air filter is heavily contaminated, clean it with warm water mixed with a neutral cleaning agent.
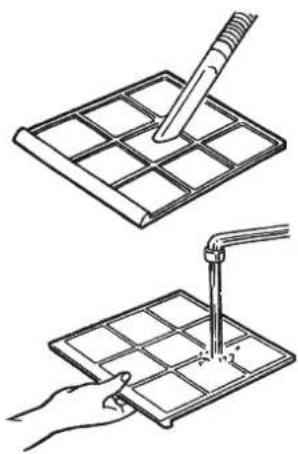
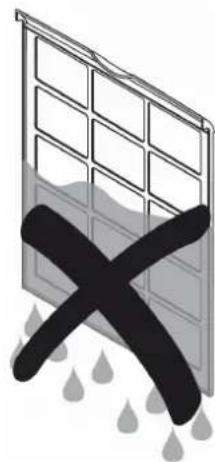
- Allow the filter to dry completely. Do not insert a wet filter into the device!
- Reinsert the air filter into the device.
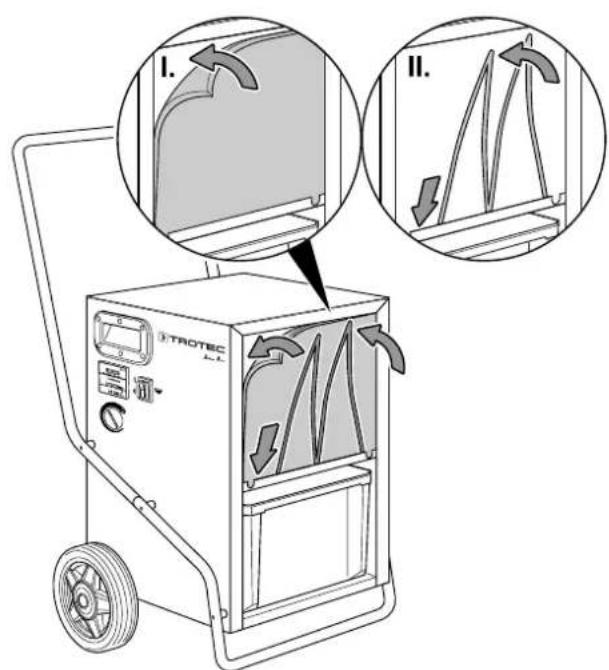
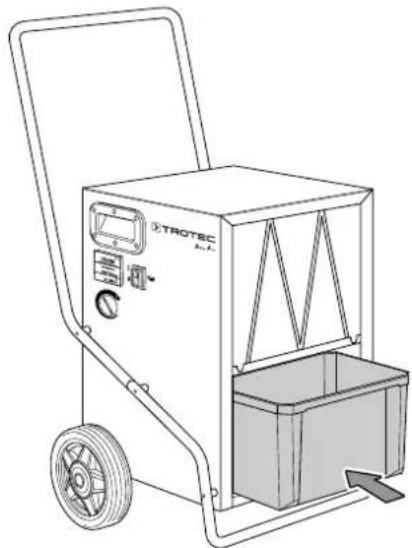
Emptying the condensation tank
(TTK 140 S / TTK 170 S / TTK 350 S)

Info
The compressor always starts with a delay. This protects the compressor and thus increases its lifetime. If you remove the condensation tank from the device and reinsert it after emptying, the compressor will switch back on with a delay of approx. 20 seconds. This delay is also enabled in optional hygrostat operation. If the room humidity exceeds the setting of the selection switch, the compressor will only switch back on after a delay. Depending on the compressor, the fan keeps running. If the condensation tank is removed, the device does not switch off.
- Set the on/off switch (11) to position 0 to switch the device off.
- Remove the condensation tank.
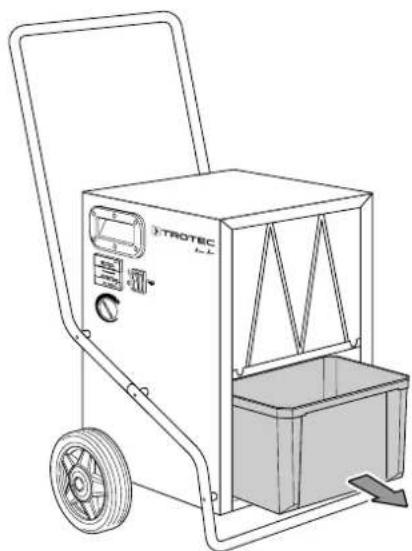
- Empty the condensation tank.
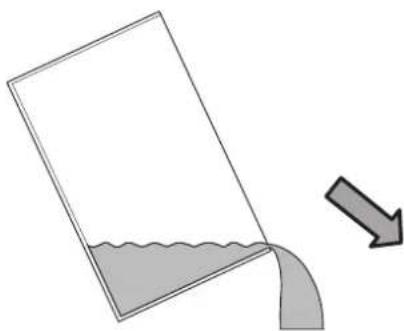
- Push the condensation tank back into the device.
If the condensation tank is full, the condensation tank indicator light (12) will be illuminated. The compressor and fan will switch off.
Activities required after maintenance
If you want to continue using the device:
- Reconnect the device to the mains.
If you do not intend to use the device for a considerable time: - Store the device according to the Transport and storage chapter.
Technical annex
Technical data
| Parameter Value | ||||
| Model TTK 140 S TTK 170 S TTK 350 S TTK 650 S | ||||
| Dehumidification performance @ 30 °C / 80 % RH | 28.5 l / 24 h 35.5 l / 24 h | 63.5 l / 24 h 88 l / 24 h | ||
| Operating range (temperature) | 5 °C – 32 °C 5 °C – 32 °C | 5 °C – 32 °C 5 °C – 32 °C | ||
| Operating range (relative humidity) | 30 % – 90 % RH 30 % – 90 % RH 30 % – 90 % RH | 30 % – 90 % RH | ||
| Max. permissible pressure | 3.0 MPa 3.0 MPa 3.0 MPa | 3.0 MPa | ||
| Suction side pressure 0.6 | MPa 0.6 MPa 0.6 MPa 0.6 | MPa | ||
| Discharge side pressure 1 | 9 MPa 2.1 MPa 2.2 MPa 2.8 MPa | 8 MPa | ||
| Air volume flow 580 m | 3/h 580 m | 3/h 490 m | 3/h 925 m | 3/h |
| Mains connection 220–240 V / 50 Hz 220–240 V / 50 Hz 220–240 V / ~ 50 Hz | 220–240 V / ~ 50 Hz | 220-240 V / ~ 50 Hz | ||
| Max. power consumption | 0.6 kW 0.6 kW 1.4 kW 2.1 kW | 146 | 146 | |
| Nominal current | 2.7 A | 2.8 A | 6.1 A | 9.5 A |
| Type of protection | IPX1 | IPX1 | IPX1 | IPX1 |
| Water tank capacity | 6 l | 6 l | 6 l | - |
| Refrigerant | R290 (propane) | R290 (propane) | R454C (F-Gas) | R454C (F-Gas) |
| Amount of refrigerant | 150 g | 150 g | 650 g | 1050 g |
| GWP factor 3 | 3 | 146 | 146 | |
| CO2equivalent | 0.00045 t | 0.00045 t | 0.09490 t | 0.15 t |
| Sound pressure level LpA (1 m; complies with DIN 45635-01-KL3) | 52 dB(A) | 52 dB(A) | 54 dB(A) | 56 dB(A) |
| Dimensions (length x width x height) | 400 x 400 x 605 mm | 540 x 490 x 963 mm | 530 x 500 x 965 mm | 616 x 511 x 1022 mm |
| Minimum distance to walls or other objects top (A): | 50 cm | 50 cm | 50 cm | 50 cm |
| rear (B): | 50 cm | 50 cm | 50 cm | 50 cm |
| sides (C): | 50 cm | 50 cm | 50 cm | 50 cm |
| front (D): | 50 cm | 50 cm | 50 cm | 50 cm |
| Weight | 27.5 kg | 32 kg | 39 kg | 52 kg |
Wiring diagram
TTK 140 S / TTK 170 S / TTK 350 S
Operating hours counter
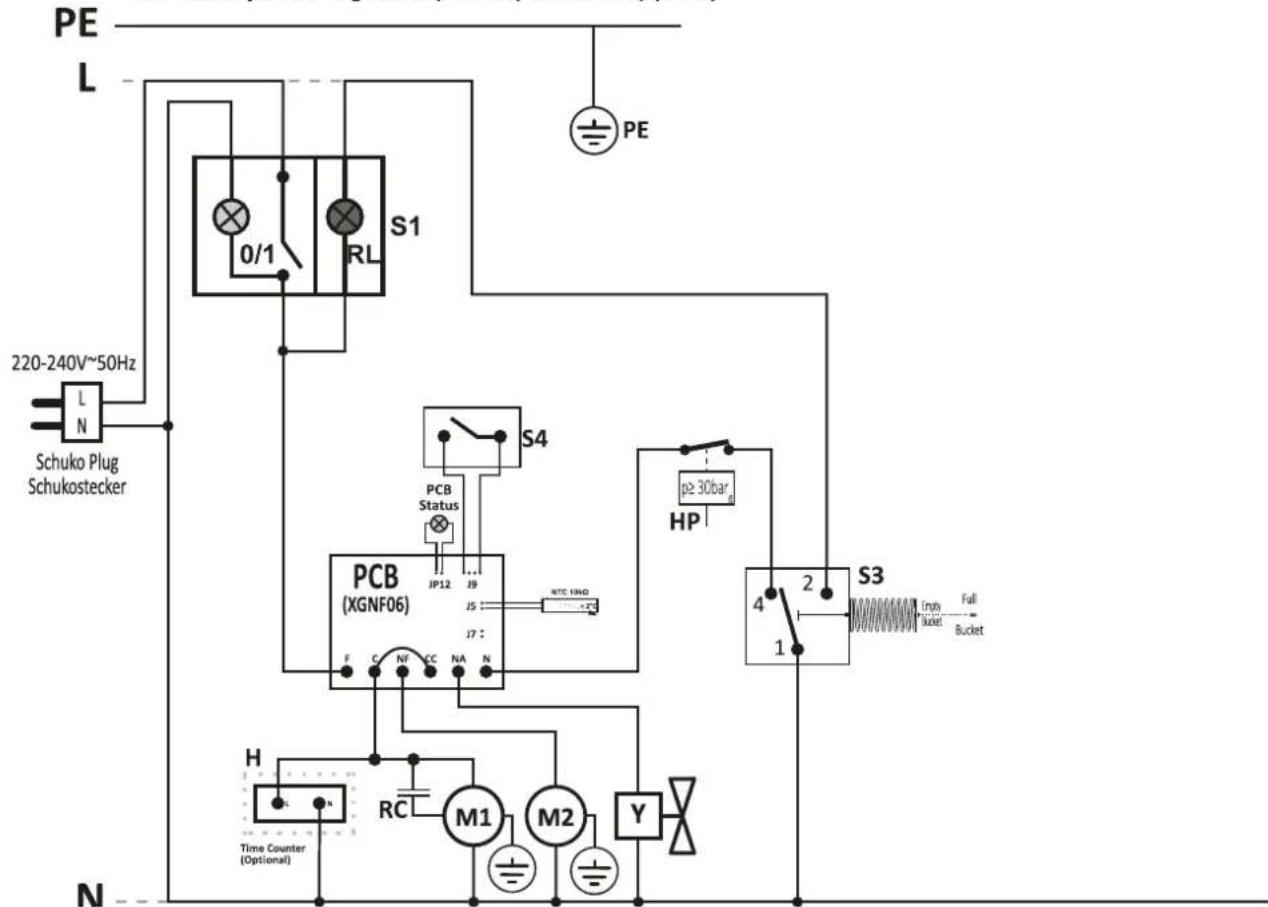
STANDARD MODELS ARE NOT EQUIPED WITH ANY OF THE COUNTERS REPRESENTED IN THE DIAGRAMS!
Wiring diagram with full tank switch & pressure switch reseing the PCB
With the LED in JP12, the ambient temperature monitoring probe is not active and in this mode no delay for is set during startup
Hour counter just counting the compressor operation time (optional)
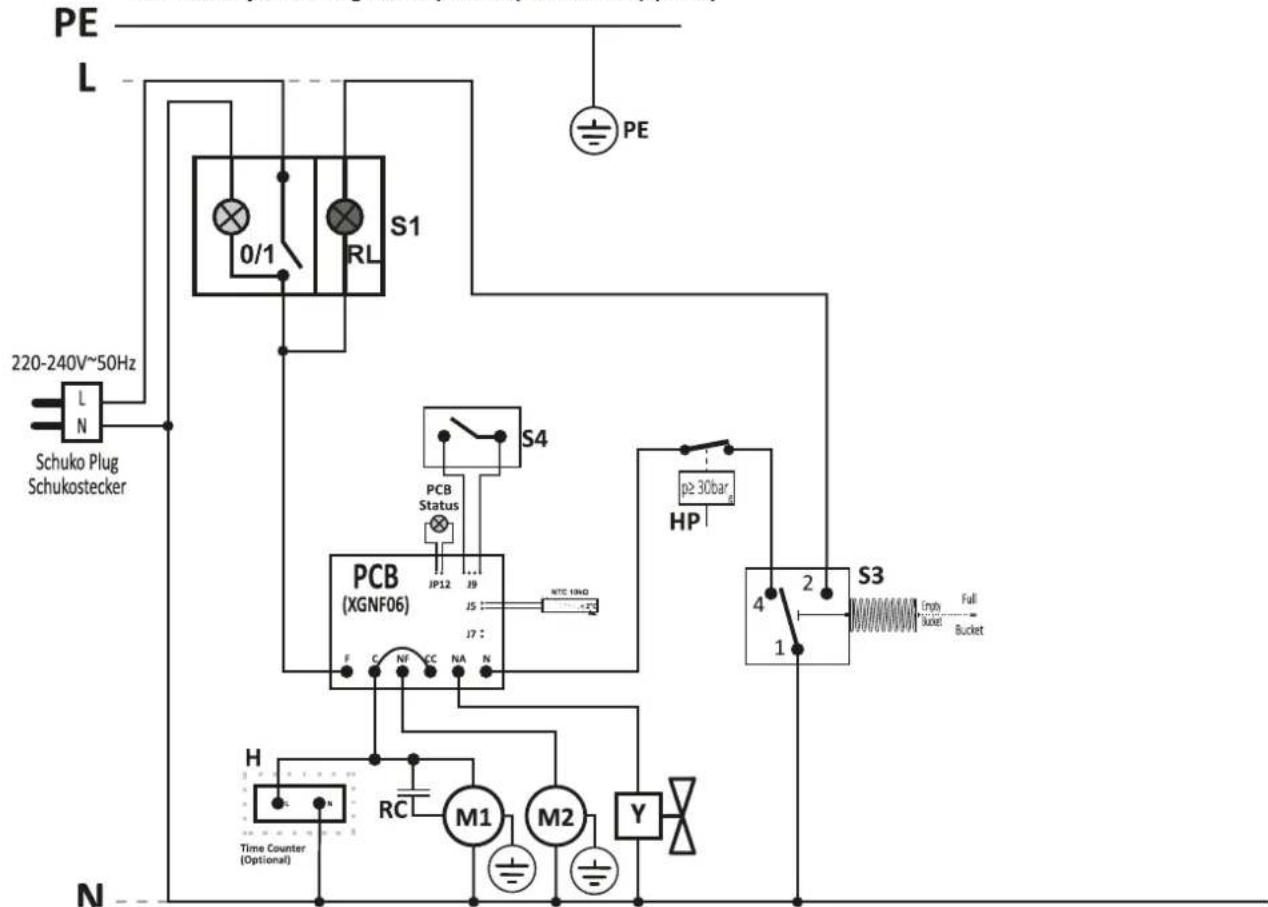
NOTE: Wiring is prepared to connect both Time Counter as well as Time & Energy Counter
| PE – Protective earth conductor M1 – Compressor | |
| N – Common Line M2 – Fan motor | |
| L – Line Y – Two way valve | |
| S1 – On-Off switch RC – Running Capacitor | |
| S3 - Micro switch (tank full) H – Operating hours counter (optional) | |
| S4 – Hygrostat HP – High pressure switch | |
| RL – Red lamp (tank full) | |
Operating hours counter with MID counter
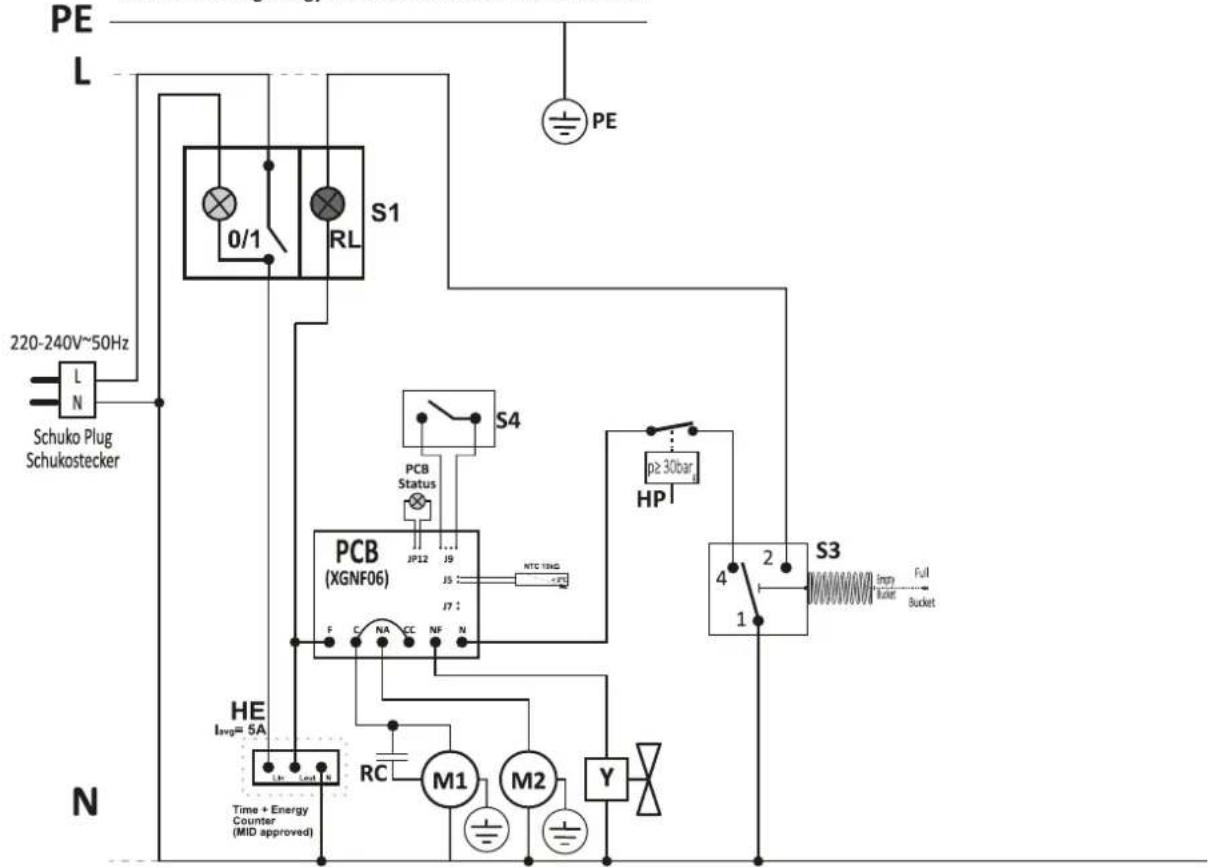
STANDARD MODELS ARE NOT EQUIPED WITH ANY OF THE COUNTERS REPRESENTED IN THE DIAGRAMS!
Wiring diagram with full tank switch & pressure switch resetting the PCB
With the LED in JP12, the ambient temperature monitoring probe is not active and in this mode no delay for is set during startup
Counter counting energy and time downstream the main switch
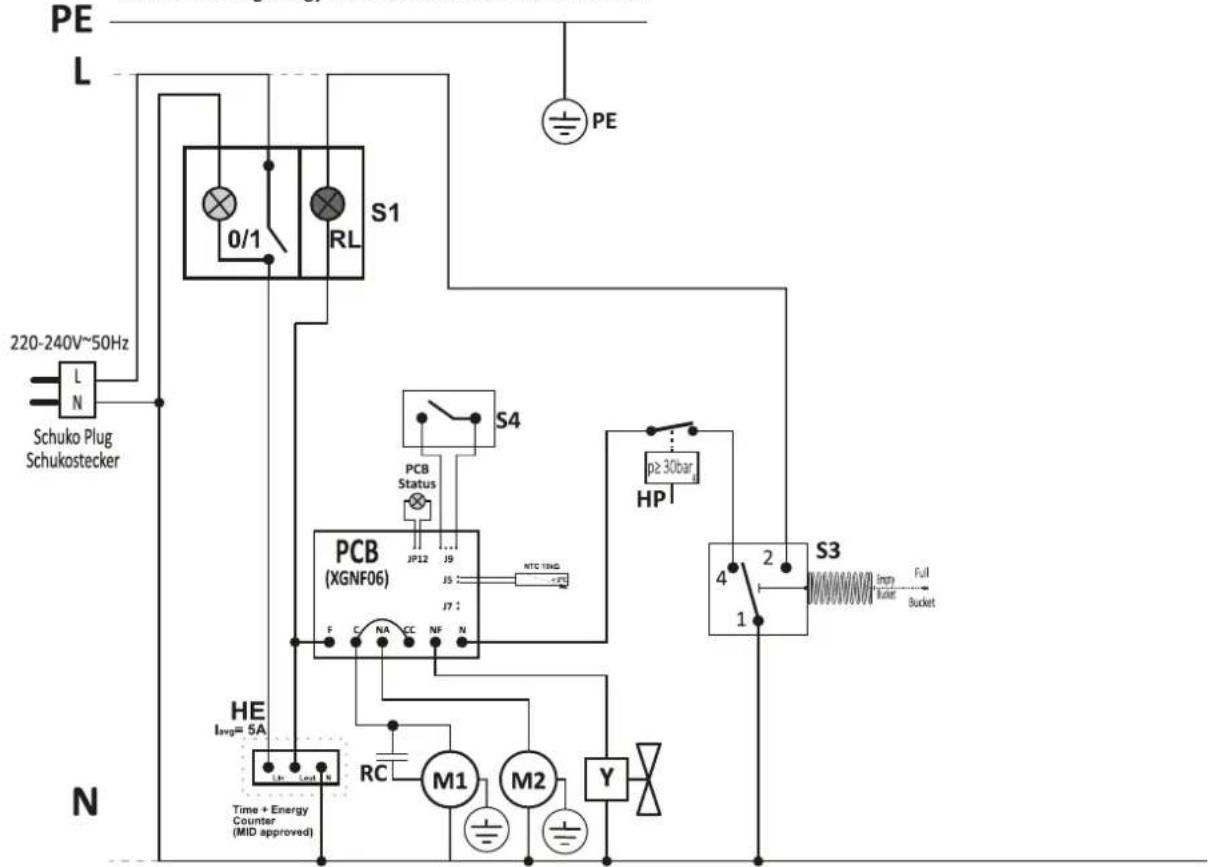
NOTE: Wiring is prepared to connect both Time Counter as well as Time & Energy Counter
| PE – Protective earth conductor M1 – Compressor | |
| N – Common Line M2 – Fan motor | |
| L – Line Y – Two way valve | |
| S1 – On-Off switch RC – Running Capacitor | |
| S3 - Micro switch (tank full) HE – Time + energy counter (optional) | |
| S4 – Hygrostat HP – High pressure switch | |
| RL – Red lamp (tank full) |
TTK 650 S
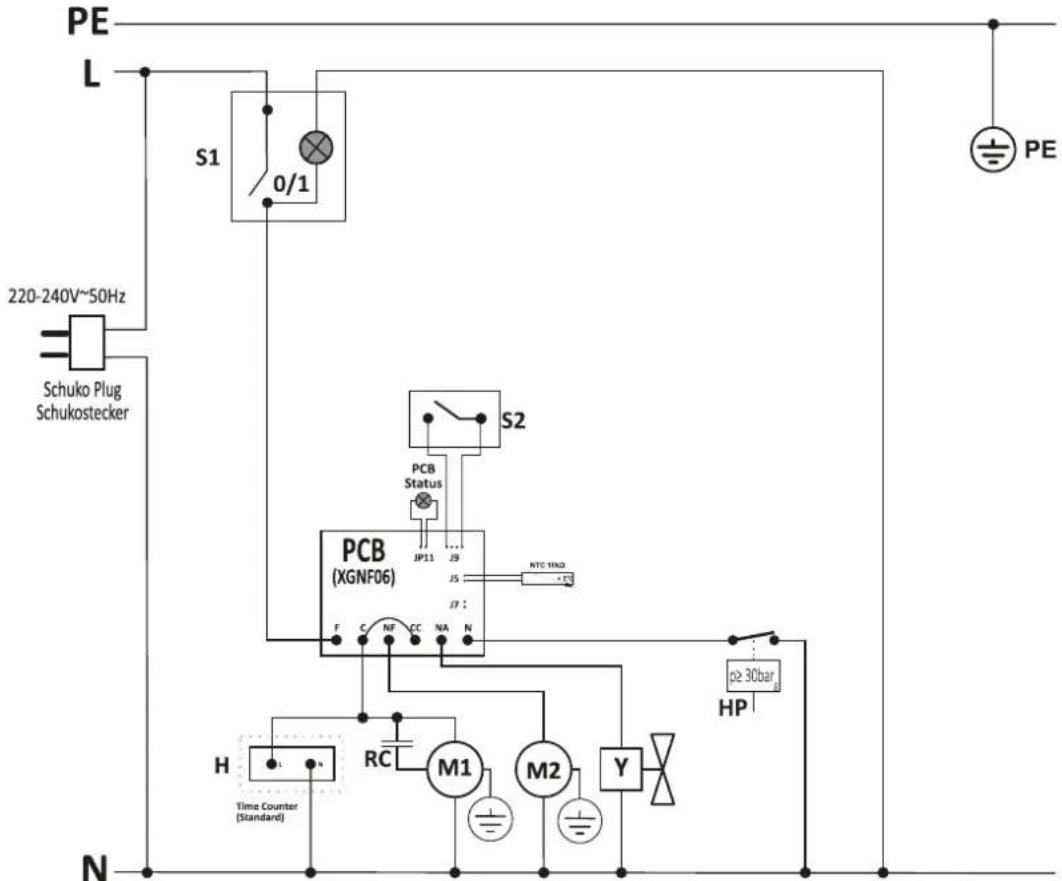
Operating hours counter
STANDARD MODELS ARE NOT EQUIPED WITH ANY OF THE COUNTERS REPRESENTED IN THE DIAGRAMS!
Hour counter just counting the compressor operation time (optional)
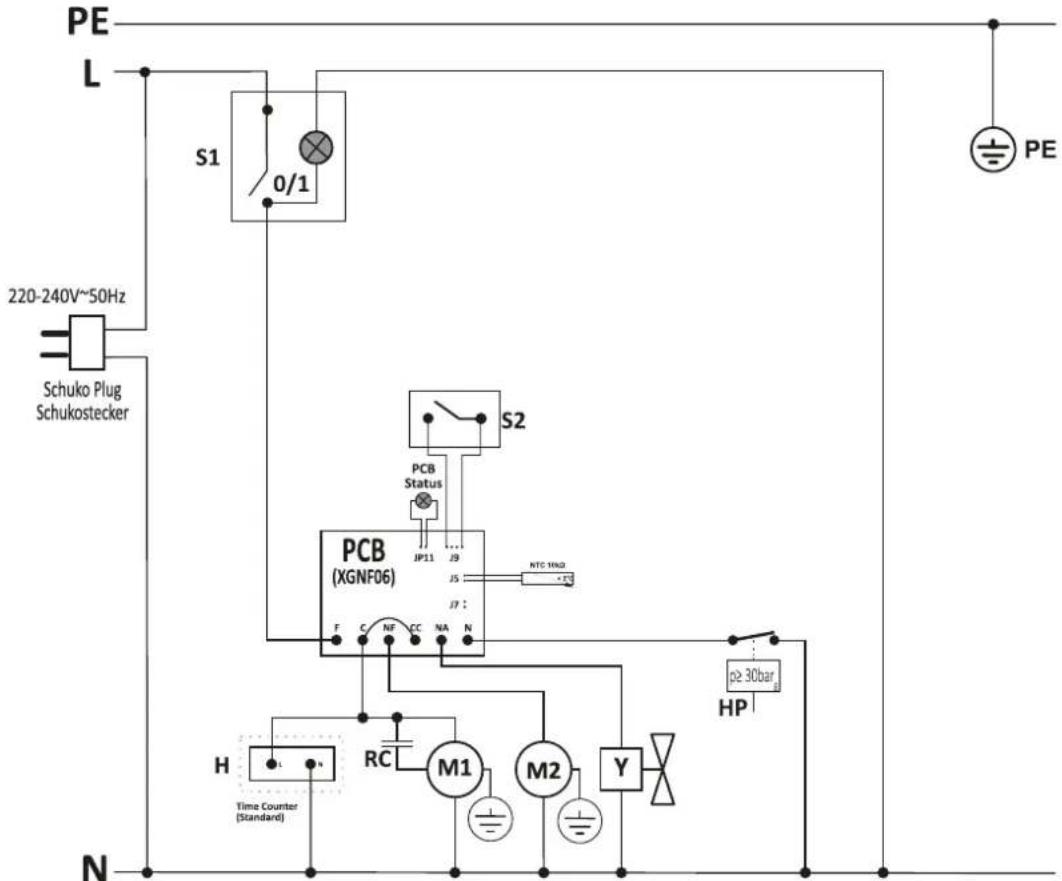
NOTE: Wiring is prepared to connect both Time Counter as well as Time & Energy Counter
| PE – Protective earth conductor M2 – Fan motor | |
| N – Common Line Y – Two way valve | |
| L – Line RC – Running Capacitor | |
| S1 – On-Off switch H – Operating hours counter (optional) | |
| S2 – Hygrostat P – Water Pump Socket | |
| M1 – Compressor HP – High pressure switch |
Operating hours counter with MID counter
STANDARD MODELS ARE NOT EQUIPED WITH ANY OF THE COUNTERS REPRESENTED IN THE DIAGRAMS!
Counter counting energy and time downstream the main switch (optional)
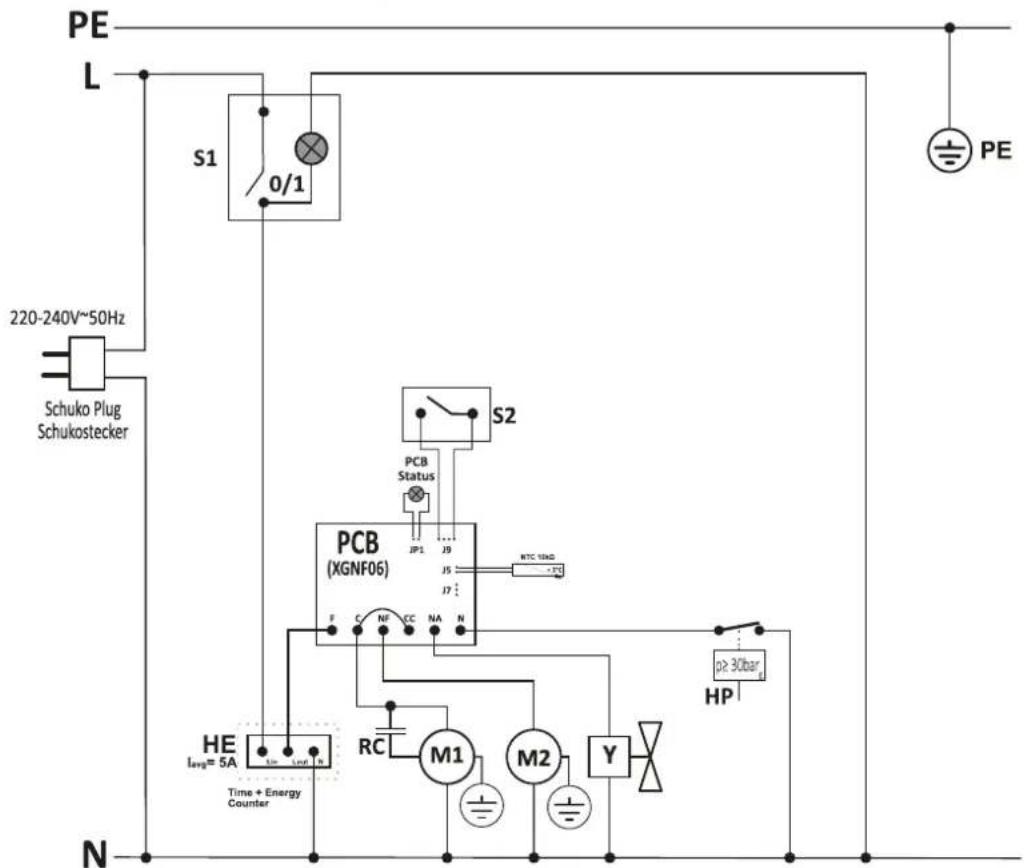
NOTE: Wiring is prepared to connect both Time Counter as well as Time & Energy Counter
| PE – Protective earth conductor M2 – Fan motor | |
| N – Common Line Y – Two way valve | |
| L – Line RC – Running Capacitor | |
| S1 – On-Off switch HE – Operating hours counter and energy counter (optional) | |
| S2 – Hygrostat P – Water Pump Socket | |
| M1 – Compressor HP – High pressure switch |
Overview of spare parts and spare parts list TTK 140 S Info

The position numbers of the spare parts differ from those describing the positions of the components mentioned in these instructions.
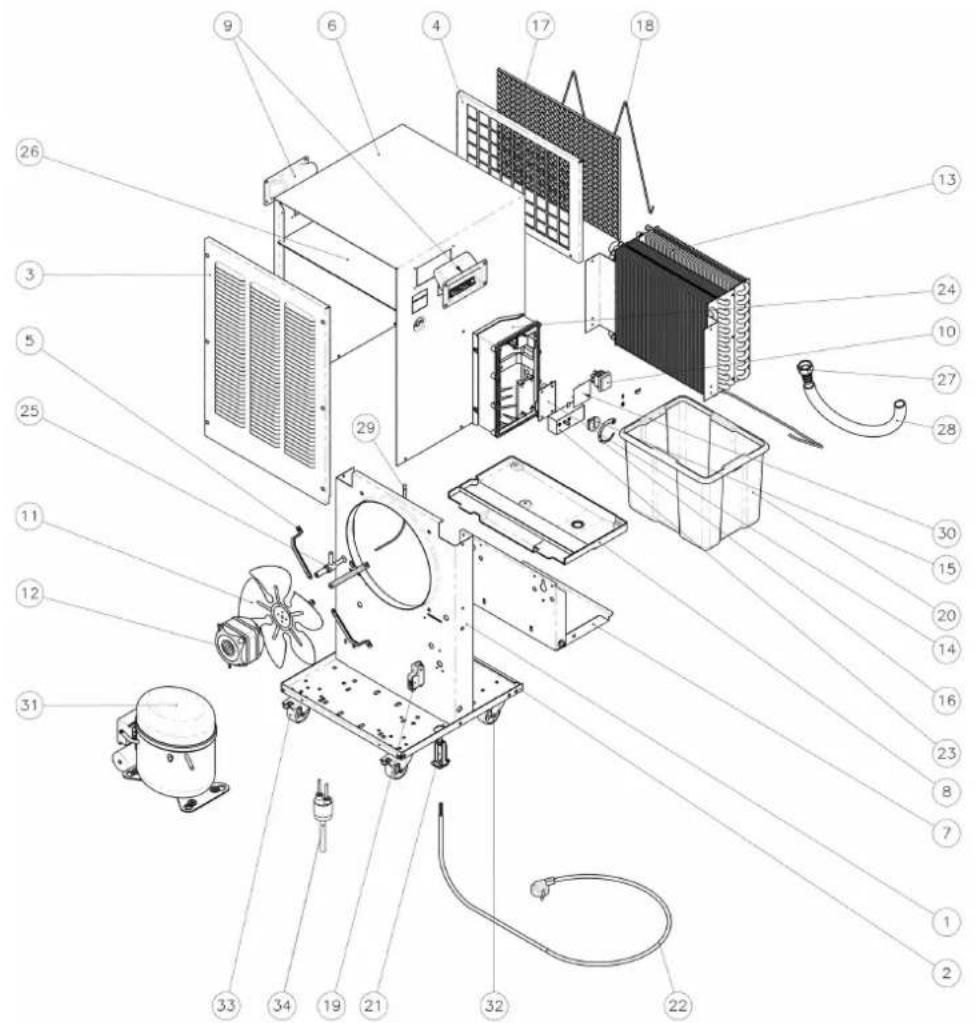
| No. | Spare part No. | Spare part No. | Spare part | ||
| 1 | Main frame 13 Heat exchangers 25 Defrost valve | ||||
| 2 | Baseplate 14 Electronic controller 26 Top hood thermal isolating foam | ||||
| 3 | Air outlet grille 15 Humidistat knob 27 Hose connector | ||||
| 4 | Air inlet grille 16 Control panel sticker 28 Flexible hose | ||||
| 5 | Fan motor brackets 17 Air filter 29 Defrost sensor | ||||
| 6 | Pre-coated PVC hood | 18 | Air filter bracket | 30 | Hour counter gap cover |
| 7 | Water tank base plate (complete set) | 19 | Full water tank switching system | 31 | Compressor NLY90RAb |
| 8 | Condensates water pan | 20 | Water tank | 32 | Spinning castor without brake |
| 9 | Plastic grip | 21 | Cable gland + electric terminal block | 33 | Spinning castor with brake |
| 10 | Main switch | 22 | Power supply cable 34 Pressure switch | ||
| 11 | Fan blade 23 Humidistat | ||||
| 12 | Fan motor | 24 | Control's box | ||
Overview of spare parts and spare parts list TTK 170 S / TTK 350 S

Info
The position numbers of the spare parts differ from those describing the positions of the components mentioned in these instructions.
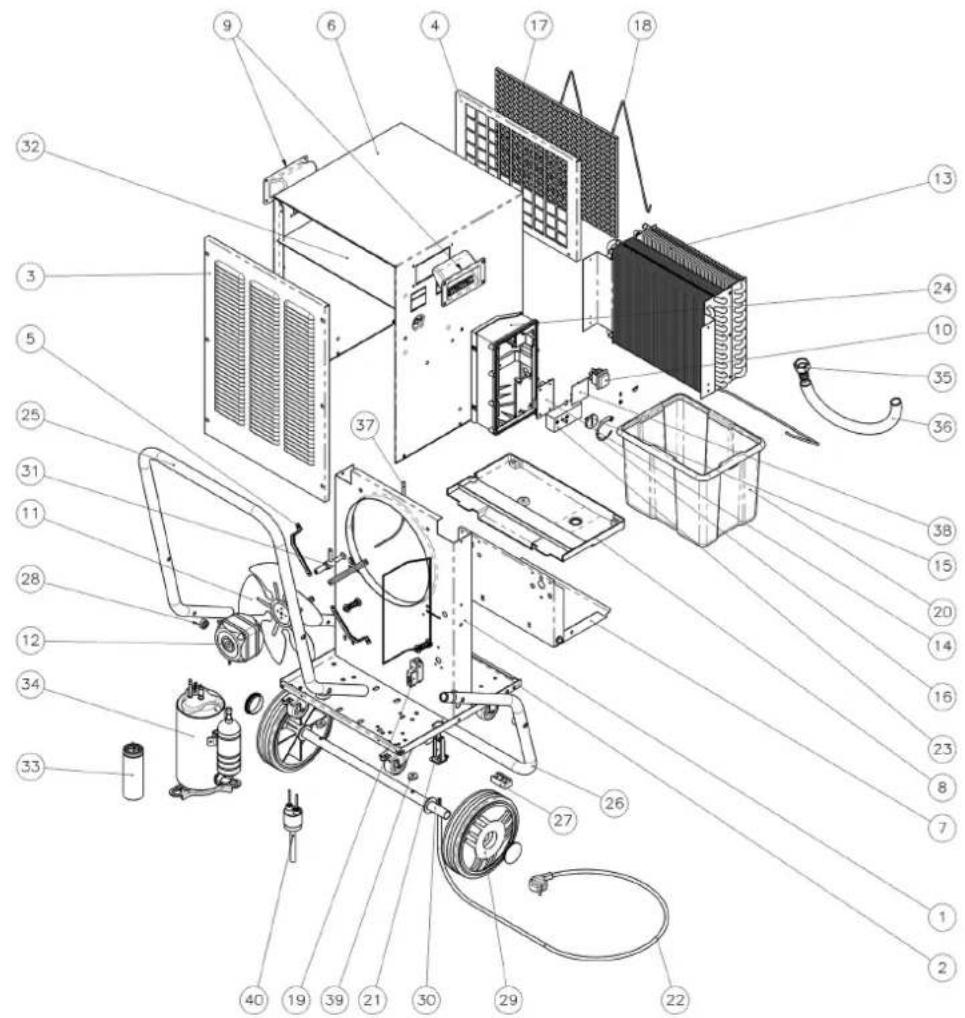
| No. | Spare part No. | Spare part No. | Spare part | |||
| 1 | Main frame 15 | Humidistat knob 29 Wheel | ||||
| 2 | Baseplate 16 | Control panel sticker 30 Wheel's axle | ||||
| 3 | Air outlet grille 17 | Air filter 31 Defrost valve | ||||
| 4 | Air inlet grille 18 | Air filter bracket 32 Top hood thermal isolating foam | ||||
| 5 | Fan | motor brackets 19 Full water tank switching system 33 Running capacitor | ||||
| 6 | Pre-coated PVC hood 20 Water tank | 34 Compressor | ||||
| 7 | Water tank base plate (complete set) | 21 | Cable gland + electric terminal block | 35 | Hose connector | |
| 8 | Condensates water pan | 22 Power supply cable 36 Flexible hose | ||||
| 9 | Plastic grip | 23 Humidstat | 37 Defrost sensor | |||
| 10 | Main switch | 24 Control's box | 38 Hour counter gap cover | |||
| 11 | Fan blade 25 Tubular handle | 39 Axle's saddle spacer | ||||
| 12 | Fan motor | 26 Tubular foot | 40 Pressure switch | |||
| 13 | Heat exchangers | 27 Saddle foot | ||||
| 14 | Electronic controller | 28 Handle's saddle spacers |
Overview of spare parts and spare parts list TTK 650 S Info

The position numbers of the spare parts differ from those describing the positions of the components mentioned in these instructions.
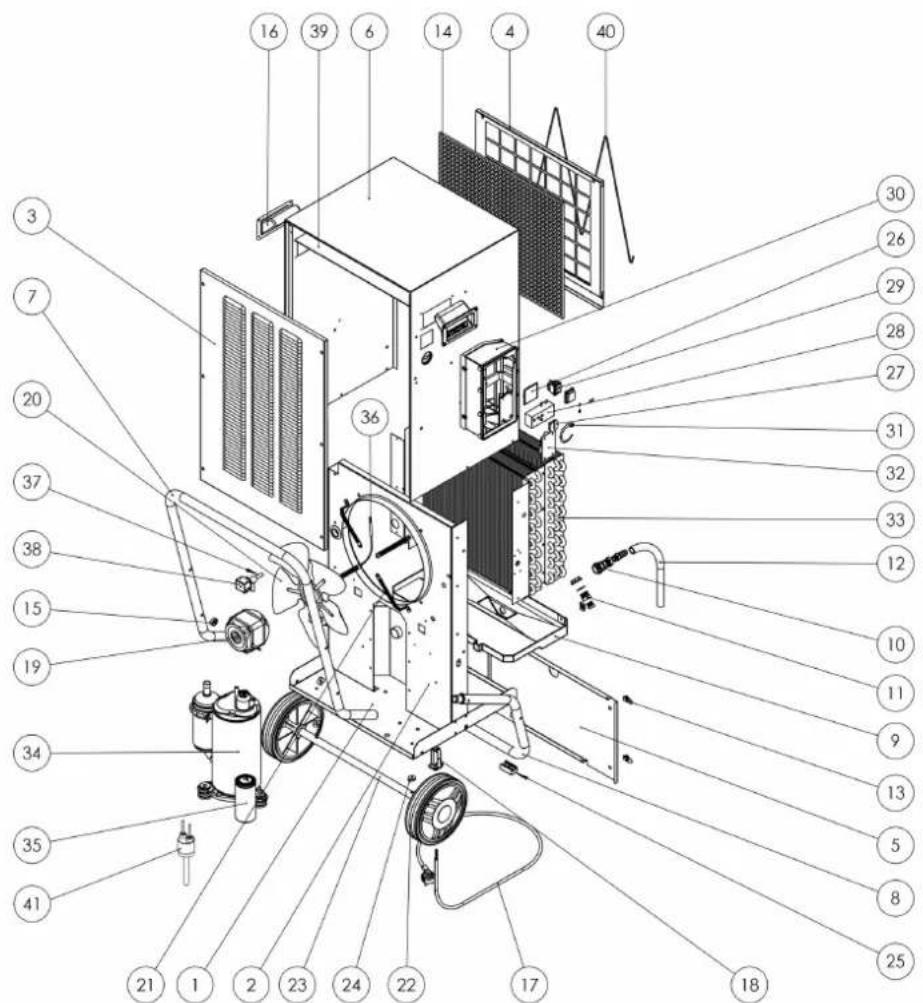
| No. | Spare part No. Spare part | No. | Spare part | ||
| 1 | Baseplate 15 Handle's saddle spacer 29 Main | switch | |||
| 2 | Structural element 16 Plastic grip 30 Control's | box | |||
| 3 | Air outlet ventilation grille 17 Power supply cable 31 | Control panel sticker | |||
| 4 | Air inlet ventilation grille 18 Cable gland + electric terminal block 32 Electronic controller | ||||
| 5 | Back cover 19 Fan motor | 33 Heat exchanger | |||
| 6 | Pre-coated PVC hood | Fan blade | 34 Compressor | ||
| 7 | Tubular handle | Fan motor brackets 35 Running capacitor | |||
| 8 | Tubular foot | Wheel | 36 Defrost sensor | ||
| 9 | Water pan | Wheel's axle | 37 Defrost valve | ||
| 10 | Hose fitting | 24 | Axle's saddle spacer | 38 | Defrost valve coil |
| 11 | Hidraulic plug | 25 | Plastic feet | 39 | Top hood thermal isolating foam |
| 12 | Hose | 26 | Hour counter gap cover | 40 | Air filter bracket |
| 13 | 1/4 turn lock | 27 | Humidistat knob | 41 | Pressure switch |
| 14 | Air filter | 28 Humidistat | |||
Disposal
Always dispose of packing materials in an environmentally friendly manner and in accordance with the applicable local disposal regulations.

The icon with the crossed-out wheeled bin indicates that this device and any associated components must not be disposed of with household waste at the end of their life, in accordance with the Waste Electrical and Electronic Equipment Directive (2012/19/EU) and national laws.
You will find collection points for free return of waste electrical and electronic equipment in your vicinity. The addresses can be obtained from your municipality or local administration. You can also find out about other return options that apply for many EU countries on the website https://hub.trotec.com/?id=45090. Otherwise, please contact an official recycling centre for electronic and electrical equipment authorised for your country. The separate collection of waste electrical and electronic equipment aims to enable the re-use, recycling and other forms of recovery of waste equipment as well as to prevent negative effects for the environment and human health caused by the disposal of hazardous substances potentially contained in the equipment.
TTK 140 S / TTK 170 S
The device is operated with fluorinated greenhouse gas, which can be dangerous for the environment and contribute to global warming when emitted to the atmosphere.
Further information is provided on the nameplate.
Have the refrigerant (propane) disposed of appropriately and according to the national regulations by a company with the relevant certification (European Waste Catalogue 160504).
TTK 350 S / TTK 650 S
The device is operated with fluorinated greenhouse gas, which can be dangerous for the environment and contribute to global warming when emitted to the atmosphere.
Further information is provided on the nameplate.
Dispose of the refrigerant appropriately and according to the national regulations.
Only for United Kingdom
According to Waste Electrical and Electronic Equipment Regulations 2013 (SI 2013/3113) (as amended) devices that are no longer usable must be collected separately and disposed of in an environmentally friendly manner.
EU Declaration of Conformity
| ORIGINAL EU Declaration of Conformity for a machinein accordance with 2006/42/EC, Annex II, Part 1, Section A | ||
| 1. Machine: Dehumidifier | ||
| 2. Manufacturer: Trotec GmbH | Grebbener Str. 752525 HeinsbergGermanyonline@trotec.comwww.trotec.com | |
| 3. /. | ||
| 4. This declaration of conformity is issued under the sole responsibility of the manufacturer. | ||
| 5. Object of the declaration: TTK 140 S | Year of manufacture as of: 2024 | |
| 6. The object of the declaration described in point 5 is in conformity with the following Union harmonisation legislation: | • 2006/42/EC• 2011/65/EU• 2012/19/EU• 2014/30/EU• 2015/863/EU | |
| 7. Applied harmonised standards:• EN 60335-1:2012, EN 60335-1:2012/AC:2014, EN 60335-1:2012/A11:2014, EN 60335-1:2012/A13:2017,EN 60335-1:2012/A15:2021 (Official Journal 13/04/2022)• EN 60335-2-40:2003, EN 60335-2-40:2003/A11:2004, EN 60335-2-40:2003/A12:2005,EN 60335-2-40:2003/A12:2006, EN 60335-2-40:2003/A13:2012/AC:2013, EN 60335-2-40:2003/A13:2012,EN 60335-2-40:2003/A2:2009, EN 60335-2-40:2003/AC:2006, EN 60335-2-40:2003/AC:2010 (Official Journal 28/11/2013)• EN IEC 61000-3-3:2013 (Official Journal 13/05/2016) | ||
| Common specifications applied: /. | ||
| Other applied standards and specifications:• EN 60335-1:2012/A1:2019, EN 60335-1:2012/A2:2019, EN 60335-1:2012/A14:2019• IEC 60335-1:2010, IEC 60335-1:2010/A1:2013/A2:2016• IEC 60335-2-40:2018• IEC 61000-3-2:2018, IEC 61000-3-2:2018/A1:2020• IEC 61000-3-3:2013, IEC 61000-3-3:2013/A1:2017, IEC 61000-3-3:2013/A2:2021 | ||
| 8. /. | ||
| 9. The machine is subject to the conformity assessment procedure on the basis of an internal production control. | ||
| 10. Other information: | Authorised representative compiling the technical documentation:Trotec GmbHGrebbener Str. 752525 HeinsbergGermany | |
Heinsberg, 15 July 2024
Joachim Ludwig (Managing Director)
Sommaire
https://hub.trotec.com/?id=42763
TTK 170 S

https://hub.trotec.com/?id=42764


https://hub.trotec.com/?id=42765
TTK 650 S

https://hub.trotec.com/?id=42766
Sécurité
STANDARD MODELS ARE NOT EQUIPED WITH ANY OF THE COUNTERS REPRESENTED IN THE DIAGRAMS!
Wiring diagram with full tank switch & pressure switch reseing the PCB
With the LED in JP12, the ambient temperature monitoring probe is not active and in this mode no delay for is set during startup
Hour counter just counting the compressor operation time (optional)
NOTE: Wiring is prepared to connect both Time Counter as well as Time & Energy Counter
STANDARD MODELS ARE NOT EQUIPED WITH ANY OF THE COUNTERS REPRESENTED IN THE DIAGRAMS!
Wiring diagram with full tank switch & pressure switch resetting the PCB
With the LED in JP12, the ambient temperature monitoring probe is not active and in this mode no delay for is set during startup
Counter counting energy and time downstream the main switch
NOTE: Wiring is prepared to connect both Time Counter as well as Time & Energy Counter
STANDARD MODELS ARE NOT EQUIPED WITH ANY OF THE COUNTERS REPRESENTED IN THE DIAGRAMS!
Hour counter just counting the compressor operation time (optional)
NOTE: Wiring is prepared to connect both Time Counter as well as Time & Energy Counter
STANDARD MODELS ARE NOT EQUIPED WITH ANY OF THE COUNTERS REPRESENTED IN THE DIAGRAMS!
Counter counting energy and time downstream the main switch (optional)
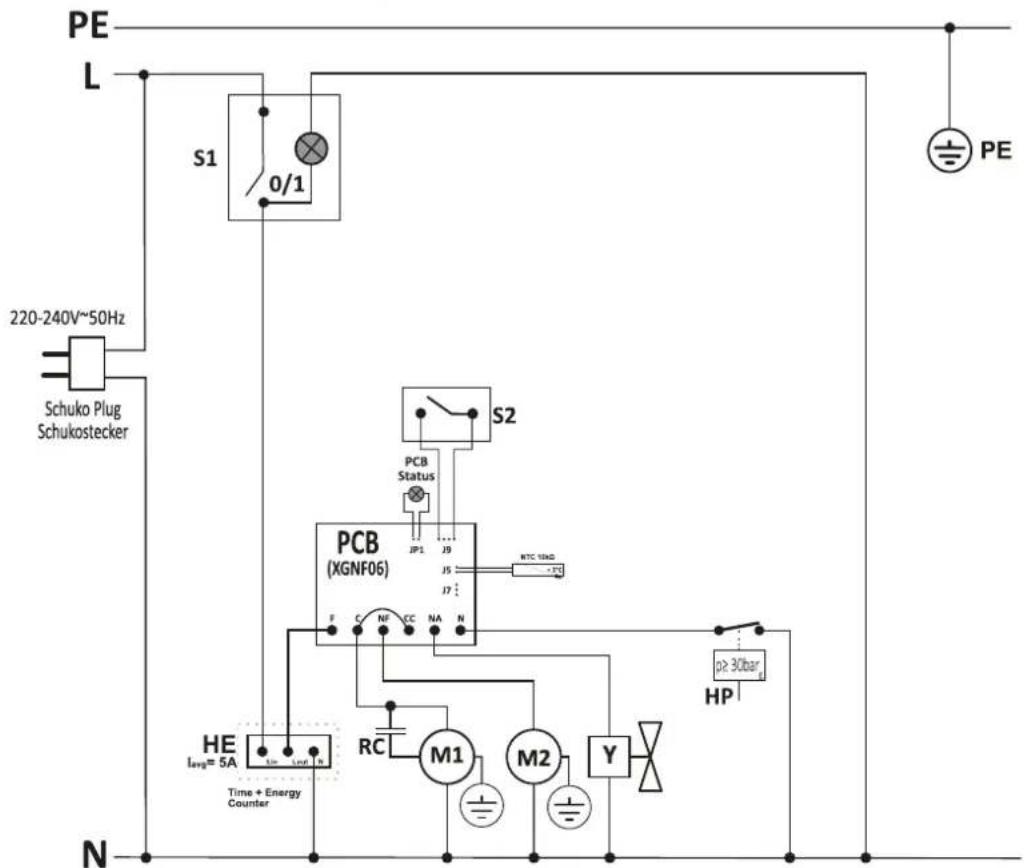
NOTE: Wiring is prepared to connect both Time Counter as well as Time & Energy Counter

- SICHERHEIT
- STANDARD MODELS ARE NOT EQUIPED WITH ANY OF THE COUNTERS REPRESENTED IN THE DIAGRAMS
- INFORMATION ON THE USE OF THESE INSTRUCTIONS
- SYMBOLS
- DANGER
- WARNING OF ELECTRICAL VOLTAGE
- WARNING
- CAUTION
- NOTICE
- INFO
- FOLLOW THE MANUAL
- SAFETY
- SAFETY WARNINGS FOR DEVICES CONTAINING FLAMMABLE REFRIGERANTS
- INTENDED USE
- REASONABLY FORESEEABLE MISUSE
- PERSONNEL QUALIFICATION
- SAFETY SIGNS AND LABELS ON THE DEVICE
- TTK 140 S / TTK 170 S
- WARNING · WARNING · ATTENTION
- FOLLOW THE REPAIR MANUAL
- RESIDUAL RISKS
- NATURAL REFRIGERANT PROPANE (R290)
- REFRIGERANT R454C
- BEHAVIOUR IN THE EVENT OF AN EMERGENCY
- INFORMATION ABOUT THE DEVICE
- DEVICE DESCRIPTION
- MODELS
- TTK 140 S
- NO. DESIGNATION
- TRANSPORT AND STORAGE
- TRANSPORT
- STORAGE
- ASSEMBLY AND START-UP
- SCOPE OF DELIVERY
- UNPACKING THE DEVICE
- ASSEMBLY
- MOUNTING THE TRANSPORT HANDLE
- (TTK 170 S / TTK 350 S / TTK 650 S)
- START-UP
- INSERTING THE AIR FILTER
- CONNECTING THE POWER CABLE
- OPERATION
- OPERATING ELEMENTS
- TTK 140/170/350 S
- TTK 650 S
- OPERATING HOURS/ POWER CONSUMPTION COUNTER
- SWITCHING THE DEVICE ON
- CONTINUOUS OPERATION MODE
- CONNECTING THE CONDENSATION DRAIN HOSE (TTK 140 S / TTK 170 S / TTK 350 S)
- CONNECTING THE CONDENSATION DRAIN HOSE (TTK 650 S)
- AUTOMATIC DEFROSTING
- OPERATION WITH CONDENSATE PUMP (OPTIONAL)
- SHUTDOWN
- AVAILABLE ACCESSORIES
- ERRORS AND FAULTS
- THE DEVICE DOES NOT START
- THE DEVICE IS RUNNING, BUT THERE IS NO FORMATION OF CONDENSATE
- THE DEVICE IS LOUD OR VIBRATES
- CONDENSATE IS LEAKING
- THE COMPRESSOR DOES NOT START
- THE DEVICE GETS VERY WARM, IS LOUD OR IS LOSING POWER
- THE DEVICE STILL DOES NOT OPERATE CORRECTLY AFTER THESE CHECKS
- ACTIVITIES REQUIRED BEFORE STARTING MAINTENANCE
- RUNNING CAPACITOR
- REFRIGERANT CIRCUIT
- TTK 350 S / TTK 650 S
- CLEANING THE HOUSING
- VISUAL INSPECTION OF THE INSIDE OF THE DEVICE FOR DIRT
- CLEANING THE AIR FILTER
- EMPTYING THE CONDENSATION TANK
- (TTK 140 S / TTK 170 S / TTK 350 S)
- ACTIVITIES REQUIRED AFTER MAINTENANCE
- OVERVIEW OF SPARE PARTS AND SPARE PARTS LIST TTK 140 S INFO
- OVERVIEW OF SPARE PARTS AND SPARE PARTS LIST TTK 650 S INFO
- DISPOSAL
- ONLY FOR UNITED KINGDOM
- SOMMAIRE
- SÉCURITÉ
Brand : TROTEC
Model : TTK 140 S
Category : Humidifier