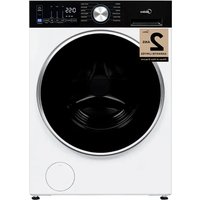
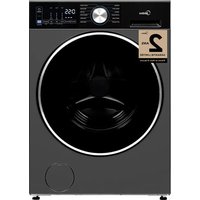
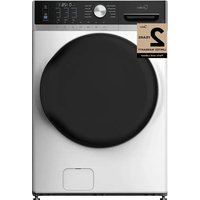
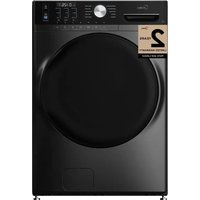
MLE45N1BWWC - Washing machine MIDEA - Free user manual and instructions
Find the device manual for free MLE45N1BWWC MIDEA in PDF.

| Product type | Electric clothes dryer |
| Brand | Midea |
| Model | MLE45N1BWWC |
| Power supply | 120/240 V, 60 Hz, 30 A |
| Dimensions (H x W x D) | 1163 x 686 x 800 mm |
| Approximate weight | 50 kg |
| Capacity | 7.0 ft³ (198 L) |
| Ventilation options | Rear, left side or bottom |
| Drying cycles | Normal, Delicates, Bulky, Heavy Duty, Wrinkle Free, Towels, Baby Care, Sanitize, Air Fluff, Timed Dry, Quick Dry, Towel Warm |
| Special features | Eco Dry, Wrinkle Care, My Cycle, Damp Alert, Control Lock |
| Dryness levels | Low, Medium, High, Extra Dry |
| Drying temperatures | High, Medium, Low, Ultra Low, No Heat |
| Sensor type | Moisture sensor (automatic cycles) |
| Display | Digital with status indicators |
| Drum material | Stainless steel or anodized |
| Lint filter | Internal filter, clean before/after each load |
| Duct maintenance | Annual inspection and cleaning recommended |
| Safety | Grounding required, auto shut-off, door lock, child lock |
| Parts and accessories | Power cord (3 or 4 wires), exhaust duct, side/bottom exhaust kit |
| Warranty | 1 year parts and labor |
Frequently Asked Questions - MLE45N1BWWC MIDEA
User questions about MLE45N1BWWC MIDEA
0 question about this device. Answer the ones you know or ask your own.
Ask a new question about this device
Download the instructions for your Washing machine in PDF format for free! Find your manual MLE45N1BWWC - MIDEA and take your electronic device back in hand. On this page are published all the documents necessary for the use of your device. MLE45N1BWWC by MIDEA.
USER MANUAL MLE45N1BWWC MIDEA
Before using this product, please read this manual carefully and keep it for future reference. The design and specifications are subject to change without prior notice for product improvement. Consult with your dealer or manufacturer for details.
version A
USER MANUAL & INSTALLATION INSTRUCTIONS
Dear user
THANK YOU and CONGRATULATIONS on your purchase of this high-quality Midea product. Your Midea dryer is designed for reliable, trouble-free performance. Please take a moment to register your new dryer.
Register your new dryer at www.midea.com/ca/support/Product-registration
For future reference, record your product model and serial numbers located on the inside frame of the dryer.
Model Number
Serial Number
DRYER SAFETY 4
Important to Installer 8
Basic Requirements 9
Location Requirements 9
Ducting Requirements 12
Exhausting Requirements 14
Electric Requirements 15
Grounding 16
PARTS AND FEATURES 17
Replacement Parts and Accessories 17
INSTALLATION INSTRUCTIONS 18
Removing From the Package 18
Tools Required 18
Choose the Proper Location 19
Install the Exhaust System 20
Connect the Electrical Wiring 21
Level the Dryer 24
Power On 24
Final Check 24
Door Reversal Procedure 25
Change the dryer vent location. 28
DRYER USE 31
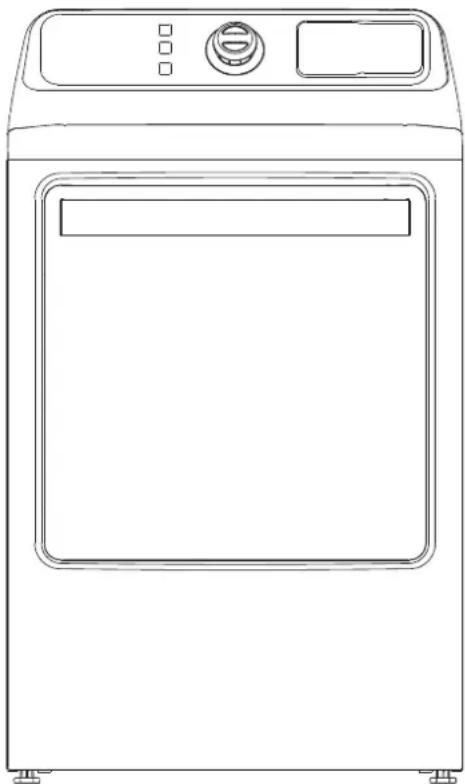
Control Panel 31
Drying a Load of Laundry 34
Special Laundry Tips 38
DRYER CARE 39
Cleaning and Maintenance 39
TROUBLESHOOTING 40
Check These Solutions if Your Dryer. 40
Error Codes 42
APPENDIX 43
Fabric Care Chart 43
WARRANTY 44
PRODUCT REGISTRATION 46
READ AND KEEP THESE INSTRUCTIONS FOR FUTURE REFERENCE
This manual contains important information on the installation, use, and care of your appliance. Please read this manual carefully before installation and operation of this machine to prevent injury and property damage.
Warnings and Important Safety Instructions in this manual DO NOT cover all possible conditions and situations that may occur. It is your responsibility to use common sense, caution and care when installing, maintaining and operating your dryer.
DRYER SAFETY
YOUR SAFETY AND THE SAFETY OF OTHERS ARE VERY IMPORTANT
To prevent injury to the user or other people and property damage, the instructions shown here must be followed. Incorrect operation due to ignoring of instructions may cause harm or damage, including death.
The level of risk is shown by the following indications.
WARNINGWARNING
This symbol indicates the possibility of death or serious injury.

CAUTION
This symbol indicates the possibility of injury or damage to property.
WARNING
This symbol indicates the possibility of dangerous voltage constituting a risk of electrical shock is present that could result in death or serious injury.

WARNING
For your safety the information in this manual must be followed to minimize the risk of fire or explosion, or to prevent property damage, personal injury or death.
- Do not store or use gasoline or other flammable vapors and liquids in the vicinity of this or any other appliance.
- Installation and service must be performed by a qualified installer, service agency.

WARNING
Fire Hazard
- Failure to follow safety warnings exactly could result in serious injury, death or property damage.
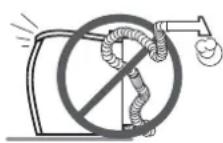
- Do not install a booster fan in the exhaust duct.
- Install all clothes dryers in accordance with the installation instructions of the manufacturer of the dryer.
IMPORTANT SAFETY INSTRUCTIONS

WARNING
To reduce the risk of fire, electric shock, or injury to persons when using your appliance, follow basic precautions, including the following:
- Read all instructions before using the appliance.
- Use this appliance only for its intended purpose as described in this Owner's Manual.
- Before use, the dryer must be properly installed as described in this manual.
- ALWAYS follow the fabric care instructions supplied by the garment manufacturer.
- Do not dry articles that have been previously cleaned in, washed in, soaked in, or spotted with gasoline, dry-cleaning solvents, other flammable or explosive substances as they give off vapors that could ignite or explode.
- Do not use the dryer to dry clothes which have traces of any flammable substance, such as vegetable oil, cooking oil, machine oil, flammable chemicals, thinner, etc., or anything containing wax or chemicals, such as mops and cleaning clothes. Flammable substances may cause the fabric to catch fire by itself.
- Do not store or use gasoline or other flammable vapors and liquids near this or any other appliance.
- Do not allow children to play on or in the appliance. Close supervision of children is necessary when the appliance is used near children.
- Before the appliance is removed from service or discarded, remove the lid of the washing or door of the drying compartment.
- Do not reach into the appliance if the drum is moving.
- Do not install or store this appliance where it will be exposed to the weather or freezing temperatures below 33^ .
- Do not tamper with the controls and latch.
- Do not install a booster fan in the exhaust duct.
- Do not repair or replace any part of the appliance or attempt any servicing unless it is specifically recommended in the user-maintenance instructions or in published user-repair instructions that you understand and have the skills to carry out.
- Keep the area underneath and around your appliances free of combustible materials (lint, paper, rags, etc.), gasoline, chemicals and other flammable vapors and liquids.
-
Do not place items exposed to cooking oils in your dryer. Items contaminated with cooking oils may contribute to a chemical reaction that could cause a load to catch fire. To reduce the risk of fire due to contaminated loads, the final part of a tumble dryer cycle occurs without heat (cool down period). Avoid stopping a tumble dryer before the end of the drying cycle unless all items are quickly removed and spread out so that the heat is dissipated.
-
Turn off the water faucets and unplug the washer if the machine is to be left for an extended period of time, such as during vacations.
- Packaging material can be dangerous for children. There is a risk of suffocation! Keep all packaging items from children.
- Always check the inside of the dryer for foreign objects before loading laundry. Keep the door closed when not in use.
- Do not use fabric softeners or by-products to eliminate static unless recommended by the manufacturer of the fabric softener or product manufacture.
- Clean the lint screen before or after each load.
- Keep the area around the exhaust opening and surrounding areas free from lint, dust, and dirt.
- Keep interior of the dryer and exhaust duct periodically clean. If necessary use services qualified service personnel.
- Do not place items exposed to cooking oils in your dryer. Items contaminated with cooking oils may contribute to a chemical reaction that could cause a load to catch fire.
- This appliance must be grounded. See "Electric Requirements" and "Grounding" in the "Operation Requirements" section.
- This appliance must be properly grounded. Never plug the power cord into a receptacle that is not grounded adequately and in accordance with local and national codes. Refer to installation instructions for grounding this appliance.
- Ensure pockets are free from small irregularly shaped hard objects and foreign material, i.e. coins, knives, pins, etc. These objects could damage your dryer and clothes.
- Do not use heat to dry articles containing foam rubber or similarly textured rubber like - materials.

WARNING
To reduce the risk of fire or explosion
- Do not dry items that have been previously cleaned, washed, soaked, or spotted with gasoline, dry cleaning solvents, or other flammable or explosive substances. They emit vapors that could ignite or explode. Any material that has been in contact with a cleaning solvent or flammable liquids or solids should not be placed in the dryer until all traces of these flammable liquids or solids and their fumes have been removed.
- There are many highly flammable items used in homes, such as acetone, denatured alcohol, gasoline, kerosene, some liquid household cleaners, some spot removers, turpentine, waxes, and wax removers.
- Do not dry items containing foam rubber (may be labeled latex foam) or similarly textured rubber-like materials on a heat setting. Heated foam rubber materials can, under certain circumstances, produce fire by spontaneous combustion.
CAUTION
- Do not sit on top of the dryer.
- Because of continuing product improvements, Midea America reserves the right of change specifications without notice. For complete details, see the Installation Instructions packed with your product before selecting cabinetry, making cutouts, or beginning installation.
- Do not dry clothing with large buckles, buttons, or other heavy metal or solid things.
Install and use in accordance with the manufacturer's instructions. - Do not place items in your dryer that have been spotted or soaked with vegetable oil or cooking oil. Even after being washed, these items may contain significant amounts of these oils.
- Residual oil on clothing can ignite spontaneously. The potential for spontaneous combustion increases when items containing vegetable oil or cooking oil are exposed to heat. Heat source such as your dryer can warm these items, allowing an oxidation reaction in the oil to occur.
- Oxidation creates heat. If this heat cannot escape, the items can become hot enough to catch fire. Piling, stacking, or storing these kinds of items may prevent heat from escaping and can create a fire hazard.
- Prevent children's from playing with the dryer door that fingers are not caught in door when closing it. This may result in injury.
State of California Proposition 65Warnings:

WARNING: Cancer and Reproductive Harm
- www.P65Warnings.ca.gov.
SAVE THESE INSTRUCTIONS
THIS APPLIANCE IS FOR HOUSEHOLD USE ONLY
- Clothes dryer installation must be performed by a qualified installer.
- Install the clothes dryer according to the manufacturer's instructions and local codes.
- Do not install a clothes dryer with flexible plastic venting materials. If flexible metal (foil type) duct is installed, it must be of a specific type identified by the appliance manufacturer as suitable for use with clothes dryer. Flexible venting materials are known to collapse, be easily crushed, and trap lint. These conditions will obstruct with the clothes dryer's airflow and increase the risk of fire.
- To reduce the risk of severe injury or death, follow all installation instructions
- Save these instructions.
IMPORTANT TO INSTALLER
Please read the following instructions carefully before installing the dryer. These instructions should be kept for future reference.

CAUTION
- The dryer is not suitable for installation in a mobile home.
- Remove the door from all discarded appliances to avoid the danger of a child being trapped and suffocating, after unplugging cut off Power Cord.
BASIC REQUIREMENTS
Make sure you have everything necessary for the proper installation.
- A GROUNDED ELECTRICAL OUTLET is required. Refer to the "Electrical requirements" section.
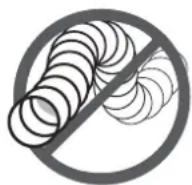
- The EXHAUST SYSTEM must be made of rigid metal or flexible stiff-walled metal exhaust ducting. DO NOT USE PLASTIC DUCTS.
LOCATION REQUIREMENTS
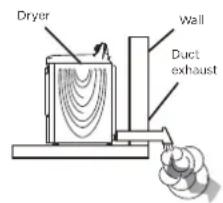
- The dryer should be located where there is enough space at the front for loading the dryer, and enough space behind for the exhaust system.
- This dryer is factory-ready for the rear exhaust option. To exhaust out the bottom or left, use the accessory exhaust kit. Instructions are included with the kit.
- Make sure the room in which the dryer is located has enough fresh air. The dryer must be located where there are no air-flow obstructions. Ambient temperature shall not be lower than 33^ .
- The dryer must not be installed or stored in an area where it will be exposed to water and/or weather. The dryer area must be kept clear of combustible materials, gasoline, and other flammable vapors and liquids. A dryer produces combustible lint. The area around the dryer should be kept lint-free.
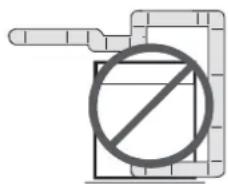
ALCOVE OR CLOSET OR WALL INSERT/RECESSED INSTALLATIONS

WARNING
- The dryer must be exhausted to the outside to reduce the risk of fire when installed any place inside the house.
- No other fuel-burning appliance should be installed in the same closet as the dryer.
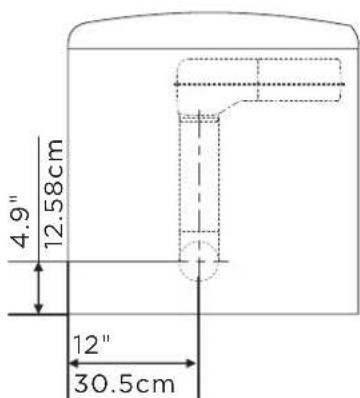
Minimum clearances between the dryer and adjacent walls or other surfaces:
| Sides 1 | in. (25 mm) Rear 5 in. (127 mm) | |
| Top 24 | in. (610 mm) Closet front 2 in. (51 mm) |
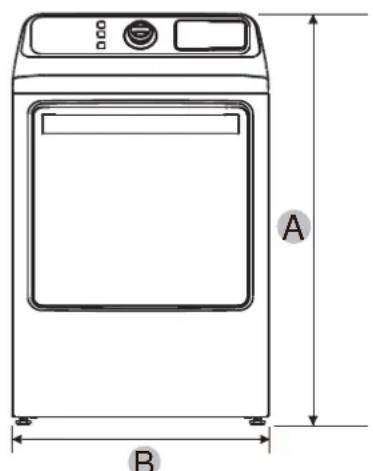
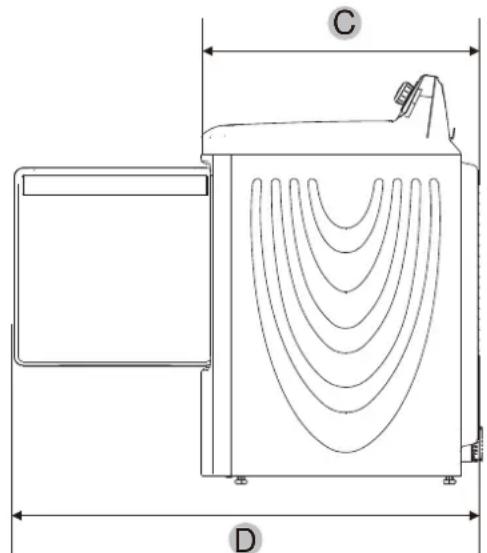
| A 4 | 5.8 in. (1163 mm) B 27 in. (686 mm) | ||
| C | 31.5 in. (800 mm) | D | 52.5in. (1333 mm) |
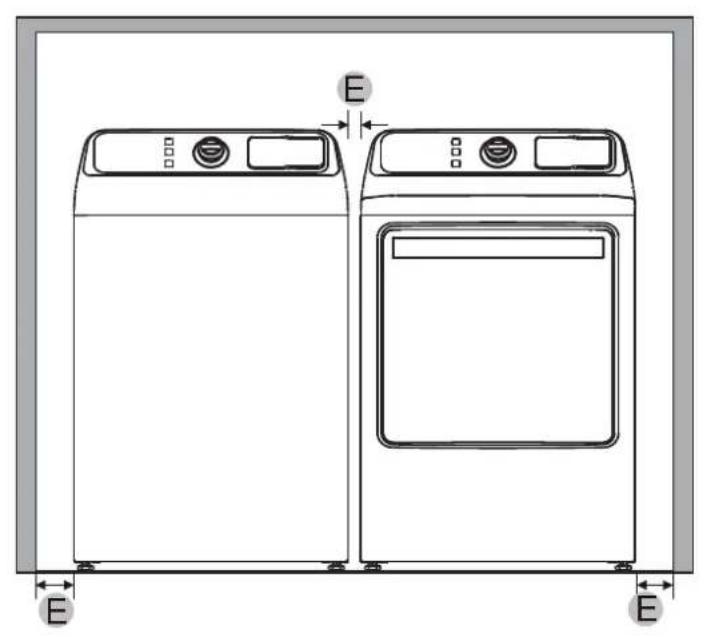
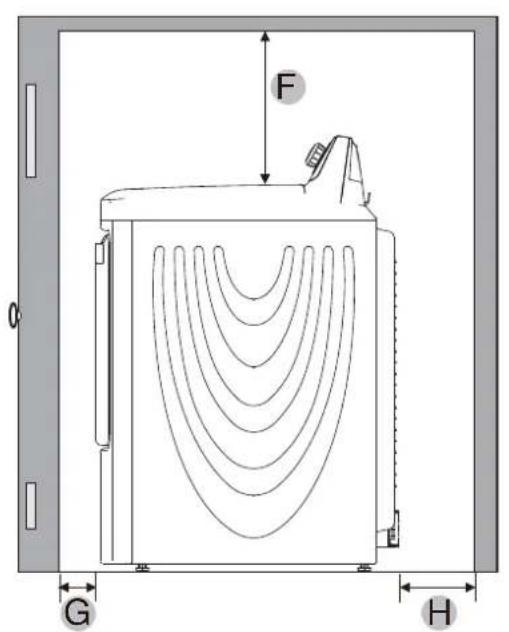
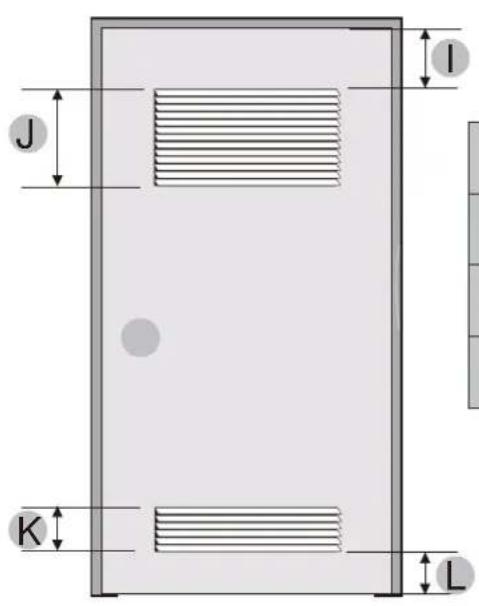
| E 1 | in. (25 mm) F 24 in. | (610 mm) |
| G 2 | in. (51 mm) H 5 in. | (127 mm) |
| I 3 | in. (76 mm) | J 48 in. (39000 mm) |
| K 2 | 4 in. (15500 mm) E 3 | in. (76 mm) |
NOTE:
The front of the closet must have two unobstructed air openings for a combined minimum total area of 72 sq.in. (465 sq.cm) with a minimum clearance of 3 in. (76 mm) at the top and bottom. A slatted door with equivalent space clearance is acceptable.
DUCTING REQUIREMENTS
| Recommended Use only for short-run installation | ||
| Weather Hood Type | 4"DIA 4"DIA 4 inch. (10.2 cm) | 4"DIA 2-1/2" 2.5 inch. (6.4 cm) |
| No. of 90° elbows | Rigid Metallic Rigid | Metallic |
| 0 90 ft. (27.4 m) 60 ft. (18.3 m) | ||
| 1 60 ft. (18.3 m) 45 ft. (13.7 m) | ||
| 2 45 ft. (13.7 m) 35 ft. (10.7 m) | ||
| 3 35 ft. (10.7 m) 25 ft. (7.6 m) | ||
If this new dryer is installed into an existing exhaust system you must make sure:
- The exhaust system meets all local, state, and national codes.
- That a flexible plastic duct is not used.
- To inspect and clean all lint buildup from inside the existing duct.
The duct is not dented or crushed.
The exhaust hood damper opens and closes freely.
Manometer measurements
The static pressure in any exhaust system for best results shall be between 0.3 to 0.8 inches of water column, and cannot be less than 0 under any circumstances. with installed duct of 4 inch diameter. Measurement must be done with the empty dryer working with a manometer at the point where the exhaust duct connects to the dryer. A no-heat setting should be used. Lint filter must be clean.

WARNING
The correct exhaust installation is YOUR RESPONSIBILITY.
- Use a 4-inch (10.2cm) diameter rigid aluminum or rigid galvanized steel duct.
- Do not use smaller diameter than recommended diameter duct.
- Ducts larger than 4 inches (10.2cm) in diameter can result in increased accumulation of lint and changes in performance
- Lint should be removed from internal filter before every cycle and clean ducts periodically.
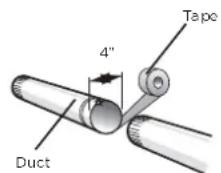
- If a flexible metal duct must be used, use the type with a stiff sheet metal wall. Do not use a flexible duct with a thin foil wall. A serious blockage can result if the flexible metal duct is bent too sharply.
- Never install any type of flexible duct in walls, ceilings, or other concealed spaces.
- Keep the exhaust duct as straight, short as possible, minimum elbows
- Secure joints with duct tape. Do not use screws.
- Plastic flexible ducts can kink, sag, be punctured, reduce airflow, extend drying times, and affect the dryer operation.
- Exhaust systems longer than recommended 90 ft can extend drying times, affect machine operations, and collect lint.
- The exhaust duct should end with an exhaust hood with a swing-out damper to prevent back drafts and entry of wildlife. Never use an exhaust hood with a magnetic damper.
- The hood should have at least 12 inches (30.5cm) of clearance between the bottom of the hood and the ground or other obstruction. The hood opening should point down.
- Never install a screen over the exhaust outlet.
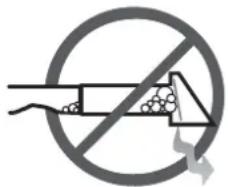
- To avoid lint buildup, do not exhaust the dryer directly into a window well. Do not exhaust under a house or porch.
- If the exhaust duct must run through an unheated area, the duct should be insulated and slope slightly down towards the exhaust hood to reduce condensation and lint buildup.
- Inspect and clean the interior of the exhaust system at least once a year. Unplug the power cord before cleaning.
- Check frequently to make sure the exhaust hood damper opens and closes freely.
- Check once per month, and clean at least once per year. NOTE: If your clothes are not getting dry, then check the ducting for obstructions.
- Do not exhaust the dryer into a wall, ceiling, crawl space, or concealed space of a building, gas vent, or any other common duct or chimney. This could create a fire hazard from the lint expelled by the dryer.
- Do not use non-metallic flexible duct.
- To reduce the risk of fire, this dryer MUST BE EXHAUSTED OUTDOORS without obstruction around the outlet.
EXHAUSTING REQUIREMENTS

WARNING
- The dryer shall not be exhausted into a chimney, a wall, a ceiling, an attic, a crawl space, or a concealed space of a building.
- The dryer must be exhausted to the outside to reduce the risk of fire when installed in alcove or closet.
Exhausting the dryer to the outside will prevent large amounts of lint and moisture from being blown into the room.

WARNING
NEVER USE A PLASTIC OR NON-METAL FLEXIBLE DUCT
If your existing ductwork is plastic, non-metal, or combustible, replace it with metal before installation this appliance
Use only a metal exhaust duct that is non-flammable to ensure containment of the exhaust air heat, and lint.
Refer to the "Ducting requirements" section on page 12 for the maximum duct length and number of bends.
All dryers must be exhausted to the outside.
- Do not assemble the duct with screws or other fastening means that extend into the duct and catch lint.
- The exhaust duct should be 4 inches (102mm) in diameter.
- The total length of flexible metal duct shall not exceed 7.8 feet (2.4 meters).
ELECTRIC REQUIREMENTS
The wiring diagram is located on the back board of the unit.

WARNING
- The improper connection of the equipment grounding conductor can result in the risk of electric shock. Check with a qualified electrician or serviceman if you are in doubt as to whether your dryer is properly grounded. Do not modify the plug provided with your dryer - if it doesn't fit the outlet, have a proper outlet installed by a qualified electrician.
- To prevent unnecessary risk of fire, electrical shock, or personal injury, all wiring and grounding must be done in accordance with local codes, or in the absence of local codes, with the National Electrical Code, ANSI/NFPA No. 70 - Latest Revision (for the U.S.) on the Canadian Electrical Code CSA C22.1 - Latest Revisions and local codes and ordinances. It is your responsibility to provide adequate electrical services for your dryer.
Electrical connections
An individual branch (or separate) circuit serving only your dryer is recommended. DO NOT USE AN EXTENSION CORD.

WARNING
Electrical Shock Hazard
When local codes allow, the electrical supply of the dryer may be connected by means of a new power supply cord kit, marked for use with a dryer, that is UL listed and rated at a minimum of 120/240 volts, 30-ampere with three No. 10 copper wire conductors terminated with closed loop terminals, open-end spade lugs with turned up ends, or with tinned leads.
- Do not reuse a power supply cord from an old dryer. The power cord electric supply wiring must be retained at the dryer cabinet with a suitable UL-listed strain relief.
- Grounding through the neutral conductor is prohibited for (1) new branch-circuit installations, (2) mobile homes, (3) recreational vehicles, and (4) areas where local codes prohibit grounding through the neutral conductor. (Use a 4-prong plug for 4 wire receptacles, NEMA type 14-30R.)
Electric models - Canada only
- A 120/240 volt, 60Hz AC approved electrical service fused through a 30-ampere fuse or circuit breaker on both sides of the line is required.
- All Canadian models are shipped with the power cord attached. The power cord should be plugged into a 30-ampere receptacle.
GROUNDING
This dryer must be grounded. In the event of a malfunction or breakdown, the grounding the product will reduce the risk of electrical shock by providing a path of least resistance for the electrical current.

WARNING
- Certain internal parts are intentionally not grounded and may present a risk of electric shock only during servicing. Service Personnel - Do not contact the following parts while the appliance is energized: inlet valve, control board and temperature-regulating thermistor (located on blower housing).

WARNING
Dryer must be grounded with 3 or 4 wire cord power cord with ground grounding conductor and a grounding plug, which is sold separately.
- The plug must be plugged into an appropriate outlet that is properly installed and grounded in accordance with all local codes and ordinances.
- Do not modify the plug provided with your dryer - if it doesn't fit the outlet, have a proper outlet installed by a qualified electrician.
- If a power cord is not used and the electric dryer is to be permanently wired, the dryer must be connected to a permanently grounded metal wiring system, or an equipment grounding conductor must be run with the circuit conductors and connected to the equipment grounding terminal or lead on the dryer.
PARTS AND FEATURES
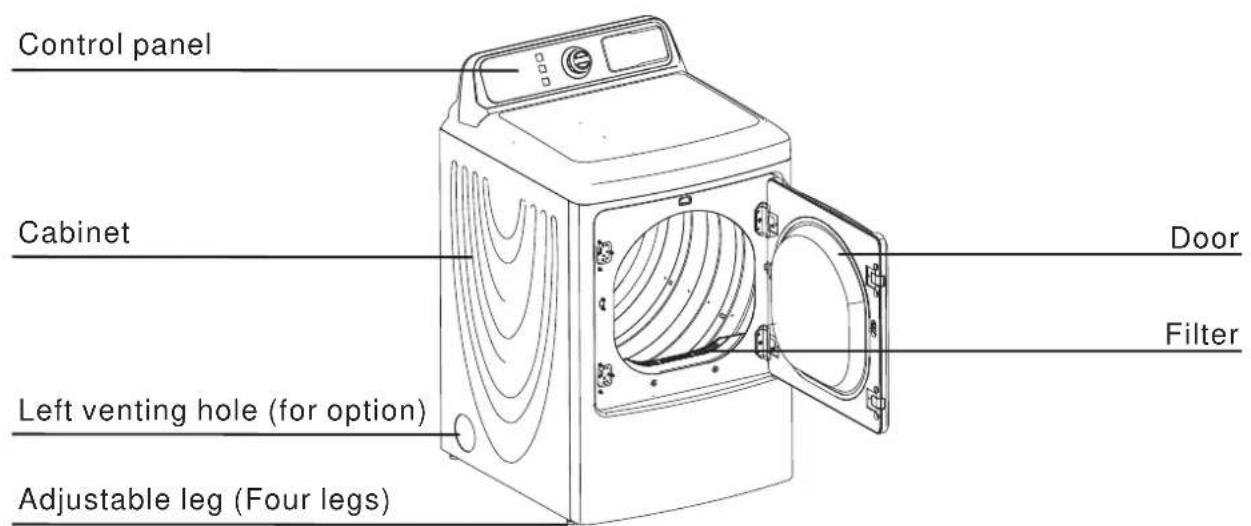
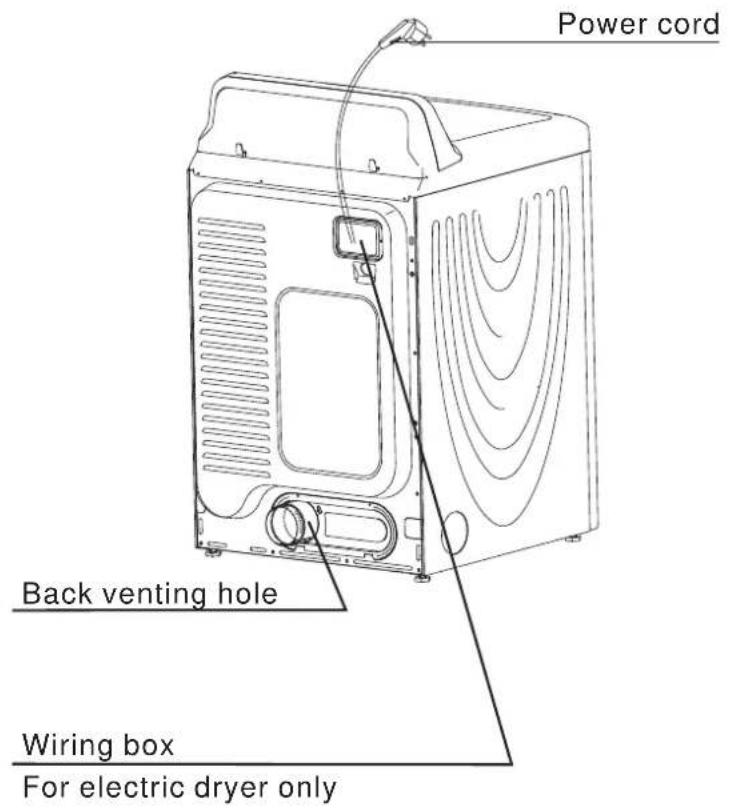
REPLACEMENT PARTS AND ACCESSORIES
If your dryer requires replacement parts or accessories, contact the dealer where you purchased your dryer or mail to customerserviceusa@midea.com.
INSTALLATION INSTRUCTIONS
For the proper installation, we recommend that you hire a qualified installer.
REMOVING FROM THE PACKAGE
- Unpack your dryer and inspect it for shipping damage. Make sure you have received all the items shown below.
- To prevent personal injury or strain, wear protective gloves whenever lifting or carrying the unit.

WARNING
Packaging materials can be dangerous to children;
Keep all packaging material (plastic bags, polystyrene, etc.) well out of children's reach.
TOOLS REQUIRED
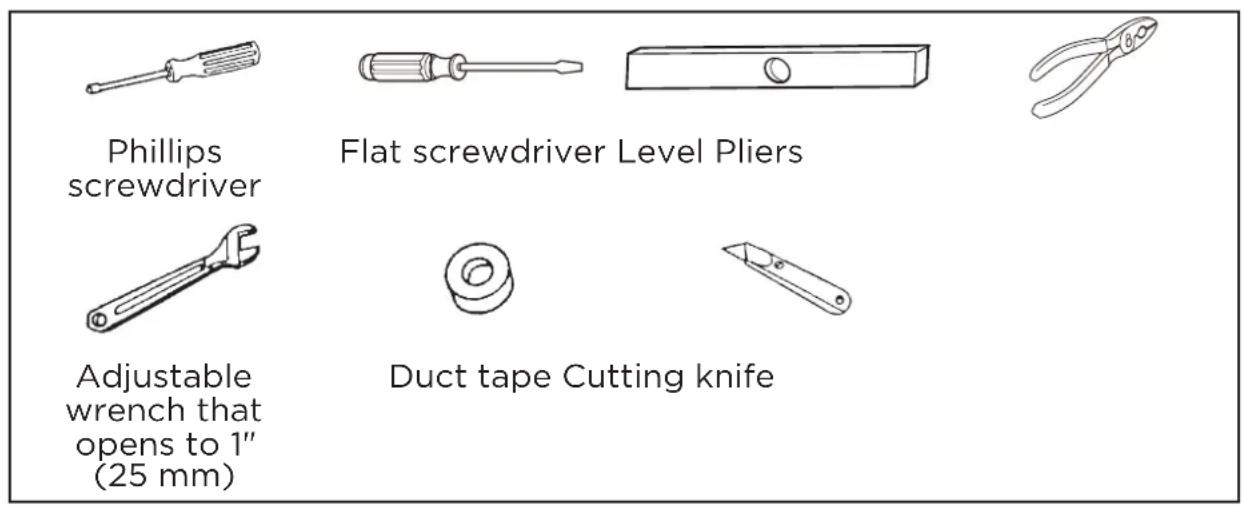
- Move your dryer to an appropriate location for the installation. Consider installing the dryer and washer side-by-side, to allow access to the electrical, and exhaust connections. Place two of the carton cushion-tops on the floor. Tip your dryer on its side so it lies across both cushion-tops.
- Set your dryer back in an upright position.
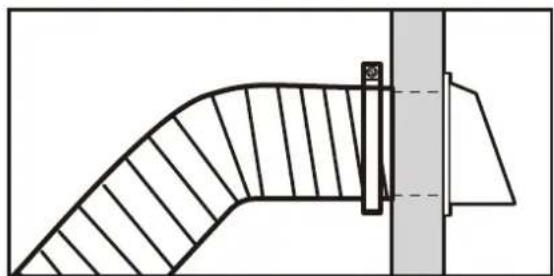
INSTALL THE EXHAUST SYSTEM
- Review the "Exhausting Requirements" section on before installing the exhaust system.
- Install the ductwork from your dryer to the exhaust hood. The crimped end of the duct sections must point away from your dryer.
- DO NOT use sheet metal screws when assembling the ducting.
- These joints should be taped.
- Never use plastic flexible exhaust material.
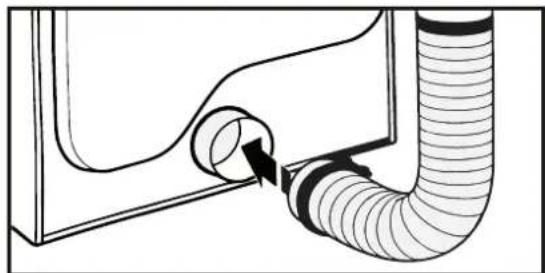
- Tip for tight installations: install a section of the exhaust system onto your dryer before putting it in place.
- Use duct tape to secure this section to your dryer, but do not cover the ventilation slots at the back of the unit in dryer cabinet.

WARNING
Make sure your dryer is installed properly so it exhausts air easily.
Use a 4^ (10.2 cm) diameter rigid metal duct. Tape all joints, including at the dryer. Never use lint-trapping screws.
Keep ducts as straight as possible.
Clean all old ducts before installing your new dryer. Be sure the vent flap opens and closes freely. Inspect and clean the exhaust system annually.
DO NOT restrict your dryer with a poor exhaust system.
DO NOT use a plastic, thin foil, or non-metal flexible duct.
DO NOT use unnecessarily long ducts that have many elbows.
DO NOT use dented or clogged ducts and vent.
CONNECT THE ELECTRICAL WIRING
Review the "Electric Requirements" section on page 15.
BEFORE OPERATING OR TESTING, follow the grounding instructions in the "Grounding" section on page 16.
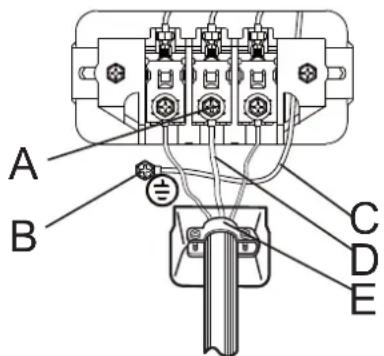
THREE WIRE OUTLET
3-Wire receptacle (10-30R)
Then choose a 3-wire power supply cord with ring or spade terminals and UL listed strain relief. The 3-wire power supply cord, at least 4 ft. (1.22 m) long, must have 3 10-gauge solid copper wires and match a 3-wire receptacle of NEMA Type 10-30R.
3-Wire system connections
- Remove the center terminal block screw.
- Connect the neutral wire (white or center wire) of the power cord to the center terminal screw of the terminal block. Be sure to cross the screw through the ring of the power cord terminal and tighten the screw.
- Connect the other wires to the outer terminal block screws. Be sure to cross the screw through the terminal ring and tighten the screw.
- Tighten the strain relief screws.
- Insert the tab of the terminal block cover into your dryer's rear panel slot. Secure the cover with a screw.
3-wire system instructions:
A Center terminal block screw
B External ground connector
C Neutral grounding wire (White)
D Neutral wire (white or center wire)
E 3 / 4'' (1.9cm) UL-listed strain relief

WARNING
If converting from a 4-wire electrical system to a 3-wire, the ground strap must be reconnected to the terminal block support to ground the dryer frame to the neutral conductor. Ring-type terminals are recommended. If using strap terminals, make sure they are tightened.
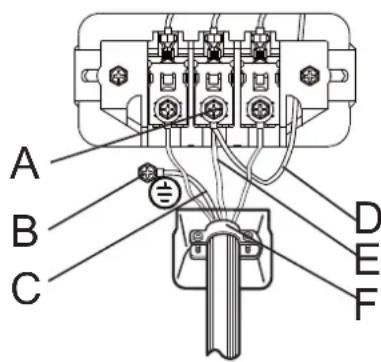
FOUR WIRE OUTLET

4-Wire receptacle (14-30R)
Then choose a 4-wire power supply cord with ring or spade terminals and UL listed strain relief. The 4-wire power supply cord, at least 4 ft. (1.22 m) long, must have 4 10-gauge solid copper wires and match a 4-wire receptacle of NEMA Type 14-30 R. The ground wire (ground conductor) may be either green or bare. The neutral conductor must be identified by a white colour.
4-Wire system connections
- Remove the center terminal block screw.
- Connect the ground wire (green or unwrapped) of the power cord to the external ground conductor screw.
- Connect the neutral wire (white or center wire) of the power cord and the appliance ground wire (white) under the center screw of the terminal block. Be sure to cross the screw through the ring of the power cord terminal and tighten the screw.
- Connect the other wires to the outer terminal block screws. Be sure to cross the screw through the terminal ring and tighten the screw.
- Tighten the strain relief screws.
- Insert the tab of the terminal block cover into your dryer's rear panel slot. Secure the cover with a screw.
4-wire system instructions:
IMPORTANT: Ring-type terminals are recommended. If using strap terminals, make sure they are tightened.
A Center terminal block screw
B External ground connector
C Green or bare copper wire of the power cord
D Neutral grounding wire (White)
E Neutral wire (white or center wire)
F 3 / 4'' (1.9cm) UL-listed strain relief
Electrical Shock Hazard
All U.S. models are produced for a 3-WIRE SYSTEM CONNECTION.
The dryer frame is grounded to the neutral conductor at the terminal block. A 4-WIRE SYSTEM CONNECTION is required for new or remodeled construction, mobile homes, or if local codes do not permit grounding through neutral conductor. If the 4-wire system is used, the dryer frame cannot be grounded to the neutral conductor at the terminal block. Refer to the "Electric Requirements" section on page 16 for 3-WIRE or 4-WIRE SYSTEM CONNECTIONS.
Remove the terminal block cover plate.
Insert the power cord with a UL-listed strain relief through the hose provided in the cabinet near the terminal block.
- A strain relief must be used.
Do not loosen the nuts already installed on the terminal block. Be sure they are tight. Use a 3/8'' (1 cm) deep-well socket.
LEVEL THE DRYER
To ensure that the dryer provides the optimal drying performance, it must be leveled. To minimize vibration, noise, and unwanted movement, the floor must be a perfectly level, solid surface.
- Adjust the leveling feet only as much as necessary to level the dryer. Extending the leveling feet more than necessary can cause the dryer to vibrate.

POWER ON
Make sure all exhaust and electrical connections are complete. Plug in your dryer.
FINAL CHECK
- Make sure the dryer is plugged into an electrical outlet and is properly grounded.
- The exhaust ductwork is hooked up and the joints are taped.
- A plastic flexible duct CAN NOT BE USED.
- Use rigid or stiff-walled flexible metal vent material.
The dryer is leveled and is sitting firmly on the floor. - Start your dryer to confirm that it runs, heats, and shuts off.
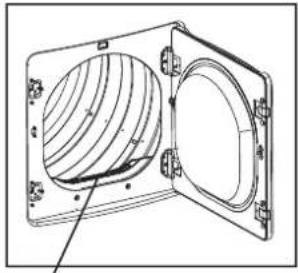
DOOR REVERSAL PROCEDURE
Step 1: Remove the dryer door
1 Make sure that the power cord is unplugged.
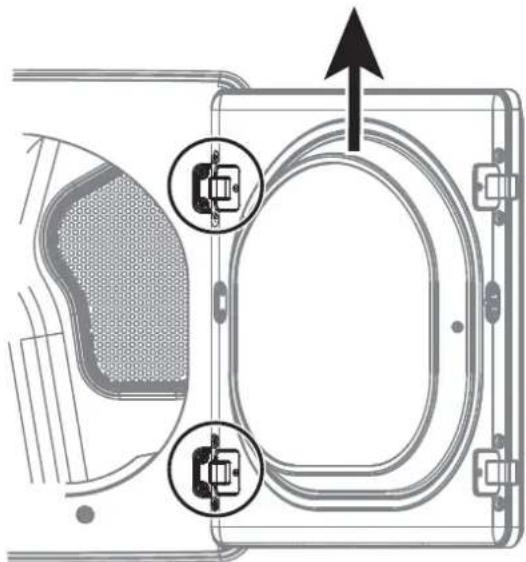
2 While supporting the door, remove the four hinge screws from the door, then lift the door to remove it and set the door aside.
Step 2: Move the door hinges covers
1 Use a flat-blade screwdriver to remove the two hinge covers from the side that you want the door to swing from.
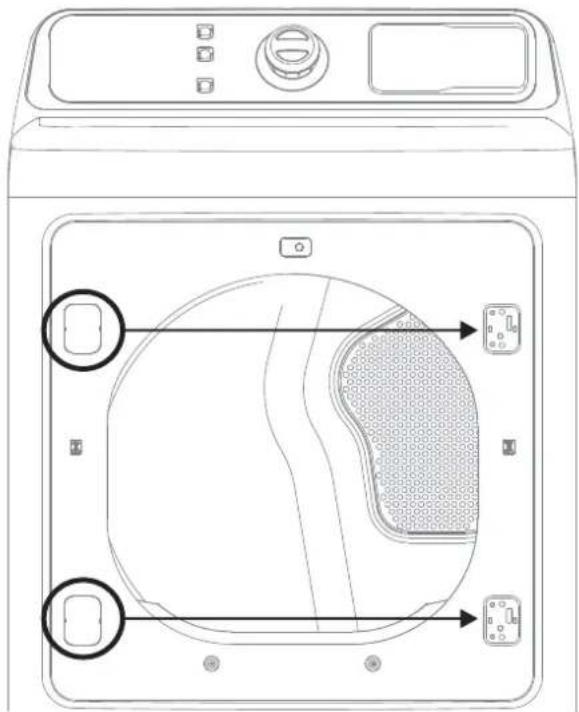
2 Install the two hinge covers on the opposite side.
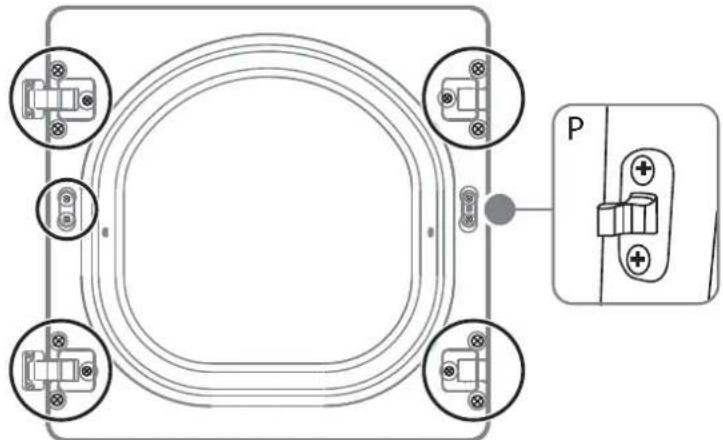
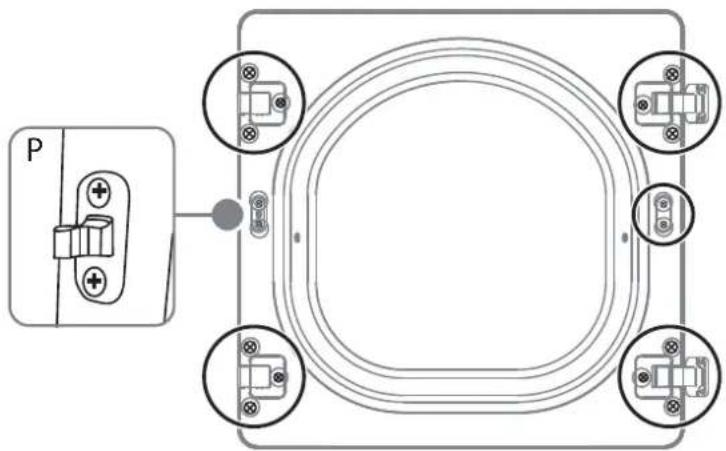
Step 3: Rotate the door frame
1 Remove the 16 screws that hold the door frame to your dryer.
Note
Two of the screws secure the door latch (P) to the door frame. You will need to attach the latch when you reassemble the door.
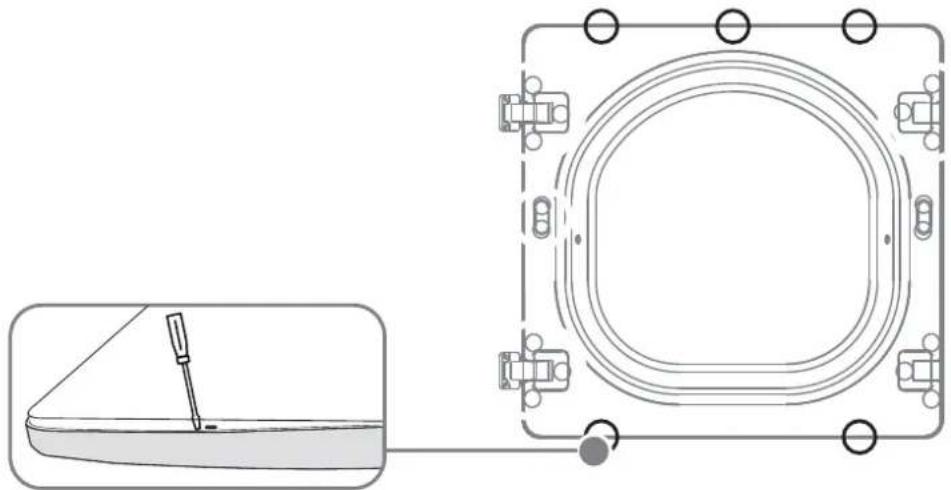
2 Use a flat-head screwdriver to pry open the 5 tabs, pull the inside door panel from the outside door panel.
3 Move the hinges, hinge covers, and door latch to the other side of the door.
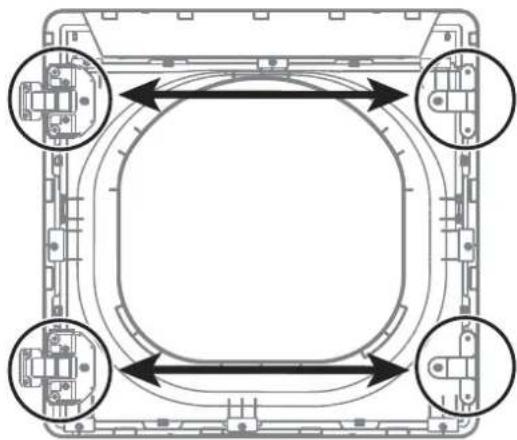
4 Secure the door frame to your dryer using the 16 screws you removed in Step 1. Make sure that you attach the door latch (P) with two of the screws.
Step 4: Install the dryer door on the other side
1 Align the hinges on the door with the hinge screw holes on the front of your dryer.
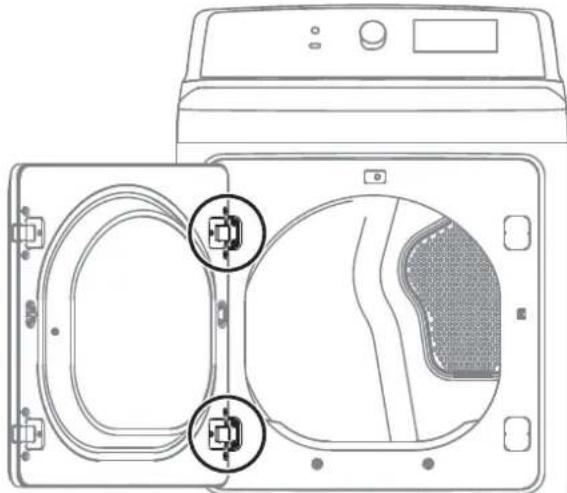
2 Secure the door with the four screws you removed in Step 1: Remove the dryer door
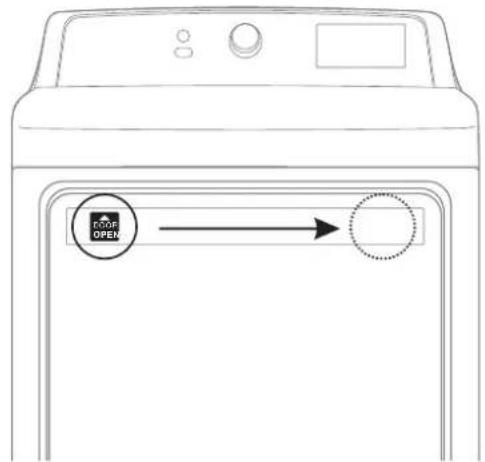
Step 5: Replace the door sticker on the other side
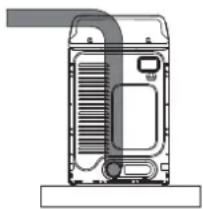
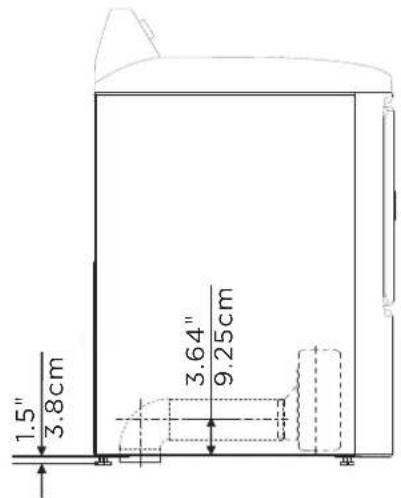
Your new dryer is shipped to vent to the rear. It can also be configured to vent to he bottom or left side (as seen from the front).
An Adapter kits which are standard components can be purchased from any retailer. This kit contains the necessary duct components to change the dryer vent location.
Tools and materials you will need
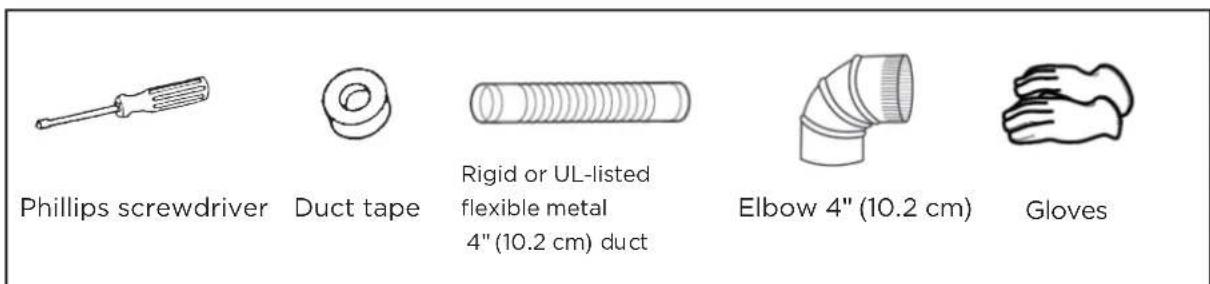
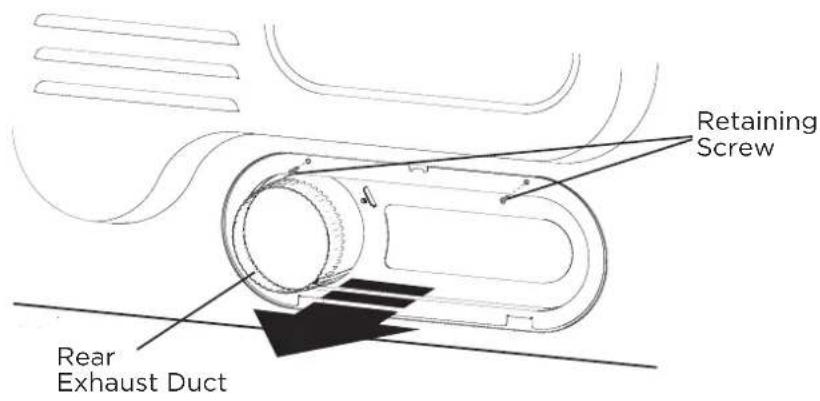
- Remove the rear exhaust retaining screws. Pull out the exhaust duct.
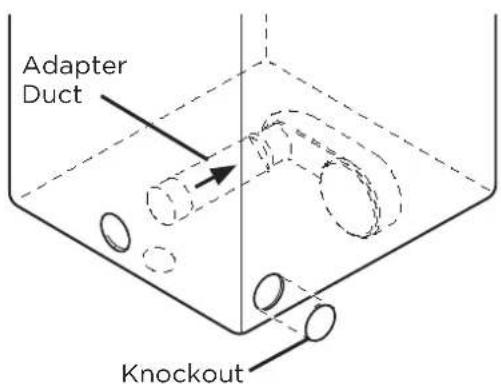
Option 1: Side venting
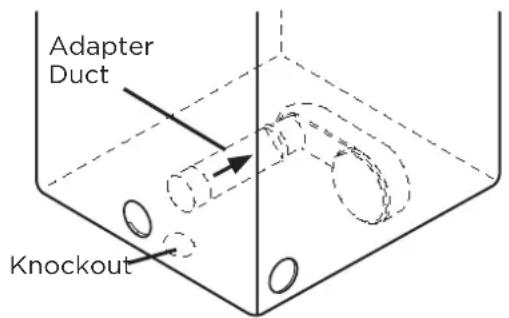
- Press the tabs on the knockout and carefully remove the knockout for the desired vent opening.
Attach the adapter duct onto the blower housing of the dryer as shown.
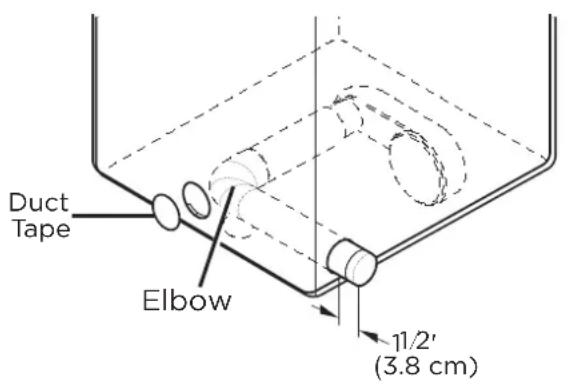
- Preassemble a 4 inches (10.2cm) elbow to the next 4 inches (10.2cm) duct section, and secure all joints with duct tape. Be sure that the male end of the elbow faces AWAY from the dryer.
Insert the elbow/duct assembly through the side opening and attach it onto the adapter duct.
Secure in place with duct tape. Be sure that the male end of the duct protrudes 1.5 inches (3.8cm) to connect the remaining ductwork.
Attach duct tape to the back of the dryer.
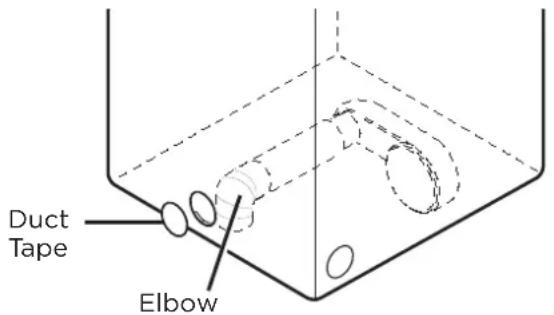
Option 2: Bottom venting
- Press the tabs on the knockout and carefully remove the knockout for the desired vent opening.
Attach the adapter duct onto the blower housing of the dryer as shown.
- Insert the 4 inches (10.2cm) elbow through the rear opening and attach it onto the adapter duct.
Be sure that the male end of the elbow faces down through hole in the bottom of the dryer.
Secure in place with duct tape. Attach duct tape to the back of the dryer.
Dimensions for installation
- Rear Venting (Default)

- Side Venting
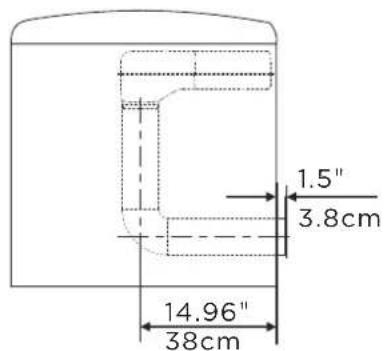
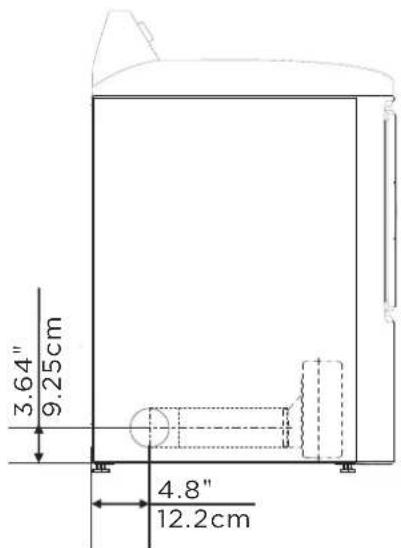
- Bottom Venting
DRYERUSE
CONTROL PANEL

WARNING
To reduce the risk of fire, electric shock, or injury to persons, read the IMPORTANT SAFETY INSTRUCTIONS before operating the appliance.
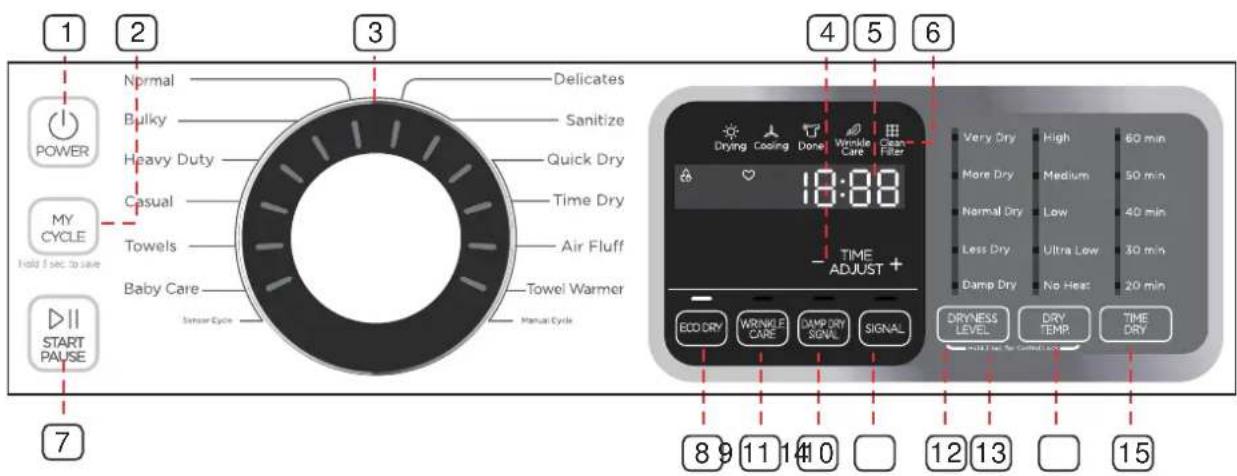

POWER
Press to turn your dryer on or off. If your dryer is on for more than 10 minutes without any buttons being pressed, it automatically turns off.

MY CYCLE
Press and hold for 3 seconds to remember your favourite drying cycle. Press once to load your favourite cycle setting.

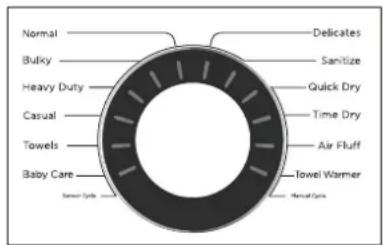
Cycle selector
Select your desired cycle for the type of load.
The cycle you select determines the heat control for the cycle.
The Normal, Delicates, Bulky, Heavy Duty, Casual, Towels, Baby Care and Sanitize cycles are Sensor Dry cycles.
The Air Fluff, Time Dry, Quick Dry and Towel Warmer cycles are Manual Dry cycles.
FOLLOW CLOTHES LABEL RECOMMENDATIONS.

TIME ADJUST
These buttons are effective only for Manual cycles. Push these buttons to change the drying time you prefer. Push repeatedly to get your desired drying time.
5 Digital display
This digital will display the time of cycle you are setting or remaining time of cycle operating.
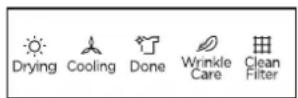
6 Cycle status display
The relative indicator graphic or text will be lit when the dryer is in its drying program. When the whole program is finished, the "Done" indicator graphic will flash to remind you to unload your laundry.
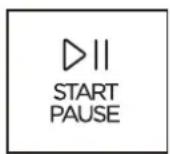
7 START/PAUSE
Press to start or pause the program. You can't change any setting except add a garment.
ECO DRY
Press to select the Eco Dry cycle. The Eco Dry cycle is a power saving mode that reduces power while providing efficient drying performance.
9 WRINKLE CARE
Press once to add the Wrinkle Care step into the operating program.
Press again to cancel selection.
Wrinkle Care provides approximately 90 minutes of intermittent tumbling in unheated air at the end of the cycle to reduce wrinkling. The load is already dry, and can be removed at any time during the Wrinkle Care cycle.
10 DAMP DRY SIGNAL
This function is useful when you want to take some garments out for ironing. The unit will beep 6 times when the moisture in the clothes is good for ironing. At this time, you can take those garments out and continue drying the other by pressing the "START/PAUSE" button once.
NOTE: The unit will not stop operating if you don't take those garments out for ironing.
11 SIGNAL
Press once to stop the buzzer sound.
Press again to activate the sound.
Your selection will be kept until next pressing.
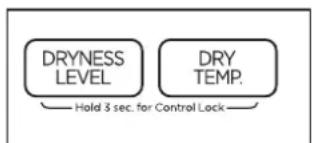
12 DRYNESS LEVEL
Press the button to select the dryness level. Different dryness level will result in different drying time. For clothes to be ironed manually, a lower dryness level should be selected.
13 Control lock
Press the "DRYNESS LEVEL" and "DRY TEMP." together to activate the Control lock function. Press again for another 3 seconds to deactivate the function. All buttons except the "POWER" will be out of function when Control lock is activated.
14 DRY TEMP.
Press the button to select the drying temperature.
High - For sturdy cottons or those labeled Tumble Dry.
Medium - For permanent press, synthetics, lightweight cottons, or items labeled Tumble Dry Medium.
Low - For lower heat than Medium to dry synthetic or washable knit fabrics.
Ultra Low - For heat sensitive items labeled Tumble Dry Low or Tumble Dry Warm.
No Heat - Provides just the air cycle without any heat.
15 TIME DRY
This button is a quick selection for Time Dry setting.
DRYING A LOAD OF LAUNDRY
1. Power on your dryer.
- Press this Power button to power your dryer on.
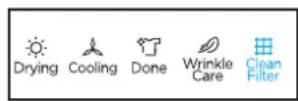
- The "Clean Filter" light in the process bar will flash 10 times when your dryer is powered on
- You should clean the filter before the dryer is loaded.
2. Load your dryer.
- Place only one wash load in your dryer at a time.
- Mixed loads of heavy and light weight fabrics will dry differently, which may result in lightweight fabrics being dry while heavy fabrics remain damp at the end of a drying cycle.
- Add one or more similar items to your dryer when only one or two articles of clothing need drying. This improves the tumbling action and drying efficiency.
- Overloading restricts tumbling action, resulting in uneven drying as well as excessive wrinkling of some fabrics.
3. Select the appropriate cycle and options for the load.
- Select the appropriate cycle by using the Cycle Selector according to the cycle chart on page 38.
- Select the appropriate options by using buttons according to the chart on page 38.
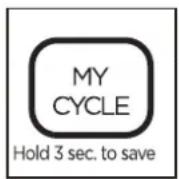
- Your favourite drying Cycle
Once you have set the cycle selector and option function, you can push and hold the "MY CYCLE" button for 3 seconds to save this setting as your favourite cycle before starting the unit.
- When you want to use your saved cycle and settings again, press the "MY CYCLE" button.
4. Start your dryer.
Pressing START/PAUSE button will start the selected cycle. To PAUSE cycle press START/PAUSE button then open the door. To resume operation after closing the door always press START/PAUSE. Opening the door during the operation will instantly stop operation and will require pressing the START/PAUSE button to resume operation.
| Cycle | Fabric type | Dry Temp | Day Temp | Time WRINKLE | DAMP | TIME | ECHO | Default | Wet load | max amount |
| SIGNAL | DAMP | Damp Dry | Damp Dry | Damp Dry | max amount | |||||
| Bulky Blanks Under | High | Very Dry | N 65min Y | |||||||
| Cusual Wrinkle- | Medium | 219 Very Dry | N | |||||||
| Free cottons synthetic | More Dry | Normal Dry | ||||||||
| Towels Towels Coatings | More Dry | Normal Dry | ||||||||
| Towels Towels Cottons | More Dry | Normal Dry | ||||||||
| Towels Towels Cottons | More Dry | Normal Dry | ||||||||
| Towels Towels Cottons | More Dry | Normal Dry | ||||||||
| Towels Towels Cottons | More Dry | Normal Dry | ||||||||
| Towels Towels Cottons | More Dry | |||||||||
| Towels Towels Cottons | More Dry | |||||||||
| Towels Towels Cottons | More Dry | |||||||||
| Towels Towels Cottons | More Dry | |||||||||
| Towels Towels Cottons | More Dry | |||||||||
| Baby Care | Clothing | N | ||||||||
| Baby Care | Clothing | N | ||||||||
| Baby Care | Clothing | N | ||||||||
| Baby Care | Clothing | N | ||||||||
| Baby Care | Clothing | N | ||||||||
| Baby Care | Clothing | N |
- Table in grey is an initial setting. "Y" are all optional functions you can select.
- For even better drying effect, please select higher dryness level.
- Default times can change automatically depending on moisture content of your specific load.
- FOLLOW GARMENTS LABELS REQUIREMENTS.
Load Size Recommendations:
For best results, follow the wet load size recommendations noted for each cycle.

Small load: Fill the dryer drum with 3-4 items, not more than 1/4 full.

Medium load: Fill the dryer drum up to about 1/2 full.
Large load: Fill the dryer drum up to about 3/4 full. Do not overload. Items need to tumble freely.
5. Unloading your laundry.
After the cycle is done, the "Done" light will flash, and the dryer will beep 6 times.
CONTROL LOCK
Your dryer has a control lock feature to prevent children from playing with your dryer. When you turn on the control lock, the only button that works is "POWER".
- You can turn on your dryer, set this function, then turn it off.
- When you do so, even if the unit is powered on, you still cannot start it before the Control Lock function is deactivated.
- 7KLV IXQFWLRQ ZLOO QRW EH FDQFHOOHG LI \RXU loses power, such as when you unplug it or the power turns off.
Press and hold both the "DRYNESS LEVEL" and "DRY TEMP." buttons for three seconds.
The control lock ico turns on.
To turn off the control lock, press and hold both the "DRYNESS LEVEL" and "DRY TEMP." buttons for three seconds.
ECO DRY

- This function will reduce the energy consumption by reducing drying temp but increasing operation time.
FILTER CLEAN
Lint filter
To prevent a risk of fire, make sure to clean the lint filter before or after every load.
- To shorten drying time.
- For better performance and energy efficiency.
CAUTION
- Do not operate your dryer without the lint filter in place.
- Do not use a damage or broken lint filter. This may reduce performance and/or cause fire.
SPECIAL LAUNDRY TIPS
Please follow the care label or manufacturer's instructions for drying special items. If care label instructions are not available, use the following information as a guide.
| Items Drying guide | |
| Bedspreads & Comforters | ·Follow the care label instructions or dry in Bulky cycle. ·Make sure the item is thoroughly dry before using or storing. ·May require repositioning to ensure even drying. |
| Blankets | ·Use the Normal cycle and dry only one blanket at a time for best tumbling action. ·Make sure the item is thoroughly dry before using or storing. ·May require repositioning to ensure even drying. |
| Curtains & Draperies | ·Use the Casual cycle, medium temperature and less dry to help minimize wrinkling. ·Dry these in small loads for best results and remove as soon as possible. |
| Cloth Diapers | ·Use the Normal cycle on High temperature for soft fluffy diapers. |
| Down Filled Items (jackets, sleeping bags, comforters, etc.) | ·Use the Normal cycle on medium temperature. ·Add a couple of dry towels to shorten drying time and absorb moisture. |
| Foam Rubber (rug backs, stuffed toys, shoulder pads, etc.) | ·DO NOT dry on a heat setting. Use the Air Fluff cycle (no heat). WARNING: Drying a rubber item with heat may damage it or create a fire hazard. |
| Pillows | ·Use the Normal cycle. ·Add a couple of dry towels and a pair of clean sneakers to help the tumbling action and to fluff the item. DO NOT dry kapok or foam pillows in the dryer. You can dry these items in the dryer as long as you use the air fluff cycle. |
| Plastics (shower curtains, outdoor furniture covers, etc.) | ·Use the Air fluff cycle or the Time Dry cycle on the Low or Ultra Low temperature setting depending on the care label instructions. |
Items NOT to dry:
- Fiberglass items (curtains, draperies, etc.)
- Woolens, unless recommended on the label.
- Items spotted or soaked with vegetable or cooking oils.
DRYER CARE

WARNING
- Certain internal parts are intentionally not grounded and may present a risk of electric shock only during servicing. Service Personnel - Do not contact the following parts while the appliance is energized: inlet valve, control board and temperature-regulating thermistor (located on blower housing).
CLEANING AND MAINTENANCE
CONTROL PANEL
- Clean with a soft, damp cloth. Do not use abrasive substances.
- Do not spray cleaners directly on the panel.
- The control panel finish may be damaged by some laundry pretreatment soil and stain remover products. Apply such products away from your dryer and wipe up any spills or overspray immediately.
STAINLESS STEEL OR ANODIZED DRUM
- To clean the stainless steel or anodized drum, use a damp cloth with a mild, non-abrasive cleaner suitable for stainless steel and anodized surfaces.
- Remove the cleaner residue and dry with a clean cloth.
DRYER EXTERIOR
- Clean with a soft, damp cloth. Do not use abrasive substances.
- Protect the surface from sharp objects.
- Do not place any heavy or sharp objects or a detergent box on the dryer. Keep them on the purchased pedestal or in a separate storage box. This may scratch or damage the top cover of the dryer.
- Since the entire dryer has a high-gloss finish, the surface can be scratched or damaged.
- Avoid scratching or damaging the surface when using the dryer.
DRYER EXHAUST SYSTEM
- Should be inspected and cleaned yearly to maintain optimum performance.
- Disconnect the exhaust duct from the dryer and from the exhaust hood (at the exhaust outlet) outside of the building.
- Check the interior of the duct and remove any lint accumulation.
- Be sure that lint is removed from the exhaust hood. Lint may collect in the exhaust hood so that the flappers or louvers will not open or close completely.
After cleaning the exhaust hood, check that the flapper or louvers move freely.
- Reassemble the exhaust duct and hood, checking that the joints are secure and sealed.
- Operate the dryer and verify that the exhaust air is not obstructed in the vent and that there are no leaks in the system.
- The outside exhaust hood should be cleaned more frequently to ensure proper operation.
TROUBLESHOOTING
CHECK THESE SOLUTIONS IF YOUR DRYER...
If your dryer has any of the following problems, you can check the solutions listed below before making a service call. This will help you save time and money.
| Problem Solution | |
| The unit doesn’t start. | Make sure the door is latched shut. Be sure the power cord is plugged into a live electrical outlet. Check the home’s circuit breaker and fuses. Press the Start/Pause button again if the door is opened during the cycle. |
| The unit doesn’t heat. | Check the home’s circuit breaker and fuses. Select a heat setting other than Air fluff and check that the Temp selection is not on “No heat”. Clean the lint filter and exhaust duct. Dryer may have moved into the cool-down process of the cycle. |
| Doesn’t dry. | Check all of the above, plus... Be sure the exhaust hood outside the home can open and close freely. Check exhaust system for lint buildup. Ducting should be inspected and cleaned annually. Use a 4” rigid metal exhaust duct. Do not overload. 1 wash load = 1 dry load. Sort heavy items from lightweight items. Large, bulky items like blankets or comforters may require repositioning to ensure even drying. Load may be too small to tumble properly. Add a few towels. |
| The unit is noisy. | Check the load for objects such as coins, loose buttons, nails, broken zips, etc. Remove promptly. It is normal to hear the dryer heating element cycle on and off during the drying cycle. Be sure the dryer is leveled properly as outlined in the installation instruction. It is normal for the dryer to hum due to the high velocity of air moving through the dryer drum and exhaust system. |
| Clothes are unevenly dried. | Seams, pockets, and other similarly heavy areas may not be completely dry when the rest of the load has reached the selected dryness level. This is normal. Select the Extra Dry setting if desired. If one heavy item is dried with a lightweight load, such as one towel with sheets, it is possible that the heavy item will not be completely dry when the rest of the load has reached the selected dryness level. Sort heavy items from lightweight items for best drying results. |
| Shuts off before load is dry. | Dryer load is too small. Add more items or a few towels and restart the cycle. Dryer load is too large. Remove some items and restart the dryer. |
| The unit has a special odour. | Household odours from painting, varnishing, strong cleaners, etc. may enter the dryer with surrounding room air. This is normal as the dryer draws the air from surrounding air space of the dryer locations. When these odours linger in the air, ventilate the room completely before using the dryer. |
| Odours remain in clothing after refresh | Fabrics containing strong odours should be washed utilizing desired wash cycle. |
| Garments still wrinkled after Wrinkle-prevent | Small loads of 1 to 4 items work best. Load fewer garments. Load similar-type garments. |
| Lint on clothes | Clean lint filter before every cycle. Some fabrics are lint producers (for example, a fuzzy white cotton towel) and they should be dried separately from clothes that are lint trappers (for example, a pair of black linen pants). Divide larger loads into smaller loads for drying. Check pockets thoroughly before washing and drying clothes. |
ERROR CODES
| Error Code Possible Cause Solutions | ||
| C9 | The PCB failed. Call the service center for help do not use dryer. | |
| E4 | The humidity sensor failed. | The unit will complete the current operating cycle but garments could be over dried. The unit can still operate under the Time Cycles. Call the service center for help. |
| E5 | The temperature sensor failed. | Call the service center for help do not use dryer. |
APPENDIX
FABRIC CARE CHART
The following symbols provide garment care direction. The Clothing care labels include symbols for washing, bleaching, drying and ironing, or dry cleaning when necessary. The use of symbols ensures consistency among garment manufacturers of domestic and imported items. Follow care label directions to maximize garment life and reduce laundering problems.
| Wash Cycle Special Instructions | Warning Symbols for Laundering | ||||
| Normal | Line Dry/Hang to Dry | Do Not Wash | |||
| Permanent Press / Wrinkle Resistant / Wrinkle Control | III | Drip Dry Do Not | Wing | ||
| Gentle/Delicates Dry | Hat | Do Not Bleach | |||
| Hand Wash Heat Setting Do Not Tumble Dry | |||||
| Water Temperature** | High | No Steam (added to iron) | |||
| *** | Hot Medium Do Not | ||||
| ** | Warm Low | Dryclean | |||
| • | Cold | ○ | Any Heat | ○ | Dry Clean |
| Bleach | ● | No Heat/Air | ● | Do Not Dry Clean | |
| Any Bleach (when needed) | Iron-Dry or Steam Temperatures | □ | Line Dry/ Hang to Dry | ||
| Only Non-Chlorine (color-safe) Bleach (when needed) | High | III | Drip Dry | ||
| Tumble Dry Cycle | Medium Dry Flat | ||||
| Normal | Low | ||||
| Permanent Press / Wrinkle Resistant / Wrinkle Control | For machine-washable wool. Loads should be under 8 pounds. | ||||
| Gentle/ Delicates | |||||
**The number of dots represent appropriate wash water temperatures for various items. The temperature range for Hot is 105^-125^ / 41^-52^ , for Warm 85^-105^ / 29^-41^ and for Cold 60^-85^ / 16^-29^ .
MIDEA LAUNDRY DRYER LIMITED WARRANTY
ATTACH YOUR RECEIPT HERE. PROOF OF PURCHASE IS REQUIRED TO OBTAIN WARRANTY SERVICE.
Please have the following information available when you call the Customer Service Centre:
Name, address and telephone number
Model number and serial number
A clear, detailed description of the problem
Proof of purchase including dealer or retailer name and address, and date of purchase
IF YOU NEED SERVICE:
- Before contacting us to arrange service, please determine whether your product requires repair. Some questions can be addressed without service. Please take a few minutes to review the Troubleshooting section of the User Manual, or email customerserviceusa@midea.com.
- All warranty service is provided exclusively by our authorized Midea Service Providers, in the U.S. and Canada.
Midea Customer Service
In the U.S.A. or Canada, call 1-866-646-4332 or email customerserviceusa@midea.com.
If outside the 50 States of the United States or Canada, contact your authorized Midea dealer to determine whether another warranty applies.
LIMITED WARRANTY
WHAT IS COVERED
FIRST YEAR LIMITED WARRANTY (PARTS AND LABOUR)
For one year from the date of purchase, if this major appliance is installed, operated and maintained according to instructions attached to or furnished with the product, Midea America (Canada) Corp. (hereafter "Midea") will pay for factory specified replacement parts and repair labour to correct defects in materials or workmanship that existed when this major appliance was purchased, or at its sole discretion replace the product. In the event of product replacement, your appliance will be warranted for the remaining term of the original unit's warranty period.
YOUR SOLE AND EXCLUSIVE REMEDY UNDER THIS LIMITED WARRANTY SHALL BE PRODUCT REPAIR OR REPLACEMENT AS PROVIDED HEREIN. Service must be provided by a Midea designated service company. This limited warranty is valid only in the 50 States of the United States or Canada and applies only when the major appliance is used in the country in which it was purchased. This limited warranty is effective from the date of original consumer purchase. Proof of original purchase date is required to obtain service under this limited warranty.
LIMITED WARRANTY
WHAT IS NOT COVERED
- Commercial, non-residential or multiple-family use, or use inconsistent with published user, operator or installation instructions.
- In-home Instruction on how to use your product.
- Service to correct improper product maintenance or installation, installation not in accordance with electrical codes or correction of household electrical system (i.e. house wiring, fuses, etc.).
- Consumable parts (i.e. light bulbs, batteries, air or water filters, etc.).
- Defects or damage caused by the use of non-genuine Midea parts or accessories.
- Damage from accident, misuse, abuse, fire, floods, electrical issues, acts of God or use with products not approved by Midea.
- Repairs to parts or systems to correct product damage or defects caused by unauthorized service, alteration or modification of the appliance.
- Cosmetic damage including scratches, dents, chips, and other damage to appliance finishes unless such damage results from defects in materials and workmanship and is reported to Midea within 30 days.
- Routine maintenance of the product.
- Products that were purchased "as is" or as refurbished products.
- Products that have been transferred from its original owner.
- Discoloration, rust or oxidation of surfaces resulting from caustic or corrosive environments including but not limited to high salt concentrations, high moisture or humidity or exposure to chemicals.
- Pick-up or delivery. This product is intended for in-home repair.
- Travel or transportation expenses for service in remote locations where an authorized Midea servicer is not available.
- Removal or reinstallation of inaccessible appliances or built-in fixtures (i.e. trim, decorative panels, flooring, cabinetry, islands, countertops, drywall, etc.) that interfere with servicing, removal or replacement of the product.
- Service or parts for appliances with original model/serial numbers removed, altered or not easily identified.
The cost of repair or replacement under these excluded circumstances shall be borne by the customer.
DISCLAIMER OF IMPLIED WARRANTYES
IMPLIED WARRANTY, INCLUDING ANY IMPLIED WARRANTY OF MERCHANTABILITY OR IMPLIED WARRANTY OF FITNESS FOR A PARTICULAR PURPOSE, ARE LIMITED TO ONE YEAR OR THE SHORTEST PERIOD ALLOWED BY LAW. Some states and provinces do not allow limitations on the duration of implied warranties of merchantability or fitness, so this limitation may not apply to you. This warranty gives you specific legal rights, and you also may have other rights that vary from state to state or province to province.
DISCLAIMER OF REPRESENTATIONS OUTSIDE OF WARRANTY
Midea makes no representations about the quality, durability, or need for service or repair of this major appliance other than the representations contained in this warranty. If you want a longer or more comprehensive warranty than the limited warranty that comes with this major appliance, you should ask Midea or your retailer about buying an extended warranty.
LIMITATION OF REMEDIES; EXCLUSION OF INCIDENTAL AND CONSEQUENTIAL DAMAGES
YOUR SOLE AND EXCLUSIVE REMEDY UNDER THIS LIMITED WARRANTY SHALL BE PRODUCT REPAIR AS PROVIDED HEREIN. MIDEA SHALL NOT BE LIABLE FOR INCIDENTAL OR CONSEQUENTIAL DAMAGES. Some states and provinces do not allow the exclusion or limitation of incidental or consequential damages, so these limitations and exclusions may not apply to you. This warranty gives you specific legal rights, and you also may have other rights that vary from state to state or province to province.
PROTECT YOUR PRODUCT:
We will keep the model number and date of purchase of your new Midea product on file to help you refer to this information in the event of an insurance claim such as fire or theft.
Register online at www.midea.com/ca/support/Product-registration
OR
Please fill out and return it to the following address:
Midea America Corp. 759 Bloomfield Ave #386, West Caldwell, NJ 07006-6701
detach here)
| Name: Model#: Serial #: Card: |
| Address: Date Purchased: Store / Dealer Name: |
| City: State: Zip: E-mail Address: |
| Area Code: Phone Number: |
| Did you purchase an additional warranty: As your Primary Residence? (Y/N) |
| How did you learn about this product: □ Advertising □ In Store Demo □ Personal Demo |
Information collected or submitted to us is only available to company internal employees for purposes of contacting you or sending you emails, based on your request for information and to company service providers for purposes of providing services relating to our communications with you. All data will not be shared with other organizations for commercial purposes.
Séchuse électrique