MLC31N5AWW - Washing machine MIDEA - Free user manual and instructions
Find the device manual for free MLC31N5AWW MIDEA in PDF.

| Product Type | All-in-One Washer-Dryer |
| Brand | Midea |
| Model | MLC31N5AWW |
| Washing Capacity | Up to 12 lb (5.4 kg) |
| Width | 59.5 cm (23.5 in) |
| Total Weight (with water and load) | 90 kg (200 lb) |
| Power Supply | 120 V, 60 Hz, 15-20 A, 3-prong grounded plug |
| Required Water Pressure | 0.05 MPa to 1 MPa |
| Wash Programs | Normal, Wrinkle Free, Heavy Soil, Bulky, Sportswear, Spin Only, Rinse and Spin, Tub Clean, Timed Dry, Auto Dry, Sanitary, Baby, Wool, Delicates, Quick Wash |
| Options | Delay Start, Time Save, Extra Rinse, Easy Iron, Prewash, Child Lock, Temperature and Spin Speed Selection |
| Spin Speed | Adjustable: No Spin, Low, Medium, High, Maximum |
| Water Temperature | Very Hot, Hot, Warm, Economy, Cold |
| Drying | Extra Dry, Normal, Delicate (condensation drying, no external vent) |
| Cleaning and Maintenance | Exterior and interior cleaning, control panel, detergent drawer, water inlet filters, drain filter, tub clean program, defrosting, storage |
| Safety | Child Lock, door locked during operation, mandatory grounding, emergency stop, overflow protection |
| Warranty | 1 year parts and labor, 10 years on inverter motor (parts only), lifetime stainless steel drum (parts and labor) |
| Electrical Specifications | Dedicated 12 A circuit protected by 12 A breaker, time-delay fuse recommended |
| Water Connection | Two water hoses (hot and cold) included, connection to faucets with adequate water pressure |
| Drainage | Drain hose, recommended height 122 cm (48 in), minimum diameter 5 cm (2 in) for wall drain |
| Error Codes | E30 (door open), E10 (water intake issue), E21 (drainage fault), E12 (overflow), EXX (other) |
| User Manual | 92 pages, available for free download at notice-facile.com |
Frequently Asked Questions - MLC31N5AWW MIDEA
User questions about MLC31N5AWW MIDEA
0 question about this device. Answer the ones you know or ask your own.
Ask a new question about this device
Download the instructions for your Washing machine in PDF format for free! Find your manual MLC31N5AWW - MIDEA and take your electronic device back in hand. On this page are published all the documents necessary for the use of your device. MLC31N5AWW by MIDEA.
USER MANUAL MLC31N5AWW MIDEA
Power supply: 120V Frequency: 60 Hz
USER MANUAL & INSTALLATION INSTRUCTIONS
Warning:
Before using this product, please read this manual carefully and keep it for future reference.
The design and specifications are subject to change without prior notice for product improvement. Consult with your dealer or manufacturer for details.
version A
MODEL NUMBER MLC31N5AWW
Dear user
THANK YOU and CONGRATULATIONS on your purchase of this high-quality Midea product. Your Midea washer dryer combo is designed for reliable, trouble-free performance. Please take a moment to register your new washer dryer combo.
Register your new washer dryer combo at www.midea.com/ca/support/Product-registration
For future reference, record your product model and serial numbers located on the inside frame of the machine.
Model Number
Serial Number
SAFETY INSTRUCTIONS. 4
FEATURES 9
Package contents 9
Main components 10
Electrical requirements 11
Water requirements. 12
Drainage requirements 12
INSTALLATION INSTRUCTIONS 13
Unpacking your washer. 13
Choosing a location 14
Tools you will need 18
Connect the water ho ses 18
Connect the drain hose 20
Level your washer 22
Power on 23
Run a test cycle 24
OPERATION INSTRUCTIONS 25
Control panel 25
Washing a load of laundry 27
Setting the child lock 31
- Washer options and settings 32
CARE AND CLEANING 33
Cleaning and maintenance 33
BEFORE YOU CALL FOR SERVICE 39
Error codes 41
WARRANTY 42
PRODUCT REGISTRATION 44
READ AND KEEP THESE INSTRUCTIONS FOR FUTURE REFERENCE
This manual contains important information on the installation, use, and care of your appliance. Please read this manual carefully before installation and operation of this machine to prevent injury and property damage.
Warnings and Important Safety Instructions in this manual DO NOT cover all possible conditions and situations that may occur. It is your responsibility to use common sense, caution and care when installing, maintaining and operating your washer.
CAUTION RISK OF ELECTRIC SHOCK DO NOT OPEN

SAFETY INSTRUCTIONS
YOUR SAFETY AND THE SAFETY OF OTHERS ARE VERY IMPORTANT
To prevent injury to the user or other people and property damage, the instructions shown here must be followed. Incorrect operation due to ignoring of instructions may cause harm or damage, including death.
The level of risk is shown by the following indications.

This indicates that hazards or unsafe practices may cause serious personal injury or death.
To reduce the risk of fire, explosion, electric shock or personal injury when using your washing machine, you SHOULD follow these basic safety precautions.

This indicates that hazards or unsafe practices may cause minor personal injury or property damage.

This symbol indicates that there are important operating and maintenance instructions in the literature accompanying your washing machine

WARNING
Do not store or use gasoline or other flammable vapors and liquids in the vicinity of this or any other appliance.

WARNING
Basic precautions
To reduce the risk of fire, electric shock, or injury to persons when using your appliance, follow basic precautions:
- Read all instructions before using the appliance.
- Do not wash articles that have been previously cleaned in, washed in, soaked in, or spotted with gasoline, dry-cleaning solvents, or other flammable or explosive substances, as they give off vapors that could ignite or explode.
- Do not add gasoline, dry-cleaning solvents, or other flammable or explosive substances to the wash water. These substances give off vapors that could ignite or explode.
- Never stop a tumble dryer before the end of the program and spread out so that the heat is dissipated.
- Use copper conductors only.
-
To reduce the risk of electric shock or fire, do not use a flexible power-supply cord with this appliance.
-
Always unplug the washing machine from the power supply before attempting any service. Disconnect the power cord by grasping the plug, not the cord.
- To reduce the risk of fire, clothes, cleaning rags, mop heads and the like which have traces of any flammable substance, such as vegetable oil, cooking oil, petroleum based oils or distillates, waxes, fats, etc. must not be placed in the washing machine. These items may contain flammable substances which, even after washing, may smoke or catch fire.
- Never place items in the washer that have been dampened with gasoline or any combustible or explosive substance. Do not wash or dry anything that has been soaked in or spotted with any type of oil (including cooking oils). Doing so can result in fire, explosion, or death.
- Do not allow children to play on or in the appliance. Close supervision of children is necessary when the appliance is used near children.
- Glass door or protector may be very hot during the operation. Keep kids and pets far away from the machine during the operation.
- This machine is not intended for use by persons (including kids) with reduced physical, sensory or mental capabilities, or lack of experience and knowledge, unless they have been given supervision or instruction concerning use of the machine by a person responsible for their safety.
- Do not machine wash fiberglass materials (such as curtains and window coverings that use fiberglass materials.) Small particles may remain in the washing machine and stick to fabrics in subsequent wash loads causing skin irritation.
- Before the appliance is removed from service or discarded, remove the door and cut off the power cord.
- Do not reach into the appliance if the tub or agitator is moving.
- Do not install or store this appliance where it will be exposed to the weather.
- Do not tamper with controls.
- Do not repair or replace any part of the appliance or attempt any servicing unless specifically recommended in the user-maintenance instructions or in published user-repair instructions that you understand and have the skills to carry out.
- Make sure that all pockets are emptied. Sharp and rigid items such as coin, brooch, nail, screw or stone etc. may cause serious damages to this machine.
- Pull out its plug and cut off the water supply after the operation.
- Make sure that the water inside the drum has been drained before opening its door. Please do not open the door if there is any water visible.
- Do not try to repair the machine by yourself. The machine may be damaged or more troublesome repair work may be needed and even dangerous operation may take place if it is repaired by any inexperienced or unqualified staff.
- If the plug (power cord) is damaged, it shall be replaced by the manufacturer or a service agent to avoid any danger.
-
Take care that power voltage and frequency shall be identical to those of washing machine.
-
Do not use any socket with rated current less than that of the washing machine. Never pull out a power plug with a wet hand.
- To ensure your safety, the power cord plug must be inserted into an grounded three-pole socket. Check carefully and make sure that your socket is properly and reliably grounded.
- This washing machine should only be repaired and serviced by qualified technicians.
- If connected to a circuit protected by fuses, use time-delay fuses with this appliance.
- To reduce the risk of electric shock, disconnect this appliance from the power supply before attempting any user maintenance other than cleaning the lint trap. Turning the controls to the OFF position does not disconnect this appliance from the power supply.
- Certain internal parts are intentionally not grounded and may present a risk of electric shock only during servicing. Service Personnel - Do not contact the following parts while the appliance is energized: electrical value, drain pump, door lock, fan motor (comb).

WARNING
Grounding
- This appliance must be grounded. In the event of a malfunction or breakdown, grounding will reduce the risk of electric shock by providing a path of least resistance for the electric current. This appliance is equipped with a cord that has an equipment grounding conductor and a grounding plug. The plug must be plugged into an appropriate outlet that is properly installed and grounded in accordance with all local codes and ordinances.
- Improper connection of the equipment grounding conductor can result in electric shock. Connect to an individual branch circuit. Check with a qualified electrician or serviceman if you are in doubt as to whether the washer is properly grounded.
- DO NOT modify the plug provided with the appliance if it will not fit the outlet. Please have a proper outlet installed by a qualified electrician.
- Risk of Electric Shock: Appliance grounded to neutral conductor through a link. Grounding through the neutral conductor is prohibited for (1) new branch-circuit installations, (2) mobile homes, (3) recreational vehicles, and (4) areas where local codes prohibit grounding through the neutral conductor.
For installations where grounding through the neutral conductor is prohibited: (1) disconnect the link from the neutral, (2) use grounding terminal or lead to ground appliance, and (3) connect neutral terminal or lead to branch-circuit neutral in usual manner (where the appliance is to be connected by means of a cord kit use 4-conductor cord for purpose).
For installations where grounding through the neutral conductor is prohibited, the 3-conductor cord or cable assembly must be replaced by a 4-conductor cord or cable assembly. See manufacturer's instructions.

WARNING
To reduce the risk of fire, do not use heat when drying articles containing foam rubber or similarly textured rubber-like materials.

WARNING
Before operating this machine
- Packing materials may be dangerous to the kids. Please keep all packing materials (plastic bags, foams, etc.) far away from kids.
- Washing machine shall not be installed in a bath room or very wet rooms as well as in rooms with explosive or caustic gases.
- Make sure that the water and electrical devices must be connected by a qualified technician in accordance with the manufacturer's instructions and local safety regulations.
- Before operating this machine, all packages and transport bolts must be removed. Otherwise, the washing machine may be seriously damaged while washing the clothes.
- Before washing the clothes the first time, the washing machine shall be operated in Cotton and hot water procedures without the clothes inside.
- This washing machine is for indoor use only.

WARNING
Attention shall be paid to protecting the machine
- Do not climb up and sit on the top cover of the machine.
- Do not lean against the machine door.
- Please do not close the door with excessive forces. If it is found difficult to close the door, please check if the excessive clothes are put in or distributed well.

WARNING
Cautions during handling machine
- Transport bolts shall be reinstalled to the machine by a specialized person.
The accumulated water shall be drained out of the machine. - Handle the machine carefully. Never hold each protruded part on the machine while lifting.
Machine door can not be used as the handle during the conveyance.

WARNING
Cautions when washing clothes
- Cold city water shall be used and hot water may also be connected according to the local situations.
- Your washing machine is only for home use and is only designed for the textiles suitable for machine washing.
- Flammable and explosive or toxic solvents are forbidden. Gasoline and alcohol etc. shall not be used as detergents. Please only select the detergents suitable for machine washing, especially for front loading.
- Do not wash carpet in this machine.
- Never refill the water by hand during washing.
- Always follow the fabric care instructions recommended by the clothing manufacturer.
- Do not use the washing machine if it has a worn power cord or loose plug. Contact an authorized service agent.
- Do not operate the washing machine if any guards, panels and/or fasteners, except transport fixing bolts, have been removed. Check
- the fill hose connections on a regular basis to ensure that they are tight and not leaking.
- Do not operate the washing machine if parts are missing or broken.
- Do not touch the door if washing at high temperatures.
NOTE:
- The IMPORTANT SAFETY INSTRUCTIONS indicated in this manual do not cover all possible conditions which may occur. Common sense, caution, and care must be exercised when installing, maintaining, or operating the washing machine.
- Always contact your dealer, distributor, service agent, or the manufacturer about any problems or conditions that you do not understand.

WARNING
Installation requirements
- This machine must be grounded properly. If there is any short circuit, grounding can reduce the danger of electrical shock. This machine is equipped with power cord, which includes plug, grounding wire at grounding terminal.
- Washing machine shall be operated in a circuit separate from other electrical appliances. Otherwise, the power protector may be tripped or the fuse may be burned out.
NOTE: Environmental Protection
- If you plan to dispose of this machine, please comply with the local waste disposal regulations. Cut off the power cord so that it will not be put into reuse.
- Remove the door so that kids and animals will not be trapped in the machine.
- Do not use excessive detergents.
FEATURES
Package Contents
Make sure that the following items came with your washer
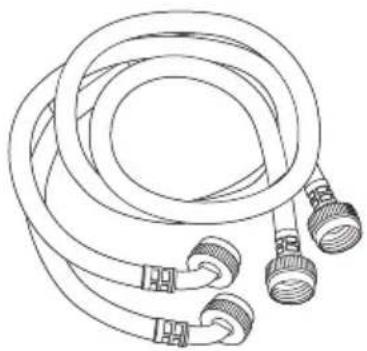
Water hoses (x2)
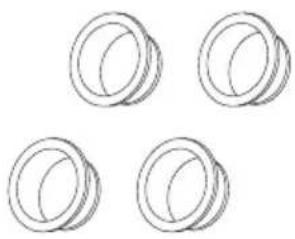
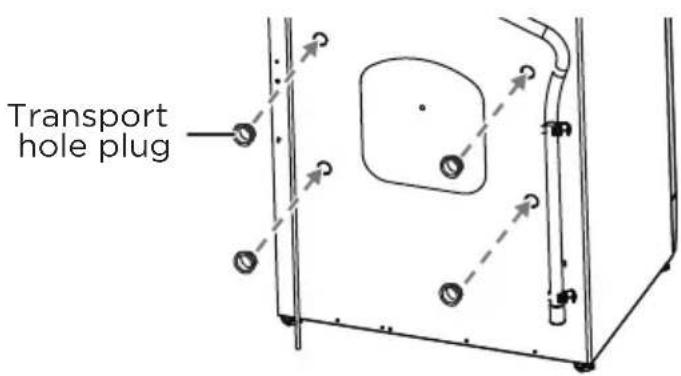
Transport hole plugs (x4)

Hose holder (1)

User Guide
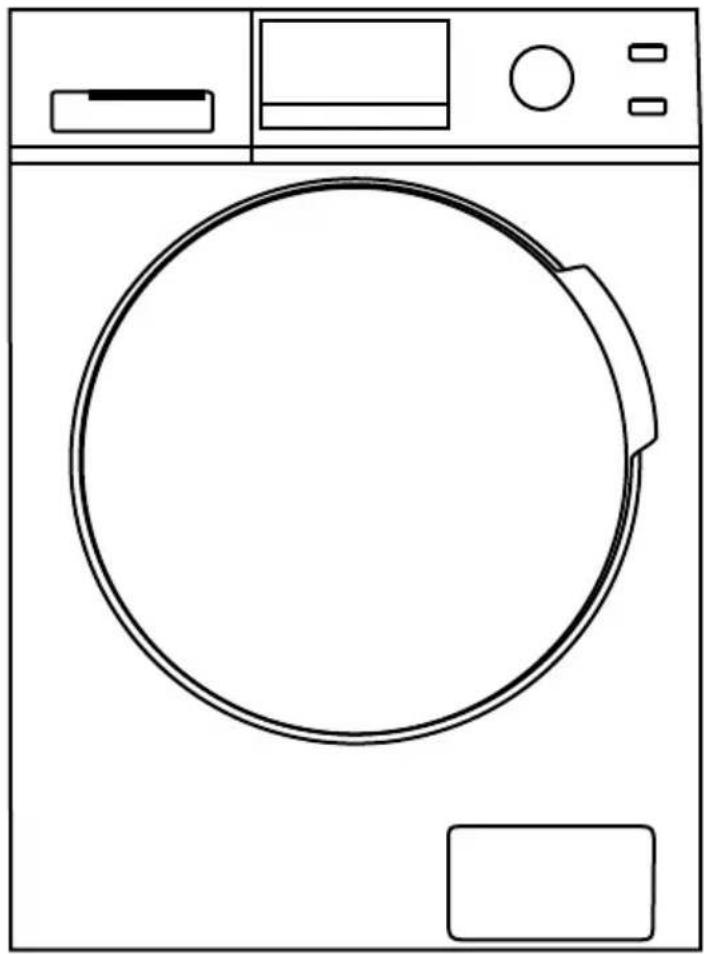
Main components
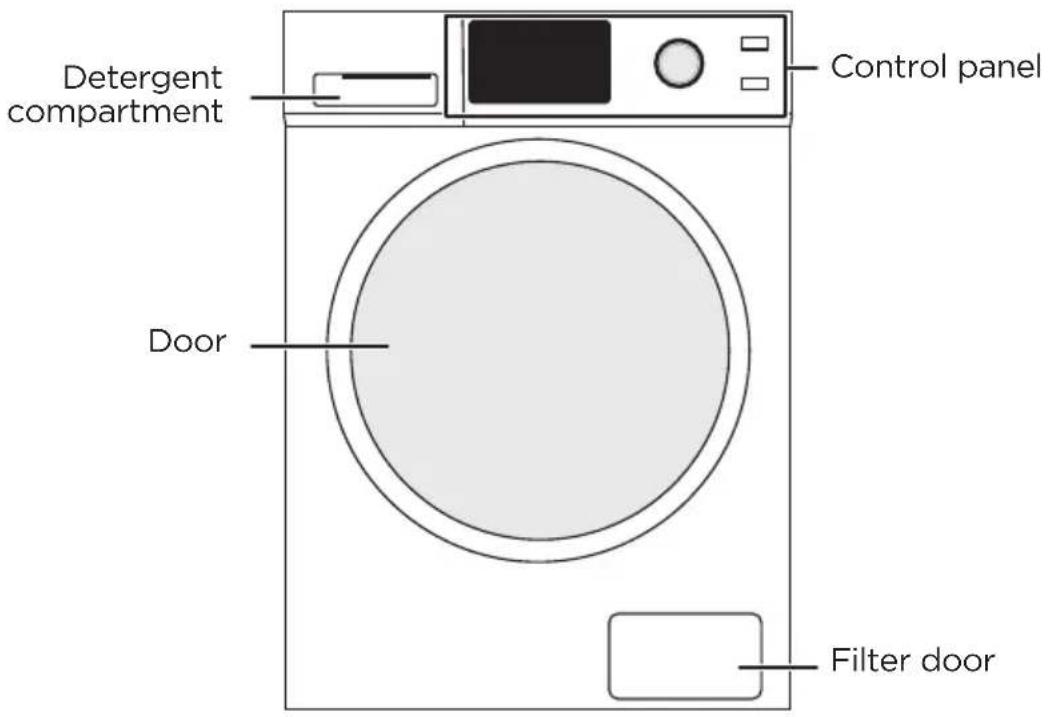
Front
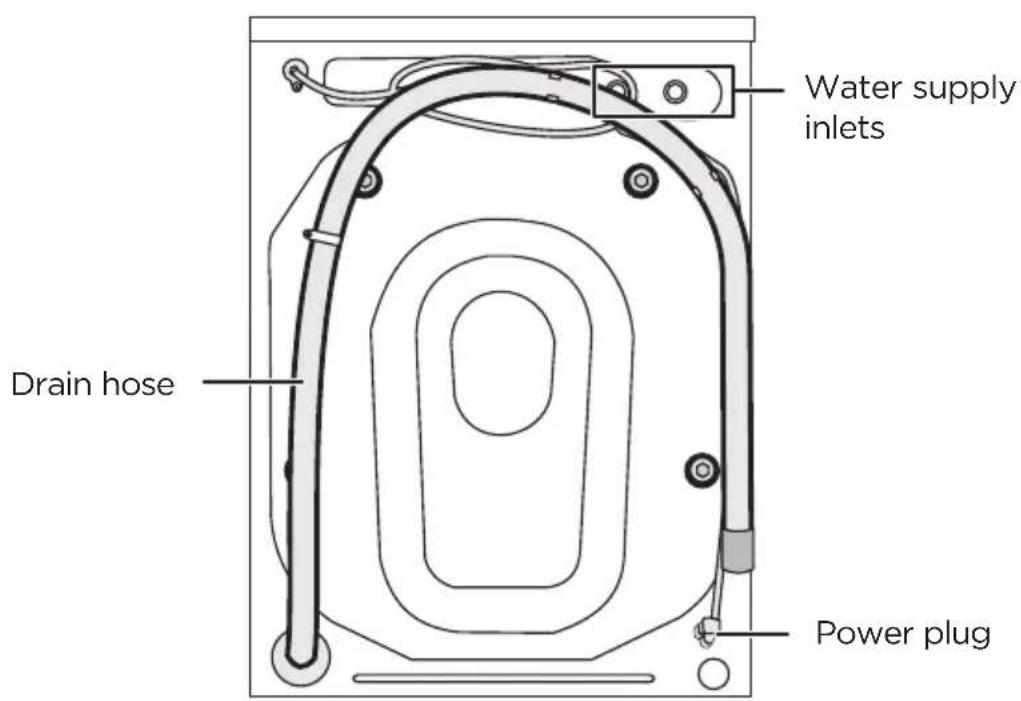
Back
INSTALLATION REQUIREMENTS
Electrical requirements

WARNING
To reduce the risk of fire, electric shock, or injury to persons, read the SAFETY INSTRUCTIONS before operating this appliance.

WARNING
- Connect to grounded 3-prong outlet with an individual 12 amp branch circuit protected by a 12 amp circuit breaker.
- Connect to individual branch circuit.
- Do not remove the ground prong.
- Do not use an adapter.
Failure to follow these instructions can result in electrical shock, fire, or death.
Electrical grounding is required for your washer.
- You must ground your washer. In the event of a malfunction or breakdown, grounding reduces the risk of electric shock by providing a path of least resistance for the electric current.
- A 120 v, 60 Hz, AC-only,15 or 20 amp, fused electrical supply is required. We recommend that you use a time-delay fuse or provide a circuit serving only your washer.
- Your washer is equipped with a power cord that has a 3-prong grounding plug. To minimize possible shock hazard, the cord must be plugged into a matched 3-prong, grounding type outlet, grounded in accordance with local codes and ordinances. If a 3-prong outlet is not available, contact a qualified electrician to install one. Do not use an adapter.
- If codes permit and you use a separate ground wire, we recommend that a qualified electrician determine that the ground path is adequate.
- Check with a qualified electrician if you are not sure your washer is correctly grounded.
- Do not have a fuse in the neutral or ground circuit.
- Certain internal parts are intentionally not grounded and may present a risk of electric shock only during servicing. When servicing, do not contact the following parts while the appliance is energized: electrical valve, drain pump and door lock.

WARNING
- You're responsible for providing adequate electrical services for your washer.
- Never connect the ground wire to plastic plumbing lines, gas lines, or hot water pipes.
Water requirements
To fill your washer in the correct amount of time, the water pressure needs to be between 0.05 MPa~1 MPa.
If the water pressure is lower than 0.05 MPa:
- The water valve may fail or may not shut off completely.
- The time it takes to fill your washer may be longer than the time your washer controls allow. Your washer will turn off and report an error. A time-limit is built into the controls to prevent flooding in your home if a hose becomes loose.
- Water inlet hoses must be purchased separately. You can buy inlet hoses in various lengths up to 8 ft. (240 cm).
To avoid the possibility of water damage:
- Make sure that the water faucets are easily accessible.
- Turn off the faucets when you are not using your washer.
- Periodically check to make sure that water is not leaking from the water hose fittings.
Drainage requirements
The recommended height for the drain standpipe is 48 in. (122 cm).
The drain hose must be routed through the drain hose clip to the standpipe.
The standpipe must be large enough to accept the outside diameter of the drain hose.
INSTALLATION INSTRUCTIONS
Unpacking your washer

WARNING
- Packing materials can be dangerous to children. Keep all packing materials (plastic bags, polystyrene, and so on) well out of the reach of children.
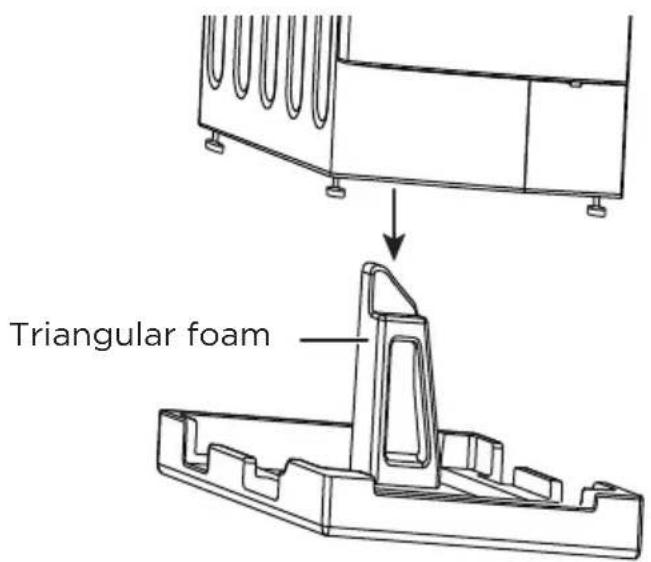
- Do not operate your washer on the foam base cushion. Doing so will result in serious vibration, which could cause equipment damage or physical injury.

CAUTION
- Your washer is heavy. You may need help to unpack and move it.
1 Remove your washer from the packaging.
2 Make sure that the small, triangular piece of foam comes off with the packaging base. If it doesn't, lay your washer on its side, remove the foam, then set your washer upright.
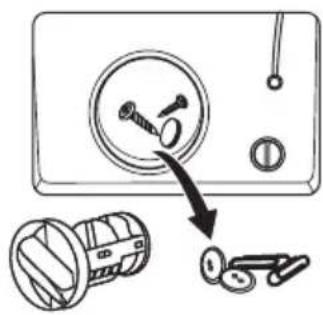
3 Remove the four transport bolts on the back of your washer.

CAUTION
If you do not remove the four bolts, your washer will make loud noise and vibrate excessively or move. This can damage your washer.
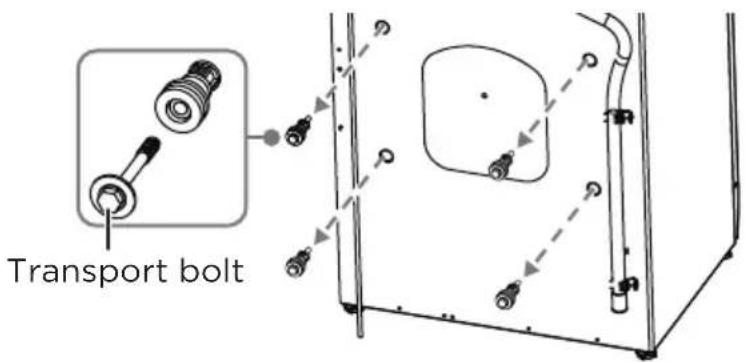
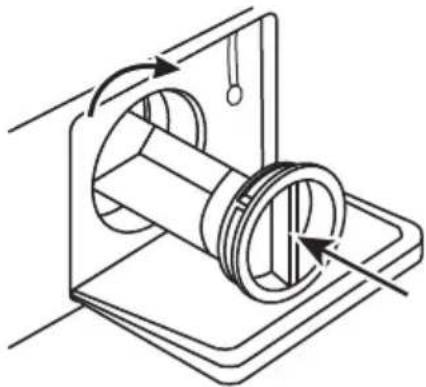
4 Cover the holes with the transport hole plugs. Keep the four bolts for future use. You need them if you want to transport your washer to another location.
Choosing a location

WARNING
- Do not install your washer in areas where water may freeze, because your washer always retains some water in its water valve, pump and hose areas. Frozen water can damage the valve, pump, hoses and other components.
- Never install on a platform or weakly supported structure.
Selecting a correct location for your washer improves performance and minimizes noise and possible washer "walk." Your washer can be installed under a custom counter or in a basement, laundry room, closet, or recessed area. See Drainage requirements on page 12. You should also consider a companion appliance (dryer) location requirements.
For best performance, you need:
-
A water heater set to deliver 120^ F( 49^ C) water to the washer.
-
A grounded electrical outlet located within 6 ft. (1.8 m) of where the power cord is attached to the back of the washer. See Electrical requirements on page 11.
- Hot and cold water faucets located within 4 ft. (1.2 m) of the hot and cold water fill valves, and water pressure of between 0.05MPa~1MPa.
- A level floor with a maximum slope of 1 in. (25 mm) under entire washer. Don't install your washer on soft floor surfaces, such as carpets or surfaces with foam backing.
- A sturdy and solid floor to support the washer with a total weight (water and load) of 200 lbs. (90 kg)
Make sure that the location is:
- Away from direct sunlight. Direct sunlight can raise the water temperature, which may cause safety risks.
An area where the temperature is above 32^ (0^) - Away from the heat resources such as coal or gas. Heat sources can raise the water temperature, which may cause safety risks.
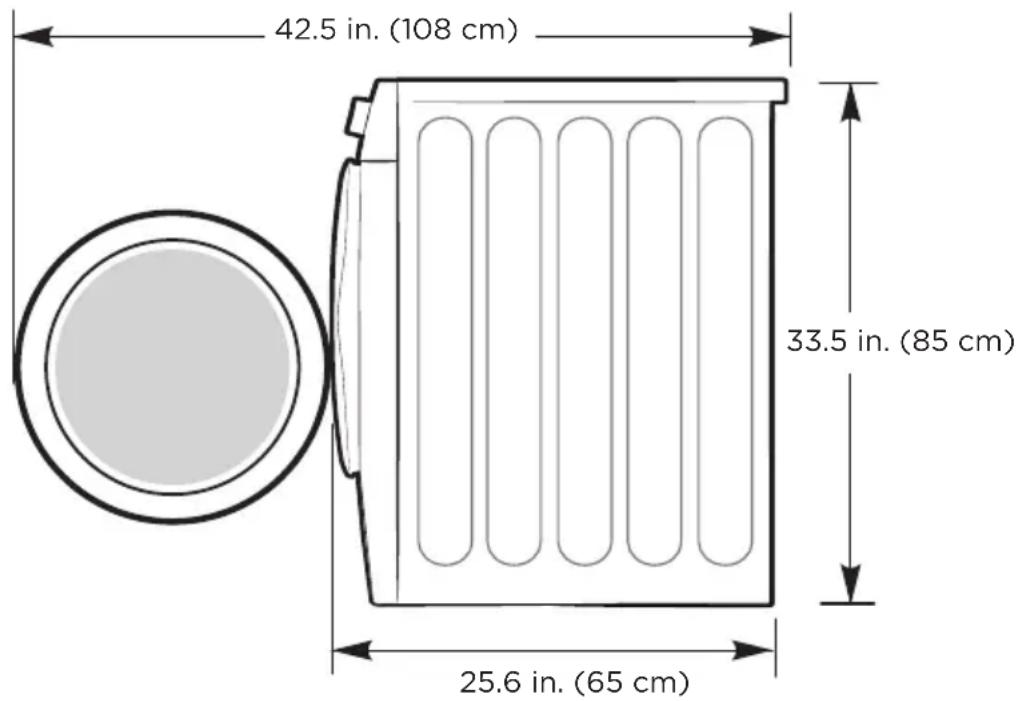
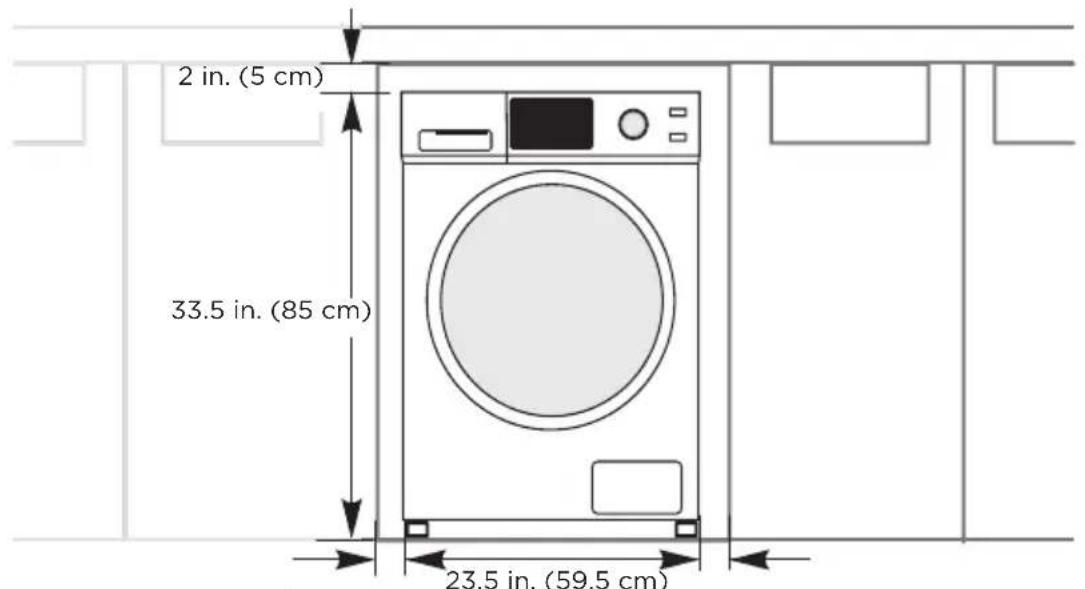
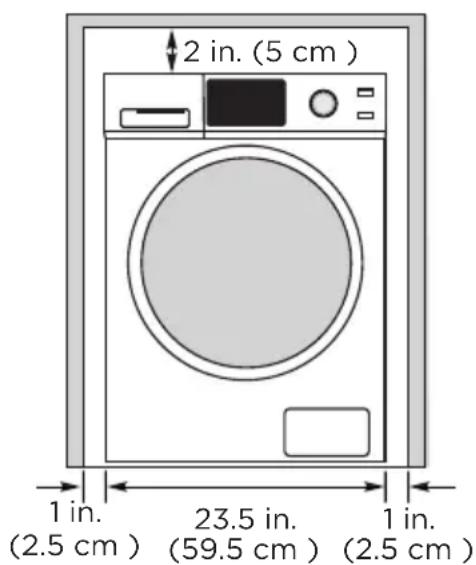
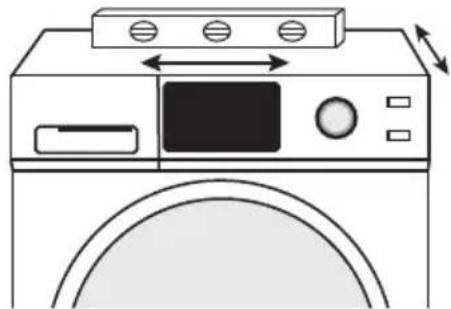
Washer dimensions and installation measurements
23.5 in. (59.5 cm)
Installing under a counter
1 in. (2.5 cm) 1 in. (2.5 cm)
Installing in an alcove or closet
If you install your washer in an alcove or closet, the front of the closet must have two unobstructed air openings for a combined minimum total area of 72 sq. in. (465 square cm) with a minimum clearance of 3 in. (7.6 mm) at the top and bottom. A slatted door with equivalent space clearance is acceptable.
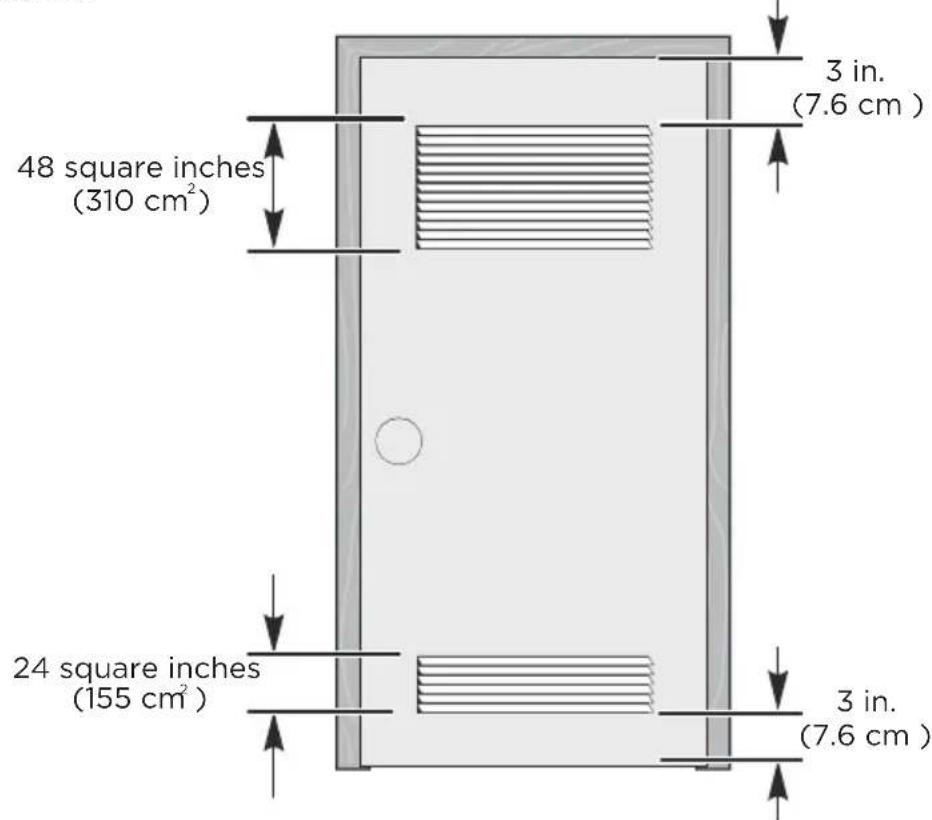
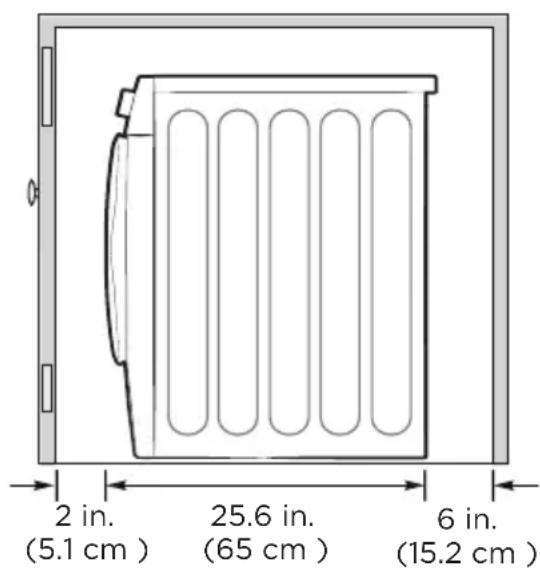
Minimum clearances between your washer and adjacent walls or other surfaces are:
Either side: 1 in. (2.5 cm)
Rear: 6 in. (15.2 cm)
- Closet Front: 2 in. (5.1 cm)
Top: 2 in. (5.1 cm)
If you install your washer and dryer side-by-side in a closet, the closet front must have an unobstructed air opening of at least 72 square inches (465 square cm).

WARNING
Before you install your washer, make sure that the location:
- Is a hard, level surface without carpeting or soft flooring that can obstruct ventilation.
- Is away from direct sunlight.
- Has adequate ventilation.
- Is not exposed to freezing temperatures (below 32^ or 0^ ).
- Is away from heat sources such as oil or gas.
- Has enough space so that the washer does not rest on its power cord.
Tools you will need
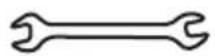
3/8" open-end wrench
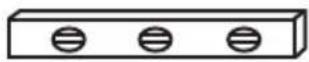
Level
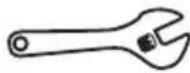
Adjustable wrench or 7/16" socket with ratchet
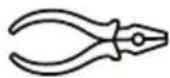
Pliers Nut driver with ratchet

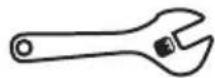
Adjustable wrench or 9/16" open-end wrench
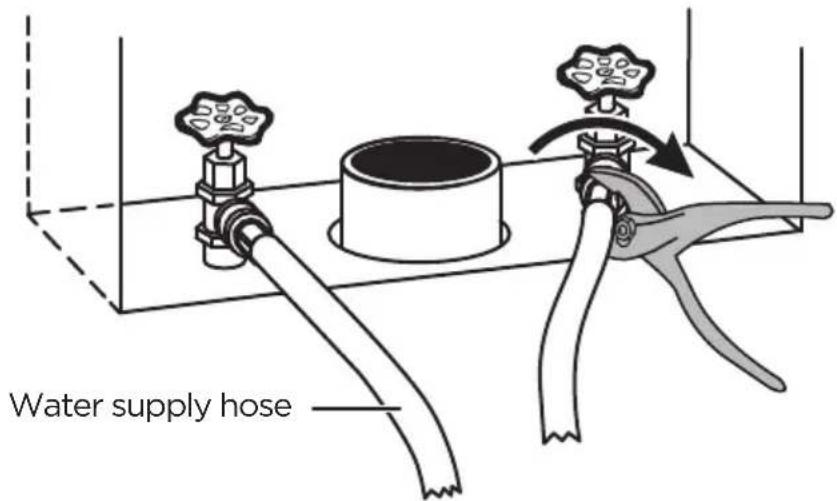
Connect the water hoses

Caution
- Use new water supply hoses. Using old hoses can result in leakage or overflow that can damage your property.
-
Do not connect multiple water supply hoses together to increase the length of the hose. Hoses connected this way can leak and cause electrical shock. If a hose is too short, replace the hose with a longer, high-pressure hose.
-
Connect the water hoses to the hot and cold water faucets.
- Tighten the hose and faucet fittings by hand until they are snug. Tighten them an additional two-thirds of a turn with pliers or a wrench. Pull the water supply hoses downwards to make sure that they are connected securely.

Caution
Don't overtighten the fittings or apply tape or sealant to the faucets or water supply intakes. This can damage the fittings.
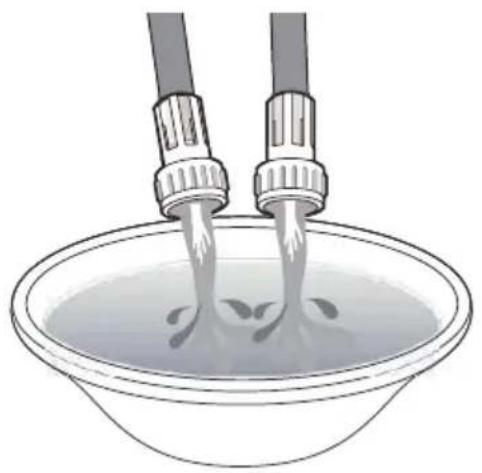
- Place the unconnected ends of the hoses into a bucket and turn on the faucets connected to the water supply hoses for 10 or 15 seconds to remove any foreign substances. Turn off the faucets.
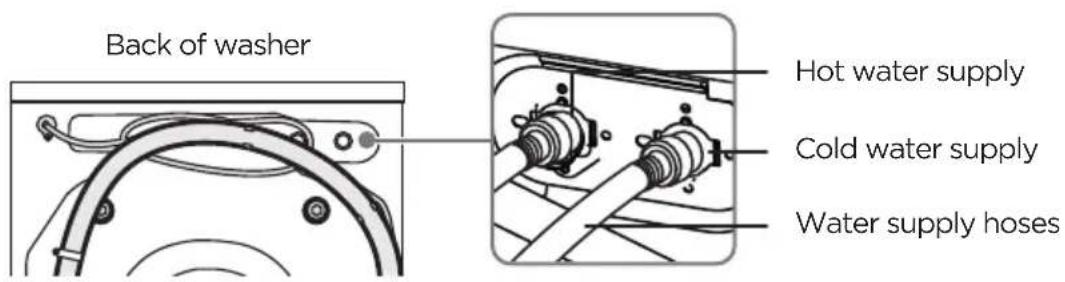
- Connect the ends of the water supply hoses to the water supply intake connections at the top of the washer. The water supply hose connected to the hot faucet must be connected to the hot water supply intake and the water hose connected to the cold faucet must be connected to the cold water supply intake.
NOTE:
- If you don't want to use the hot water faucet or you don't have a hot water faucet, you have to adjust the Temp. setting to cold, or your washer will have an Error code E10.
-
If you only have cold water faucet, we recommend that you buy and install a T-branch pipe.
-
Tighten the fittings by hand until they are snug, then tighten them an additional two-thirds of a turn with pliers or a wrench.

Caution
- Don't overtighten the fittings or apply tape or sealant to the faucets or water supply intakes. This can damage the fittings.
-
Make sure that the water supply hoses aren't twisted or bent. A bent or twisted hose can leak and cause an electric shock because of water leakage.
-
Turn on the hot and cold water supplies, then check all the water supply intake connections and the faucets for water leaks.
Connect the drain hose

Caution
- Make sure that the connection between the drain hose and the wash basin, standpipe, or laundry tub is not airtight.
Connect the drain hose in one of the following ways.
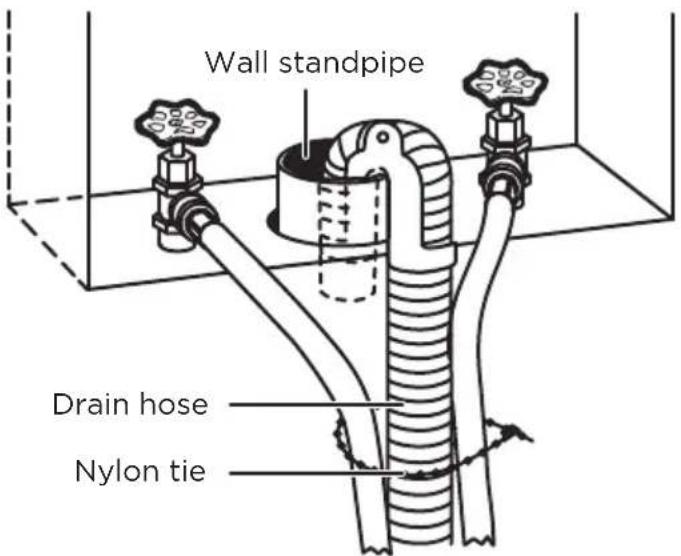
In a wall standpipe
NOTE: The wall standpipe drain requires a minimum diameter standpipe of 2^ (5 cm).
Place the drain hose into the wall standpipe. You can use a nylon ties (not included) to bundle the hoses and the drain pipe together.
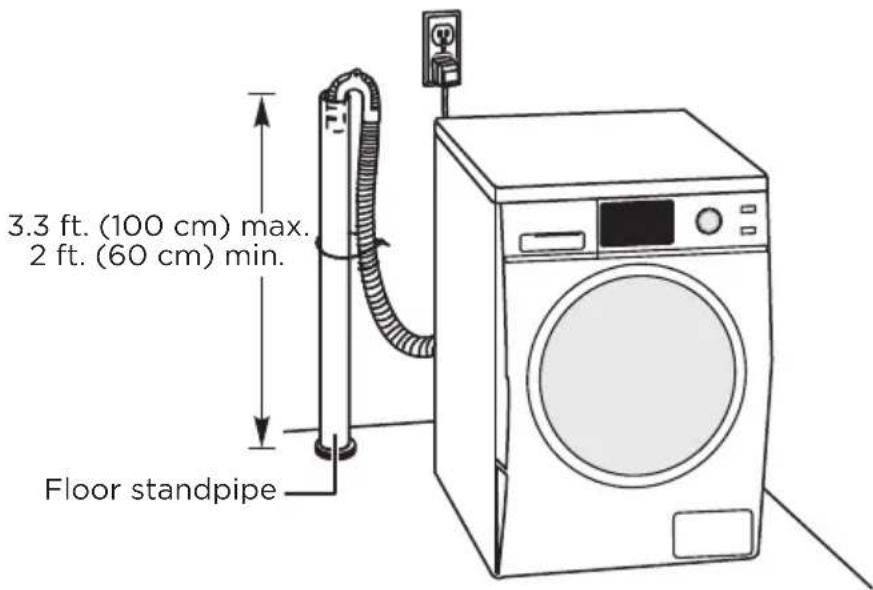
In a floor standpipe
NOTE: For a floor standpipe, the capacity must be at least 17 gal. (64 L) per minute. The top of the standpipe must be between 2 ft. (60 cm) and 3.3 ft. (100 cm) from the bottom of your washer.
Place the drain hose into the standing floor standpipe. You can use nylon ties (not included) to attach the drain hose to the standpipe.
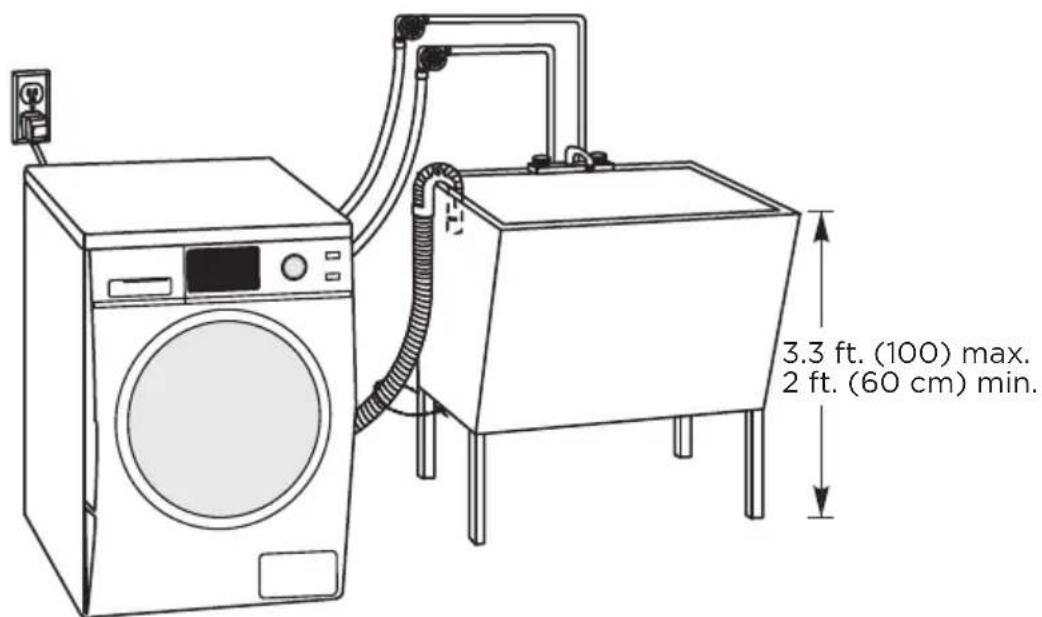
In a laundry tub
NOTE:
The laundry tub needs a minimum capacity of 20 gal. (76 L).
- The top of the laundry tub must be between 2 ft. (60 cm) and 3.3 ft. (100 cm) above the floor.
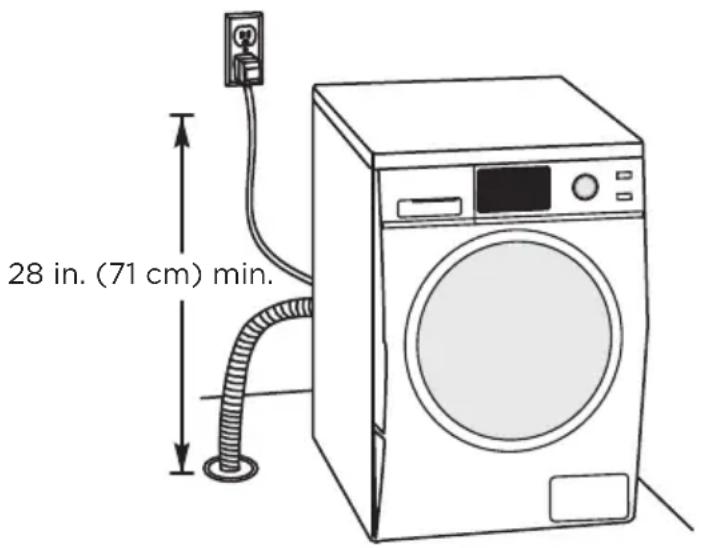
In a floor drain system
NOTE:
- A floor drain system requires a siphon break (not included). The siphon break must be a minimum of 28 in. (71 cm) from the bottom of the washer.
- If the drain hose on the washer is shorter than the siphon break distance, attach an extra drain hose (not included) to the washer's drain hose.
Place the drain hose into the floor drain system. The weight of the hose and gravity keep the drain hose in the drain.
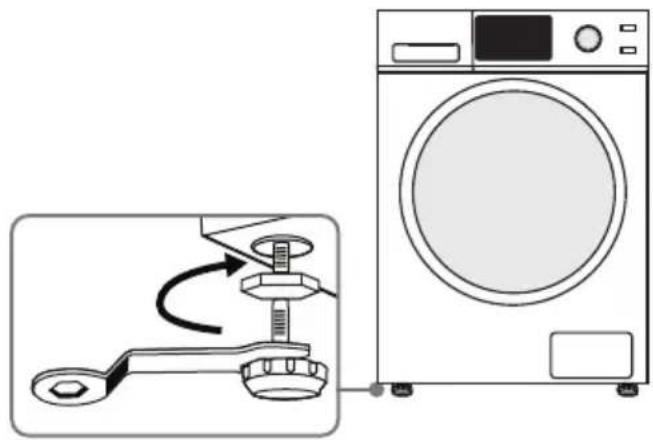
Level your washer

Caution
Don't use your washer without leveling it. If your washer isn't level, it may:
- Vibrate excessively which can cause your washer to malfunction
- Make excessive noise
Extend the leveling feet only as much as is necessary. If the feet are extended too much, your washer may vibrate.
- Make sure that the legs are flush with the washer cabinet. If needed, use a wrench to loosen the lock nut on a leg, slide the leg up, then tighten the bolt.
- Slide your washer into position.
- Press the four top corners of your washer. If your washer moves when you press a corner, the leg for that corner needs to be adjusted.
- Loosen the lock nut on the bottom of your washer, pull the leg down until it touches the floor, then tighten the nut. Extend the feet only as much as necessary. If the feet are extended too much, your washer may vibrate.
- Press the four corners again to make sure that your washer is level. If your washer is still not level, repeat step 4.
- Use a level to make sure that all four sides of your washer are level.
Power on
Plug the power cord into a well-grounded, 3-prong, 120 Volt 60Hz approved electrical outlet protected by a 12-amp fuse or comparable circuit breaker. Your washer is grounded through the third prong of the power cord.

WARNING
- Make sure that the power voltage at your location is the same as the voltage on your washer's rating label.
- Do not use a multi-purpose plug or socket.
- Do not use an adapter.
- Do not use an extension cord.
- Do not touch or pull out the plug with a wet hand.
- When you unplug the power cord, hold the plug not the power cord.
- If power cord is damaged or has any sign of being broken, replace the cord.
Run a test cycle
Run a test cycle to make sure that your washer is correctly installed.
- Leave the tub empty.
- Press the Power button to turn on your washer.
- Turn the cycle selector to select the Rinse&Spin cycle.
- Press the Start/Pause button to start the test cycle. Your washer shouldn't rock or vibrate excessively when water is filling the tub, or when washing or spinning. Your washer should drain well during the spin cycle.

CAUTION
- If you detect any water leaks while your washer is filling or draining, check the water connections. See Connect the water hoses on page 18 or Connect the drain hose on page 20.
If your washer rocks or vibrates excessively, level it again. See Level your washer on page 22.
OPERATION INSTRUCTIONS
Control panel
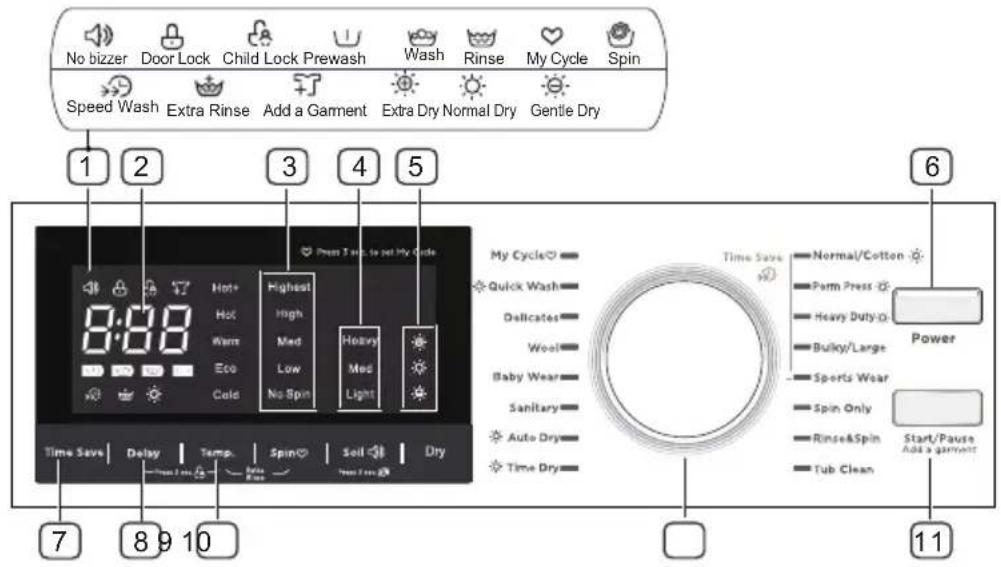
1 Status indicators
These indicators appear when you select settings and options.
2 Digital display
The initial display is the total time for the cycle you select.
While your washer is running, the display shows the cycle process and time remaining in the cycle.
Note: The time shown is an estimate based on normal operating conditions. External factors (such as the load size, incoming water temperature, and water pressure) can affect actual time.
If you set a delay time for the start of the cycle, the display shows the time when the cycle will start.
3 Spin speed
Press to select the spin speed. You can select Highest, High, Med, Low, or No Spin.
4 Soil type
Press to select the soil type.
5 Dry
Press the Dry button continuously to choose the dry level: Extra Dry / Normal Dry/Gentle Dry
Extra Dry
Normal Dry
Gentle Dry
6 Power
Press to turn your washer on or off.
Time Save
Press to shorten the washing time. See Step 7: (Optional) Decrease the wash time on page 30.
8 Delay
Press to set a delayed start time. See Step 6: (Optional) Set a delayed start time on page 30.
9 Temp.
Press to select the water temperature. You can select Hot+, Hot, Warm, Eco, or Cold. For more information, see Washer options and settings on page 32.
10 Cycle selector
Turn to select a cycle. For more information, see Washer options and settings on page 32.
11 Start/Pause
Press to start or pause the cycle.
Washing a load of laundry
- If this is the first time you are washing an item, make sure that it is color-fast. Use a white rag or towel with a little detergent to wash a hidden part of the item. If the rag or towel is stained, the item is not color-fast.
- If an item has stains, use a spot remover or gently apply a small amount of detergent to the stains, then gently scrub the stains with a brush.
- Check the manufacturer's label for special washing instructions.
- Make sure that you remove all items from pockets. Hard items, like coins, can damage your washer.
- Never wash clothes stained with chemicals such as gasoline, petroleum, benzene, paint thinner and alcohol.
- Consider using a pillow case you can close or a washing bag to protect items like bras, lacy items, and delicate items.
- Wash whites and colors separately.
- Turn items that can pill (like sweaters and sweatshirts) inside out.
NOTE:
- Never leave wet items to be washed in your washer for long periods of time. Items may mold and cause stains.
- Make sure that you check the manufacturer's label for water temperature instructions.
- Don't wash items, like ties or items with decorations, that may stretch or distort.
- Don't wash waterproof items, like rain coats, ski suits, shower curtains, and mattress pads. These items don't absorb water and may cause excessive vibration.

WARNING
To reduce the risk of fire, electric shock, or injury to persons, read the SAFETY INSTRUCTIONS before operating this appliance.
1. Select a detergent
Your washer is designed to use high efficiency (HE) detergents.
-
For the best cleaning results, use an HE detergent. We recommend that you do not use a regular detergent. HE detergents contain suppressors that reduce or eliminate suds. When fewer suds are produced, the load tumbles more efficiency and cleaning is maximized.
-
Reducing the amount of detergent may affect the quality of cleaning. Make sure that you:
-
Pre-treat stains.
- Sort carefully by color and soil level.
- Avoid overloading.
2. Turn on your washer
Press the Power button to turn on your washer. Your washer's initial settings are:
Normal cycle
Warm temperature
Medium spin speed
3. Load your washer

Caution
Before loading your laundry, make sure that you remove coins, keys, and other hard objects and close zippers. These items may damage clothes.
- Sort laundry by fabric type, soil level, color, and load size.
- Fill the tub with dry, unfolded clothes. Load the tub no more than 3/4 fill. For best performance, the maximum load size should be less than 12 lbs. (5.4kg) .
NOTE:
- Overloading may reduce washing efficiency, cause excess wear, and possibly cause creasing or wrinkling of the load.
- Wash delicate items such as bras, hosiery and other lingerie on the Delicates cycle with similar lightweight items.
- Don't overfill your washer with too many big, bulky items This could lead to unwanted vibration during the spin cycle. If this happens, remove some items and restart the washing cycle.
Always use the Bulky cycle for bulky items. - When washing heavily soiled loads, do not overload your washer to ensure good cleaning results.
- Your washer is not suitable for washing comforters. Your washer may not reach high spin speed and may result in a the wet load after spinning.
- Sometimes your washer can't reach a high spin speed because the load is out of balance. Rearrange the clothes, then try the Spin Only mode again.
4. Add detergent and additives to the compartments

Caution
- Avoid splashing or over-filling the compartment.
- Never pour undiluted liquid chlorine bleach directly onto the load or into the tub. Doing so can damage fabrics by weakening of the fibers or stripping the color.
- You can pour less than 1.7 oz. (50 ml) of liquid bleach in the main detergent compartment before your press the Start button. If you want to use more bleach, we recommend that you pour the bleach in the main detergent compartment when water flows into detergent compartment after you start your washer.
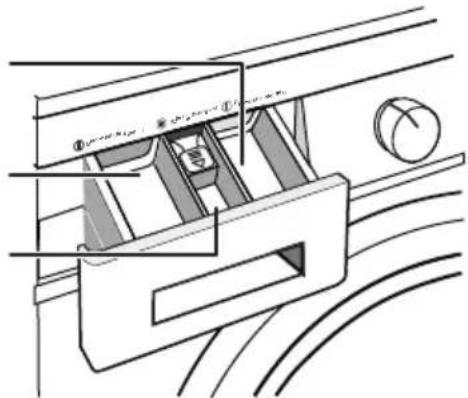
Pre-detergent compartment
Detergent compartment
Fabric softener compartment
- If you are using the Pre-Wash option, pour the recommended amount of laundry detergent directly into the pre-detergent compartment before starting your washer.
- Pour the recommended amount of laundry detergent directly into the detergent compartment before starting your washer.
If you're using color-safe bleach or liquid chlorine bleach, add it with the detergent to the detergent compartment.
NOTE:
-
When adding color-safe bleach with detergent, both laundry products must be in the same form (liquid).
If you are using powder detergent, add it to the bottom of the tub before you add the load. -
Pour the recommended amount of liquid fabric softener into the softener compartment. The dispenser automatically releases liquid fabric softener at the correct time during the rinse cycle.
5. Select the appropriate cycle and options for the load
Turn the cycle selector to select a washing cycle. For information on wash cycles, see Washer options and settings on page 32.
6. (Optional) Set a delayed start time
You can program a wash cycle, then set a time when you want a wash cycle to begin.
NOTE:
Your washer stores your settings in memory. If the power fails, press the Start/Pause button when power is restored. Your washer continues the Delay function you set.
- Turn the cycle selector knob to the cycle type you want.
- Press the Delay button repeatedly to select the delay time you want.
- The delay start time, in hours, appears on the display, in sequence, from 0 to 24, then back to 0. When you reach the time setting you want, hold the Delay button for three seconds to confirm the setting. The Delay light turns on.
- Press and hold the Start/Pause button for three seconds to start the delay timer.
- To cancel the delay start time function before you save the setting, press the Delay button until OH appears on the display.
NOTE:
- After the delay time is set, if you want to change the delay setting, press the Delay button again until the hour you want is reached. Release the button for three seconds.
If you decide to cancel the delay setting, you can either turn the cycle selector or press the Delay button until O is reached. - Ideally, you should set your cycle before setting the delay time because turning the cycle selector after you set the delay time cancels the delay function.
- You can change settings or cancel the delay start time function anytime before you press the Start/Pause button by turning the cycle selector.
- You can't change the delay start time after you press the Start/Pause button. If you pressed the Start/Pause button, you can cancel the delay start time function by pressing the Power button to turn off your washer, then pressing the button again to turn it back on.
- You can't change the Delay Start Time after the program has started.
7. (Optional) Decrease the wash time
Press the Time Save. The light turns on and the wash time decreases.
NOTE:
Time Save works for Normal/Cotton, Perm Press, Heavy Duty, Bulky/Large, and Sport Wear cycles.
8. Start your washer
- Press the Start/Pause button.
NOTE:
- If you haven't set a delayed start time or if the delay time has expired, your washer starts the cycle and the Wash light turns on.
- As your washer moves from stage to stage in the wash cycle, the related light turns on (such as Rinse or Spin).
-
If you set a delayed start time, the Delay light turns on and your washer starts counting down the start time.
-
If you need to pause the cycle (for example to add or remove items), press and hold the Start/Pause button for 3 seconds. Wait for the drum to stop, then open the door. When you're ready to resume washing, close the door, then press the button again.

Caution
Don't try to force the door open if:
The drum is moving. You will damage your washer.
- The water level is above the edge of the inner tub. Water will spill on the floor.
The water temperature is too hot. You may scald yourself.
- If you press and hold Start/Pause button for three seconds, the door won't open because the door can't match the above conditions. You should wait until the perfect time.
Setting the child lock
Your washer has a child lock function to prevent children from playing with your washer. When you turn on the child lock, the only buttons that work are the Power button and the Delay and Temp. buttons you use to turn off the child lock.
- Press and hold both the Delay and Temp. buttons for three seconds. The child lock light turns on.
- To turn off the child lock, press and hold both the Delay and Temp. buttons for three seconds.
NOTE:
- If your washer is not turned on, the child lock can still remain set. Press the Power button, turn on the child lock function, then press the Power button to turn off your washer. When you want to use your washer, you need to turn off the lock function.
Washer options and settings
- (dots) indicate options functions you can select.
| Cycle | Temp. | Spin Speed | Soil level | Time Save | Delay | Extra Rinse | Default Time (H) |
| Normal/Cotton | Warm | Med | Med | ● | ● | ● | 1:04 |
| Perm Press | Warm | High | Med | ● | ● | ● | 4:27 |
| Heavy Duty | Hot | High | Heavy | ● | ● | ● | 1:40 |
| Bulky/Large | Eco | High | Med | ● | ● | ● | 1:23 |
| Sports Wear | Warm | Highest | Heavy | ● | ● | ● | 0:57 |
| Spin Only | -- | High | -- | -- | ● | -- | 0:13 |
| Rinse & Spin | -- | High | -- | -- | ● | -- | 0:23 |
| Tub Clean | Hot+ | -- | -- | -- | ● | -- | 1:28 |
| Time Dry | -- | Highest | -- | -- | ● | -- | 1:29 |
| Auto Dry | -- | Highest | -- | -- | ● | -- | 4:19 |
| Sanitary | Hot+ | High | Heavy | -- | ● | ● | 2:18 |
| Baby Wear | Hot | High | Med | -- | ● | ● | 1:37 |
| Wool | Eco | Med | Med | -- | ● | ● | 1:01 |
| Delicates | Eco | Med | Med | -- | ● | ● | 0:58 |
| Quick Wash | Cold | High | Light | -- | ● | -- | 2:16 |
Note:
The parameters in this table are only for user's reference. The actual parameters maybe different with the parameters in above table. Dry function can be chose for those programme with
CARE AND CLEANING

WARNING
- Don't use solvents to clean your washer. They can damage the finish and create toxic gases that can harm you or explode.
- Don't sprinkle or spay water or other liquids directly on your washer.
- Don't use detergents containing PCMX to clean your washer. PCMX can damage the finish.
SERVICE PERSONNEL—Some internal parts are intentionally not grounded and may present a risk of electric shock during servicing. Do not contact the following parts while the appliance is energized: electrical valve, drain pump, door lock, dry heater, fan motor.

Caution
Before performing any maintenance, turn off your washer, unplug the power cord, and turn off the water faucets.
CLEANING AND MAINTENANCE
Cleaning the exterior
Use a soft cloth to wipe up all detergent, bleach, or other spills as they occur.
Cleaning the interior
- Clean the interior of your washer periodically to remove any dirt, soil, odor, mold, mildew, or bacterial residue that may remain in your washer as a result of washing clothes.
- Failure to follow these instructions may result in unpleasant conditions, including odors or permanent stains in your washer or on your laundry.
- To remove hard water deposits, use a cleaner labeled "Washer safe".
Cleaning the control panel
- Clean with a soft, damp cloth. Do not use abrasive powders or cleaning pads.
- Do not spray cleaners directly on the panel. The control panel finish may be damaged by some laundry pre-treatment soil and stain remover products. Apply such products away from your washer and wipe up any spills or over-spray immediately.
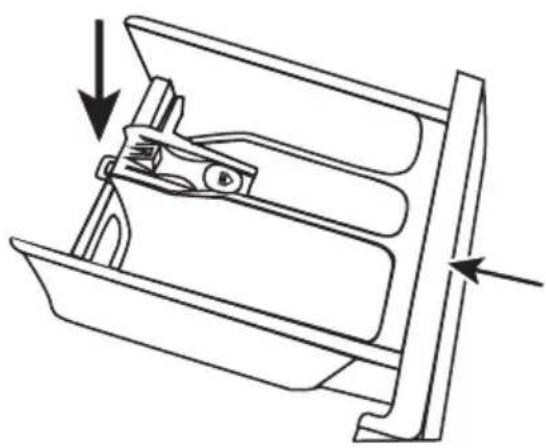
Cleaning the detergent and softener compartments
- Open the drawer, then press down the arrow located on softener cover inside the drawer.
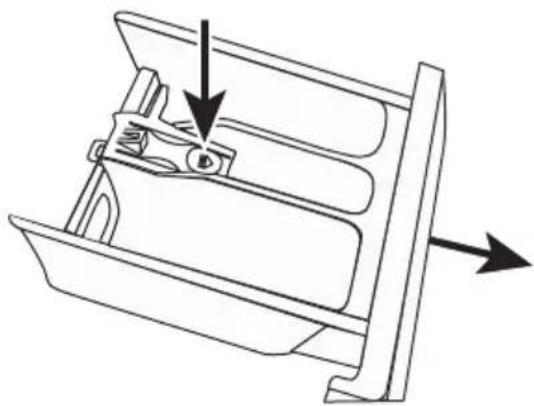
- Lift the clip up and pull out the drawer.
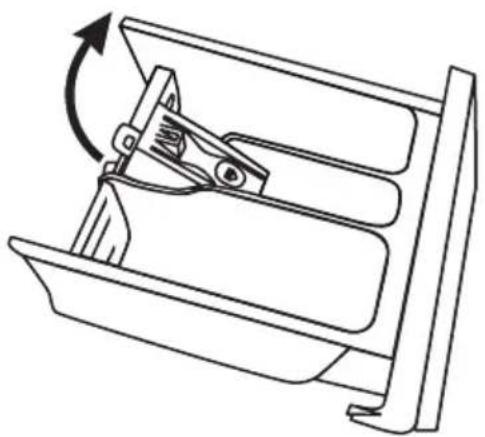
- Wash the compartments and grooves with water, then dry with a cloth.
- Restore the softener cover and push the drawer into position.
Cleaning the inlet filters
If water flows too slowly or not at all, you need to clean the inlet filter.
Machine filter
- Turn off the water faucets.
- Unscrew the inlet pipe on the back of your washer from the tap.
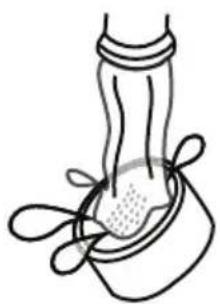
Pull out the filter with long nose pliers.
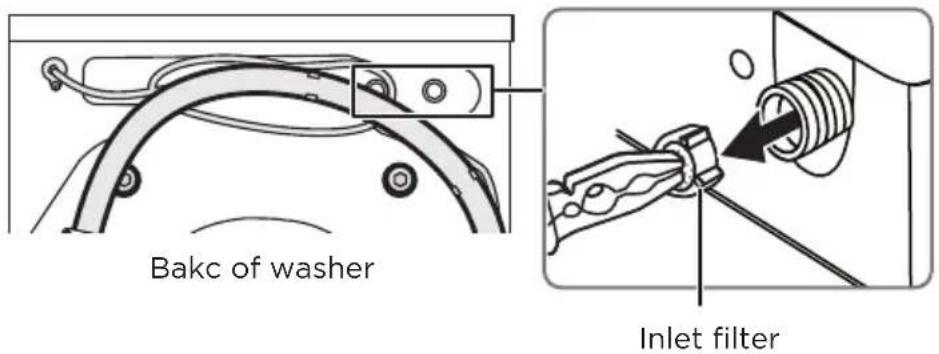
- Use water to wash the filter.
- Reinstall the filter, then reconnect the inlet pipe.
- Turn on the water faucets and make sure there is no water leakage.
Cleaning the drain filter

Caution
Clean the filters frequently. Blocked filters may:
- Keep your washer from draining water
- Keep your washer from spinning
-
Cause loud or unusual noises from object caught in the filters
-
Use a flat blade screwdriver to open the filter door located on the bottom right of the front of your washer.
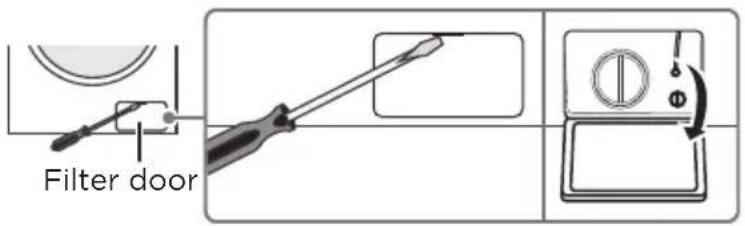
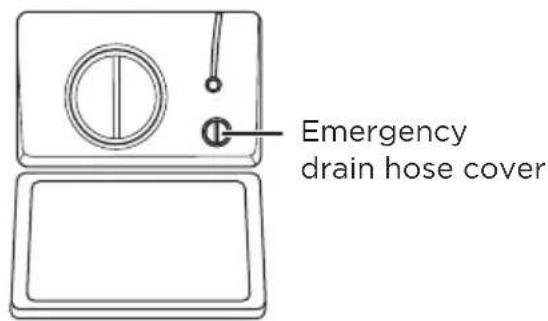
- Rotate the cap 90^ clockwise, then pull the emergency drain hose out and remove the hose cap.
- Drain water into a bowl or bucket.
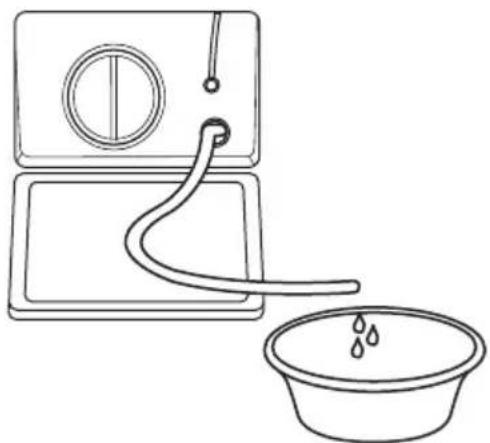
- Reset the drain hose.
- Rotate the filter counter-clockwise, then pull it out of your washer.
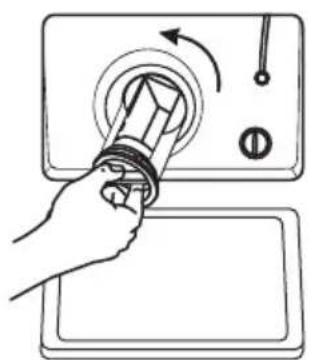
- Remove lint and other objects from the filter.
- Slide the filter back in and rotate is counter-clockwise to lock it in place.
Cleaning the drain filter
The Tub Clean cycle is a self-cleaning cycle that removes the causes of odors that may occur inside your washer without using a cleaning agent. We suggest cleaning the tub about once a month.

Caution
Never use the Tub Clean cycle when laundry is in your washer. This may damage the laundry or your washer.
- With the tub empty, add one cup of chlorine bleach to the bleach dispenser.
- Press the Power button.
- Turn the cycle selector to Tub Clean. When you select Tub Clean, the only option you can change is the Delay option.
- Press the Start/Pause button.
Using the emergency door release
If the power fails or other circumstances prevent you from opening the door, you can use the emergency cord to open the door.

WARNING
You can't use the emergency cord when your washer is running. If you must open the door, turn your washer off and wait for the water to cool before you use the emergency cord.
- Open the filter door located on the bottom right of the front of your washer.
Gently pull the emergency cord down.

NOTE: Don't pull hard on the cord. You might break it. Pull gently.
- Open the your washer's door.
- Restore the cord to its original position, then close the filter door.
Unfreezing your washer
If the ambient temperature drops to freezing (32^ / 0^) , any water in the pipes or water hoses may freeze.
Unplug the power cord.
- Wash the water faucets with warm water to loosen the inlet hose.
- Remove the water hoses and immerse them in warm water.
- Pour warm water into the washing drum and wait for 10 minutes.
- Reconnect the water hoses to the water faucets and make sure that there are no leaks.
- Run your washer on the Drain Only cycle to remove any water you added.
Storing your washer
You can damage your washer if you don't remove water from hoses and internal components before storage.
To prepare your washer for storage:
- Select the Quick Wash cycle and add bleach to your washer. Run your washer through the cycle without a load.
- Turn the water faucets off and disconnect the inlet hoses.
- Unplug your washer from the electrical outlet and leave your washer's door open to let air circulate inside the tub.
BEFORE YOU CALL FOR SERVICE...
Troubleshooting Tips
Save time and money! Review the charts on the following pages first and you may not need to call for service.
| Problems Solutions | |
| Washer does not start | ·Make sure that your washer is plugged in. ·Make sure that the door is closed. ·Make sure that the water source faucets are open. ·Make sure that you press the Power button to start your washer. ·Make sure that you press the Start/Pause button. ·Make sure that the Child Lock isn't turned on. See Setting the child lock on page 31. ·Make sure that the Delay option isn't turned on. See (Optional) Set a delayed start time on page 30. ·Check the fuse or reset the circuit breaker. |
| Door is locked or does not open | ·You can't open the door if your washer is running. Press the Start/Pause button for three seconds. When the washer drum has stopped, open the door and add clothing. Close the door, then press the Start/Pause button again to restart the load. Note: Don't use the pause function when the water surface is over the edge of the inner tub or when the temperature is too hot. ·If the door is locked when your washer isn't running, unplug the power cord, then plug it back in. |
| The water isn't hot. | ·Contact a qualified plumber to check the hot water pipe. Note: You can still wash clothes in cold water only. |
| Water leaks | ·Make sure that all hose connections are tight. See Connect the water hoses on page 18 and Connect the drain hose on page 20. ·Make sure that the end of the drain hose is correctly inserted and secured to the drainage system. See Connect the drain hose on page 20. ·Make sure that the drain hose is not clogged. ·Avoid overloading. ·Use a high-efficiency detergent to reduce over-sudsing. See Select a detergent on page 27. |
| Water overflows from the bottom of washer. | ·Make sure that the inlet hose is connected firmly. ·Make sure that the leak is not coming from the drain hose. Replace the hose if needed. |
| No water or not enough water OR detergent / softener is still in its compartment after the wash cycle is completed | ·Make sure that both faucets are fully turned on. ·Make sure that the water pressure is in the range listed in Water requirements on page 12. ·Make sure that the water inlet hoses aren't kinked. Straighten if necessary. |
| Washer vibrates or is too noisy | ·Make sure that your washer is set on a level surface. If the surface isn't level, adjust your washer's feet to level your washer. See Level your washer on page 22. ·Make sure that your washer isn't touching any other object. ·Make sure that you remove the transport bolts. |
| Washer stops | ·Make sure that the power outlet is a working outlet. ·Close the door, then press the Start/Pause button to start your washer. For your safety, your washer doesn't spin unless the door is closed. ·Sometimes your washer may pause between stages in the cycle. Wait to see if your washer starts again. ·Check the fuse or reset the circuit breaker. |
| Washer doesn't drain or spin | ·Close the door, then press the Start/Pause button to start your washer. For your safety, your washer doesn't spin unless the door is closed. ·Make sure that the drain hose isn't kinked. Straighten as necessary. ·Make sure that the height of the drain hose is within specified limits. See Drainage requirements on page 21. ·Check the fuse or reset the circuit breaker. ·The pipes to your sewer system may be clogged. Contact a plumber or qualified repair professional. |
| There is soap residue in the drawer | ·Clean the drawer. ·Use a liquid detergent. |
| The display panel does not light | ·Make sure that the power cord is connected to a working outlet. ·Contact a qualified repair professional to check the display panel wiring. |
| Items are still dirty after washing | ·Make sure that you do not overload your washer. ·Make sure that you use the correct amount of detergent. ·If items are extremely dirty, try washing them a second time. |
| Load is too wet at the end of the cycle | ·Use a high-efficiency detergent to reduce over-sudsing. See Select a detergent on page 27. ·The load may be too small. Very small loads (one or two items) may become unbalanced and not spin out completely. |
| Load has too many suds | ·Use a high-efficiency detergent to reduce over-sudsing. See Select a detergent on page 27. ·If you have “soft” water, reduce the amount of detergent. ·For small or lightly soiled loads, reduce the amount of detergent. |
ERROR CODES
| Code | Reason | Solutions |
| E30 | Door open | ·Open, then close the door. ·Make sure that no items are caught between the door and your washer. |
| E10 | Water injecting problem while washing | ·Make sure that the water pressure is not too low. ·Straighten the water hose, if necessary. ·Make sure that the inlet valve filter isn’t blocked. |
| E21 | Washer doesn’t drain | ·Make sure that the drain hose is not blocked. |
| E12 | Water overflow | ·Restart you washer. |
| EXX | Other | ·Try restarting your washer. If the error remains or a different error code is displayed, contact qualified service personnel. |
MIDEA LAUNDRY WASHER LIMITED WARRANTY
ATTACH YOUR RECEIPT HERE. PROOF OF PURCHASE IS REQUIRED TO OBTAIN WARRANTY SERVICE.
Please have the following information available when you call the Customer Service Centre:
Name, address and telephone number
Model number and serial number
A clear, detailed description of the problem
Proof of purchase including dealer or retailer name and address, and date of purchase
IF YOU NEED SERVICE:
- Before contacting us to arrange service, please determine whether your product requires repair. Some questions can be addressed without service. Please take a few minutes to review the Troubleshooting section of the User Manual, or email customerserviceusa@midea.com
- All warranty service is provided exclusively by our authorized Midea Service Providers, in the U.S. and Canada.
Midea Customer Service
In the U.S.A. or Canada, call 1-866-646-4332 or email customerserviceusa@midea.com.
If outside the 50 States of the United States or Canada, contact your authorized Midea dealer to determine whether another warranty applies.
LIMITED WARRANTY
WHAT IS COVERED
FIRST YEAR LIMITED WARRANTY (PARTS AND LABOUR)
For one year from the date of purchase, if this major appliance is installed, operated and maintained according to instructions attached to or furnished with the product, Midea America (Canada) Corp. (hereafter "Midea") will pay for factory specified replacement parts and repair labour to correct defects in materials or workmanship that existed when this major appliance was purchased, or at its sole discretion replace the product. In the event of product replacement, your appliance will be warranted for the remaining term of the original unit's warranty period.
TEN YEAR WARRANTY INVERTER MOTOR ONLY - LABOUR NOT INCLUDED
In the second through tenth years from the date of original purchase, when this major appliance is installed, operated and maintained according to instructions attached to or furnished with the product, Midea will pay for factory parts to replace the inverter motor if it fails and prevent an essential function of this major appliance and that existed when this major appliance was purchased. This is a 10 -year warranty on the parts only and does not include repair labour.
LIFETIME LIMITED WARRANTY (STAINLESS STEEL TUB)
For the lifetime of the product from the date of original purchase, when this major appliance is installed, operated and maintained according to instructions attached to or furnished with the product, Midea will pay for factory specified parts and repair labour for the following components to correct non-cosmetic defects in materials or workmanship that existed when this major appliance was purchased:
Stainless steel tub
YOUR SOLE AND EXCLUSIVE REMEDY UNDER THIS LIMITED WARRANTY SHALL BE PRODUCT REPAIR OR REPLACEMENT AS PROVIDED HEREIN. Service must be provided by a Midea designated service company. This limited warranty is valid only in the 50 States of the United States or Canada and applies only when the major appliance is used in the country in which it was purchased. This limited warranty is effective from the date of original consumer purchase. Proof of original purchase date is required to obtain service under this limited warranty.
LIMITED WARRANTY
WHAT IS NOT COVERED
- Commercial, non-residential or multiple-family use, or use inconsistent with published user, operator or installation instructions.
- In-home Instruction on how to use your product.
- Service to correct improper product maintenance or installation, installation not in accordance with electrical or plumbing codes or correction of household electrical or plumbing (i.e. house wiring, fuses, plumbing or water inlet hoses).
- Consumable parts (i.e. light bulbs, batteries, air or water filters, etc.).
- Defects or damage caused by the use of non-genuine Midea parts or accessories.
- Damage from accident, misuse, abuse, fire, floods, electrical issues, acts of God or use with products not approved by Midea.
- Repairs to parts or systems to correct product damage or defects caused by unauthorized service, alteration or modification of the appliance.
- Cosmetic damage including scratches, dents, chips, and other damage to appliance finishes unless such damage results from defects in materials and workmanship and is reported to Midea within 30 days.
- Routine maintenance of the product.
- Products that were purchased "as is" or as refurbished products.
- Products that have been transferred from its original owner.
- Discoloration, rust or oxidation of surfaces resulting from caustic or corrosive environments including but not limited to high salt concentrations, high moisture or humidity or exposure to chemicals.
- Pick-up or delivery. This product is intended for in-home repair.
- Travel or transportation expenses for service in remote locations where an authorized Midea servicer is not available.
- Removal or reinstallation of inaccessible appliances or built-in fixtures (i.e. trim, decorative panels, flooring, cabinetry, islands, countertops, drywall, etc.) that interfere with servicing, removal or replacement of the product.
- Service or parts for appliances with original model/serial numbers removed, altered or not easily identified.
The cost of repair or replacement under these excluded circumstances shall be borne by the customer.
DISCLAIMER OF IMPLIED WARRANTYES
IMPLIED WARRANTY, INCLUDING ANY IMPLIED WARRANTY OF MERCHANTABILITY OR IMPLIED WARRANTY OF FITNESS FOR A PARTICULAR PURPOSE, ARE LIMITED TO ONE YEAR OR THE SHORTEST PERIOD ALLOWED BY LAW. Some states and provinces do not allow limitations on the duration of implied warranties of merchantability or fitness, so this limitation may not apply to you. This warranty gives you specific legal rights, and you also may have other rights that vary from state to state or province to province.
DISCLAIMER OF REPRESENTATIONS OUTSIDE OF WARRANTY
Midea makes no representations about the quality, durability, or need for service or repair of this major appliance other than the representations contained in this warranty. If you want a longer or more comprehensive warranty than the limited warranty that comes with this major appliance, you should ask Midea or your retailer about buying an extended warranty.
LIMITATION OF REMEDIES; EXCLUSION OF INCIDENTAL AND CONSEQUENTIAL DAMAGES
YOUR SOLE AND EXCLUSIVE REMEDY UNDER THIS LIMITED WARRANTY SHALL BE PRODUCT REPAIR AS PROVIDED HEREIN. MIDEA SHALL NOT BE LIABLE FOR INCIDENTAL OR CONSEQUENTIAL DAMAGES. Some states and provinces do not allow the exclusion or limitation of incidental or consequential damages, so these limitations and exclusions may not apply to you. This warranty gives you specific legal rights, and you also may have other rights that vary from state to state or province to province.
PROTECT YOUR PRODUCT:
We will keep the model number and date of purchase of your new Midea product on file to help you refer to this information in the event of an insurance claim such as fire or theft.
Register online at www.midea.com/ca/support/Product-registration OR
Please fill out and return it to the following address:
Midea America Corp. 759 Bloomfield Ave #386, West Caldwell, NJ 07006-6701
(_detach here)
| Name: Model#: | Serial #: |
| Address: Date Purchased: Store / Dealer City: | Name: |
| Province: Postal Code: E-mail Address: | |
| Phone Number: | |
| Did you purchase an additional warranty: As | your Primary Residence? (Y/N) |
| How did you learn about this product: □ Advertising □ In Store Demo □ Personal Demo |
Information collected or submitted to us is only available to company internal employees for purposes of contacting you or sending you emails, based on your request for information and to company service providers for purposes of providing services relating to our communications with you. All data will not be shared with other organizations for commercial purposes.
Midea America (Canada) Corp.
Markham, ON, Canada L3R 8V2
Customer Service 1-866-646-4332 Made in China

idea
fr
Markham, ON, Canada L3R 8V2