USER MANUAL MRS26D5AST MIDEA
Side By Side Refrigerator
Power supply: 115 V\~
Frequency: 60 Hz
Capacity: 26.3 cu. ft.
Warning:
Before using this product, please read this manual carefully and keep it for future reference. The design and specifications are subject to change without prior notice for product improvement. Consult with your dealer or manufacturer for details.
version E - 01 - 2024
USER MANUAL

natural_image
Exterior view of a modern stainless steel double door refrigerator with front panel and side door (no visible text or symbols)
Dear user
Thank you for letting Midea help you "make yourself at home."
This manual is part of our commitment to your total satisfaction. Please read this manual carefully before use and keep it in a convenient place for future reference.
To help pus better serve you, please consider registering your product using our convenient Midea app MSmartlife, by visiting http://www.midea.com, or by texting a picture of your proof of purchase to 1-844-224-1614.
REFRIGERATOR SAFETY ....3
Location Requirements ....7
Electrical Requirements 8
Water Supply Requirements 9
PARTS AND FEATURES ....10
INSTALLATION ....11
Unpack ....11
Door Removal (only if needed) 11
Connect to Water 14
Move to Final Location....16
Install Water Filter 17
Door Alignment (If needed)....19
Level Refrigerator....20
BEFORE USE 20
Waiting Period....20
Cleaning 20
REFRIGERATOR USE....21
General 21
Controls 22
Ice Maker 25
Dispenser 26
Drip Tray 27
REFRIGERATOR CARE ....28
Cleaning 28
Moving 29
Storage 29
Replacing Lights 29
TROUBLESHOOTING 30
General 30
Ice and Water 33
Error Codes ....36
REFRIGERATOR SAFETY
YOUR SAFETY AND THE SAFETY OF OTHERS ARE VERY IMPORTANT
To prevent injury to the user or other people and property damage, the instructions shown here must be followed. Incorrect operation due to ignoring of instructions may cause harm or damage, including death.
The level of risk is shown by the following indications.

This symbol indicates the possibility of death or serious injury.

This symbol indicates the possibility of injury or damage to property.
This symbol indicates the possibility of dangerous voltage constituting a risk of electrical shock is present that could result in death or serious injury.
IMPORTANT SAFETY INSTRUCTIONS
WARNING
GENERAL APPLIANCE SAFETY
- Read all safety warnings, instructions, illustrations and specifications provided with this appliance. Failure to follow all instructions listed below may result in electric shock, fire and/or serious injury.
- Save all warnings and instructions for future reference.
ELECTRICAL SAFETY
- Plug into a grounded 3-prong outlet.
- Do not remove ground prong.
- Do not use an adapter.
- Unplug the power cord by holding the plug, never by pulling the cord.
- Do not turn the appliance by plugging in or unplugging the power cord.
- Do not use an extension cord.
- Unplug the refrigerator before cleaning or defrosting.
NOTE: Power to the refrigerator cannot be disconnected by pressing a control on the control panel.
Grounding requirement
- This refrigerator must be grounded. This refrigerator is equipped with a grounding plug. The plug must be inserted into an outlet that is properly installed and grounded.
- Improper use of the grounding plug can result in a risk of electric shock. Consult a qualified electrician or service person if the grounding instructions are not completely understood or if doubt exists as to whether the refrigerator is properly grounded.
LOCATION SAFETY
- This refrigerator is intended to be used in household and similar environments.
- Install in accordance with the manufacturer's instructions.
- This refrigerator should not be recessed or built-in an enclosed cabinet. It is designed for freestanding installation only.
WARNING - Keep ventilation openings, in the refrigerator, clear of obstruction.
- When moving the refrigerator, do not roll over or damage the power supply cord.
- Do not install near any heat sources, such as radiators, heat registers, stoves, other cooking appliances or in direct sunlight.
- Keep flammable materials and vapors, such as gasoline, away from refrigerator.
USE AND CARE SAFETY
- Flammable refrigerant used. Follow handling instructions carefully. Risk of fire or explosion due to puncture of refrigerant tubing.
- Flammable refrigerant used. Do not use mechanical devices to defrost freezer. Do not puncture refrigerant tubing.
- Do not store or use gasoline or any flammable liquids inside or in the vicinity of this refrigerator.
- Use two or more people to move and install refrigerator.
- Connect refrigerator to a potable water supply only for ice maker and dispenser use.
- This appliance is not intended for use by persons (including children) with reduced physical, sensory or mental capabilities, or lack of experience and knowledge, unless they have been given supervision or instruction concerning use of the appliance by a person responsible for their safety.
- Children should be supervised to ensure that they do not play with the appliance.
- Keep fingers out of the “pinch point” areas; clearances between the doors and between the doors and cabinet are necessarily small. Be careful closing doors when children are in the area.
- Do not use electrical appliances inside the food storage compartments of the appliance, unless they are of the type recommended by the manufacturer.
- Do not touch the interior of the freezer with wet hands. This could result in frostbite.
- Use nonflammable cleaner. Clean only with a damp cloth.
- In refrigerators with automatic icemakers, avoid contact with the moving parts of the ejector mechanism, or with the heating element that releases the cubes. Do not place fingers or hands on the automatic ice making mechanism while the refrigerator is plugged in.
- Do not use electrical appliances on the top of the refrigerator, unless they are of the type recommended by the manufacturer.
- Do not place heavy objects on the top of the refrigerator considering that objects may fall when doors are opened and closed.
- Do not store beer, beverages or other fluid contained in bottles or enclosed containers in the freezer. The bottles or containers may crack due to freezing.
SERVICE SAFETY
- Disconnect power before servicing.
-
Flammable refrigerant used. To be repaired only by trained service personnel. Do not puncture refrigerant tubing.
-
Refer all servicing to qualified service personnel. Do not repair or replace any part of this appliance unless specifically recommended in this manual. Servicing is required when the appliance has been damaged in any way, such as the power supply cord or plug is damaged, liquid has been spilled or objects have fallen into the appliance, the appliance has been exposed to rain or moisture, does not operate normally, or has been dropped.
- If the supply cord is damaged, it must be replaced by the manufacturer, its service agent, or similarly qualified person, in order to avoid a hazard.
- If component part is damaged, it must be replaced by the manufacturer, its service agent or similarly qualified persons in order to avoid a hazard.
- Replace all parts and panels before operating.
SAVE THESE INSTRUCTIONS
THIS APPLIANCE IS FOR HOUSEHOLD USE ONLY
State of California Proposition 65 Warnings:

WARNING:
Cancer and Reproductive Harm
-www.P65Warnings.ca.gov.
PROPER DISPOSAL

WARNING
Suffocation Hazard
Before you throw away your old refrigerator:
- Remove the doors and drawers so that children cannot hide or get trapped inside your old appliance.
- Leave any shelves in place so that children may not easily climb inside.
- Failure to follow these instructions can result in death or brain damage.
IMPORTANT: Refrigerant and cyclopentane foaming material used for the appliance are flammable. It is the consumer's responsibility to comply with Federal and Local regulations when disposing of this product. Refrigerants must be evacuated by a licensed, EPA certified refrigerant technician in accordance with established procedures.
Explosion and Fire Hazard
- Keep flammable materials and vapors, such as gasoline, away from appliance.
- Failure to do so, can result in death, explosion or fire.
This refrigerator is designed to be freestanding only, and should not be recessed or built-in.
- Place your refrigerator on a floor that is level and strong enough to support the refrigerator when it is fully loaded.
- Place your refrigerator where there is access to the required electrical connection. See "Electrical Requirements."
- Locate the refrigerator away from direct sunlight and sources of heat, such as a stove, heater or radiator.
NOTES:
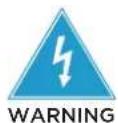
RECOMMENDED CLEARANCE
Ⓐ Back and sides: 3" (7.6 cm)
⑧ Top: 3" (7.6 cm)
NOTE: If you place the refrigerator next to a fixed wall, allow sufficient space for the door to swing open.
ELECTRICAL REQUIREMENTS

WARNING
Electrical Shock Hazard
- Plug into a grounded 3-prong outlet.
- Do not remove the ground prong from the power cord plug.
- Do not use an adapter.
- Do not use an extension cord.
- Failure to do so can result in death, fire or electrical shock.
IMPORTANT: A 115 Volt, 60 Hz., AC only, 15-amp fused, grounded electrical supply is required.
- Use an electrical outlet that accepts the grounding prong.
NOTE: The power cord is equipped with a 3-prong (grounding) plug which mates with a standard 3-prong (grounding) electrical outlet.
- We recommend that the refrigerator be plugged into an electrical circuit serving ONLY this appliance.
- Use an electrical outlet that cannot be turned off with a switch or pull-chain.
• DO NOT use an extension cord.
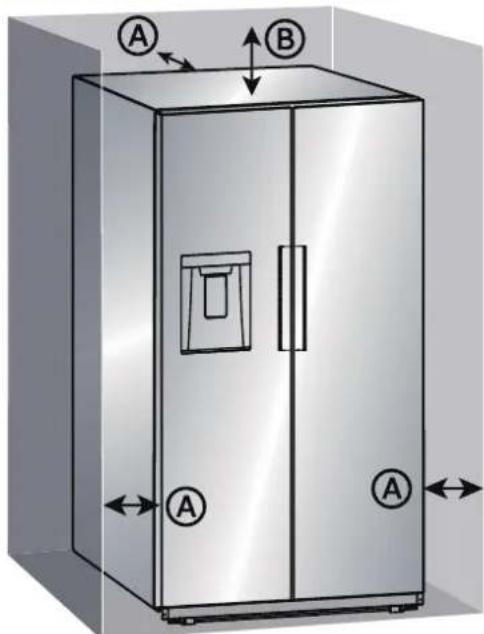
Ⓐ 3-prong plug
⑧ 3-prong receptacle
© Receptacle box cover
WATER SUPPLY REQUIREMENTS
A cold water supply with water pressure between 30 and 100 psi (207 and 689 kPa) is required to operate the water dispenser and ice maker. If you have questions about your water pressure, call a licensed, qualified plumber.
IMPORTANT: Operation outside the water pressure range may cause malfunction and severe, damaging water leaks.
NOTE: If the water pressure is less than what is required, the flow of water from the water dispenser could decrease or ice cubes could be hollow or irregularly shaped.
Reverse Osmosis Water Supply (if applicable)
IMPORTANT: The pressure of the water supply coming out of a reverse osmosis system going to the water inlet valve of the refrigerator needs to be between 30 and 100 psi (207 and 689 kPa).
If water pressure is too low:
Check to see whether the sediment filter in the reverse osmosis system is blocked. Replace the filter if necessary.
Allow the storage tank on the reverse osmosis system to refill after heavy use. The tank capacity could be too small to keep up with the requirements of the refrigerator.
If your refrigerator has a water filter, it may further reduce the water pressure when used in conjunction with a reverse osmosis system. Remove the water filter.
PARTS AND FEATURES
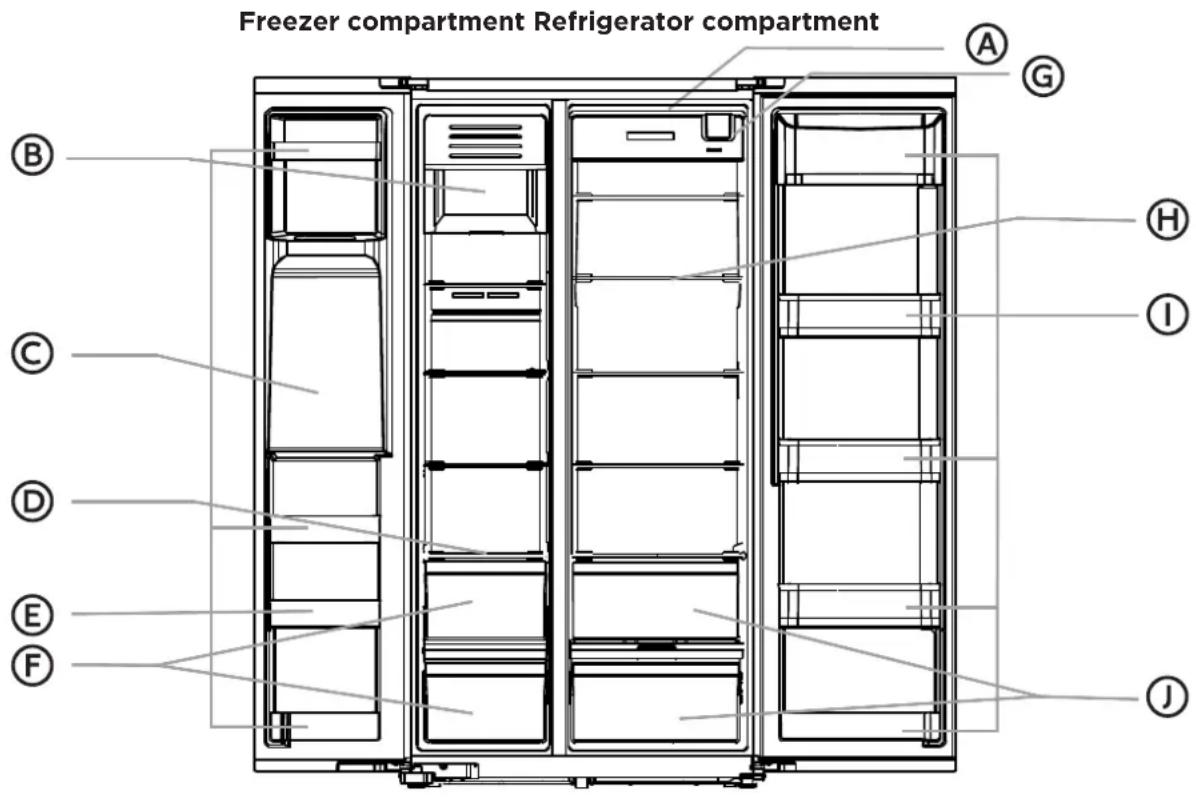
Ⓐ LED Light
B Ice Storage Bin
© Ice / Water Dispenser
D Glass Shelf
E Door Bin
(F) Drawer Bin
G Water Filter
H Glass Shelf
① Door Bin
J Drawer Bin
SPECIFICATIONS
| Dimension (WxDxH) | 35.9" x 33.9" x 69.9"(91.1 x 86.0 x 177.5 cm) |
| Width with door open 90° 40.9" (104 cm) | |
| Width with door open 130° 61.4" (156 cm) | |
| Power requirements 115 V ~ 60 Hz, 15A minimum requirement | |
| Power cord length 66.9" (170 cm) | |
INSTALLATION
UNPACK

WARNING
Fire or Explosion Hazard
- Do not puncture refrigerant tubing.
- Follow handling instructions carefully.
- Flammable refrigerant used.
- Failure to do so can result in death, explosion or fire.
IMPORTANT: Remove ALL exterior and interior packing materials including the foam packing between the exterior condenser and the refrigerator cabinet.
DOOR REMOVAL (ONLY IF NEEDED)
Measure the refrigerator to make sure it will fit through the doorway. If the refrigerator cannot pass easily through the doorway, follow the instructions to remove the refrigerator compartment doors and the freezer compartment doors.

WARNING
Electrical Shock Hazard
- Disconnect power before removing doors.
- Reconnect ground wire before operating.
- Failure to do so could result in death or electric shock.
DOOR REMOVAL INSTRUCTIONS
IMPORTANT: Keep the refrigerator doors closed until you are ready to lift them from the cabinet.
- The refrigerator doors need to be removed if the refrigerator cannot enter the room fully assembled.
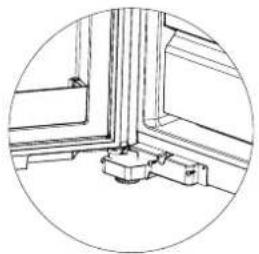
Freezer Door Removal
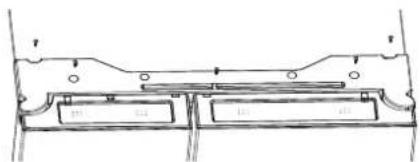
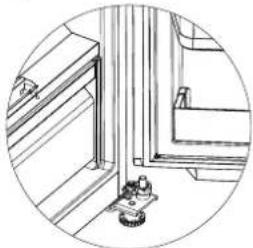
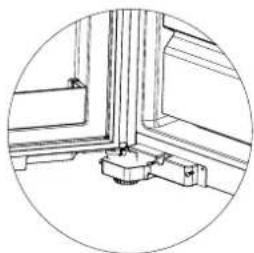
- Remove the freezer door bottom hinge cover 2 screws and hinge cover.
natural_image
Simple line drawing of a corner window with a central base and wall-mounted components (no text or symbols)
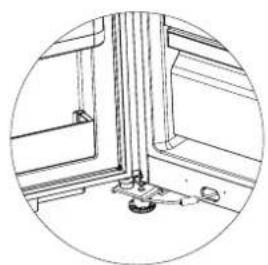
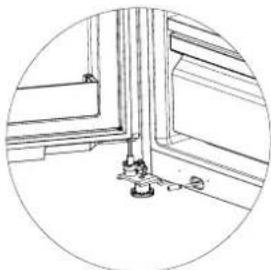
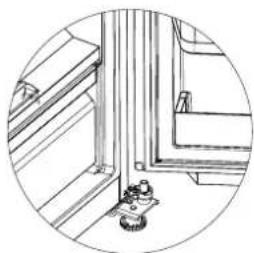
- Pull out the blue retaining clip from the quick release one way valve on the door side of valve only. Remove the door water line from the valve.
Note: Do not remove the cabinet side water line from the valve.
natural_image
Interior view of a window with a mounted fixture and a small component (no text or symbols visible)
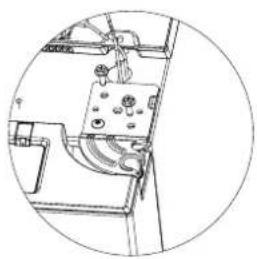
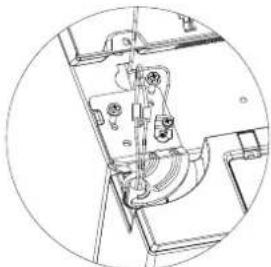
- Remove the 5 screws from the top hinge cover then remove the hinge cover.
natural_image
Technical line drawing of a mechanical component with no visible text or symbols
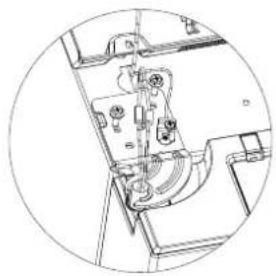
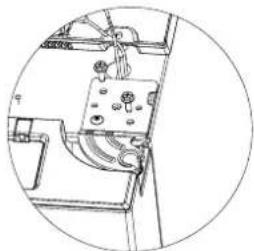
- Disconnect the 2 harness quick connectors, and remove the yellow/green grounding wires screw. Then remove the 2 screws and upper hinge form the product.
natural_image
Technical line drawing of a mechanical assembly with no visible text or symbols
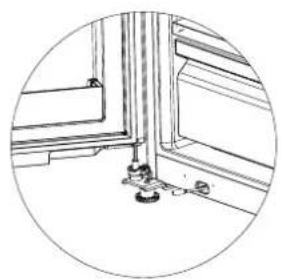
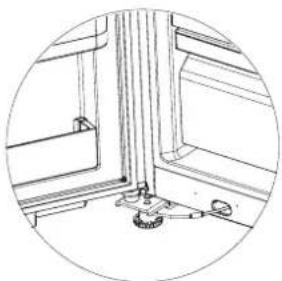
- Carefully open the door, and gently lift the door up from the hinge pin.
natural_image
Technical line drawing of a window frame with mounting fixtures and a circular outline (no text or symbols)
Refrigerator Door Removal
- Remove the 2 hinge screws and upper hinge from the product.
natural_image
Technical line drawing of a mechanical or electrical component with no visible text or symbols
- Carefully open door, and gently lift the door up from the hinge pin.
natural_image
Technical line drawing of a mechanical assembly with a pulley and mounting bracket (no text or symbols)
Freezer Door Assembly
- Gently install the freezer door back on to the bottom hinge pin. Make sure the water line is inserted into the shaft hole properly without kinking the water line. Carefully close door.
natural_image
Technical line drawing of a window frame with mounting fixtures (no text or symbols)
- Install the freezer door upper hinge, and secure with the 2 hinge screws. Secure the yellow/green grounding wires with the screw. Reconnect the 2 harness quick connectors.
natural_image
Technical line drawing of a mechanical assembly with no visible text or symbols
- Open door and insert the freezer door water line into the water valve. Install the blue retaining clip on to the quick release check valve.
natural_image
Technical line drawing of a mechanical assembly or mounting bracket (no text or symbols)
- Assemble the hinge cover with the 2 screws.
Note: Make sure the water line is routed around the front of the leveling leg and is not kinked when installing the hinge cover.
natural_image
Technical line drawing of a mechanical assembly or mounting bracket (no text or symbols)
Refrigerator door Assembly
- Insert the refrigerator door back on to the bottom hinge shaft. Carefully close door.
natural_image
Technical line drawing of a mechanical assembly or mounting bracket with a small gear base (no text or symbols)
- Install the refrigerator door upper hinge, and secure with the 2 hinge screws.
natural_image
Technical line drawing of a mechanical device with no visible text or symbols
- Install the upper hinge cover and secure it with the 5 screws.
Test water dispenser and check for leaks. If no water is dispensing, check one way valve for proper flow direction, and house water supply installation.
CONNECT TO WATER
A cold water supply with water pressure of between 30 and 100 psi (207 and 689 kPa) is required to operate the water dispenser and ice maker. If you have questions about your water pressure, call a licensed, qualified plumber.
IMPORTANT:
- Connect only to a drinking (potable) water supply.
- Plumbing shall be installed in accordance with the International Plumbing Code and any local codes and ordinances.
Connect to Water Line
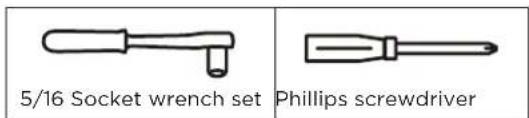
Gather the required tools and parts before starting installation.
IMPORTANT: Make sure it is a cold water pipe.
NOTE: Horizontal pipe will work; however, you must drill on the top side of the pipe, not the bottom. Drilling on the top side will keep water away from the drill and keep normal sediment from collecting in the valve.
-
Determine the length of copper tubing you need. Measure from the connection on the back of the refrigerator to the water pipe. Add 7 ft (2.1 m) to allow for cleaning. Use 14 " (6.35 mm) O.D. (outside diameter) copper tubing. Be sure both ends of copper tubing are cut square.
-
Using a cordless drill, drill a 14 " (6.35 mm) hole in the cold water pipe.
- Fasten the shutoff valve to the cold water pipe with the pipe clamp. Be sure the outlet end is solidly in the 14 " (6.35 mm) drilled hole in the water pipe and that the washer is under the pipe clamp.
- Tighten the packing nut. Tighten the pipe clamp screws slowly and evenly so the washer makes a watertight seal. Do not overtighten.
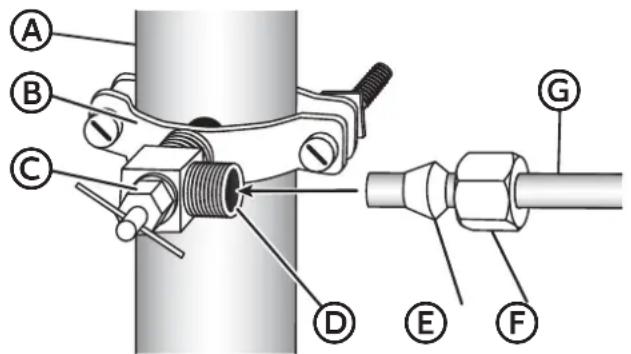
Ⓐ Household supply line
B Saddle valve
© Packing nut
(D) Shutoff valve
E Ferrule (sleeve)
⑤ Compression nut
© 14 " Copper tube
- Slip the compression sleeve and compression nut on the copper tubing as shown. Insert the end of the tubing into the outlet end squarely as far as it will go. Screw compression nut onto outlet end with adjustable wrench. Do not overtighten or you may crush the water line.
- Place the free end of the tubing in a container or sink, and then turn ON the main water supply. Flush the tubing until water is clear. Turn OFF the shutoff valve on the water pipe.
Connect to Refrigerator
- Unplug refrigerator or disconnect power.
- Close shut-off valve.
- Thread a brass compression nut and ferrule (sleeve) onto the free end of the copper tube.
- Remove the plastic cap from the end of the refrigerator water line.
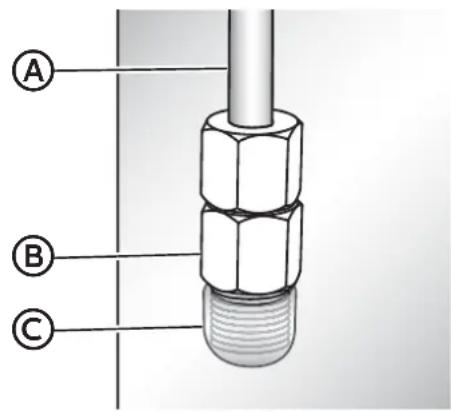
Ⓐ Refrigerator water line
(B) Compression nut
© Plastic cap
- Insert the water line directly into the fitting on the end of the refrigerator water line. Tighten the compression nut. Do not overtighten.
- Confirm connection is secure by gently pulling on the water line.
- Turn on the water supply to refrigerator and check for leaks. Correct any leaks.
Complete the Installation

WARNING
Electrical Shock Hazard
NOTE: This refrigerator begins operating as soon as it is connected to the power supply.
- Move the refrigerator into its final location, making sure to maintain the recommended clearance.
MOVE TO FINAL LOCATION

WARNING
Fire or Explosion Hazard
- Do not puncture refrigerant tubing.
- Follow handling instructions carefully.
- Flammable refrigerant used.
- Failure to do so can result in death, explosion or fire.
IMPORTANT:
- If the refrigerator has been in a horizontal position for any period of time, wait 24 hours to allow the refrigerant to settle before plugging in the refrigerator.
- When moving the refrigerator, DO NOT tilt it beyond 45^ from upright.
NOTE: Tilting the refrigerator more than 45^ could damage the compressor and the sealed system.
- Avoid placing excessive stress on the doors or top when moving the refrigerator.
INSTALL WATER FILTER
REMOVE BYPASS PLUG
- Turn off the water supply to refrigerator.
- Squeeze the sides of the filter cover where marked, and then pull downward to open the cover.
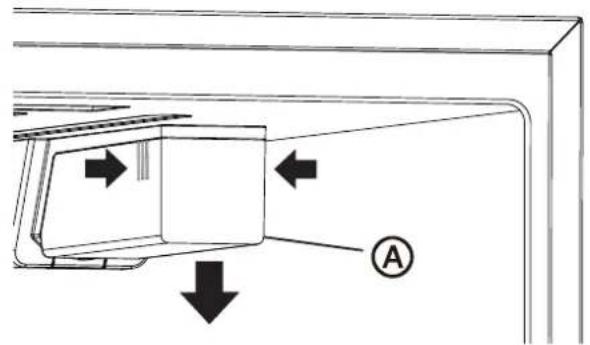

Filter cover
- Turn the bypass plug counterclockwise, and then pull out to remove.
IMPORTANT: Keep the bypass plug for later use. The ice maker and dispenser will not operate unless either a water filter or the bypass plug is properly installed.
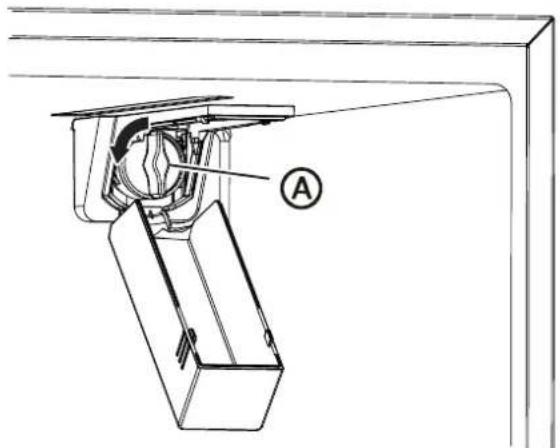
natural_image
Technical line drawing of a mechanical assembly with labeled component A (no text or symbols beyond label)

Bypass plug
INSTALL WATER FILTER
- Remove the water filter from its packaging, and then remove the clear, plastic cap from the filter head.
- Align the tabs on the filter head with the notches in the opening, and then insert the water filter into the opening. Press inward, while turning the filter clockwise to install.
NOTE: The housing allows the filter to move slightly upward and downward.
Ⓐ Water filter
- Turn on the water supply to refrigerator.
- Close the filter cover.
REPLACE WATER FILTER
The Water Filter icon on the control panel will illuminate after 150+ days to indicate that it is time to order a replacement water filter. After 180+ days the icon will illuminate and flash to indicate it is time to replace the water filter.
- Turn off the water supply to refrigerator.
- Turn the water filter counterclockwise, and then pull out to remove.
- Install a new water filter following steps 4 to 7 in the previous section.
- Press and hold the Water Filter control for 3 seconds to clear and reset the filter status clock.
NOTE: The light will turn off and 3 beeps will sound.
FLUSH THE WATER SYSTEM
After installing the replacement water filter it is important to flush air from the water line so that water will not drip from the water dispenser.
- Turn on the main water supply.
- Dispense 2.5 gallons of water (flush for approximately 5 minutes) to remove trapped air and contaminants from the system.
NOTE: Do not dispense the entire 2.5 gallon amount continuously. Depress and release the dispenser pad for cycles of 30 seconds ON and 60 seconds OFF. In some homes, additional flushing may be required.
- Open the refrigerator door to make sure there are no water leaks coming from the water filter.
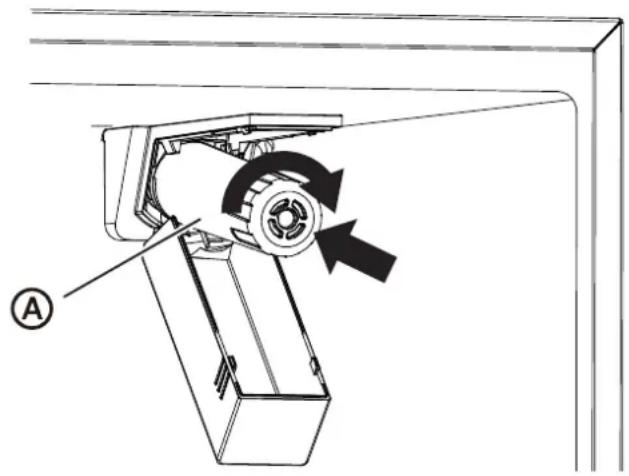
DOOR ALIGNMENT (IF NEEDED)
Door alignment or adjustment can be done on side-by-side model refrigerators.
- Locate the adjusting screws found on the underside of the bottom corner of the refrigerator door.
- After loosening the locking nut by turning it clockwise, turn the door adjusting screw clockwise to raise the door or counter-clockwise to lower it.
- After one or two turns of the wrench, open and close the refrigerator door, and check the alignment at the top of the doors.
- Tighten the locking nut by turning it counter-clockwise.
NOTE: If necessary, repeat the above steps until the doors are aligned.
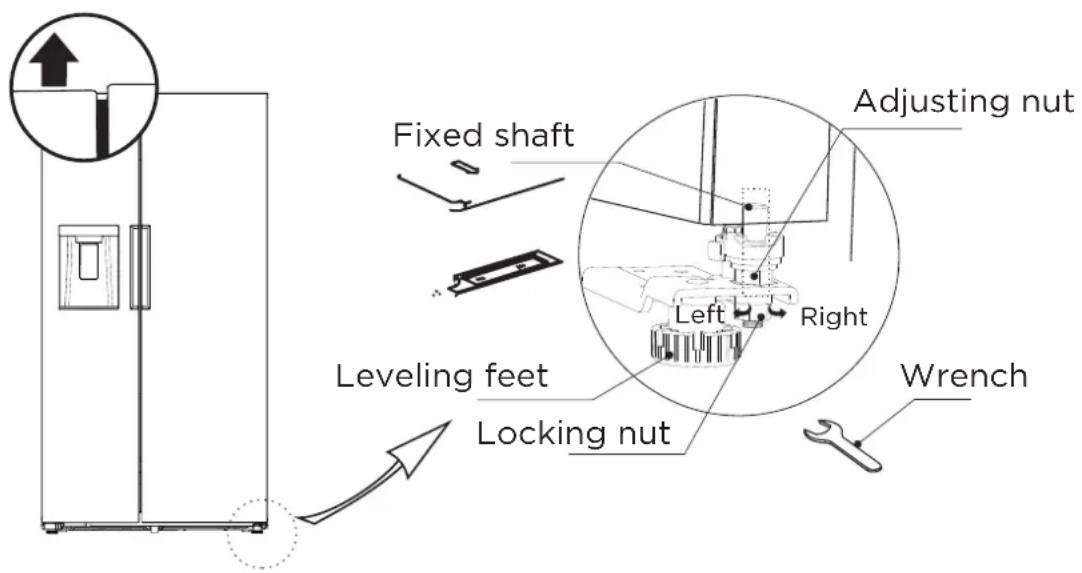
LEVEL REFRIGERATOR
IMPORTANT: Level the refrigerator for proper operation and to avoid cooling, frost and moisture problems that can occur if the doors do not close completely.
- Move the refrigerator to its final location. See "Move to Final Location."
- Place a carpenter's level on the top of the cabinet to check that the refrigerator is level from side to side and tilted slightly downward toward the back. If the refrigerator is not level, go to steps 3 and 4 to adjust.
NOTE: The doors will close easier when the front of the refrigerator is slightly higher than the back of the refrigerator.
- Using two or more people, adjust the leveling feet (one foot located at each of the two front corners of the refrigerator cabinet).
- With one person pressing against the top front of the refrigerator to take weight off the leveling feet, the other(s) can then turn the leveling feet to adjust the height of each side.
- Use the carpenter's level to check the level and tilt.
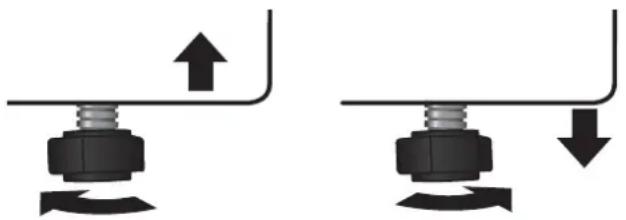
natural_image
Two mechanical assembly diagrams showing upward and downward motion of a bolted joint (no text or symbols)
To Raise - Turn the leveling feet clockwise.
To Lower - Turn the leveling feet counterclockwise.
BEFORE USE
WAITING PERIOD
- Before plugging the refrigerator into a grounded 3-prong electrical outlet, allow it to stand upright for approximately 2 hours.
NOTE: This reduces the possibility of a malfunction in the cooling system caused by improper handling during transportation.
- Allow the refrigerator to cool for 2 to 3 hours before adding food.
CLEANING
-
Wash the refrigerator interior using a soft cloth dampened with a baking soda solution (2 tablespoons baking soda mixed with 1 quart of warm water).
-
Using a soft cloth, thoroughly dry all surfaces.
REFRIGERATOR USE
GENERAL
- The storage life of frozen foods varies and the recommended storage time should not be exceeded.
- Place frozen food into the freezer as quickly as possible after purchase.
- Do not refreeze frozen foods which have thawed completely.

WARNING
Electrical Shock Hazard
- Plug into a grounded 3-prong outlet.
- Do not remove the ground prong from the power cord plug.
- Do not use an adapter.
- Do not use an extension cord.
-
Failure to do so can result in death, fire or electrical shock.
-
Plug refrigerator into a grounded 3-prong outlet.
- Wait 30 minutes, and then open the refrigerator door to determine if the refrigerator is cooling.
- Load items into the refrigerator and freezer compartments.
ENERGY SAVING TIPS
- Allow hot foods to cool to room temperature before placing them in the freezer. Foods that freeze too slowly may lose quality or spoil.
- Do not overload the refrigerator with a large amount of unfrozen food. Overloading forces the compressor to run longer, which decreases the cooling efficiency of the refrigerator.
- Wrap foods properly and wipe containers dry before placing them in the refrigerator. This decreases frost build-up inside the refrigerator.
- Do not line refrigerator storage shelves with aluminum foil, wax paper or paper toweling. Liners interfere with cold air circulation, making the refrigerator less efficient.
- Organize and label food to reduce the number of door openings, and length of time the door or drawer is open. Remove the items needed at one time, and then close the door as soon as possible.
CONTROLS
The control panel is located on right side of freezer door.
When the refrigerator is first plugged into the electrical outlet, the display will begin to illuminate and scroll; after which the display icons will fully illuminate for 3 seconds and a tone will sound.
Under normal conditions, if no door is opened or no control is pressed for 30 seconds, the display will turn off and lock.
When the display is not illuminated, press any control to illuminate, and then press and hold for 3 seconds to unlock the control panel.
① Temp indicator
② Super freezer indicator
③ Super cool indicator
④ Refrigerator temperature button
⑤ Freezer temperature button
⑥ Water filter reset indicator and button
⑦ Ice maker on/off indicator and button
⑧ ENERGY SAVING indicator and button
⑨ Lock/unlock indicator and button
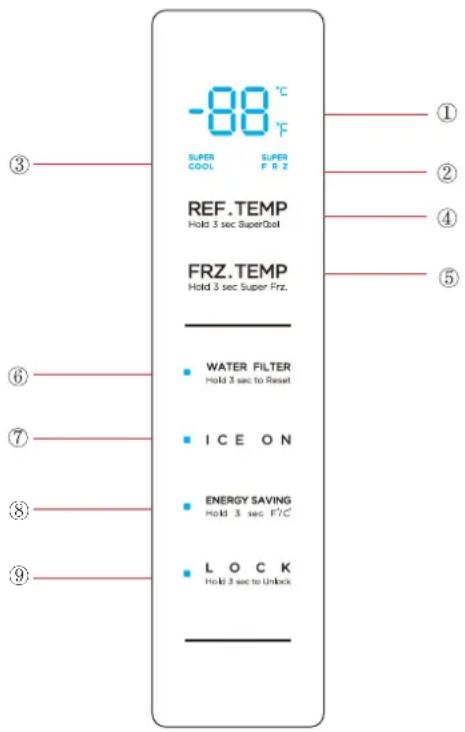
(The picture above is only for reference. The actual configuration will depend on the physical product or statement by the distributor)
TEMPERATURE
When the refrigerator is first plugged into a power source, the default temperature settings will be displayed.
The temperature of each compartment is adjustable within its specified range.
Refrigerator Compartment
Default temperature setting: 39^ F ( 4^ C).
The temperature range for the refrigerator compartment is 34^ F to 44^ F ( 1^ C to 7^ C).
Freezer Compartment
Default temperature setting: 0^ F ( -18^ C).
The temperature range for the freezer compartment is -7^ to 7^ ( -22^ to -14^ ).
To adjust the temperature of the refrigerator and/or freezer compartments:
-
Select the compartment by pressing either off REF. TEMP
Hold 3 sec SuperCool
FRZ. TEMP
Hold 3 sec Super Frz.
-
Press to enter a raise of temperature in increments of 1° until the desired temperature is reached.
TEMPERATURE UNIT DISPLAY
The compartment temperatures can be viewed in either degrees Fahrenheit ( ^ F) or degrees Celsius ( ^ C).
Press and hold controls for 3 seconds to change the unit display from degrees Fahrenheit (°F) to degrees Celsius (°C) or vice versa.
LOCK/UNLOCK CONTROLS
To Unlock the Controls:
Press and hold LOCK for 3 seconds. A tone will sound, and the display will illuminate.
To Lock the Controls:
Press and hold LOCK for 3 seconds. A tone will sound, and the display will turn off.
NOTE: After 30 seconds, if no control is pressed, the controls will automatically lock.
SUPER COOL MODE
Press and hold RBF TEMP
Hold a Super Cool mode, the temperature in the compartment will lower to 34°F (1°C).
Press and hold again for 3 seconds to exit the Super Cool mode. The light will turn off and the refrigerator compartment temperature will return to the previously set temperature.
SUPER FREEZE MODE
Press and hold for 3 seconds to enter the Super Freeze mode, the temperature in the compartment will lower to -7°F (-22°C).
Press and hold FRZ TEMP
Hold 3 seconds again for 3 seconds to exit the Super Freeze mode.
The light will turn off, and the freezer compartment
temperature will return to the previously set temperature.
ENERGY SAVING MODE
Press to enter and exit Energy Saving mode. Energy Saving will illuminate to indicate the mode is activated and turn off when it is not activated.
When Energy Saving mode is activated, the refrigerator compartment temperature is 44^ F ( 7^ C) and the freezer compartment temperature is 7^ F (-14°C).
When Energy Saving mode is turned off, the refrigerator and freezer compartment temperatures will revert to the previously set temperatures.
NOTE: If a temperature was set to either Super Freeze or Super Cool mode, it will be automatically cancelled.
ICE MAKER
Freezer Ice Maker
Press ICE ON to turn ON/OFF the freezer compartment ice maker. When the Freezer ice maker is on, the control will be illuminated.
Freezer Ice Bin
The freezer compartment ice bin is removable for cleaning or emptying when a large amount of cubed ice is needed.
After emptying and/or cleaning, replace the ice bin immediately. The ice maker will continue to make ice, and the cubes will drop into the ice making compartment if the ice bin is not properly installed.
To Remove the Ice Bin:
- Open the freezer door as soon as possible.
- Grasp the Ice storage bin and pull the bin out of the compartment.
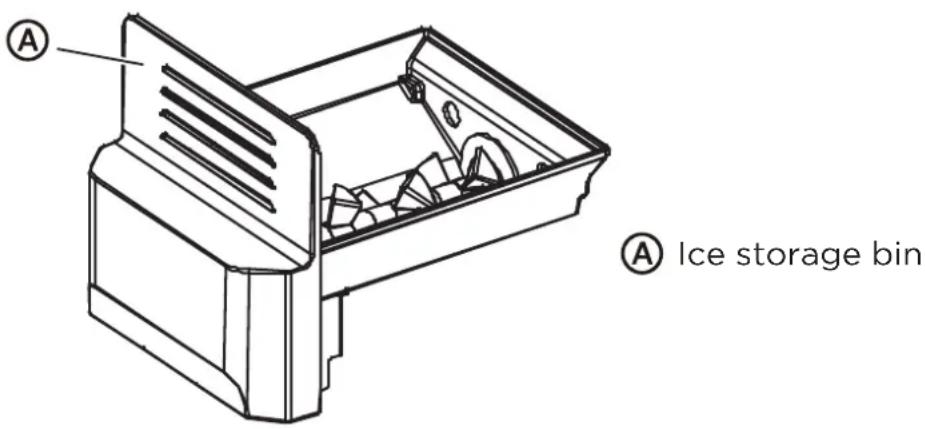
To Replace the Ice Bin:
- Remove any ice cubes that may have fallen into the ice compartment.
- Slide the ice bin into the compartment.
DISPENSER
The dispenser control incorporates backlit LED icons to designate the operating mode of the dispenser. There are two display modes that you can choose between, Standby Mode and Active Mode. You can switch the modes by following the instruction in below. As the factory default, the dispense control is in Standby Mode.
In Standby Mode, the dispenser icons are hidden until activated. The icons can be activated by swiping your finger across the control surface. The dispenser icons will turn off after 120 seconds automatically. Standby Mode provides a minimalist look which some users prefer.
In Active Mode, the dispenser icons (Cubed, Water, Crushed) are always on. The control uses brighter LED icon to indicate what dispensing mode is selected.
Switching between Active Mode and Standby Mode: Press and hold WATER and CRUSHED icons for 3 seconds. The dispenser control will flash for 2 seconds, confirming the mode is change
The water and ice dispenser, located on the front of the refrigerator compartment door, dispenses cold water, cubed ice or crushed ice.
The dispensing function will operate only when the refrigerator door is fully closed.
When the refrigerator is first plugged into an electrical outlet, the dispenser control display will illuminate for 3 seconds. Dispensing water is the default dispensing option.
When the refrigerator is first connected to water, water may not dispense if there is air in the water line.
- Press the dispenser pad for at least 5 minutes to remove trapped air from the water line and to fill the water system. See "Flush the Water System."
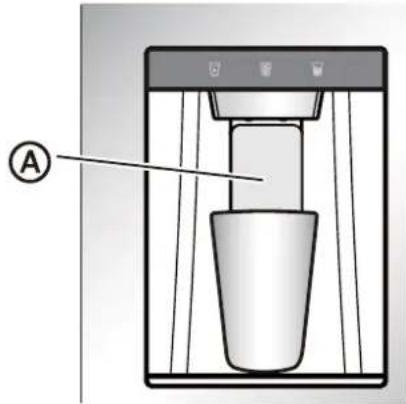

Dispenser pad
- Discard the first six full glasses of water to flush out impurities in the water line.
Dispenser Light
Dispenser light turns on when dispensing water and ice. The LED light will turn off after 3 seconds.
To use as a night light or extend the duration that the dispenser light is on, press and hold Water and Cubed icons together for 3 seconds. The dispenser light will turn off automatically after 12 hours. To turn off, hold the same buttons again for 3 seconds.
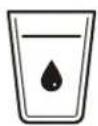
Water distribution
- Press the Water button 📋. The water indicator lights up.
- Using your finger or a container, press the lever to dispense water.
- Release the lever to stop dispensing water.
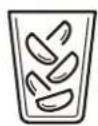
Ice cube distribution
- Press the Cubed button 📋. The ice cube indicator lights up.
- Using your finger or a container, press the lever to dispense ice cubes.
- Release the lever to stop dispensing ice.
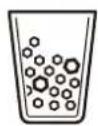
Dispensing Crushed Ice
- Press the Crushed button 📋. The Crushed indicator lights up.
- Using your finger or container, press the lever to dispense crushed ice.
- Release the lever to stop dispensing ice.
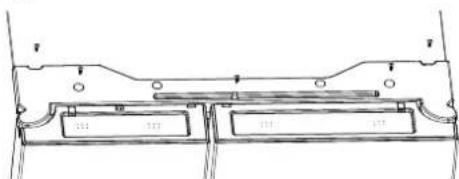
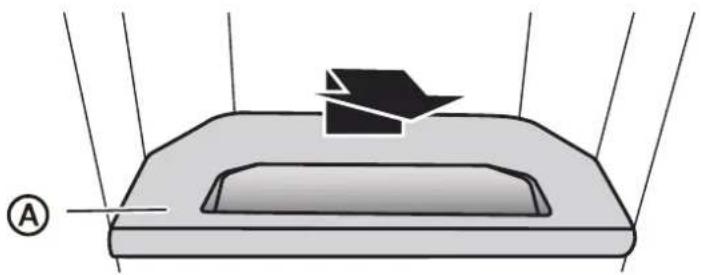
DRIP TRAY
The drip tray is removable for cleaning.
natural_image
Diagram of a device with a rectangular base and a black arrow pointing to it, no text or symbols present.

Drip tray
REMOVABLE DOOR BINS
The door bins are removable for easier cleaning.
To Remove:
- Remove all items from the door bin.
- Grasp the sides of the bin, lift the bin up and pull it outward.

natural_image
Illustration of two hands holding a transparent container with a black arrow symbol (no text or symbols present)
To Replace:
- Insert bin into the door liner above the support, and then press downward to engage.
REFRIGERATOR CARE
Both the refrigerator and freezer compartments defrost automatically and require minimal cleaning and maintenance. To keep your refrigerator running efficiently and odor free, we recommend that you wipe up spills immediately and clean the refrigerator regularly.
CLEANING

WARNING
Electrical Shock Hazard
- Unplug your appliance or disconnect power before cleaning.
- Failure to do so can result in death, electric shock or personal injury.

WARNING
Explosion Hazard
- Use nonflammable cleaner.
- Failure to do so can result in death, explosion or fire.
IMPORTANT: To prevent damage to the finish, DO NOT use gasoline, benzine, thinner or other solvents, and DO NOT use abrasive cleaners.
- Unplug the refrigerator from the electrical outlet.
- Remove all food.
-
Remove and wash the shelves with a mild detergent solution.
-
Wash the refrigerator interior using a soft cloth dampened with a baking soda solution (2 tablespoons baking soda mixed with 1 quart of warm water).
- Clean the gasket around the door. Gently wipe the gasket using a soft cloth dampened with a mild detergent solution.
NOTE: Gaskets must be kept clean and pliable to assure a proper seal.
- Using a soft cloth, thoroughly dry all surfaces.
- Plug in or reconnect power.
MOVING
IMPORTANT: When moving your refrigerator, DO NOT tilt it beyond 45^ from upright.
- Unplug your refrigerator from the wall outlet.
- Remove all food.
- Securely tape down all loose items inside your refrigerator.
- Tape the door shut.
STORAGE
IMPORTANT: Do not store refrigerator in a location that is accessible to children.
- Unplug your refrigerator from the electrical outlet.
- Remove all food.
- Clean the refrigerator.
- Leave the door open slightly to avoid possible formation of condensation, mold or odor.
REPLACING LIGHTS
Any replacement or maintenance of the LED lights is intended to be made by the manufacturer, its service agent or similarly qualified person.
TROUBLESHOOTING
IMPORTANT: DO NOT try to repair your refrigerator yourself. Doing so invalidates the warranty.
GENERAL
| PROBLEM POSSIBLE CAUSE SOLUTION |
| The refrigerator is not on or is not cooling | The refrigerator is unplugged. | Make sure that the refrigerator power cord is fully plugged into the electrical outlet. |
| The fuse on the circuit is blown or the circuit breaker is tripped. | Check the house fuse / circuit breaker box and replace the fuse or reset the circuit breaker. |
| Power failure. If a power failure occurs, the refrigerator turns off. Wait until the power is restored. | |
| Temperature control is not set to correct temperature. | Adjust the temperature to a lower setting. |
| The clearance between the refrigerator and surrounding cabinets or wall is insufficient. | Make sure there is adequate clearance around the refrigerator, and remove all items from the top of the refrigerator to maximize air circulation. See “Location Requirements.” |
| The refrigerator door does not close completely | Food packages are interfering with the door. | Move or remove some food items. |
| The door gaskets are dirty. | Clean the door gaskets. |
| The refrigerator may not be level. | Level the refrigerator. |
| The LED lights do not come on | The refrigerator is unplugged. | Plug refrigerator into a grounded 3-prong outlet. |
| LED light is burned out. Contact a qualified technician to replace the burned out LED. | |
| Food in the refrigerator is not cold | The door has been opened too often or was not closed properly.A large amount of food was recently added.The door is not closed completely.The refrigerator has been disconnected for a period of time.The temperature control is set too warm. | Make sure that the door is closed properly.Allow time for the recently added food to cool, and then check again.Check the door gasket and food distribution, and make sure that the door closes completely.Allow 4 hours for the refrigerator to cool completely before adding food.Set the temperature control to a colder setting. |
| Items in the refrigerator compartment are freezing | The air vents are blocked. Place large items on the sides of the top shelf so that they are not blocking the air circulating from the vent in the center. |
| The refrigerator makes unusual noises or vibrations | The refrigerator may not be level.The refrigerator cabinet is touching a wall.Metal parts undergo expansion and contraction.Refrigerant is circulating throughout the system. | Adjust the leveling feet located on the front corners of the refrigerator until the refrigerator is level.Move the refrigerator away from the wall.This is normal.This is normal. |
| Moisture is building up in the interior of the refrigerator | The door has been opened too often or was not closed properly.The refrigerator is located in a humid area.The weather is hot and humid. | Make sure that the door is closed properly.Move the refrigerator to a drier location.This is normal. |
| The compressor turns on and off frequently. | The room temperature is hotter than normal.A large amount of food was recently added.The door is not closed completely or was opened too often.The refrigerator has been disconnected for a period of time.The temperature control was not set correctly. | This is normal.Allow time for the recently added food to cool, and then check again.Check the door gasket and food distribution to make sure the door will close completely.Allow 4 hours for the refrigerator to cool completely before adding food.Set the temperature control to the correct setting. |
| Refrigerator has an odor | Refrigerator needs cleaning.Improperly wrapped food is giving off an odor. | Clean the refrigerator. See, “Cleaning.”Wrap food tightly or seal before storing it in the refrigerator. |
ICE AND WATER
| PROBLEM POSSIBLE CAUSE SOLUTION |
| The ice maker is not producing ice or is not producing enough ice | The refrigerator is not connected to a water supply or the water supply shutoff valve is not turned on.The ice maker(s) are turned off.The refrigerator has just been installed.The ice storage bin is not in place.A large amount of ice was recently removed.An ice cube is jammed in the ice maker ejector arm. | Connect refrigerator to water supply and turn water shutoff valve fully open.Turn on the ice maker(s). See “Controls.”Wait 12 hours after ice maker installation for ice production to begin.Make sure the ice storage bin is correctly installed.Allow sufficient time for ice maker to produce more ice.Remove ice from the ejector arm with a plastic utensil. |
| The ice cubes are hollow or smallNOTE: This is an indication of low water pressure. | The water shutoff valve is not fully open.There is a kink in the water source line.A water filter is installed on the refrigerator. | Turn the water shutoff valve fully open.A kink in the line can reduce water flow.Straighten the water source line.Remove the water filter and operate the ice maker. If ice volume improves, then the filter may be clogged or incorrectly installed. Replace filter or reinstall it correctly. |
| The water and ice dispenser do not operate properly | The refrigerator is not connected to a water supply or the water supply shutoff valve is not turned on. | Connect the refrigerator to the water supply and turn the water shutoff valve fully open. |
| There is a kink in the water source line. | A kink in the line can reduce water flow. Straighten the water source line. |
| Inadequate water pressure to the house. | The water pressure to the house determines the flow from the dispenser. See “Water Supply Requirements.” |
| A refrigerator door is not closed completely. | Make sure both doors to the refrigerator compartment are completely closed. |
| The water filter or bypass plug is not installed properly. | Water cannot be dispensed without a water filter or the bypass plug correctly installed. See “Water Filter.” |
| Ice is blocking the ice delivery chute. | Remove the ice bin from the upper ice compartment. Check the delivery chute and remove jammed ice using a plastic utensil, if necessary. Clean the ice delivery chute and the ice bin using a warm, damp cloth, and then dry both thoroughly. |
| To avoid ice jams and to maintain a fresh supply of ice, empty the ice bin and clean both the bin and delivery chute regularly. |
| Ice bin is not properly seated in the ice maker compartment. | Check the position of the ice bin. |
| Water is leaking or dripping from the dispenser systemNOTE: A few drops of water after dispensing is normal. | The glass was not held under the dispenser long enough.The water filter was recently installed or replaced. | Hold the glass under the dispenser 2 to 3 seconds after releasing the dispenser pad.Flushing the water system removes the air from the lines which causes the water dispenser to drip. Flush the water system. See “Flush the Water System.” |
| The water from the dispenser tastes bad | Water has not been dispensed recently (approx. 4 days).The water filter needs to be replaced. | Dispense and discard at least 1 gallon of water.Replace the water filter when indicated. |
| Water from the dispenser is warm | The refrigerator has just been installed.The refrigerator is not connected to a cold water pipe.A large amount of water was recently dispensed.Water has not been recently dispensed. | Allow 24 hours after installation for the water supply to cool completely.Make sure the refrigerator is connected to a cold water pipe.Allow 3 hours for the water supply to cool completely.The first glass of water may not be cool. Discard the first glass of water dispensed. |
| Water is leaking from the back of the refrigerator | The water line connections were not fully tightened. | See “Connect to Water.” |
| Water is leaking from the pan under the freezer drawer | The refrigerator is automatically defrosting more frequently.The doors or drawers are not closed completely allowing warm air to enter. | Empty the drip pan. Make sure the refrigerator is not overcrowded and that stored food with a high liquid content, such as soups, are tightly sealed.Make sure all doors and drawers are closed completely. |
ERROR CODES
If an error code is displayed on the control panel, contact your place of purchase or Midea customer service at 1-866-646-4332.
| Error Code | Error Description |
| E0 | Ice machine fault |
| E1 | Fault of temperature sensor in refrigerating chamber |
| E2 | Fault of temperature sensor in freezing chamber |
| E5 | Fault of defrosting sensor in freezing chamber |
| E6 | Communication fault of display board of main board |
| E7 | Ambient temperature fault |
| EH | Temperature sensor fault |
| EE | Ice machine sensor fault |
| CA | Communication fault of ice making board of mainboard |
| EP | Ice making machine o ff-ice fault |
WATER FILTRATION SYSTEM
MODEL MF-2008-R2 CAPACITY 200 GALLONS (757 LITERS)

System tested and certified by NSF International against NSF/ANSI Standards 42 and 53 for the reduction of contaminants specified on the Performance Data Sheet.
This system has been tested according to NSF/ANSI Standards 42 and 53 for the reduction of the substances listed below. The concentration of the indicated substances in water entering the system was reduced to a concentration less than or equal to the permissible limit for water leaving the system, as specified in NSF/ANSI Standards 42 and 53.
| Substance Reduction | Influent challenge concentration (mg/L) | Maximum permissible product water concentration (mg/L) | Avg % Reduction | NSF Reduction Requirements |
| Chlorine Reduction | 2.0 mg/L ± 10% NA | 93.7% 50% | | |
| Particulate Reduction, Class I* | ≥10000/ml NA | >99.9% ≥85% | | |
| Lead Reduction | 0.15mg/L ± 10% ≤0.010 | 99.60% | NA |
| Live Cysts† | 50000/L NA | >99.99% 99.95% | | |
Test Parameters: pH = 7.69 ± 0.5 unless otherwise noted. Flow = 0.52 gpm (1.89 Lpm). Pressure = 60 psig (413.7 kPa).
Temp. = 68°F to 71.6°F (20°C to 22°C). Rated service capacity = 200 gallons (757 liters).
- It is important that operational, maintenance, and filter replacement requirements be carried out for the product to perform as advertised. Property damage can occur if all instructions are not followed.
- The disposable cartridge must be changed at least every 6 months.
- Use replacement filter MF-2008-R2.
- The filter monitor system measures the amount of water that passes through the filter and alerts you when it is time to replace the filter. See “Using the Controls.”
- After changing the water filter, flush the water system. See “Dispenser.”
- These contaminants are not necessarily in your water supply. While testing was performed under standard laboratory conditions, actual performance may vary.
● The product is for cold water use only.
-
The water system must be installed in compliance with state and local laws and regulations.
-
Do not use with water that is microbiologically unsafe or of unknown quality without adequate disinfection before or after the system. Systems certified for cyst reduction may be used on disinfected waters that may contain filterable cysts. EPA Est. No. 10350-MN-005.
- Refer to the “Warranty” section for the Manufacturer’s limited warranty, name and telephone number.
Application Guidelines/
Water Supply Parameters
| Water Supply Potable City or Well |
| Water Pressure 35 - 120 psi(241 - 827 kPa) |
| Water Temperature | 33° - 100°F(1° - 38°C) |
| Service Flow Rate | 0.52 gpm (1.89 L/min.)@ 60 psi |
* Class I particle size: >0.5 to <1 μm.
^+ Based on the use of Cryptosporidium parvum oocysts.
® NSF is a registered trademark of NSF International.
2 YEAR LIMITED WARRANTY
This warranty is provided to the original purchaser at retail (the “Purchaser” or “you”) by Midea America Corp. (“Midea” or “we”), which warrants all parts of this Product, as described below. Midea warrants this Product to the Purchaser for personal, family or household use. This warranty covers performance and quality issues in materials and workmanship that appear under normal use and maintenance appearing within two years from the date of delivery. This warranty gives you specific rights, and you may also have other rights that vary from state to state.
WARRANTY LIMITATIONS
This warranty is given only to the original purchaser at retail in either the United States or Canada and may not be transferred to any subsequent buyer. This warranty does not apply to purchasers of our products for use or resale in a business; a separate commercial warranty may protect those purchasers.
This warranty does not cover any Product failure caused by:
(a) Abuse, damage or use of the Product in violation of the Product instructions.
(b) Modification to any Product or part.
(c) Failure to maintain the Product or part as described in accordance with the Product instructions.
(d) Faulty installation or application.
(e) Use of parts or accessories not compatible with this Product.
(f) Floods, fires, winds, lightning, accidents, corrosive atmosphere, or other conditions beyond Midea's control.
(g) Interruption in electrical service or inadequate electrical service.
(h) Replacement of fuses and replacement or resetting of circuit breakers.
(i) Frozen or broken water pipes, water damage, moisture intrusion, mold or other biological growth.
(j) The use, combination or linking of the Product to other products, processes or materials not provided by Midea.
WARRANTY REMEDY
If any quality or performance issue covered by this warranty is discovered during the warranty period, we will, at our option, repair or replace any such Product. This warranty is limited to Product repair or replacement by an authorized Midea servicer or dealer and does not cover any shipping cost, labor cost, customs duties, inland logistics cost, or cost of service, including any diagnostics, removal, transportation, or reinstallation costs. If we ask, you must return the Product to us.
WARRANTY DISCLAIMER; EXCLUSION OF DAMAGES
This is the only express warranty to consumers that we offer on our Products. ANY IMPLIED WARRANTIES BY MIDEA, INCLUDING BUT NOT LIMITED TO WARRANTIES OF MERCHANTABILITY AND FITNESS FOR PARTICULAR PURPOSE, ARE LIMITED TO THE DURATION OF THIS EXPRESS WARRANTY. Some states and provinces do not allow the exclusion of express warranties and/or limitations on how long an implied warranty lasts, so the above exclusion and/or limitation may not apply to you.
THE REMEDY DESCRIBED ABOVE IS THE ONLY ONE THAT WE WILL PROVIDE, EITHER UNDER THIS WARRANTY OR UNDER ANY WARRANTY ARISING BY OPERATION OF LAW. WE WILL NOT BE RESPONSIBLE FOR ANY CONSEQUENTIAL OR INCIDENTAL DAMAGES ARISING FROM THE BREACH OF THIS WARRANTY OR ANY OTHER WARRANTY, WHETHER EXPRESS OR IMPLIED, NEGLIGENCE OR OTHER TORT, OR ON ANY STRICT LIABILITY THEORY, INCLUDING BUT NOT
LIMITED TO LOST PROFITS. Some states do not allow the exclusion or limitation of incidental or consequential damages, so the above exclusion may not apply to you.
WARRANTY CLAIMS PROCESS
For more information or to make a warranty claim, please visit:
https://www.midea.com/us/support
Or contact us at:
Telephone: 1-866-646-4332
Email: customerserviceusa@midea.com
You must have Your bill of sale, delivery slip, or appropriate proof of purchase to submit a warranty claim. The date of delivery establishes the warranty period, should service be required.
DISPUTE RESOLUTION
ARBITRATION CLAUSE. IMPORTANT. PLEASE REVIEW THIS ARBITRATION CLAUSE. IT AFFECTS YOUR LEGAL RIGHTS.
(a) Parties: This arbitration clause (this “Arbitration Clause”) affects your rights against Midea and any of its affiliates or employees or agents, successors, or assigns, all of whom together are referred to below as “we” or “us” for ease of reference.
(b) ARBITRATION REQUIREMENT: EXCEPT AS STATED BELOW, ANY DISPUTE BETWEEN YOU AND ANY OF US SHALL BE DECIDED BY NEUTRAL, BINDING ARBITRATION RATHER THAN IN COURT OR BY JURY TRIAL. "Dispute" will be given the broadest possible meaning allowable by law. It includes any dispute, claim, or controversy arising from or relating to your purchase of this Product, any warranty upon the Product, or the Product's condition. It also includes determination of the scope or applicability of this Arbitration Clause. The arbitration requirement applies to claims in contract and tort, pursuant to statute, or otherwise.
(c) CLASS-ARBITRATION WAIVER: ARBITRATION IS HANDLED ON AN INDIVIDUAL BASIS. IF A DISPUTE IS ARBITRATED, YOU AND WE EXPRESSLY WAIVE ANY RIGHT TO PARTICIPATE AS A CLASS REPRESENTATIVE OR CLASS MEMBER ON ANY CLASS CLAIM YOU MAY HAVE AGAINST US OR WE AGAINST YOU, OR AS A PRIVATE ATTORNEY GENERAL OR IN ANY OTHER REPRESENTATIVE CAPACITY, TO THE MAXIMUM EXTENT PERMITTED BY LAW. YOU AND WE ALSO WAIVE ANY RIGHT TO CLASS ARBITRATION OR ANY CONSOLIDATION OF INDIVIDUAL ARBITRATIONS.
(d) Discovery and Other Rights: Discovery and rights to appeal in arbitration are generally more limited than in a lawsuit. This applies to both you and us. Other rights that you or we would have in court may not be available in arbitration. Please read this Arbitration Clause and consult the rules of the arbitration organizations listed below for more information.
(e) SMALL CLAIMS COURT OPTION: YOU MAY CHOOSE TO LITIGATE ANY DISPUTE BETWEEN YOU AND ANY OF US IN SMALL CLAIMS COURT, RATHER THAN IN ARBITRATION, IF THE DISPUTE MEETS ALL REQUIREMENTS TO BE HEARD IN SMALL CLAIMS COURT.
(f) Governing Law: For residents of the United States, the procedures and effect of the arbitration will be governed by the Federal Arbitration Act (9 U.S.C. § 1 et seq.) rather than by state law concerning arbitration. For residents of Canada, the procedures and effect of the arbitration will be governed by the applicable arbitration law of the province in which you purchased your Product. The law governing your substantive warranty rights and other claims will be the law of the state or province in which you purchased your Product. Any court having jurisdiction may enter judgment on the arbitration award.
(g) Rules of the Arbitration: If the amount in controversy is less than \250,000, the arbitration will be decided by a single arbitrator. If the amount in controversy is greater than or equal to \250,000, the arbitration will be decided by a panel of three arbitrators. The arbitrator(s) will be chosen pursuant to the rules of the administering arbitration organization. United States residents may choose JAMS (1920 Main Street, Ste. 300, Irvine, CA 92614, www.jamsadr.com), or, subject to our approval, any other arbitration organization. In addition, Canadian residents may choose the ADR Institute of Canada (234 Eglinton Ave. East, Suite 405, Toronto, Ontario, M4P 1K5, www.amic.org). These organizations' rules can be obtained by contacting the organization or visiting its website. If the chosen arbitration organization's rules conflict with this Arbitration Clause, the provisions of this Arbitration Clause control. The award of the arbitrator(s) shall be final and binding on all parties.
(h) Location of the Arbitration Hearing: Unless applicable law provides otherwise, the arbitration hearing for United States residents will be conducted in the federal judicial district in which you reside (in your hometown area) or, for Canadian residents, in the province in which you reside, and, if you choose, will be in-person.
(i) Costs of the Arbitration: Each party is responsible for its own attorney, expert, and other costs and fees unless applicable law requires otherwise. Notwithstanding the preceding sentence, and unless applicable law requires otherwise, if you are a consumer under the JAMS rules or the rules of another agreed upon arbitration administrator, Midea will pay or reimburse you for all reasonable fees or costs to the extent required by law or the applicable arbitration administrator's rules. Whether or not required by law or such rules, if you prevail at arbitration on any claim against Midea, Midea will reimburse you for any reasonable fees paid to the arbitration administrator in connection with the arbitration proceedings. Under no circumstances will Midea seek from you payment or reimbursement of any reasonable fees that Midea incurs in connection with the arbitration. If you are required to advance any fees or costs to JAMS or other agreed upon arbitration administrator, but you ask Midea to do so in your stead, Midea will consider and respond to your request.
(j) Survival and Enforceability of this Arbitration Clause: This Arbitration Clause shall survive the expiration or termination, or any transfer, of the warranty on your Product. If any part of this Arbitration Clause, except waivers of class-action rights, is found to be unenforceable for any reason, the remainder of this clause and the warranty shall remain enforceable. If, in a case in which class-action allegations have been made, the waiver of class-action rights under this warranty is found to be unenforceable with respect to any part of the dispute, the parts of the dispute as to which the waiver of class-action rights have been found unenforceable will be severed and will proceed in court without reference or application of this Arbitration Clause. Any remaining parts will proceed in arbitration.
QUEBEC RESIDENTS
The arbitration provisions of this warranty shall not apply to residents of Quebec.
natural_image
Exterior view of a modern stainless steel double door refrigerator with black plastic clamps (no text or symbols visible)
Cher utilisateur
MISE AU REBUT APPROPRIÉE

AVERTISSEMENT
Dangers de suffocation
Ⓐ Prise à 3 fiche
natural_image
Simple line drawing of a window frame with a mounted bracket and wall, enclosed in a circular frame (no text or symbols)
natural_image
Simple line drawing of a window with a door and a floor-mounted tool, enclosed in a circular frame (no text or symbols)
natural_image
Technical line drawing of a mechanical assembly with no visible text or symbols
natural_image
Technical line drawing of a window frame with mounting fixtures and structural elements (no text or symbols)
natural_image
Technical line drawing of a mechanical assembly with no visible text or symbols
natural_image
Technical line drawing of a mechanical assembly with a base mount (no text or symbols)
natural_image
Technical line drawing of a window frame with mounting base and railings (no text or symbols)
natural_image
Technical line drawing of a mechanical assembly with no visible text or symbols
natural_image
Line drawing of a window with a small mechanical component at the bottom (no text or symbols)
natural_image
Simple line drawing of a window with a small box and two legs, enclosed in a circular frame (no text or symbols)
natural_image
Technical line drawing of a mechanical assembly with a base and mounting bracket (no text or symbols)
natural_image
Technical line drawing of a mechanical assembly with no visible text or symbols
RACCORDEMENT À L'EAU

Couvercle
du filtre

natural_image
Two mechanical assembly diagrams showing upward and downward motion of a bolted joint (no text or symbols)
natural_image
Technical line drawing of a mechanical device with internal components and labeled section A (no text or symbols beyond label)
A
Bac à glaçons
natural_image
Diagram of a mechanical component with labeled point A and directional arrow (no text or symbols beyond label)
BALCONNETS AMOVIBLES
natural_image
Illustration of two hands holding a transparent container with a black arrow symbol on top (no text or symbols present)
Réinstallation :
REEMPLACEMENT DES AMPOULES
natural_image
Exterior view of a modern stainless steel double door refrigerator with a black vent and side latch (no visible text or symbols)
Estimado usuario
Ⓐ Área trasera y laterales: 3" (7.6 cm)
(B) Aéra superior: 3" (7.6 cm)
Ⓐ Luz LED
© Repisa de vidrio
© Filtro de agua
natural_image
Technical line drawing of a corner-mounted fixture with mounting base and vertical panel (no text or symbols)
natural_image
Interior view of a train or window frame with a small robotic arm and a handle (no text or symbols visible)
natural_image
Technical line drawing of a mechanical assembly with no visible text or symbols
natural_image
Technical line drawing of a window frame with mounting bracket and railings (no text or symbols)
natural_image
Technical line drawing of a mechanical or electrical component with no visible text or symbols
natural_image
Simple line drawing of a mechanical assembly or mounting bracket with a small figurine on the base (no text or symbols)
natural_image
Technical line drawing of a window frame with mounting feet and structural supports (no text or symbols)
natural_image
Technical line drawing of a mechanical assembly with no visible text or symbols
natural_image
Technical line drawing of a window frame with a central fixture and mounting bracket (no text or symbols)
natural_image
Technical line drawing of a mechanical assembly or mounting bracket (no text or symbols)
natural_image
Technical line drawing of a mechanical assembly with a base and mounting bracket (no text or symbols)
natural_image
Technical line drawing of a mechanical assembly with no visible text or symbols
CONEXIÓN AL AGUA

Cubierta del
filtro

Tapón de
derivación

Filtro de agua
natural_image
Two mechanical assembly diagrams showing upward and downward motion of a bolted joint (no text or symbols)
natural_image
Technical line drawing of a mechanical device with internal components and labeled section A (no text or symbols beyond label)
A
Depósito
de hielo
natural_image
Diagram of a water dispenser with a glass cup inside, labeled with point A (no text or symbols on the diagram itself)
A
natural_image
Diagram of a mechanical component with a triangular base and internal cavity, labeled with point A (no text or symbols present)
A
Bandeja antigoteo
natural_image
Illustration of two hands holding a transparent container with a black arrow symbol inside (no text or symbols present)
Cómo sustituirlos:
make yourself at home