
Explore 6 E6TB16ST - Blender ELECTROLUX - Free user manual and instructions
Find the device manual for free Explore 6 E6TB16ST ELECTROLUX in PDF.
| Product type | Blender |
| Brand | Electrolux |
| Model | Explore 6 E6TB16ST |
| Main container material | Borosilicate glass |
| Main container capacity | 1.75 L |
| Take-away bottle capacity | 0.6 L |
| Automatic programs | Smoothie, Hot soup, Crushed ice |
| Speeds | Variable with rotary selector |
| Pulse function | Yes (via selector) |
| Blades | Stainless steel |
| Non-slip feet | Yes |
| Included accessories | 2-in-1 take-away bottle (depending on model), measuring lid |
| Dishwasher-safe parts | Container, lid, measuring cup, blade assembly, take-away bottle |
| Maintenance | Do not immerse base, clean after each use |
| Maximum liquid temperature (main container) | 100 °C |
| Maximum liquid temperature (take-away bottle) | 60 °C |
| Safety | Locking if container not properly locked, very sharp blades |
| Usage | Household only |
| Control type | Rotary with preset programs |
Frequently Asked Questions - Explore 6 E6TB16ST ELECTROLUX
User questions about Explore 6 E6TB16ST ELECTROLUX
0 question about this device. Answer the ones you know or ask your own.
Ask a new question about this device
Download the instructions for your Blender in PDF format for free! Find your manual Explore 6 E6TB16ST - ELECTROLUX and take your electronic device back in hand. On this page are published all the documents necessary for the use of your device. Explore 6 E6TB16ST by ELECTROLUX.
USER MANUAL Explore 6 E6TB16ST ELECTROLUX
Explore 6 High Power Blender
User Manual
E6TB1-6ST
E6TB1-8ST
natural_image
Illustration of a blender with two containers: one with a Max handle and the other with an Electrolyzer (no text or symbols on the main objects)HR KORISNIČKI PRIRUČNIK
CZ NÁVOD K POUŽITÍ
DK BRUGSANVISNING
EN INSTRUCTION BOOK
EE KASUTUSJUHEND
FI KÄYTTÖOHJE
FR NOTICE D'UTILISATION
natural_image
Technical diagram of a mechanical component with labeled parts 1 and 2 (no text or symbols beyond labels)
natural_image
Cross-sectional diagram of a plastic container with internal channels and a labeled part (11), no text or symbols present.HOW TO USE
natural_image
Illustration of kitchen cleaning items including blender, water dispenser, and blender with cleaning tools (no text or symbols)2 Mainblender jar Mainblender jar |  | Smoothie | MAX1.75L |  /Max Speed90sec /Max Speed90sec |
 | Hot Soup | MAX1.4L | [BC48]/Low Speed60sec | |
 | Ice crush | MAX8-10pcs |  /10x pulse /10x pulse | |
 | Carrot Soup | 700gr1050gr | [4WBK]Speed)sec | |
 Takeawaybottle Takeawaybottle |  | Smoothie | MAX0.6L | [OCHC]/Max Speed90sec |
 | Warm liquid(max 60°C) | MAX0.4L |  Speed)sec Speed)sec | |
 | Ice crush | MAX5-7pcs |  /10x pulse /10x pulse | |
| [8W00] | Carrot Soup | 240gr360gr | [26K3]Speed)sec |
flowchart
graph TD
    A["Step 1: Lock"] --> B["Step 2: Press"]
    B --> C["Step 3: Click"]
    C --> D["Step 4: Press"]
    style A fill:#cce5ff,stroke:#333
    style B fill:#cce5ff,stroke:#333
    style C fill:#cce5ff,stroke:#333
    style D fill:#cce5ff,stroke:#333

8
9
natural_image
Illustration of a blender with a lock icon highlighting the interior area (no text or symbols present)▶

natural_image
Illustration of a mechanical component with a lock icon (no text or symbols)
natural_image
Illustration of a camera lens with a lock icon and upward arrow (no text or symbols)▶
natural_image
Illustration of a container pouring liquid into a glass with a speedometer (no text or symbols)10
natural_image
Illustration of a blender with a measuring cup and a small logo on the right (no text or symbols on the main object)▶
natural_image
Illustration of a blender being poured into a glass with liquid, labeled '1.5 L' (no text or symbols on the diagram itself)▶
11
▶
flowchart
graph TD
    A["Top Top Stage"] --> B["Middle Stage"]
    B --> C["Bottom Bottom Stage"]
▶
▶
▶

natural_image
Illustration of a blender with a hand holding a blue glove, showing the handle and control panel (no text or symbols)▶
▶
12

natural_image
Illustration of a plug inserted into a socket with a blue arrow indicating downward motion (no text or symbols)CLEANING AND CARE
natural_image
Illustration of a plug with a cable and a switch, showing no text or symbols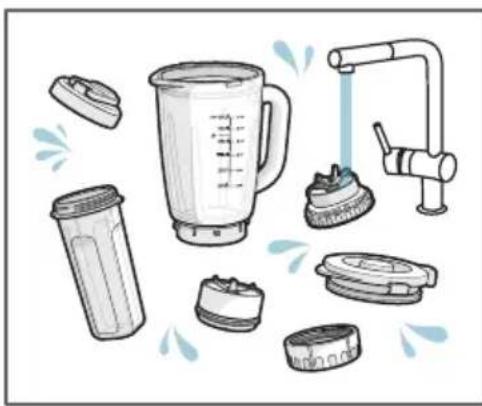
natural_image
Illustration of kitchen cleaning tools including a blender, water dispenser, and cleaning bins (no text or symbols)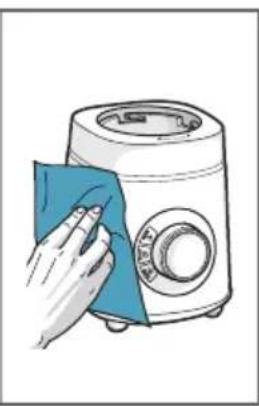
natural_image
Illustration of a hand cleaning a kitchen appliance with a cloth (no text or symbols)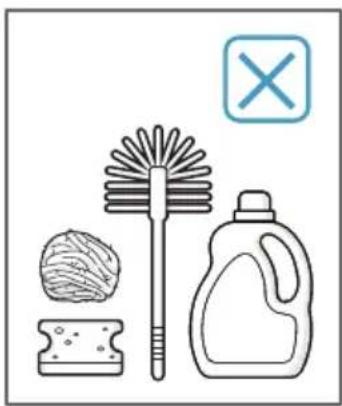
natural_image
Illustration of cleaning items including a broom, soap, and a plastic bottle with a crossed-out 'X' symbol (no text or labels)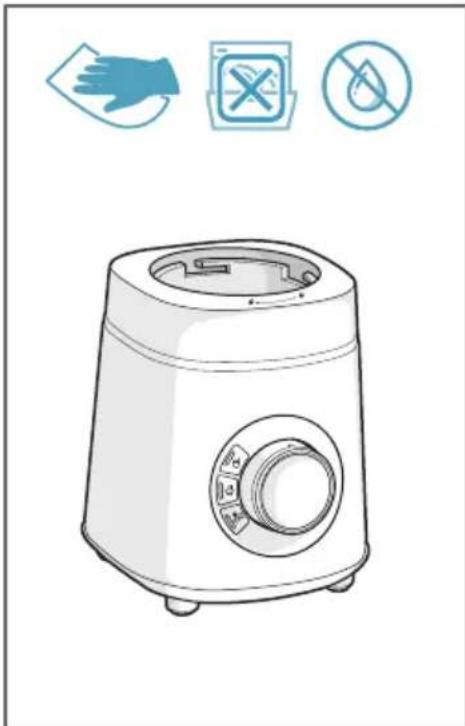
natural_image
Line drawing of a kitchen toaster with three prohibition symbols (no text or labels)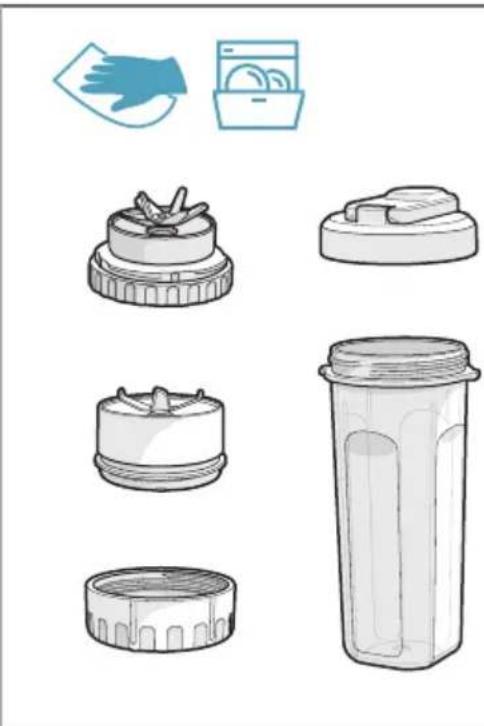
natural_image
Illustration of kitchen utensils including a hand, a blender, and a plastic container (no text or symbols)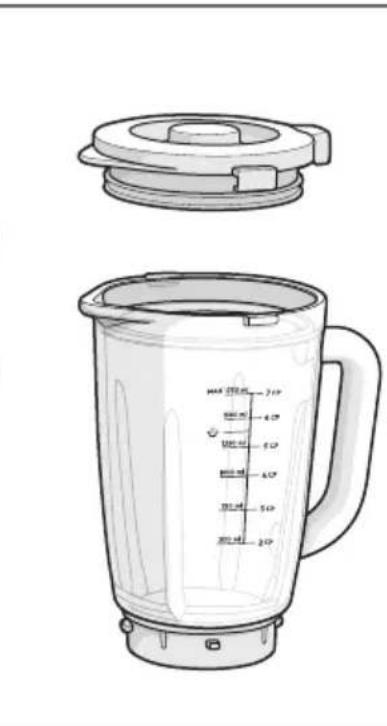
natural_image
Line drawing of a blender with lid and side view showing interior scale (no text or symbols)SAVJETI ZA SIGURNU UPOTREBU
Read the following instruction carefully before using the appliance for the first time.
• This appliance is designed for mixing food.
- This appliance can be used by persons with reduced physical, sensory or mental capabilities or lack of experience and knowledge if they have been given supervision or instruction concerning use of the appliance in a safe way and if they understand the hazards involved. This appliance shall not be used by children. Keep the appliance and its cord out of reach of children. Cleaning and user maintenance shall not be made by children without supervision. Children shall not play with the appliance.
- The appliance can only be connected to a power supply whose voltage and frequency comply with the specifications on the rating plate.
• If the supply cord is damaged, it must be replaced by the manufacturer, its service agent or similarly qualified persons in order to avoid a hazard.
• Always place the appliance on a flat level surface.
• Always switch of f and disconnect the appliance from the mains if it is left unattended and before assembling, disassembling, cleaning, changing accessories or approaching parts that move during use.
- WARNING: the blades are very sharp. Care shall be taken when assembling, disassembling after use or during cleaning.
• This appliance is intended for domestic use only. It must not be used for other purposes.
• This appliance is intended to be used in household and similar applications such as:
- staff kitchen areas in shops, offices and other working environments;
- farm houses;
- by clients in hotels, motels and other residential type environments;
- bed and breakfast type environments.
- staff kitchen areas in shops, offices and other working environments;
- farm houses;
- by clients in hotels, motels and other residential type environments;
- bed and breakfast type environments.
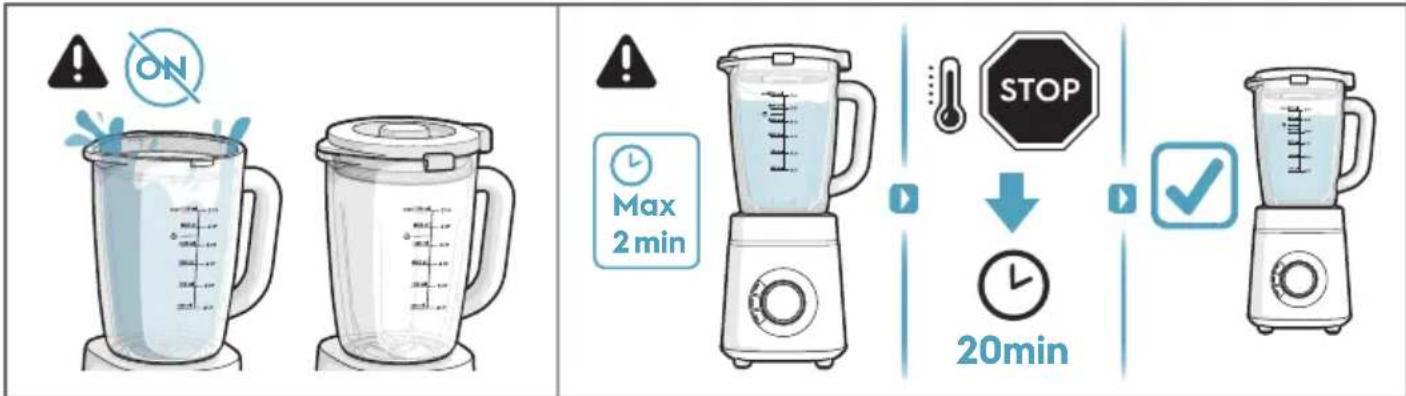
- With heavy load(maximum capacity), do not let the blender run for more than 2 minutes. Allow it to cool down for at least 20 minutes before continuing.
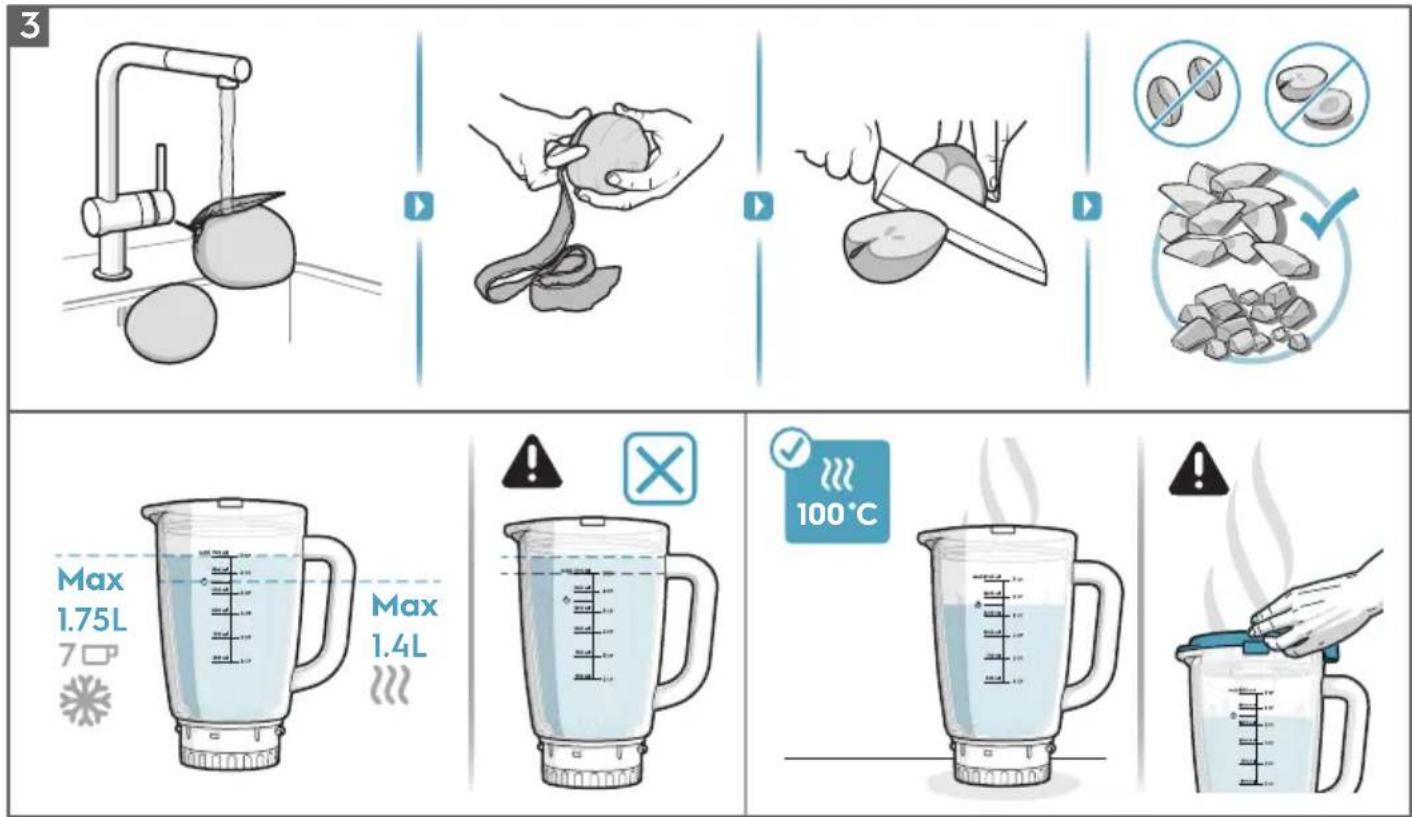
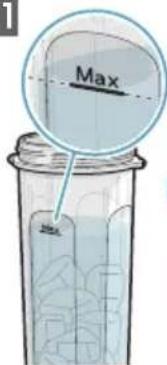
• Do not exceed the maximum filling volume as indicated on the jar.
- The main blender jar is made of borosilicate glass that can withstand even boiling water (100°C). Please ensure that the jar temperature is in room temperature (25°C) for at least 4 hours before pouring it with boiling water.
• The takeaway bottle jar is not suitable to blend hot liquid (max 60°C).
- Be careful when pouring hot liquid as released steam can caused burn.
• Never operate appliance without lid.
• Never immerse the appliance body, cord or plug in water or any other liquid.
• Do not use this application to stir paint. It may cause an explosion.
• Do not let cord touch or hang over hot surfaces.
• Use only accessories or parts recommended for this appliance.
- The main blender and takeaway bottle cannot be used for blending or grinding hard and dry substance, except for ice cubes and frozen fruits.
- Keep hands and utensils out of the appliance during operation to avoid the risk of severe injury or damage to the appliance.
DISPOSAL

This symbol on the product or on its packaging indicates that the product may not be treated as household waste. To recycle your product, please take it to an official collection point or to an Electrolux service center that can remove and recycle the battery and electric parts in a safe and professional way. Follow your country's rules for the separate collection of electrical products and rechargeable batteries.
Electrolux reserves the right to change products, information and specifications without notice.
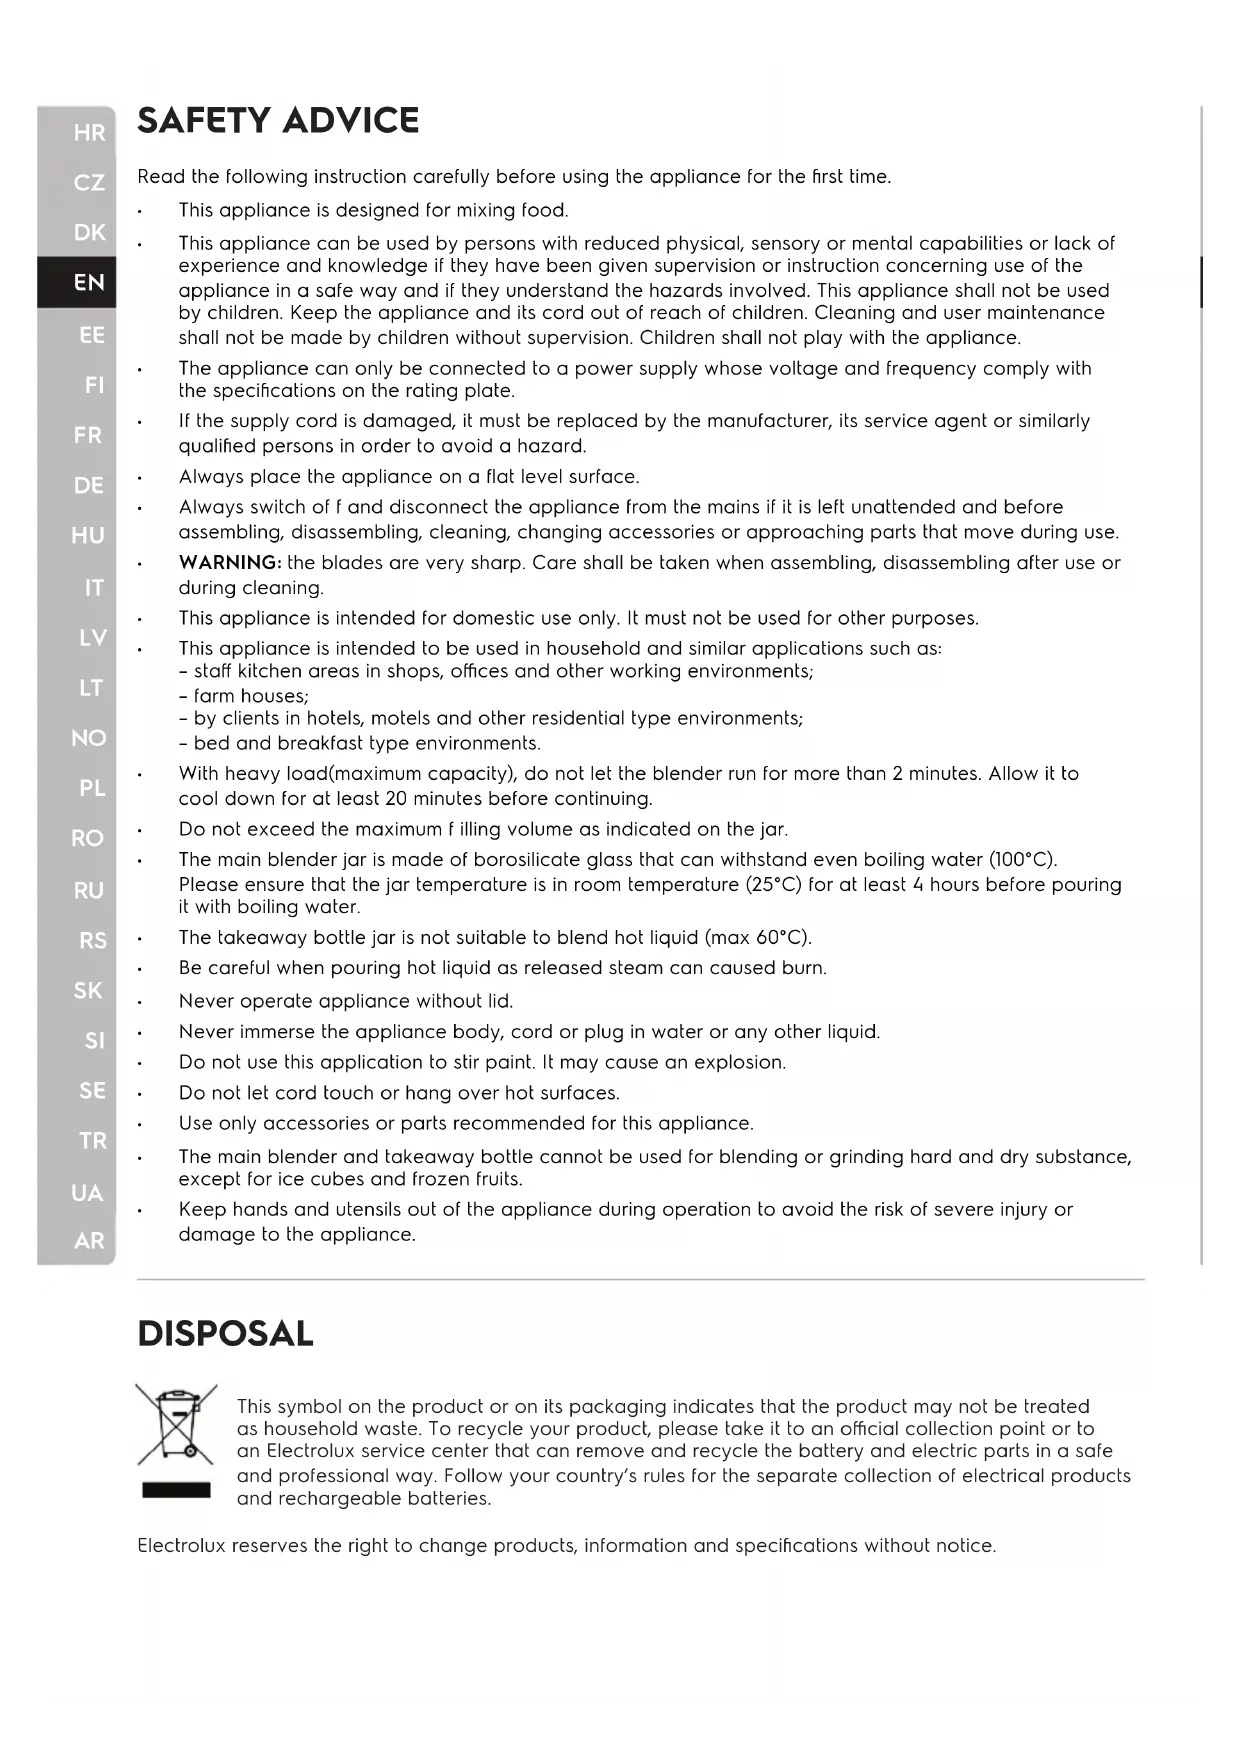
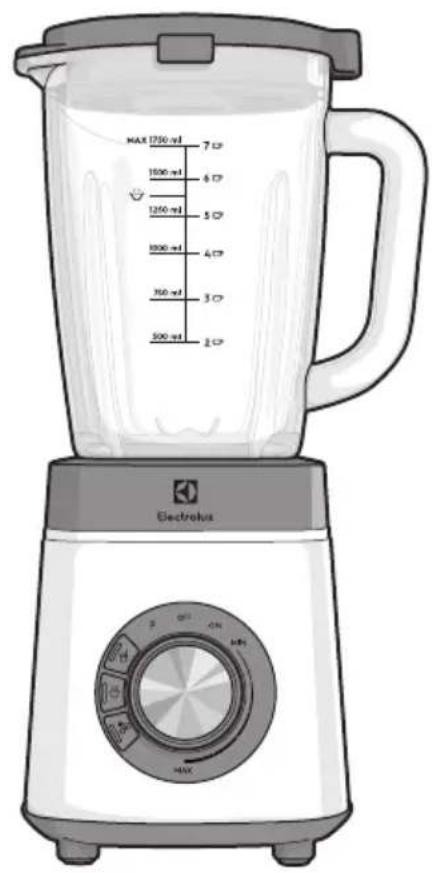
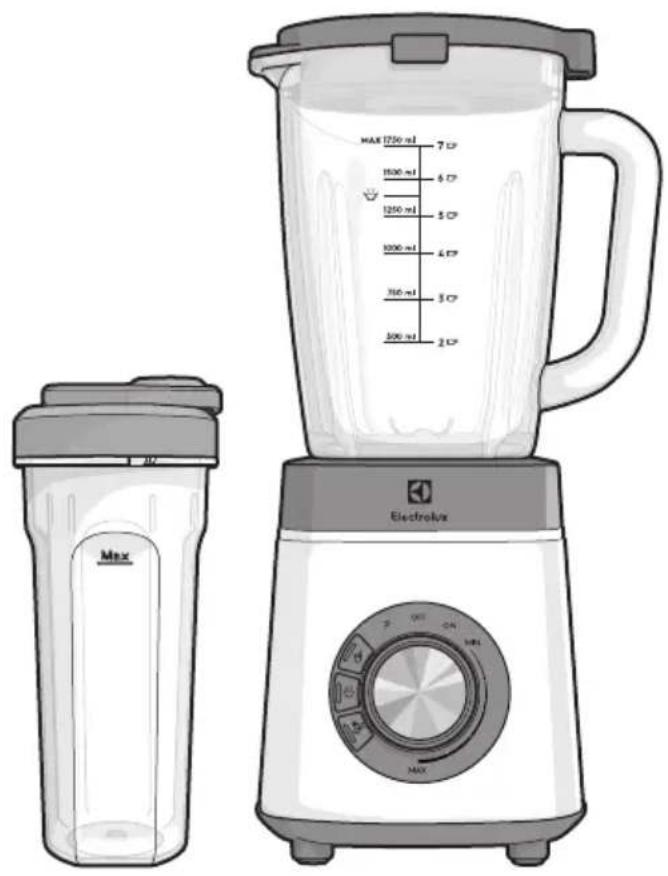
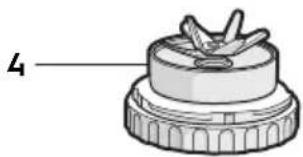
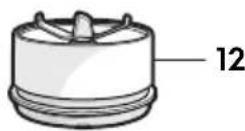
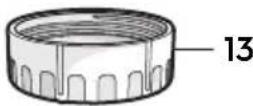
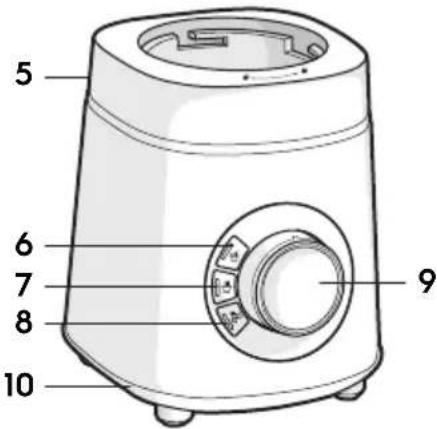
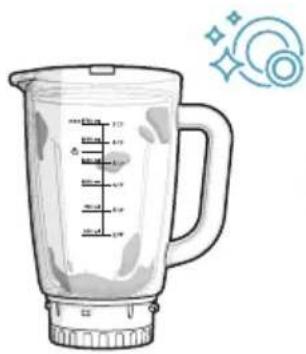
COMPONENT (picture page '2')
1 Measuring lid
2 Lid
3 Borosilicate glass jar
4 Blade assembly
5 Blender base
6 Smoothie program
7 Hot soup program
8 Ice crush program
9 Speed selector
10 Non-slip feet
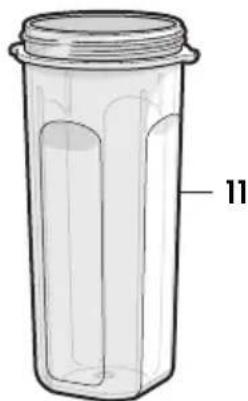
11 Takeaway bottle*
12 Takeaway bottle central blade*
13 Takeaway bottle blade holder*
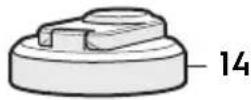
14 Takeaway bottle lid*
*certain models only
HOW TO USE (picture page '2-4')
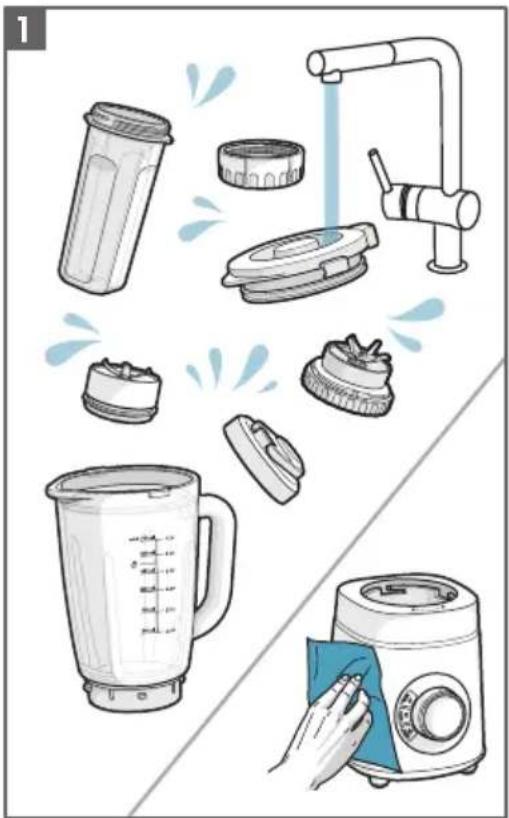
1 Cleaning - Make sure that you start with clean jar before use.
2 Maximum capacity and program/speed setting.
Main blender jar
| Program/Recipe Maximum capacity Recommended setting/program | ||
| Smoothie | 1.75L Smoothie program OR Max speed for 90sec | |
| Hot Soup | 1.4L Hot soup program OR Low speed for 60sec | |
| Ice crush | 8-10pcs | Ice crush program OR 10x pulse |
| Carrot Soup | 700gr carrot + 1050gr water | MAX speed for 60sec |
Notes! The blender doesn't have the functionality of heating up liquid directly inside it. Hot soup program means that the blender is capable in mixing the hot soup/liquid that is put inside without breaking the jar.
Takeaway bottle
| Program/Recipe Maximum capacity Recommended setting/program | ||
| Smoothie | 0.6L | Smoothie program OR Max speed for 90sec |
| Warm liquid (max 60°C) | 0.4L | Max speed for 60sec |
| Ice crush | 5-7 pcs | Ice crush program OR 10x pulse |
| Carrot Soup | 240gr carrot + 360gr water | Max speed for 60sec |
3 Prepare the ingredients by rinsing them thoroughly and cut them into 4 to 6 pieces and remove any hard or large seeds. Remove any thick peel from the fruit or vegetables.
WARNING! Do not exceed the maximum filling volume as indicated on the jar.
Pro Tips: The jar is made of borosilicate glass that can withstand even boiling water (100°C).
Please ensure that the jar temperature is in room temperature (25°C) for at least 4 hours before pouring it with boiling water.
WARNING! Be careful when opening the lid (2) with hot liquid inside as released steam can cause burn.
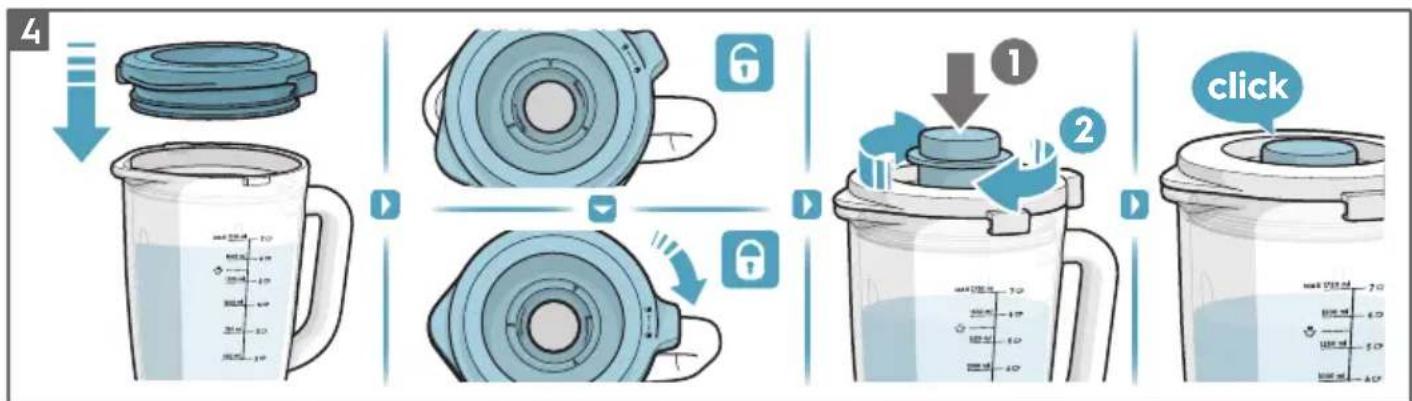
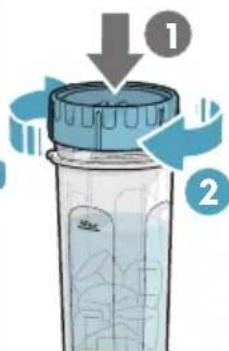
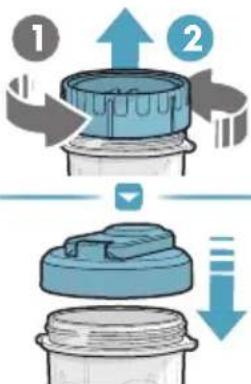
4 Place the lid (2) on the jar (3) with the cap on the right side of jar handle, then turn it clockwise to make sure that it is securely locked. Fit the measuring cup (1) in the lid by rotating clockwise until it clicks into position.
Pro Tips: You can add ingredients through the filler hole, while the blender is in operation.
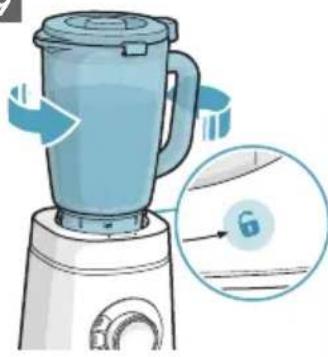
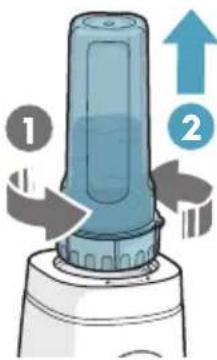
5 Place the jar (3) with attached blade assembly (4) on the blender base (5) with the handle to the right. Rotate it clockwise until it locks into position.
WARNING! The appliance can't be turned on unless the jar is perfectly fitted on the blender base.
6 Plug into mains.
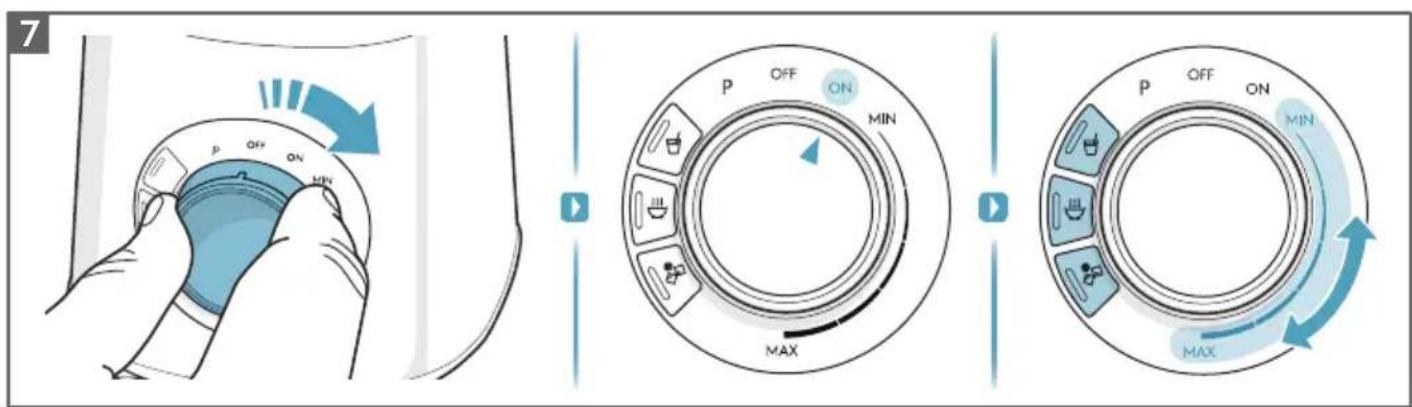
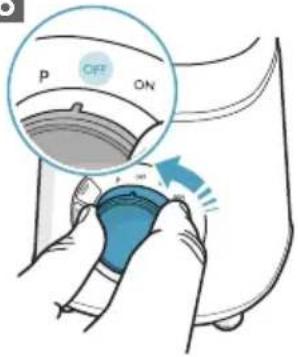
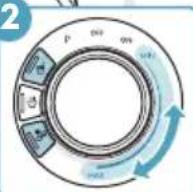
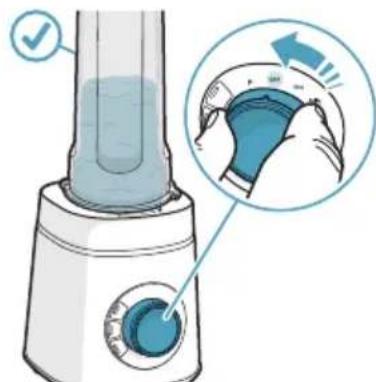
7 Turn the knob to the "ON" position then select the program accordingly, or Turn the knob over "ON" position onto the desired speed directly (see no.2 program/speed setting).
WARNING! Never operate appliance without lid. Never run the blender empty, running the blender empty can cause overheating and can damage the product. Keep hands and utensils out of the blender jar while blending.
WARNING! During operation, do not remove your jar from blender base. If it's necessary to remove the jar, please turn off the appliance first then remove it.
WARNING! With heavy load (maximum capacity), do not let the blender run for more than 2 minutes. Allow it to cool down for at least 20 minutes before continuing.
Pro Tips: With Pulse mode you can give the ingredients a quick mix to achieve your desired consistency.
8 The blender will operate until the program is finished. To stop any program manually, turn the knob to OFF position.
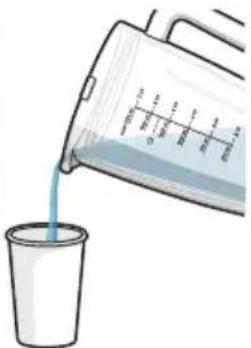
9 Remove the jar (3) from blender base (5) by turning it counterclockwise and pull it off, then pour and serve.
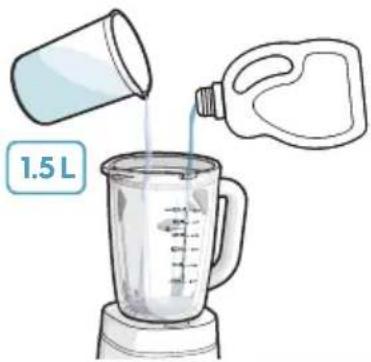
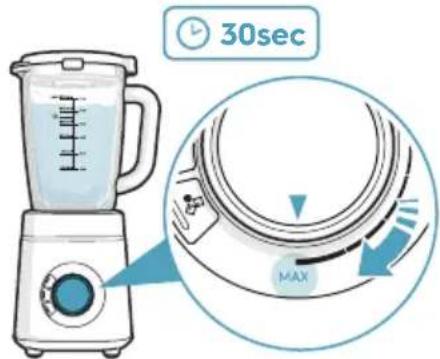
10 Wash the components right after use in order to avoid drying of food residue on components.
Pro Tips: Always detach blade assembly with jar and rinse them clean even before placing it into the dishwasher. Fill the jar with 1.5L lukewarm water and dishwasher liquid then run MAX speed for 30 seconds for rinsing purpose.
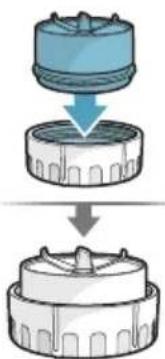
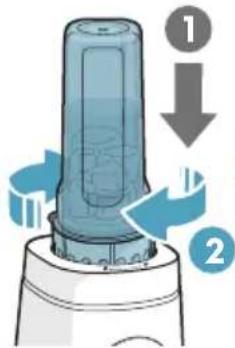
11 Using 2-in-1 takeaway bottle.
a. Fill the ingredients in the takeaway bottle (11).
b. Push the central blade (12) to blade holder (13) to create a blade assembly.
WARNING! The blades are very sharp!
c. Fasten the blade assembly on the open end of the bottle by turning it clockwise. Turn the takeaway bottle upside down.
d. Push down the assembled takeaway bottle onto the blender base (5) and rotate it clockwise to lock until it clicks into position.
e. Turn the knob to the "ON" position then select the program accordingly, or Turn the knob over "ON" position onto the desired speed directly (see no.2 program/speed setting). Once done, turn the knob to OFF position.
f. Turn the assembled takeaway bottle counterclockwise to release it off from blender base.
g. Take off the blade assembly by turning it counterclockwise.
WARNING! Always take off the blade assembly within 1 minute after blending to avoid hard disassemble afterwards.
h. Attach the lid (14) to enjoy your blending on-the-go
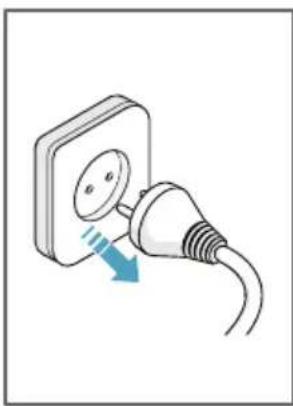
12 Unplug the appliance.
CLEANING AND CARE (picture page '5')
Always unplug the appliance before cleaning.
1 Motor Housing. Never immerse the blender base in water! Clean it only with a damp cloth. Do not use abrasive cleaners, scouring pads or abrasive detergents while cleaning the appliance.
2 Jar (3), blade assembly (4), lid (2), measuring cup (1), and all parts of takeaway bottle (11-14) are dishwasher safe.
If washing by hand, don't use wire brush, steel wool or bleach to avoid rust.
Notes: Always detach the blade assembly with jar for cleaning to ensure no leftover food stuck in between. Don't immerse the Blade assembly into water completely.
WARNING! the blades are very sharp. Handle carefully during cleaning.
TROUBLESHOOTING
| PROBLEM POSSIBLE CAUSE SOLUTION | ||
| You cannot activate or operate the blender. | Blender is not connected to electrical supply. | Check your home power supply and replug. |
| Safety switch is not activated. | Make sure the blade assembly is fastened and the jar is locked in the right position of blender base. | |
| The knob position is not turned to “ON” yet. | Turn the knob to the “ON” position. | |
| There is functional problem. Contact authorized service centre. | ||
| Blades do not turn when processing. | Blade is stuck, due to the pieces of food are too large or too much food in jug. | Cut food into smaller pieces or reduce some food. |
| Machine stops in the middle of blending process. | Loading is too heavy hence motor protector is automatically activated. | Unplug, wait for minimum 20 minutes, reduce some food, then restart. |
| Wrong ingredients put inside jar. | Main blender jar and takeaway bottle intended use is production of beverages. Add fruits, vegetables or similar. Never mix ingredients such as dough, mashed potatoes, meat or similar. | |
