BrewSense KF7155 - Coffee maker BRAUN - Free user manual and instructions
Find the device manual for free BrewSense KF7155 BRAUN in PDF.
User questions about BrewSense KF7155 BRAUN
0 question about this device. Answer the ones you know or ask your own.
Ask a new question about this device
Download the instructions for your Coffee maker in PDF format for free! Find your manual BrewSense KF7155 - BRAUN and take your electronic device back in hand. On this page are published all the documents necessary for the use of your device. BrewSense KF7155 by BRAUN.
USER MANUAL BrewSense KF7155 BRAUN
When using electrical appliances, basic safety precautions should always be followed to reduce the risk of fire, electric shock and/or injury to persons, including the following:
READ ALL INSTRUCTIONS.
- The appliance is not intended for use by persons (including children) with reduced physical, sensory or mental capabilities, or lack of experience and knowledge, unless they have been given supervision or instructions concerning use of the appliance by a person responsible for their safety.
- Always unplug appliance from outlet when not in use and before cleaning. Allow to cool before putting on or taking off parts and before cleaning the appliance.
- To protect against the risk of electric shock, do not put motor body of blender in water or other liquids.
- The use of attachments/accessories not sold or recommended by Braun may cause fire, electrical shock or risk of injuries to persons.
- Regularly inspect the power cord, power plug and actual appliance for any damage. Do not operate if damaged in any way or after the appliance malfunctions. Immediately cease use of the appliance and call Braun Customer Service for examination, repair or adjustment.
- Do not use outdoors or for anything other than its intended purpose.
- Snap lid securely onto carafe before serving any coffee.
- Scalding may occur if the reservoir cover is opened during the brewing cycle.
- The carafe is designed for use with this appliance only. It must never be used on a range top or in a microwave oven.
- Do not set a hot carafe on a wet or cold surface.
- Do not use cracked carafe or a carafe having a loose or weakened handle.
- Do not clean carafe with abrasive cleansers, steel wool pads, or other abrasive materials.
- Do not immerse in water.
- Regularly inspect the power cord, power plug and actual appliance for any damage. Do not operate if damaged in any way or after the appliance malfunctions. Immediately cease use of the appliance and call Braun Customer Service for examination, repair or adjustment.
- Do not touch hot surfaces. Use handles and buttons.
- Do not let cord hang over edge of table or counter, or touch hot surface.
- Do not place on or near a hot gas or electric burner, or in a heated oven.
- Always fill water reservoir first, then plug cord into the wall outlet. To disconnect, press the «On/Off« button, then remove plug from wall outlet.
- Warning: Risk of fire or electric shock. Do not remove the base panel. No user serviceable parts are inside. Repair should be done by authorized service personnel only.
-
Do not operate your appliance in an appliance garage or under a wall cabinet. When storing in an appliance garage always unplug the unit from the electrical outlet. Not doing so could create a risk of fire, especially if the appliance touches the walls of the garage or the door touches the unit as it closes.
-
Never open the reservoir cover during the brewing cycle, even if no water is draining from the filter basket, since extremely hot water/coffee can spill out from the filter basket and cause injury. If water/coffee is not draining from the filter basket during the brewing cycle, unplug the unit and wait 10 minutes before opening the top cover and checking the filter basket.
- We suggest you save all packing materials in the event that future shipping of the machine is needed. Keep all plastic bags away from children.
- This appliance has a polarized plug (one blade is wider than the other). To reduce the risk of electric shock, this plug will fit in a polarized outlet only one way. If the plug does not fit fully in the outlet, reverse the plug. If it still does not fit, contact a qualified electrician. Do not modify the plug in any way.
SAVE THESE INSTRUCTIONS
FOR HOUSEHOLD USE ONLY SPECIAL CORD SET INSTRUCTIONS
A short power-supply cord is provided to reduce the risks resulting from becoming entangled in or tripping over a longer cord.
Longer detachable power supply cords or extension cords are not recommended, but may be used if care is exercised. If an extension cord is used:
(1) the marked electrical rating of the cord set or extension cord should be at least as great as the electrical rating of the appliance,
(2) the cord should be arranged so that it will not drape over the countertop or tabletop where it can be pulled on by children or tripped over unintentionally
IMPORTANT MESURES DE PROTECTION
Our products are engineered to meet the highest standards of quality, functionality and design. We hope you thoroughly enjoy the new Braun appliance.
Before Use
Please read instructions carefully and completely before using the appliance.
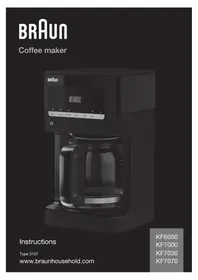
Description of Parts and Accessories
1 On/Off button
2 LED control panel and clock
3 Water reservoir incl. water level indicator (inside)
4 Filter basket with anti drip-system
5 Gold tone permanent filter
6 Reservoir cover and showerhead
7 Charcoal water filter
8 Charcoal water filter holder
9 Carafe stand
10 Cord storage
11 Stainless steel thermal carafe
12 Lid
13 Coffee measuring scoop
Maximum water capacity: 10 cups (48 fl. oz.)
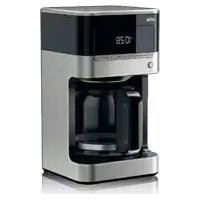
LED Control Panel
a. BREW
Use to start the brew cycles.
b.AUTO ON
Use to program the start time of the brew cycle. The AUTO ON time can be set for any time, day or night. PM is displayed on the LED for night time program times.
c. CLEAN
Use to activate the descending mode and set the water hardness level.
d. CLOCK
Displays time of day and use to set time for auto on function.
e. SET
Use to program the time of day, auto on and water hardness level.
f. BOLD
Use to select the brew strength (regular or bold).
g. 1-4
Use to brew smaller amounts of coffee (up to 4 cups).
10
OPERATING INSTRUCTIONS
Installing the Charcoal Water Filter (A)
Use of the charcoal water filter is optional, but strongly recommended. The filter eliminates chlorine, bad tastes and odors from tap water. The coffee maker will operate normally without it.
Replacement water filters can be purchased in stores, through the Braun website, or by calling Customer Service.
- Remove the charcoal water filter (7) from polybag and soak in cold tap water a minimum of 15 minutes.
- Remove the charcoal water filter holder (8) from the coffee maker by lifting it out of the water reservoir (3).
- Gently press down the stem and pull toward you. Compartment will flip open.
- Place the charcoal water filter in the water filter holder and close it; you will hear a snap indicating it is in place.
- Hold the filter under cold running tap water for 10 seconds to flush. You should place the hole openings directly under the water stream.
- Allow the filter to drain completely.
- Position the green indicator to the month you installed the charcoal water filter. We recommend changing the charcoal water filter every 2 months, more often if you have hard tap water.
- Replace the charcoal water filter holder in the water reservoir of the coffee maker, pushing it all the way down to the base of the unit, along the reservoir wall.
NOTE: Caution must be used when inserting the charcoal water filter. Improper placement in the water filter holder can cause tearing of the filter skin.
Switching On/Off
- To switch on the coffee maker, press the On/Off button (1). The green indicator light will illuminate indicating that the coffee maker is in "ready" mode.
- To switch off the coffee maker, press the On/Off button again. The green indicator light will turn off indicating that the coffee maker is in “stand by” mode.
Auto Off Function
For your convenience and also additional safety, the appliance will switch off automatically 1 minute after the brewing cycle is complete.
Programming the Coffee Maker
NOTE: The coffee maker features a 60-second power loss back-up system that remembers all programmed information, including time of day and auto on/off times in the event of a tripped breaker, unit is unplugged, or power failure.
Setting the Time
When the coffee maker is first plugged in or when power is restored after an interruption, the LED control panel will start flashing 2:00 AM.
- To set the hour, press the CLOCK button (d) for a minimum of 3 seconds. The LED control panel will start flashing.
- Press and hold the SET button (e) to scroll through the numbers. Release the button once the desired hour is displayed.
- To set the minutes, press the CLOCK button. The LED control panel will start flashing.
- Press and hold the SET button to scroll through the numbers. Release the button once the desired minutes is displayed.
- Press the CLOCK button again to save the desired time.
If during the setting process no button is pressed for 10 seconds, the time currently set will be saved.
NOTE: When the number count passes 12, the PM light will be displayed on the LCD.
Before programming, always switch on the coffee maker.
Programming and Activating the AUTO ON Time
- Press the AUTO ON button (b) for a minimum of 3 seconds.
The hours in the LED panel will start flashing. - To set the hour, press the CLOCK button (d) for a minimum of 3 seconds. The LED control panel will start flashing.
- Press and hold the SET button (e) to scroll through the numbers. Release the button once the desired hour is displayed.
- To set the minutes, press the AUTO ON button. The minutes in the LED control panel will start flashing.
- Press and hold the SET button to scroll through the numbers. Release the button once the desired minutes are displayed.
-
Press the AUTO ON button again to save the desired time.
-
The pre-set auto on time will disappear after 3 seconds and the time of day will show on the LED control panel.
- If during the setting process no button is pressed for 10 seconds, the auto on time currently set will be saved.
This function can only be activated if the auto on time and the time of the day have been set.
To activate the AUTO ON function:
- Press the AUTO ON button (b). The green LED above the button will illuminate and the coffee maker will start to brew at the pre-set auto on time.
The pre-set auto on time disappears after 3 seconds. - When the appliance starts brewing, the green LED BREW will continually flash and the LED AUTO ON turns off.
- Press the AUTO ON button (b) again to switch off the function; the green LED light will disappear.
NOTE: The AUTO ON function remains activated even when the appliance has been switched off (1).
Setting the Water Hardness Level
Set the water hardness level on the coffee maker to the water hardness level for your local area.
- Press the CLEAN button (c) for a minimum of 3 seconds.
The default setting (h3) will start flashing. - Press the SET button (e) to scroll through the options (h1 = soft, h2 = normal, h3 = hard) and select the appropriate water hardness level.
- Press the CLEAN button again to save the hardness level.
- The pre-set water hardness disappears after 3 seconds and the time of day will show on the LED control panel.
1 - 4 Cups Setting
- Press the «1-4» button (g). The green LED above the button will illuminate.
- Press BREW (a) to start brewing.
- The green LED turns off after the brewing cycle is finished.
Brew Strength Selector
-
Press the BOLD button (f) to select brew strength «bold».
-
The green LED above the button will illuminate.
- If the BOLD button is not pressed, regular coffee strength is automatically selected.
Making Coffee (B)
Before using the coffee maker for the first time, after a long period of not using it, or after installing a new charcoal water filter, run the coffee maker through a complete brew cycle without ground coffee. Use a full carafe of fresh cold water. This will remove any dust from the manufacturing process or residues that have remained in the unit.
- Open the reservoir cover (6).
- When filling the water reservoir (3) with fresh cold water, refer the water level indicator (inside the water reservoir) and fill to the desired number of cups.
- To prepare the exact amount of coffee for the Braun Thermal Mug (available separately as accessory), fill to the corresponding water mark (11 oz.) inside the reservoir.
- Insert the gold tone permanent filter (5) or a paper filter (cone type # 4) in the filter basket (4).
- Add the desired amount of ground coffee, corresponding to the number of cups being brewed. We recommend using 1 tablespoon or 1 coffee scoop of ground coffee per cup, but use more or less to suit your taste.
- Close the water reservoir and place the carafe in its position on the carafe stand (9).
- Plug the cord into an electrical outlet and press the On/Off button (1).
- Press the BREW button (a) to start brewing immediately or press AUTO ON (b) to commence brewing at the pre-set time.
- During brewing, the indicator light will flash continuously. Once the brewing cycle is complete, the light will turn off.
NOTE: The anti-drip system halts the flow of coffee from the filter basket when the carafe is removed, so a cup can be poured before brewing is finished. The carafe should be returned to the carafe stand (maximum 20 seconds) to prevent the filter basket from overflowing.
For Best Results
- When using paper filters, be sure that it is completely open and fully inserted in the basket. It may help to fold and flatten the seams of the paper filter beforehand.
- Store ground coffee in a cool, dry and dark place in an airtight container.
- For the best performance from your Braun coffee maker, descale the unit regularly.
Note: The maximum amount of ground coffee the.
coffee maker can take is 10 coffee measuring
scoops or tablespoons.
Dscaling
For the best performance from your Braun coffee maker, descale the unit when the LED CLEAN (c) lights up solid green. This indicates it is time to descale your coffee maker.
Frequency will depend upon the hardness of your tap water and how often you use the coffee maker.
To set water hardness, see «Setting the Water Hardness Level».
You can use a commercially available descaling agent that is safe to use on aluminum. We recommend using the Braun Descaling Solution (can be purchased in stores, through the Braun website, or by calling Customer Service).
NOTE: For your convenience, the cleaning cycle is automatic. The entire cleaning cycle including rinsing can take up to 45 minutes to complete.
- Remove the charcoal water filter holder (8) including the charcoal water filter (7) and the gold tone permanent filter (5).
- Follow package instructions on the descending agent.
- Place the empty carafe in its position on the carafe stand (9).
- Press the CLEAN button (c). The green LED above the button will start flashing.
- Press BREW (a) to start the descending program, while the green LED is still flashing. Once the descending process has started, it is not possible to stop the program until finished.
- When the descending program has been completed, the green LED will turn off.
- Discard the cleaning solution and rinse the carafe thoroughly with clean water.
- Fill the water reservoir with clean, fresh water (not exceeding 8 cups). Run the coffee maker through two complete brew cycles to flush the unit after descaling.
Repeat the procedure as many times as necessary in order to reduce the brewing time per cup to a normal level.
Cleaning and Maintenance (C)
Always turn the coffee maker off and remove the plug from the electrical outlet before cleaning.
- Let the appliance cool down.
Clean the metal surfaces of the thermal carafe with a damp cloth only. Carafe and lid are not dishwasher safe.
- Do not use any scouring agents or harsh cleansers on any part of the coffee maker.
- To clean the base never immerse the unit in water or other liquids but simply wipe with a clean, damp cloth and dry before storing.
Both the design specifications and these user instructions are subject to change without notice.
Do not dispose the product in household waste at the end of its useful life.
Troubleshooting Guide
| Problem Potential Causes | Solution | |
| The ON/OFF switch does not light up | · The appliance is unplugged · There was a power outage · ON/OFF button was not pressed | · Plug unit in · Wait for power to be restored · Press ON/OFF button |
| Display does not show a time | · The appliance is unplugged | · Plug unit in |
| Display flashes «2:00 AM» | Initial operation or there was a power outage | Set clock |
| It is not possible to set the AUTO ON time | · ON/OFF button was not pressed · Clock has not been set | · Press ON/OFF button · Set clock time |
| It is not possible to activate the AUTO ON time | · ON/OFF button was not pressed · AUTO ON time has not been set | · Press ON/OFF button · Set AUTO ON time |
| The green LED light above BREW does not light up | · The appliance is unplugged · There was a power outage · ON/OFF button was not pressed and the BREW button was not pressed | · Plug unit in · Wait for power to be restored · Press the ON/OFF button, followed by BREW |
| Coffee is not brewing · The | · The appliance is unplugged · There was a power outage · BREW button was not pressed · There is no water in the reservoir | · Plug unit in · Wait for power to be restored · Press BREW button · Pour water into the reservoir |
| The coffee maker is only brewing water | There are no coffee grounds in the filter basket | Add the desired amount of coffee to the filter |
| The coffee maker is overflowing | The filter basket is not properly inserted | Insert the filter basket correctly |
| The carafe was not properly positioned on the keep warm plate | Be sure the carafe is centered directly under the filter basket | |
| The lid is not on the carafe Place the lid | on the carafe | |
| Carafe was removed for more than 20 seconds while the unit is brewing | Carafe should be replaced promptly after removing | |
| Using too much coffee grounds Remove filter from the filter basket. If using a paper filter, replace with new one. Restart the coffee brewing process with proper amount of coffee grounds (not exceeding 10 coffee measuring scoops or tablespoons) | ||
| Using coffee that is too finely ground Use only coffee that is ground for drip coffee makers | ||
| Paper filter and gold tone permanent filter are used together | Use either paper or the gold tone permanent filter, never both at the same time | |
| The coffee flow through the lid is blocked | Remove the insert from the middle of the lid Rinse the lid properly under running water | |
| Coffee is flowing out of the filter basket onto the carafe stand when the carafe is not in place | The filter basket spring popped out during cleaning | Reattach the spring to the filter basket |
| There are coffee grounds at the bottom of the carafe | The paper filter was not inserted correctly into the filter basket | Rinse filter basket, set filter into the filter basked and restart brewing |
| Paper filter collapsed Remove filter, rinse | se filter basket and restart brewing with a new paper filter | |
| Display shows «E01», «E02» or «E03» | ---- Contact Braun Customer Service | |