
085020 - Vacuum Cleaner MILWAUKEE - Free user manual and instructions
Find the device manual for free 085020 MILWAUKEE in PDF.
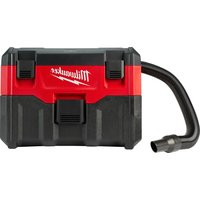
| Brand | Milwaukee |
| Model | 085020 (0850-20) |
| Category | Cordless Hand Vacuum |
| Product Type | Compact Battery-Powered Vacuum |
| Power Source | M12™ 12V DC Lithium-Ion Battery |
| Airflow | 0.9 m³/min (33 CFM) |
| Operating Ambient Temperature | -18°C to 50°C (0°F to 125°F) |
| Compatible Battery Type | M12™ |
| Compatible Charger Type | M12™ |
| Filter | Removable dust filter (replacement part #49-90-1950) |
| Dust Reservoir | Removable with lock, manual emptying |
| Included Accessories | Nozzles and extension |
| Usage | Home and workshop (do not vacuum liquids) |
| Trigger | With lock for continuous operation |
| Battery Charge Indicator | Integrated fuel gauge |
| Safety | Eye and respiratory protection recommended |
| Maintenance | Clean filter by tapping or using compressed air (no water) |
| Warranty | 5 years (subject to exceptions) |
| After-Sales Service | Authorized MILWAUKEE service centers |
Frequently Asked Questions - 085020 MILWAUKEE
User questions about 085020 MILWAUKEE
0 question about this device. Answer the ones you know or ask your own.
Ask a new question about this device
Download the instructions for your Vacuum Cleaner in PDF format for free! Find your manual 085020 - MILWAUKEE and take your electronic device back in hand. On this page are published all the documents necessary for the use of your device. 085020 by MILWAUKEE.
USER MANUAL 085020 MILWAUKEE
natural_image
Line drawing of a Milwaukee electric shaver with visible internal components and mounting bracket (no text or symbols)Cat. No. / No de cat.
0850-20
M12 ^TM COMPACT VACUUM
ASPIRATEUR COMPACT M12™
ASPIRADORA COMPACTA M12™

WARNING To reduce the risk of injury, user must read and understand operator's manual.
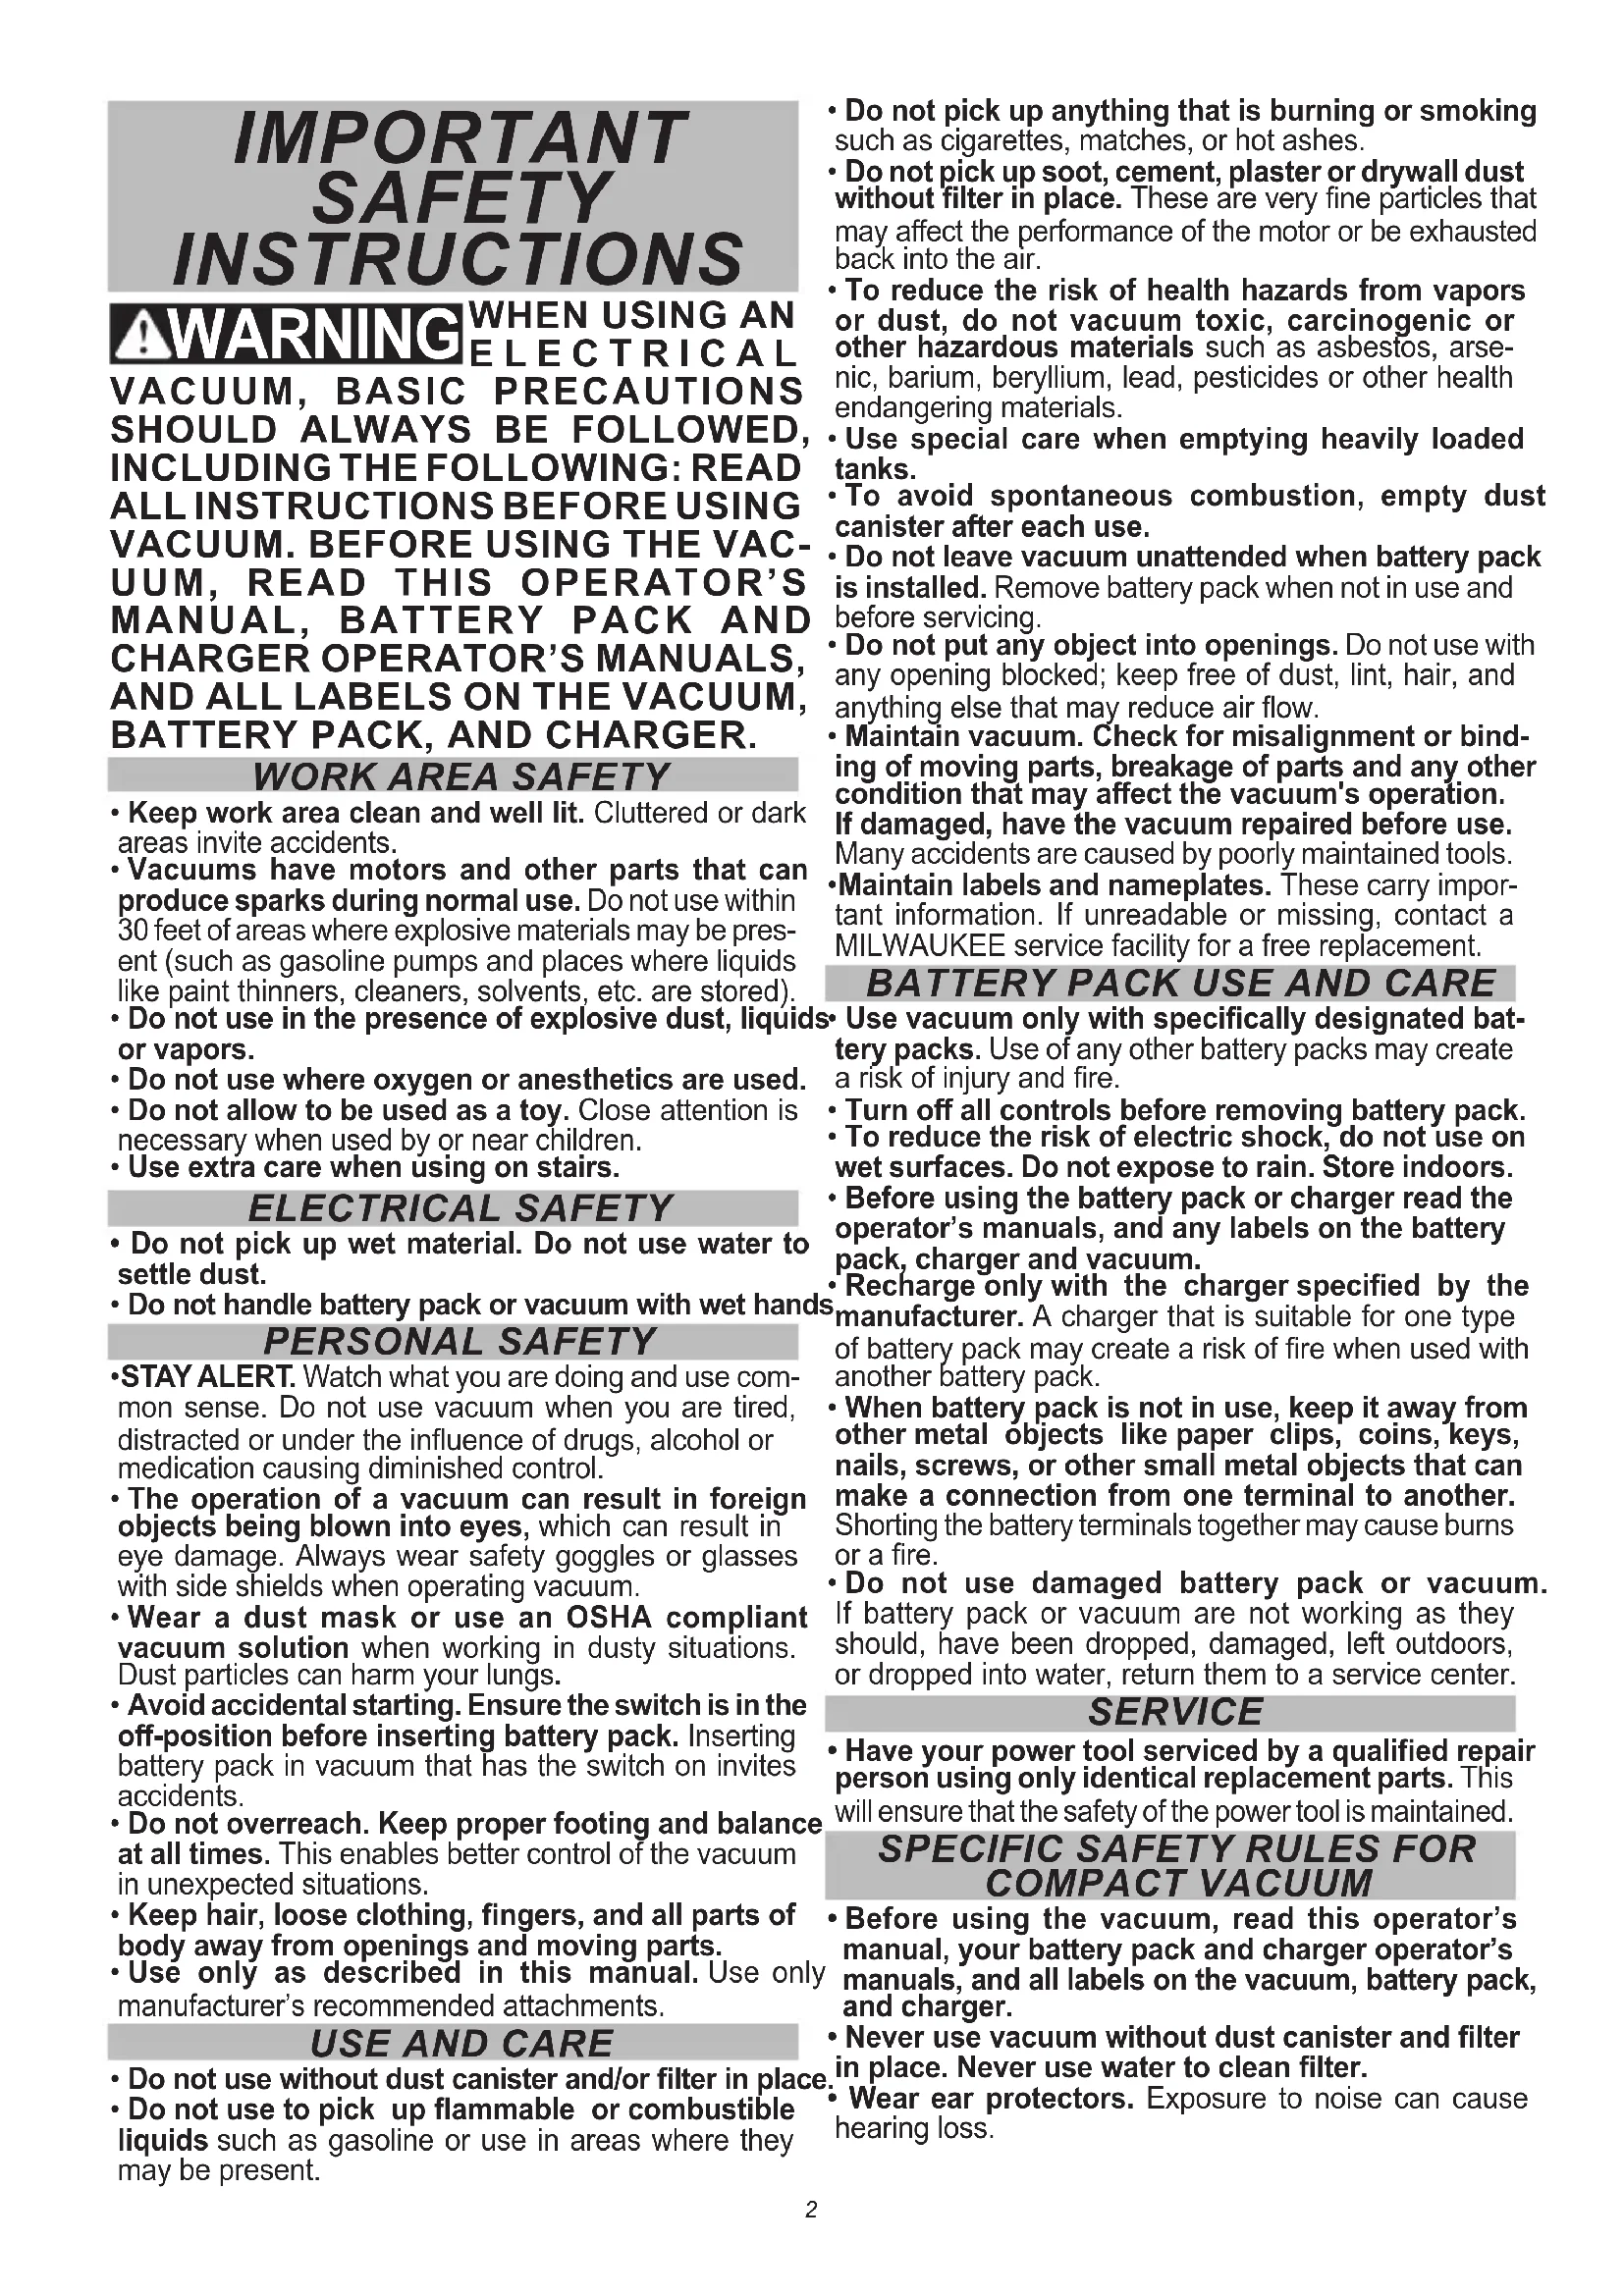
IMPORTANT SAFETY INSTRUCTIONS
WARNING WHEN USING AN ELECTRICAL VACUUM, BASIC PRECAUTIONS SHOULD ALWAYS BE FOLLOWED, INCLUDING THE FOLLOWING: READ ALL INSTRUCTIONS BEFORE USING VACUUM. BEFORE USING THE VACUUM, READ THIS OPERATOR'S MANUAL, BATTERY PACK AND CHARGER OPERATOR'S MANUALS, AND ALL LABELS ON THE VACUUM, BATTERY PACK, AND CHARGER.
WORK AREA SAFETY
- Keep work area clean and well lit. Cluttered or dark areas invite accidents.
• Vacuums have motors and other parts that can produce sparks during normal use. Do not use within 30 feet of areas where explosive materials may be present (such as gasoline pumps and places where liquids like paint thinners, cleaners, solvents, etc. are stored). - Do not use in the presence of explosive dust, liquids or vapors.
- Do not use where oxygen or anesthetics are used.
- Do not allow to be used as a toy. Close attention is necessary when used by or near children.
- Use extra care when using on stairs.
ELECTRICAL SAFETY
- Do not pick up wet material. Do not use water to settle dust.
- Do not handle battery pack or vacuum with wet hands
PERSONAL SAFETY
- STAY ALERT. Watch what you are doing and use common sense. Do not use vacuum when you are tired, distracted or under the influence of drugs, alcohol or medication causing diminished control.
- The operation of a vacuum can result in foreign objects being blown into eyes, which can result in eye damage. Always wear safety goggles or glasses with side shields when operating vacuum.
- Wear a dust mask or use an OSHA compliant vacuum solution when working in dusty situations. Dust particles can harm your lungs.
- Avoid accidental starting. Ensure the switch is in the off-position before inserting battery pack. Inserting battery pack in vacuum that has the switch on invites accidents.
- Do not overreach. Keep proper footing and balance at all times. This enables better control of the vacuum in unexpected situations.
- Keep hair, loose clothing, fingers, and all parts of body away from openings and moving parts.
- Use only as described in this manual. Use only manufacturer's recommended attachments.
USE AND CARE
- Do not use without dust canister and/or filter in place
- Do not use to pick up flammable or combustible liquids such as gasoline or use in areas where they may be present.
- Do not pick up anything that is burning or smoking such as cigarettes, matches, or hot ashes.
- Do not pick up soot, cement, plaster or drywall dust without filter in place. These are very fine particles that may affect the performance of the motor or be exhausted back into the air.
- To reduce the risk of health hazards from vapors or dust, do not vacuum toxic, carcinogenic or other hazardous materials such as asbestos, arsenic, barium, beryllium, lead, pesticides or other health endangering materials.
- Use special care when emptying heavily loaded tanks.
- To avoid spontaneous combustion, empty dust canister after each use.
- Do not leave vacuum unattended when battery pack is installed. Remove battery pack when not in use and before servicing.
- Do not put any object into openings. Do not use with any opening blocked; keep free of dust, lint, hair, and anything else that may reduce air flow.
- Maintain vacuum. Check for misalignment or binding of moving parts, breakage of parts and any other condition that may affect the vacuum's operation. If damaged, have the vacuum repaired before use. Many accidents are caused by poorly maintained tools.
- Maintain labels and nameplates. These carry important information. If unreadable or missing, contact a MILWAUKEE service facility for a free replacement.
BATTERY PACK USE AND CARE
- Use vacuum only with specifically designated battery packs. Use of any other battery packs may create a risk of injury and fire.
- Turn off all controls before removing battery pack.
• To reduce the risk of electric shock, do not use on wet surfaces. Do not expose to rain. Store indoors. - Before using the battery pack or charger read the operator's manuals, and any labels on the battery pack, charger and vacuum.
• Recharge only with the charger specified by the manufacturer. A charger that is suitable for one type of battery pack may create a risk of fire when used with another battery pack.
- When battery pack is not in use, keep it away from other metal objects like paper clips, coins, keys, nails, screws, or other small metal objects that can make a connection from one terminal to another. Shorting the battery terminals together may cause burns or a fire.
- Do not use damaged battery pack or vacuum. If battery pack or vacuum are not working as they should, have been dropped, damaged, left outdoors, or dropped into water, return them to a service center.
SERVICE
- Have your power tool serviced by a qualified repair person using only identical replacement parts. This will ensure that the safety of the power tool is maintained.
SPECIFIC SAFETY RULES FOR COMPACT VACUUM
- Before using the vacuum, read this operator's manual, your battery pack and charger operator's manuals, and all labels on the vacuum, battery pack, and charger.
- Never use vacuum without dust canister and filter in place. Never use water to clean filter.
- Wear ear protectors. Exposure to noise can cause hearing loss.
WARNING To reduce the risk of injury, when working in dusty situations, wear appropriate respiratory protection or use an OSHA compliant dust extraction solution.
• Always use common sense and be cautious when using tools. It is not possible to anticipate every situation that could result in a dangerous outcome. Do not use this tool if you do not understand these operating instructions or you feel the work is beyond your capability; contact Milwaukee Tool or a trained professional for additional information or training.
WARNING Some dust created by power sanding, sawing, grinding, drilling, and other construction activities contains chemicals known to cause cancer, birth defects or other reproductive harm. Some examples of these chemicals are:
- lead from lead-based paint - crystalline silica from bricks and cement and other masonry products, and - arsenic and chromium from chemically-treated lumber. Your risk from these exposures varies, depending on how often you do this type of work. To reduce your exposure to these chemicals: work in a well ventilated area, and work with approved safety equipment, such as those dust masks that are specially designed to filter out microscopic particles.
READ AND SAVE ALL INSTRUCTIONS FOR FUTURE USE
FOR HOUSEHOLD USE.
FUNCTIONAL DESCRIPTION

-
Lock-on switch
-
Trigger
-
Lock/Unlock indicators
-
Dust canister
SYMBOLOGY

Direct Current


c US UL Listing for Canada and U.S.
SPECIFICATIONS
Cat. No. 0850-20
Volts....12 DC
Battery Type....M12™
Charger Type....M12™
Air Flow....33 CFM
Recommended Ambient
Operating Temperature....0°F to 125°F
ASSEMBLY
WARNING Recharge only with the charger specified for the battery. For specific charging instructions, read the operator's manual supplied with your charger and battery.
Removing/Inserting the Battery
To remove the battery, push in the release buttons and pull the battery pack away from the tool.
WARNING Always remove battery pack before changing
or removing accessories.
To insert the battery, slide the pack into the body of the tool. Make sure it latches securely into place.
WARNING To reduce the risk of injury, always remove the battery pack before removing the dust canister. Do not use tool without dust canister and filter in place.
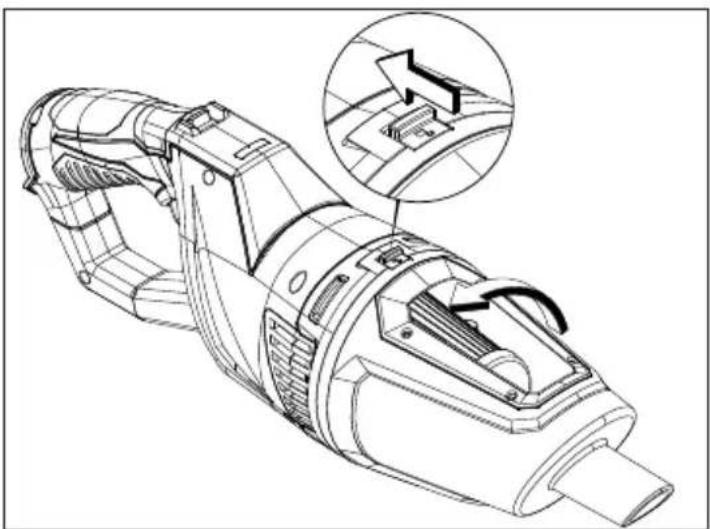
Installing/Removing the Dust Canister and Filter
To remove the dust canister:
- Turn OFF the tool.
- Remove the battery pack.
- While holding over the trash, press the dust canister latch back and rotate the dust canister to the unlock position. Pull the dust canister away from the vacuum.
natural_image
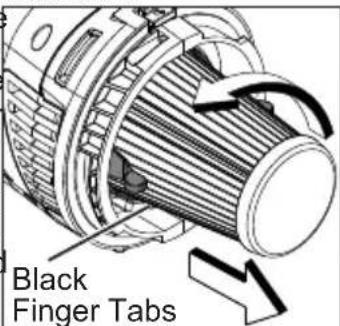
Technical line drawing of a mechanical device with an inset showing a close-up of internal components (no text or symbols)- Empty dust from the dust canister.
- To clean the filter, rotate the filter using the black finger tabs only. Pull the filter away from the vacuum and tap clean or blow off with compressed air. Do not clean with water. Replace filter if damaged or suction decreases (Cat. No. 49-90-1950).
CAUTION
Keep filter clean. Efficiency of the vacuum is
largely dependent on the filter. A dirty filter will reduce the air flow and overall efficiency of the system. Do not clean with water. Remove from dust canister and tap clean or blow off with compressed air.
To install the dust canister:
- Twist the filter onto the vacuum using the black tabs to tighten securely.
- Line up the dust canister with the unlock symbol on the vacuum. Twist the rotate the dust canister to the lock position. The dust canister latch should click into place.
NOTE: Do not operate the vacuum without the dust canister and filter in place.
Installing/Removing the Accessories
To install the nozzles or extension, push the accessory onto the vacuum inlet.
OPERATION
WARNING
To reduce the risk of injury, always wear
proper eye protection marked to comply with ANSI Z87.1.
When working in dusty situations, wear appropriate respiratory protection or use an OSHA compliant dust extraction solution.
To reduce the risk of fire and injury, do not use to pick up flammable or combustible materials. Empty dust canister before use.
Fuel Gauge
To determine the amount of charge left in the battery, turn the tool ON. The Fuel Gauge will light up for 2-3 seconds. When less than 10% of charge is left, 1 light on the fuel gauge will flash 4 times.
To signal the end of charge, 1 light on the fuel gauge will flash 8 times and the tool will not run. Charge the battery pack.
If the battery becomes too hot, the fuel gauge lights will flash in an alternating pattern and the tool will not run. Allow the battery to cool down.
Starting, Stopping, and Controlling Air flow
- To start the vacuum, pull the trigger.
- To stop the vacuum, release the trigger.
Lock-on
To lock-on the trigger for continuous use:
- Pull the trigger.
- Press forward and hold the lock-on switch.
- Release the trigger, then release the lock-on switch.
- To stop the vacuum, pull and release the trigger.
MAINTENANCE
WARNING
To reduce the risk of injury, always unplug
the charger and remove the battery pack from the charger or tool before performing any maintenance. Never disassemble the tool, battery pack or charger. Contact a MILWAUKEE service facility for ALL repairs.
Maintaining Tool
Keep your tool, battery pack and charger in good repair by adopting a regular maintenance program. Inspect your tool for issues such as undue noise, misalignment or binding of moving parts, breakage of parts, or any other condition that may affect the tool operation. Return the tool, battery pack, and charger
to a MILWAUKEE service facility for repair. After six months to one year, depending on use, return the tool, battery pack and charger to a MILWAUKEE service facility for inspection.
*If the tool does not start or operate at full power with a fully charged battery pack, clean the contacts on the battery pack. If the tool still does not work properly, return the tool, charger and battery pack, to a MILWAUKEE service facility for repairs.
WARNING
To reduce the risk of personal injury and dam-
age, never immerse your tool, battery pack or charger in liquid or allow a liquid to flow inside them.
Cleaning
Clean dust and debris from vents. Keep handles clean, dry and free of oil or grease. Use only mild soap and a damp cloth to clean, since certain cleaning agents and solvents are harmful to plastics and other insulated parts. Some of these include gasoline, turpentine, lacquer thinner, paint thinner, chlorinated cleaning solvents, ammonia and household detergents containing ammonia. Never use flammable or combustible solvents around tools.
Repairs
For repairs, return the tool, battery pack and charger to the nearest authorized service center.
ACCESSORIES
WARNING
Use only recommended accessories. Others
may be hazardous.
For a complete listing of accessories, go online to www.milwaukeetool.com or contact a distributor.
SERVICE - UNITED STATES
1-800-SAWDUST (1.800.729.3878)
Monday-Friday, 7:00 AM - 6:30 PM CST
or visit www.milwaukeetool.com
Contact Corporate After Sales Service Technical Support with technical, service/repair, or warranty questions.
Email: metproductsupport@milwaukeeetool.com
Become a Heavy Duty Club Member at www.milwaukeetool.com to receive important notifications regarding your tool purchases.
SERVICE - CANADA
Milwaukee Tool (Canada) Ltd
1.800.268.4015
Monday-Friday, 7:00 AM - 4:30 PM CST
or visit www.milwaukeetool.ca
LIMITEDWARRANTYUSA & CANADA
Every MILWAUKEE power tool* (see exceptions below) is warranted to the original purchaser only to be free from defects in material and workmanship. Subject to certain exceptions, MILWAUKEE will repair or replace any part on an electric power tool which, after examination, is determined by MILWAUKEE to be defective in material or workmanship for a period of five (5) years** after the date of purchase unless otherwise noted. Return of the power tool to a MILWAUKEE factory Service Center location or MILWAUKEE Authorized Service Station, freight prepaid and insured, is required. A copy of the proof of purchase should be included with the return product. This warranty does not apply to damage that MILWAUKEE determines to be from repairs made or attempted by anyone other than MILWAUKEE authorized personnel, misuse, alterations, abuse, normal wear and tear, lack of maintenance, or accidents.
Normal Wear: Many power tools need periodic parts replacement and service to achieve best performance. This warranty does not cover repair when normal use has exhausted the life of a part including, but not limited to, chucks, brushes, cords, saw shoes, blade clamps, o-rings, seals, bumpers, driver blades, pistons, strikers, lifters, and bumper cover washers.
*This warranty does not cover Air Nailers & Staplers; Airless Paint Sprayer; Cordless Battery Packs; Gasoline Driven Portable Power Generators; Hand Tools; Hoist – Electric, Lever & Hand Chain; M12™ Heated Gear; Recon-
ditioned Product; and Test & Measurement Products. There are separate and distinct warranties available for these products.
**The warranty period for Job Site Radios, M12™ Power Port, M18™ Power Source, Jobsite Fan and Trade Titan™ Industrial Work Cartsis one (1) year from the date of purchase. The warranty period for the M18 FUEL™ 1" D-Handle High Torque Impact Wrenches, Drain Cleaning Cables and AIRSNAKETM Drain Cleaning Air Gun Accessories is two (2) years from the date of purchase. The warranty period for the M18™ Compact Heat Gun, 8 Gallon Dust Extractor, M18™ Framing Nailers, M18 FUEL™ 1/2" Ext. Anvil Controlled Torque Impact Wrench w/ ONE-KEY™, M18 FUEL™ 1" High Torque Impact Wrench w/ ONE-KEY™, and the M18 FUEL™ 2 Gal. Compact Quiet Compressor is three (3) years from the date of purchase. The warranty period for the LED in the LED Work Light and the LED Upgrade Bulb for the Work Light is the lifetime of the product subject to the limitations above. If during normal use the LED or LED Bulb fails, the part will be replaced free of charge.
Warranty Registration is not necessary to obtain the applicable warranty on a MILWAUKEE power tool product. The manufacturing date of the product will be used to determine the warranty period if no proof of purchase is provided at the time warranty service is requested.
ACCEPTANCE OF THE EXCLUSIVE REPAIR AND REPLACEMENT REMEDIES DESCRIBED HEREIN IS A CONDITION OF THE CONTRACT FOR THE PURCHASE OF EVERY MILWAUKEE PRODUCT. IF YOU DO NOT AGREE TO THIS CONDITION, YOU SHOULD NOT PURCHASE THE PRODUCT. IN NO EVENT SHALL MILWAUKEE BE LIABLE FOR ANY INCIDENTAL, SPECIAL, CONSEQUENTIAL OR PUNITIVE DAMAGES, OR FOR ANY COSTS, ATTORNEY FEES, EXPENSES, LOSSES OR DELAYS ALLEGED TO BE AS A CONSEQUENCE OF ANY DAMAGE TO, FAILURE OF, OR DEFECT IN ANY PRODUCT INCLUDING, BUT NOT LIMITED TO, ANY CLAIMS FOR LOSS OF PROFITS. SOME STATES DO NOT ALLOW THE EXCLUSION OR LIMITATION OF INCIDENTAL OR CONSEQUENTIAL DAMAGES, SO THE ABOVE LIMITATION OR EXCLUSION MAY NOT APPLY TO YOU. THIS WARRANTY IS EXCLUSIVE AND IN LIEU OF ALL OTHER EXPRESS WARRANTIES, WRITTEN OR ORAL. TO THE EXTENT PERMITTED BY LAW, MILWAUKEE DISCLAIMS ANY IMPLIED WARRANTIES, INCLUDING WITHOUT LIMITATION ANY IMPLIED WARRANTY OF MERCHANTABILITY OR FITNESS FOR A PARTICULAR USE OR PURPOSE; TO THE EXTENT SUCH DISCLAIMER IS NOT PERMITTED BY LAW, SUCH IMPLIED WARRANTIES ARE LIMITED TO THE DURATION OF THE APPLICABLE EXPRESS WARRANTY AS DESCRIBED ABOVE. SOME STATES DO NOT ALLOW LIMITATIONS ON HOW LONG AN IMPLIED WARRANTY LASTS, SO THE ABOVE LIMITATION MAY NOT APPLY TO YOU, THIS WARRANTY GIVES YOU SPECIFIC LEGAL RIGHTS, AND YOU MAY ALSO HAVE OTHER RIGHTS WHICH VARY FROM STATE TO STATE.
This warranty applies to product sold in the U.S.A. and Canada only. Please consult the 'Service Center Search' in the Parts & Service section of MILWAUKEE's website www.milwaukeeetool.com or call 1.800.SAWDUST (1.800.729.3878) to locate your nearest service facility for warranty and non-warranty service on a Milwaukee electric power tool.
RÈGLES GÉNÉRALES, DE SÉCURITÉ
! AVERTISSEMENT
LORS DE L'UTILISATION D'UN ASPI-RATEURÉLECTRIQUE, DES PRÉCAU-TIONS ÉLÉMENTAIRES, Y COMPRIS CELLES PRÉSENTÉES CI-DESSOUS, DOIVENT TOUJOURS ÊTRE PRISES EN COMPTE : LIRE TOUTES LES INSTRUCTIONS AVANT D'UTILISER L'ASPIRATEUR. AVANT D'UTILISER L'ASPIRATEUR, LIRE LE PRÉSENT MANUEL D'UTILISATION, LE MANUEL D'UTILISATION DU BLOC-PILES ET DU CHARGEUR, AINSI QUE TOUTES LES ÉTIQUETTES SETROUVANTSUR L'ASPIRATEUR, LE BLOC-PILES, ET LE CHARGEUR.
SÉCURITÉ DU LIEU DE TRAVAIL
natural_image
Technical line drawing of a mechanical device with an inset showing a close-up of internal components (no text or symbols)Milwaukee Tool (Canada) Ltd 1.800.268.4015
Monday-Friday, 7:00 AM - 4:30 PM CST
www.milwaukeetool.ca
GARANTIE LIMITÉE - AUX ÉTATS-UNIS ET AU CANADA
natural_image
Technical line drawing of a mechanical device with an inset showing a close-up of internal components (no text or symbols)Lunes a Viernes (9am a 6pm)
13135 West Lisbon Road
Brookfield, WI 53005 USA
58140850d3 01604900401Q-01(A)
05/20 Printed in Vietnam

- IMPORTANT SAFETY INSTRUCTIONS
- WORK AREA SAFETY
- ELECTRICAL SAFETY
- PERSONAL SAFETY
- USE AND CARE
- BATTERY PACK USE AND CARE
- SERVICE
- SPECIFIC SAFETY RULES FOR COMPACT VACUUM
- READ AND SAVE ALL INSTRUCTIONS FOR FUTURE USE
- FUNCTIONAL DESCRIPTION
- SYMBOLOGY
- SPECIFICATIONS
- ASSEMBLY
- CAUTION
- Installing/Removing the Accessories
- OPERATION
- WARNING
- Fuel Gauge
- Starting, Stopping, and Controlling Air flow
- Lock-on
- MAINTENANCE
- Maintaining Tool
- Cleaning
- Repairs
- ACCESSORIES
- SERVICE - UNITED STATES
- SERVICE - CANADA
- LIMITEDWARRANTYUSA & CANADA
- RÈGLES GÉNÉRALES, DE SÉCURITÉ
- ! AVERTISSEMENT
- SÉCURITÉ DU LIEU DE TRAVAIL
- Milwaukee Tool (Canada) Ltd 1.800.268.4015
- GARANTIE LIMITÉE - AUX ÉTATS-UNIS ET AU CANADA
Brand : MILWAUKEE
Model : 085020
Category : Vacuum Cleaner