
Easy - Ice Maker Sonnenkönig - Free user manual and instructions
Find the device manual for free Easy Sonnenkönig in PDF.
| Product type | Ice maker |
| Brand | Sonnenkönig |
| Model | Easy |
| Daily production | 12 kg / 24 hours |
| Ice storage capacity | 600 g |
| Water tank capacity | 1.7 liters |
| Dimensions (L x D x H) | 24 x 35 x 34 cm |
| Power supply | 220-240 V / 50 Hz |
| Compressor | R134a, CFC-free |
| Number of ice cubes per cycle | 9 |
| Ice cube shape | Crystalline bullets |
| Alarm types | Full ice basket (ICE FULL) and water shortage (ADD WATER) |
| Features | Instant ice production, automatic shut-off when basket is full |
| Maintenance | Internal cleaning with water/vinegar solution; thorough rinsing |
| Safety | Can be used by children aged 8 and above under supervision; do not immerse |
| Power cable | With grounded plug (3 pins) |
| Warranty | 24 months from date of purchase |
| Included accessories | Ice bucket, ice scoop |
| After-sales service | Armin Schmid, info@sonnenkoenig.ch |
Frequently Asked Questions - Easy Sonnenkönig
User questions about Easy Sonnenkönig
0 question about this device. Answer the ones you know or ask your own.
Ask a new question about this device
Download the instructions for your Ice Maker in PDF format for free! Find your manual Easy - Sonnenkönig and take your electronic device back in hand. On this page are published all the documents necessary for the use of your device. Easy by Sonnenkönig.
USER MANUAL Easy Sonnenkönig
Festnetz 14 Cent/Minute
Modifications techniques
Festnetz 14 Cent/Minute
Ice machine User's manual
GB
INDEX
1 Safety Information 41
2 Description 42
3 Specifications and Features 43
4 Before using your ice maker for the first time. 44
5 Control panel operation 44
6 Operating Instructions 45
7 Care 46
8 Troubleshooting 47
9 Warranty / Disposal / Technical change 49
1 Safety Information
Please read before first commissioning the safety instructions carefully and observe the safety instructions to prevent damage due to misuse, improper operation, and improper environmental conditions to be avoided. Keep these for later reference.
Check the device after removing the packaging for damage. Do not put the unit in case of suspected corruption in operation and consult a specialist. The recyclable packaging material must not be stored or disposed accessible for young children, but must be disposed of properly.
This appliance is only for the purpose for which it was explicitly developed. Any other use is regarded as improper and therefore dangerous. The supplier is not liable for damage to persons and / or property damage due to an improper or incorrect use.
This appliance can be used by children aged from 8 years and above and persons with reduced physical, sensory or mental capabilities or lack of experience and knowledge if they have been given supervision or instruction concerning use of the appliance in a safe way and understand the hazards involved. Children shall not play with the appliance. Cleaning and user maintenance shall not be made by children without supervision. Please make sure to place the device on a suitable and waterproof surfaces, so that spilled liquids can not cause harm.
Repairs to electrical appliances must only be carried out by trained personnel only. Improperly performed repairs and alterations to the equipment can have dangerous consequences for the user according to what the warranty will be rejected.
- If the power cord is damaged, it must be replaced by the manufacturer, its service agent or a similarly qualified person in order to avoid a hazard.
- Fill with potable water only.
- It is normal for the compressor and condenser surfaces to reach temperatures between 70^ and 90^ during operation, and the surrounding areas may be very hot.
- Due to fast freezing, ice cubes may appear cloudy. This is due to trapped air in the water and will not affect the quality or taste of the ice.
- This appliance can be used by children aged from 8 years and above and persons with reduced physical, sensory or mental capabilities or lack of experience and knowledge if they have been given supervision or instruction concerning use of the appliance in a safe way and understand the hazards involved.
Children shall not play with the appliance. - Cleaning and user maintenance shall not be made by children without supervision
-
Do not immerse in water
-
R-134a is a fluorinated greenhouse gas covered by the Kyoto Protocol, with a global warming potential of 1300. Please keep this unit carefully.
GB
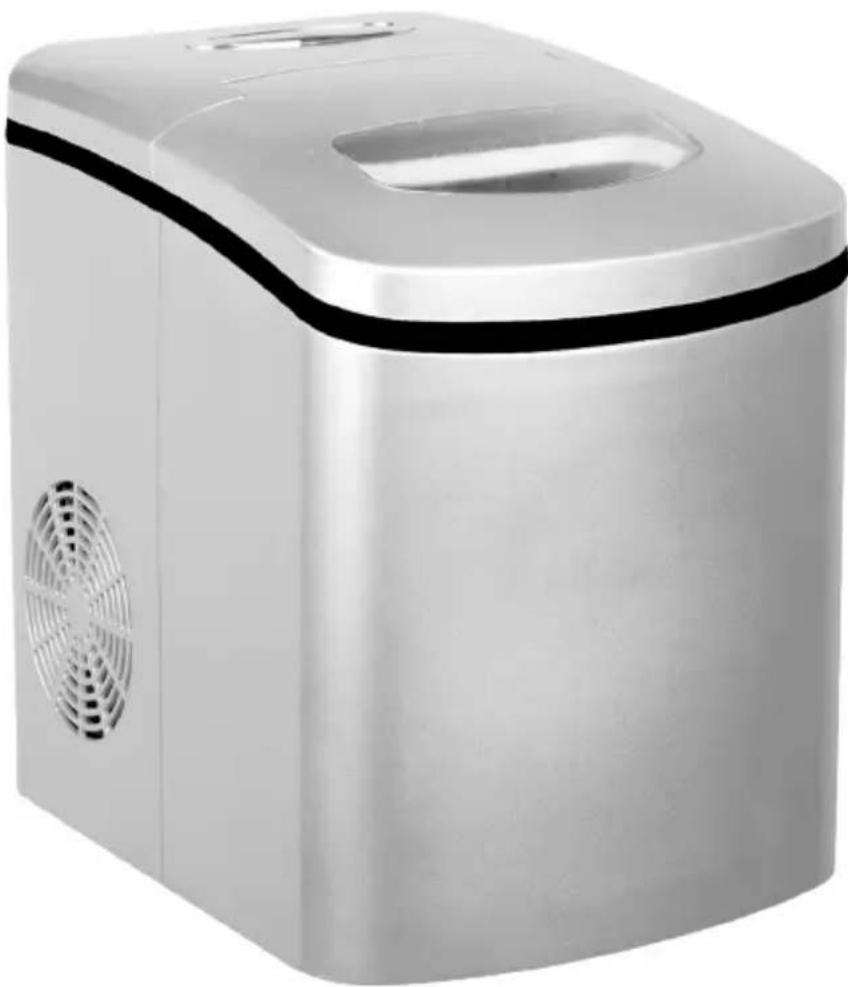
2 Description
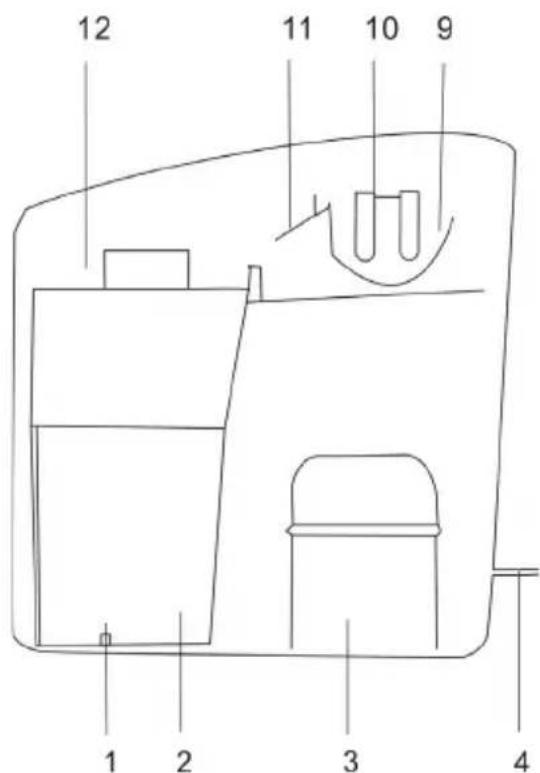
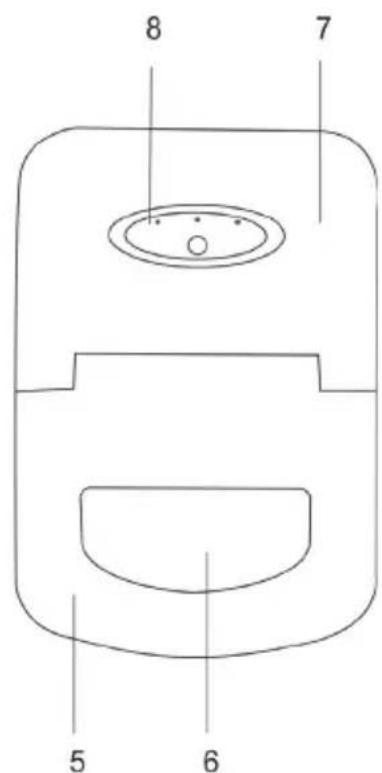
- Silicon stopper
- Water tank
- Compressor
- Plug and power cord
- Front lid
-
View window
-
Back cover
- Control panel
- Water tray
- Evaporator
- Ice shovel
- Ice basket
3 Specifications and Features
Specifications
Daily ice output. 12kg / 24 hours
Ice storage capacity. 600 g
Compressor high efficiency CFC free .R134a
Water tank capacity. 1.7 litres
Dimensions 243534 cm
Voltage 220-240V/50Hz
Power cord. 3 pin earthed plug. (to reduce the risk of electric shock)
Features
Instant ice making (6 minutes)
Alarm indicates when ice is full and water low
Spherical ice cubes
9 ice cubes per cycle
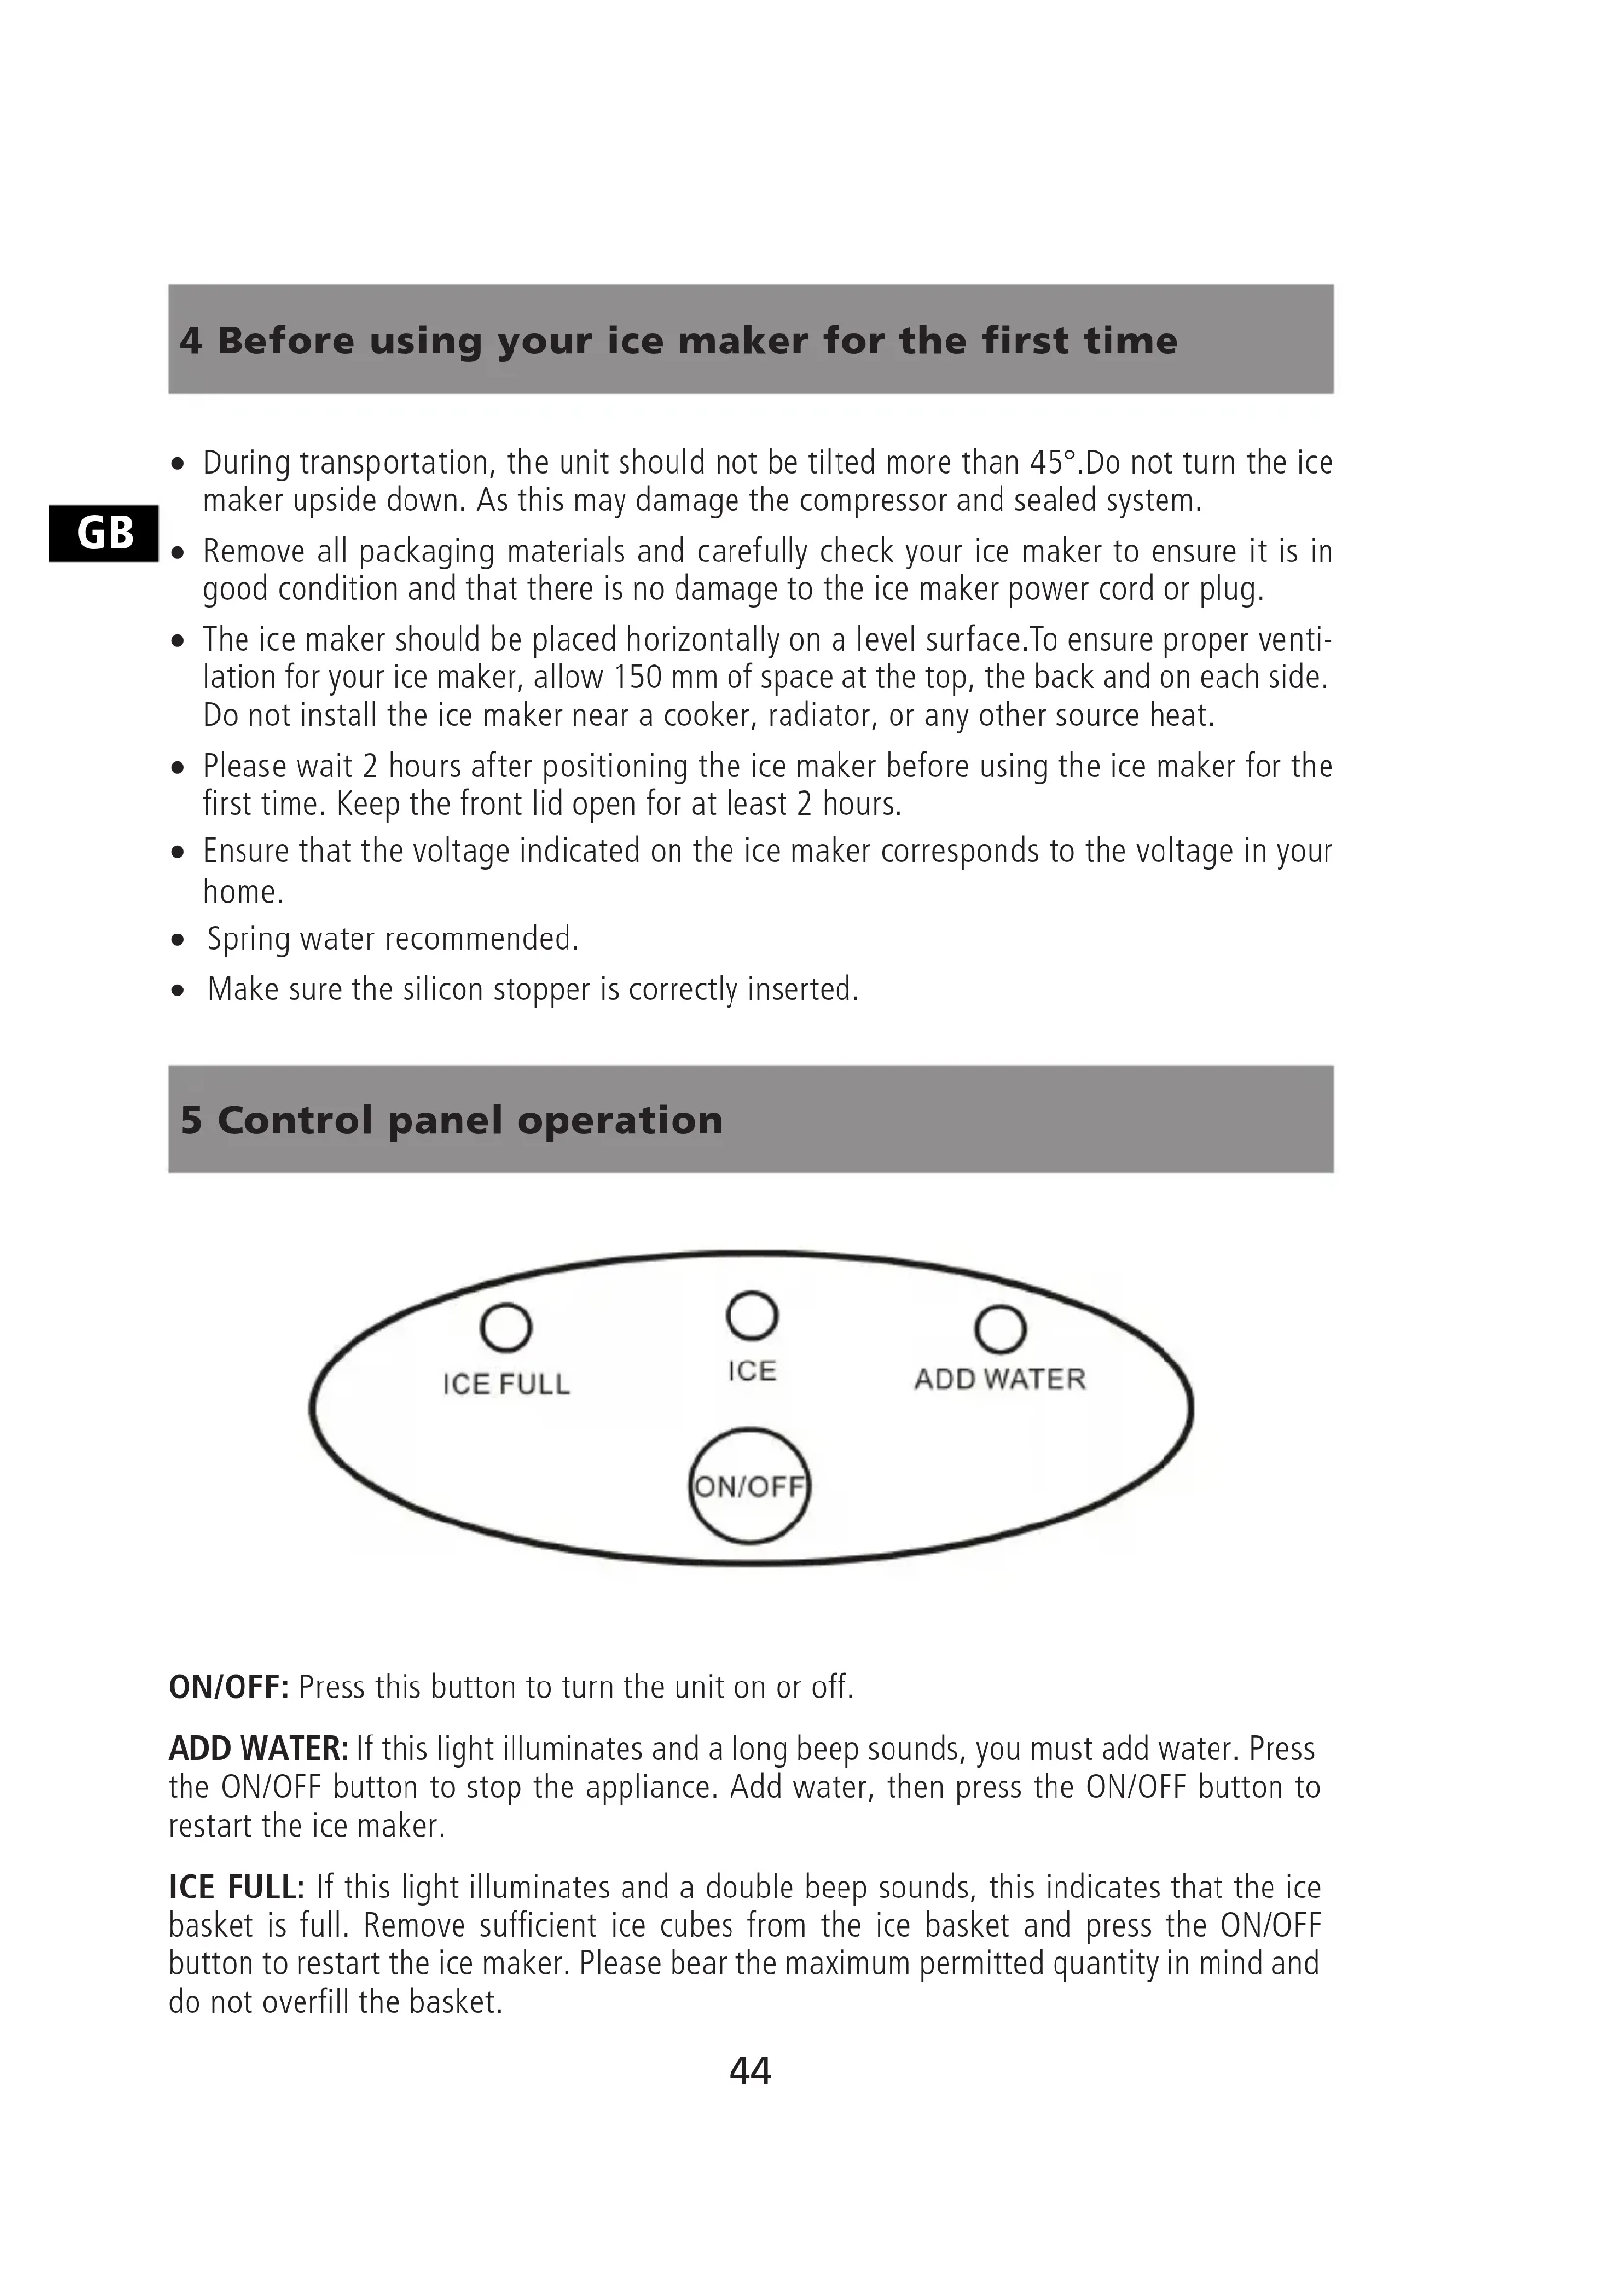
4 Before using your ice maker for the first time
- During transportation, the unit should not be tilted more than 45^ . Do not turn the ice maker upside down. As this may damage the compressor and sealed system.
- Remove all packaging materials and carefully check your ice maker to ensure it is in good condition and that there is no damage to the ice maker power cord or plug.
- The ice maker should be placed horizontally on a level surface. To ensure proper ventilation for your ice maker, allow 150mm of space at the top, the back and on each side. Do not install the ice maker near a cooker, radiator, or any other source heat.
- Please wait 2 hours after positioning the ice maker before using the ice maker for the first time. Keep the front lid open for at least 2 hours.
- Ensure that the voltage indicated on the ice maker corresponds to the voltage in your home.
- Spring water recommended.
- Make sure the silicon stopper is correctly inserted.
5 Control panel operation
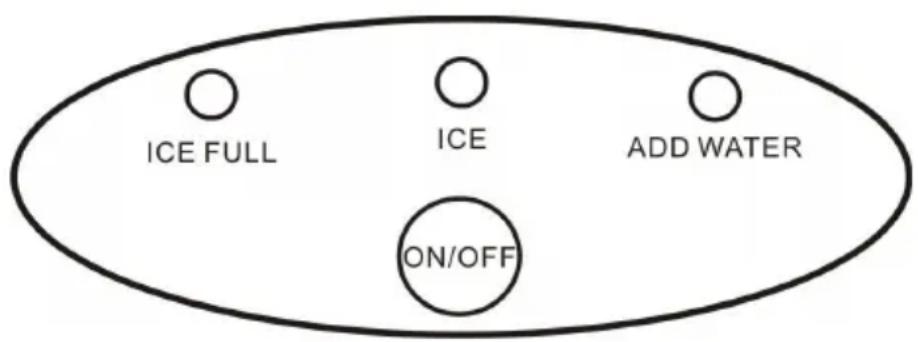
ON/OFF: Press this button to turn the unit on or off.
ADD WATER: If this light illuminates and a long beep sounds, you must add water. Press the ON/OFF button to stop the appliance. Add water, then press the ON/OFF button to restart the ice maker.
ICE FULL: If this light illuminates and a double beep sounds, this indicates that the ice basket is full. Remove sufficient ice cubes from the ice basket and press the ON/OFF button to restart the ice maker. Please bear the maximum permitted quantity in mind and do not overfill the basket.
6 Operating Instructions
Step 1.
Open the lid and fill the water tank with water.
Note: Keep the water level below the maximum level and make sure it does not flow over into the ice basket.
Step 2.
Connect the ice maker to the power.
Step 3.
Press ON/OFF button to turn the unit on. The ice maker will begins to work.
Note: For the first three cycles, the ice cubes may be small and irregular in size. this is normal
Step 4.
If the ADD WATER indicator is red and a beep sounds, remove the basket and, add water as per step 1. Then press the ON/OFF button to restart the ice maker.
Note: If water is not pumped up to the water tray once the unit has run through two cycles but there is sufficient water in the water tank, then tilt the unit slightly, remove the silicon stopper, and let several drops of water run out.
Step 5.
If the ICE FULL indicator is in red and a double beep sounds, please remove the ice with the scoop.
Note: When the ice basket is full, please remove the ice immediately. Do not allow the ice basket to overfill.
Step 6.
Press the ON/OFF button to stop the machine.
GB
7 Care
- Clean the inner liner, ice basket, water tank, ice shovel and evaporator frequently. When cleaning, unplug the unit from the power supply and remove the ice cubes. Use a diluted solution of water and vinegar to clean the inside and outside surfaces of the ice maker. Do not clean the ice maker with chemicals or diluted cleaning agents such as acids, cleaning solvents or oil. Rinse thoroughly before operating.
- Keep the ventilation openings on the unit free from obstructions. Do not use mechanical devices or other meansimplements to accelerate the defrosting process, aside from those recommended by the manufacturer.
- If the ice maker is reused after it has not been operated for a long time, the water pump may not pump sufficient water due to an air blockage. If this happens, the ADD WATER indicator will illuminate. To correct this, press the ON/OFF button again, the the ice maker will work normally.
- To ensure the ice cubes, are clean, the water in the water tank should be replaced every 24 hours.
- If the compressor stops for any reason (e.g. low water, ice full or the power is turned off) or if the appliance does not start immediately do not attempt to restart the appliance straight away. Instead wait 3 minutes, and then restart the ice maker.
- Always use fresh water when you first operate the unit and after the unit has not been used for a long time.
8 Troubleshooting
- Please note, that if a power failure occurs because the power cord is disconnected, or if the ON/OFF button has been pressed during an ice -making cycle, small ice chips may form and cause the shovel to jam. If this happens, the ice chips can be removed by disconnecting the power cord and gently pushing the shovel to the rear of the unit, removing the ice chips and, then restarting the appliance.
- Please restart the ice maker by pressing the ON/OFF button. If the ice shovel does not push the ice into the ice basket after ice drops from on the evaporator rods and the ICE indicator in the middle of the control panel is illuminated, check to see if the water tray is horizontal and balanced. If it is not, adjust it by pressing the ice shovel lightly with your finger. Then restart the ice maker.
| PROBLEM POSSIBLE CAUSE SUGGESTED SOLUTIONS | ||
| The compressor functions abnormally and makes a buzzig noise. | The voltage is lower than recommended. | Stop the ice maker and do not restart it until the voltage is correct. |
| low water indicator light is illuminated | 1.There is no water. 2.The pump has an air blockage. | 1. Press ON/OFF button the stop button, fill with water, wait 3 minutes and press ON/OFF button to restart. When the water has reaches the water level indicator, the ice maker will restart automatically. 2. Remove the silicon stopper and let several drops of water run out. |
| Indicator lights on display are not illuminated. | Blown fuse / no power. Replace the fuse / Turn the power on. | |
| The Ice cubes produced are too large and stick together. | 1.Ice from previous cycles has been left in the water tray. 2.The evaporator is too low | 1.Stop the unit immediately. Do not restart the unit until the ice in water tray melts. 2. Move the evaporator a little. |
| All the conditions required to make ice are right in place, but no ice is produced. | 1.There is no refrigerant in the compressor. 2.B. Compressor is broken or fan motor is broken. | Call for service. |
| The ICE FULL and ADD WATER indicators come on at the same time. | Water tray is blocked by ice cubes. | Remove the cubes from under the ice shovel. Remove the plug from the socket and reinsert it, then press the “ON/OFF” button. After two minutes the unit will restart automatically. |
| The unit is running, but the water is warmer than normal. | The magnetic valve is broken. | Replace the magnetic valve. |
| Water leaking from the bottom of the unit at the front. | The silicon stopper is not properly insertd. | Please insert the silicon stopper properly. |
9 Warranty / Disposal / Technical change
Warranty
All products are checked from our company before the delivery. In case that there is a lack on your product, please contact the vendor. Please bring your proof of purchase for guarantees.
Disposal
Please remove the heater properly. You can bring the product to any specialist dealer for he removal.
Technical changes
Technical changes in technique and design are possible.
Please save the packaging materials of the unit.
CE declaration of Conformity
This device complies with the following standards:
EN60335-2-24:2010
EN60335-1:2012+AC:14+A11:14 EN602233:2008 2006/98/EC 2014/35/EU
EN55014-1:2006/+A1:2009/+A2:2011
EN55014-2:1997/+A1:2001/+A2:2008
EN61000-3-2:2014
EN61000-3-3:2013 2004/108/EC 2014/30/EU
Firma
Armin Schmid
Olensbachstrasse 9-15
CH-9631 Ulisbach
Tel. Int. +41 71 987 60 60
Tel.Nat.0848870850
Festnetz 14 Cent/Minute