SGS2HTW73E - Dishwasher BOSCH - Free user manual and instructions

Find the device manual for free SGS2HTW73E BOSCH in PDF.
BOSCH SGS2HTW73E - Dishwasher
📄 989 pages English EN Download 💬 AI Question 10 questions ⚙️ Specs
Notice BOSCH SGS2HTW73E - page 210
Pick your language and provide your email: we'll send you a specifically translated version.
Product type Built-in dishwasher
Brand Bosch
Model SGS2HTW73E
Dimensions (H x W x D) 86.5 cm x 59.8 cm x 57.7 cm (estimation - 60 cm built-in model)
Net weight Approximately 50 kg
Power supply 220-240 V, 50-60 Hz, 10 A
Energy class E (EU 2019 reference)
Water consumption per cycle Approximately 9.5 L (Eco program)
Noise level 44 dB (category B)
Number of place settings 12-14 standard place settings
Wash programs Eco 50°C, Intensive, Quick, Glass, etc.
Special functions VarioDrawer, EmotionLight, TimeLight, AquaStop
Installation type Built-in (integratable or fully integrated)
Tub material Stainless steel
Filters 3-level self-cleaning filter (microfilter, coarse filter, etc.)
Safety AquaStop, child lock, overflow protection
Spare parts and repairability Repair manual provided, parts available: spray arms, filters, power cord, control panel, etc.
Repairability index 8.1 /10 (estimation for similar models)
Included accessories Upper basket, lower basket, Vario drawer, cup shelf
Manufacturer warranty 2 years, extension possible

Frequently Asked Questions - SGS2HTW73E BOSCH

How to install the SGS2HTW73E dishwasher?
Make sure you have a built-in space 60 cm wide. Connect the cold water supply (pressure 0.5-10 bar), drain hose, and electrical outlet. Adjust the feet to level it. Refer to the full manual for installation diagrams.
What to do if the dishwasher does not start?
Check that the door is properly closed, the appliance is plugged in, and the circuit breaker has not tripped. Ensure the water supply is open. If the problem persists, refer to the troubleshooting section of the manual.
How to clean the dishwasher filters?
Turn the coarse filter counterclockwise and remove the filter system. Clean the filters under running water. Reassemble by aligning the arrows and turn clockwise until it clicks.
What does error code E15 mean?
Error code E15 indicates that the anti-flood protection (AquaStop) has been activated. Turn off the water supply, unplug the appliance, and contact customer service. A sensor has detected a leak.
How to use the VarioDrawer drawer?
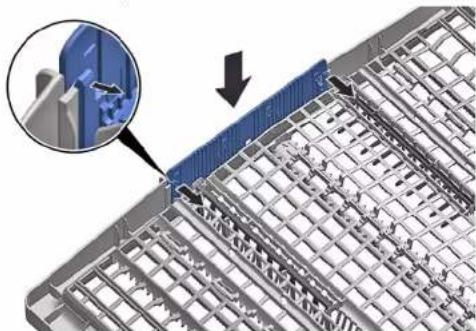
The VarioDrawer can be placed in the upper basket. It allows washing cutlery, small glasses, or delicate items. To install it, attach the side plastic inserts and insert the metal frame into the guides.
Can I repair the dishwasher myself?
Yes, for simple parts like filters, spray arms, or the power cord. For electrical repairs, it is recommended to call a qualified professional. The manual provides detailed step-by-step instructions.
How to replace the control panel?
Unplug the appliance, remove the front door, disconnect the cables (electrical connections, rinse aid sensor) and the ground wire. Unscrew the six screws, remove the control panel, and install the new one in reverse order.
What is the power consumption of this model?
The consumption is about 0.95 kWh for the Eco 50°C program. The rated power is approximately 2100 W. Check the energy label for exact values.
How to disable the child lock?
Press the 'Delayed start' and 'Rinse' buttons simultaneously for 3 seconds until the lock symbol turns off. Refer to the 'Safety' chapter of the manual.
Where to find spare parts for this dishwasher?
Original Bosch parts are available from customer service or on the Bosch website. The references are given in the repair manual (e.g., [00614935] for the tablet guide).

User questions about SGS2HTW73E BOSCH

0 question about this device. Answer the ones you know or ask your own.

Ask a new question about this device

Your email remains private: it is only used to notify you if someone answers your question.

No questions yet. Be the first to ask one.

Download the instructions for your Dishwasher in PDF format for free! Find your manual SGS2HTW73E - BOSCH and take your electronic device back in hand. On this page are published all the documents necessary for the use of your device. SGS2HTW73E by BOSCH.

USER MANUAL SGS2HTW73E BOSCH

  1. Lift the worktop slightly at the front. (3).
  2. Push the worktop back (4).
  3. Remove the worktop.
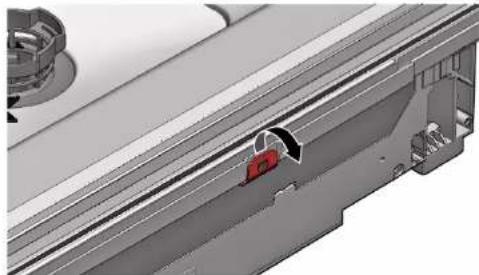
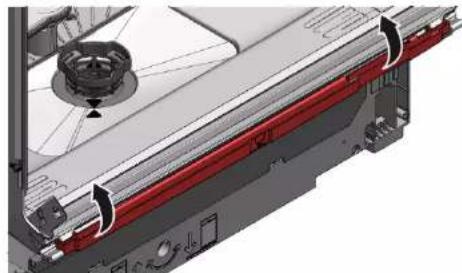
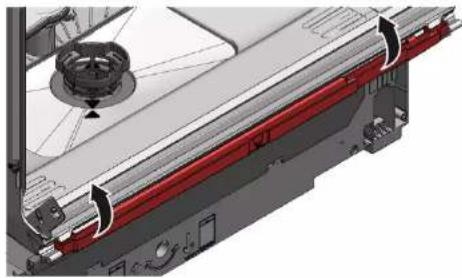
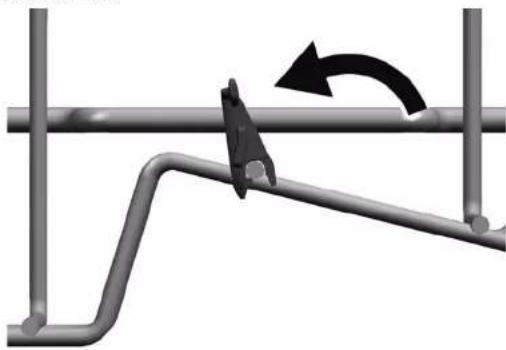
  1. Fold the retainer.

Mechanical diagram showing a lever mechanism with a curved arrow indicating rotational motion (no text or symbols present)

BOSCH SGS2HTW73E - 2

Repair

  1. Place the items to be washed.

Two diagrams showing a mechanical device with a curved arrow indicating rotation, no text or symbols present.

BOSCH SGS2HTW73E - Repair - 2

Repair

BOSCH SGS2HTW73E - Repair - 1

Repair

3.

Diagram showing a hand inserting a screw into a device with a magnified view of the screw and its insertion direction.

BOSCH SGS2HTW73E - Repair - 2

Repair

Requirement:

BOSCH SGS2HTW73E - Requirement: - 1

Repair

  1. Lift the panel.

BOSCH SGS2HTW73E - Repair - 1

Repair

4.

Mechanical assembly diagram showing a red lever mechanism with labeled parts (1 and 2), no readable text or symbols present.

BOSCH SGS2HTW73E - Repair - 2

Repair

BOSCH SGS2HTW73E - Repair - 1

Repair

3D diagram of a mechanical component with red and black arrows indicating directional flow or movement (no text or symbols).

BOSCH SGS2HTW73E - Repair - 2

Repair

2.

Close-up of a red mechanical bracket with green cable and arrow indicating connection (no text or symbols).

BOSCH SGS2HTW73E - Repair - 2

Repair

BOSCH SGS2HTW73E - Repair - 1

Repair

4.

Pure technical line drawing of curved pipe or channel sections without any text, numbers, or symbols.

BOSCH SGS2HTW73E - Repair - 2

Repair

4.21 Replacing the EmotionLight

Technical diagram showing a mechanical assembly with labeled parts and directional arrows indicating movement or assembly.

  1. Remove the EmotionLight from the appliance.

BOSCH SGS2HTW73E - Replacing the EmotionLight - 2

Repair

BOSCH SGS2HTW73E - Repair - 1

Repair

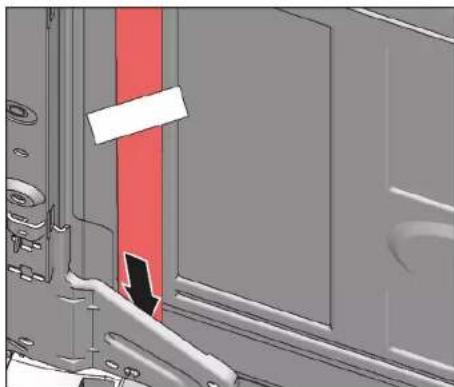
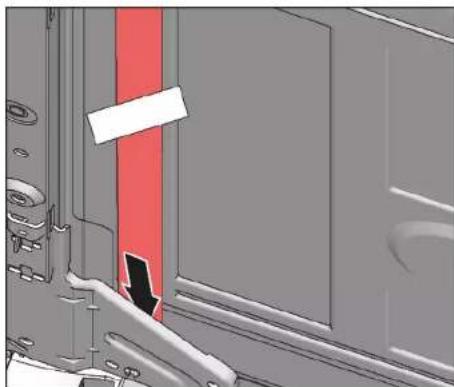
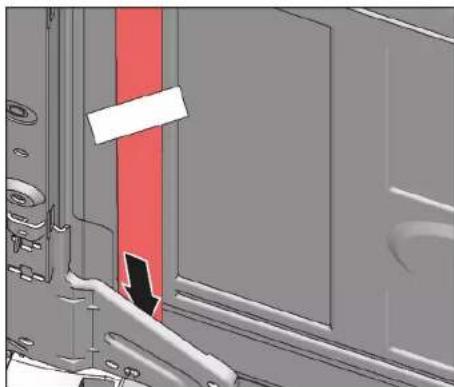
Close-up of a mechanical component with a red vertical stripe and black arrow pointing to a section (no text or symbols visible).

BOSCH SGS2HTW73E - Repair - 2

Repair

  1. Slightly lift the worktop from the front (3).
  2. Push the worktop towards the rear (4).
  3. Remove the worktop.

4.1.2 Installing the worktop

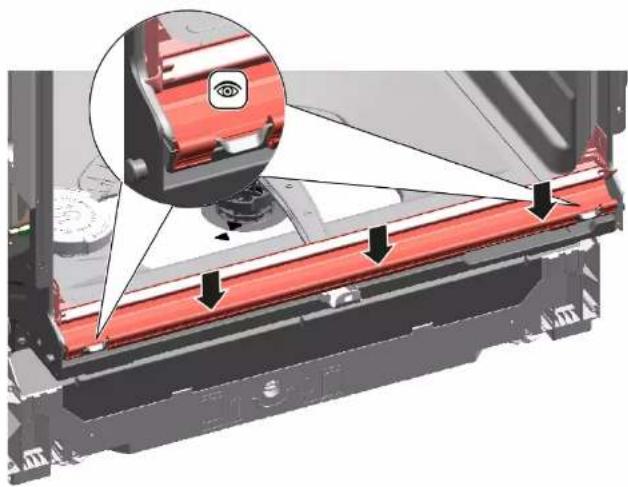
  1. Fit the rear part of the worktop into the guides using the fixing connectors (1).
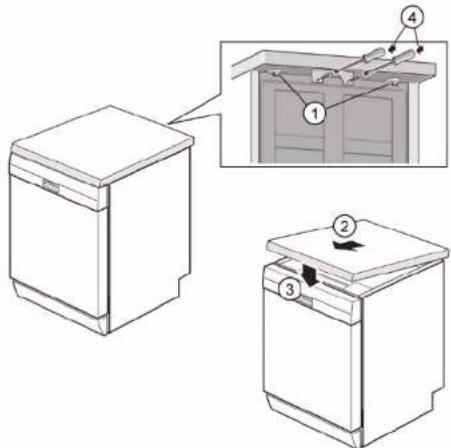
Diagram showing three views of a kitchen appliance with numbered components and an inset view highlighting a cabinet interior.

  1. Push the worktop forward (2).
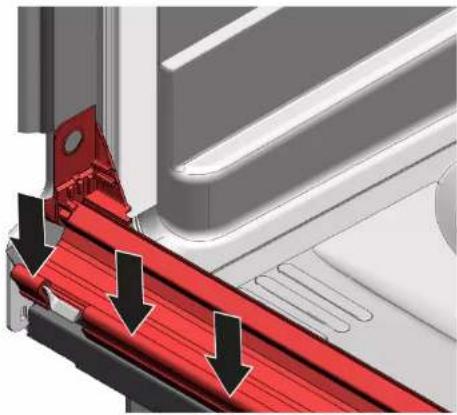
  2. Press the front part of the worktop down until both locking levers audibly engage into place (3).
  3. Retighten the two screws (4) (optional).

BOSCH SGS2HTW73E - Installing the worktop - 2

Repair

4.2 Installing the basket system

Requirement:

The basket has been removed from the appliance.

4.2.1 Setting the tablet guide for the 86 cm model Special tools:

Tablet guide [00614935]

Cup holder [00618565]

BOSCH SGS2HTW73E - Setting the tablet guide for the 86 cm model Special tools: - 1

Repair

  1. Place the items to be washed.

Two diagrams showing a mechanical device being lifted by a spring, with no visible text or symbols.

4.2.3 Installing the steam oven insert Special tools:

Tablet guide [00614935] Cup holder [00618565]

- Attach the steam oven insert with the end parts under the basket system.
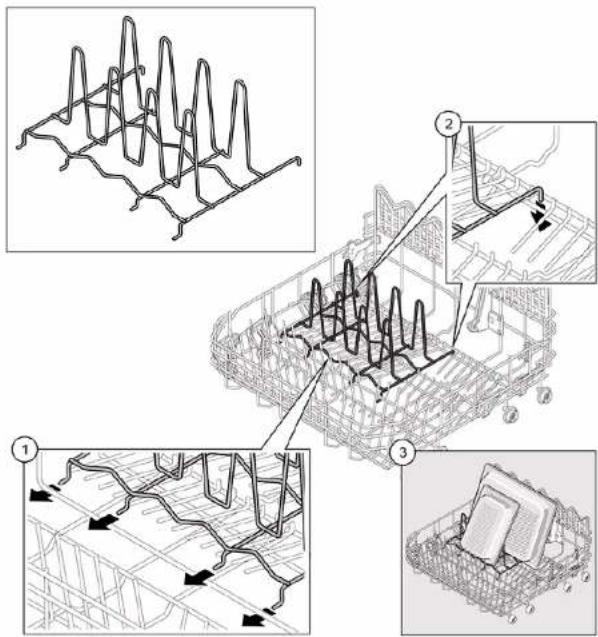
Technical diagram illustrating a multi-step installation process with labeled steps and component illustrations.

BOSCH SGS2HTW73E - Repair - 3

Repair

4.3 Replacing the varioDrawer

4.3.1 Removing the varioDrawer

  1. Fold the handle flaps inward.

3D architectural diagram of a steel-framed building facade with structural grid and window grilles, showing a close-up inset of a blue door detail (no text or symbols).

  1. Remove the handle upwards.
  2. Press the plastic side inserts outward and lift them up out of the frame.
Two blue industrial equipment components with metal railings and directional arrows indicating motion (no text or symbols).

Repair

  1. Carefully bend the guide tabs outward.
3D architectural diagram showing structural grid and rebar layout with labeled components (no text or symbols present).

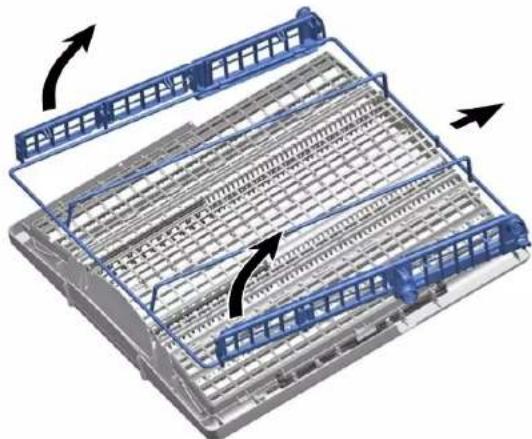
  1. Pull the folding supports out of the tabs.
  2. Press and remove the metal frame from the front out of the holder.
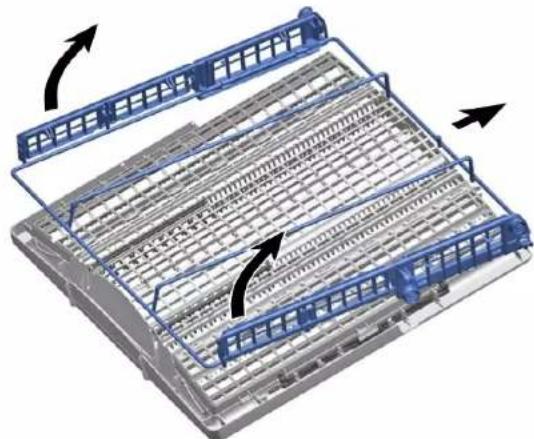
3D diagram of a mechanical assembly with blue structural elements and directional arrows indicating motion (no text or symbols).

  1. Push and remove the metal frame from the back out of the guide.

4.3.2 Installing the varioDrawer drawer

4.4.2 Installing the spray arm

  1. Insert the lower spray arm. The spray arm clicks into place.
  2. Insert the upper spray arm and secure it.

BOSCH SGS2HTW73E - Installing the spray arm - 1

Repair

4.5 Replacing the filters

4.5.1 Removing the filter

Make sure that no foreign objects get into the siphon.

  1. Pull the microfilter downwards to remove it.
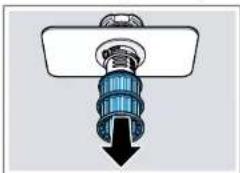
Diagram of a mechanical component with a downward arrow indicating force or direction (no text or symbols present).

4.5.2 Installing the filters

  1. Reassemble the filter system.

4.7.2 Connecting the power cable

BOSCH SGS2HTW73E - Connecting the power cable - 1

CAUTION!

  1. Insert the short end of the spring into the opening for installing the detergent cover (2).
  2. Press the cover onto the dispenser (3).
  1. Lift the pump cover inwards at an angle and remove it.

4.9.2 Installing the waste water pump cover

▶ Insert the pump cover (1) and press it (2).
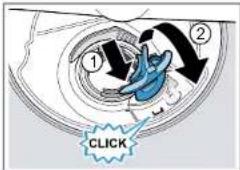
① ② CLICK

The pump cover clicks into place.

BOSCH SGS2HTW73E - Installing the waste water pump cover - 2

Repair

4.10 Replacing the side panel

Requirement:

Fig. 1: Fully integratedTechnical diagram of a refrigerator interior with numbered components and directional arrows indicating rotation or movement.
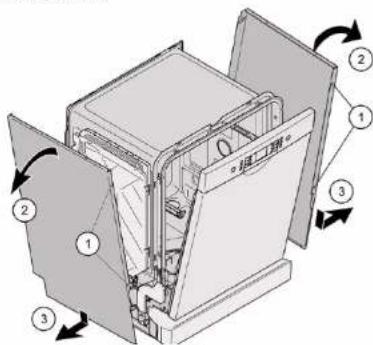
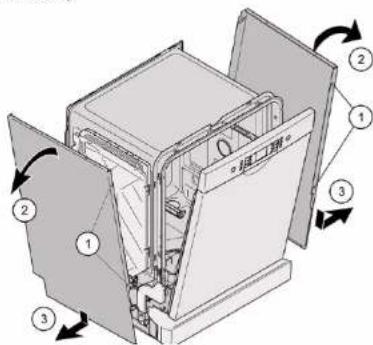
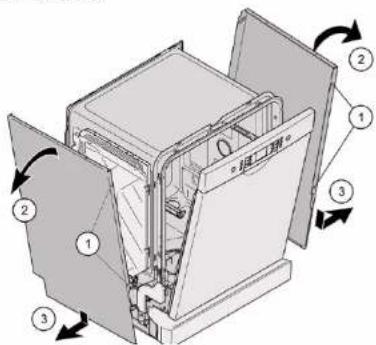
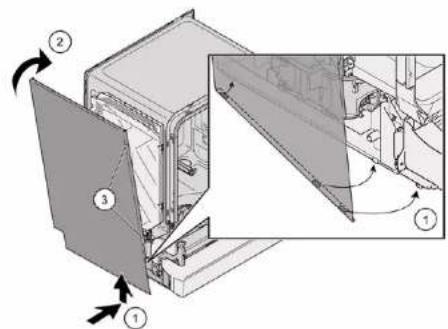
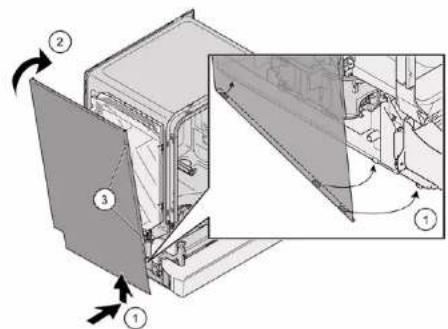
  1. Tilt the side panel slightly outward at the top (2).
  2. Lower the side panel and pull it out of the base channel (3).

BOSCH SGS2HTW73E - Requirement: - 2

Repair

Fig. 2: Fully integrated

Technical diagram showing a mechanical assembly with numbered components and directional arrows indicating motion or assembly.

  1. Press the side panel against the appliance (2).
  2. Secure the side panel with screws (3).

BOSCH SGS2HTW73E - Repair - 2

Repair

3.

BOSCH SGS2HTW73E - Repair - 1

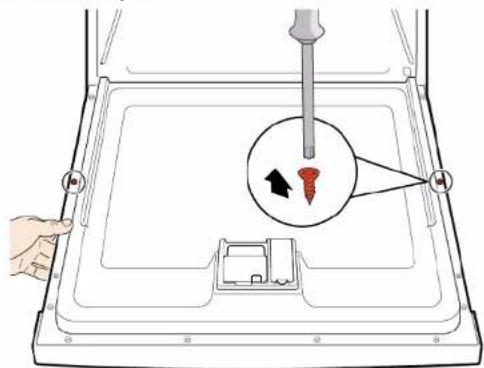
Secure the door by holding it on one side.

Remove the two screws.
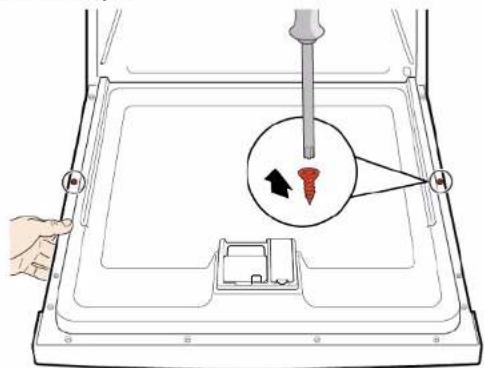
Diagram showing a hand inserting a screw into a device with a magnified view of the screw and its insertion direction.

BOSCH SGS2HTW73E - Repair - 3

Repair

Requirement:

BOSCH SGS2HTW73E - Requirement: - 1

Repair

  1. Remove the control panel.
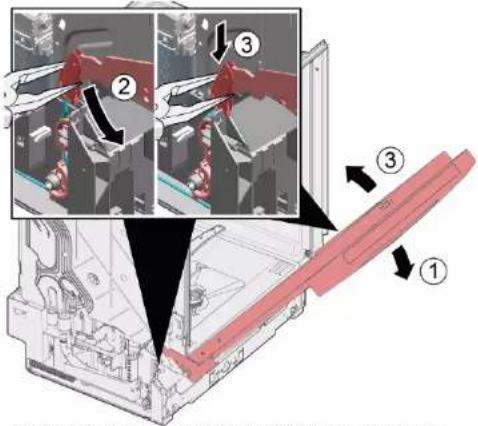
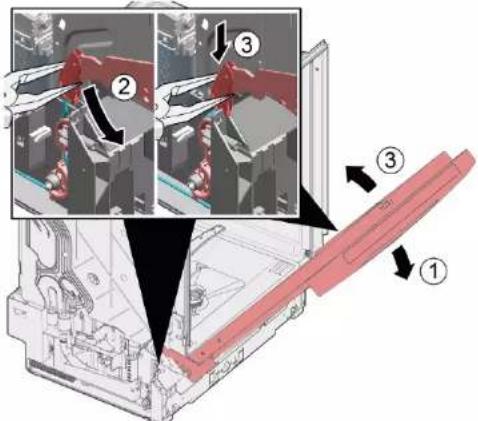
  1. Gently open the door (1).
  2. Attach to the slot of the base channel (2).
  3. Slowly close the door (3).

Technical diagram showing assembly steps of a mechanical component with numbered annotations indicating different states or features.

The cable system automatically attaches to the door hinge.

BOSCH SGS2HTW73E - Repair - 2

Repair

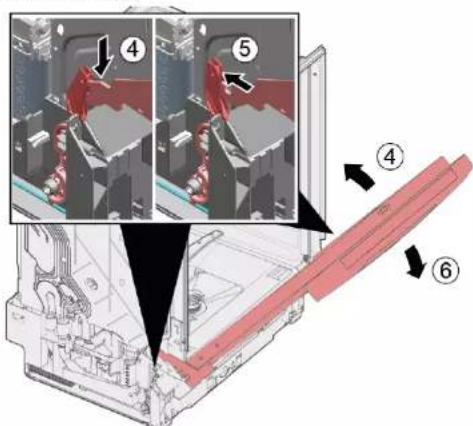
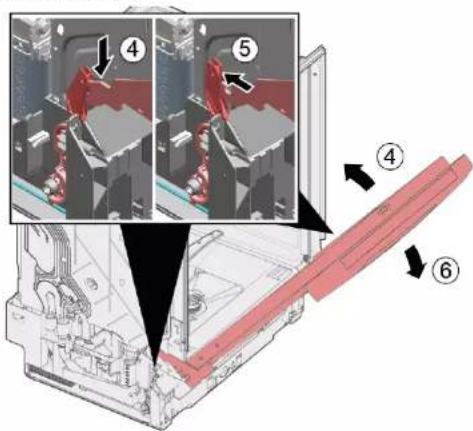
  1. Gently close the door (4).
  2. Move the slot backward and release the door hinge (5).
  3. Open the door (6).

Technical diagram showing assembly steps of a mechanical component with numbered annotations indicating process flow.

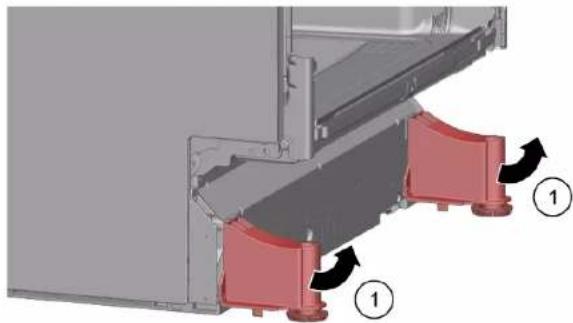
  1. Lift and remove the panel.
  2. Remove the foot towards the front (1).

Mechanical assembly diagram showing red clamps and mounting brackets (no text or symbols).

4.14.2 Installing the bottom plate

BOSCH SGS2HTW73E - Installing the bottom plate - 1

Repair

4.

BOSCH SGS2HTW73E - Repair - 1

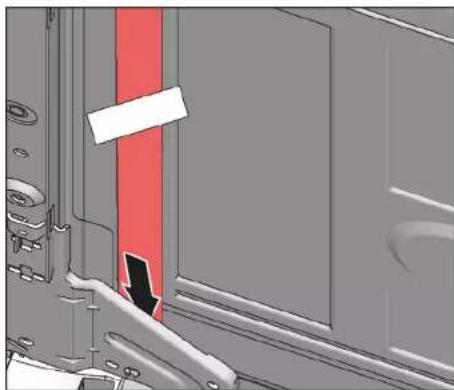
Depending on the model series, the plug for EmotionLight is still attached to the base.

Unlock the plug on the lifting handle and push it towards the back (optional) (2).

4.15.2 Installing the base plate

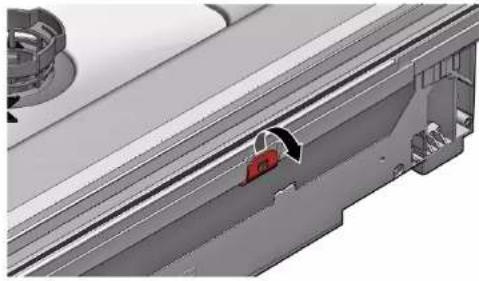
  1. Release the handle at the top.

3D mechanical assembly diagram showing internal components and a red component (no text or symbols).

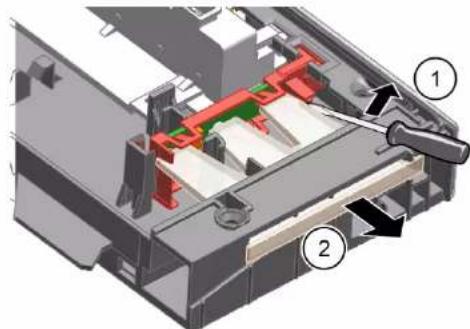
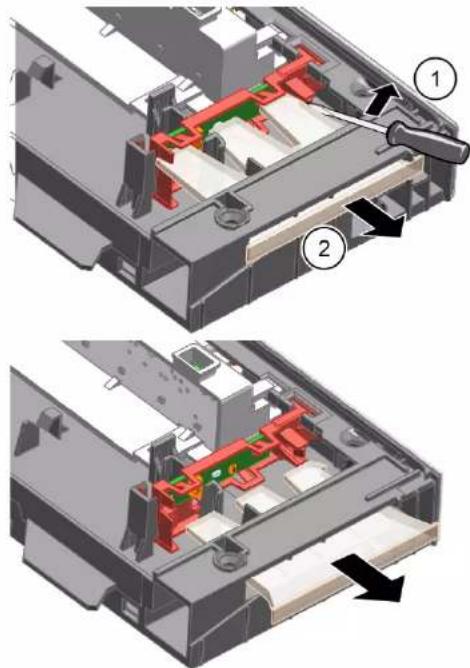
  1. Insert a screwdriver under the metal clamp (1).
  2. Gently release the metal clip (2).

Mechanical assembly diagram showing a lever mechanism with labeled parts (1 and 2), no readable text or symbols present.

BOSCH SGS2HTW73E - Installing the base plate - 3

Repair

  1. Lift and remove the overflow pipe.

3D mechanical assembly diagram showing a red component with mounting holes and a central hub (no text or symbols visible).

4.16.2 Installing the overflow pipe

Technical diagram showing mechanical assembly with numbered components and directional arrows indicating motion or assembly steps.

BOSCH SGS2HTW73E - Installing the overflow pipe - 2

Repair

3D diagram of a mechanical component with red and black arrows indicating directional flow (no text or symbols).

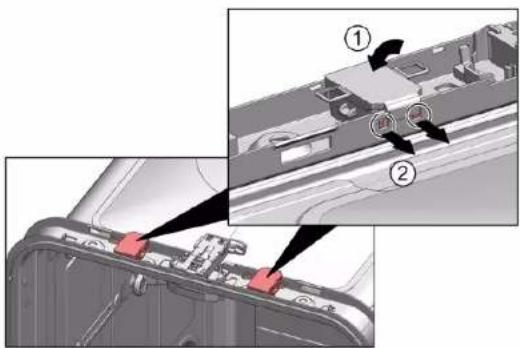
  1. Attach the metal clip on the left and right sides.

Mechanical assembly diagram showing a tool inserted into a component with a red component, no visible text or symbols.

BOSCH SGS2HTW73E - Repair - 3

Repair

  1. Attach the door hinge with screws.
  2. Place the inner door on the door hinge.
  3. Attach the inner door with screws.

4.17.2 Installing the inner door

4.18.2 Installing the door hinge

BOSCH SGS2HTW73E - Installing the door hinge - 1

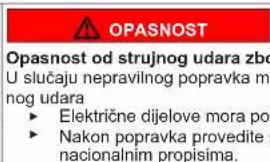
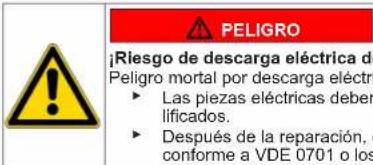
DANGER Risk of electric shock due to improper repair. In case of improper repair, electric shock may occur. ► Electrical parts must be repaired by qualified personnel. ► After repair, carry out testing in accordance with national regulations.

BOSCH SGS2HTW73E - Installing the door hinge - 3

Repair

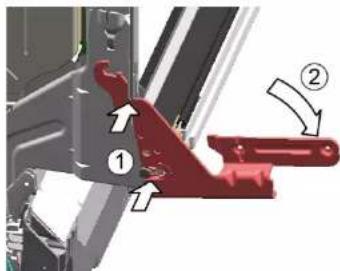
  1. Place the hinge on the device (1).
  2. Move the hinge downwards (2) until it attaches to the device.

Technical diagram showing mechanical assembly with numbered components and directional arrows indicating motion or movement.

2.

BOSCH SGS2HTW73E - Repair - 2

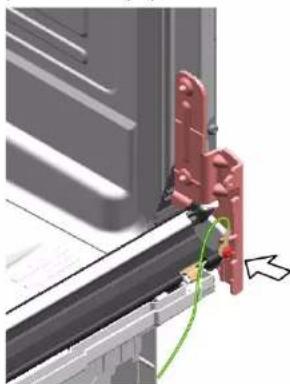
Missing grounding can lead to electrical potential on the door.

Establish grounding.

Close-up of a red mechanical bracket with green cable and arrow indicating assembly (no text or symbols)

BOSCH SGS2HTW73E - Repair - 4

Repair

4.19 Replacing the (lower) door seal

Requirement:

The device is disconnected from the power supply. The device is disconnected from the water supply. √ The outer door has been removed. The base plate has been removed. →68 The lower plate has been removed (optional). →67 √ The door springs have been removed. The control panel has been removed. The cable harness holder on the lower right side has been removed.

4.19.1 Removing the door seal

  1. Lift and remove the overflow drain.

3D mechanical assembly diagram showing internal components and a central hub (no text or symbols visible)

BOSCH SGS2HTW73E - Removing the door seal - 2

Repair

4.19.2 Installing the door seal

4.

BOSCH SGS2HTW73E - Installing the door seal - 1

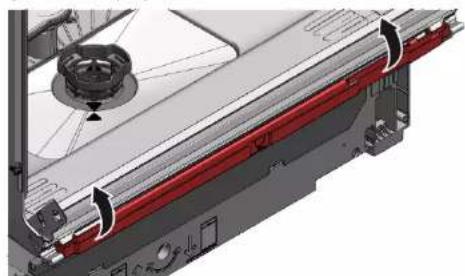
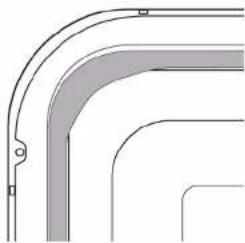
The seal must not be wavy or stretched at the corners. The seal is cut diagonally at the ends and tapers at the bottom of the tub on the front side.

BOSCH SGS2HTW73E - Installing the door seal - 2

Repair

4.21 Replacing the EmotionLight module

Diagram showing a device's internal components with numbered annotations indicating parts of the main body and insertion.

  1. Remove the EmotionLight from the device.

4.21.2 Installing the EmotionLight module

  1. Insert the holder into the frame of the rinse aid container (1).

Technical diagram showing a device's internal components with numbered annotations indicating parts of the main body and parts of the rear panel.

BOSCH SGS2HTW73E - Installing the EmotionLight module - 2

Repair

  1. Position the catch hook (2).

3.

BOSCH SGS2HTW73E - Repair - 1

CAUTION!

BOSCH SGS2HTW73E - CAUTION! - 1

Repair

Close-up of a mechanical component with a red vertical stripe and a black arrow pointing to a section (no text or symbols visible)

Fig. 3: Flat cable

  1. Connect the plug.

BOSCH SGS2HTW73E - Repair - 2

Repair

4.22 Replacing the TimeLight module

Technical diagram showing a mechanical assembly with numbered components and highlighted parts, likely illustrating a machining or assembly process.

  1. Pull the TimeLight module upward and remove it from the guide (2).

4.22.2 Installing the TimeLight module

  1. Bend the gripping elements (1) back again.

Technical diagram showing a red structural component with numbered annotations (1 and 2) indicating parts of a mechanical assembly.

  1. Push the TimeLight module into the guide (2).
  2. Connect the electrical connector.

BOSCH SGS2HTW73E - Installing the TimeLight module - 2

Repair

4.23 Replacing the gap illumination

Requirement:

The device is disconnected from the power supply. The device is disconnected from the water supply connection. The outer door is removed. The worktop is removed.

4.23.1 Removing the gap illumination

  1. Disconnect the handle element (1).
  2. Remove the electrical connector from the work module (2).

Technical diagram showing a device interior with labeled components and wiring, including numbered annotations 1 and 2.

  1. Disconnect the handle hook from the rear side (1).
  2. Remove the fiber (2).

3D mechanical assembly diagram showing internal components and a directional arrow (no text or symbols)

BOSCH SGS2HTW73E - Removing the gap illumination - 3

Repair

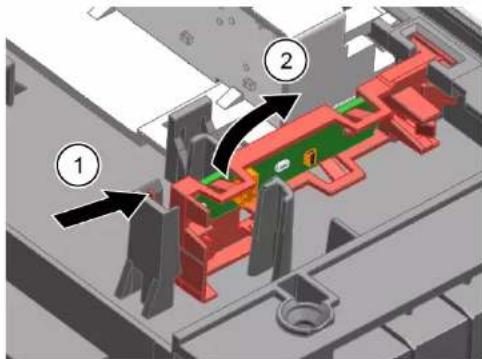
  1. Disconnect the handle hook (1).
  2. Lift the PCB with the holder and remove it from the work module frame (2).

Technical diagram of a mechanical assembly with numbered components, likely illustrating a machining or assembly process.

4.23.2 Setting the Gap illumination

  1. Insert the PCB holder into the work module frame.

3D mechanical assembly diagram showing a red component inserted into a housing (no text or symbols visible)

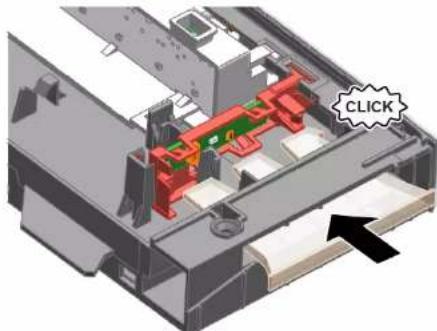
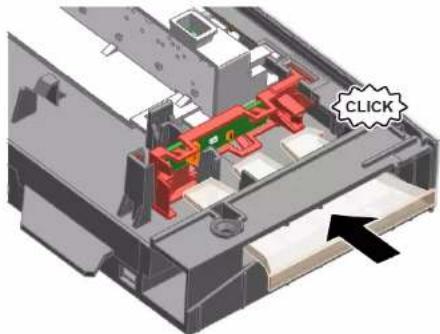
  1. Tighten it until you hear a click.

3D mechanical assembly diagram showing a red component inside a transparent housing, with a black arrow indicating a directional movement and a 'CLICK' label (no readable text or symbols beyond the label)

  1. Place the optical fiber and tighten it until you hear a click.

3D mechanical assembly diagram showing internal components with a highlighted 'CLICK' button (no text or symbols beyond label)

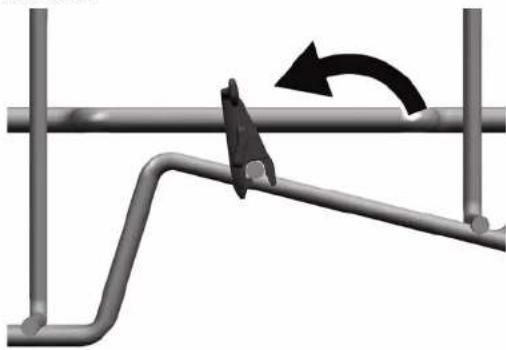
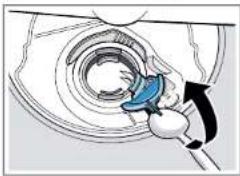
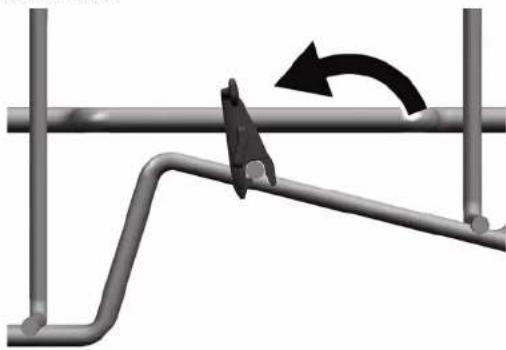
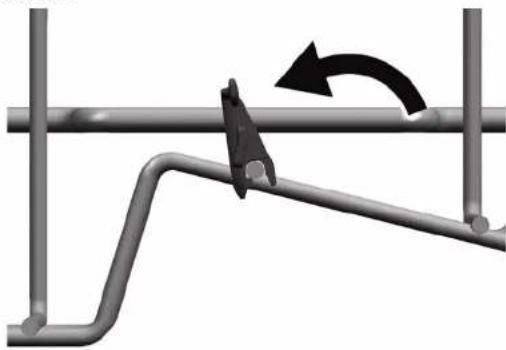
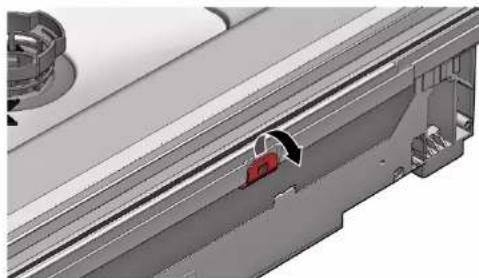
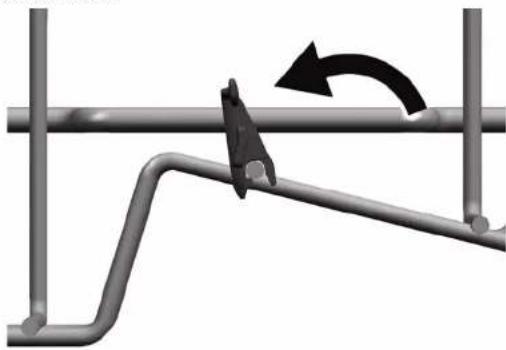
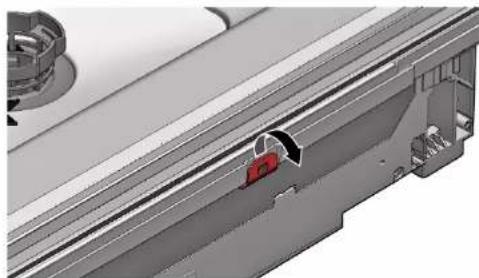
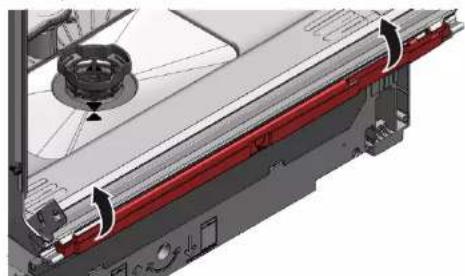
  1. Fold out the holder.

Mechanical diagram showing a lever mechanism with a curved arrow indicating rotational motion (no text or symbols present)

BOSCH SGS2HTW73E - Repair - 6

Repair

BOSCH SGS2HTW73E - Repair - 1

Repair

BOSCH SGS2HTW73E - Repair - 1

Repair

4.5.2 Mounting the filters

3.

Diagram showing a hand inserting a screw into a device with a magnified view of the screw and its insertion direction.

BOSCH SGS2HTW73E - Mounting the filters - 2

Repair

Requirement:

BOSCH SGS2HTW73E - Requirement: - 1

Repair

BOSCH SGS2HTW73E - Repair - 1

Repair

4.

Mechanical assembly diagram showing a red lever mechanism with labeled parts (1 and 2), no readable text or symbols present.

BOSCH SGS2HTW73E - Repair - 2

Repair

BOSCH SGS2HTW73E - Repair - 1

Repair

3D diagram of a car door frame with red and black arrows indicating directional movement (no text or symbols).

BOSCH SGS2HTW73E - Repair - 2

Repair

2021-03-22_9001630792 Copyright BSH Hausgeräte GmbH page 114 of 989

2.

Close-up of a red mechanical bracket with a green cable and an arrow indicating a connection. No text or symbols.

BOSCH SGS2HTW73E - Repair - 2

Repair

BOSCH SGS2HTW73E - Repair - 1

Repair

4.

Pure technical line drawing of curved structural elements. No text or symbols.

BOSCH SGS2HTW73E - Repair - 2

Repair

BOSCH SGS2HTW73E - Repair - 1

Repair

BOSCH SGS2HTW73E - Repair - 1

Repair

Close-up of a mechanical component with a red vertical stripe and a black arrow indicating a section. No text or symbols visible.

Fig. 3: Flat cable 4. Insert the plug.

BOSCH SGS2HTW73E - Repair - 2

Repair

BOSCH SGS2HTW73E - Repair - 1

Repair

4.23.2 Installing Gap Illumination

  1. Clip the clips on.

Mechanical diagram showing a lever mechanism with a curved arrow indicating rotational motion (no text or symbols present)

2021-03-22_9001630792 Copyright by BSH Hausgeräte GmbH Page 132 of 989

BOSCH SGS2HTW73E - Installing Gap Illumination - 2

Repair

  1. Place the items to be washed.

Two diagrams showing a mechanical device being lifted by a tool, with no visible text or symbols.

BOSCH SGS2HTW73E - Repair - 2

Repair

BOSCH SGS2HTW73E - Repair - 1

Repair

4.4.2 Installing the spray arm

4.5.2 Installing the filters

Fig. 1: Fully integratedTechnical diagram of a multi-chamber refrigerator with numbered components and directional arrows indicating internal flow or movement.

Fig. 2: Fully integrated

Technical diagram showing a mechanical assembly with numbered components and directional arrows indicating motion or assembly.

  1. Press the side panel onto the appliance (2).
  2. Secure the side panel with screws (3).

BOSCH SGS2HTW73E - Installing the filters - 3

Repair

3.

Diagram showing a hand inserting a screw into a device with a magnified view of the screw and its insertion direction.

BOSCH SGS2HTW73E - Repair - 2

Repair

Presetting:

BOSCH SGS2HTW73E - Presetting: - 1

Repair

  1. Disconnect the ground cable (3) (optional).
  2. Open the appliance door.
  3. Hold the control panel firmly to prevent it from falling down (hold onto it).
  4. Remove the six screws.

Diagram of a server rack with a screw icon and indicator lights, no text or symbols present.

  1. Remove the control panel.

4.12.2 Installing the control panel

Mechanical assembly diagram showing a red component with a numbered arrow pointing to a specific part (no text or symbols present).

BOSCH SGS2HTW73E - Installing the control panel - 2

Repair

4.

Mechanical assembly diagram showing a red lever mechanism with labeled parts (1 and 2), no readable text or symbols present.

BOSCH SGS2HTW73E - Repair - 2

Repair

BOSCH SGS2HTW73E - Repair - 1

Repair

3D diagram of a mechanical component with red and black arrows indicating directional flow (no text or symbols)

BOSCH SGS2HTW73E - Repair - 2

Repair

2.

Close-up of a red mechanical bracket with green cable and arrow indicating assembly (no text or symbols)

BOSCH SGS2HTW73E - Repair - 2

Repair

BOSCH SGS2HTW73E - Repair - 1

Repair

4.

Pure technical line drawing of curved structural elements without any text or symbols.

BOSCH SGS2HTW73E - Repair - 2

Repair

BOSCH SGS2HTW73E - Repair - 1

Repair

  1. Activate the reading hook (2).

3.

BOSCH SGS2HTW73E - Repair - 1

NOTE

Incorrect assembly!

BOSCH SGS2HTW73E - Incorrect assembly! - 1

Repair

Close-up of a mechanical component with a red vertical stripe and black arrow indicating a section (no text or symbols visible).

Fig. 3: Flat cable

  1. Insert the plug.

BOSCH SGS2HTW73E - Repair - 2

Repair

  1. Push the timeLight module into the guide (2).
  2. Connect the electrical connection.

BOSCH SGS2HTW73E - Repair - 1

Repair

  1. Release the locking hook on the back (1).
  2. Remove the light guide (2).

3D mechanical assembly diagram showing internal components and directional arrows (no text or symbols).

BOSCH SGS2HTW73E - Repair - 2

Repair

4.23.2 Installing the gap illumination

  1. Insert the circuit board holder into the frame of the operating module.

3D mechanical assembly diagram showing a red component inserted into a housing (no text or symbols visible).

BOSCH SGS2HTW73E - Installing the gap illumination - 2

Repair

4.2.3 Installing the steamer insert

Special tools:

Guide [00614935] Cup holder [00618565]

BOSCH SGS2HTW73E - Installing the steamer insert - 1

Repair

4.3 Replacing the varioDrawer

Repair

4.4.2 Mounting the spray arm

4.5.2 Mounting the filters

3.

Diagram showing a hand inserting a screw into a device with a magnified inset highlighting the screw's direction.

BOSCH SGS2HTW73E - Mounting the filters - 2

Repair

4.11.2 Mounting the outer door

Technical diagram of a refrigerator interior showing labeled components and directional arrows indicating movement or flow.

4.14.2 Mounting the plinth

BOSCH SGS2HTW73E - Mounting the plinth - 1

Repair

4.

Mechanical assembly diagram showing a red lever mechanism with labeled parts (1 and 2), no readable text or symbols present.

  1. Release the locking element at the top.

3D mechanical assembly diagram showing a sliding mechanism with a red component (no text or symbols visible).

BOSCH SGS2HTW73E - Repair - 3

Repair

BOSCH SGS2HTW73E - Repair - 1

Repair

3D diagram of a mechanical component with red and black arrows indicating directional flow (no text or symbols).

Repair

4.17 Replacing the interior door

Condition:

4.18.2 Mounting the door hinge

BOSCH SGS2HTW73E - Mounting the door hinge - 1

BOSCH SGS2HTW73E - Mounting the door hinge - 2

DANGER

2.

Close-up of a red mechanical bracket with green cable and arrow indicating assembly (no text or symbols).

BOSCH SGS2HTW73E - DANGER - 2

Repair

4.19 Replacing the (lower) door seal

Condition:

Repair

4.19.2 Mounting the door seal

4.

Pure technical line drawing of curved structural elements without any text or symbols.

BOSCH SGS2HTW73E - Mounting the door seal - 2

Repair

4.21 Replacing the EmotionLight

Diagram showing a device's internal components with numbered annotations indicating parts of the main body and adjustment.

BOSCH SGS2HTW73E - Replacing the EmotionLight - 2

Repair

  1. Attach the locking hook (2).

3.

BOSCH SGS2HTW73E - Repair - 1

CAUTION

Incorrect assembly!

Repair

Close-up of a mechanical component with a red vertical stripe and a black arrow indicating a section.

Fig. 3: Flat cable

  1. Push the TimeLight module into the guide (2).
  2. Connect the electrical connection.

BOSCH SGS2HTW73E - Repair - 2

Repair

BOSCH SGS2HTW73E - Repair - 1

Repair

1.2 Explanation of symbols 210

1.2.1 Danger levels.... 210

1.2.2 Hazard symbols 210

1.2.3 Structure of the warnings.... 211

1.2.4 General symbols.... 211

Safety

2.1 General Safety instructions

2.1.1 All domestic appliances

Tools and aids

Repair

4.1 Replacing worktop

4.1.1 Removing worktop

4.1.2 Installing worktop

4.2 Installing basket system

4.2.1 Installing a tab slide for the 86 cm model

4.2.2 Installing cup support clip

4.2.3 Installing steamer insert

4.3 Replacing varioDrawer

4.3.1 Removing varioDrawer

4.3.2 Installing varioDrawer

4.4 Replacing spray arms 219

4.4.1 Removing spray arm 219

4.4.2 Installing spray arm.... 219

4.5 Replacing filters.... 220

4.5.1 Removing filter 220

4.5.2 Installing filters 220

4.6 Installing baking sheet spray head 221

4.7 Replacing power cord 222

4.7.1 Unplugging power cord.... 222

4.7.2 Plugging in power cord.... 222

4.8 Replacing detergent cover 223

4.8.1 Removing detergent cover 223

4.8.2 Inserting spring.... 223

4.8.3 Installing detergent cover 223

4.9 Replacing wastewater pump cover 224

4.9.1 Removing wastewater pump cover 224

4.9.2 Installing wastewater pump cover 224

4.10 Replacing side panel.... 225

4.10.1 Removing side panel 225

4.10.2 Installing side panel 226

4.11 Replacing outer door....227

4.12 Replacing control panel 229

4.12.1 Removing control panel 229

4.12.2 Installing control panel 229

4.15.1 Removing base socket plate 233

4.15.2 Installing base socket plate 233

4.16 Replacing overflow conduit 234

4.16.1 Removing overflow channel 234

4.16.2 Installing overflow conduit 235

4.17 Replacing inner door 237

4.17.1 Removing inner door 237

4.17.2 Installing inner door 237

4.19 Replacing (lower) door seal 240

4.19.1 Removing the door seal 240

4.19.2 Installing the door seal 241

4.20 Replacing (upper) door seal.... 242

4.20.1 Removing door seal.... 242

4.20.2 Installing door seal.... 242

Repair hints - Dishwasher

4.21 Replacing EmotionLight 243

4.21.1 Removing EmotionLight 243 4.21.2 Installing EmotionLight 243

4.22 Replacing TimeLight 246

4.22.1 Removing TimeLight 246 4.22.2 Installing TimeLight 246

4.23 Replacing Gap illumination.... 247

4.23.1 Removing Gap illumination 247 4.23.2 Installing Gap illumination.... 248

Concerning this document

1.1 Important information

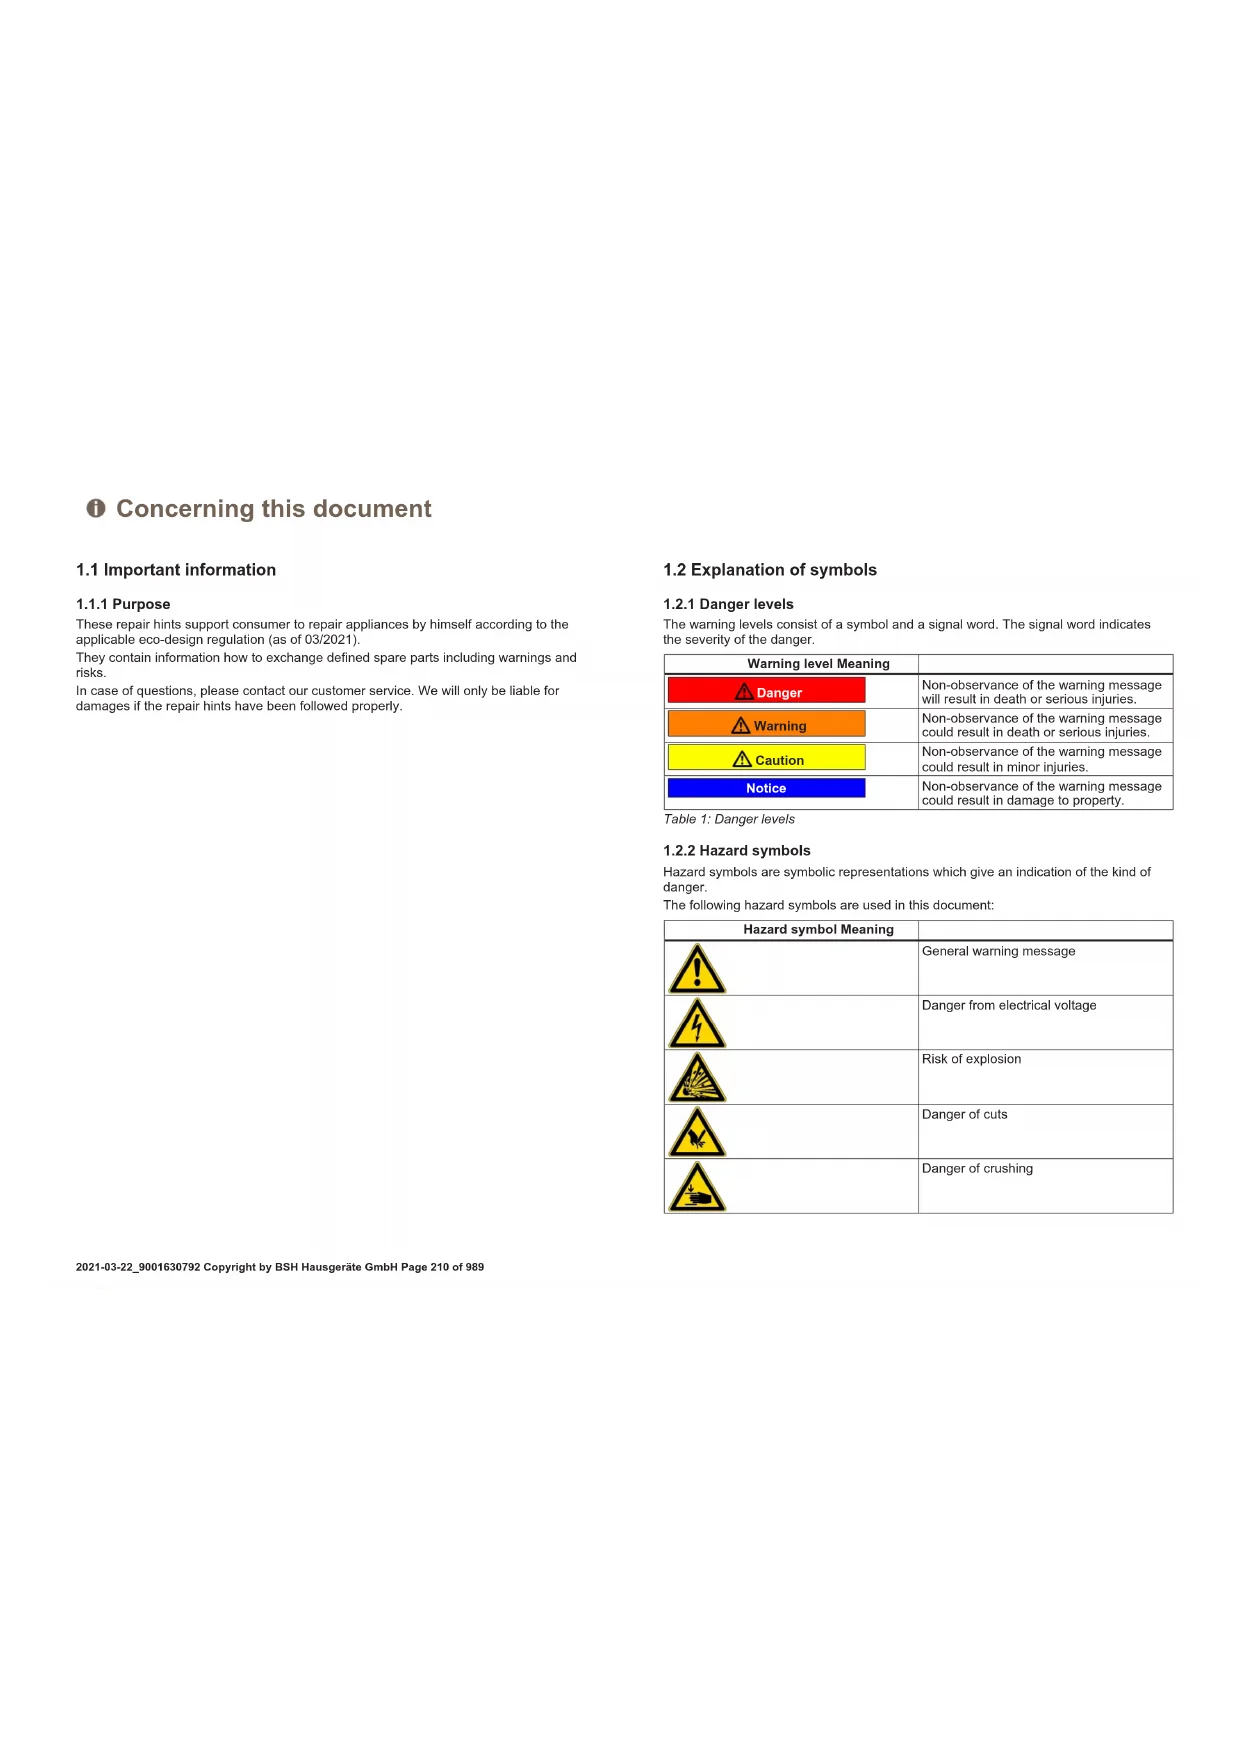
1.1.1 Purpose

These repair hints support consumers in repairing appliances themselves, in accordance with the applicable eco-design regulation (as of 03/2021).

They contain information on how to exchange defined spare parts, including warnings and risks.

If you have any questions, please contact our customer service. We will only be liable for damages if the repair hints have been followed properly.

1.2 Explanation of symbols

1.2.1 Danger levels

The warning levels consist of a symbol and a signal word. The signal word indicates the severity of the danger.

Warning level Meaning
DangerNon-observance of the warning message will result in death or serious injuries.
WarningNon-observance of the warning message could result in death or serious injuries.
CautionNon-observance of the warning message could result in minor injuries.
NoticeNon-observance of the warning message could result in damage to property.

Table 1: Danger levels

1.2.2 Hazard symbols

Hazard symbols are symbolic representations that give an indication of the kind of danger.

The following hazard symbols are used in this document:

Hazard symbol Meaning
BOSCH SGS2HTW73E - Hazard symbols - 1General warning message
BOSCH SGS2HTW73E - Hazard symbols - 2Danger from electrical voltage
BOSCH SGS2HTW73E - Hazard symbols - 3Risk of explosion
BOSCH SGS2HTW73E - Hazard symbols - 4Danger of cuts
BOSCH SGS2HTW73E - Hazard symbols - 5Danger of crushing

Concerning this document

Hazard symbol Meaning
BOSCH SGS2HTW73E - Concerning this document - 1Danger from hot surfaces
BOSCH SGS2HTW73E - Concerning this document - 2Danger from strong magnetic field
BOSCH SGS2HTW73E - Concerning this document - 3Danger from non-ionizing radiation

Table 2: Hazard symbols

1.2.3 Structure of the warnings

Warnings in this document have a standardised appearance and a standardised structure.

BOSCH SGS2HTW73E - Structure of the warnings - 1

BOSCH SGS2HTW73E - Structure of the warnings - 2

Type and source of danger!

Possible consequences of ignoring the danger / warning.

▶ Measures and prohibitions for preventing the danger.

The following example shows a warning that warns against electric shock due to live parts. The measure for avoiding the danger is mentioned.

BOSCH SGS2HTW73E - Structure of the warnings - 3

BOSCH SGS2HTW73E - Structure of the warnings - 4

Risk of electric shock due to live parts!

Death by electrocution

- Disconnect appliances from electrical supply at least 60 seconds before starting repairs.

1.2.4 General symbols

The following general symbols are used in this document:

Gen. symbol Meaning
Identification of a special tip (text and/or graphic)
Identification of a simple tip (only text)
Identification of a link to a video tutorial
Gen. symbol Meaning
Identification of required tools
Identification of required preconditions
Identification of a condition (if ..., then ...)
Identification of a result
StartIdentification of a key or button
[00123456] Identification of a material number
StatusIdentification of displayed text / window(in the appliance's display)

Table 3: General symbols

Safety

2.1 General Safety instructions

2.1.1 All domestic appliances

Risk of electric shock due to live parts!

  • Errors by repairs involving electrical components can lead to electrical shock! ■ Disconnect the appliance from the mains for at least 60 seconds before starting work. ■ After the repair have a safety test according VDE 0701 or country-specific regulations performed.

Risk of injury from sharp edges!

■ Wear protective gloves.

Risk of crushing during repair, maintenance, troubleshooting and service due to heavy and moving components

■ Wear protective shoes. ■ Secure heavy components from falling down. ■ Do not stick body parts into moving components.

Risk to the appliance's safety / function!

■ Only use original spare parts.

Risk of damage to electrostatically sensitive components (ESDs)!

- Do not touch the modules, including connections and conductor paths.

BOSCH SGS2HTW73E - Risk of damage to electrostatically sensitive components (ESDs)! - 1

Tools and aids

Designation Details Images
Screwdriver Torx T20 with bore hole [00340764]100 mm, for screws with safety pinBOSCH SGS2HTW73E - Tools and aids - 1
Insulated Screw-driver Torx T15 with bore hole [15000626]Blade length 125 mm, for screws with safety pinBOSCH SGS2HTW73E - Tools and aids - 2
Slotted screwdriverBlade 10 mm x 1.6 mm x 200 mmBOSCH SGS2HTW73E - Tools and aids - 3
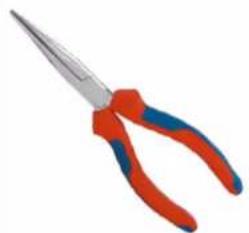
Needle nose pliers [00340871]Length: 200 mm, straightBOSCH SGS2HTW73E - Tools and aids - 4

Repair

4.1 Replacing worktop

Prerequisite:

√ Appliance is disconnected from the power supply. √ Appliance is freely accessible.

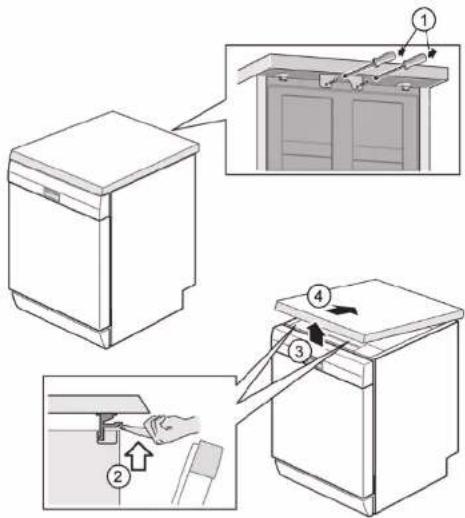
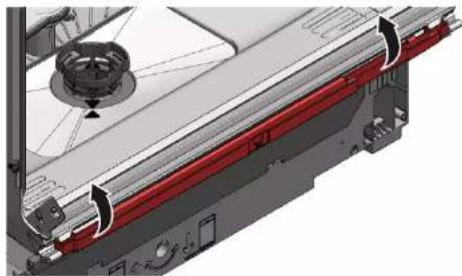
4.1.1 Removing worktop

  1. Remove the two screws at the back (1) (optional).
  2. Press both catch levers under the worktop upwards (2).

Diagram illustrating the step-by-step installation of a kitchen appliance, showing front, side, and interior views with numbered annotations.

  1. Lift the worktop slightly at the front (3).
  2. Push worktop away towards the rear (4).
  3. Remove worktop.

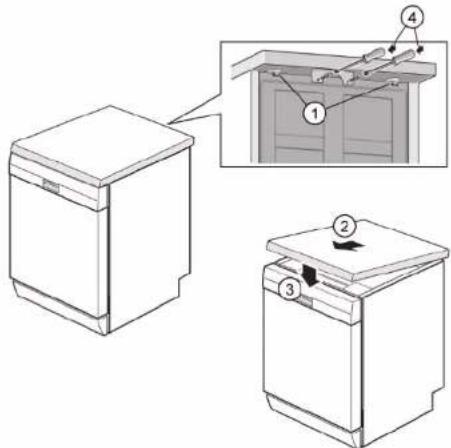
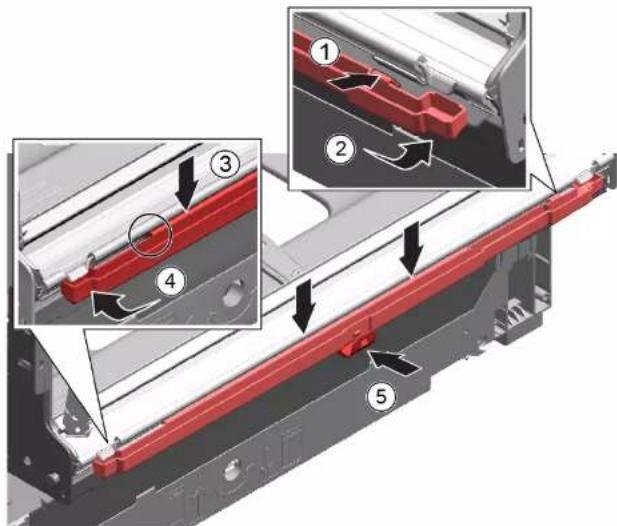
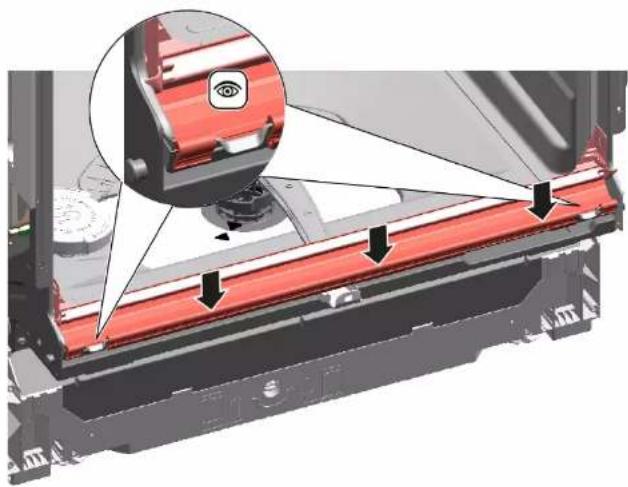
4.1.2 Installing worktop

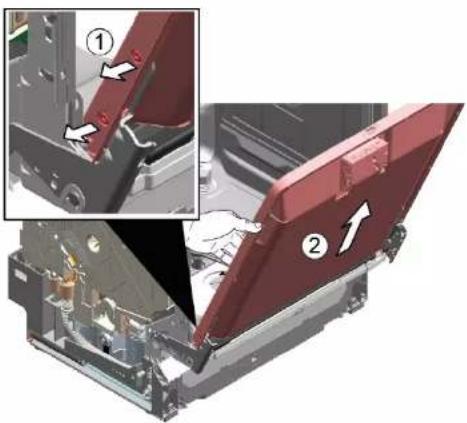
  1. Lock the rear of the worktop into the guides using the retaining collars (1).

Diagram showing three views of a kitchen appliance with numbered components and an inset view of the cabinet interior.

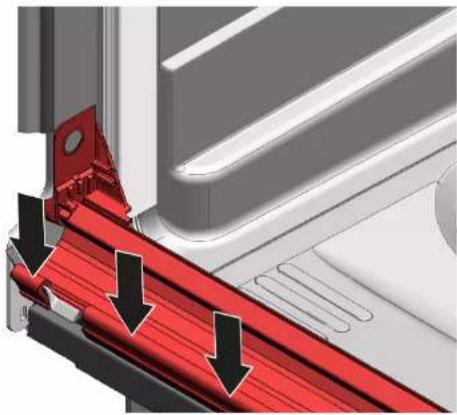
  1. Push worktop forwards (2).
  2. Press the front of the worktop downwards until both catch levers click audibly into place (3).
  3. Screw in the two screws again (4) (optional).

BOSCH SGS2HTW73E - Installing worktop - 2

Repair

4.2 Installing basket system

Prerequisite:

√ The relevant basket has been removed from the appliance.

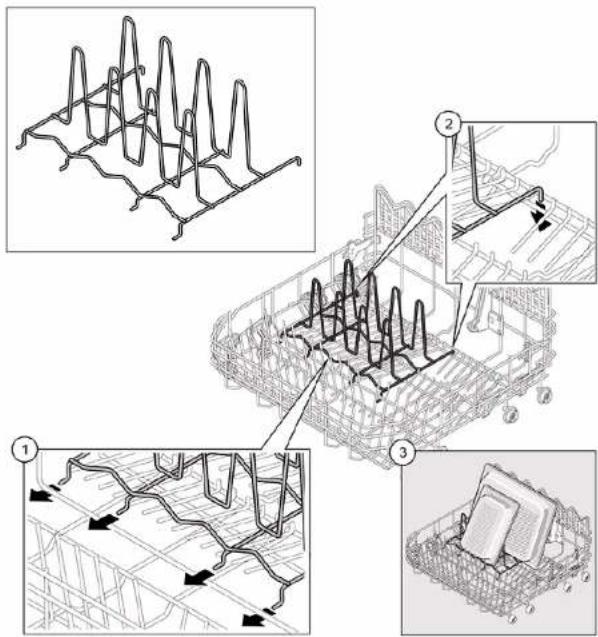
4.2.1 Installing a tab slide for the 86 cm model

Required tools:

Tab guide [00614935]

Cup support clip [00618565]

  1. Insert the tab slide diagonally at the front of the basket.
  2. Centre and click the tab chute into place.

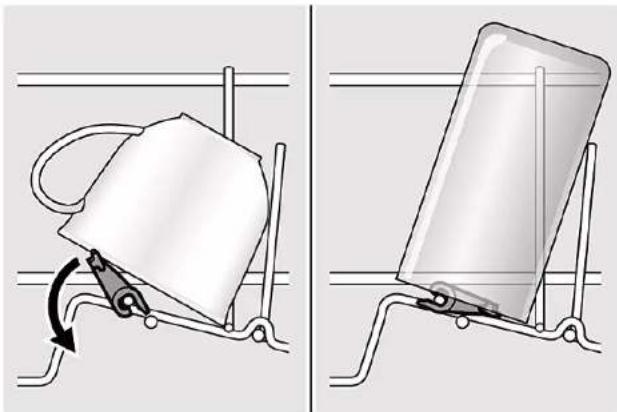
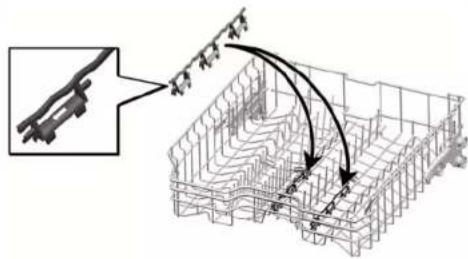
4.2.2 Installing cup support clip

Required tools:

Tab guide [00614935] Cup support clip [00618565]

BOSCH SGS2HTW73E - Installing cup support clip - 1

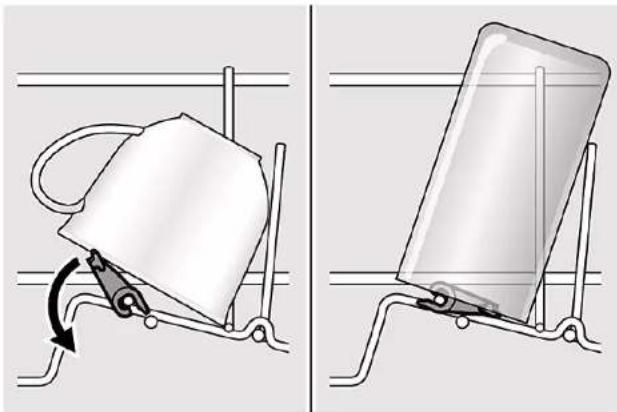
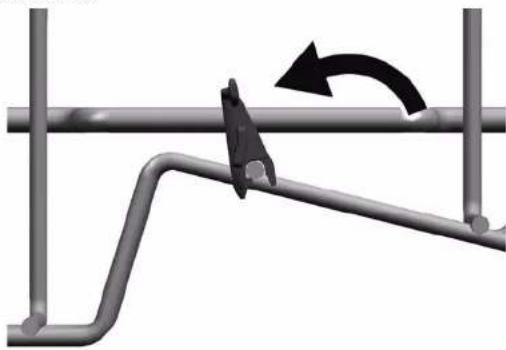
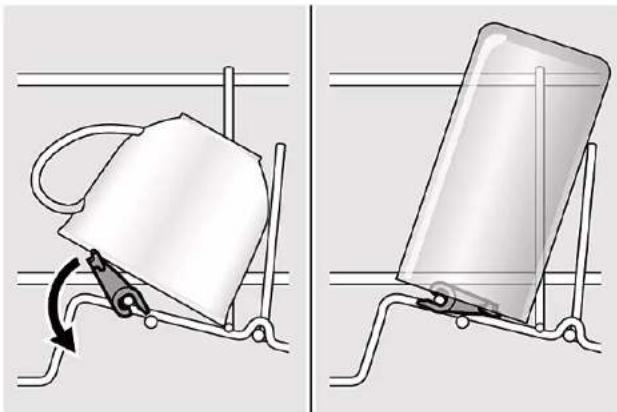
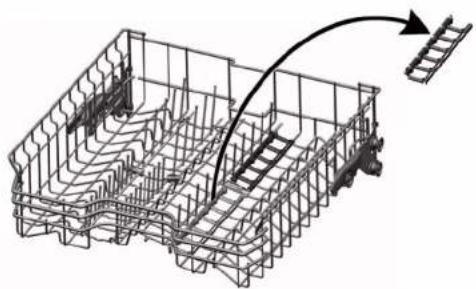
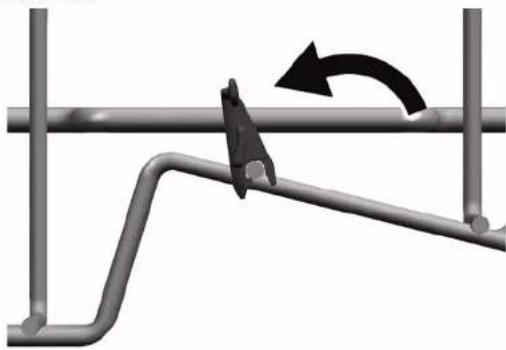
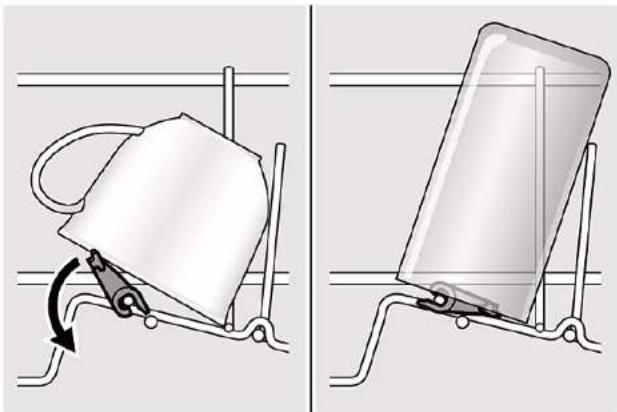
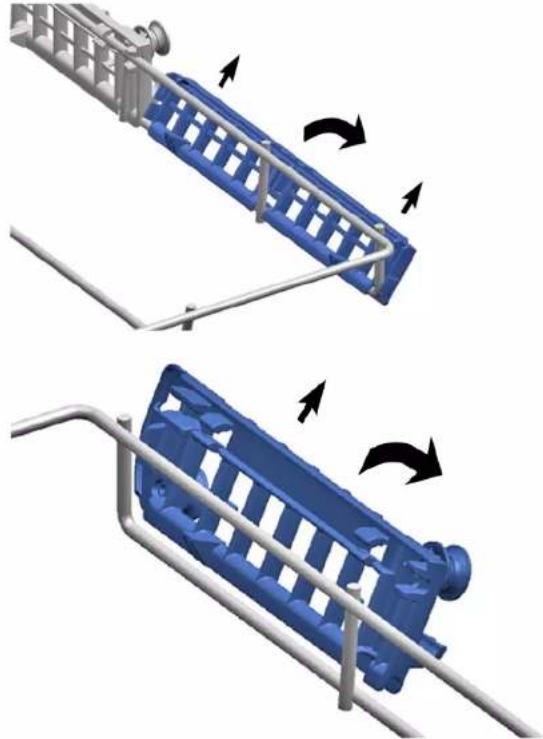
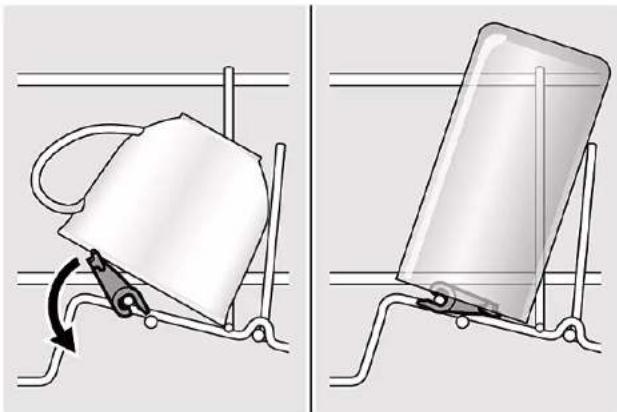
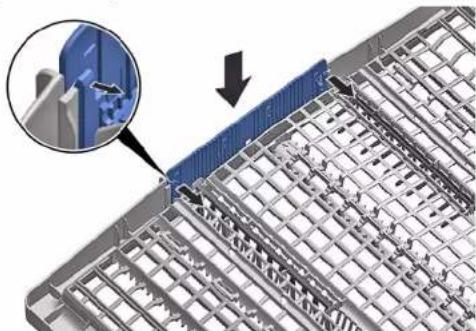
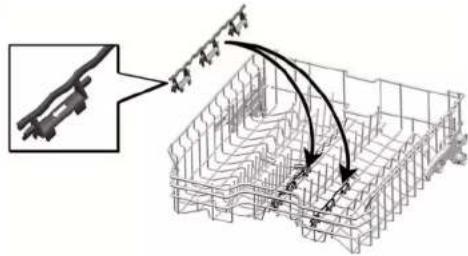
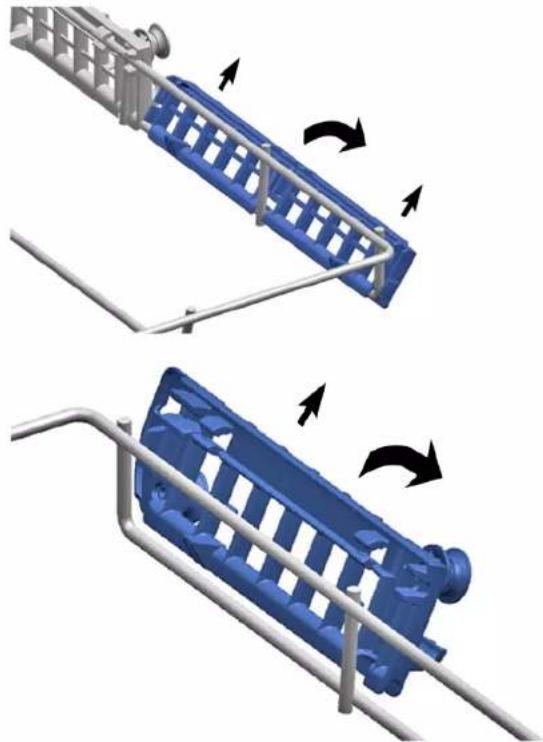
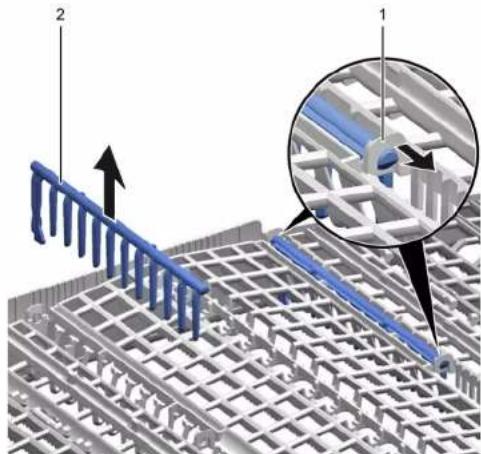
When washing cups, the cup support clip can be folded up. The additional angle reduces the collection of water on the bottom of cups. In the case of tall glasses we recommended leaving the cup support clip folded down. If upper baskets have an optional plastic insert, they must first be removed.

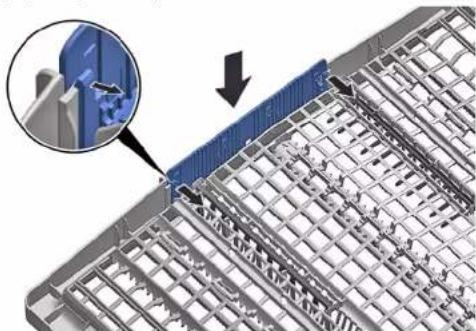
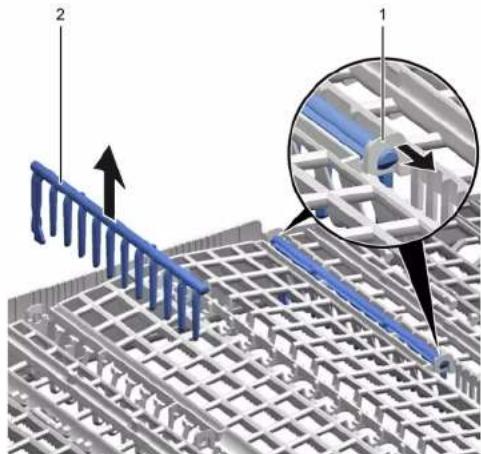
  1. Remove the plastic insert.

Isometric line drawing of a mechanical structure with ladder and frame components.

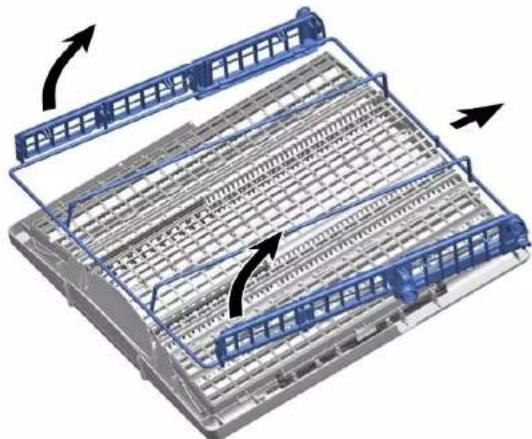
  1. Click the cup support clip into place.

Technical diagram showing structural assembly with labeled components and directional arrows indicating motion or force vectors.

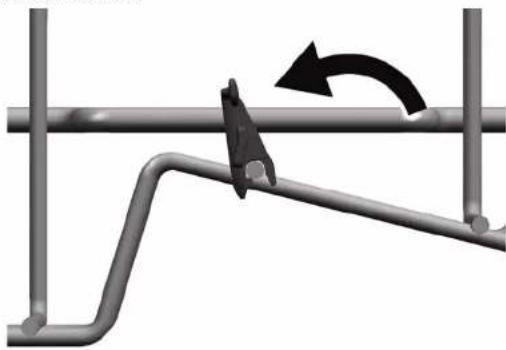
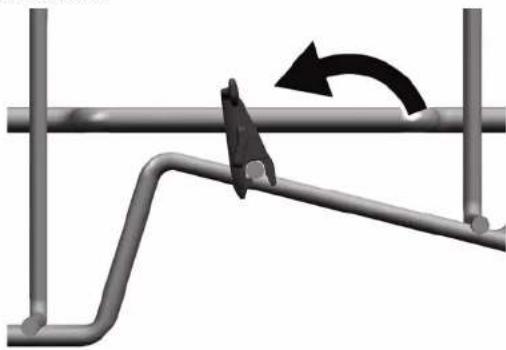
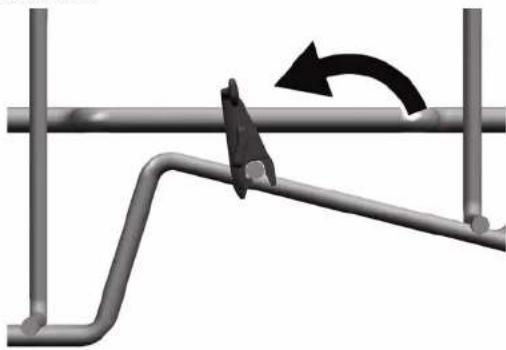
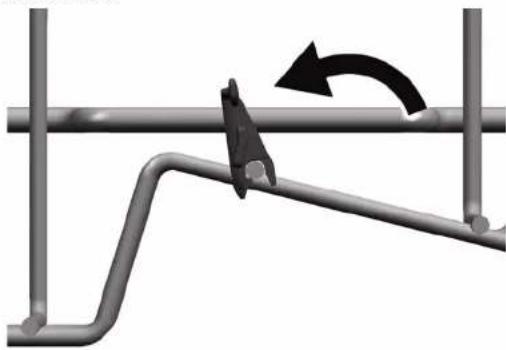
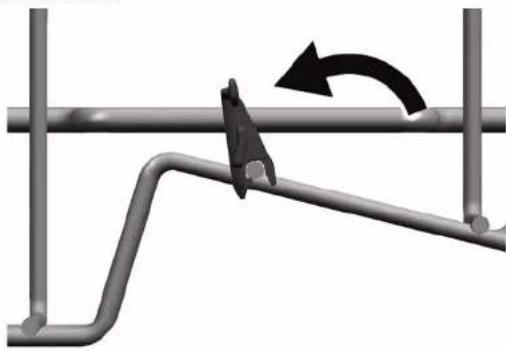
  1. Fold up the clip.

Mechanical diagram showing a lever mechanism with a curved arrow indicating rotational motion (no text or symbols).

  1. Position the items to be washed.

Two diagrams showing a mechanical device being lifted by a spring, with no visible text or symbols.

4.2.3 Installing steamer insert Required tools:

Tab guide [00614935] Cup support clip [00618565]

Wedge the steamer insert with the end pieces under the basket system.

Technical diagram illustrating a multi-step installation or installation process with labeled steps and structural details.

BOSCH SGS2HTW73E - Installing steamer insert Required tools: - 2

Repair

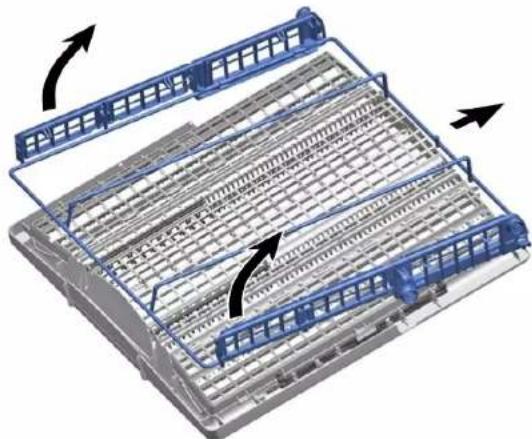
4.3 Replacing varioDrawer

4.3.1 Removing varioDrawer

  1. Bend the handle flaps inwards.

3D architectural diagram of a steel-framed building facade with structural grid and window grilles, showing a close-up inset of a blue door detail (no text or symbols).

  1. Remove the handle upwards.
  2. Press plastic side inserts outwards and press them upwards out of the frame.

Two blue industrial conveyor systems with metal railings and directional arrows indicating motion (no text or symbols).

BOSCH SGS2HTW73E - Removing varioDrawer - 3

Repair

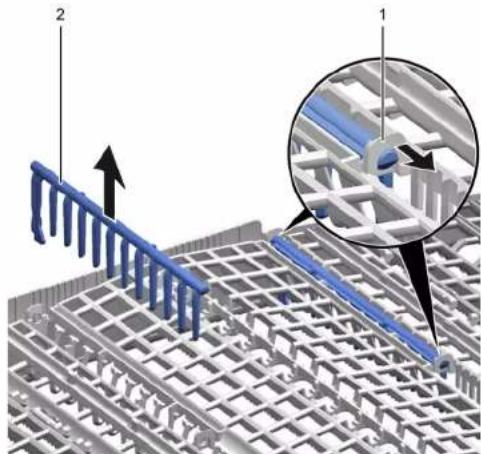
  1. Carefully bend the guide tabs outwards.

3D architectural diagram showing structural grid and rebar layout with labeled components (no text or symbols present).

  1. Pull the folding spines out of the tabs.
  2. Press the metal frame at the front out of the holders.

3D diagram of a mechanical assembly with blue structural elements and directional arrows indicating motion (no text or symbols).

  1. Push the metal frame back out of the guide.

4.3.2 Installing varioDrawer

Install in reverse order.

Repair

4.4 Replacing spray arms

4.4.1 Removing spray arm

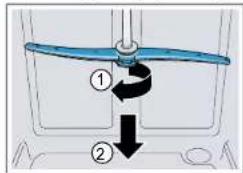
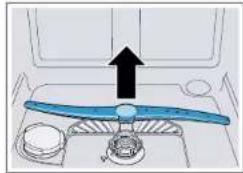
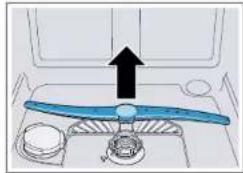
  1. Unscrew the upper spray arm (1) and pull down to remove (2).

Diagram showing a blue propeller with two directional arrows labeled ① and ②, indicating motion or rotation.

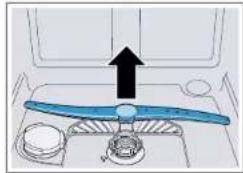
  1. Pull down the lower spray arm to remove.

Diagram of a blue propeller inside a vehicle cabin with an upward arrow indicating motion (no text or symbols).

4.4.2 Installing spray arm

  1. Insert the lower spray arm. The spray arm clicks into position.
  2. Insert the upper spray arm and screw it firmly in place.

BOSCH SGS2HTW73E - Installing spray arm - 1

Repair

4.5 Replacing filters

4.5.1 Removing filter

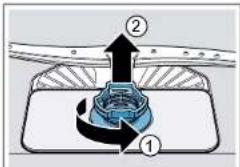
  1. Turn the coarse filter anticlockwise (1) and remove the filter system (2).

Diagram showing a mechanical component with labeled parts ① and ②, likely illustrating a gear or cam mechanism.

Check that no foreign objects fall into the sump.

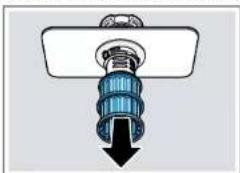
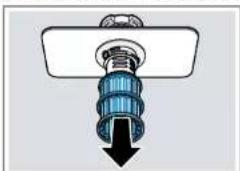
  1. Pull down the micro filter to remove.

Diagram of a mechanical component with a blue threaded base and black downward arrow (no text or symbols).

4.5.2 Installing filters

  1. Re-assemble the filter system. Make sure that the locking catches on the coarse filter click into position.
  2. Insert the filter system into the appliance and turn the coarse filter clockwise. Make sure that the arrow markings match up.

BOSCH SGS2HTW73E - Installing filters - 1

Repair

4.6 Installing baking sheet spray head

  1. Remove top basket.
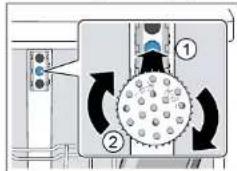
  2. Insert the baking sheet spray head in the holder (1) and turn to the right (2).

Diagram showing a mechanical or fluid system with labeled components and directional arrows indicating flow or movement.

The baking sheet spray head clicks into position.

BOSCH SGS2HTW73E - Installing baking sheet spray head - 2

Repair

4.7 Replacing power cord

Prerequisite:

√ Appliance is disconnected from power supply. √ Appliance is disconnected from water supply. √ Appliance is freely accessible.

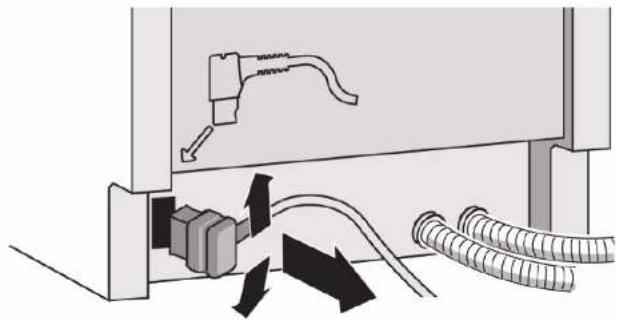
4.7.1 Unplugging power cord

- Move the plug of the power cord carefully up and down and pull it out of the mains socket.

Diagram showing cable routing and connector connections (no text or symbols).

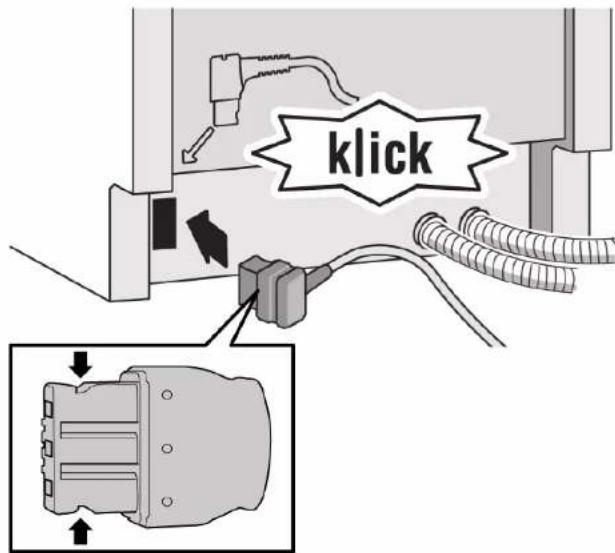
4.7.2 Plugging in power cord

BOSCH SGS2HTW73E - Plugging in power cord - 1

Notice

Overheating of main connection!

Risk of fire

▶ Firmly insert the power cord until it clicks.

- Insert the plug of the power cord into the mains socket until the plug clicks audibly into place.

BOSCH SGS2HTW73E - Notice - 1

BOSCH SGS2HTW73E - Notice - 2

Repair

4.8 Replacing detergent cover

BOSCH SGS2HTW73E - Replacing detergent cover - 1

A small screwdriver can be used as a levering tool.

Prerequisite:

√ Appliance is disconnected from power supply. √ Appliance is disconnected from water supply. √ Door has been opened. √ Detergent cover has been opened.

4.8.1 Removing detergent cover

  1. Slide the detergent cover in 5 mm.
  2. Lever the detergent cover on the lower side out of the guide rails and take the detergent cover on the upper side out of the guide rails.
  3. Remove the spring.

4.8.2 Inserting spring

  1. Insert the long end of the spring into the mounting hole of the dispenser device (1).

Technical diagram of a device interior with numbered components and directional arrows indicating motion or flow.

  1. Insert the short end of the spring into the mounting hole of the detergent cover (2).
  2. Press cover into the dispenser device (3).

4.8.3 Installing detergent cover

  1. Insert the detergent cover 5 mm before the completely open position into the guide rails on one side. Applying gentle force, press the opposite side into the guide rails.
  2. Check the function of the detergent cover.

BOSCH SGS2HTW73E - Installing detergent cover - 1

Repair

4.9 Replacing wastewater pump cover

Prerequisite:

√ Basket has been removed. √ Filters have been removed. → Page 220

4.9.1 Removing wastewater pump cover

  1. Scoop out any water. Use a sponge if necessary.
  2. Pry off the pump cover using a spoon and grip it by the crosspiece.

Illustration of a hand using a tool to adjust or install a mechanical component (no text or symbols visible)

  1. Lift the pump cover inwards at an angle and remove.

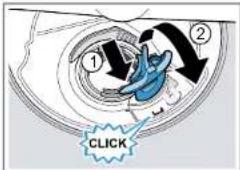
4.9.2 Installing wastewater pump cover

- Insert the pump cover (1) and press down (2).

① ② CLICK

The pump cover clicks into position.

BOSCH SGS2HTW73E - Installing wastewater pump cover - 2

Repair

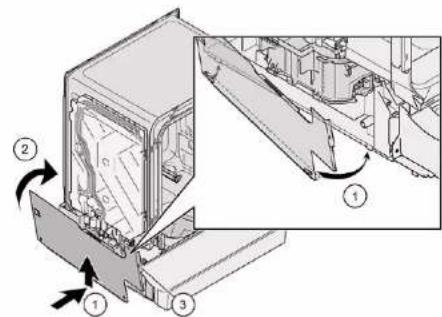
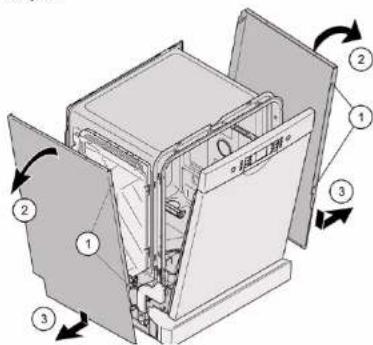
4.10 Replacing side panel

Prerequisite:

√ Appliance is disconnected from power supply. √ Appliance is disconnected from water supply. √ Appliance is freely accessible. √ Free-standing appliances: Worktop has been removed.→ Page 214

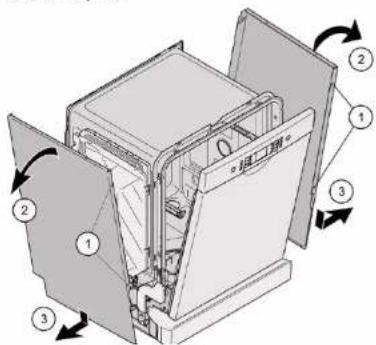
4.10.1 Removing side panel

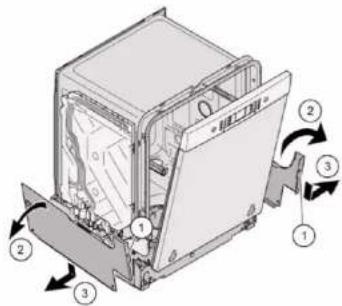
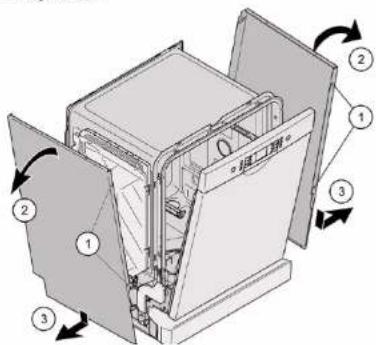
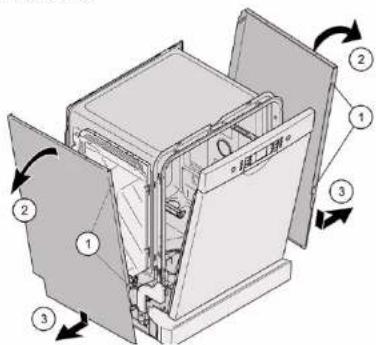
  1. Remove screws from the side panel (1).

Technical diagram of a refrigerator with numbered parts and directional arrows indicating components

Fig. 1: Fully integratedTechnical diagram of a multi-chamber refrigerator with numbered components and directional arrows indicating internal flow.

  1. Tilt the side panel slightly outwards at the top (2).
  2. Lower the side panel and pull it out of the base trough (3).

BOSCH SGS2HTW73E - Removing side panel - 3

Repair

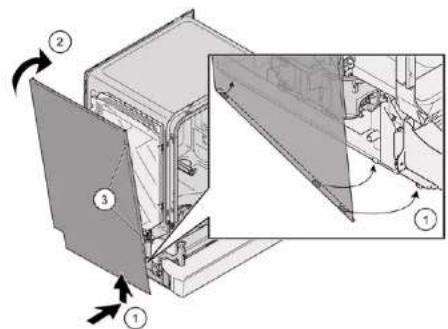
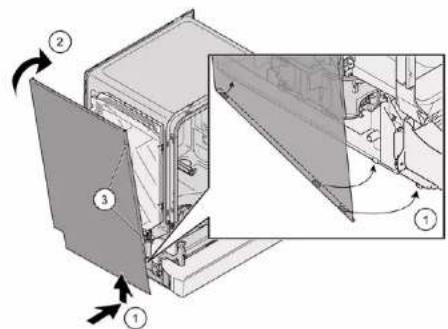
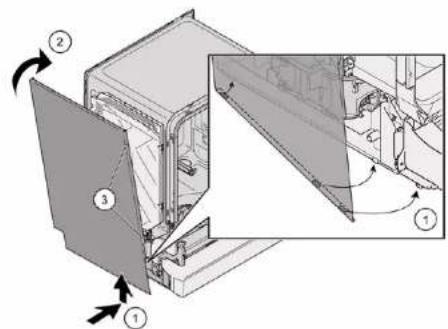
4.10.2 Installing side panel

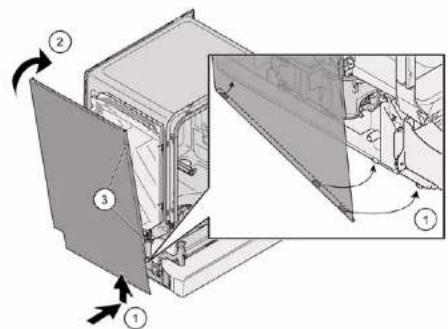
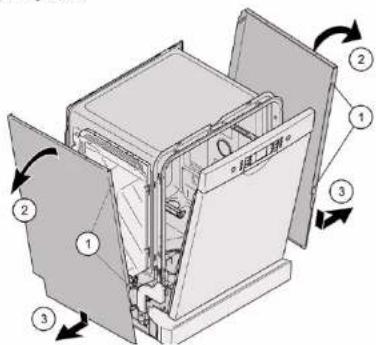
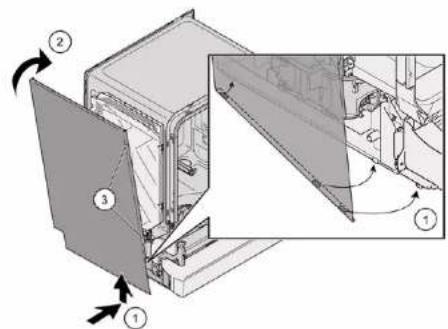
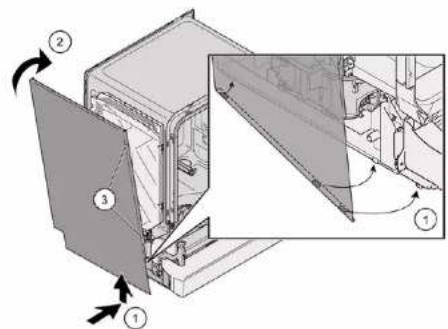
  1. Insert the side panel into the base trough (1).

Technical diagram showing a mechanical assembly with numbered components and directional arrows indicating motion or assembly steps.

Fig. 2: Fully integratedTechnical diagram showing a mechanical assembly with numbered components and directional arrows indicating motion or assembly.

  1. Press the side panel onto the appliance (2).
  2. Secure the side panel with screws (3).

BOSCH SGS2HTW73E - Installing side panel - 3

Repair

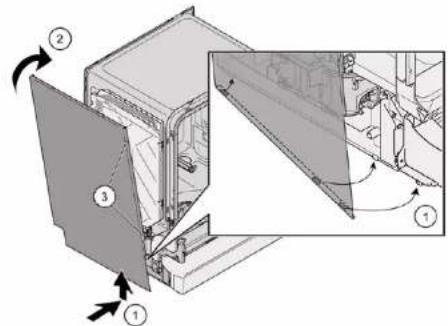
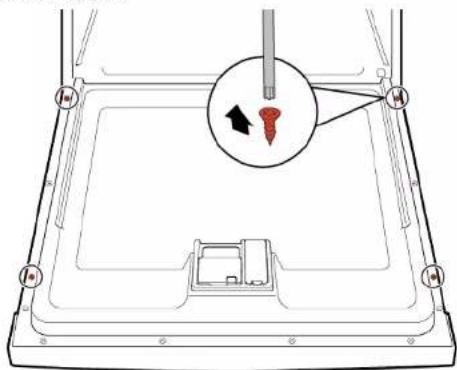
4.11 Replacing outer door

Prerequisite:

√ Appliance is disconnected from power supply. √ Appliance is disconnected from water supply.

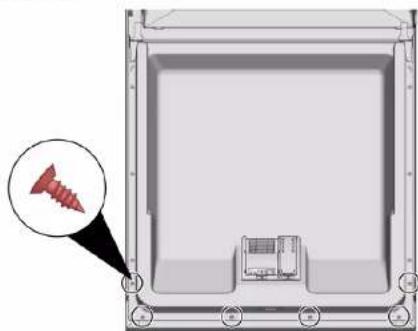
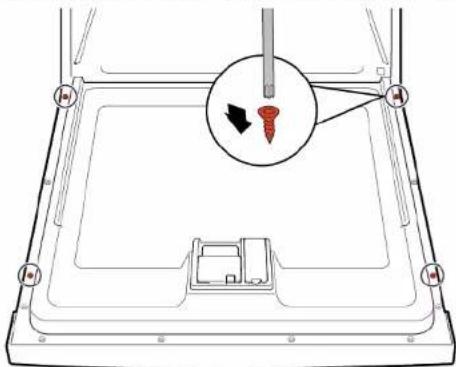
Just remove the screws which are described in the following steps.

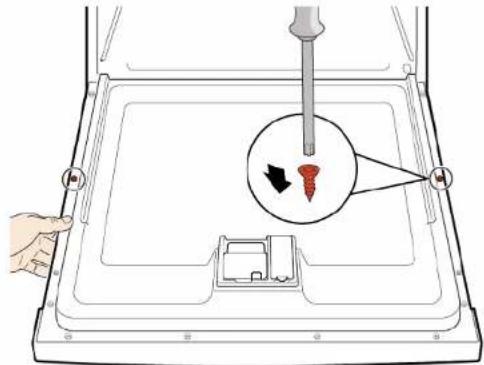
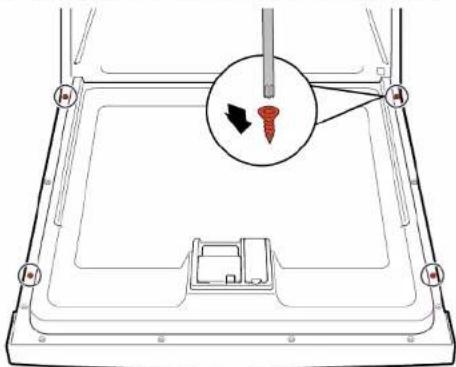
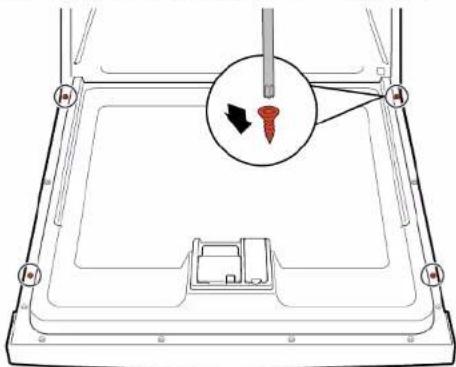
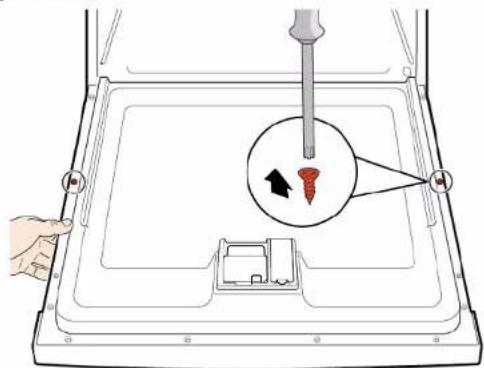
  1. Open door.
  2. Remove four screws.

Diagram of a device with a screwdriver inserted into a tray, showing a close-up of the component (no text or symbols present)

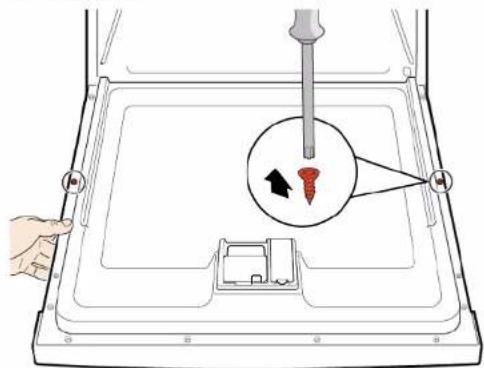
3.

BOSCH SGS2HTW73E - Replacing outer door - 2

Secure the door by holding it on one side.

Remove two screws.

Diagram showing a hand inserting a screw into a device with a magnified view of the screw and its insertion direction.

BOSCH SGS2HTW73E - Replacing outer door - 4

Repair

Prerequisite:

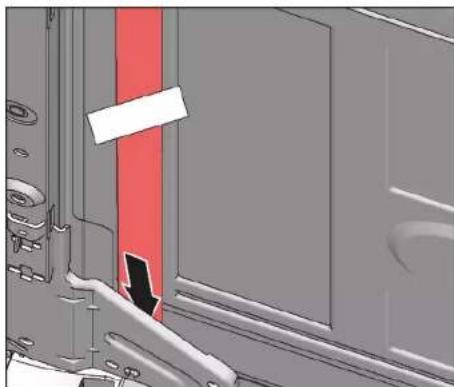
√ Insulating fleece has been correctly positioned and fixed on the inside of the outer door.

√ Hinges are inserted into the outer door.

  1. Close the inner door without snapping it shut.
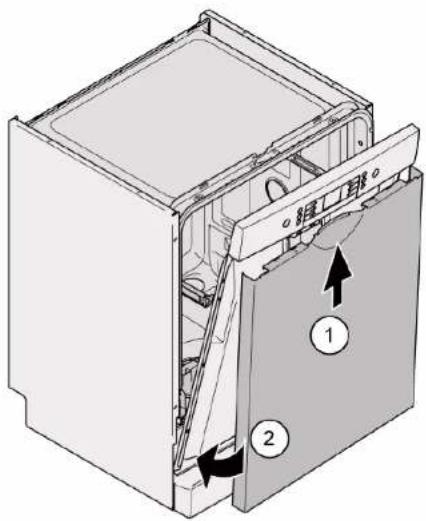
  2. Push the outer door upwards underneath the control panel (1).

Technical diagram of a refrigerator interior with labeled components and directional arrows indicating parts of the door.

  1. Press the outer door against the inner door and hold (2).

4.

BOSCH SGS2HTW73E - Repair - 2

Secure the door by holding it on one side.

Open the door and secure it with two screws (4 x 11 mm metal screws).

Diagram showing a hand holding a screwdriver inserted into a tray with a magnified view of the screw and its insertion point.

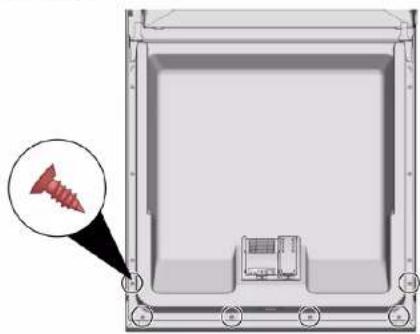
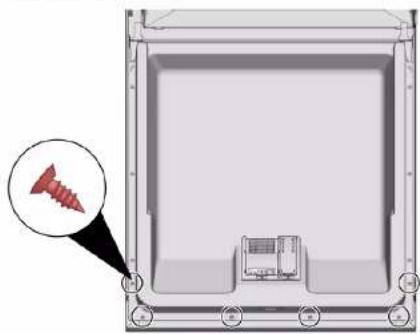
  1. Secure the outer door with four screws (4 x 11 mm metal screws).

Diagram of a device with a screw and a magnified inset showing the screw being inserted (no text or symbols present)

BOSCH SGS2HTW73E - Repair - 5

Repair

4.12 Replacing control panel

BOSCH SGS2HTW73E - Replacing control panel - 1

If an operating module is defective, the entire control panel must be replaced.

Prerequisite:

√ Appliance is disconnected from power supply. √ Appliance is disconnected from water supply. √ Outer door has been removed. √ Outer door has been removed (fully integrated/integrated).

4.12.1 Removing control panel

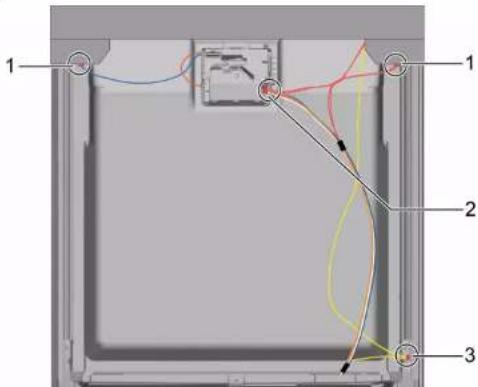
  1. Disconnect electrical connections from the control panel and the low rinse-aid sensor (1, 2).

Technical diagram of a device interior with numbered components and colored wiring, likely illustrating a mechanical or electrical assembly.

  1. Disconnect the earth cable (3) (optional).
  2. Open the appliance door.
  3. Secure the control panel to prevent it from falling down (hold on to it).
  4. Remove six screws.

Diagram of a device interior with screw and printer, showing no text or symbols

  1. Remove the control panel.

4.12.2 Installing control panel

BOSCH SGS2HTW73E - Installing control panel - 1

Use screws 4 x 16 mm.

Install in reverse order.

BOSCH SGS2HTW73E - Installing control panel - 2

Repair

  1. Remove cord guide cover out.

Mechanical assembly diagram showing a red component with a numbered arrow and label (1), no readable text or symbols present.

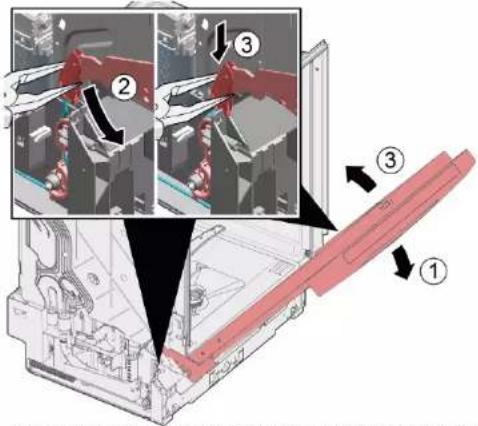
  1. Open door slightly (1).
  2. Fix in the groove of the base trough (2).
  3. Slowly close the door (3).

Technical diagram showing assembly steps of a mechanical component with numbered annotations indicating process flow.

The cord system attaches itself automatically to the door hinge.

BOSCH SGS2HTW73E - Repair - 3

Repair

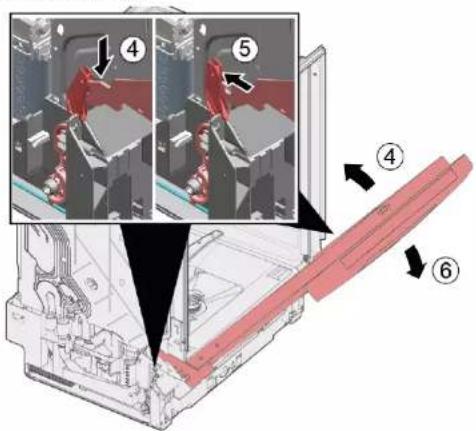
  1. Slightly close the door (4).
  2. Move the groove to the back and release the door hinge (5).
  3. Open the door (6).

Technical diagram showing assembly steps of a mechanical component with numbered annotations indicating different states or features.

  1. Repeat the process again on the other side of the appliance.

BOSCH SGS2HTW73E - Repair - 2

Repair

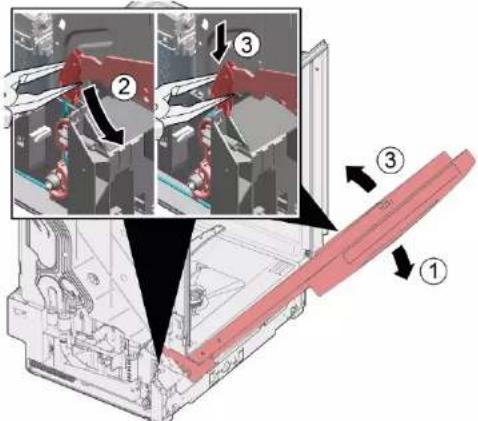
4.14 Replacing the toe panel

BOSCH SGS2HTW73E - Replacing the toe panel - 1

The feet are identical and can be swapped over.

Prerequisite:

√ Appliance is disconnected from power supply. √ Appliance is disconnected from water supply. √ Outer door has been removed. √ Outer door has been removed (fully integrated/integrated).

4.14.1 Removing the toe panel

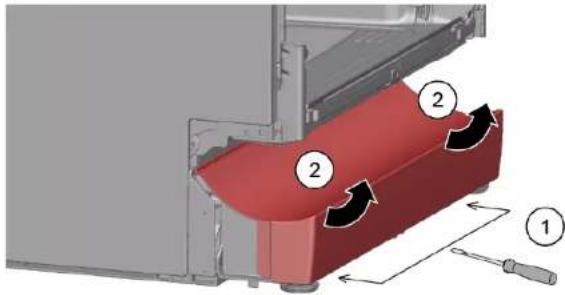
1.

BOSCH SGS2HTW73E - Removing the toe panel - 1

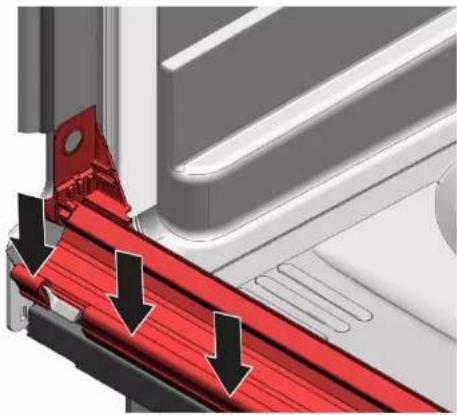
Incorrect removal. If the toe panel is loosened at the side and removed, the two brackets may break away. If only one bracket is damaged, the side can be changed as the brackets are identical. It is advisable to place something under the appliance at the front on the side to relieve the load on the toe panel with the feet.

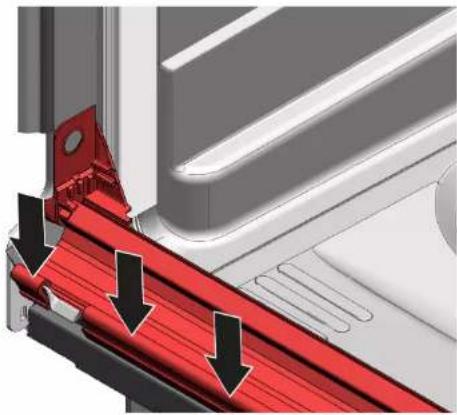
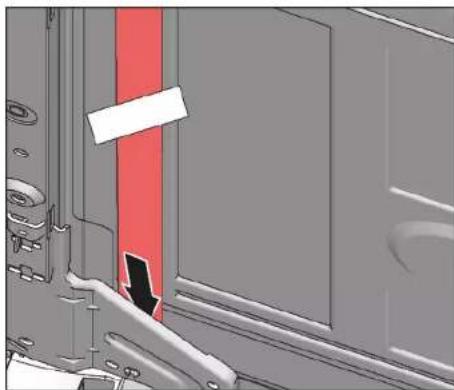
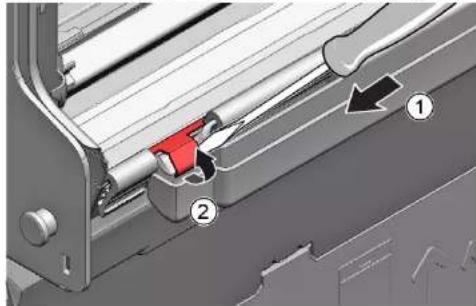
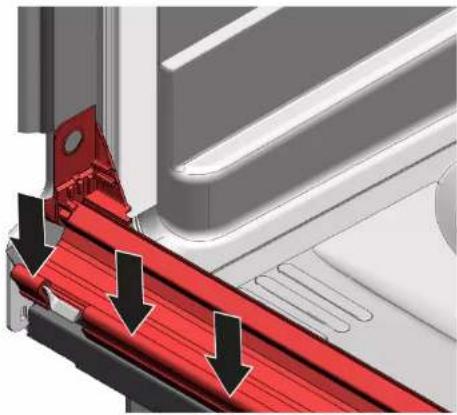
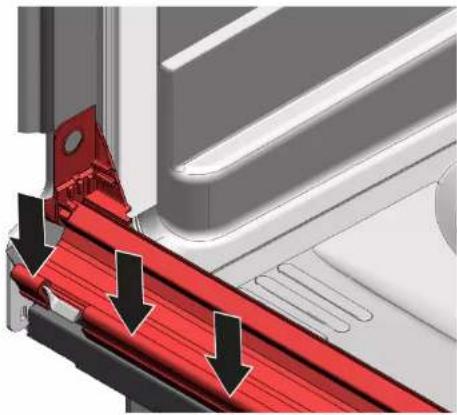
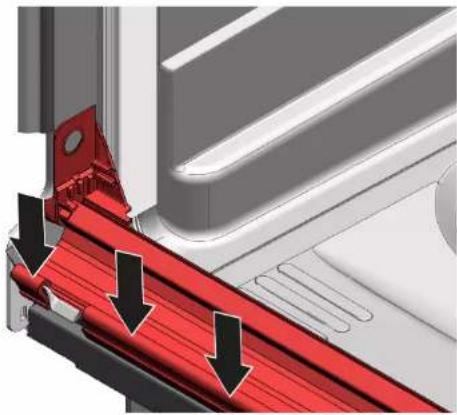
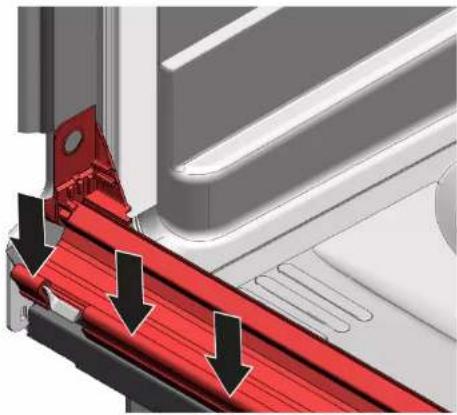
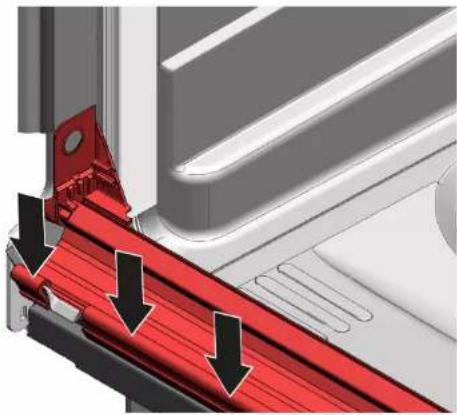
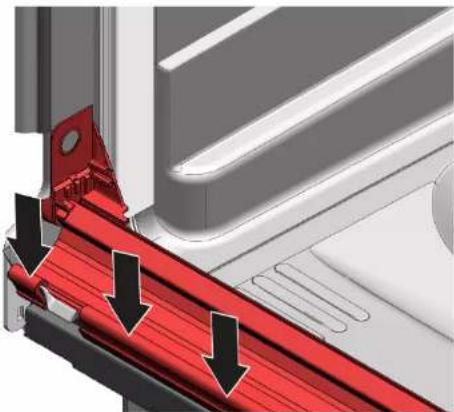
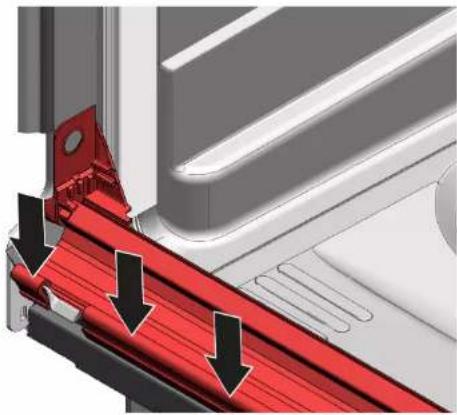
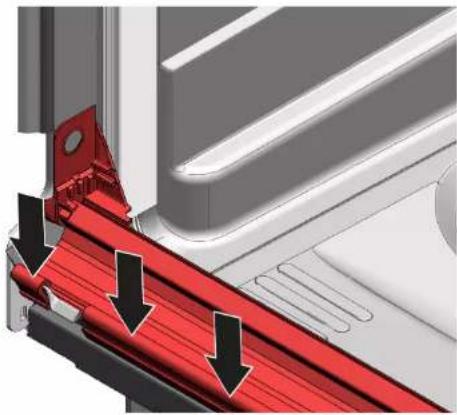
  1. Reach into the guides (1) with a screwdriver and release the catch by pushing downwards.

Technical diagram showing a red mechanical component with numbered callouts and directional arrows indicating motion or flow.

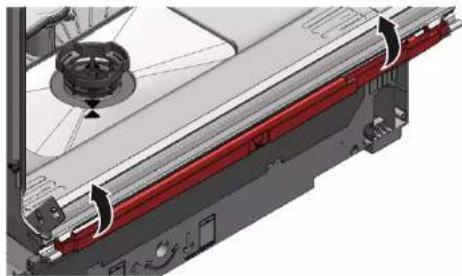
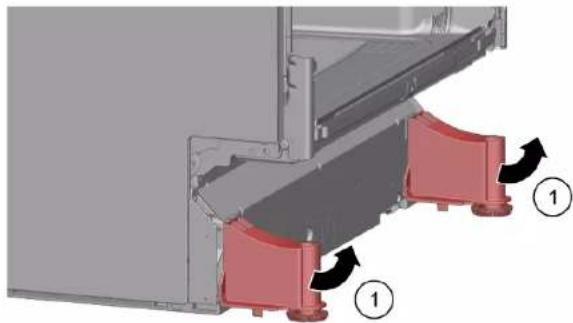
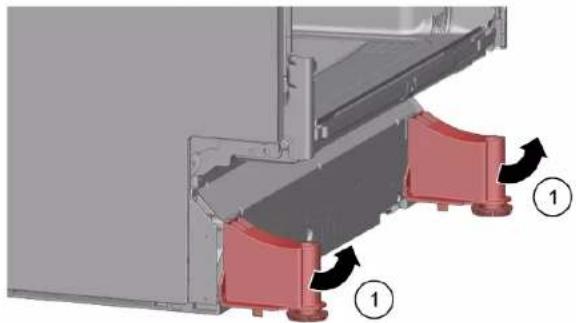
  1. Lift the panel off.
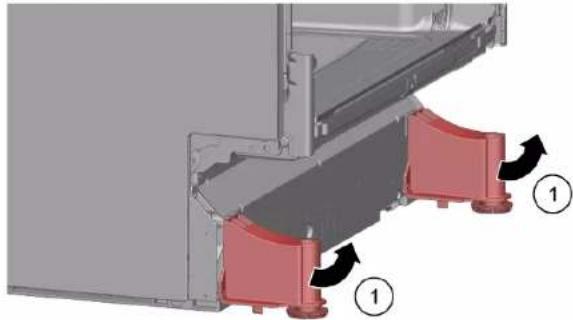
  2. Remove the feet forwards (1).

Mechanical assembly diagram showing red clamps mounted on a metal frame, with numbered callouts indicating components (no text or symbols present).

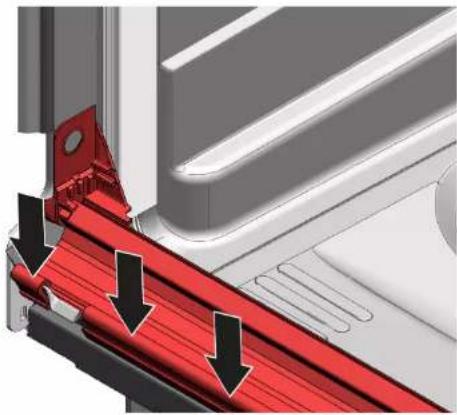
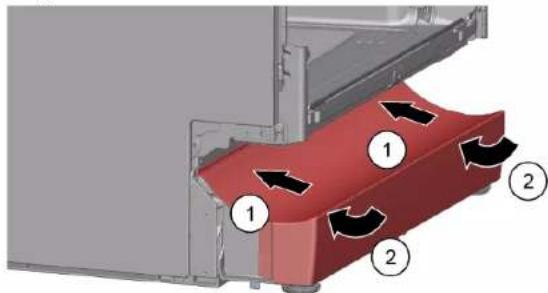
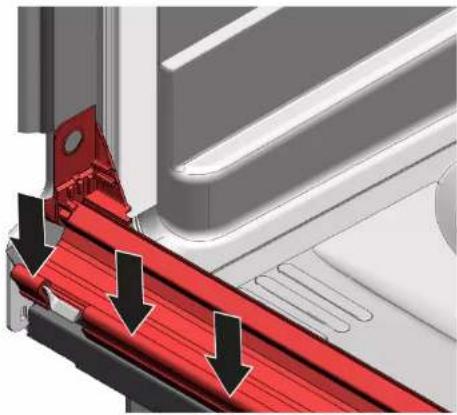
4.14.2 Installing toe panel

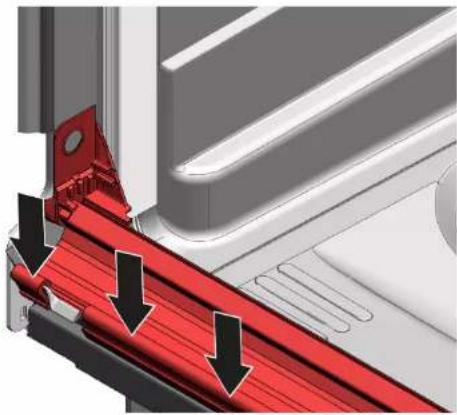
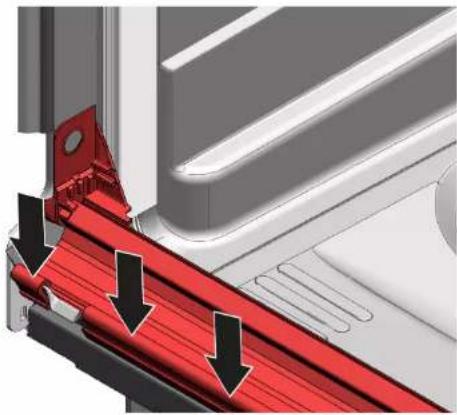
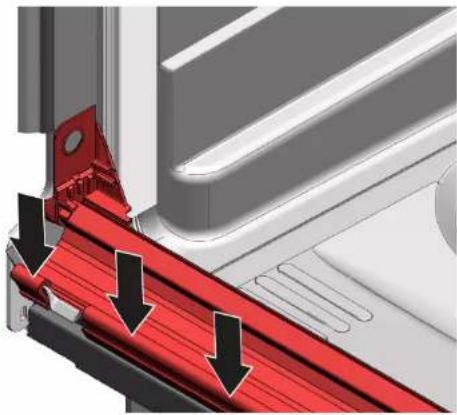
  1. Insert the feet.
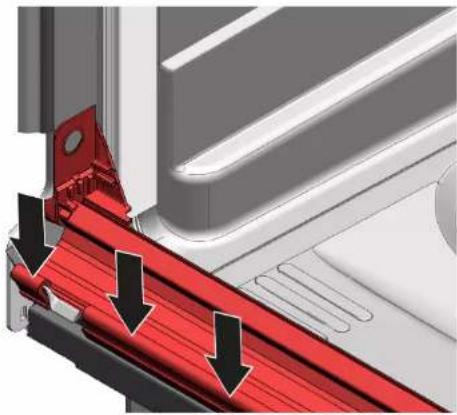
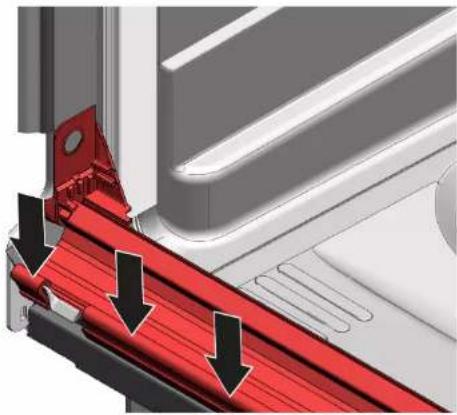
  2. Attach the toe panel at the top (1) and press it down until it audibly clicks into place (2).

Technical diagram showing a red component with numbered arrows indicating flow or movement, likely illustrating a mechanical or fluid system.

BOSCH SGS2HTW73E - Installing toe panel - 2

Repair

4.15 Replacing base socket plate

BOSCH SGS2HTW73E - Replacing base socket plate - 1

The base socket plate is located in the lower area at the front.

Prerequisite:

√ Appliance is disconnected from power supply. √ Appliance is disconnected from water supply. √ Furniture panel (optional) has been removed. √ Outer door has been removed. √ Outer door has been removed (fully integrated/integrated). √ Toe panel has been removed (optional).→ Page 232

4.15.1 Removing base socket plate

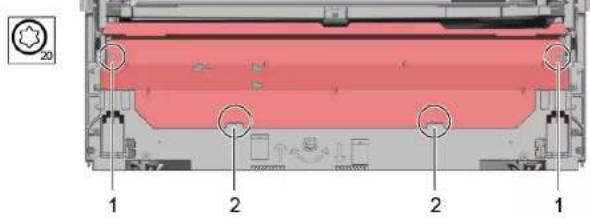
  1. Remove two screws (1).

1 2 2 1

  1. Disengage catch elements (2).
  2. Tilt the base socket plate carefully forwards (1).

Technical diagram showing a mechanical assembly with numbered components and directional arrows indicating motion or flow.

4.

BOSCH SGS2HTW73E - Removing base socket plate - 3

Depending on the model series, the plug to the EmotionLight is still secured to the base.

Unlock the plug on the catch tappet and pull to the rear (optional) (2).

4.15.2 Installing base socket plate

Install the base socket plate in reverse order.

BOSCH SGS2HTW73E - Installing base socket plate - 1

Repair

4.16 Replacing overflow conduit

BOSCH SGS2HTW73E - Replacing overflow conduit - 1

The overflow conduit is located in the front lower area of the appliance.

Prerequisite:

√ Appliance is disconnected from power supply. √ Appliance is disconnected from water supply. √ Furniture panel has been removed (optional). √ Outer door has been removed. √ Toe panel has been removed (optional). → Page 232 √ Base socket plate has been removed. → Page 233

4.16.1 Removing overflow channel

BOSCH SGS2HTW73E - Removing overflow channel - 1

Residual water

When the drainage hose is removed, residual water may run out.

Catch water or remove from the base pan with suction syringe.

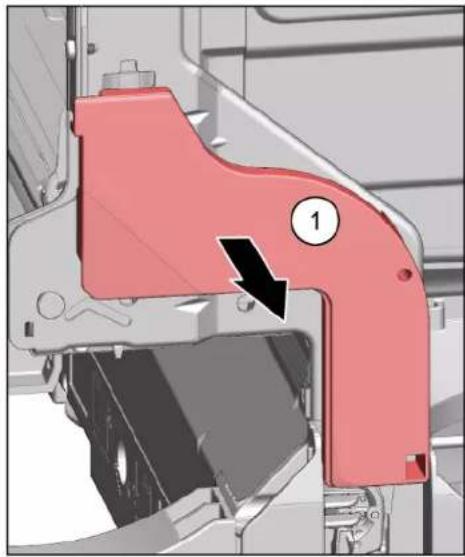
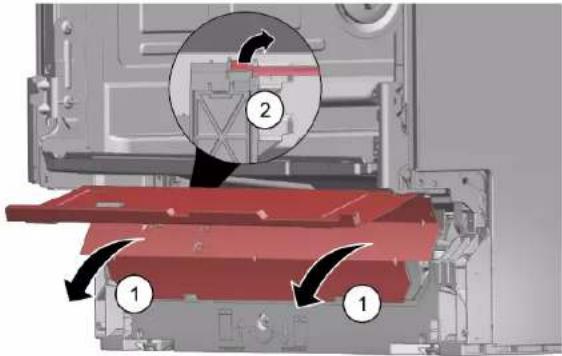
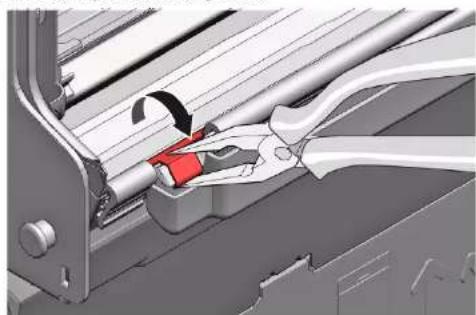
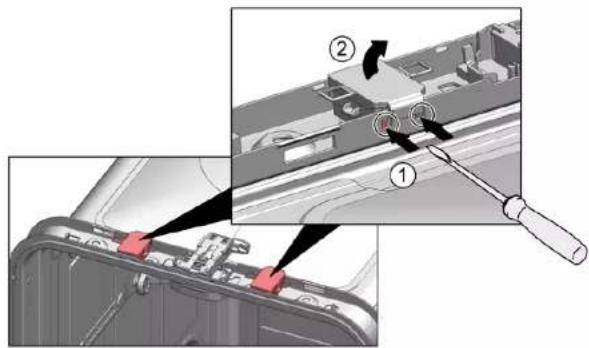
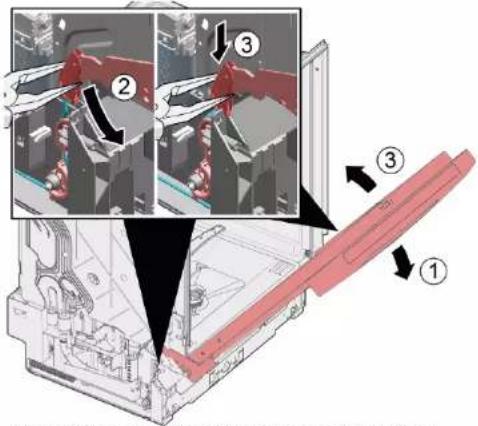
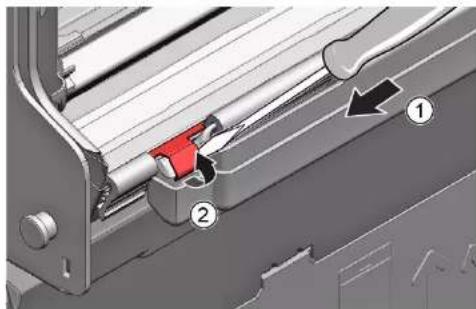
  1. Lever out of the catch mechanism at the top (1, 2).

Mechanical assembly diagram showing a red lever mechanism with labeled parts (1 and 2), no readable text or symbols present.

  1. Release catch element at top.

3D mechanical assembly diagram showing a red component inserted into a channel (no text or symbols visible).

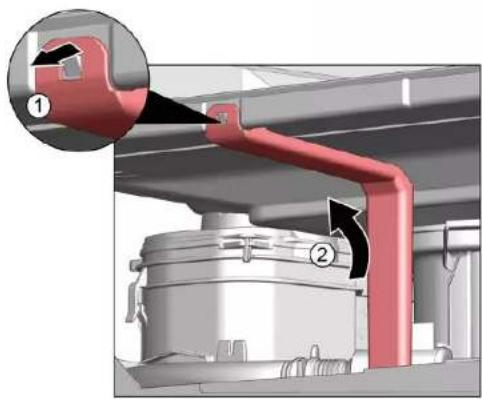
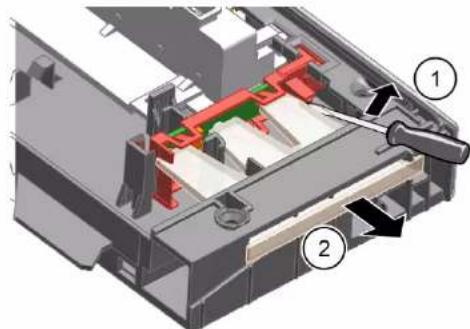
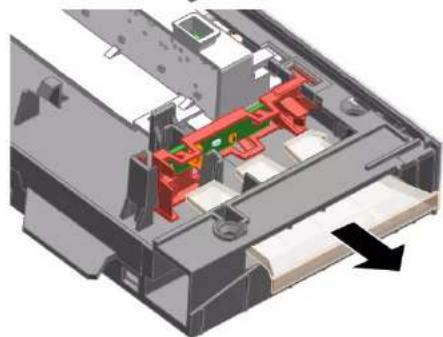
  1. Insert screwdriver below metal brake (1).
  2. Gently release metal clip (2).

Mechanical assembly diagram showing a lever mechanism with labeled parts (1 and 2), no readable text or symbols present.

BOSCH SGS2HTW73E - Removing overflow channel - 5

Repair

  1. Lift overflow conduit off.

3D mechanical assembly diagram showing internal components and mounting features (no text or symbols visible).

4.16.2 Installing overflow conduit

BOSCH SGS2HTW73E - Installing overflow conduit - 1

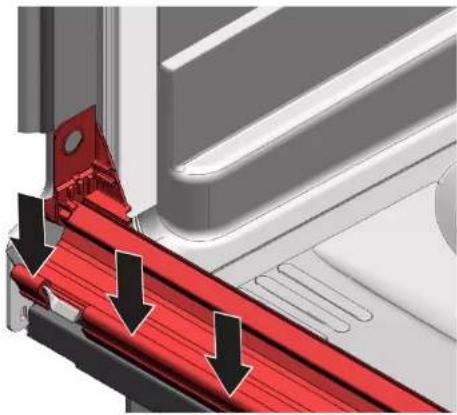
Water damage due to incorrect installation of the overflow conduit! Correctly insert the overflow conduit at the bottom into the guide of the base trough. Click the overflow conduit correctly into place at the top.

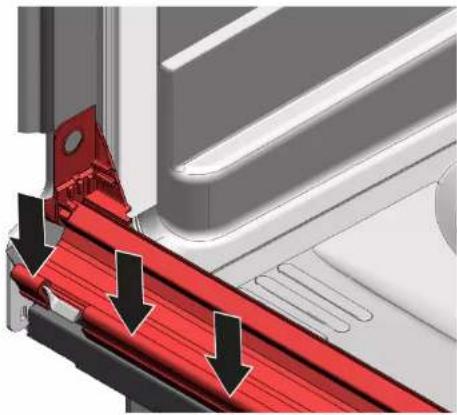
  1. Place overflow conduit (1).
  2. Move overflow conduit into seal (2).
  3. Press overflow conduit in guide of seal (3).
  4. Insert overflow conduit concisely (4).
  5. Clip in overflow conduit (5).

Technical diagram showing mechanical assembly with numbered components and directional arrows indicating motion or flow.

BOSCH SGS2HTW73E - Installing overflow conduit - 3

Repair

  1. Check installation left and right. 3. Check firm seat.

Mechanical assembly diagram showing a red component with arrows indicating motion or assembly, no visible text or symbols.

3D diagram of a mechanical component with red and black arrows indicating directional flow (no text or symbols).

  1. Clip in metal clip on left and right side.

Mechanical assembly diagram showing a clamping tool interacting with a mechanical component (no text or symbols visible).

BOSCH SGS2HTW73E - Repair - 4

Repair

4.17 Replacing inner door

Prerequisite:

√ Appliance is disconnected from power supply. √ Appliance is disconnected from water supply.

  1. Secure door hinge with screws.
  2. Place inner door on door hinge.
  3. Secure inner door with screws.

4.17.1 Removing inner door

  1. Remove screws (1).
  2. Remove inner door upwards (2).

Mechanical assembly diagram showing two views of a red component with labeled parts (no text or symbols present)

4.17.2 Installing inner door

  1. Flap door seal to front.
  2. Move inner door behind door seal.
  3. Close inner door.
  4. Flap door seal upwards. Side parts show upwards.
  5. Move door hinge upwards.

BOSCH SGS2HTW73E - Installing inner door - 1

Repair

4.18 Replacing door hinge

Prerequisite:

√ Appliance is disconnected from power supply. √ Appliance is disconnected from water supply. √ Appliance is freely accessible. √ Side panel has been removed. → Page 225 √ Outer door has been removed. √ Inner door has been removed. √ Control panel has been removed. → Page 229 √ Door springs have been fixed. → Page 230 √ Toe panel has been removed. → Page 232 √ Base socket plate has been removed. → Page 233 √ Overflow channel has been removed. → Page 234

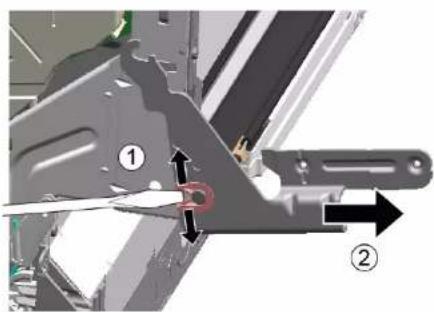
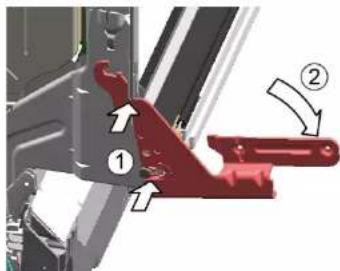
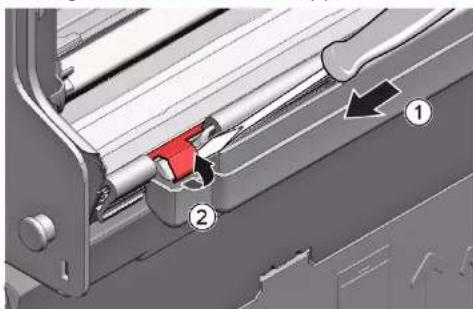
  1. Release catch hook with a screwdriver (1).
  2. Pull door hinge forwards (2).

Mechanical assembly diagram showing two labeled parts (① and ②) with directional arrows indicating movement or force (no text or symbols beyond labels)

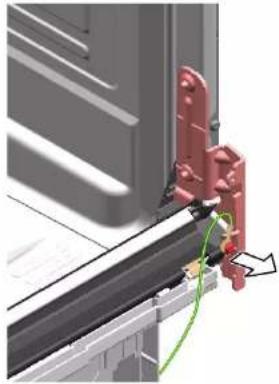
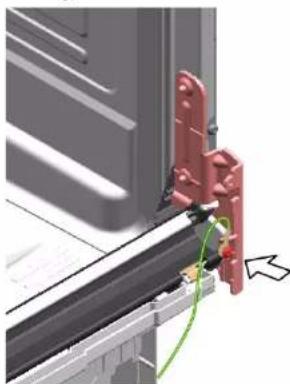
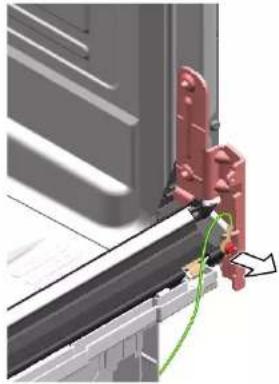
  1. Release ground connection on door hinge.

Mechanical assembly diagram showing a red bracket mounted on a metal frame with green wiring (no text or symbols visible)

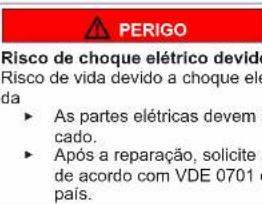
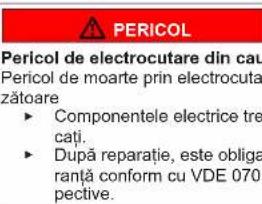
Risk of electric shock due to live parts!

Danger to life through electric shock in case of improper repair.

▶ Electric parts should be repaired by qualified electricians. ▶ After the repair, have a safety test according to VDE 0701 or country-specific regulations performed.

BOSCH SGS2HTW73E - Prerequisite: - 3

Repair

  1. Place hinge on appliance (1).
  2. Move hinge downwards (2) till it is latched to the appliance.

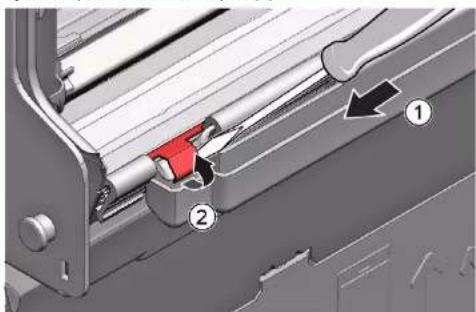
Technical diagram showing mechanical assembly with numbered components and directional arrows indicating motion or movement.

2.

BOSCH SGS2HTW73E - Repair - 2

A missing ground connection can lead to mains potential on door.

Establish ground connection.

3D mechanical assembly diagram showing red bracket and green cable connection (no text or symbols)

BOSCH SGS2HTW73E - Repair - 4

Repair

4.19 Replacing (lower) door seal

Prerequisite:

√ Appliance is disconnected from power supply. √ Appliance is disconnected from water supply. √ Outer door has been removed. √ Base socket plate has been removed.→ Page 233 √ Toe panel has been removed (optional).→ Page 232 √ Door springs have been removed. √ Control panel has been removed. √ Cable harness holder on bottom right has been removed.

4.19.1 Removing the door seal

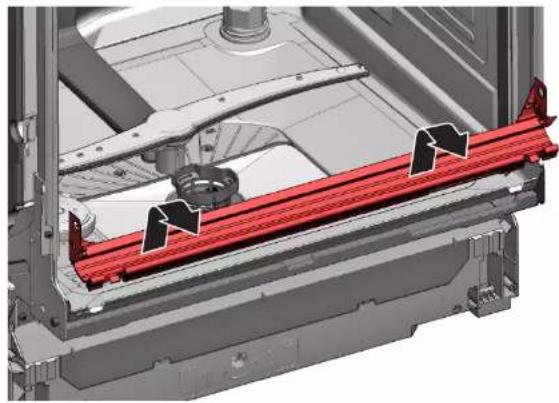
  1. Remove the two retaining clips on the lower door seal (1, 2).

Mechanical assembly diagram showing a lever mechanism with labeled parts (1 and 2), no readable text or symbols present.

  1. Detach the overflow channel.

3D mechanical assembly diagram showing a sliding mechanism with a red component (no text or symbols visible)

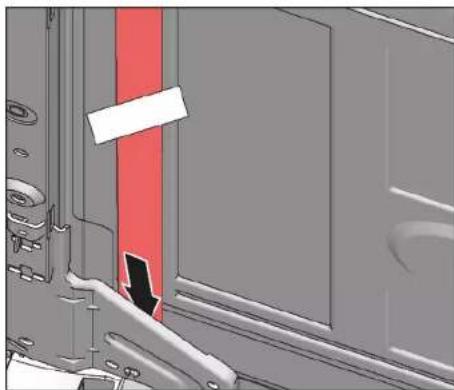
  1. Lift the overflow gutter off.

3D mechanical assembly diagram showing internal components and a central hub (no text or symbols visible)

Repair

  1. Remove the lower door seal from the inner door.

3D mechanical assembly diagram showing a red structural component with arrows indicating flow or movement (no text or symbols present)

4.19.2 Installing the door seal

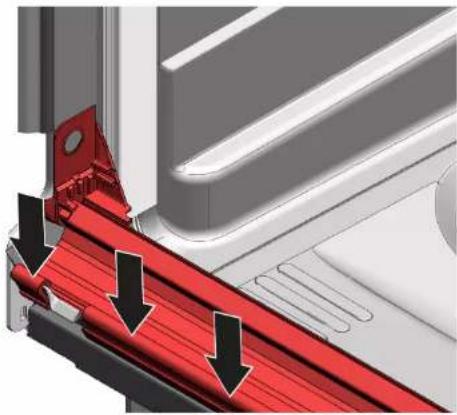
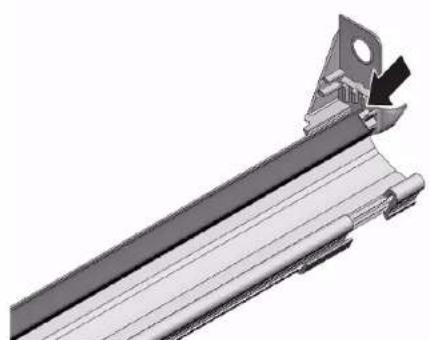
  1. Fit the sealing caps on the left and right to the sealing rail with the door seal.

Technical illustration of a mechanical bracket assembly (no text or symbols visible)

  1. Insert the door seal with the sealing flap in the inner door.
  2. Secure the door seal with two retaining clips.

BOSCH SGS2HTW73E - Installing the door seal - 2

Repair

4.20 Replacing (upper) door seal

Prerequisite:

√ Appliance is disconnected from power supply. √ Appliance is disconnected from water supply.

4.20.1 Removing door seal

Remove door seal from inner frame.

4.20.2 Installing door seal

The door seal must be cut to the correct length before installation. This is 1750 mm for appliances of 81 cm in height and 1850 mm for appliances of 86 cm in height.

  1. Prepare appropriate door seal.
  2. Ensure correct installation position of sealing profile.

BOSCH SGS2HTW73E - Installing door seal - 1

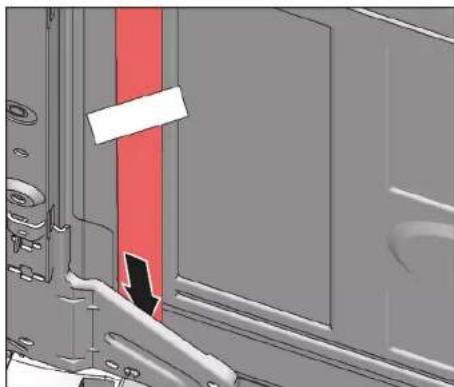
  1. White dot must be on level with sealing bed strip.

Diagram of a hand holding a tool or grip, with an arrow pointing to the grip area (no text or symbols present)

4.

BOSCH SGS2HTW73E - Installing door seal - 3

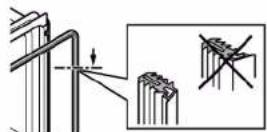
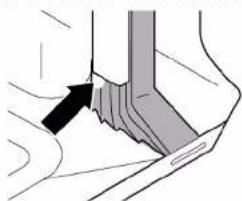
Sealing must not be wavy or stretched at corners. Seal is cut off diagonally at ends and tapers away into bottom of container at front.

Position end of seal straight to front underneath inner door. Seal should lie against side of container as far as possible.

BOSCH SGS2HTW73E - Installing door seal - 4

Correctly installed door seal:

Pure technical line drawing of curved structural elements without any text or symbols

BOSCH SGS2HTW73E - Installing door seal - 6

Repair

4.21 Replacing EmotionLight

BOSCH SGS2HTW73E - Replacing EmotionLight - 1

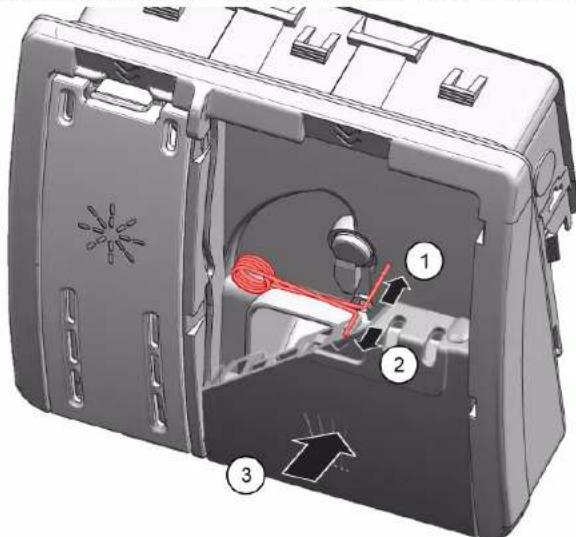
The EmotionLight is situated in the upper front exterior area of the rinsing tank.

Prerequisite:

√ Appliance is disconnected from power supply. √ Appliance is disconnected from water supply. √ Appliances is freely accessible. √ Worktop has been removed (optional). The right-hand side panel has been removed (optional).→ Page 225

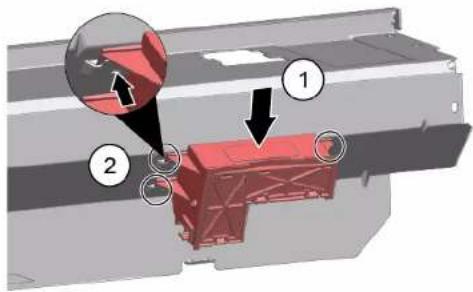
4.21.1 Removing EmotionLight

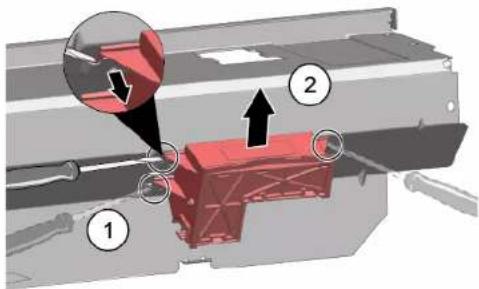
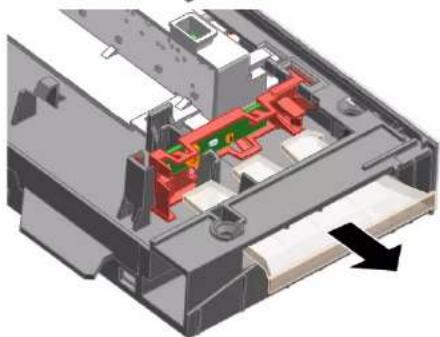
  1. Detach catch hook at the rear (1).

Diagram showing a device's internal components with numbered annotations indicating parts of the main body and parts of the device.

  1. Remove the holder upwards (2).
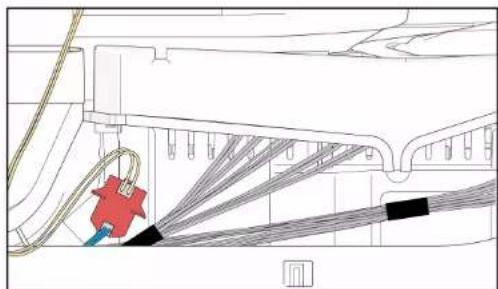
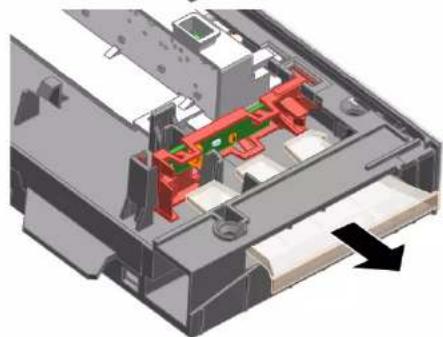
  2. Pull plug out of connector (bottom right at front of appliance).
  1. Remove electrical connection from the power module.

Technical line drawing of a mechanical assembly with wires and components (no text or symbols)

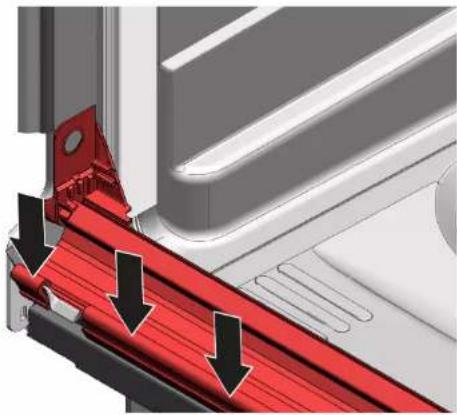
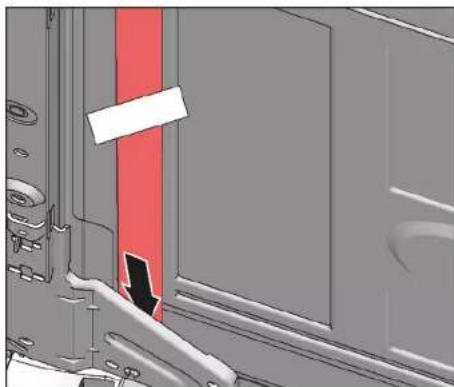
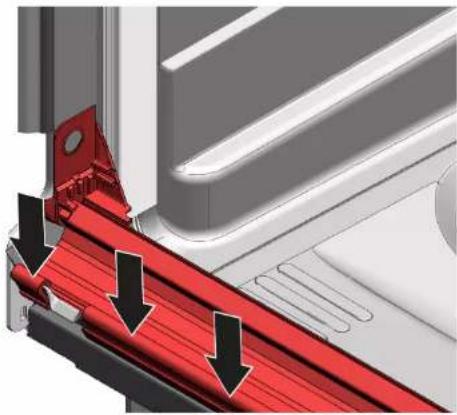
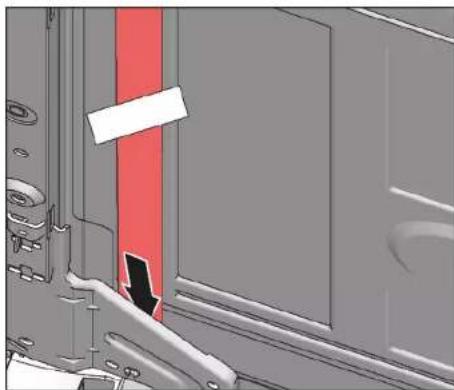
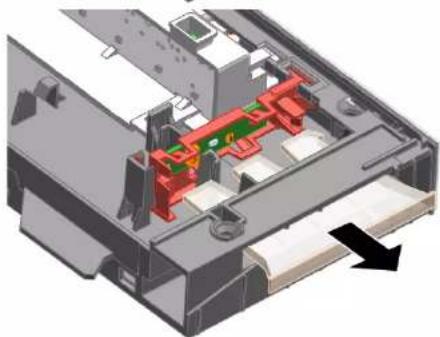
  1. Remove EmotionLight from the appliance.

4.21.2 Installing EmotionLight

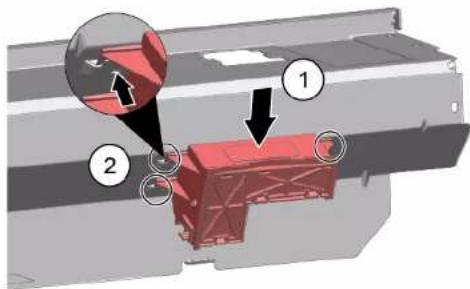
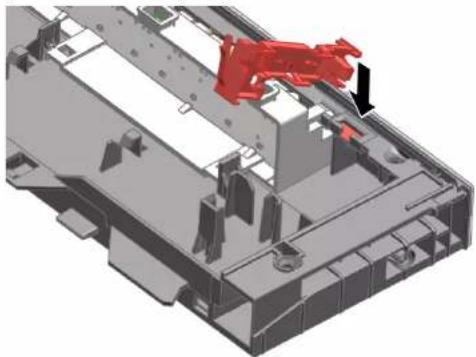
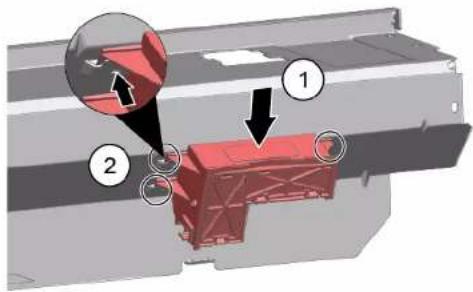
  1. Insert the holder into the rinsing tank frame (1).

Technical diagram showing a device's internal components with numbered annotations indicating parts of the main body and parts of the rear panel.

BOSCH SGS2HTW73E - Installing EmotionLight - 2

Repair

  1. Engage the catch hook (2).

3.

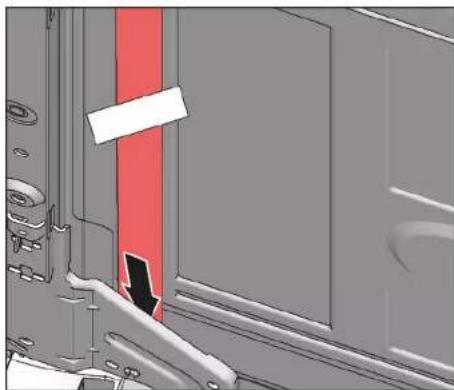
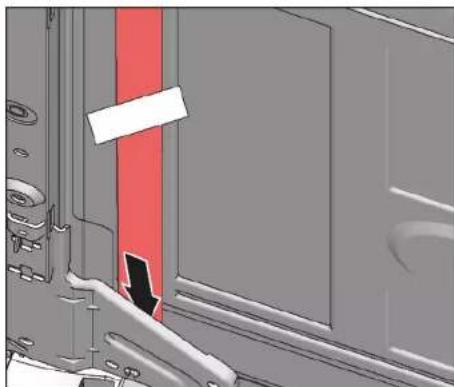
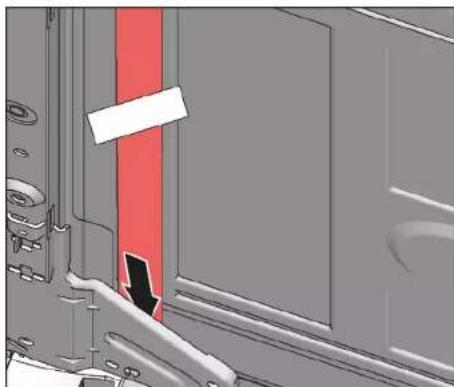
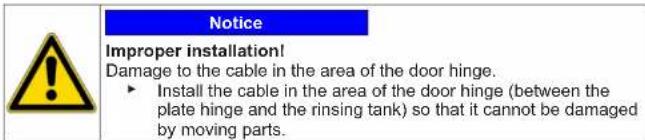
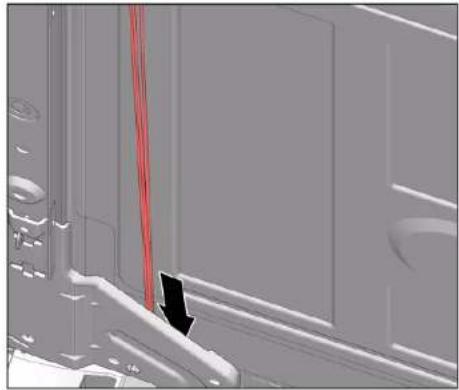
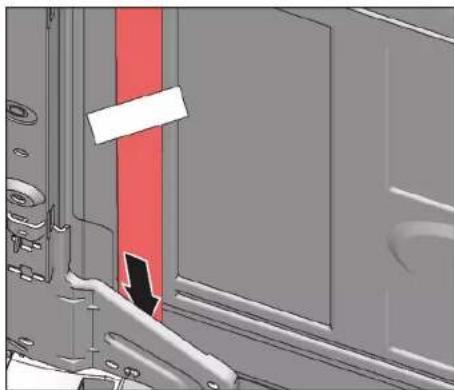
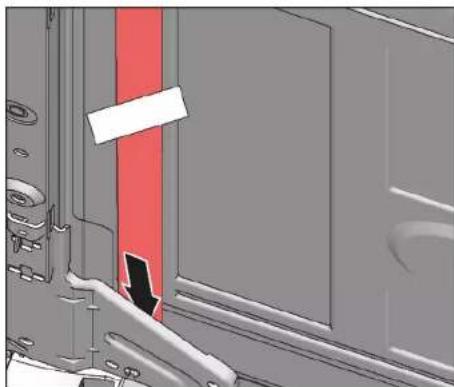
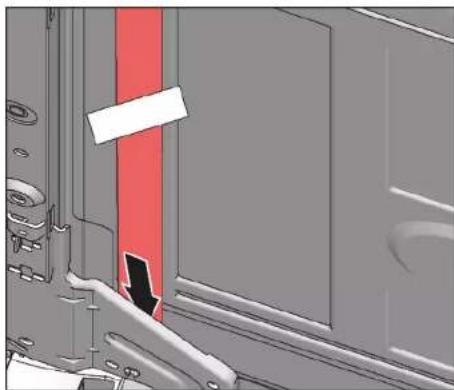
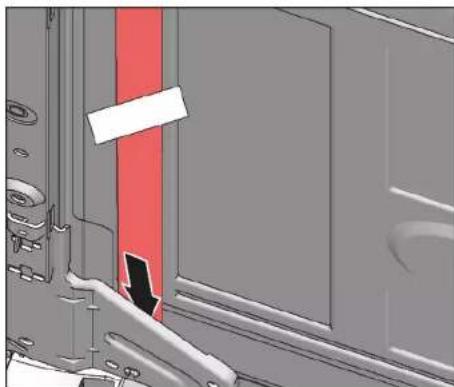
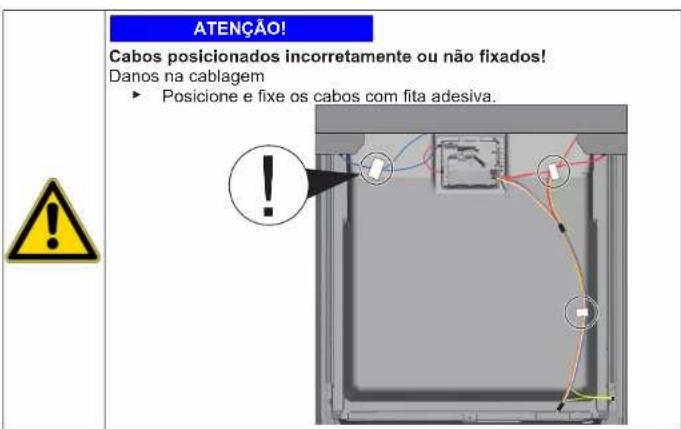
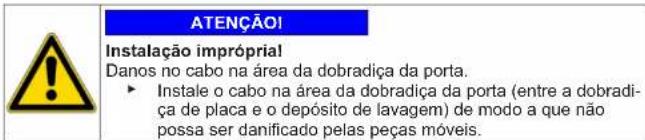
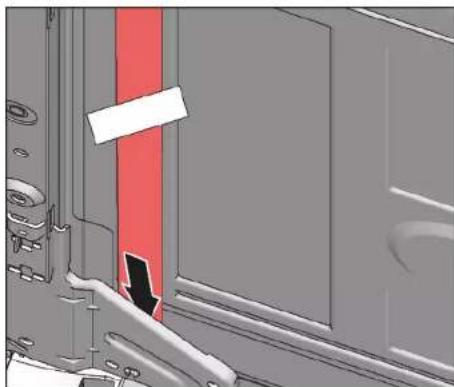
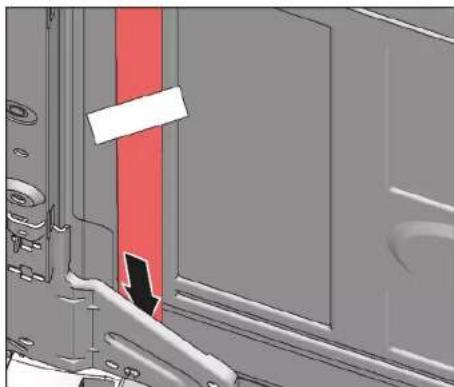
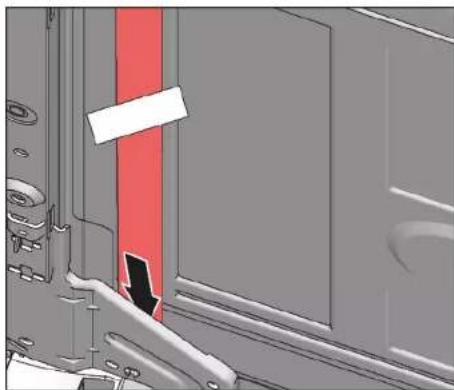
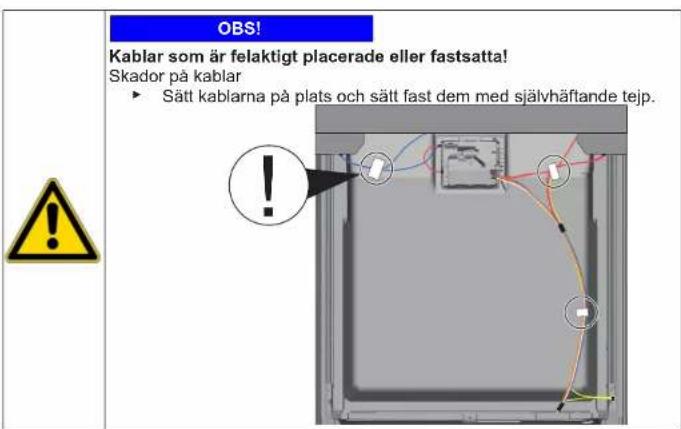
Notice: Improper installation! Damage to the cable in the area of the door hinge. Install the cable in the area of the door hinge (between the plate hinge and the rinsing tank) so that it cannot be damaged by moving parts.

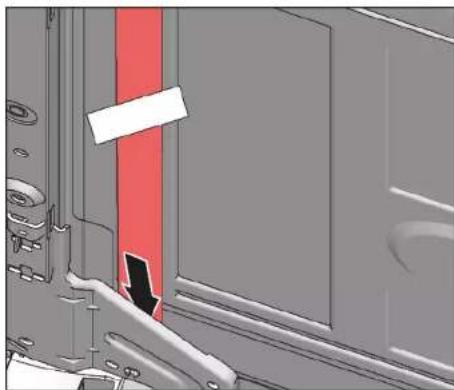
Install the cable on the right lower side.

Close-up of a mechanical component with a red vertical rod and a black arrow pointing to a detail. No visible text or symbols.

BOSCH SGS2HTW73E - Repair - 3

Repair

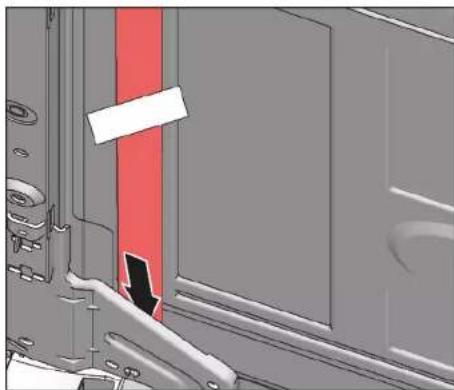
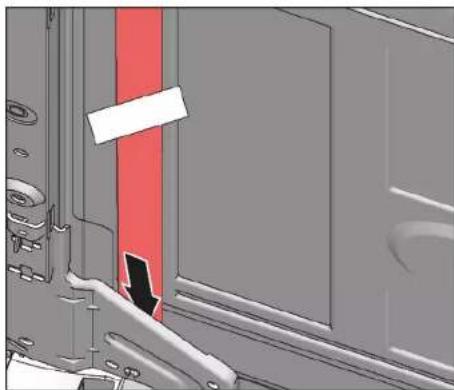
Close-up of a mechanical component with a red vertical stripe and a black arrow pointing to a section. No text or symbols visible.

Fig. 3: Flat cable

  1. Insert the plug.

BOSCH SGS2HTW73E - Repair - 2

Repair

4.22 Replacing TimeLight

BOSCH SGS2HTW73E - Replacing TimeLight - 1

Replace the TimeLight only as a complete part. The TimeLight module is fixed to the rear of the base socket plate.

Prerequisite:

√ Appliance is disconnected from power supply. √ Appliance is disconnected from water supply. √ Toe panel has been removed.→ Page 232 √ Base socket plate has been removed and turned.→ Page 233

4.22.1 Removing TimeLight

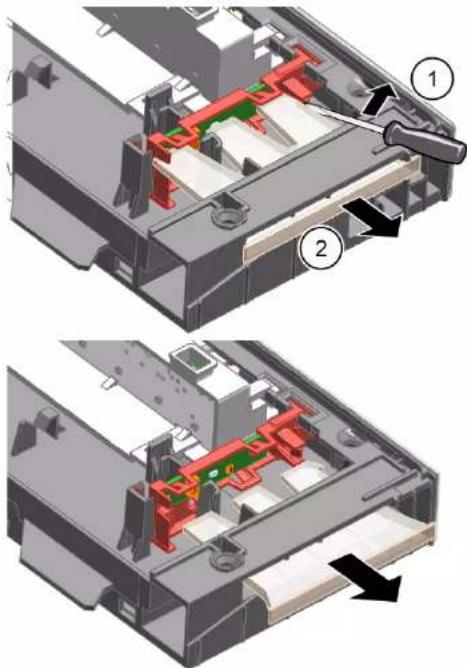
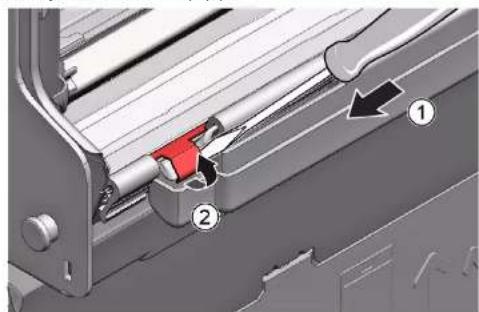
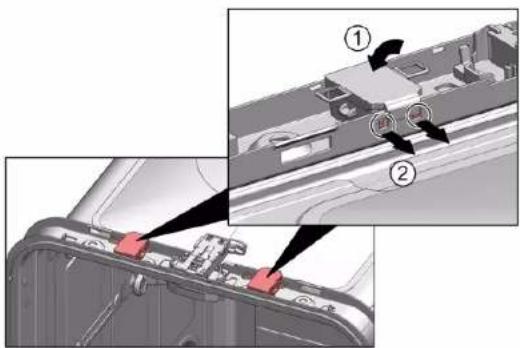
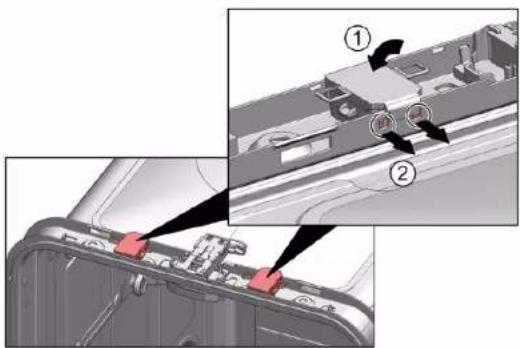
  1. Bend the catch elements (1) slightly outwards.

Technical diagram showing a mechanical assembly with numbered components and directional arrows indicating motion or force.

  1. Pull the TimeLight module upwards out of the guide (2).

4.22.2 Installing TimeLight

  1. Bend the catch elements (1) back again.

Technical diagram showing a red structural component with numbered annotations indicating parts of the assembly.

  1. Push the TimeLight module into the guide (2).
  2. Connect the electrical connection.

BOSCH SGS2HTW73E - Installing TimeLight - 2

Repair

4.23 Replacing Gap illumination

Prerequisite:

√ Appliance is disconnected from power supply. √ Appliance is disconnected from water supply. √ Outer door is disassembled. √ Operation panel has been removed.

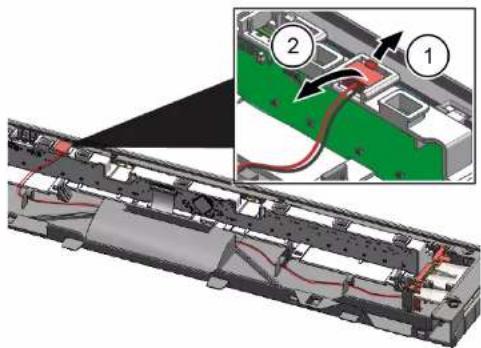
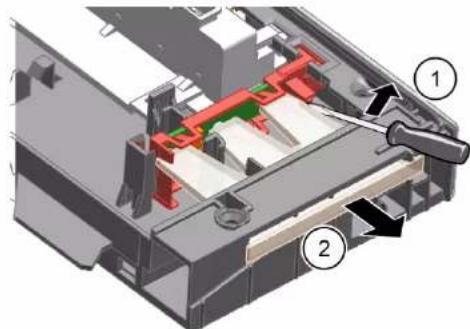
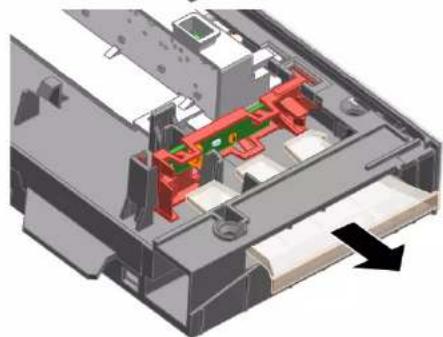
4.23.1 Removing Gap illumination

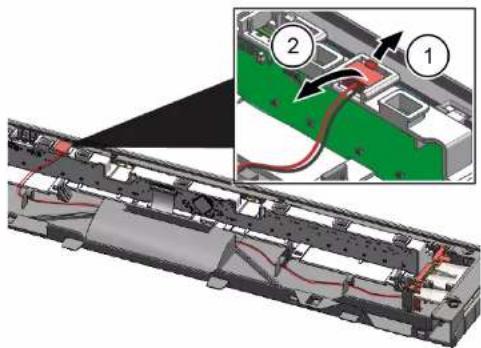
  1. Detach catch (1).
  2. Remove electrical connection from the operation module (2).

Technical diagram showing a device interior with labeled components and wiring, including numbered annotations 1 and 2.

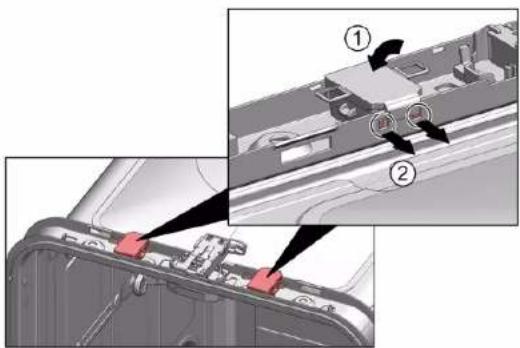
  1. Detach catch hook at rear (1).
  2. Remove light fibre (2).

3D mechanical assembly diagram showing internal components with numbered parts (1 and 2). No visible text or symbols.

3D mechanical assembly diagram showing internal components. No visible text or symbols.

BOSCH SGS2HTW73E - Removing Gap illumination - 4

Repair

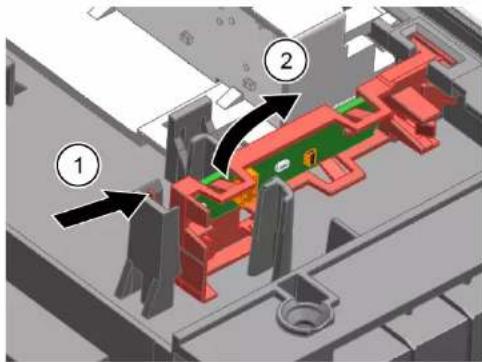
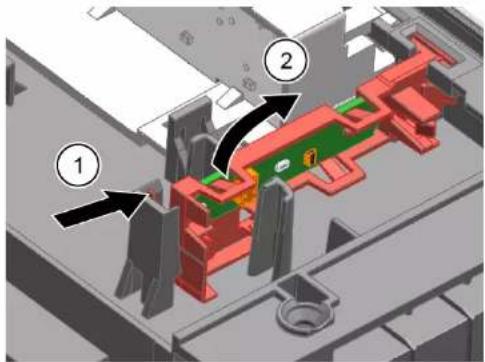
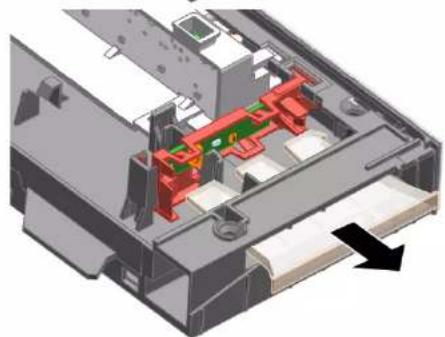
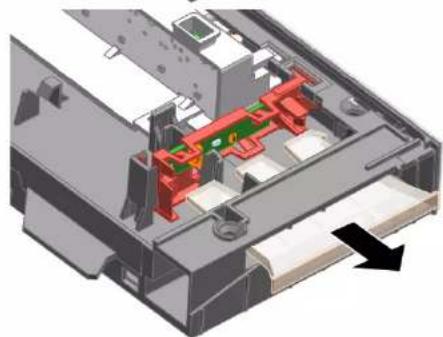
  1. Detach catch hook (1).
  2. Lift up PCB with holder and remove it from operation module frame (2).

Technical diagram of a mechanical assembly with numbered components, likely illustrating a gear or mechanism assembly.

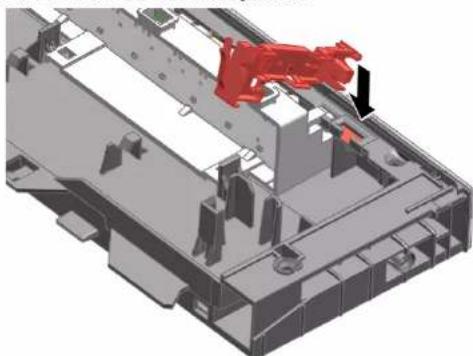
4.23.2 Installing Gap illumination

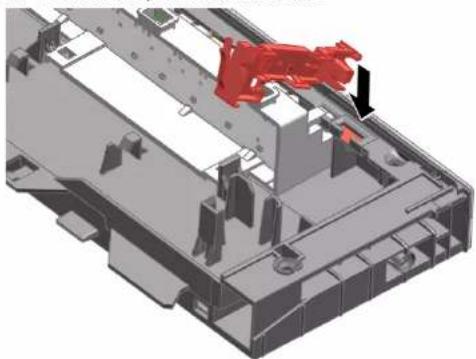
  1. Insert PCB holder to operation module frame.

3D mechanical assembly diagram showing a red component inserted into a housing. No text or symbols visible.

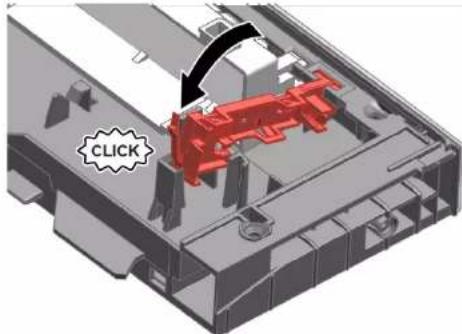
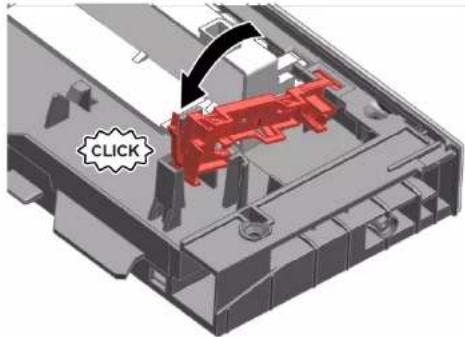
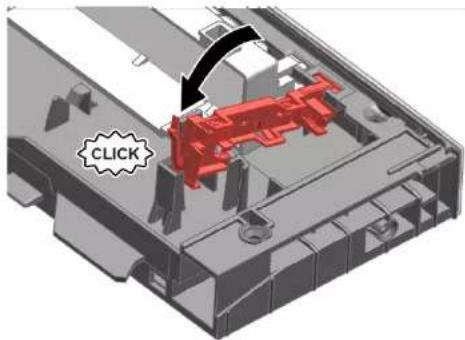
  1. Tighten it until it clicks.

CLICK

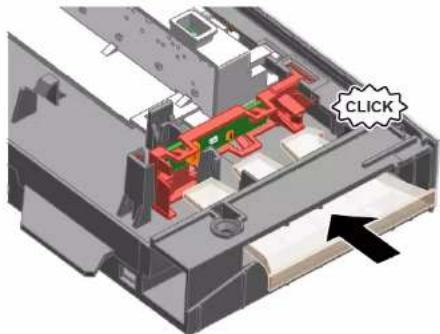
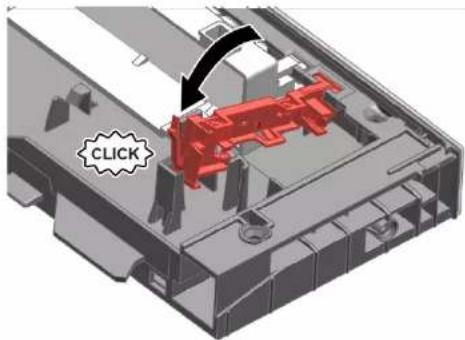
  1. Install the light fiber and tighten it until it clicks.

3D mechanical assembly diagram showing internal components with a highlighted 'CLICK' button. No text or symbols beyond the label.

  1. Connect the wire to the operation module.

BOSCH SGS2HTW73E - Repair - 5

Repair

  1. Place the items to be washed.

Two diagrams showing a mechanical device being lifted by a tool. No visible text or symbols.

4.2.3 Installing the steam adapter

Special tools:

Tablet drawer guide [00614935] Cup support clamp [00618565]

BOSCH SGS2HTW73E - Installing the steam adapter - 1

Repair

4.3 Replacing the detergent drawer

4.3.1 Removing the detergent drawer

BOSCH SGS2HTW73E - Removing the detergent drawer - 1

Repair

  1. To remove, pull the lower spray arm down.

Diagram of a blue propeller inside a vehicle cabin with an upward arrow indicating motion. No text or symbols.

4.4.2 Installing the spray arm

4.5.2 Installing the filters

The spray arm of the baking tray clicks into place.

BOSCH SGS2HTW73E - Installing the filters - 1

Repair

  1. Insert the short end of the spring into the mounting hole of the detergent drawer cover (2).
  2. Push the cover into the dispenser (3).

4.8.3 Installing the detergent drawer cover

  1. Press the side panel onto the appliance (2).
  2. Secure the side panel with screws (3).

BOSCH SGS2HTW73E - Installing the detergent drawer cover - 1

Repair

3.

Diagram showing a hand inserting a screw into a device with a magnified view of the screw and its insertion direction.

4.11.2 Installing the outer door

CAUTION!

  1. Secure the outer door with four screws (4 × 11 mm metal screws).

Diagram of a device with a screwdriver inserted into a tray, showing a close-up of the screw (no text or symbols present)

BOSCH SGS2HTW73E - CAUTION! - 2

Repair

4.14.2 Installing the base panel

BOSCH SGS2HTW73E - Installing the base panel - 1

Repair

4.

Mechanical assembly diagram showing a red lever mechanism with labeled parts (1 and 2), no readable text or symbols present.

  1. Place the screwdriver under the metal retainer (1)
  2. Carefully release the metal clip (2).

Technical diagram of a mechanical assembly with numbered components and directional arrow indicating motion or force.

BOSCH SGS2HTW73E - Repair - 3

Repair

4.16.2 Installing the overflow pipe

Technical diagram showing mechanical assembly with numbered components and directional arrows indicating motion or flow.

BOSCH SGS2HTW73E - Installing the overflow pipe - 2

Repair

3D diagram of a mechanical component with red and black arrows indicating directional flow (no text or symbols).

BOSCH SGS2HTW73E - Repair - 2

Repair

  1. Attach the door hinge with screws.
  2. Place the inner door on the hinge.
  3. Attach the inner door with screws.

4.17.2 Installing the inner door

4.18.2 Installing the door hinge

BOSCH SGS2HTW73E - Installing the door hinge - 1

Technical diagram showing mechanical assembly with numbered components and directional arrows indicating motion or movement.

2.

Close-up of a red mechanical bracket with green cable and arrow indicating assembly (no text or symbols)

BOSCH SGS2HTW73E - Installing the door hinge - 4

Repair

BOSCH SGS2HTW73E - Repair - 1

Repair

4.

Pure technical line drawing of curved pipe or channel sections without any text, numbers, or symbols

BOSCH SGS2HTW73E - Repair - 2

Repair

4.21 Replacing the EmotionLight

Diagram showing a device's internal structure with labeled parts and directional arrows indicating movement or assembly.

  1. Remove the EmotionLight from the device.

4.21.2 Installing the EmotionLight

  1. Place the holder on the flush tank frame (1).

Technical diagram showing a device's internal components with numbered annotations indicating parts of the main body and parts of the rear panel.

BOSCH SGS2HTW73E - Installing the EmotionLight - 2

Repair

  1. Fasten the hook (2).

3.

BOSCH SGS2HTW73E - Repair - 1

NOTE

Incorrect installation!

BOSCH SGS2HTW73E - NOTE - 1

Repair

Close-up of a mechanical component with a red vertical stripe and black arrow indicating a section (no text or symbols visible)

Figure 3: Flat cable 4. Install the connector.

BOSCH SGS2HTW73E - Repair - 2

Repair

4.22 Replacing the TimeLight

Technical diagram of a mechanical assembly with numbered components and highlighted parts.

  1. Unhook the back (1).
  2. Remove the optical fiber (2).

3D mechanical assembly diagram showing internal components with numbered parts (1 and 2), no visible text or symbols.

3D mechanical assembly diagram showing internal components with no visible text or symbols.

BOSCH SGS2HTW73E - Replacing the TimeLight - 4

Repair

4.23.2 Installing the Gap Illumination recessed light

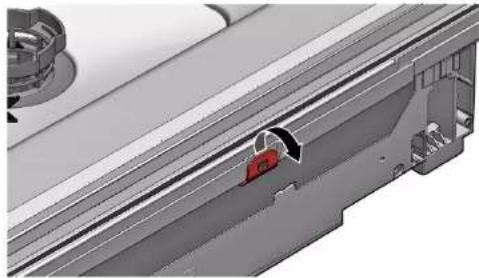
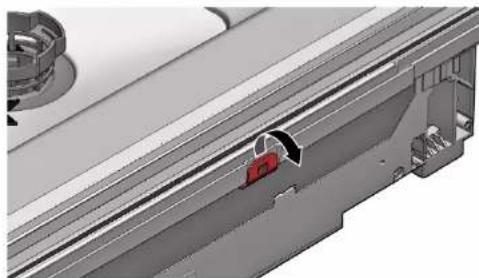
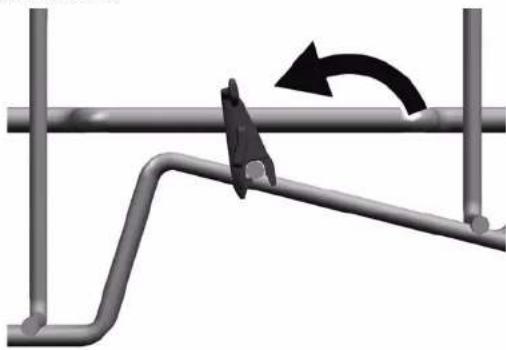
  1. Turn the clip upward.

Mechanical diagram showing a lever mechanism with a curved arrow indicating rotational motion (no text or symbols present).

BOSCH SGS2HTW73E - Installing the Gap Illumination recessed light - 2

Correction

Correction

3.

Diagram showing a hand inserting a screw into a device with a magnified view of the screw and its insertion direction.

3. Lift the panel off.

4.14.2 Installing the bottom panel

BOSCH SGS2HTW73E - Installing the bottom panel - 1

Correction

4.

Mechanical assembly diagram showing a red lever mechanism with labeled parts (1 and 2). No readable text or symbols present.

BOSCH SGS2HTW73E - Correction - 2

Correction

BOSCH SGS2HTW73E - Correction - 1

Correction

3D diagram of a mechanical component with red and black arrows indicating directional flow. No text or symbols.

BOSCH SGS2HTW73E - Correction - 2

Correction

4.18.2 Installing the door hinge

BOSCH SGS2HTW73E - Installing the door hinge - 1

Technical diagram showing mechanical assembly with numbered components and directional arrows indicating motion or movement.

2.

Close-up of a red mechanical bracket with green cable and arrow indicating connection. No text or symbols.

BOSCH SGS2HTW73E - Installing the door hinge - 4

Correction

Correction

4.

Pure technical line drawing of curved structural elements without any text or symbols

BOSCH SGS2HTW73E - Correction - 2

Repair

BOSCH SGS2HTW73E - Repair - 1

Repair

BOSCH SGS2HTW73E - Repair - 1

Repair

Close-up of a mechanical component with a red vertical stripe and black arrow indicating a cut or section (no text or symbols visible)

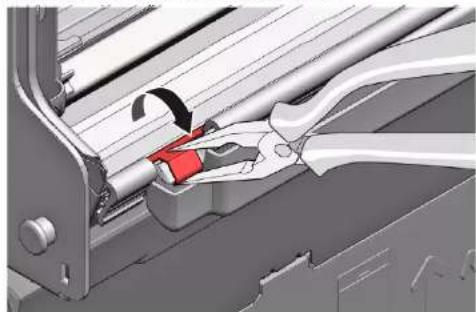
  1. Remove the retainer from the rear (1).
  2. Remove the optical fiber (2).

3D mechanical assembly diagram showing internal components with numbered parts (1 and 2), no readable text or symbols present.

3D mechanical assembly diagram showing internal components with no visible text or symbols.

BOSCH SGS2HTW73E - Repair - 4

Repair

2021-03-22_9001630792 Copyright by BSH Hausgeräte GmbH Pages 338 to 989

BOSCH SGS2HTW73E - Repair - 1

Repair

BOSCH SGS2HTW73E - Repair - 1

Repair

4.3 Changing the Vario drawer

BOSCH SGS2HTW73E - Changing the Vario drawer - 1

Repair

4.7.2 Connecting the connection cable

BOSCH SGS2HTW73E - Connecting the connection cable - 1

CAUTION!

3.

Diagram showing a hand inserting a screw into a device with a magnified view of the screw and its insertion direction.

BOSCH SGS2HTW73E - CAUTION! - 2

Repair

BOSCH SGS2HTW73E - Repair - 1

Repair

4.

Mechanical assembly diagram showing a red lever mechanism with labeled parts (1 and 2), no readable text or symbols present.

BOSCH SGS2HTW73E - Repair - 2

Repair

BOSCH SGS2HTW73E - Repair - 1

Repair

3D diagram of a mechanical component with red and black arrows indicating directional flow or movement (no text or symbols)

BOSCH SGS2HTW73E - Repair - 2

Repair

2021-03-22_9001630792 Copyright by BSH Hausgeräte GmbH Pages 361 to 989

2.

Close-up of a red mechanical bracket with green cable and arrow indicating connection (no text or symbols)

BOSCH SGS2HTW73E - Repair - 2

Repair

BOSCH SGS2HTW73E - Repair - 1

Repair

4.

Pure technical line drawing of curved structural elements without any text or symbols

BOSCH SGS2HTW73E - Repair - 2

Repair

4.21 Changing the EmotionLight

Technical diagram showing a disassembly or repair process with labeled components and directional arrows indicating movement.

BOSCH SGS2HTW73E - Changing the EmotionLight - 2

Repair

  1. Snap the lug (2) into place.

3.

BOSCH SGS2HTW73E - Repair - 1

ATTENTION!

Installation non conforme.

BOSCH SGS2HTW73E - ATTENTION! - 1

Repair

Close-up of a mechanical component with a red vertical stripe and black arrow indicating a section (no text or symbols visible)

Fig. 3: Flat cable

BOSCH SGS2HTW73E - Repair - 2

Repair

4.23.2 Mount the Gap illumination

BOSCH SGS2HTW73E - Mount the Gap illumination - 1

Repair

BOSCH SGS2HTW73E - Repair - 1

Repair

3.

Diagram showing a hand inserting a screw into a device with a magnified view of the screw and its insertion direction.

BOSCH SGS2HTW73E - Repair - 2

Repair

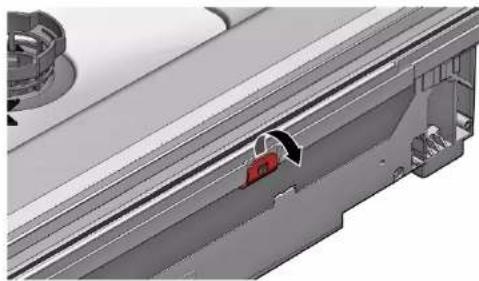
4.14.2 Mount the base panel

BOSCH SGS2HTW73E - Mount the base panel - 1

Repair

4.15 Replace the base plate

Technical diagram showing a mechanical assembly with numbered components and directional arrows indicating motion or flow.

4.

Mechanical assembly diagram showing a red component being inserted into a housing (no text or symbols visible).

BOSCH SGS2HTW73E - Replace the base plate - 3

Repair

BOSCH SGS2HTW73E - Repair - 1

Repair

3D diagram of a vehicle door with red and black arrows indicating airflow or movement (no text or symbols).

BOSCH SGS2HTW73E - Repair - 2

Repair

2.

Close-up of a red mechanical hinge mounted on a metal frame, with a green cable and arrow indicating a connection point (no text or symbols visible).

BOSCH SGS2HTW73E - Repair - 2

Repair

4.

Pure technical line drawing of curved pipe or channel sections without any text, numbers, or symbols.

BOSCH SGS2HTW73E - Repair - 2

Repair

4.21 Replacing the EmotionLight

Diagram showing a device's internal components with numbered annotations indicating parts of the main body and parts of the device.

BOSCH SGS2HTW73E - Replacing the EmotionLight - 2

Repair

BOSCH SGS2HTW73E - Repair - 1

Repair

Close-up of a mechanical component with a red vertical stripe and black arrow indicating a cut or section (no text or symbols visible)

Fig. 3: Flat cable

  1. Insert the connector.

BOSCH SGS2HTW73E - Repair - 2

Repair

4.22 Replacing the TimeLight

Technical diagram showing a mechanical assembly with numbered components and highlighted parts, likely illustrating a machining or assembly process.

BOSCH SGS2HTW73E - Replacing the TimeLight - 2

Repair

4.23.2 Mounting the gap illumination

BOSCH SGS2HTW73E - Mounting the gap illumination - 1

Repair

BOSCH SGS2HTW73E - Repair - 1

Repair

BOSCH SGS2HTW73E - Repair - 1

Repair

3.

Diagram showing a hand inserting a screw into a device with a magnified view of the screw and its insertion direction.

BOSCH SGS2HTW73E - Repair - 2

Repair

BOSCH SGS2HTW73E - Repair - 1

Repair

4.

Mechanical assembly diagram showing a red lever mechanism with labeled parts (1 and 2), no readable text or symbols present.

BOSCH SGS2HTW73E - Repair - 2

Repair

BOSCH SGS2HTW73E - Repair - 1

Repair

3D diagram of a car door frame with red and black arrows indicating directional movement (no text or symbols).

2021-03-22_9001630792 Copyright by BSH Hausgeräte GmbH Page 442 of 989

BOSCH SGS2HTW73E - Repair - 2

Repair

2021-03-22_9001630792 Copyright by BSH Hausgeräte GmbH Page 444 of 989

2.

Close-up of a red mechanical bracket with a green cable and an arrow indicating assembly. No text or symbols.

2021-03-22_9001630792 Copyright by BSH Hausgeräte GmbH Page 445 of 989

BOSCH SGS2HTW73E - Repair - 2

Repair

BOSCH SGS2HTW73E - Repair - 1

Repair

4.

Pure technical line drawing of curved pipe or channel sections without any text, numbers, or symbols.

BOSCH SGS2HTW73E - Repair - 2

Repair

BOSCH SGS2HTW73E - Repair - 1

Repair

BOSCH SGS2HTW73E - Repair - 1

Repair

Close-up of a mechanical component with a red vertical stripe and a black arrow indicating a cut or section. No text or symbols visible.

3D mechanical assembly diagram showing internal components with no visible text or symbols.

BOSCH SGS2HTW73E - Repair - 3

Repair

  1. Lift the tab.

Mechanical diagram showing a lever mechanism with a curved arrow indicating rotational motion (no text or symbols present).

BOSCH SGS2HTW73E - Repair - 2

Repair

BOSCH SGS2HTW73E - Repair - 1

Repair

3.

Diagram showing a hand inserting a screw into a device, with a magnified view of the screw and its insertion direction.

BOSCH SGS2HTW73E - Repair - 2

Repair

  1. Lift the panel.

BOSCH SGS2HTW73E - Repair - 1

Repair

4.

Mechanical assembly diagram showing a red lever mechanism with labeled parts (1 and 2). No readable text or symbols present.

BOSCH SGS2HTW73E - Repair - 2

Repair

BOSCH SGS2HTW73E - Repair - 1

Repair

3D diagram of a vehicle door with red and black arrows indicating airflow or movement (no text or symbols).

BOSCH SGS2HTW73E - Repair - 2

Repair

2.

Close-up of a red mechanical bracket with green cable and arrow indicating connection (no text or symbols).

BOSCH SGS2HTW73E - Repair - 2

Repair

BOSCH SGS2HTW73E - Repair - 1

Repair

4.

Pure technical line drawing of curved pipe or channel sections without any text, numbers, or symbols

BOSCH SGS2HTW73E - Repair - 2

Repair

BOSCH SGS2HTW73E - Repair - 1

Repair

BOSCH SGS2HTW73E - Repair - 1

Repair

Close-up of a mechanical component with a red vertical stripe and black arrow indicating a cut or section (no text or symbols visible)

Figure 3: Flat cable

3D mechanical assembly diagram showing internal components with no visible text or symbols

BOSCH SGS2HTW73E - Repair - 3

Repair

BOSCH SGS2HTW73E - Repair - 1

Repair

BOSCH SGS2HTW73E - Repair - 1

Repair

Repair

3.

Diagram showing a hand inserting a screw into a device with a magnified view of the screw and its insertion direction.

Repair

Repair

4.

Mechanical assembly diagram showing a red component being inserted into a container, with no visible text or symbols.

BOSCH SGS2HTW73E - Repair - 2

Repair

BOSCH SGS2HTW73E - Repair - 1

Repair

3D diagram of a car door frame with red and black arrows indicating airflow or movement. No text or symbols.

Repair

2.

Close-up of a red mechanical bracket with green cable and arrow indicating assembly. No text or symbols.

Repair

Repair

4.

Pure technical line drawing of curved pipe or channel sections without any text, numbers, or symbols.

BOSCH SGS2HTW73E - Repair - 2

Repair

BOSCH SGS2HTW73E - Repair - 1

Repair

Repair

Close-up of a mechanical component with a red vertical stripe and black arrow indicating a section (no text or symbols visible).

Fig. 3: Flat cable

  1. Insert the plug.

BOSCH SGS2HTW73E - Repair - 2

Repair

Repair

  1. Set the supports.

Mechanical diagram showing a lever mechanism with a curved arrow indicating rotational motion. No text or symbols.

BOSCH SGS2HTW73E - Repair - 2

Repair

4.3 Replacing the varioDrawer drawer

4.3.1 Removing the varioDrawer drawer

  1. Press the handle plates.

3D structural diagram of a steel-framed metal grid panel with an inset showing a blue door component. No text or symbols.

BOSCH SGS2HTW73E - Removing the varioDrawer drawer - 2

Repair

3.

BOSCH SGS2HTW73E - Repair - 1

Hold the door by the sides.

Repair

  1. Open the door (1).
  2. Secure it in the groove of the base recess (2).
  3. Close the door slowly (3).

Technical diagram showing assembly steps of a mechanical component with numbered annotations indicating different states or features.

BOSCH SGS2HTW73E - Repair - 2

Repair

4.

Mechanical assembly diagram showing a red lever mechanism with labeled parts (1 and 2), no readable text or symbols present.

BOSCH SGS2HTW73E - Repair - 2

Repair

BOSCH SGS2HTW73E - Repair - 1

Repair

3D diagram of a vehicle door frame with red and black arrows indicating directional flow (no text or symbols).

Repair

2.

Close-up of a red mechanical bracket with green cable and arrow indicating assembly (no text or symbols)

BOSCH SGS2HTW73E - Repair - 2

Repair

BOSCH SGS2HTW73E - Repair - 1

Repair

4.

Pure technical line drawing of curved structural components without any text or symbols

BOSCH SGS2HTW73E - Repair - 2

Repair

4.21 Replacing the EmotionLight lamp

Technical diagram showing a device's internal components with numbered annotations indicating parts of the main body and adjustment.

  1. Remove the EmotionLight lamp from the device.

BOSCH SGS2HTW73E - Replacing the EmotionLight lamp - 2

Repair

BOSCH SGS2HTW73E - Repair - 1

Repair

Close-up of a mechanical component with a red vertical stripe and black arrow indicating a cut or section (no text or symbols visible)

Att. 3: Flat cable

  1. Insert the plug.

BOSCH SGS2HTW73E - Repair - 2

Repair

4.22 Replacing the TimeLight lamp

Technical diagram showing a mechanical assembly with numbered components and highlighted parts, likely illustrating a machining or assembly process.

  1. Pull the TimeLight lamp module upward out of the guide (2).

3D mechanical assembly diagram showing internal components with no visible text or symbols.

BOSCH SGS2HTW73E - Replacing the TimeLight lamp - 3

Repair

BOSCH SGS2HTW73E - Repair - 1

Repair

BOSCH SGS2HTW73E - Repair - 1

Repair

4.7.2 Connecting the power cord

BOSCH SGS2HTW73E - Connecting the power cord - 1

CAUTION!

  1. Lift the pump cover at an angle toward the inside and remove it.

3.

Diagram showing a hand inserting a screw into a device with a magnified view of the screw and its insertion direction.

BOSCH SGS2HTW73E - CAUTION! - 2

Repair

  1. Remove the cover.
  2. Remove the feet by pulling them forward (1).

Mechanical assembly diagram showing red components mounted on a gray frame, with numbered arrows indicating motion (no text or symbols present).

BOSCH SGS2HTW73E - Repair - 2

Repair

4.15 Replacing the base socket cover

Technical diagram showing a mechanical assembly with numbered components and directional arrows indicating motion or flow.

4.

Mechanical assembly diagram showing a red lever mechanism with labeled parts (1 and 2). No readable text or symbols present.

BOSCH SGS2HTW73E - Replacing the base socket cover - 3

Repair

BOSCH SGS2HTW73E - Repair - 1

Repair

3D diagram of a vehicle door frame with red and black arrows indicating directional flow. No text or symbols.

BOSCH SGS2HTW73E - Repair - 2

Repair

2.

Close-up of a red mechanical bracket with green cable and arrow indicating assembly. No text or symbols.

BOSCH SGS2HTW73E - Repair - 2

Repair

BOSCH SGS2HTW73E - Repair - 1

Repair

4.

Pure technical line drawing of curved pipe or channel sections without any text, numbers, or symbols

BOSCH SGS2HTW73E - Repair - 2

Repair

4.21 Replacing the EmotionLight

Diagram showing a device's internal structure with labeled parts and directional arrows indicating movement or assembly.

BOSCH SGS2HTW73E - Replacing the EmotionLight - 2

Repair

BOSCH SGS2HTW73E - Repair - 1

Repair

Close-up of a mechanical component with a red vertical stripe and black arrow indicating a section (no text or symbols visible)

  1. Push the "TimeLight" module into the guide (2).
  2. Connect the electrical connector.

BOSCH SGS2HTW73E - Repair - 2

Repair

4.23 Replacing the "Gap illumination"

Requirement.

BOSCH SGS2HTW73E - Requirement. - 1

Repair

4.23.2 Installing the "Gap illumination"

2021-03-22_9001630792 Copyright BSH Hausgeräte GmbH Side 627 av 989

  1. Fold down the clamps.

Mechanical diagram showing a lever mechanism with a curved arrow indicating rotational motion (no text or symbols).

BOSCH SGS2HTW73E - Repair - 2

Repair

BOSCH SGS2HTW73E - Repair - 1

Repair

Repair

  1. Pull the lower spray arm down to remove it.

Diagram of a blue propeller inside a vehicle cabin with an upward arrow indicating motion.

4.4.2 Installing the spray arm

Check that no foreign objects fall into the bottom pan.

  1. Pull the microfilter down to remove it.

Diagram of a mechanical component with a blue cylindrical assembly and a black downward arrow.

4.5.2 Installing the filters

Image 1: Fully integratedTechnical diagram of a refrigerator interior with numbered components and directional arrows indicating flow or movement.

Image 2: Fully integrated

Technical diagram showing a mechanical assembly with numbered components and directional arrows indicating motion or assembly.

  1. Press the side panel onto the appliance (2).
  2. Secure the side panel with the screws (3).

BOSCH SGS2HTW73E - Installing the filters - 3

Repair

3.

BOSCH SGS2HTW73E - Repair - 1

Secure the door by holding it on one side.

Remove two screws.

Diagram showing a hand inserting a screw into a device with a magnified view of the screw and its insertion direction.

BOSCH SGS2HTW73E - Repair - 3

Repair

  1. Disassemble the control panel.
  1. Open the door slightly (1).
  2. Attach it in the groove in the bottom tub (2).
  3. Close the door slowly (3).

Technical diagram showing assembly steps of a mechanical component with numbered annotations indicating different states or features.

Repair

4.

Mechanical assembly diagram showing a red pipe connection with labeled parts (no text or symbols present)

BOSCH SGS2HTW73E - Repair - 2

Repair

BOSCH SGS2HTW73E - Repair - 1

Repair

3D diagram of a car door frame with red and black arrows indicating directional movement. No text or symbols.

BOSCH SGS2HTW73E - Repair - 2

Repair

  1. Disconnect the ground connection on the door hinge.

Mechanical assembly diagram showing a red bracket mounted on a metal frame with green wiring. No visible text or symbols.

2.

Close-up of a red mechanical bracket with green cable and arrow indicating connection. No text or symbols.

BOSCH SGS2HTW73E - Repair - 3

Repair

Repair

4.19.2 Installing the door gasket

4.

Pure technical line drawing of curved structural components without any text or symbols.

BOSCH SGS2HTW73E - Installing the door gasket - 2

Repair

BOSCH SGS2HTW73E - Repair - 1

Repair

  1. Attach the mounting hook (2).

3.

BOSCH SGS2HTW73E - Repair - 1

CAUTION!

Incorrect installation!

Damage to the cable in the area around the door hinge.

Repair

Close-up of a mechanical component with a red vertical stripe and black arrow indicating a section (no text or symbols visible).

Figure 3: Flat cable

  1. Insert the plug.

BOSCH SGS2HTW73E - Repair - 2

Repair

  1. Slide the TimeLight module into the guide (2).
  2. Connect the electrical connection.

BOSCH SGS2HTW73E - Repair - 1

Repair

Repair

  1. Release the locking hook (1).
  2. Lift up the circuit board with the holder and remove it from the control module frame (2).

Technical diagram of a mechanical assembly with numbered components, likely illustrating a machining or assembly process.

  1. Clip the clip.

Mechanical diagram showing a lever mechanism with a curved arrow indicating rotational motion (no text or symbols)

BOSCH SGS2HTW73E - Repair - 3

Repairs

4.3 Replacing the varioDrawer drawer

BOSCH SGS2HTW73E - Replacing the varioDrawer drawer - 1

Repairs

Fig. 1: For built-in installationTechnical diagram of a refrigerator interior with numbered components and directional arrows indicating flow or movement.

Fig. 2: For built-in installationTechnical diagram showing a mechanical assembly with numbered components and directional arrows indicating motion or assembly.

3.

Diagram showing a hand inserting a screw into a device with a magnified view of the screw and its insertion direction.

BOSCH SGS2HTW73E - Repairs - 4

Repairs

BOSCH SGS2HTW73E - Repairs - 1

Repairs

4.

Mechanical assembly diagram showing a red lever mechanism with labeled parts (1 and 2). No readable text or symbols present.

BOSCH SGS2HTW73E - Repairs - 2

Repairs

BOSCH SGS2HTW73E - Repairs - 1

Repairs

3D diagram of a car door with red and black arrows indicating airflow or movement. No text or symbols present.

BOSCH SGS2HTW73E - Repairs - 2

Repairs

2.

Close-up of a red mechanical hinge assembly with a green cable. No visible text or symbols.

BOSCH SGS2HTW73E - Repairs - 2

Repairs

BOSCH SGS2HTW73E - Repairs - 1

Repairs

4.

Pure technical line drawing of curved structural elements without any text or symbols.

BOSCH SGS2HTW73E - Repairs - 2

Repairs

BOSCH SGS2HTW73E - Repairs - 1

Repairs

BOSCH SGS2HTW73E - Repairs - 1

Repairs

Close-up of a mechanical component with a red vertical stripe and a black arrow indicating a section (no text or symbols visible).

BOSCH SGS2HTW73E - Repairs - 2

Repairs

4.17.1 Removing the interior door 731

4.17.2 Installing the interior door 731

4.18 Replacing the door hinge 732

4.18.1 Removing the door hinge 732

4.18.2 Install the door hinge....732

4.2.3 Install the steam insert

BOSCH SGS2HTW73E - Install the steam insert - 1

Repair

4.3 Replace the Vario drawer

4.3.1 Remove the Vario drawer

BOSCH SGS2HTW73E - Remove the Vario drawer - 1

Repair

4.4.2 Install the spray arm

4.5.2 Install the filters

  1. Press the side panel onto the appliance (2).
  2. Secure the side panel with screws (3).

BOSCH SGS2HTW73E - Install the filters - 1

Repair

4.11 Replace the outer door

Prerequisite:

3.

Diagram showing a hand inserting a screw into a device with a magnified view of the screw and its insertion direction.

4.11.2 Install the outer door

Technical diagram of a refrigerator interior with labeled components and directional arrows indicating parts of the door.

  1. Press the outer door against the inner door and hold it (2).

4.

Diagram showing a hand holding a screwdriver inserted into a tray with a magnified inset highlighting the screw and its direction.

  1. Fix the outer door with four screws (4 metal screws of 11 mm).

Diagram of a device with a screw and a magnified inset showing the screw being inserted (no text or symbols).

BOSCH SGS2HTW73E - Install the outer door - 4

Repair

4.12 Replacing the control panel

Diagram of a device interior with numbered components and colored wiring, likely illustrating a mechanical or electrical component layout.

  1. Remove the control panel.

4.12.2 Installing the control panel

BOSCH SGS2HTW73E - Installing the control panel - 1

Use the 4 x 16 mm screws.

4.14.2 Installing the lower panel

BOSCH SGS2HTW73E - Installing the lower panel - 1

Repair

4.15 Replacing the base socket plate

Technical diagram showing a mechanical assembly with numbered components and directional arrows indicating motion or flow.

4.

Mechanical assembly diagram showing a red lever mechanism with labeled parts (1 and 2), no readable text or symbols present.

BOSCH SGS2HTW73E - Replacing the base socket plate - 3

Repair

  1. Insert the screwdriver under the metal clip (1).
  2. Gently release the metal clip (2).

Mechanical assembly diagram showing a lever mechanism with labeled parts (1 and 2), no readable text or symbols present.

4.16.2 Install the overflow channel.

Technical diagram showing mechanical assembly with numbered components and directional arrows indicating motion or flow.

BOSCH SGS2HTW73E - Repair - 3

Repair

3D diagram of a car door with red and black arrows indicating airflow or movement, no text or symbols present.

BOSCH SGS2HTW73E - Repair - 2

Repair

4.17 Replace the inner door

Prerequisite:

4.17.1 Remove the inner door

4.17.2 Install the inner door

4.18.2 Install the door hinge

BOSCH SGS2HTW73E - Install the door hinge - 1

Technical diagram showing mechanical assembly with numbered components and directional arrows indicating motion or movement.

2.

Close-up of a red mechanical bracket with green cable and arrow indicating assembly (no text or symbols).

BOSCH SGS2HTW73E - Install the door hinge - 4

Repair

  1. Detach the overflow channel.

3D mechanical assembly diagram showing a sliding mechanism with a red component (no text or symbols visible).

BOSCH SGS2HTW73E - Repair - 2

Repair

4.

Pure technical line drawing of curved pipe or channel sections without any text, numbers, or symbols.

BOSCH SGS2HTW73E - Repair - 2

Repair

4.21 Replacing the EmotionLight

Technical diagram showing a disassembly or repair process with labeled components and directional arrows indicating movement.

BOSCH SGS2HTW73E - Replacing the EmotionLight - 2

Repair

  1. Engage the snap hook (2).

3.

Close-up of a mechanical component with a red vertical rod and black arrow pointing to a detail (no visible text or symbols).

BOSCH SGS2HTW73E - Repair - 2

Repair

Close-up of a mechanical component with a red vertical stripe and black arrow indicating a section (no text or symbols visible).

Fig. 3: Flat cable

  1. Insert the plug.

BOSCH SGS2HTW73E - Repair - 2

Repair

4.22 Replacing the TimeLight

Technical diagram showing a mechanical assembly with numbered components and highlighted parts, likely illustrating a machining or assembly process.

4.23.1 Removing the Gap Illumination

  1. Release the snap hook at the rear (1).
  2. Remove the optical fiber (2).

3D mechanical assembly diagram showing internal components and a directional arrow (no text or symbols)

BOSCH SGS2HTW73E - Removing the Gap Illumination - 2

Repair

4.23.2 Installing the Gap Illumination

BOSCH SGS2HTW73E - Installing the Gap Illumination - 1

Repair

BOSCH SGS2HTW73E - Repair - 1

Repair

Repair

4.5.2 Installing the filters

3.

Diagram showing a hand inserting a screw into a device with a magnified view of the screw and its insertion direction.

Repair

  1. Lift the panel.

BOSCH SGS2HTW73E - Repair - 1

Repair

4.

Mechanical assembly diagram showing a red lever mechanism with labeled parts (1 and 2), no readable text or symbols present.

BOSCH SGS2HTW73E - Repair - 2

Repair

BOSCH SGS2HTW73E - Repair - 1

Repair

3D diagram of a car door with red and black arrows indicating airflow or movement, no text or symbols present

BOSCH SGS2HTW73E - Repair - 2

Repair

4.18.2 Installing the door hinge

BOSCH SGS2HTW73E - Installing the door hinge - 1

Technical diagram showing mechanical assembly with numbered components and directional arrows indicating motion or movement.

2.

Close-up of a red mechanical bracket with green cable and arrow indicating assembly (no text or symbols)

BOSCH SGS2HTW73E - Installing the door hinge - 4

Repair

  1. Remove the overflow gutter.

3D mechanical assembly diagram showing a sliding mechanism with a red lock and housing (no text or symbols)

  1. Lift the overflow gutter.

3D mechanical assembly diagram showing internal components and mounting features (no text or symbols visible)

Repair

4.19.2 Installing the door seal

4.

Pure technical line drawing of curved structural elements without any text or symbols.

BOSCH SGS2HTW73E - Installing the door seal - 2

Repair

4.21 Replacing the EmotionLight lamp

Technical diagram showing a disassembly or repair process with labeled components and directional arrows indicating movement.

BOSCH SGS2HTW73E - Replacing the EmotionLight lamp - 2

Repair

BOSCH SGS2HTW73E - Repair - 1

Repair

Close-up of a mechanical component with a red vertical stripe and black arrow indicating a section (no text or symbols visible).

Fig. 3: Flat cable

  1. Insert the plug.

BOSCH SGS2HTW73E - Repair - 2

Repair

BOSCH SGS2HTW73E - Repair - 1

Repair

4.23.2 Installing the Gap Illumination lamp

  1. Snap the cup holder retainer into place.

Technical diagram showing a mechanical assembly with labeled components and directional arrows indicating motion or force vectors.

  1. Fold out the handle.

Mechanical diagram showing a lever mechanism with a curved arrow indicating rotational motion (no text or symbols)

BOSCH SGS2HTW73E - Installing the Gap Illumination lamp - 3

Repair

BOSCH SGS2HTW73E - Repair - 1

Repair

  1. Carefully bend the guide handles outward.

3D architectural diagram showing structural grid and rebar layout with labeled components (no text or symbols present)

  1. Pull the folding wires out of the holders.
  2. Press the metal frame on the front out of the handles.

3D diagram of a mechanical assembly with blue structural elements and directional arrows indicating motion (no text or symbols)

4.4.2 Installing the spray arm

  1. Insert the lower spray arm. The spray arm clicks into place.
  2. Insert the upper spray arm and screw it firmly into place.

BOSCH SGS2HTW73E - Installing the spray arm - 1

Repair

4.5 Replacing the filters

4.5.1 Removing the filter

The spray head for the baking tray clicks into place.

BOSCH SGS2HTW73E - Removing the filter - 1

Repair

The pump cover clicks into place.

BOSCH SGS2HTW73E - Repair - 1

Repair

Fig. 1: Fully integratedTechnical diagram of a multi-chamber refrigerator with numbered components and directional arrows indicating internal flow or movement.

Fig. 2: Fully integratedTechnical diagram showing a mechanical assembly with numbered components and directional arrows indicating motion or assembly.

3.

BOSCH SGS2HTW73E - Repair - 3

Secure the door and hold it from one side.

  1. Disconnect the grounding cable (3) (optional).
  2. Open the appliance door.
  3. Ensure that the control panel does not fall (hold it).
  4. Remove the six screws.

Diagram of a computer monitor with a screw icon and labeled ports (no text or symbols on the device itself)

  1. Repeat the process on the other side of the appliance.

BOSCH SGS2HTW73E - Repair - 5

Repair

  1. Lift the panel.

BOSCH SGS2HTW73E - Repair - 1

Repair

4.

Mechanical assembly diagram showing a red pipe connection with numbered components (no text or symbols).

BOSCH SGS2HTW73E - Repair - 2

Repair

3D diagram of a mechanical assembly with red and black arrows indicating directional flow (no text or symbols).

2.

3D mechanical assembly diagram showing red bracket and green cable connection. No text or symbols.

BOSCH SGS2HTW73E - Repair - 3

Repair

4.19.2 Installing the door gasket

4.

Pure technical line drawing of curved pipe or channel sections without any text, numbers, or symbols.

BOSCH SGS2HTW73E - Installing the door gasket - 2

Repair

4.21 Replacing EmotionLight

Technical diagram showing a disassembly or repair process with labeled components and directional arrows indicating movement.

  1. Remove the handle by pulling it upwards (2).
  2. Disconnect the plug from the connector (bottom right on the front of the appliance).
  1. Remove the EmotionLight from the appliance.

4.21.2 Installing the EmotionLight

BOSCH SGS2HTW73E - Installing the EmotionLight - 1

Repair

BOSCH SGS2HTW73E - Repair - 1

Repair

Close-up of a mechanical component with a red vertical stripe and black arrow indicating a section (no text or symbols visible)

  1. Pull the TimeLight module upward out of the guide (2).

4.22.2 Installing the TimeLight

  1. Push the TimeLight module into the guide (2).
  2. Make the electrical connection.

BOSCH SGS2HTW73E - Installing the TimeLight - 1

Repair

4.23 Replacing the Gap illumination

Requirement:

BOSCH SGS2HTW73E - Requirement: - 1

Repair

4.23.2 Installing the Gap illumination

  1. Tighten it until it clicks into place.

CLICK

  1. Install the light guide and tighten it until it clicks into place.

3D mechanical assembly diagram showing internal components with a highlighted 'CLICK' button (no text or symbols beyond the label)

  1. Slightly lift the front part of the work surface (3).
  2. Push the work surface away from the rear part (4).
  3. Remove the work surface.
  1. Fold the support.

Mechanical diagram showing a lever mechanism with a curved arrow indicating rotational motion (no text or symbols present)

BOSCH SGS2HTW73E - Installing the Gap illumination - 4

Repair

4.3 Replacing varioDrawer drawers

4.3.1 Removing varioDrawer drawers

BOSCH SGS2HTW73E - Removing varioDrawer drawers - 1

Repair

  1. Pull the folding rod supports out of the tab.
  2. Press the metal frame out of the holders at the front.

3D diagram of a mechanical assembly with blue structural elements and directional arrows indicating motion (no text or symbols).

  1. Pull the metal frame back, out of the guide.

4.3.2 Installing the varioDrawer drawer

▶ Install in reverse order.

BOSCH SGS2HTW73E - Installing the varioDrawer drawer - 1

Repair

Fig. 1: Fully integratedTechnical diagram of a multi-chamber refrigerator with numbered components and directional arrows indicating internal flow or movement.

Fig. 2: Fully integrated

Technical diagram showing a mechanical assembly with numbered components and directional arrows indicating motion or assembly.

  1. Push the side panel onto the appliance (2).
  2. Secure the side panel with screws (3).

BOSCH SGS2HTW73E - Repair - 3

Repair

4.11 Replacing the outer door

Requirement:

3.

BOSCH SGS2HTW73E - Replacing the outer door - 1

Hold the door by gripping it on one side.

Remove the two screws.

Diagram showing a hand inserting a screw into a device with a magnified view of the screw and its insertion direction.

BOSCH SGS2HTW73E - Replacing the outer door - 3

Repair

Requirement:

  1. Press the outer door against the inner door and hold it in place (2).

4.

BOSCH SGS2HTW73E - Requirement: - 1

Hold the door by gripping it on one side.

BOSCH SGS2HTW73E - Requirement: - 2

Repair

  1. Remove the control panel.
  1. Open the door slightly (1).
  2. Engage it in the notch of the base tub (2).
  3. Slowly close the door (3).

Technical diagram showing mechanical assembly steps with numbered annotations indicating sequence of components.

The cable system automatically attaches to the door hinge.

BOSCH SGS2HTW73E - Repair - 2

Repair

  1. Close the door slightly (4).
  2. Move the notch back and release the door hinge (5).
  3. Open the door (6).

Technical diagram showing assembly steps of a mechanical component with numbered annotations indicating different states or features.

  1. Repeat the procedure on the other side of the appliance.

BOSCH SGS2HTW73E - Repair - 2

Repair

  1. Remove the bar.
  2. Remove the legs in the forward direction (1).

Mechanical assembly diagram showing red components and directional arrows (no text or symbols).

BOSCH SGS2HTW73E - Repair - 2

Repair

4.

Mechanical assembly diagram showing a red pipe connection with labeled parts (no text or symbols present).

BOSCH SGS2HTW73E - Repair - 2

Repair

  1. Lift the overflow channel.

3D technical diagram of a mechanical assembly with red components and a central hub (no visible text or symbols).

BOSCH SGS2HTW73E - Repair - 2

Repair

  1. Check the adjustment on the left and right sides. 3. Check the firmness of the installation.

Mechanical assembly diagram showing a red component with arrows indicating motion or assembly, and an inset magnified view of a mechanical part (no text or symbols visible).

3D diagram of a car door frame with red and black arrows indicating directional movement (no text or symbols).

  1. Unclip the metal clip on the left and right sides.
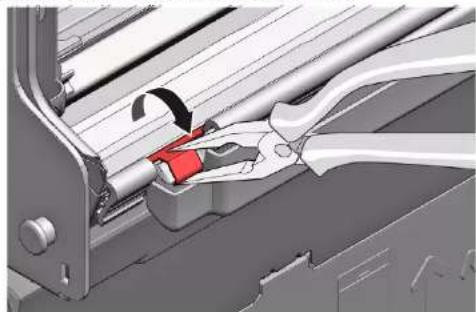
Mechanical assembly diagram showing a tool interacting with a rod and bracket (no text or symbols visible).

  1. Attach the door hinge with screws.
  2. Install the inner door onto the door hinge.
  3. Attach the inner door with screws.

2.

Close-up of a red mechanical bracket with a green cable and an arrow indicating assembly (no text or symbols).

BOSCH SGS2HTW73E - Repair - 5

Repair

  1. Disconnect the overflow channel.

3D mechanical assembly diagram showing a sliding mechanism with a red component (no text or symbols visible).

  1. Remove the overflow trough.

3D mechanical assembly diagram showing internal components and a central hub (no text or symbols visible).

BOSCH SGS2HTW73E - Repair - 3

Repair

4.

BOSCH SGS2HTW73E - Repair - 1

In the corners, the gasket must not be wrinkled or stretched. The end of the gasket is cut diagonally and is hidden in the front lower part of the tub.

Place the end of the gasket straight forward under the inner door. The gasket must be laid along the edge of the tub as far as possible.

Pure technical line drawing of curved pipe or channel sections without any text, numbers, or symbols.

BOSCH SGS2HTW73E - Repair - 3

Repair

4.21 Replacing the EmotionLight

Diagram showing a device's internal components with numbered annotations indicating parts of the main body and a wrench.

  1. Remove the holder in an upward direction (2).
  2. Pull the plug out of the connector (bottom right on the front of the appliance).
  1. Remove the EmotionLight from the appliance.

4.21.2 Installing the EmotionLight

  1. Insert the holder into the frame of the rinse tub (1).

Technical diagram showing a device's internal components with numbered annotations indicating parts of the main body and parts of the rear panel.

BOSCH SGS2HTW73E - Installing the EmotionLight - 2

Repair

  1. Make sure that the locking pins engage (2).

3.

BOSCH SGS2HTW73E - Repair - 1

CAUTION!

BOSCH SGS2HTW73E - CAUTION! - 1

Repair

Close-up of a mechanical component with a red vertical stripe and a black arrow indicating a cut or section (no text or symbols visible).

  1. Pull the TimeLight module upward and out of the guide (2).

4.22.2 Installing TimeLight

  1. Bend the retaining elements (1) back.

Technical diagram showing a red structural component with numbered annotations indicating parts of the assembly.

  1. Push the TimeLight module back into the guide (2).
  2. Connect the electrical connector.

BOSCH SGS2HTW73E - Installing TimeLight - 2

Repair

4.23 Replacing Gap illumination

Requirement:

BOSCH SGS2HTW73E - Requirement: - 1

Repair

4.23.2 Installing Gap illumination

  1. Attach it until you hear a click.

CLICK

  1. Attach the clip.

Mechanical diagram showing a lever mechanism with a curved arrow indicating rotational motion (no text or symbols).

BOSCH SGS2HTW73E - Installing Gap illumination - 3

Repair

BOSCH SGS2HTW73E - Repair - 1

Repair

4.3 Replacing the varioDrawer system

4.3.1 Removing the varioDrawer system

Repair

4.5.2 Installing the filters

Fig. 1: Fully integratedTechnical diagram of a multi-chamber refrigerator with numbered components and directional arrows indicating internal flow or movement.
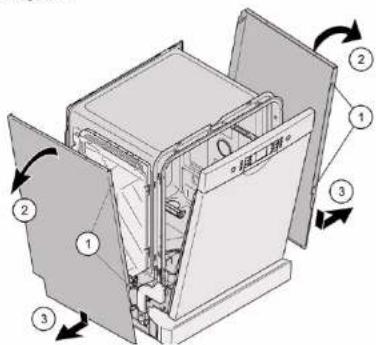
Fig. 2: Fully integratedTechnical diagram showing a mechanical assembly with numbered components and directional arrows indicating motion or assembly.

3.

Diagram showing a hand holding a screwdriver inserted into a device with a magnified inset highlighting the screw and its insertion direction.

BOSCH SGS2HTW73E - Installing the filters - 4

Repair

  1. Remove the panel.

4.14.2 Installing the plinth

BOSCH SGS2HTW73E - Installing the plinth - 1

Repair

4.15 Replacing the base socket plate

Technical diagram showing a mechanical assembly with numbered components and directional arrows indicating motion or flow.

4.

Mechanical assembly diagram showing a red lever mechanism with labeled parts (1 and 2). No readable text or symbols present.

BOSCH SGS2HTW73E - Replacing the base socket plate - 3

Repair

BOSCH SGS2HTW73E - Repair - 1

Repair

3D diagram of a car door frame with red and black arrows indicating directional movement. No text or symbols.

BOSCH SGS2HTW73E - Repair - 2

Repair

4.17 Replacing the inner door

Requirement:

4.18.2 Mounting the door hinge

Technical diagram showing mechanical assembly with numbered components and directional arrows indicating motion or movement.

2.

Close-up of a red mechanical bracket with green cable and arrow indicating assembly. No text or symbols.

Repair

4.

Pure technical line drawing of curved pipe or channel sections without any text, numbers, or symbols.

BOSCH SGS2HTW73E - Repair - 2

Repair

4.21 Replacing the EmotionLight system

Technical diagram showing a mechanical assembly with labeled parts and directional arrows indicating movement or assembly.

  1. Remove the EmotionLight from the appliance.

4.21.2 Mounting the EmotionLight system

BOSCH SGS2HTW73E - Mounting the EmotionLight system - 1

Repair

Repair

Mechanical assembly diagram showing a red highlighted section with a black arrow pointing to a component (no text or symbols present).

Fig. 3: Flat cable

BOSCH SGS2HTW73E - Repair - 2

Repair

  1. Fold up the clamp.

Mechanical diagram showing a lever mechanism with a curved arrow indicating rotational motion (no text or symbols present)

BOSCH SGS2HTW73E - Repair - 2

Repair

BOSCH SGS2HTW73E - Repair - 1

Repair

4.3 Replacing the varioDrawer

4.3.1 Removing the varioDrawer

BOSCH SGS2HTW73E - Removing the varioDrawer - 1

Repair

4.4.2 Installing the spray arm

4.5.2 Installing the filter

3.

Diagram showing a hand inserting a screw into a device with a magnified view of the screw and its insertion direction.

4.11.2 Installing the outer door

Technical diagram of a refrigerator interior with labeled components and directional arrows indicating parts of the door.

BOSCH SGS2HTW73E - Installing the outer door - 2

Repair

4.12 Replacing the control panel

Diagram of a device interior with numbered components and colored wiring, likely illustrating a mechanical or electrical component layout.

4.14.2 Installing the foot panel

BOSCH SGS2HTW73E - Installing the foot panel - 1

Repair

4.

Mechanical assembly diagram showing a red lever mechanism with labeled parts (1 and 2), no readable text or symbols present.

BOSCH SGS2HTW73E - Repair - 2

Repair

BOSCH SGS2HTW73E - Repair - 1

Repair

3D diagram of a car door frame with red and black arrows indicating directional movement. No text or symbols.

BOSCH SGS2HTW73E - Repair - 2

Repair

4.17 Replacing the inner door

Prerequisite:

2.

Close-up of a red mechanical bracket with green cable and arrow indicating connection. No text or symbols.

BOSCH SGS2HTW73E - Replacing the inner door - 2

Repair

4.19 Replacing the door seal (lower)

Prerequisite:

BOSCH SGS2HTW73E - Prerequisite: - 1

Repair

4.

Pure technical line drawing of curved pipe or channel sections without any text, numbers, or symbols.

BOSCH SGS2HTW73E - Repair - 2

Repair

4.21 Replacing EmotionLight

Technical diagram showing a device's internal components with numbered annotations indicating parts of the main body and parts of the device.

  1. Remove the EmotionLight from the machine.

4.21.2 Installing EmotionLight

BOSCH SGS2HTW73E - Installing EmotionLight - 1

Repair

BOSCH SGS2HTW73E - Repair - 1

Repair

Close-up of a mechanical component with a red vertical stripe and black arrow indicating a cut or section (no text or symbols visible).

Figure 3: Flat cable

  1. Insert the connector.

BOSCH SGS2HTW73E - Repair - 2

Repair

4.22 Replacing TimeLight

Technical diagram showing a mechanical assembly with numbered components and highlighted parts, likely illustrating a component assembly or assembly.

  1. Pull the TimeLight module out of the control unit (2).

4.22.2 Installing TimeLight

4.23 Replacing Gap illumination

Prerequisite:

3D mechanical assembly diagram showing internal components with no visible text or symbols.

BOSCH SGS2HTW73E - Prerequisite: - 2

Repair

4.23.2 Montera Gap illumination

  1. Connect the cable to the operating module.

BOSCH SGS2HTW73E - Repair - 1

Repair

BOSCH SGS2HTW73E - Repair - 1

Repair

BOSCH SGS2HTW73E - Repair - 1

Repair

Figure 1: Fully built-inTechnical diagram of a multi-chamber refrigerator with numbered components and directional arrows indicating internal flow.

Figure 2: Fully built-inTechnical diagram showing a mechanical assembly with numbered components and directional arrows indicating motion or assembly.

  1. Press the side panel against the appliance (2).
  2. Secure the side panel with screws (3).

BOSCH SGS2HTW73E - Repair - 3

Repair

3.

Diagram showing a hand inserting a screw into a device with a magnified view of the screw and its insertion direction.

BOSCH SGS2HTW73E - Repair - 2

Repair

BOSCH SGS2HTW73E - Repair - 1

Repair

4.

Mechanical assembly diagram showing a red lever mechanism with labeled parts (1 and 2), no readable text or symbols present.

3D mechanical assembly diagram showing internal components and mounting features (no text or symbols visible)

Mechanical assembly diagram showing a red component with arrows pointing to a specific part, no visible text or symbols.

3D diagram of a vehicle door frame with red and black arrows indicating directional flow (no text or symbols)

Mechanical assembly diagram showing two views of a red component with arrows indicating parts.

2.

Close-up of a red mechanical bracket with green cable and arrow indicating connection.

Mechanical assembly diagram showing a lever mechanism with labeled parts (1 and 2).

3D mechanical assembly diagram showing a red structural component with directional arrows indicating flow or movement.

4.

Technical line drawing of curved structural elements.

Diagram showing a device's internal components with numbered annotations indicating parts of the main body and adjustment.

Close-up of a mechanical component with a red vertical rod and a black arrow pointing to a detail. No visible text or symbols.

BOSCH SGS2HTW73E - Repair - 12

Close-up of a mechanical component with a red vertical stripe and a black arrow indicating a cut or section. No text or symbols visible.

Figure 3: Flat cable

  1. Insert the plug.

Technical diagram showing a mechanical assembly with numbered components and directional arrows indicating motion or force.

Technical diagram of a mechanical assembly with numbered components, likely a valve or actuator assembly.

Table of contents Click a title to access it
Manual assistant
Powered by Anthropic
Waiting for your message
Product information

Brand : BOSCH

Model : SGS2HTW73E

Category : Dishwasher