BFV157 - TV Stand SANUS - Free user manual and instructions
Find the device manual for free BFV157 SANUS in PDF.
Download the instructions for your TV Stand in PDF format for free! Find your manual BFV157 - SANUS and take your electronic device back in hand. On this page are published all the documents necessary for the use of your device. BFV157 by SANUS.
USER MANUAL BFV157 SANUS
Customer Service Americas: 800-359-5520 • 651-484-7988 • info@sanus.com Europe, Middle East, and Africa: +31 (0) 495 580 852 • europe.sanus@milestone.com Asia Pacic: 86 755 8996 9226 • sanus.ap@milestone.com SANUS • 6436 City West Parkway • Eden Prairie, MN • 55344 ©2011 Milestone AV Technologies, a Duchossois Group Company. All rights reserved. Sanus is a division of Milestone.All other brand names or marks are used for identication purposes and are trademarks of their respective owners. sanus.com We are here to help! Please contact Customer Service with any questions. 6901-002148 00) BFV157 Instruction Manual6901-002148 00)
English - How to use this manual For best results, reference both the text and illustrations.
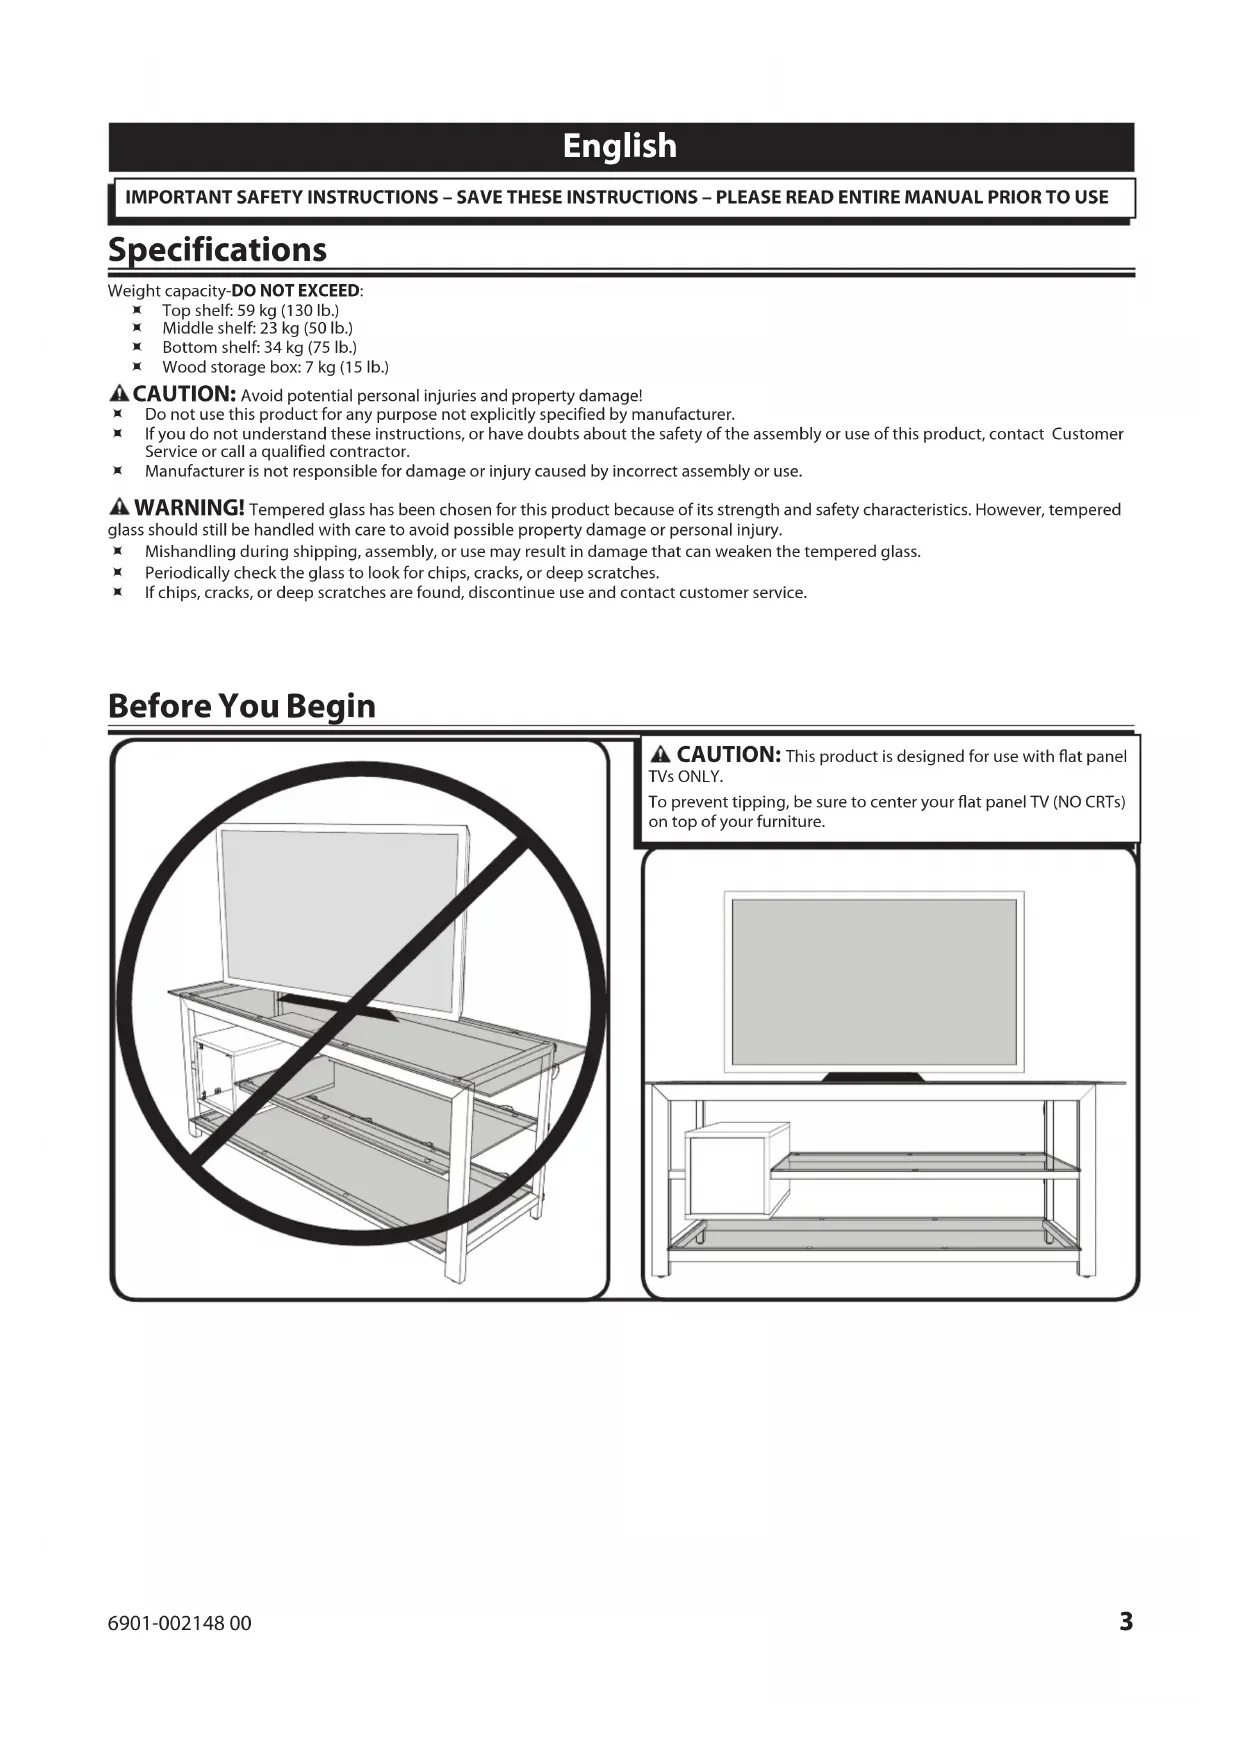
IMPORTANT SAFETY INSTRUCTIONS – SAVE THESE INSTRUCTIONS – PLEASE READ ENTIRE MANUAL PRIOR TO USE Specifications Weight capacity-DO NOT EXCEED: Ù Top shelf: 59 kg (130 lb.) Ù Middle shelf: 23 kg (50 lb.) Ù Bottom shelf: 34 kg (75 lb.) Ù Wood storage box: 7 kg (15 lb.) CAUTION: Avoid potential personal injuries and property damage! Ù Do not use this product for any purpose not explicitly specified by manufacturer. Ù If you do not understand these instructions, or have doubts about the safety of the assembly or use of this product, contact Customer Service or call a qualified contractor. Ù Manufacturer is not responsible for damage or injury caused by incorrect assembly or use. WARNING! Tempered glass has been chosen for this product because of its strength and safety characteristics. However, tempered glass should still be handled with care to avoid possible property damage or personal injury. Ù Mishandling during shipping, assembly, or use may result in damage that can weaken the tempered glass. Ù Periodically check the glass to look for chips, cracks, or deep scratches. Ù If chips, cracks, or deep scratches are found, discontinue use and contact customer service. English Before You Begin CAUTION: This product is designed for use with at panel TVs ONLY.To prevent tipping, be sure to center your at panel TV (NO CRTs) on top of your furniture.6901-002148 00)
WARNING: This product contains small items that could be a choking hazard if swallowed.
Before starting assembly, verify all parts are included and undamaged. If any parts are missing or damaged, do not return the damaged item to your dealer; contact Customer Service. Never use damaged parts! [08] x 1 [11] x 1 [12] x 1 [13] x 4 [14] x 6 [16] x 6 [15] x 22 [17] x 86901-002148 00)
1 Attach Feet Screw the feet [13] into the holes in the bottoms of the front [01] and sides [11] [12]. 2 Attach the Sides to the Front Lay the front [01] face down. Secure the right side [11] to the front using two small threaded knobs [16]. Repeat for the left side [12]. [01] [13] [12] [11] [01] [11] [16] [12] [16]6901-002148 00)
Set the unit on its feet. Secure the top tube [05] to the sides [11] [12] using the large threaded knobs [14]. Repeat for the bottom [05] and middle [06] tubes. 3 Attach Back Tubes 4 Attach Glass Pads Attach glass pads [15] to the front [01] sides [11] [12] and tubes [05], [06] as shown in the graphic. [01] [05] [05] [12] [11] [14] [06] [15] [01] [12] [11] [06] [05] [05]6901-002148 00)
5 Assemble Wood Box Insert the hinge of the door [08] into the plastic insert in the bottom [10]. Secure the box top [07] to the box sides [09] and door [08] using the cams (C) and dowels [17]. Secure the box sides [09] to the box bottom [10] using the cams (C) and dowels [17].
For wood box assembly: Before assembling the wood box, open the cams (C). Cams are open when the tab is NOT ush with the front surface fo the cam. Lock the cams after assembling each piece to secure. Cams are closed when the tab is ush with the front surface of the cam. Image 1 shows the cam in the open position. Image 2 shows the cam closed and locked.
Slide the wood box into the unit as shown. Be sure the back of the box fits securely over the center back tube [06].
Secure the box into place using two small threaded knobs [16]. [06] [16] [16]6901-002148 00)
Set the middle glass shelf [02] evenly onto the glass pads [15] next to the wood box. 7 Install Glass Shelves Set the bottom glass shelf [04] evenly onto the glass pads below the wood box.
Set the top glass shelf [03] evenly onto the glass pads [15] on the top of the unit.
Attach Optional Anti-Tip Strap OPT OPT For wood with a natural nish dust regularly with a soft dry cloth. When needed wipe with a moist cloth, not wet, and wipe dry. Care and Accessories The Anti-Tip Strap is sold separately. [03] [15]6901-002148 00)
Attach Optional Pillar Mount OPT OPT The Pillar Mount Kit is sold separately.6901-002148 00)