
THBD47718 - Beer dispenser THOMSON - Free user manual and instructions
Find the device manual for free THBD47718 THOMSON in PDF.

| Product type | Home beer dispenser |
| Brand | Thomson |
| Model | THBD47718 |
| Dimensions (L × P × H) | 272 × 414 × 446 mm |
| Net weight | 5.8 ± 0.5 kg |
| Power supply | 220-240 V / 50 Hz |
| Operating power | 65 W |
| Keg capacity | 5 litres (sealed pressure kegs) |
| Storage temperature | 3 to 6 °C (adjustable from 2 to 12 °C) |
| Noise level | ≤ 38 dB(A) |
| Display | Digital LCD display |
| Climate class | N/SN |
| Cooling system | Thermoelectric with water conduction and aluminum radiator |
| Insulation | PU foam, 300 ± 5 g |
| Water capacity in cavity | 800 ml (recommended filling) |
| Drip tray capacity | 450 ml |
| Included accessories | Beer tube, outlet connector, adapter, cleaning bottle |
| Main functions | Cooling, pressure dispensing, temperature adjustment, LCD screen, memory |
| Maintenance and cleaning | Clean with dry cloth; replace water weekly; clean the tap using the kit |
| Safety | Do not immerse in water; leave 10 cm space around; use on flat surface |
| Spare parts and repairability | Replaceable beer tube; removable tap; other repairs at authorized center |
| General information | Domestic use; compatible with 5L kegs; cooling time: 19-21 h (ambient 22-24°C) |
Frequently Asked Questions - THBD47718 THOMSON
User questions about THBD47718 THOMSON
0 question about this device. Answer the ones you know or ask your own.
Ask a new question about this device
Download the instructions for your Beer dispenser in PDF format for free! Find your manual THBD47718 - THOMSON and take your electronic device back in hand. On this page are published all the documents necessary for the use of your device. THBD47718 by THOMSON.
USER MANUAL THBD47718 THOMSON
natural_image
Line drawing of a modern water dispenser with lid, front panel, and side vent (no text or symbols)Figure 1

Figure 2
natural_image
Line drawing of a portable water heater with handle and control panel (no text or symbols)Figure 4
natural_image
Technical line drawing of a circular mechanical or architectural component with internal structural details (no text or symbols)Figure 5
natural_image
Technical line drawing of a mechanical device with a lever and base plate (no text or symbols)Figure 6
natural_image
Technical line drawing of a mechanical component with directional arrows indicating assembly or flow (no text or symbols)Figure 9
natural_image
Technical line drawing of a mechanical assembly with concentric circular components and a tool, no visible text or symbolsFigure 10
C. Mode d'emploi
natural_image
Technical line drawing of a mechanical device with an open lid and handle, showing internal components and directional arrows (no text or symbols)natural_image
Symbol of a trash bin with crossed lines indicating no waste or discharge, and a solid black rectangle below (no text or labels)natural_image
Line drawing of a modern water heater with a side panel and control panel (no text or symbols)Please read these instructions carefully before using this appliance. Please keep these instructions for future reference.
This product conforms to the requirements of directives 2014/35/UE (repealing directive 73/23/CEE amended by directive 93/68/CEE) and 2014/30/UE (repealing directive 89/336/CEE).
CE
INTRODUCTION
This is a household beertender with a high quality and unique design. It brings the beer to the best temperature for cold storage (3 to 6°C) within 19-21 hours. The beertender will keep the pressurized 5L Keg cool for an almost indefinite period. We do, however, suggest that you initially cool your beer keg for at least 12 hours in your refrigerator before placing it into the beertender.
IMPORTANT SAFETY INSTRUCTION
Please read the instructions carefully before using this product. Incorrect operation may cause injury to people and property. Please save the instructions to a safe place.
Safety Instruction
- Before use it, check whether the power cord is well connected or not; if not, please don’t use it, and call service center;
- Before use it, check whether the plug conform with the socket or not; if not, please don’t use it, and call service center;
- Do not connect or disconnect the electric plug when your hands are wet.
- Place the beertender on a dry and horizontal surface.
- To ensure proper ventilation for the beertender, make sure the beertender is at least 5 inches / 10cm away on either side so as to allow correct ventilation on the appliance.
- Never put the beertender under the sunlight.
- Never cover the beertender when it is operating by some other object.
- The beertender must be installed in an area protected from the elements, such wind, rain, water spray or drips.
- Before proceeding with cleaning and maintenance operation, make sure the power line of the unit is disconnected. Failure to do so can result in electric shock or death.
- Do not immerse the beertender or power plug in the water or other liquid.
- Do not use coarse cloth, abrasive stuff to clear the beertender
- Do not take beer keg out from the beertender if the beer is not drunk out completely.
- Never allow children to operate, play with or crawl inside the beertender.
- This appliance can be used by children aged from 8 years and above and persons with reduced physical, sensory or mental capabilities or lack of experience and knowledge if they have been given supervision or instruction concerning use of the appliance in
a safe way and understand the hazards involved. Children shall not play with the appliance. Cleaning and user maintenance shall not be made by children without supervision.
- Children should be supervised to ensure that they do not play with the appliance.
- Warning: Do not store explosive substances such as aerosol cans with a flammable propellant in this appliance.
- This appliance is intended to be used in household.

Suitable for food contact.
HOW TO SELECT A KEG
• Applicable for sealed 5L keg
- Pay attention to the safety and storage instruction from the pressurized beer keg
- Check the pressurized beer keg is not damaged or expired before purchasing
- Keep the pressurized beer keg in a ventilated area. Do not put the beer keg in too cold places such as refrigerator until next use
- Never shake the pressurized beer keg before using
- Never put the pressurized beer keg under sunlight
SPECIFICATIONS
| Item | Descriptions | Specification |
| 1 | Voltage | AC 220-240V/50Hz |
| 2 | Available capacity | Pressurized 5L beer keg |
| 3 Rated operating power 65W | ||
| 4 Cooling performance | The lowest temperature in the keg: 3~6°C (room temperature 22~24°C) | |
| 5 Noise level | ≤38dB(A); (ambient noise ≤25dB(A)) | |
| 6 | Dimensions | (W)272*(D)414*(H)446 mm |
| 7 Net weight 5.8±0.5kg | ||
| 8 | Elegant plastic appearance | √ |
| 9 | Aluminum radiator system | √ |
| 10 | Semi-conductor cooling technology | √ |
| 11 | Water conduction cooling system | √ |
| 12 | Manual drainage outfit | √ |
| 13 Detachable water drip tray | √ | |
| 14 Cool preservation system | PU insulation / Weight 300±5g | |
| 15 | Climate type | N/SN |
| 16 | LCD display | √ |
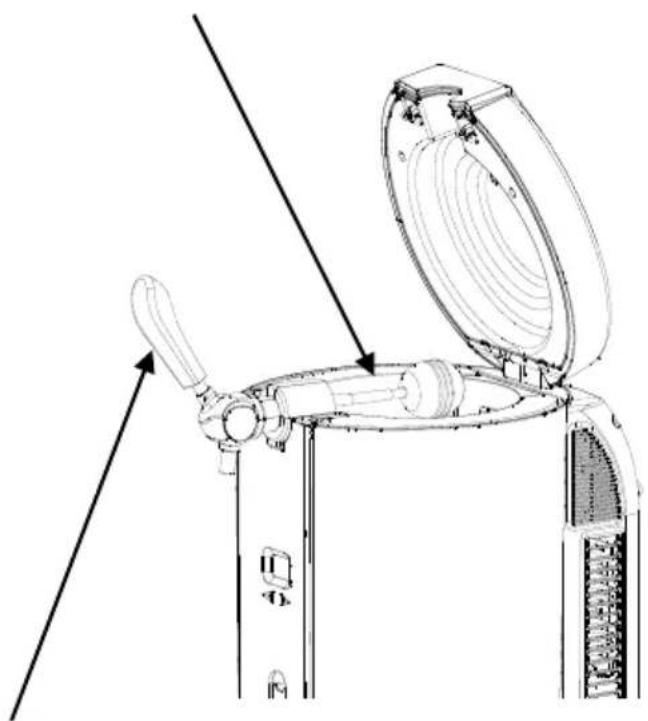
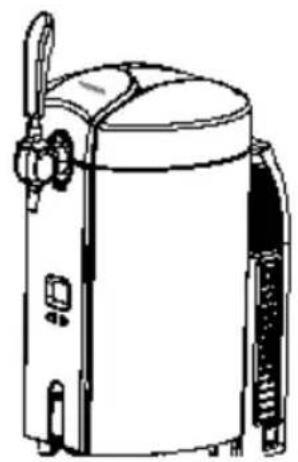
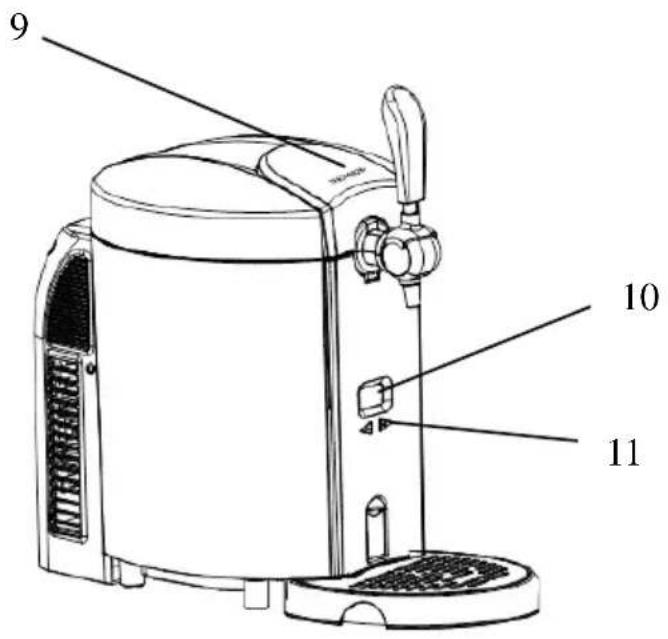
PARTS & FEATURE
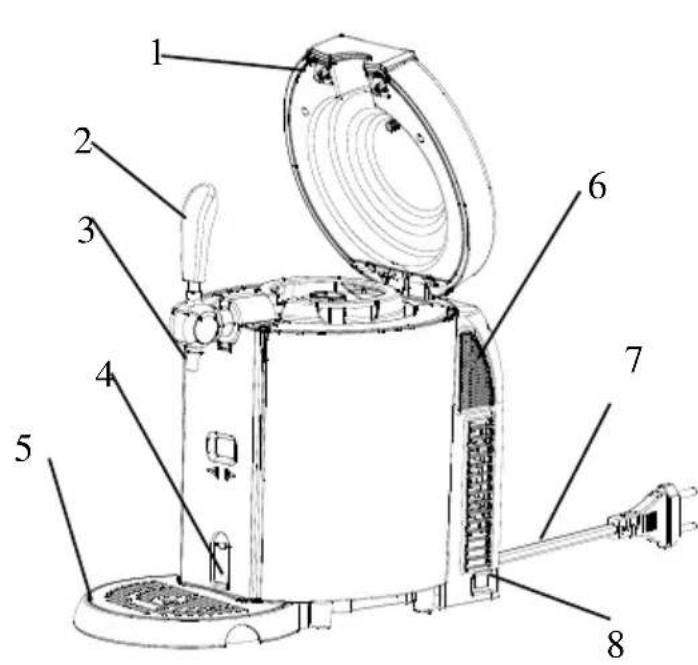
Figure 1
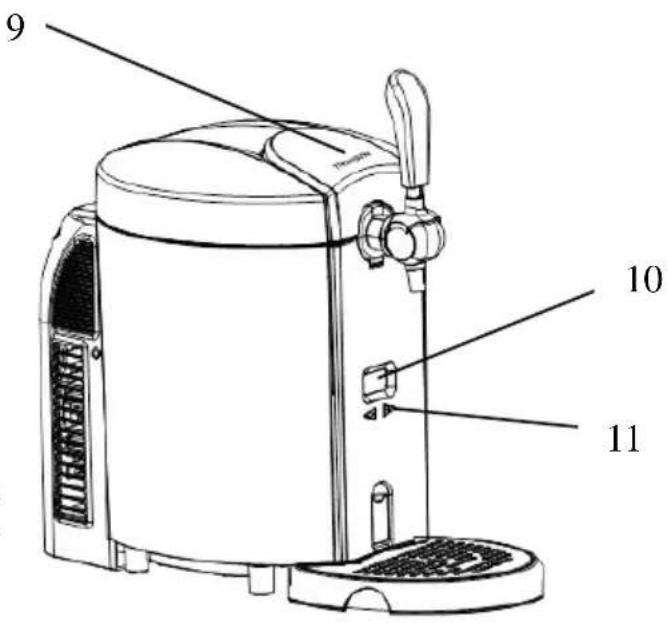
Figure 2
- Top cover
- Tap handle
- Tap
- Drain switch
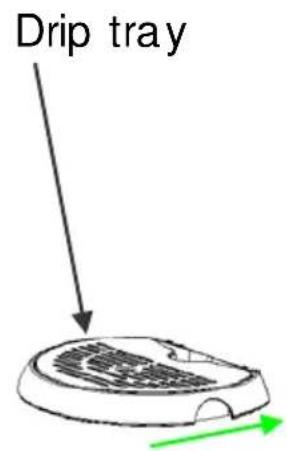
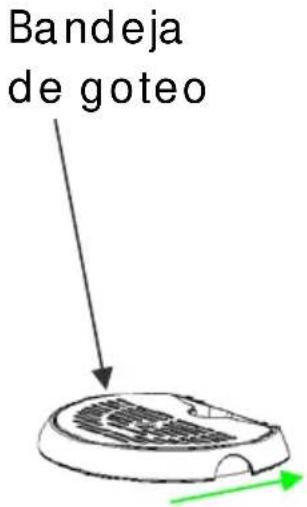
- Drip tray
- Rear cover
- Power cord & plug
- AC power switch
- Door lock button
- LCD display
- Digital control button
- Take out the beertender from the package. Put the beertender on a horizontal surface and ensure that the beertender is at least 10cm away from other appliances or wall for each side to allow ventilation.
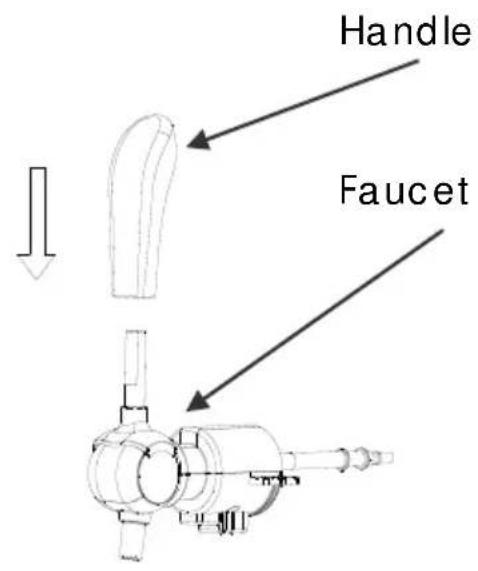
Figure 3
natural_image
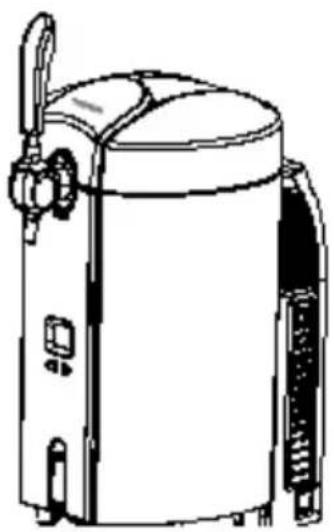
Line drawing of a cylindrical industrial vessel with attached pipes and control panel (no text or symbols)Figure 4
- Install the tap handle on the tap and ensure both end fit together perfectly. (Figure3)
- Install the drip tray into the notch provided. (Figure 4)
- Plug the beertender.
Note: Do not the plug when your hands are wet. Make sure the voltage is conformed with the beertender. If the power cord is not well connected, do not use it and call the service center.
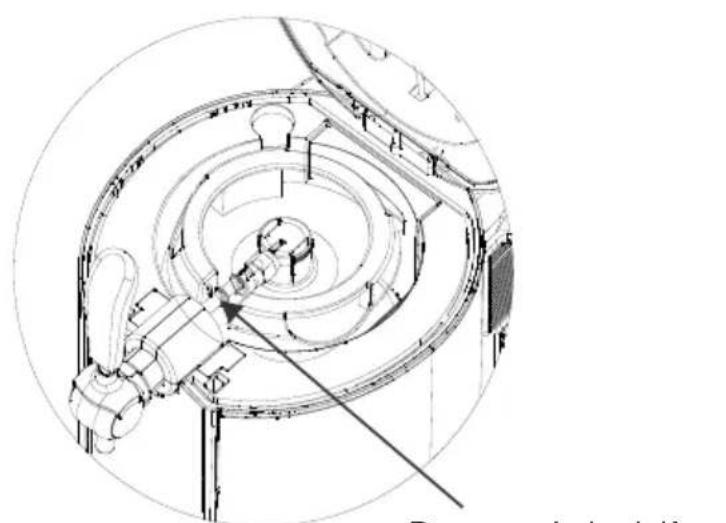
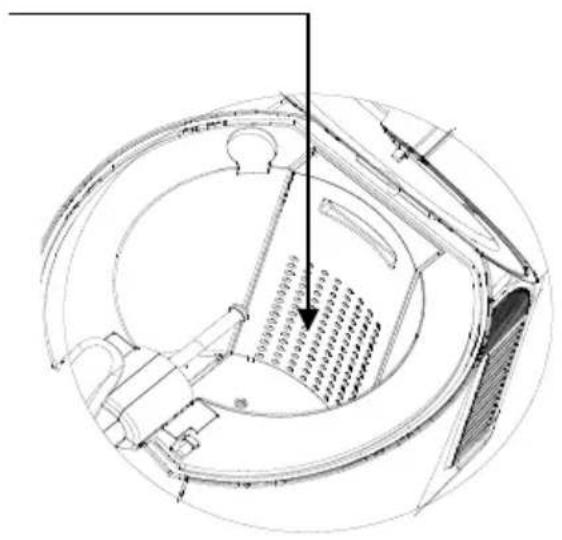
- The beertender can work without water. To achieve best performance, put 800mL of water or to the max line into the cooling cavity (Figure 5).
Note: Make sure the drain switch is closed, and no foreign objects in the cooling cavity. (Figure 6)
The max water level line Make sure the drain switch
natural_image
Technical line drawing of a circular mechanical or architectural component with internal structural details (no text or symbols)Figure 5
is closed.
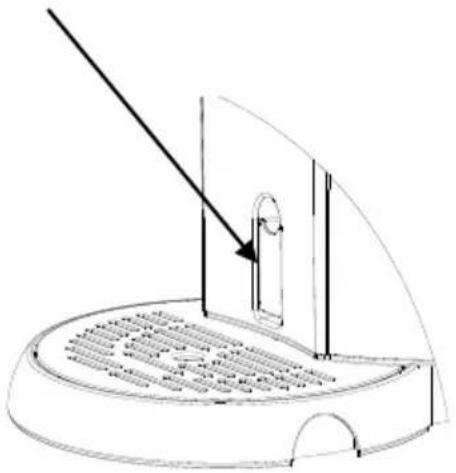
natural_image
Technical line drawing of a mechanical device with a lever and base plate (no text or symbols)Figure 6
B. Pressurized Keg
- Remove the adaptor from pressurized keg. (Figure 7) Recycle the adaptor according to the local environmental law.
- Install the new adaptor on the beertender and make sure that the hose is well connected. (Figure 8 and 9)
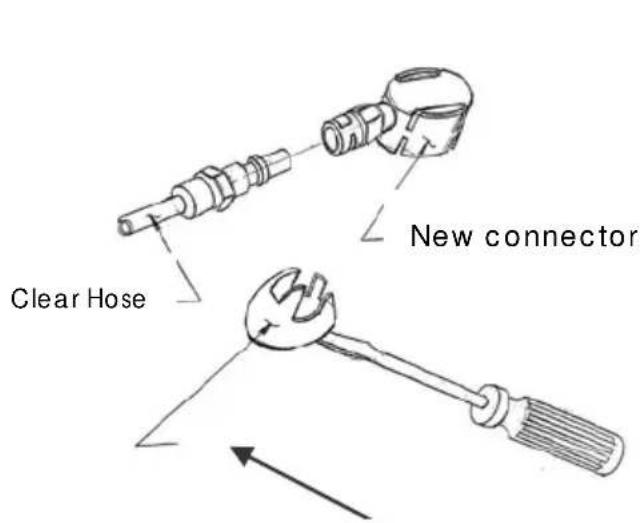
Green plastic base that must be removed from the keg to install the new connector
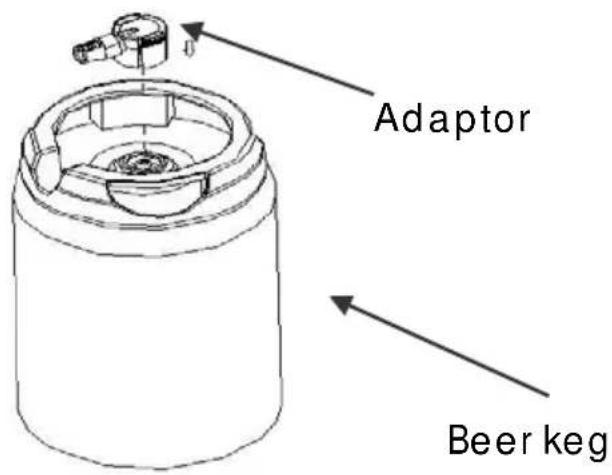
Figure 7 Figure 8
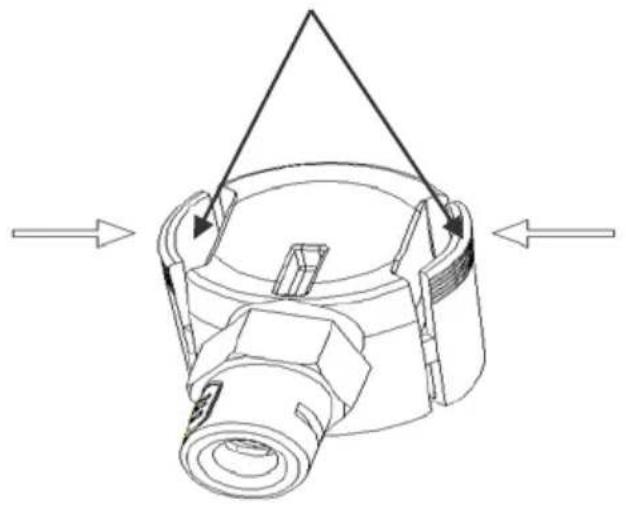
Note: Press the adaptor in both way as the arrow indicated. Otherwise the adaptor will be damaged
natural_image
Technical line drawing of a mechanical component with directional arrows indicating assembly or force (no text or symbols)Figure 9
natural_image
Technical line drawing of a mechanical assembly with concentric circular components and a tool (no text or symbols)Figure 10
Beer connector
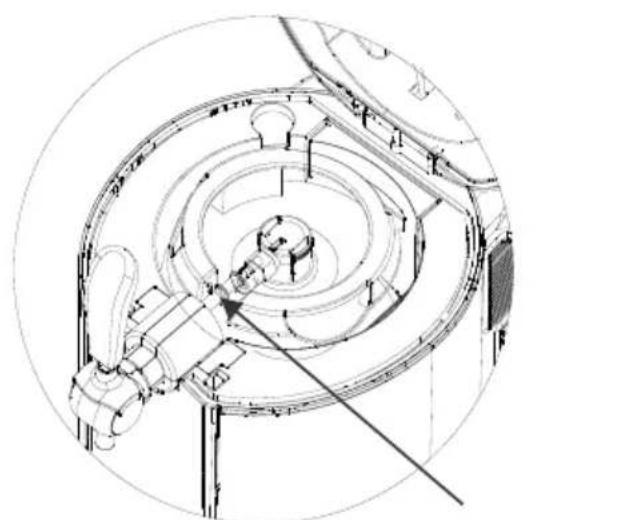
C. How to use
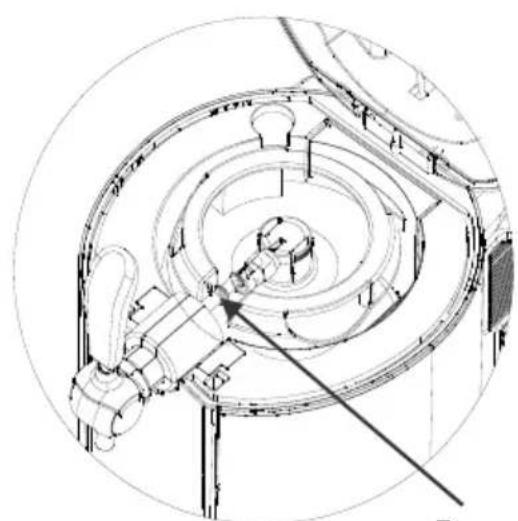
- Open the top cover by pressing the door lock (Figure 11). Place the well-assembled keg into the cooling cavity (Figure 10).
Note: Ensure that the tap is in closed position when connecting the hose and the adaptor. (Figure 12)
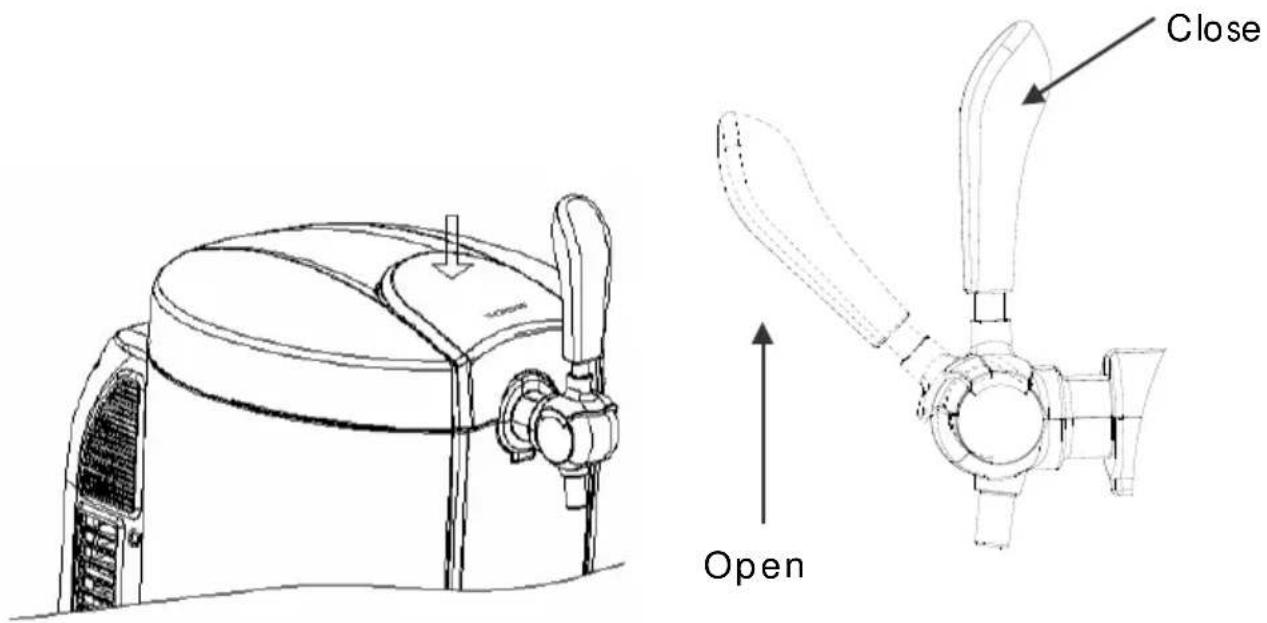
Figure 11 Figure 12
EN-10
-
C lose the top cover of the beertender.
-
Turn on the beertender by putting the switch into "I" position. (Power off at "0" position) (Figure 13)
Note: Make sure your hands are dry when you use the beertender.
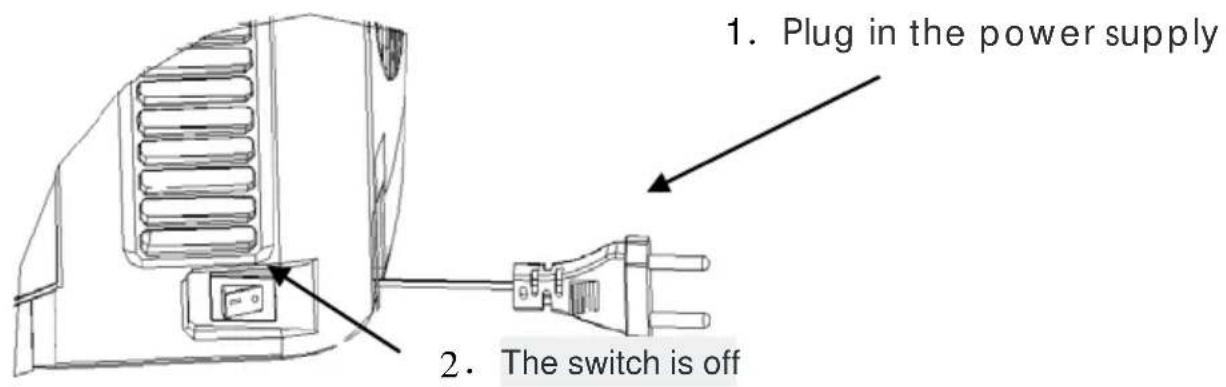
Figure 13
-
It takes 19-21 hours to cool the beet to 3 - 6^ C at a surrounding temperature of 22 - 24^ C . You can shorten the cooling time by pre-cooling the keg in advance.
-
Temperature can be pre-set by pressing the buttons (+ and - next to the temperature display) on the front panel. The temperature can be set from 2^ C to 12^ C (36°F to 54°F).
There are 6 pre-set temperatures. The LED shows the real temperature of the beer. The temperature can be set by pressing “+” button by 1 second. It will show the set temperature for 3 seconds and re-show the actual temperature of the beet.
By pressing and holding the “-” button, you can choose a certain preset temperature: 4°C (40°F), 8°C (46°F), 9°C (48°F), 10°C (50°F), 11°C (52°F) and 12°C (54°F) by press the “-” button.
Pressing and holding “+” button can change the temperature unit between °C and °F.
The beertender has a memory function. It will keep the same temperature set last time when you turn on the beertender.
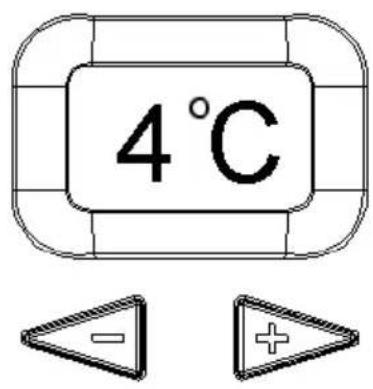
Figure 14
Figure 14
- Pull the tap handle into 45 degrees to pour the beer from the beertender. (Figure 12) the beer flow rate and bubble can be controlled by adjusting the pressure regulator knob.
Note: If the glass is with high temperature or the beer is not cool enough, there might been many bubble when pouring the beer out.
- Leaning the beer glass against the tap and slowly straighten it up when pouring the beer from the beertender. Open the tap completely to avoid too much bubble. It is suggested to pour half of the glass and pause before continuing pouring the rest.
Notes: Never immerse the tap into the beer to avoid excessive bubble. Remember to lock the tap after finishing pouring.
- Before the beer keg is used up, there will be a short spray from the nozzle.
D. REPLACE WATER INSIDE THE COOLING CAVITY
It is recommended replacing the water inside the cavity once each week. It is not necessary to replace the water for each beer keg.
Open the drain switch, water flow into the S shape drainpipe from this end
Move the drain switch to horizontal line, will start to drain water
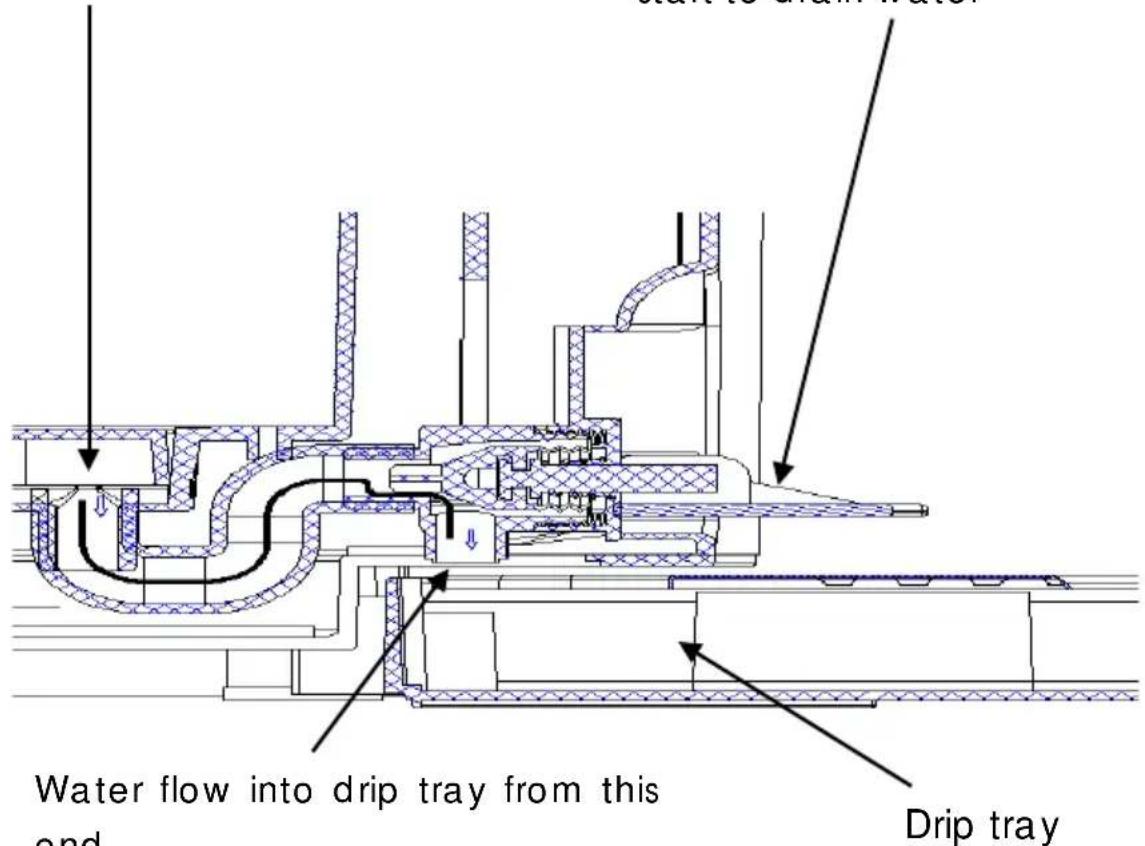
Figure 15(Sketch map of drain construction)
- Open the drain switch to release the water from the cavity into the drip tray. Ensure the drip tray fit into the notch to avoid water overflow. The drip tray can load 450mL water.
- A after all the water drain out, close the drain switch and put 800 ~mL fresh water into the cavity.
CLEANING BEER TAP MECHANISAM
Please clean before the first use or after no use in long time. Clean the whole beertender with dry cloth:
- Use warm water with cleaning kit.
-
Connect the end of the piercing pin. Push the water into the pin to clean the tube. Push the water our from the tube at the other end. Repeat this process with warm water at least 3 times.
-
Disassemble the tap to clean.
This connector must connect with cleaning bottle
natural_image
Technical line drawing of a mechanical device with an open lid and lever mechanism (no text or symbols)Please open the tap when you are cleaning the beer tube
Figure 16
Warning:
Never put the tap mechanism parts in the washing machine or dishwasher; Never use any detergent to clean
ACCESSORIES INCLUDED WITH YOUR BEERTENDER
| Items | Name | Quantity | Installment | Picture |
| 1 Beer tube 2 | Beer-out connector | 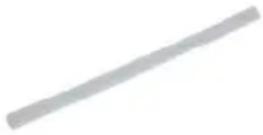 | ||
| 2 Adaptor 3 Tub | 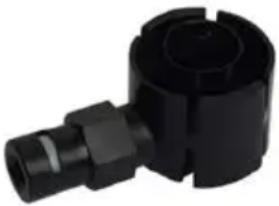 | |||
| 3 | Cleaning bottle | 1 N/A | 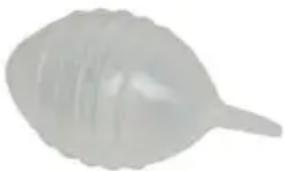 |
A. r eplace the beer tube
Please replace the beer tube if beer tube is damaged and cause beer leakage. (show as figure 17)
- Remove the connection 1. Pull the beer handle in the direction of beer pouring when draw out the beer tube.
- Take out the connection 2 and remove the connection 3.
- Replace a new beer tube, and install the beer tube according with reverse procedure.
Note: Don't move other screws when processing tube replacement, otherwise, it may cause the beer leakage or gas leakage
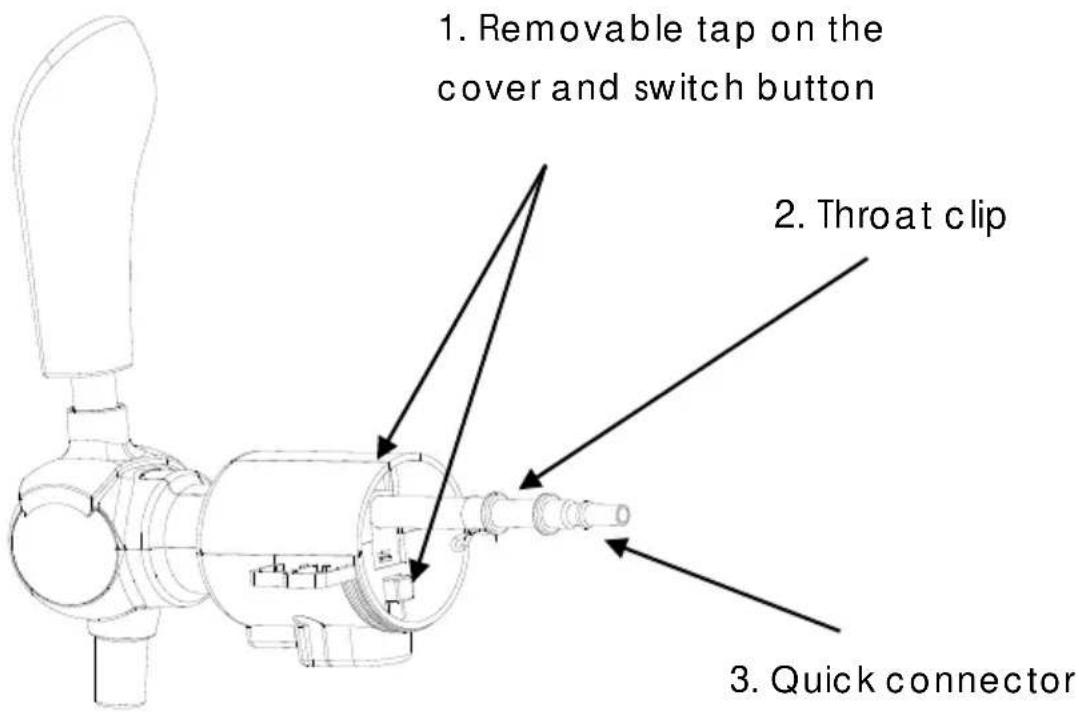
Figure17
MAINTENANCE
If the beertender does not work properly, please call the service center.
Troubleshooting
| Trouble Cause Troubleshooting | ||
| The tap does not work / can’t pour beer out | 1. The pouring tube is in poor connection2. No keg or no beer in the keg; | 1. Well connect the pouring tube.2. Change a new keg |
| Too much bubble pouring out | 1. Use a wrong way to pour beer out2. The beer temp is high (best at 3-6°C)3. The keg is shaken before usage4. Almost no beer in the keg | 1. Use the right way to pour beer out2. Cool the beer down to 3-6°C3. Put the beer keg aside a while till no bubble inside4. Change a new keg |
| Beer flows out too slowly | 1. The connection tube or pouring tube has leakage | 1. Check whether the tube is leakage or not, if so replace the tube |
natural_image
Symbol of a trash bin with crossed lines indicating no waste or discharge, and a solid black rectangle below (no text or labels)If this logo appears on the appliance, it signifies that it should be scrapped in line with directive 2012/19/UE relating Waste Electronic and Electric Equipment (WEEE). All dangerous substances contained in electric and electronic equipment may exert deleterious effects on the environment and human health during processing. This explains why at the end of its useful life this appliance should not be disposed of with unsorted municipal waste. As end consumer your role is essential in ensuring reuse, recycling or other form of value creation for this
appliance. You have at your disposal several collection and recovery systems put in place by your local authority (recycling centre) and distributors. You have the obligation of using these systems.
The warranty does not cover the wear parts of the product, nor the problems or damage resulting from:
(1) surface deterioration due to normal wear and tear of the product;
(2) defects or deterioration due to contact with liquids and corrosion caused by rust;
(3) any incident, abuse, misuse, alteration, disassembly or Unauthorized repair;
(4) improper maintenance, improper use concerning the product or connection to an incorrect voltage;
(5) any use of accessories not supplied or not approved by the manufacturer.
The guarantee will be cancelled if the nameplate and / or serial number of the product are removed.
THOMSON is a brand of Technicolor SA used under licence by ADMEA This product is imported by: ADMEA - 12 rue Jules Ferry - 93110 Rosny Sous Bois
THOMSON
SURTIDOR DE CERVEZA
THBD47718
natural_image
Line drawing of a modern water dispenser with a side panel and control panel (no text or symbols)Figura 1
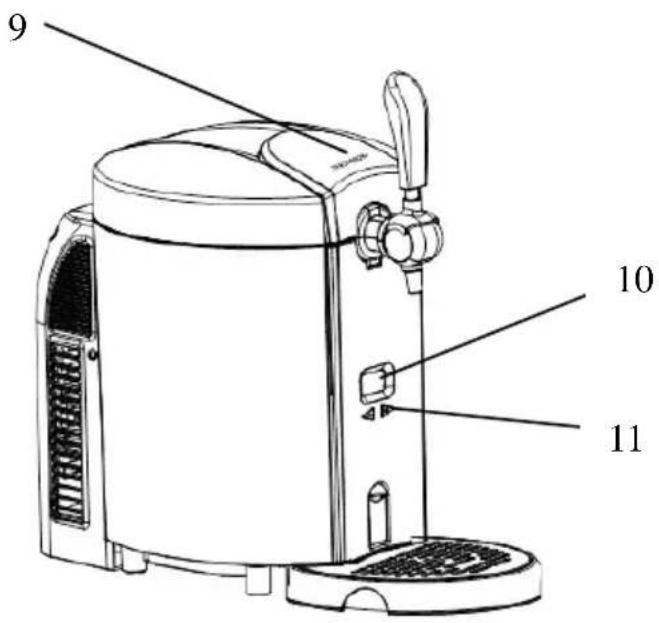
Figura 2
Figura 3
natural_image
Line drawing of a cylindrical industrial machine with attached pipes and control knobs (no text or symbols)Figura 4
natural_image
Technical line drawing of a circular mechanical or architectural component with internal structure and no visible text or symbolsFigura 5
natural_image
Technical line drawing of a mechanical component with a curved base and vertical supports (no text or symbols)Figura 6
B. Barril a presión
natural_image
Technical line drawing of a mechanical component with directional arrows indicating assembly or force (no text or symbols)Figura 9
natural_image
Technical line drawing of a mechanical assembly with concentric circles and a tool, no visible text or symbolsConector de cerveza
Figura 10
natural_image
Technical line drawing of a mechanical device with an open lid and lever mechanism (no text or symbols)natural_image
Simple line drawing of a trash bin with crossed lines indicating no waste or discharge (no text or symbols)natural_image
Line drawing of a modern water dispenser with a side panel and control panel (no text or symbols)Figuur 1
Figuur 2
- Bovenafdekking
- Voedingskabel en stekker
- Taphendel
- AC-voedingsschakelaar
- Tap
- Knop voor klepvergrendeling
- Drainageschakelaar
- LCD-display
- Druppellade
- Digitale bedieningsknop
- Achterafdekking
INSTALLATIE & BEDIENING
A. INSTALLATIE
natural_image
Line drawing of a portable industrial machine with handle and control panel (no text or symbols)Figuur 4
natural_image
Technical line drawing of a circular mechanical or architectural component with internal structural details (no text or symbols)Figuur 5
natural_image
Technical line drawing of a mechanical component with a curved base and vertical supports (no text or symbols)Figuur 6
natural_image
Technical line drawing of a mechanical component with directional arrows indicating assembly or flow (no text or symbols)Figuur 9

natural_image
Technical line drawing of a mechanical assembly with concentric circular components and a tool inserted (no text or symbols)Figuur 10