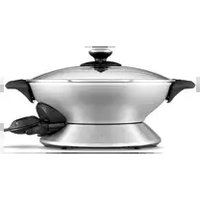
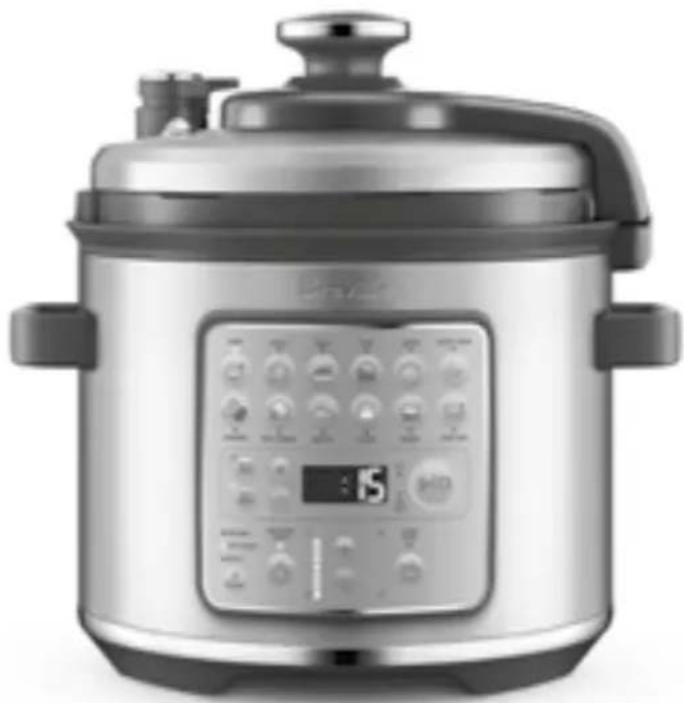
The Fast Slow Go BPR680 - Saucepan BREVILLE - Free user manual and instructions
Find the device manual for free The Fast Slow Go BPR680 BREVILLE in PDF.
| Product type | Multifunction pressure cooker (electric pot) |
| Brand | Breville |
| Model | The Fast Slow Go BPR680 |
| Bowl capacity | 6 liters (6 quarts) |
| Supply voltage | 120 V ~ |
| Power | Not specified (estimated ~1000 W) |
| Weight | Not specified (estimated ~6 kg) |
| Dimensions (L × W × H) | Not specified (estimated ~35 × 30 × 30 cm) |
| Bowl material | Stainless steel |
| Lid seal | Silicone, removable and washable (dishwasher safe) |
| Main functions | Pressure cooking, slow cooking, sear/sauté, reduce, steam, sous vide, yogurt, keep warm, delay start |
| Food presets | Soup, broth, meat, stew, legumes, rice/grains, risotto, yogurt |
| Pressure release modes | Quick automatic, pulse, natural |
| Altitude adjustment | From 0 to 6000 ft (in 1000 ft increments) |
| Display | 4-digit LED |
| Timer | Up to 24 hours (delay start), cooking up to 12 h (slow cook) or 2 h (pressure) |
| Maintenance and cleaning | Bowl and lid dishwasher safe; silicone seal washable; wipe base |
| Safety | Pressure release valve, safety valve, locking pin, automatic shut-off, overpressure protection |
| Spare parts and repairability | Replaceable silicone seal (1-2 years); removable bowl; authorized Breville service center |
| Warranty | Not specified (typically 1-2 years) |
| Included accessories | Cooking bowl, lid, silicone seal, stainless steel trivet, condensation cup |
Frequently Asked Questions - The Fast Slow Go BPR680 BREVILLE
User questions about The Fast Slow Go BPR680 BREVILLE
0 question about this device. Answer the ones you know or ask your own.
Ask a new question about this device
Download the instructions for your Saucepan in PDF format for free! Find your manual The Fast Slow Go BPR680 - BREVILLE and take your electronic device back in hand. On this page are published all the documents necessary for the use of your device. The Fast Slow Go BPR680 by BREVILLE.
USER MANUAL The Fast Slow Go BPR680 BREVILLE
2 Breville Recommends Safety First
8 Components
9 Control Panel
10 Food Presets
11 Cooking Presets
12 Functions
22 Care & Cleaning
24 Troubleshooting
BREVILLE RECOMMENDS SAFETY FIRST
At Breville® we are very safety conscious. We design and manufacture consumer products with the safety of you, our valued customer, foremost in mind. In addition, we ask that you exercise a degree of care when using any electrical appliance and adhere to the following precautions.
IMPORTANT cULus SAFEGUARDS
READ ALL INSTRUCTIONS BEFORE USE AND SAVE FOR FUTURE REFERENCE
- Remove and safely discard any packing materials and promotional labels before using the pressure cooker for the first time.
- To eliminate a choking hazard for young children, remove and safely discard the protective cover fitted to the power plug of this appliance.
- Always ensure the appliance is properly assembled before use. Follow the instructions provided in this book.
- Always insert the connector end of the power cord into the appliance inlet before inserting power plug into the power outlet and switching on appliance. Ensure the appliance inlet is completely dry before inserting the connector end of the power cord.
- Take care to avoid spillage on the connector.

WARNING
Only use the cooking bowl intended for this appliance; using cooking vessels not provided will result in a non-resettable issue.
- Do not touch hot surfaces.
Appliance surfaces are hot during and after operation.
To prevent burns or personal injury, always use protective hot pads or insulated oven mitts, or use handles or knobs where available. - Do not place the appliance near the edge of a countertop or table during operation. Ensure that the surface is dry, level, clean and free of any liquid and other substances.
- Always operate the appliance on a stable and heat resistant surface. Do not use on a cloth-covered surface and position the appliance at a minimum distance of 8 inches away from walls, curtains, cloths and other heat sensitive materials.
- Do not place this appliance on or near a hot gas or electric burner, or where it could touch a heated oven or surface.
-
Do not place the appliance in a heated oven.
-
Do not operate the appliance on a sink drain board.
- Allow to cool before assembling or moving parts.
- Always attach plug to appliance first, then plug cord into the power outlet.
- We recommend not to place the cooker on a stone countertop when it's cooking. This is due to countertops being sensitive to uneven heat and may crack if heated locally. If you would like to cook with the pressure cooker on the countertop, place a chopping board or heat proof mat underneath the cooker.
- Cooking appliances should be positioned in a stable situation with the handles (if any) properly secured to avoid spillage of the hot liquids.
- Do not place anything, other than lid, on top of the cooker when assembled, when in use and when stored.
-
Extreme caution must be used when the cooker contains hot food and liquids and/or is under pressure. Improper use may result in injury. When using this appliance for pressure cook, slow cook and steam, ensure the lid is properly assembled and locked into position before use.
-
Do not move the cooker when in use.
- Do not use the lid handle to carry the appliance.
- Only use the side handles to carry or move the appliance.
- Before placing removable cooking bowl into the base ensure the base of the bowl and the base of the appliance is dry by wiping with a dry soft cloth.
- Do not use a damaged removable cooking bowl. Replace before using.
- Do not place food or liquid directly into the base. Only the removable cooking bowl is designed to contain food or liquid.
-
Never operate the cooker without food and liquid in the removable cooking bowl. Ensure a combined minimum of 4 cups (1 Liter) of food and/or liquid when cooking. Using less than 4 cups can result in a reduction of pressurization. This minimum quantity level does not apply for the LEGUMES and RICE | GRAINS settings.
-
Always ensure there is enough liquid in the removable cooking bowl when steaming. At least 4 cups (1 Liter) of liquid is required when steaming.
- Do not exceed maximum fill level. Some foods expand during pressure cooking such as rice, diced vegetables. Over filling may cause a risk of clogging pressure release valve and safety locking pin and develop excess pressure. Always follow the maximum and minimum quantities of liquid stated in instructions and recipes.
- Some food to avoid when pressure cooking are: apple sauce, cranberries, pearl barley, oatmeal and other cereals, noodles and pasta, and rhubarb; these foods can foam, froth and splatter and clog the pressure release valve and safety locking pin.
-
Before use, always check pressure release valve and safety locking pin for clogging and clean if necessary. Check to make sure the safety locking pin moves freely from under the lid.
-
Do not attempt to open the cooker lid after pressure cooking until all internal pressure has been released and is slightly cooled. If the lid will not turn to unlock, this indicates that appliance is still under pressure - do not force lid open. Any pressure remaining can be hazardous. See operating instructions for STEAM RELEASE directions in this instruction book.
- The container must not be opened until the pressure has decreased sufficiently.
- Do not touch the pressure release valve while in use.
- The surface heating element is subject to residual heat after use.
- Use only recommended STEAM RELEASE button to depressurize cooker after use.
- Do not use this appliance for deep frying.
- Do not sauté or shallow fry under pressure.
- Do not attempt to operate the appliance by any method other than those described in this booklet. Do not leave the appliance unattended when in use.

WARNING
Spilled food can cause serious burns. Keep appliance and cord away from children. Never drape cord over edge of countertop, never use outlet below countertop, and never use with an extension cord.
IMPORTANT SAFEGUARDS FOR ALL ELECTRICAL APPLIANCES
- Fully unwind the power cord fully before use. Do not let the power cord hang over the edge of a countertop or table, touch hot surfaces or become knotted.
- Connect only to a 120V power outlet.
- To protect against electric shock, do not immerse the power cord, power plug or appliance in water or any other liquid.
-
Always turn the appliance OFF; remove the plug and allow all parts to cool before attempting to move the appliance, when the appliance is not in use, before cleaning and when storing.
-
This appliance is not to be used by persons (including children) with reduced physical, sensory or mental capabilities, or lack of experience and knowledge, unless they have been given supervision or instruction by a person responsible for their safety who understands the hazards involved.
- Children shall not play with the appliance.
- Close adult supervision is necessary when this appliance is used by or near children.
- Cleaning and user maintenance shall not be made by children unless they are older than 8 and supervised.
- Keep the appliance and its cord out of reach of children less than 8 years.
-
It is recommended to regularly inspect the appliance. Do not use the appliance if the power cord, power plug or appliance becomes damaged in any way. Immediately stop use and return the entire appliance to the nearest authorized Breville Service Center for examination and/or repair.
-
Any maintenance, other than cleaning, should be performed at an authorized Breville Service Center.
- The use of attachments not sold or recommended by Breville may cause fire, electric shock or injury.
- This appliance is for household use only. Do not use this appliance for anything other than its intended use. Do not use in moving vehicles or boats. Do not use outdoors. Misuse may cause injury.
- The appliance is not intended to be operated by means of an external timer or separate remote-control system.
- The installation of a residual current device (safety switch) is recommended to provide additional safety protection when using electrical appliances. It is advisable that a safety switch with a rated residual operating current not exceeding 30mA be installed in the electrical circuit supplying the appliance. See your electrician for professional advice.
BREVILLE ASSIST® PLUG
Your Breville appliance comes with a unique Assist® Plug, conveniently designed with a finger hole to ease removal from the power outlet.
SHORT CORD INSTRUCTIONS
Your Breville appliance is fitted with a short power supply cord to reduce personal injury or property damage resulting from pulling, tripping or becoming entangled with a longer cord.
FOR HOUSEHOLD USE ONLY SAVE THESE INSTRUCTIONS

Components
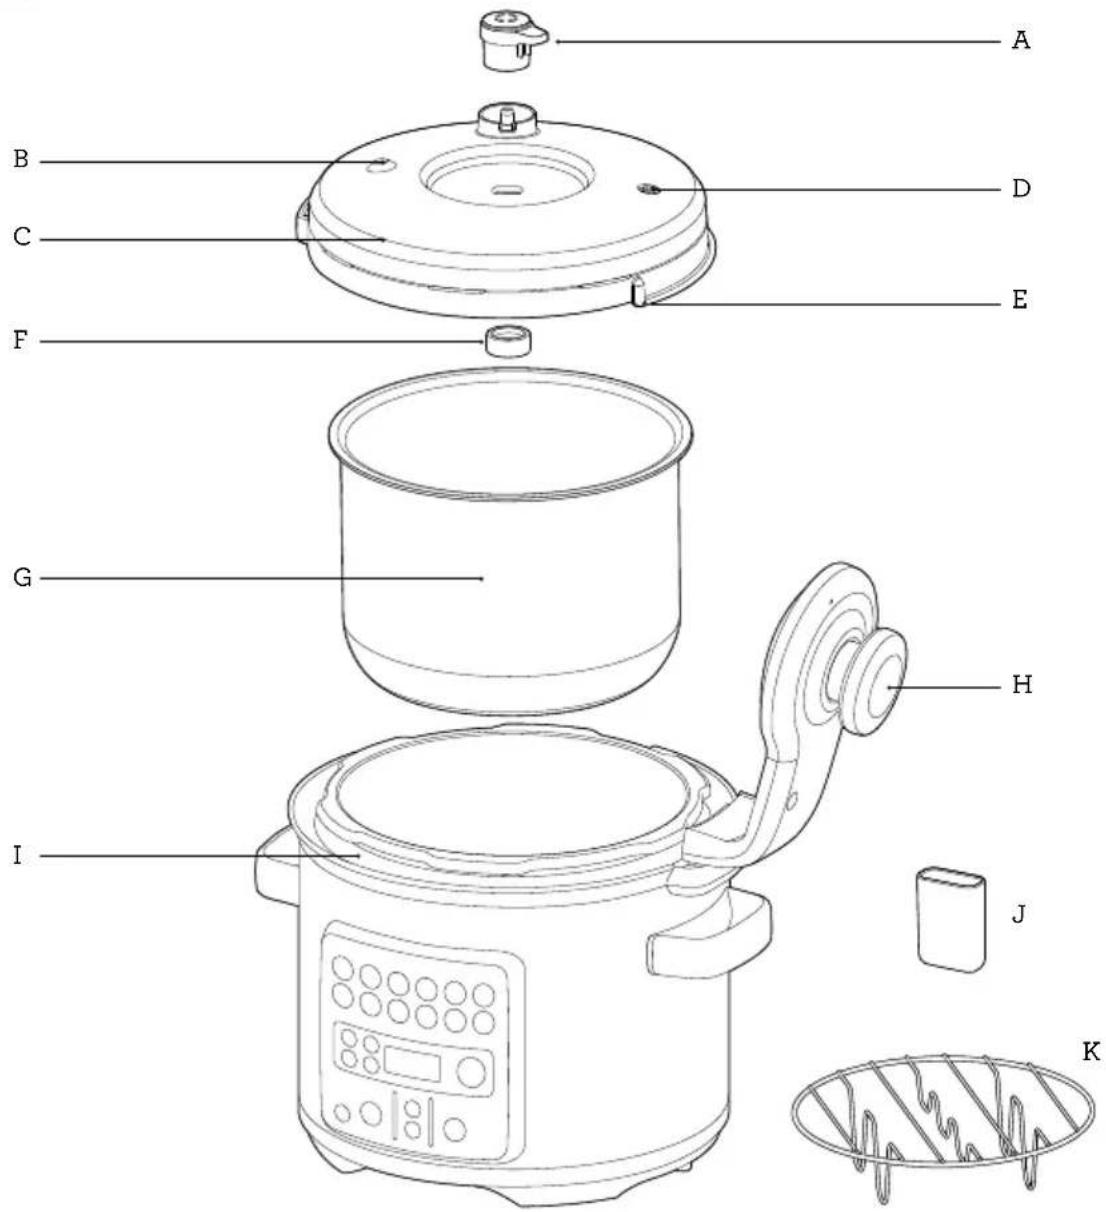
A. Pressure Release Valve Automatically controls the rate at which steam is released from the cooker.
B. Pressure Safety Valve
C. Dishwasher Safe Removable Lid
D. Safety Locking Pin Pin pops up once pressure is reached acting as a safety locking device.
E. Silicone Lid Seal Easy fitting for hassle free assembly and cleaning.
F. Sealing Nut
G. 6 quarts (6 Liters) Removable Cooking Bowl
H. Lid Arm
I. Easy Clean Moat Catches condensation drips for a mess-free clean up.
J. Condensation Drip Cup
K. Stainless Trivet Raises food out of liquid for roasting and steaming.
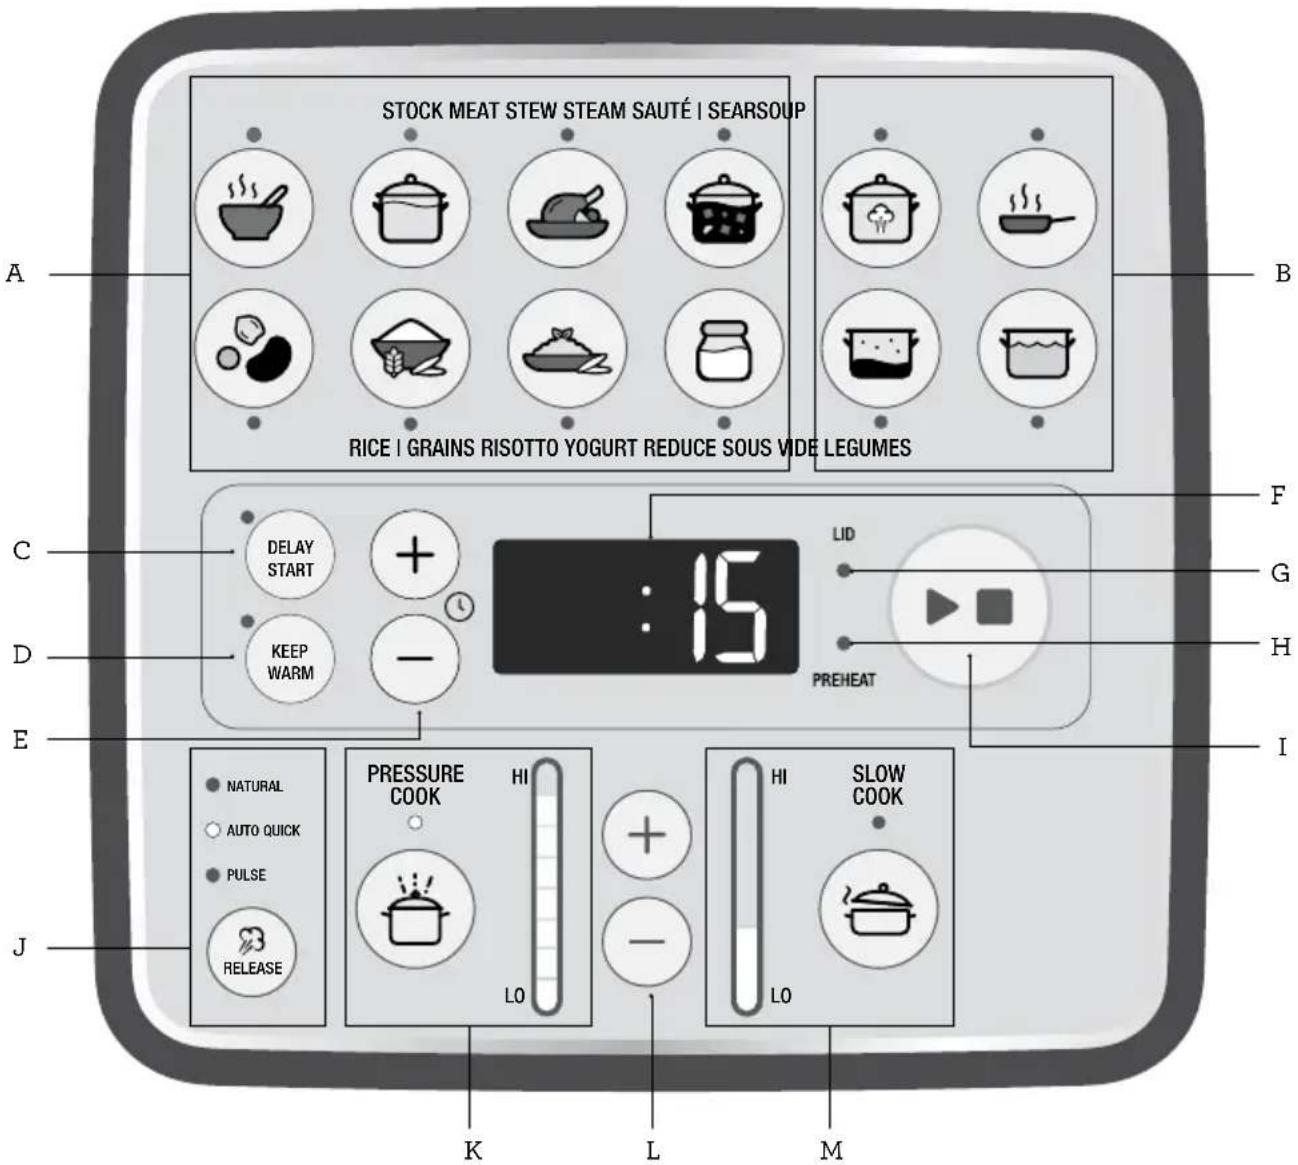
A. Food Presets with light indicators
B. Cooking Presets with light indicators
C. DELAY START
D. KEEP WARM
E. TIME (+ / -) adjustment buttons
F. LED display
G. Lid Lock / Unlock Warning Light Indicator
H. Preheat Light Indicator
I. START/CANCEL Button
J. Pressure release button with modes selection indicator
K. PRESSURE COOK with light indicator Pressure Level Indicator for Pressure Cooking Mode
L. PRESSURE/TEMPERATURE (+ / - ) adjustment buttons
M. SLOW COOK with light indicator Temperature Indicator for Slow Cooking Mode
FOOD PRESETS
SETTING: PRESSURE COOK
FOOD MENU DEFAULT PRESET RANGE
| Soup 9.0 psi | 15 MINS AUTO QUICK | 1.5 psi - 12.0 psi Up to 2:00 HRS |
| Stock 12.0 psi | 1 HOUR NATURAL | 1.5 psi - 12.0 psi Up to 2:00 HRS |
| Meat 12.0 psi | 45 MINS NATURAL | 1.5 psi - 12.0 psi Up to 2:00 HRS |
| Stew 10.5 psi | 20 MIN AUTO QUICK | 1.5 psi - 12.0 psi Up to 2:00 HRS |
| Legumes 12.0 psi | 20 MINS NATURAL | 1.5 psi - 12.0 psi Up to 2:00 HRS |
| Rice | Grains 7.5 psi | 5 MINS AUTO PULSE | 1.5 psi - 12.0 psi Up to 2:00 HRS |
| Risotto 6.0 psi | 6 MINS AUTO QUICK | 1.5 psi - 12.0 psi Up to 2:00 HRS |
SETTING: SLOW COOK
FOOD MENU DEFAULT PRESET RANGE
| Soup LOW | 4:00 HRS KEEP WARM | Time: 2 - 12 HRS Temp: High - Low Keep warm option: on / off |
| Stock LOW | 6:00 HRS KEEP WARM | Time: 2 - 12 HRS Temp: High - Low Keep warm option: on / off |
| Meat LOW | 8:00 HRS KEEP WARM | Time: 2 - 12 HRS Temp: High - Low Keep warm option: on / off |
| Stew LOW | 8:00 HRS KEEP WARM | Time: 2 - 12 HRS Temp: High - Low Keep warm option: on / off |
| Legumes HIGH | 6:00 HRS KEEP WARM | Time: 2 - 12 HRS Temp: High - Low Keep warm option: on / off |
| Yogurt | Stage 1 | Cooling* | Stage 2 | Stage 1: Time: 1 MIN - 2 HRS Temp: 159°F - 194°F (71°C - 90°C) Keep Warm: n/a |
| Scalding | Up to 3 hours | Fermentation | ||
| 10 MIN | Temp: from | 8 hours | ||
| Temp: 182°F (83°C) | 182°F to 110°F (83°C to 43°C) | Temp: 110°F (43°C) | ||
| Stage 2: Time: 30 MIN - 24 HRS Temp: 86°F - 141°F (30°C - 61°C) Keep Warm: n/a |
*Cool down time if the lid is open - for 12 gallon (2L) of milk:
It can take up to 1hr 30mins to lower the temperature from 182^ to 110^ (83°C to 43°C) Lid must be open during the cooling process.
COOKING PRESETS
SETTING TEMP / TIME PRESET RANGE
| SAUTÉ / SEAR | Temp: Sear - Med - Low COUNT UP TIME Time: n/a | |
| Keep warm: off only | ||
| REDUCE | HIGH | Time: 1 MIN - 2 HRS |
| 10 MINS | Keep warm option: on / off | |
| STEAM | 15 MIN Time: 1 MIN - 1 HR | |
| Temp: n/a | ||
| Keep warm option: off only | ||
| SOUS VIDE | Temp: 135°F (57°C) 135°F (57°C) | Time: 1 MIN - 24 HRS |
| 1 HOUR | Temp: 86°F-194°F (30°C-90°C) | |
| Keep warm: n / a | ||
| KEEP WARM | Temp: 158°F (70°C) 2 HOURS COUNT UP TIME | |

Functions
BEFORE FIRST USE
- Remove and safely discard any packaging material, promotional labels and tape from the cooker.
- Open the lid by turning the lid knob counterclockwise and lifting lid up and off the appliance until it is in the hinged open position. Unscrew and remove the sealing nut from the center of the lid and pull the lid away to remove from the lid arm.
- Wash the lid, removable cooking bowl and silicone lid seal in hot, soapy water, rinse and dry thoroughly. Wipe the inside and outside of the base with a soft, damp cloth and dry thoroughly.
- Attach the clean silicone lid seal securely around the wire ring on the underside of the lid. Adjust position if necessary, so that it sits comfortably and is free from any distortions.
- To reattach the lid, orient the lid so that the Steam Release Valve housing is to the rear of the unit, and then align the center of the lid with the bolt on the underside of the lid arm and push into position to expose the screw thread. Secure the lid by screwing on the sealing nut so that the red seal touches the lid surface.
- Clean and dry the bottom of the removable cooking bowl and the temperature sensor, making sure there are no unwanted materials on the surface. The removable cooking bowl must sit flat on the temperature sensor to ensure proper contact.
- Click condensation drip cup into place.
-
Insert the connector end of the power cord into the cooker base, ensuring it is completely dry. Insert the power plug in to a 120-volt (grounded) power outlet.
-
Set altitude level (above sea level) - machine will display Set - Alt - (distance) - feet
- Press the TIME (+/-) buttons to adjust altitude (0 to 6,000 feet in 1,000 foot increments)
-
Press START to confirm
-
The cooker alert will sound, and the LED will illuminate.
- We recommend running a 15-minute cooking cycle with water to get rid of any protective substances in the cooking bowl and on the heating element.

NOTE
The pressure cooker should not be used at altitudes above 6,000 feet.
Longer cooking times are needed at higher altitudes to achieve the best food results. For these high altitude areas, it is recommended to use the greater cooking time.

WARNING
Only use the cooking bowl intended for this appliance; using vessels not provided will result in a non-resettable issue.
CONTROL PANEL SETTINGS
The Fast Slow GO™ features 6 Cooking Preset Settings; Pressure Cook, Slow Cook, Reduce, Saute/Sear, Steam and Sous Vide. It also features 8 Food Presets: Soup, Stock, Meat, Stew, Legumes, Rice/Grains, Risotto and Yogurt.
FOOD PRESETS
The control panel displays 8 available food presets for easy selection.
Pressing any of the 8 food presets will use the default settings to achieve the best food results for that particular type of food. This includes changing to 'PRESSURE COOK' or 'SLOW COOK' mode.
Depending on the cooking mode, pressing a food preset button will adjust the PRESSURE or TEMPERATURE levels, the cooking time, and the pressure release mode, as well as turning on and off the KEEP WARM button.
The cooking time, KEEP WARM or DELAY START, can all be adjusted while remaining in selected food preset. However, any change to pressure or temperature levels, or pressure release setting (depending what mode the product is in) will change the unit to custom mode.
The table below shows, when selecting food menu, certain food can be cooked by either pressing 'PRESSURE COOK' or 'SLOW COOK'.
| Food Menu Pressure Cook | Slow Cook |
| Soup | ✓ |
| Stock | ✓ |
| Meat | ✓ |
| Stew | ✓ |
| Legumes | ✓ |
| Rice / Grains | ✓ |
| Risotto | ✓ |
SIMPLE PRESET STEPS
E.g.
SOUP

- Press the SOUP icon on the interface.
- The interface will automatically suggest a Pressure Cooking function (if relevant). To select a Slow Cooking function, press the SLOW COOK button.
- The interface will automatically display the accurate cooking time and pressure level for soup.
- The cooking time can be modified by pressing the arrows up or down.
After ingredients are added, press START to begin cooking.

TIP
If desired, it is possible to saute vegetables or sear meat with the SAUTÉ/SEAR function prior to cooking. When finished, press STOP to cancel the SAUTÉ/SEAR function and select the next cooking preset.

NOTE
-
For first timers using pressure cooking method, pressure release can be overwhelming. As it releases big bold steam, always keep hands and face clear of the pressure release. (refer to page 15 for the variable steam release description and caution).
-
Refer to 'Food Presets' and 'Cooking Presets' section for preset settings recommendations.
- If there is no visible light on any of the food shortcut indicators, then the product is in manual mode. Press a food shortcut button to return to its default settings.
- The steam or pressure release mode programmed into the preset cooking modes are selected for best results. Any changes to the steam release mode may lead to food spillage.
MANUAL PRESSURE COOK MODE
Pressure Cooking is a method of cooking food in a small amount of liquid with a gasket sealed lid that retains steam inside and builds pressure. It is the increase in pressure that raises temperature of the liquid and steam inside to well above boiling point and therefore allows food to be cooked up to 70% faster. This means less energy is consumed and you will enjoy substantial savings in both time and cost. Because pressure cooked foods require very little cooking liquid, more vitamins, minerals, and other nutrients are retained, and the natural flavors are enhanced.
- To select the manual pressure, cook mode, press and hold the PRESSURE COOK button for 2 seconds.
- Adjust the cooking pressure by using the PRESSURE/TEMPERATURE (+/-) buttons. Pressure can be adjusted from 1.5 psi (LOW) to 12 psi (HIGH).
- The figure on the LED screen indicates the preset cooking time for the selected setting. Adjust the cooking time by using the TIME (+/-) buttons (next to the 4-digit display) to reduce the cooking time or increase the cooking time. Time can be adjusted up to 2 hours.
- Press the STEAM RELEASE button to select between 'NATURAL', 'AUTO QUICK', and PULSE steam release.
- Place food into the removable cooking bowl. Ensure there is at least 4 cups (1L) of combined food and liquid in the cooking bowl.
- Close the lid and turn the lid knob clockwise
to lock into place. The cooker alert will sound when the lid has been locked.
- Ensure the Pressure Release Valve is placed on the lid in the closed position.

- Press the START button to commence cooking. The START/CANCEL button will illuminate orange, 'PREHEAT' will be lit.

NOTE
It is normal for the cooker to release small bursts of steam as it stabilizes.
- If the lid has not been locked correctly, 'LID' indicator will flash and the audio alert will beep, cooking will be paused until the lid is in the correct position. Turn the lid knob clockwise to lock the lid and commence cooking.
- Once the cooker has reached pressure, the "PREHEAT' indicator light will disappear, the cooker alert will sound, the timer will start counting down.
- The time can be adjusted during the pressure cook cycle by pressing the TIME (+ / -) buttons. The cycle can be paused at any time by pressing the START/CANCEL button. To end the cycle press and hold START/CANCEL for 2 seconds. If there is already pressure in the vessel it will go immediately to the STEAM RELEASE cycle.
- At the end of the pressure cook cycle, the cooker alert will sound, and steam will be automatically released through the Pressure Release Valve. The steam icon will blink, the timer will start counting up.
- If NATURAL steam release is selected, pressure will naturally subside in the vessel without forcing steam through the Pressure Release Valve. The STEAM RELEASE setting can be changed during the STEAM
RELEASE cycle by pressing the STEAM RELEASE button.
- At the end of the STEAM RELEASE cycle, the cooker alert will sound, the display will flash, and if 'KEEP WARM' is on, display timer will start counting up.
- Open the lid by turning the lid knob counterclockwise and carefully lift the lid into the hinged open position.
- After 5 minutes of inactivity, standby mode will be activated. The LED will no longer illuminate.

CAUTION
To avoid scalding from escaping steam, never place your face or hands over the cooker when removing the lid.

WARNING
If the lid will not unlock this indicates the appliance is still under pressure. Do not force the lid open as any remaining pressure can be hazardous.
MANUAL STEAM RELEASE
Press and hold the STEAM RELEASE button to manually release steam.

NOTE
Pressing and holding the steam release button during or after a cooking cycle will open the pressure release valve.
HANDS-FREE VARIABLE STEAM RELEASE
The Fast Slow GO™ features 3 steam release methods:
Auto Quick
Pressure is released quickly to minimize overcooking of food or recipes with short cook times.
This is recommended only for food types that do not expand or foam when boiling.
Pulse
Pressure is released in bursts to reduce disturbance to the food inside.
This is recommended for food types that generate small amount of foam or do not foam at all when boiling.
Natural
Pressure naturally subsides inside without releasing steam through the vent to prevent the churning up or breaking apart of sensitive ingredients like stocks and beans during pressure release.
Natural pressure release mode is suitable for all types of food recipes.

NOTE
Some food type (e.g. legumes) that are known to generate excessive foam can only use 'Natural' Pressure release to prevent food spillage.
These can be selected using the STEAM RELEASE button on the control panel during the set up and STEAM RELEASE cycles. Once selected, the Pressure Release Valve will automatically release the steam at the end of the pressure cooking cycle.

NOTE
The steam or pressure release mode programmed into each preset cooking modes are selected for best results. Any changes to the steam release mode may lead to food spillage.

CAUTION
Always keep hands and face clear of the pressure release valve when pressure cooking as hot steam and water may be emitted during operation.
MANUAL SLOW COOK MODE
The SLOW COOK setting is designed for long cook times at low temperatures. It is also ideal for breaking down tough cuts of meat and developing deep flavors.
- Select the SLOW COOK on the interface.
- The LED screen indicates the preset temperature for the selected food. But you may press the PRESSURE/TEMPERATURE (+/-) buttons to reduce the temperature or to increase temperature. Temperature can be adjusted to three preset temperatures: 'HI' - 'MED' - 'LO'.
- The LED screen indicates the preset cooking time for the selected food. You may adjust the TIME (+/-) to reduce or increase the cooking time. Time can be adjusted between 2 and 12 hours.
- 'KEEP WARM' indicator will automatically switch on after the SLOW COOK cycle. Press the 'KEEP WARM' button on the control panel to select or deselect the function.
- Place food into the removable cooking bowl. Ensure there is at least 4 cups (1L) of combined food and liquid in the cooking bowl.
- Close the lid and rotate to locked position.
- Turn the Pressure Release Valve to the open position.
- Press the START button to commence cooking. The START/CANCEL button will illuminate orange.
- The timer will be displayed and automatically begin to count down. The time can be adjusted during the SLOW COOK cycle by pressing the TIME (+/ -) button. The cycle can be paused at any time by pressing the START/CANCEL button. While paused, cooking settings can be adjusted. Pressing START/CANCEL button again, will continue cooking using the newly adjusted settings.

NOTE
To remove steam during pause. Hold the STEAM RELEASE button.
- At the end of the SLOW COOK cycle, the cooker will automatically switch to the KEEP WARM function. The KEEP WARM indicator will be lit, and the timer will start counting up to a maximum of 6 hours. The KEEP WARM cycle can be paused at any time by pressing the START/CANCEL button.
- If KEEP WARM has not been selected, the cooker alert will sound, the START/CANCEL orange illumination will turn off.
- After 5 minutes of inactivity, standby mode will be activated. The light will go out.
TIPS FOR PRESSURE & SLOW COOKING
Soup
- The PRESSURE & SLOW COOK SOUP setting is suitable for cooking a variety of soups from light broths to hearty minestrone to pureed vegetable soups.
- Use the SAUTÉ/SEAR settings to brown meat and soften aromatics prior to cooking.
- To shorten the pressurizing time, add cold water/stock to bowl while still in the SAUTÉ/SEAR setting and allow the water to come to a simmer before pressure cooking.
- Do not overfill the cooking bowl. The total volume of soup should not exceed the 'MAX' level marking inside the removable cooking bowl.
Stock
- The PRESSURE & SLOW COOK STOCK setting is suitable for making all kinds of stock, including chicken, beef and vegetable.
To make a brown stock, use the SAUTÉ/SEAR setting to brown bones and vegetables prior to pressure or slow cooking. -
Vegetables such as onions, carrots and celery should be cut into large pieces. This will help keep the stock clear and make it easier to strain at the end of cooking.
-
To shorten the pressurizing time, add cold water to bowl while still in the SAUTÉ/SEAR setting and allow the water to come to a simmer before pressure cooking.
- Do not overfill the cooking bowl. The total volume of water, bones and/or aromatics should not exceed the 'MAX' level marking inside the removable cooking bowl.
Meat
- The PRESSURE & SLOW COOK MEAT setting uses high temperature/pressure to dissolve connective tissue, producing fork-tender, succulent results. Sauces become thick and well developed.
- Choose well-marbled cuts of meat for the best flavor and texture.
- Cut larger pieces of meat into 2 or 3 pieces to better fit the cooking bowl.
- Use the SAUTÉ/SEAR setting to brown meat prior to cooking.
- Unlike traditional stewing or braising, pressure and slow cooking have almost no evaporation. For deeply flavored dishes, use less liquid than called for in traditional recipes, 1 - 112 cups (240-360ml) maximum.
- Do not overfill the cooking bowl. The total volume of uncooked ingredients should not exceed the 'MAX' level marking inside the removable cooking bowl.
Stew
- The PRESSURE & SLOW COOK STEW setting is ideal for cooking ground meat, meat sauces and hearty stews.
- Use the SAUTÉ/SEAR settings to brown meat and soften aromatics prior to cooking.
- Unlike traditional stovetop methods, pressure and slow cooking have almost no evaporation. For thick, rich chilies and stews use less liquid than called for in traditional recipes. Use the REDUCE setting after cooking to thicken foods that are too soupy.
- Do not overfill the cooking bowl. The total volume of uncooked stew ingredients should not exceed the 'MAX' level marking inside the removable cooking bowl.
Legumes
- The PRESSURE & SLOW COOK LEGUMES setting is suitable for cooking all types of legumes, lentils and dried beans.
- Legumes and other beans can produce a lot of foam during cooking. The preset NATURAL steam release setting ensures foam does not interfere with the steam release valve.
- Cooking times are based on unsoaked dried beans. To shorten the cooking time, soak beans in cold water overnight. Discard soaking water and cook with fresh cold water for half of the preset cooking time.
- Use a ratio of 1-part beans to 3 parts water.
- Beans and legumes swell and double in size after cooking. Do not overfill the cooking bowl. The total volume of uncooked legumes and water should not exceed the 1/2 level marking inside the removable cooking bowl.
Rice | Grains
- The PRESSURE COOK RICE setting is designed to cook rice and grains, so they remain separate and tender. It is suitable for all types of rice such as long grain, jasmine, basmati and brown rice.
- When pressure cooking brown rice, increase the cooking time to 20 minutes.
- Measure or weigh dry rice accurately and wash well with cold water until water runs clear. Drain well and place into the removable cooking bowl.
- Add corresponding water amount. For white rice use 1.25 parts water to 1-part rice. For brown rice use 1.5 parts water to 1-part rice. Refer to the table below for more information.
After cooking, allow rice to stand in bowl for 5 minutes before stirring and serving. - Rice will swell and double in size after cooking. Do not overfill the cooking bowl. The total volume of uncooked rice and liquid should not exceed the 1/2 level marking inside the removable cooking bowl.
Rice Measurements:
White Rice Water Servings
| 2 cups 2.5 cups 4-6 |
| 3 cups 3.75 cups 6-8 |
| 4 cups 5 cups 8-12 |
Brown Rice Water Servings
| 2 cups 3 cups 4-6 |
| 3 cups 4.5 cups 6-8 |
| 4 cups 6 cups 8-12 |
Risotto
- The PRESSURE COOK RISOTTO setting is ideal for making creamy risotto, without all the stirring and in a fraction of the time.
- Use the SAUTÉ setting to soften onions and other aromatics, as well as deglaze the cooking bowl with wine.
- The key to creamy risotto is toasting the rice grains before the liquid is added. Use the SAUTÉ setting to toast the rice, stirring frequently, for 3-5 minutes or until the edges become transparent and then turn white.
- With little or no evaporation during pressure cooking, it is important to keep to the ratio of 1-part rice to 3 parts stock. If adding a lot of vegetables to the risotto, reduce stock by a third.
- Rice will swell and double in size after cooking. Do not overfill the cooking bowl. The total volume of uncooked rice and stock should not exceed the 12 level marking inside the removable cooking bowl.
OTHER PRESET SETTINGS:
SAUTÉ/SEAR
This preset has three levels: low sauté, medium sauté and sear.
The SAUTÉ setting is ideal for softening and caramelizing garlic, onions or vegetables prior to pressure or slow cooking.
The SEAR setting is designed to enhance and deepen the taste of meals by using the same
cooking bowl for caramelizing and browning foods before pressure or slow cooking.
The maximum SAUTÉ/SEAR cycle is 45 minutes. At the end of the cycle, the cooker alert will sound, the STOP/CANCEL button back light will go out and the LCD screen will illuminate.
REDUCE
This preset has three levels: low, medium and high.
The REDUCE function is ideal for thickening and intensifying the flavor of sauscs, syrups and stocks.
STEAM
The STEAM setting is ideal for steaming food such as vegetables, fish fillets and dumplings. When steaming for more than 30 minutes, it is recommended to add 1 cup warm water into the cooking bowl at 30 minute increments to ensure consistent steaming performance.
To reduce condensation forming on the outside surfaces of the lid and handle, it is recommended to remove the pressure release valve.

WARNING
If the lid will not unlock, this indicates the appliance is still under pressure. Do not force the lid open as any remaining pressure can be hazardous. Press and hold the STEAM RELEASE button to manually release steam (refer to page 15 for manual and variable steam release).
SOUS VIDE
The SOUS VIDE setting is ideal for cooking food to a very precise temperature in a water bath.
What is Sous Vide?
Sous Vide is a cooking technique that allows you to cook food to the doneness you desire by heating water to a set temperature. Food items are placed in a heat-proof, food safe plastic bag, that is submerged and cooked to your preferred
doneness without the risk of drying out through over cooking.
What do you need to cook food with the SOUS VIDE function?
Thick, heat-proof, food safe plastic bags.
Resealable zip-top bags will also work if the cooking temperature is under 158^ (70^) .
Do I need to vacuum seal?
You do not need to vacuum seal bags for SOUS VIDE, however, as much air as possible needs to be removed from the bag, and water prevented from entering the bag to provide accurate food results. To use the water displacement method, place food in a zip-top bag with a double seal, then lower the bagged food into a water filled container. Once most of the air is out of the bag, carefully seal just above the water line.
Is the lid open or closed?
To ensure consistent cooking temperatures, the lid must be closed and in the locked position during the sous vide function.
When do I sear?
You can sear items before or after cooking with the SAUTÉ/SEAR function. If searing prior to using the SOUS VIDE function, allow time for resting and cooling overnight in the refrigerator.
SOUS VIDE steps:
- Fill cooking bowl with warm water until it has reached the MAX line. To reduce preheat time, start with water close to your target temperature.
- Press SOUS VIDE and set temperature and time as desired. Close lid and press START to begin heating water.
-
Place the food item or the produce in a plastic Sous Vide or zip-top bag. If you do not have specific Sous Vide sealed bag, we recommend using a double-sealed zip-top bag. Add aromatics like bay leaves, rosemary, lemon slices or rind and oil as desired.
-
When water has reached desired temperature (machine will beep once), carefully place bag into the water bath. If bag floats, place stainless trivet upside down over the bag to keep it fully submerged.
- Close the lid and rotate to locked position, but ensuring the pressure release valve is in the open position.
- When cooking time is completed, remove bag from water bath.
Temperature and Time:
BEEF FILLET (1 inch thick) - Medium rare - 129^ (54^) for 1 hour
- CHICKEN BREAST (1 inch thick) - Tender - 149^ (65^) for 45 minutes
- SALMON FILLET (1 inch thick) - Medium - 122^ F( 50^ C) for 40 minutes
- EGGS - poached egg - 147°F (64°C) for 1 hour
YOGURT
How to use the yogurt shortcut auto program?
Plain Yogurt
Prep time: 10 minutes / Incubation: 5-8 hours (plus up to 1 hour 30 minutes cooling)
1 quart / 1 Liter whole, homogenized milk
2 tbsp plain yogurt with live and active cultures
STEP1-Scald the Milk
Place the cooking bowl in the Fast Slow GO. Add the milk. Close and lock the lid. Press YOGURT then press START. The milk will heat to 182^ (83^) and hold at the temperature for 10 minutes.
STEP 2 - Cool the Milk
Open the lid and do not press any controls. The cooling phase will automatically cool the milk to 110^ (43^) . First the word 'COOL' will appear on the cooker screen.
At the end of the cooling time the cooker will sound an alert when it has reached the correct temperature, about 1 hour 30 minutes.

TIP
Cooling the milk with the lid open will result in a skin forming on top. Removing this skin before adding the starter will help to ensure a smoother texture to the yogurt.
STEP 3 - Incubate the Yogurt
At the end of STEP 2, the word 'ADD' will appear in the cooker screen. Place the yogurt starter in a bowl. Add 12 cup of the cooled milk and whisk until smooth. Whisk the milk mixture into the cooled milk in the cooking bowl. Close and lock the lid press START to incubate for 5-8 hours. The longer it is incubated the tangier the yogurt will be.
STEP 4 - Refrigerate
When the cooker sounds an alert that the yogurt has finished incubating, remove the cooking bowl, cover with plastic wrap and refrigerate until cold. Once the yogurt is completely cold, transfer to an airtight container and refrigerate for up to 2 weeks.

TIPS
- Using homogenized milk will produce a smoother yogurt. If your result is slightly lumpy and separated, whisk the cooled yogurt gently to combine.
- To cool scalded milk faster, place cooking bowl in a larger bowl of iced water, check the temperature with a thermometer. When the milk has reached 110^ (43^) , add 12 cup of the cooled milk to the yogurt starter, whisk until smooth, then whisk in the mixture and return the cooking bowl to the pressure cooker.
- To increase tanginess of the yogurt, increase the incubation time.
KEEP WARM
The KEEP WARM function maintains hot food at safe serving temperature of 140^ (60^) or above for up to 6 hours at the end of a cooking cycle. If using the KEEP WARM function as a standalone, the feature can be run for up to 24 hours.
- To use KEEP WARM as a standalone function, press and hold the KEEP WARM button on the control panel.
- The KEEP WARM function can be toggled on and off in both PRESSURE COOK and SLOW COOK using the KEEP WARM button on the control panel. The 'KEEP WARM' light is lit, and the timer will start counting up to a maximum of 8 hours at the end of a cooking cycle.

NOTE
To not compromise food quality, it is recommended to use KEEP WARM function no longer than 1-2 hours.
DELAY START
The Fast Slow GO™ has a timer function to delay the start of cooking for up to 24 hours. This timer function does not apply to the KEEP WARM and STEAM functions.
The DELAY START function is disabled for the MEAT food preset.

CAUTION
Never allow meat, poultry, seafood, eggs or other foods that require refrigeration to sit at room temperature for more than two hours. Bacteria quickly multiplies in warm temperatures between 39^ (4^) and 140^ (60^) .
The following steps show how to program for delayed cooking:
- Adjust cooking cycle time and temperature/ pressure level as desired.
-
Press 'DELAY START' button to enable DELAY START function.
-
The screen will show the delay start time in hours and minutes.
- Use the TIME (+/ -) buttons to adjust the time delay in 15-minute intervals for up to 24 hours.
- Press DELAY START again at any time to exit without saving the delay start setting.
- Press START/CANCEL to activate the current cooking settings with a delayed starting time.
- Time will start counting down and preheat LED will not be illuminated during DELAY START.
ALTITUDE ADJUST
Pressure builds and increases when the temperature inside the cooking vessel exceeds boiling point. As altitude increases, the temperature at which water boils decreases as a result of the drop in air pressure. This creates very different conditions for cooking when using a pressure cooker.
In order to maintain consistent cooking results at various altitudes, the Fast Slow GO™ has an Altitude Adjust feature that adjusts the settings based on the altitude of your current location.
- To enter Altitude Adjust, press and hold both the DELAY START and KEEP WARM buttons for 2 seconds.
- Press the TIME (+/-) buttons or the PRESSURE/TEMPERATURE (+/-) buttons to adjust altitude in 1000 feet increments..
- Four-digit display shows 'Alt' and number, switching every 1 second.
- Press START button to confirm and a beep will sound.
- The cooker's settings have now been adjusted for your current altitude. Pressing any button or quitting after timeout will save the current set altitude value. To change altitude to factory settings, adjust the altitude back to 0 feet.

NOTE
Exact altitude can be found at www.elevationmap.net or by contacting Breville Customer Service Center.
SETTING THE UNIT MEASURE
The unit measure default is in Fahrenheit (F). To change between imperial and metric units, press the PRESSURE/TEMPERATURE (+/-) buttons for 5 seconds and the display will show C for Celsius. Press the PRESSURE/TEMPERATURE (+/-) buttons again for 5 seconds to revert to Fahrenheit and the display will show F.

Care & Cleaning
Before cleaning, remove the power plug from the power outlet and remove the connector end of the power cord from the cooker base. Allow the cooker and all accessories to cool completely before disassembling and cleaning.
Wash removable cooking vessel with warm soapy water and a clean soft cloth or sponge. Rinse with clean water and dry thoroughly.

NOTE
Removable cooking bowl can be washed in dishwasher, but it is recommended to wash cooking bowl in hot, soapy water using a mild household detergent. Rinse and dry thoroughly.

WARNING
- Do not use abrasive cleaners, steel wool or scouring pads on the outer and inner body of the appliance.
- Do not immerse metal base or power cord in water or any other liquid as they may cause electrocution.
- Ensure removable cooking bowl is correctly positioned in the base before you commence cooking.
DISASSEMBLE LID:
- Gently pull the silicone rubber gasket out from under the gasket holder. Check periodically that it is clean, flexible and not cracked or torn. If damaged do not use the appliance.
- Wash the inside of the lid with a wet, soapy sponge or cloth. Use a brush to remove oil residue if necessary. Wipe dry with a clean, damp cloth.
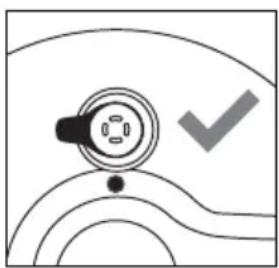
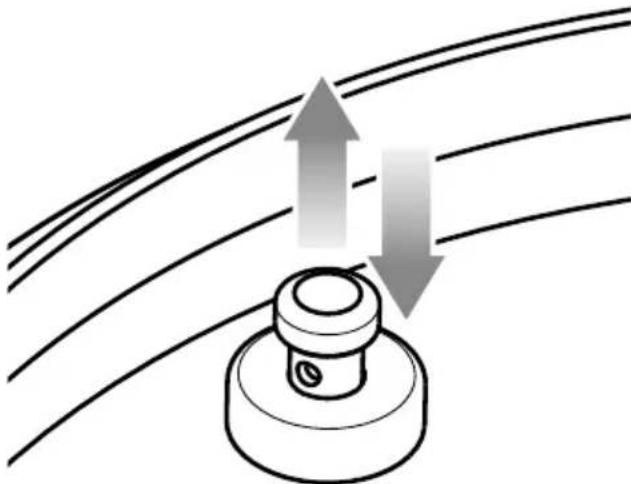
Regularly inspect that Pressure Release Valve Cover is clean and free of liquid/food. Remove pressure release valve cover from the lid and wipe with a soapy cloth. Rinse, dry well and replace by clipping back in place. - Pressure Safety Valve will need to be regularly checked and cleaned in order to avoid any clogging which could result in blocking the safety valve. Wash and clean any oil or food residue. Ensure the valve moves in and out smoothly after cleaning
- Replace silicone rubber gasket every 1-2 years (see your nearest Breville Service Center).
- Wash gasket in warm, soapy water. Rinse with clean water, dry thoroughly and replace securely around the wire ring on the underside of the lid.
- The silicone rubber gasket can be washed in the top rack of a dishwasher to eliminate odor from spices.
- Soak the silicone rubber gasket in a mixture of baking soda and water to help eliminate odors before cleaning.

WARNING
If the silicone rubber gasket is not fitted correctly into the holder, the lid will not seal properly. This may cause the appliance to malfunction and leak steam or hot liquid which can cause burns or scalding.

TIP
A mixture of 1 tablespoon vanilla, 12 cup lemon juice, 1 tablespoon lemon rind plus 17 floz (500ml) hot water, cook at HIGH pressure for 5 minutes can help eliminate food odors.
STORAGE:
- Ensure the cooker is completely turned off. The cooker is off when all lights are off on the display.
- Remove the power plug from the power outlet. Allow the cooker and all accessories to cool completely before disassembling and cleaning.
- Ensure the cooker and all accessories are clean and dry.
- Ensure the cooking bowl is inserted into the cooker.
- Ensure the lid is closed and in the locked position.
- Store the appliance in an upright position standing level on its support legs. Do not store anything on top.
PROBLEM EASY SOLUTION
| The lid cannot be opened at the end of the cooking cycle | ·Press the STEAM RELEASE button until all internal pressure is released, and the cooker can be opened. ·If this occurs frequently, the cooker may need to be adjusted to suit your current altitude. Follow “Altitude Adjust” instructions. NOTE: The safety locking pin will drop when the lid can be opened. ·Using the lid knob, wiggle the lid up and down and then twist open and close to reduce any friction caused by water or food. |
| The LID LED is flashing and the buzzer is sounding. | ·Turn the lid to the correct position for pressure cooking or slow cooking. |
| Steam is escaping from the lid OR | ·Assemble the lid correctly ensuring there is no gap between lid arm and the stainless-steel lid. Make sure to secure the lid by screwing on the sealing nut so that the red seal touches the lid surface; and should be screwed on tightly. |
| Safety locking pin does not rise | ·Ensure the silicone lid seal is clean, free from damage or cracks and is properly inserted. |
| OR | ·Ensure that the safety locking pin can move freely up and down. |
| Cooker is not getting to pressure | ·When the lid is locked, ensure the safety locking pin is properly aligned within the opening of the lid arm. |
| OR | ·Ensure that the Pressure Release Valve is properly seated in position and facing the lid knob. |
| Timer will not count down. | ·Add more liquid/food to the bowl. There should be a minimum of 4 cups (1L) combined food and liquid. |
| OR | ·If problem persists, call Breville Customer Service. |
| The screen displays ‘SEAL’ | |
| The cooker automatically switches to KEEP WARM without going through a complete cooking cycle | ·Add more water to the cooking bowl and restart the cycle. |
| Water is collecting on the countertop | ·Ensure the cooker is on a flat level surface and that the condensation drip cup is installed on the back of the cooker. Follow “Before First Use” instructions on page 12. ·Empty the condensation drip cup. |
| The screen displays “Err” | ·The screen will display “Err” when there is a non-resettable issue with the appliance. Should this occur, immediately remove the power cord from the power outlet and contact Breville Customer Service. |
| Factory Reset | ·Press and hold 'soup' and 'sous vide' buttons for three seconds to clear settings including altitude level. |
the Fast Slow GO

MANUEL D'INSTRUCTIONS
Breville

Contenu
PRISE BREVILLE ASSIST
COURTCORDON D'ALIMENTATION
| 2 tasses 2,5 tasses 4-6 |
| 3 tasses 3,75 tasses 6-8 |
| 4 tasses 5 tasses 8-12 |
Riz brun Eau Portions
| 2 tasses 3 tasses 4-6 |
| 3 tasses 4,5 tasses 6-8 |
| 4 tasses 6 tasses 8-12 |
Risotto
Breville Consumer Support
USA Mail: Breville USA 19400 S. Western Ave, Torrance CA 90501-1119 Phone: 1-866-273-8455 1-866-BREVILLE Web: breville.com/us/support
Canada
Mail: Breville Canada
9800 Boulevard Cavendish, Suite 250, Saint-Laurent
Québec, H4M 2V9
Phone: 1-855-683-3535
Web: breville.ca/support
Breville is a registered trademark of Breville Pty. Ltd. A.B.N. 98000 092 928. Copyright Breville Pty. Ltd. 2021.