
B160001HDSI - HDMI Extender Tripp Lite - Free user manual and instructions
Find the device manual for free B160001HDSI Tripp Lite in PDF.

| Product Type | HDMI over IP Extender |
| Brand | Tripp Lite |
| Model | B160001HDSI |
| Power | External power supply |
| Maximum Resolution | 1920 x 1080 (1080p) |
| Maximum Distance (Point-to-Point) | 100 m (328 ft) between transmitter and receiver |
| Maximum Distance (with Switch) | 100 m from transmitter to switch + 100 m from switch to receiver |
| Video Compression | H.264 |
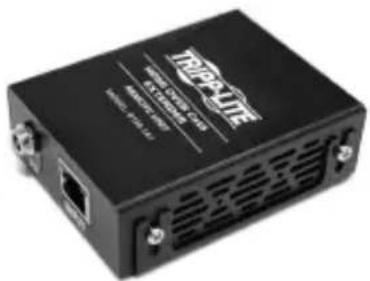
| Input Ports (Transmitter) | 1x HDMI, 1x RJ45, 1x IR-Out, 1x RS-232 |
| Output Ports (Receiver) | 1x HDMI, 1x RJ45, 1x IR-In, 1x RS-232 |
| HDCP Compatibility | Yes |
| 3D Support | Yes |
| RS-232 Baud Rate | Up to 57,600 baud |
| IR Frequency | 20 to 60 kHz |
| Number of Channels | 0 to 63 |
| Mounting | Wall, 19" rack, pole (mounting hardware included) |
| Warranty | 1 year |
| Weight | Not specified in the manual |
| Dimensions | Not specified in the manual |
Frequently Asked Questions - B160001HDSI Tripp Lite
User questions about B160001HDSI Tripp Lite
0 question about this device. Answer the ones you know or ask your own.
Ask a new question about this device
Download the instructions for your HDMI Extender in PDF format for free! Find your manual B160001HDSI - Tripp Lite and take your electronic device back in hand. On this page are published all the documents necessary for the use of your device. B160001HDSI by Tripp Lite.
USER MANUAL B160001HDSI Tripp Lite
Audio/Video with RS-232 and IR Control over IP Extenders
Extender Kit Models:
B160-101-DPSI
B160-101-DPHDSI
B160-101-HDSI
B160-103-HDSI
B160-201-HSI
B160-202-HDSI
B160-301-HDSI
Transmitter Models:
B160-001-CSI
B160-001-DPSI
B160-001-HDSI
B160-001-VSI
Receiver Models:
B160-100-CSI
B160-100-DPSI
B160-100-HDSI
B160-100-VSI
B160-200-HSI
Espanol 25 • Français 50 • Pycckn 75
WARRANTY REGISTRATION
Register your product today and be automatically entered to win an ISOBAR surge protector in our monthly drawing!
www.triplite.com/warranty


Manufacturing Excellence.
1111 W. 35th Street, Chicago, IL 60609 USA • www.triplite.com/support
Copyright © 2019 Tripp Lite. All trademarks are the sole property of their respective owners.
Package Contents
| B160-001-CSI | B160-001-DPSI | B160-001-HDSI | B160-001-VSI | B160-100-CSI | B160-100-DPSI | B160-100-HDSI | B160-100-VSI | B160-200-HSI | B160-101-DPSI | B160-101-DPHDI | B160-101-HDSI | B160-103-HDSI | B160-201-HSI | B160-202-HDSI | B160-30-HDSI | |
| Transmitter (T), Receiver (R), Kit (K) | TTTT | RRRR | RRRR | KKKK | KKKK | KKKK | KKKK | KKKK | KKKK | KKKK | KKKK | KKKK | KKKK | KKKK | KKKK | |
| External Power Supply 1 | 11 | 11 | 11 | 11 | 22 | 22 | 42 | 44 | ||||||||
| IR-In Cable 000011 | 11 | 11 | 11 | 11 | 23 | |||||||||||
| IR-Out Cable 11100 | 000 | 11 | 11 | 13 | 12 | 1 | ||||||||||
| 3.5 mm to DB9 M/Adapters Cable | 110 | 10 | 00 | 00 | 11 | 10 | 80 | 21 | ||||||||
| 3.5 mm to DB9 M/Adapters Cable | 000 | 01 | 10 | 11 | 11 | 10 | 11 | 23 | ||||||||
| HDMI to DVIAdapters Cable | 001 | 00 | 01 | 00 | 01 | 2 | 40 | 44 | ||||||||
| Mounting Hardware YYY | YYYY | YYYY | YYYY | YYYY | YYYY | Y | ||||||||||
| Owner's Manual YYYYY | YYYYYY | YYYYYY | YYYYYY | YYYYYY |
Optional Accessories
A008-006 Component Video Gold Cable - 6 ft.
N202-Series Cat6, 24 AWG, Solid-Wire Patch Cables
NSS-G16D2 16-Port Gigabit L2 Managed Switch with 8-Outlet PDU
NSS-G24D2 24-Port Gigabit L2 Managed Switch with 12-Outlet PDU
P502-Series VGA Cables with RGB Coax
P520-006 RS-232 Serial Extension Cable - 6 ft.
P561-Series DVI-D Single-Link Cables
P566-Series HDMI to DVI Adapter Cables
P568-Series High-Speed HDMI Cables
- P569-XXX-LOCK* High-Speed HDMI Cables with Ethernet and Locking Connectors
P580-Series DisplayPort™ Cables
P583-Series Mini DisplayPort to DisplayPort Cables
*XXX refers to the length, with cables available in 6 ft. (006), 10 ft. (010) and 15 ft. (015) lengths.
Product Features
- Extends and distributes audio/video, serial and IR control signals over Cat5/Cat6 cabling.
- Models available with Component Video + Stereo Audio, DisplayPort, HDMI**, and VGA + Stereo Audio.
- Converts source video to an IP-based signal that can be transmitted to and distributed through a network switch.
- Transmitters can be located up to 328 ft. (100 m) from the switch, with an additional 328 ft. (100 m) between the switch and the receiver, for a total distance of 656 ft. (200 m).
- Can also be used in a point-to-point installation where the transmitter directly connects to a receiver up to 328 ft. (100 m) away.
- Designed for managed network switches with IGMP, which allow login and remote management via the switch interface.
- Video source can be sent to any analog or digital display (e.g. Component Video to HDMI, VGA to HDMI, HDMI to DisplayPort, HDMI to HDMI).
- Display a single source on a single monitor or distribute a single signal to multiple monitors.
- B160-200-HSI and B160-201-HSI receiver units include two HDMI output ports for connection of two monitors.
- Connect up to 64 transmitters and 255 receivers in a single managed switch installation.
- Utilizes H.264 video compression standard.
- Extends IR control signals that control a source (such as a Blu-ray™ player) from a remote display.
Uses a 20kHz to 60kHz IR frequency.
Supports RS-232 Serial baud rates up to 57600 bps.
VGA video models support video resolutions up to 1920 x 1440, including 1080p. - DisplayPort and HDMI models support video resolutions up to 1920 x 1080 (1080p).
Product Features
- Component video models support video resolutions up to 1080i.
Each transmitter features an HDMI output port for connecting a local monitor. - HDCP and 3D compatible.
- Includes mounting hardware for wall-mount, rack mount or pole mount installations.
- Plug and play; no software or drivers required.
**Connect a DVI source and/or monitor using an HDMI to DVI adapter (select models include an HDMI to DVI adapter). HDMI to DVI adapter cables (Tripp Lite P566-Series) are available, sold separately.
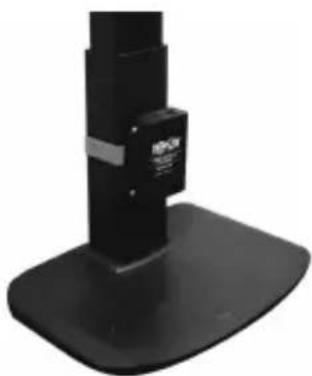
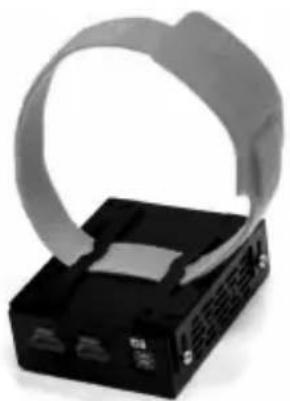
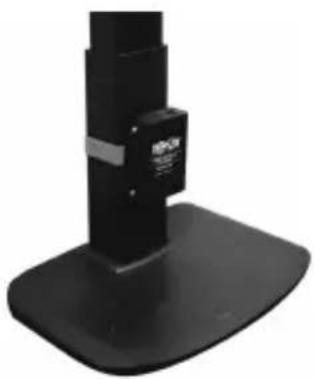
Mounting Instructions
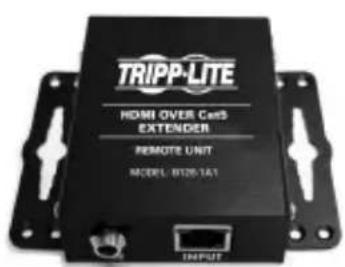
Audio/Video over IP extenders include mounting hardware that allows for a variety of mounting options. The following images demonstrate these mounting methods.
Note: Model B126-1A1 is shown for illustrative purposes; installation for Audio/Video over IP extender units is the same.

Wall-mount


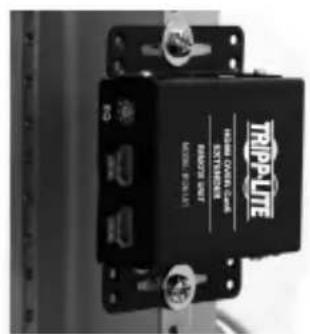
19" Rack-mount

Pole-mount
Point-to-Point Installation
Notes:
- Test to ensure the entire installation works properly before pulling cables through ceilings/walls.
- To achieve maximum distance and performance, use 24 AWG solid wire Cat5e/6 cable. Using stranded wire cable or cable with a gauge (AWG) size higher than recommended will result in a shorter extension distance. Higher gauge cabling (such as 26 AWG) has a limited transmission capability compared to lower-gauge cabling. All Tripp Lite N202-Series Cat6 cables use 24 AWG solid wire cabling. Extended lengths of 23 AWG solid wire Cat6a cable are available from Tripp Lite as a custom order.
-
Transmitter and receiver kits are available in DisplayPort, HDMI and VGA, but separate transmitters and receivers can be purchased in any combination (e.g. Component Video to HDMI, VGA to HDMI, HDMI to VGA, HDMI to DisplayPort).
-
Ensure all equipment to be connected is powered off.
- Connect the audio/video source to the transmitter unit's input port (see Optional Accessories for available Tripp Lite audio/video cables).
- (Optional) Connect the computer's DB9 port to the transmitter unit's serial port. Depending on the model, the serial port will be either DB9 or 3.5mm . Models with 3.5mm jacks include a 3.5mm to DB9 adapter. Models with DB9 ports require standard RS-232 DB9 cable (sold separately) for connecting to a computer.
- (Optional) Connect the included IR-OUT cable to the transmitter unit's IR-OUT port. Place the sensor on the IR-OUT cable in an unobstructed area within clear view of the device being controlled.
Note: The IR-OUT cable receives the signal from the remote control and sends it to the device being controlled (e.g. Blu-ray player, etc.).
- (Optional) Using an HDMI cable, connect a local monitor to the transmitter unit's HDMI output port (see Optional Accessories for available Tripp Lite HDMI cables).
- Connect the external power supply to the local transmitter unit and plug it into a Tripp Lite Surge Protector, Uninterruptible Power Supply (UPS) or Power Distribution Unit (PDU).
Point-to-Point Installation
- Press the Up / Down buttons to set the Channel Number (0-63) on the front of the transmitter unit to a number that will also be used on the receiver unit.
Note: A locking mechanism prevents the Channel Number from being unintentionally changed. When the Channel Number is locked, hold down the Up and Down buttons until the Channel Number starts blinking. Then navigate to the desired Channel using the Up / Down buttons. Once the desired Channel Number has been selected, lock the Channel Number by holding down the Up and Down buttons until the Channel Number stops blinking.
- Using Cat5e/6 cable, connect the transmitter unit's RJ45 Output port to the receiver unit's RJ45 Input port.
Note: The maximum allowable cable length from transmitter to receiver is 328 ft. (100 m).
-
Connect a monitor to the receiver unit's audio/video Output port (See Optional Accessories for available Tripp Lite audio/video cables).
-
(Optional) Connect the serial device's DB9 port to the receiver unit's serial port. Depending on the model, the serial port will be either DB9 or 3.5mm . Models with 3.5mm jacks include a 3.5mm to DB9 adapter. Models with DB9 ports require standard RS-232 DB9 cable (sold separately) for connecting a device.
-
(Optional) Connect the included IR-IN cable to the receiver unit's IR-IN port. Place the sensor on the IR-IN cable in an unobstructed area within clear view of the device being controlled.
Note: The IR-IN cable accepts a signal from a remote control and sends it to a device being controlled on the other end of the installation.
- Connect the external power supply to the receiver unit and plug it into a Tripp Lite Surge Protector, Uninterruptible Power Supply (UPS) or Power Distribution Unit (PDU).
Point-to-Point Installation
- Press the Up / Down buttons to set the Channel Number (0-63) on the front of the receiver unit to a number also used on the transmitter unit.
Note: A locking mechanism prevents the Channel Number from being unintentionally changed. When the Channel Number is locked, hold down the Up and Down buttons until the Channel Number starts blinking. Then navigate to the desired Channel using the Up / Down buttons. Once the desired Channel Number has been selected, lock the Channel Number by holding down the Up and Down buttons until the Channel Number stops blinking.
- Power on all connected devices.
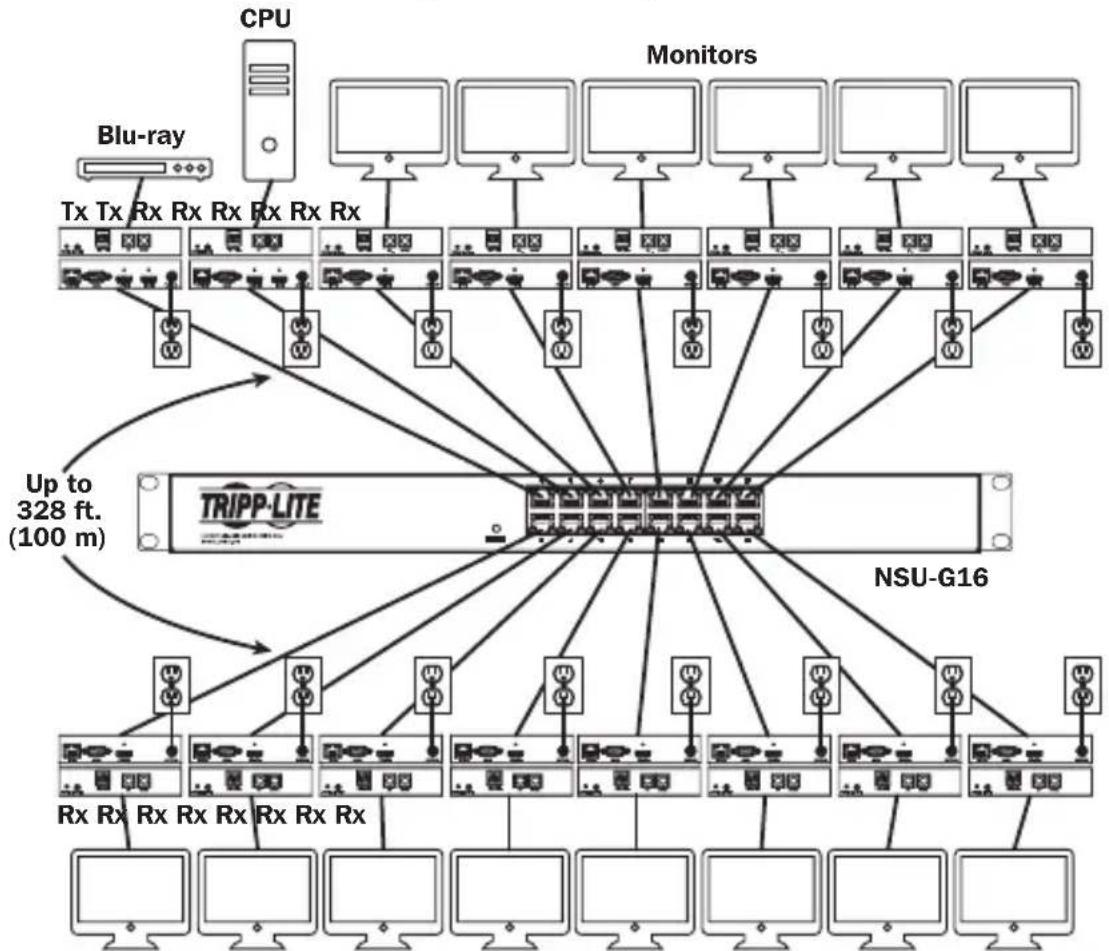
Point-to-Multipoint Installation - Managed Switch with IGMP
Notes:
- Test to ensure the entire installation works properly before pulling cables through ceilings/walls.
- To achieve maximum distance and performance, use 24 AWG solid wire Cat5e/6 cable. Using stranded wire cable or cable with a gauge (AWG) size higher than recommended will result in a shorter extension distance. Higher gauge cabling (such as 26 AWG) has a limited transmission capability compared to lower-gauge cabling. All Tripp Lite N202-Series Cat6 cables use 24 AWG solid wire cabling. Extended lengths of 23 AWG solid wire Cat6a cable are available from Tripp Lite as a custom order.
- B160-Series Audio/Video over IP Extenders are designed for use with a dedicated network switch. Connecting IP Extenders to a switch used with other networking equipment will result in degraded or non-functional product performance.
- The installation diagram on the next page shows HDMI transmitters and receivers only, though any combination of transmitters and receivers (e.g. Component Video, DisplayPort, HDMI, VGA) may be used. Up to 64 transmitters and 255 receivers can be connected in a single managed switch installation (the diagram shown stops at a single 16-port network switch).
- The installation diagram on the next page shows only required connections. Optional connections (such as the IR-IN and IR-OUT Cables) are not shown.
Point-to-Multipoint Installation - Managed Switch with IGMP

Installation Overview (All Models)
Point-to-Multipoint Installation - Managed Switch with IGMP
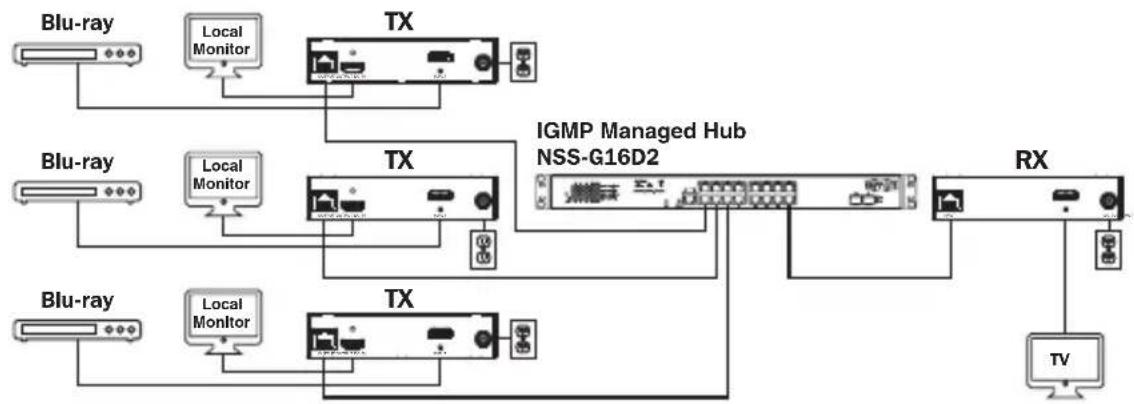
B160-103-HDSI Kit
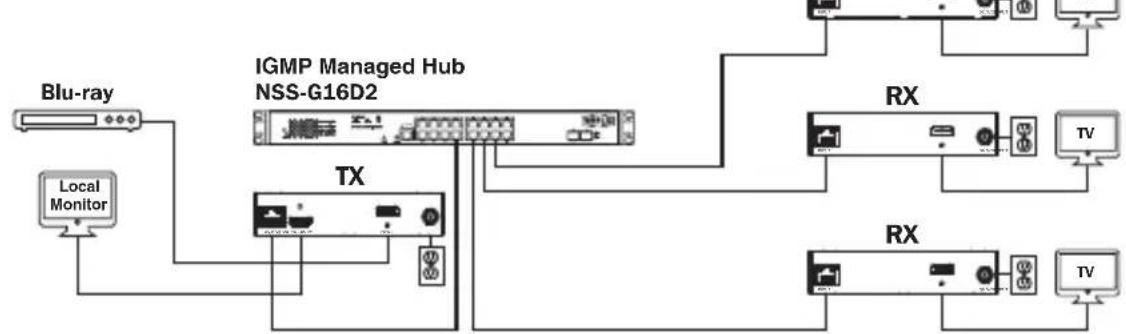
B160-301-HDSI Kit

B160-202-HDSI Kit
Point-to-Multipoint Installation - Managed Switch with IGMP
- Ensure all equipment to be connected is powered off.
- Connect the audio/video source to the transmitter unit's input port (see Optional Accessories for available Tripp Lite audio/video cables).
- (Optional) Connect the computer's DB9 port to the transmitter unit's serial port. Depending on the model, the serial port will be either DB9 or 3.5mm . Models with 3.5mm jacks include a 3.5mm to DB9 adapter. Models with DB9 ports require standard RS-232 DB9 cable (sold separately) for connecting to a computer.
- (Optional) Connect the included IR-OUT cable to the transmitter unit's IR-OUT port. Place the sensor and cable in an unobstructed area within clear view of the device being controlled.
Note: The IR-OUT cable receives the signal from the remote control and sends it to the device being controlled (e.g. Blu-ray player, etc.).
-
(Optional) Using an HDMI cable, connect a local monitor to the transmitter unit's HDMI output port (see Optional Accessories for available Tripp Lite HDMI cables).
-
Set the Channel Number (0 to 63 are available) on the front of the transmitter to a desired number by pressing the Up / Down buttons. This number MUST be the same on all transmitter and receiver units in the installation. If you are using transmitter and receiver units that are all brand new, they will default to Channel Number 0 and you can leave the channel unchanged upon installation.
Note: A locking mechanism prevents the Channel Number from being unintentionally changed. When the Channel Number is locked, hold down the Up and Down buttons until the Channel Number starts blinking. Then navigate to the desired Channel using the Up / Down buttons. Once the desired Channel Number has been selected, lock the Channel Number by holding down the Up and Down buttons until the Channel Number stops blinking.
- Connect the RJ45 Output port on the transmitter unit to an RJ45 port on the network switch using Cat5e/6 cable.
Note: The maximum allowable cable length from transmitter to switch is 328 ft. (100 m).
Point-to-Multipoint Installation - Managed Switch with IGMP
Do not connect the external power supply to the transmitter at this time. The transmitter should not be powered on until all audio/video equipment is connected and powered on.
- To connect additional transmitter(s), repeat steps 2 through 7.
- Connect a monitor to the receiver unit's audio/video Output port (See Optional Accessories for available Tripp Lite audio/video cables).
- (Optional) Connect the serial device's DB9 port to the receiver unit's serial port. Depending on the model, the serial port will be either DB9 or 3.5mm . Models with 3.5mm jacks include a 3.5mm to DB9 adapter. Models with DB9 ports require standard RS-232 DB9 cable (sold separately) for connecting a device.
- (Optional) Connect the included IR-IN cable to the receiver unit's IR-IN port. Place the sensor on the IR-IN cable in an unobstructed area within clear view of the remote control.
Note: The IR-IN cable accepts a signal from a remote control and sends it to a device being controlled on the other end of the installation.
- Set the Channel Number (0 to 63 are available) on the front of the receiver to a desired number by pressing the Up / Down buttons. This number MUST be the same on all transmitter and receiver units in the installation. If you are using transmitter and receiver units that are all brand new, they will default to channel number 0, and you can leave the channel unchanged upon installation.
Note: A locking mechanism prevents the Channel Number from being unintentionally changed. When the Channel Number is locked, hold down the Up and Down buttons until the Channel Number starts blinking. Then navigate to the desired Channel using the Up / Down buttons. Once the desired Channel Number has been selected, lock the Channel Number by holding down the Up and Down buttons until the Channel Number stops blinking.
- Connect the RJ45 Input port on the receiver unit to an RJ45 port on the network switch using Cat5e/6 cable.
Note: The maximum allowable cable length from receiver to switch is 328 ft. (100 m).
Point-to-Multipoint Installation - Managed Switch with IGMP
Do not connect the external power supply to the receiver at this time. The receiver should not be powered on until all audio/video equipment is connected and powered on.
- To connect additional receivers, repeat steps 9 through 13.
- Power on all connected devices.
- Connect the external power supplies to all transmitter and receiver units in the installation, then plug the external power supplies into Tripp Lite Surge Protectors, Uninterruptible Power Supplies (UPS) or Power Distribution Units (PDU).
Operation of Point-to-Multipoint Installation - Managed Switch with IGMP
Notes:
- B160-Series Audio/Video over IP Extenders are designed for use with a dedicated network switch. Connecting IP Extenders to a switch used with other networking equipment will result in degraded or non-functional product performance.
-
The model screenshots shown in the steps below are a Tripp Lite NSS-G16D2 Network Switch. Operation of different switches will vary by model.
-
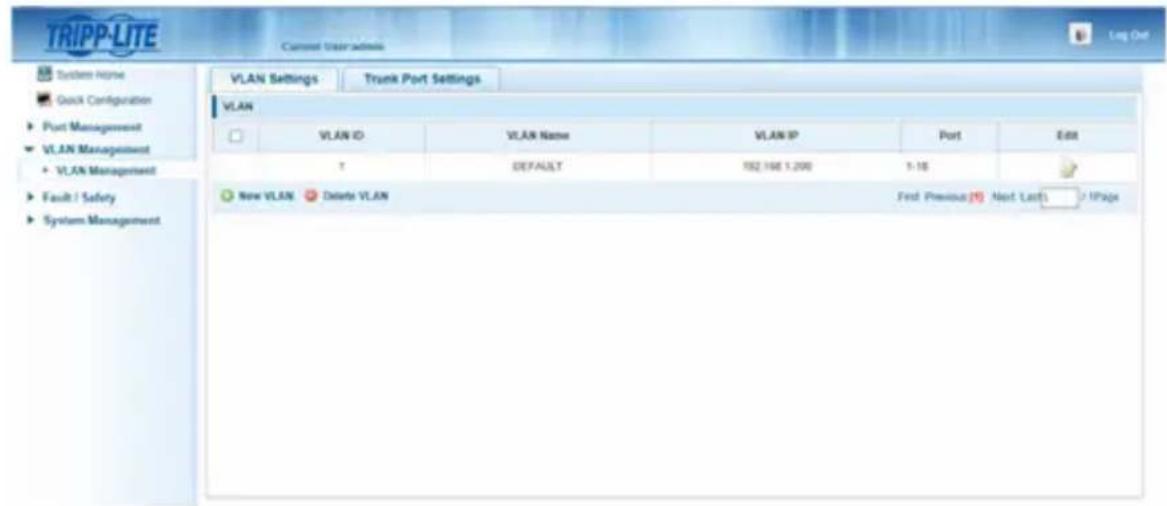
Log into the network switch user interface.
- Navigate to the VLAN Management section.
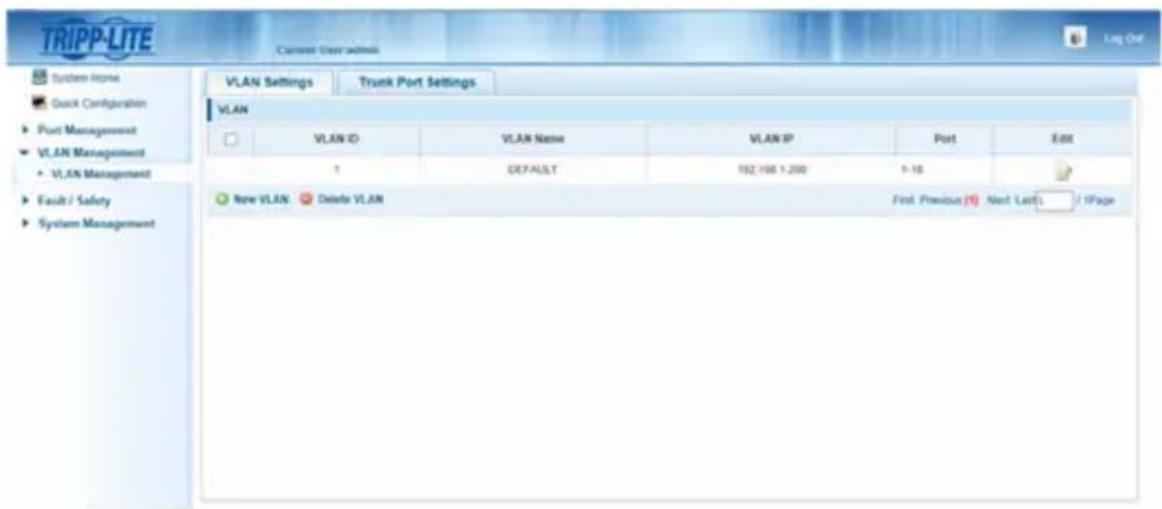
Operation of Point-to-Multipoint Installation - Managed Switch with IGMP
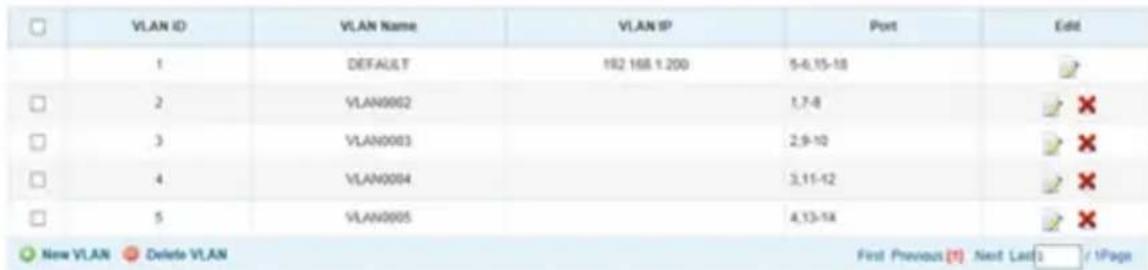
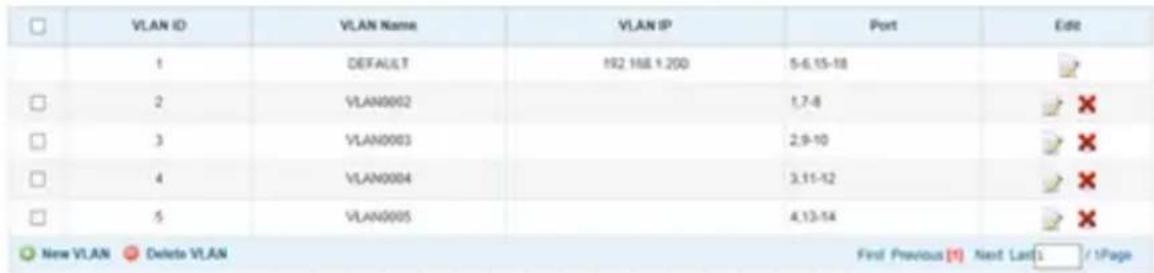
- In the VLAN Management section, create a new VLAN for each transmitter in the installation. The transmitter port number should always be the first number in the VLAN, followed by the port numbers (separated by commas) of all receiver units that will be transmitting audio/video to and from the selected transmitter. The screenshot below shows VLAN's for four transmitters (VLAN0002 through VLAN0005). VLAN0002 represents the transmitter connected to port 1, the audio/video of which is transmitted to the receivers connected to ports 7 and 8. Similarly, VLAN0003 represents the transmitter connected to port 2, whose audio/video is transmitted to receivers connected to ports 9 and 10.
-
To switch the source of the audio/video on a receiver, go to and edit the VLAN of the associated transmitters to add/remove the desired ports.
-
As more transmitters and receivers get added to the installation, simply add additional VLANs for the new transmitters and add the new receivers to the VLANs of the desired transmitters.
Point-to-Multipoint Installation – Unmanaged Switch
Notes:
- Unmanaged switch installations are limited to two transmitter units. The number of receiver units is limited to the number of ports remaining on the unmanaged switch.
- Test to ensure the entire installation works properly before pulling cables through ceilings/walls.
- To achieve maximum distance and performance, use 24 AWG solid-wire Cat5e/6 cable. Using stranded-wire cable or cable with a gauge (AWG) size higher than recommended will result in a shorter extension distance. Higher-gauge cabling (such as 26 AWG) has a limited transmission capability compared to lower-gauge cabling. All Tripp Lite N202-Series Cat6 cables use 24 AWG solid-wire cabling. Extended lengths of 23 AWG solid-wire Cat6a cable are available from Tripp Lite as a custom order.
- B160-Series Audio/Video over IP Extenders are designed for use with a dedicated network switch. Connecting IP Extenders to a switch used with other networking equipment will result in degraded or non-functional product performance.
- The installation diagram on the next page shows HDMI transmitters and receivers only, though any combination of transmitters and receivers (e.g. Component Video, DisplayPort, HDMI, VGA) may be used.
- The installation diagram on the next page shows only required connections.
Optional connections (such as the IR-IN and IR-OUT Cables) are not shown.
Point-to-Multipoint Installation – Unmanaged Switch
Installation Overview (All Models)
- Ensure all equipment to be connected is powered off.
- Connect the audio/video source to the transmitter unit's input port (see Optional Accessories for available Tripp Lite audio/video cables).
- (Optional) Connect the computer's DB9 port to the transmitter unit's serial port. Depending on the model, the serial port will be either DB9 or 3.5mm . Models with 3.5mm jacks include a 3.5mm to DB9 adapter. Models with DB9 ports require standard RS-232 DB9 cable (sold separately) for connecting to a computer.
Point-to-Multipoint Installation - Unmanaged Switch
- (Optional) Connect the included IR-OUT cable to the transmitter unit's IR-OUT port. Place the sensor on the IR-OUT cable in an unobstructed area within clear view of the device being controlled.
Note: The IR-OUT cable receives the signal from the remote control and sends it to the device being controlled (e.g. Blu-ray player, etc.).
- (Optional) Using an HDMI cable, connect a local monitor to the transmitter unit's HDMI output port (see Optional Accessories for available Tripp Lite HDMI cables).
- Set the Channel Number (0 to 63 are available) on the front of the transmitter to a desired number by pressing the Up / Down buttons. The channel number of all transmitters in the installation MUST be different.
Note: A locking mechanism prevents the Channel Number from being unintentionally changed. When the Channel Number is locked, hold down the Up and Down buttons until the Channel Number starts blinking. Then navigate to the desired Channel using the Up / Down buttons. Once the desired Channel Number has been selected, lock the Channel Number by holding down the Up and Down buttons until the Channel Number stops blinking.
- Connect the RJ45 Output port on the transmitter unit to an RJ45 port on the network switch using Cat5e/6 cable.
Note: The maximum allowable cable length from receiver to switch is 328 ft. (100 m).

Do not connect the external power supply to the transmitter at this time. The transmitter should not be powered on until all audio/video equipment is connected and powered on.
- To connect an additional transmitter, repeat steps 2 through 7.
- Connect a monitor to the receiver unit's audio/video Output port (See Optional Accessories for available Tripp Lite audio/video cables).
- (Optional) Connect the serial device's DB9 port to the receiver unit's serial port. Depending on the model, the serial port will be either DB9 or 3.5mm . Models with 3.5mm jacks include a 3.5mm to DB9 adapter. Models with DB9 ports require standard RS-232 DB9 cable (sold separately) for connecting a device.
Point-to-Multipoint Installation - Unmanaged Switch
- (Optional) Connect the included IR-IN cable to the receiver unit's IR-IN port. Place the sensor on the IR-IN cable in an unobstructed area within clear view of the remote control.
Note: The IR-IN cable accepts a signal from a remote control and sends it to a device being controlled on the other end of the installation.
- Set the Channel Number (0 to 63 are available) on the front of the receiver to match the channel number of the transmitter whose audio/video you want to receive by pressing the Up / Down buttons.
Note: A locking mechanism prevents the Channel Number from being unintentionally changed. When the Channel Number is locked, hold down the Up and Down buttons until the Channel Number starts blinking. Then navigate to the desired Channel using the Up / Down buttons. Once the desired Channel Number has been selected, lock the Channel Number by holding down the Up and Down buttons until the Channel Number stops blinking.
- Connect the RJ45 Input port on the receiver unit to an RJ45 port on the network switch using Cat5e/6 cable.
Note: The maximum allowable cable length from receiver to switch is 328 ft. (100 m).

Do not connect the external power supply to the receiver at this time. The receiver should not be powered on until all audio/video equipment is connected and powered on.
- To connect additional receivers, repeat steps 9 through 13.
- Power on all connected devices.
- Connect the external power supplies to all transmitter and receiver units in the installation, then plug the external power supplies into Tripp Lite Surge Protectors, Uninterruptible Power Supplies (UPS) or Power Distribution Units (PDU).
- Once in operation, change the monitor source signal by simply changing the channel of the corresponding receiver to match that of the transmitter with the desired source signal.
Troubleshooting
If unable to receive an acceptable image after following the installation instructions, try the following troubleshooting tips:
-
Are the included external power supplies connected and plugged into a working power source? For the product to function properly, it must be connected to and receiving power from the external power supply.
-
Was the power to the connected devices turned off prior to installation? If not, restart all connected devices.
-
Were the connected audio/video devices powered on before the transmitter and receiver units? If not, disconnect power from all transmitter and receiver units, then power them back on.
-
What resolution are you trying to obtain? Make sure the installation is within the maximum distance and resolution specs supported by the model as referenced in the Product Features section of this manual. If unable to obtain an acceptable image, try lowering the computer's video resolution or adjusting the refresh rate.
-
What type of cabling is used in the installation? Inferior cabling can result in poor performance. It is important to use cables that support the desired video resolution. To achieve maximum distance and resolution, 24 AWG solid-wire Cat5e/6 cable or 23 AWG solid-wire Cat6a cable must be used. Tripp Lite's N202-Series Cat6 cables use 24 AWG solid wire, as do the N022-01K-GY (Cat5) and N222-01K-GY bulk cables. The audio/video cables used must also support the desired video resolution. Inexpensive, low quality cables may not support the maximum resolution. It is recommended that you use the Tripp Lite cables listed in the Optional Accessories section of this manual.
-
Test the cables to ensure they are working properly. For example, connect the audio/video cable between a source and functioning monitor to ensure the cable is not defective. For Cat5e/6 cable, connect it between a computer and a network to verify it establishes a network connection.
Troubleshooting
-
Check cabling for any damages that may have occurred during installation. If a cable connector is loosened from pulling through ceilings/wall or the cable jacket is damaged with the wiring exposed, maximum performance will not be achieved.
-
Are the transmitter(s) and/or receiver(s) located in an area with exposure to higher temperatures? If the product is overheated, it will not function properly.
-
Do not set identical channel numbers for transmitters in an Unmanaged Switch installation. Doing so will result in no signal being displayed on monitors connected to receivers assigned to the same channel number. If this happens, change the transmitters' channel numbers to unique numbers and assign the desired channel number to the affected receivers. If audio/video does not reappear after doing this, disconnect power from the affected transmitter and receiver units, wait 10 seconds, and reconnect the power.
-
Do not connect more than two transmitters in an unmanaged switch installation. Unmanaged switch installations are limited to two transmitters, with the number of receivers being limited to the number of ports remaining on the unmanaged switch.
-
Do not connect other networking equipment to the network switch. The B160-Series Audio/Video over IP Extenders are designed for use with a dedicated network switch. Connecting them to a switch used with other networking equipment will result in degraded or non-functional product performance.
Warranty and Product Registration
1-Year Warranty
Tripp Lite warrants its products to be free from defects in materials and workmanship for a period of one (1) year from the date of initial purchase. Tripp Lite's obligation under this warranty is limited to repairing or replacing (at its sole option) any such defective products. To obtain service under this warranty, you must obtain a Returned Material Authorization (RMA) number from Tripp Lite or an authorized Tripp Lite service center. Products must be returned to Tripp Lite or an authorized Tripp Lite service center with transportation charges prepaid and must be accompanied by a brief description of the problem encountered and proof of date and place of purchase. This warranty does not apply to equipment, which has been damaged by accident, negligence or misapplication or has been altered or modified in any way.
EXCEPT AS PROVIDED HEREIN, Tripp Lite MAKES NO WARRANTYES, EXPRESS OR IMPLIED, INCLUDING WARRANTYES OF MERCHANTABILITY AND FITNESS FOR A PARTICULAR PURPOSE. Some states do not permit limitation or exclusion of implied warranties; therefore, the aforesaid limitation(s) or exclusion(s) may not apply to the purchaser.
EXCEPT AS PROVIDED ABOVE, IN NO EVENT WILL Tripp Lite BE LIABLE FOR DIRECT, INDIRECT, SPECIAL, INCIDENTAL OR CONSEQUENTIAL DAMAGES ARISING OUT OF THE USE OF THIS PRODUCT, EVEN IF ADVISED OF THE POSSIBILITY OF SUCH DAMAGE. Specifically, Tripp Lite is not liable for any costs, such as lost profits or revenue, loss of equipment, loss of use of equipment, loss of software, loss of data, costs of substitutes, claims by third parties, or otherwise.
PRODUCT REGISTRATION
Visit www.triplite.com/warranty today to register your new Tripp Lite product. You'll be automatically entered into a drawing for a chance to win a FREE Tripp Lite product!*
- No purchase necessary. Void where prohibited. Some restrictions apply. See website for details.
FCC Notice, Class B
This device complies with part 15 of the FCC Rules. Operation is subject to the following two conditions: (1) This device may not cause harmful interference, and (2) this device must accept any interference received, including interference that may cause undesired operation.
Note: This equipment has been tested and found to comply with the limits for a Class B digital device, pursuant to part 15 of the FCC Rules. These limits are designed to provide reasonable protection against harmful interference in a residential installation. This equipment generates, uses and can radiate radio frequency energy and, if not installed and used in accordance with the instructions, may cause harmful interference to radio communications. However, there is no guarantee that interference will not occur in a particular installation. If this equipment does cause harmful interference to radio or television reception, which can be determined by turning the equipment off and on, the user is encouraged to try to correct the interference by one or more of the following measures:
- Reorient or relocate the receiving antenna.
- Increase the separation between the equipment and receiver.
- Connect the equipment into an outlet on a circuit different from that to which the receiver is connected.
- Consult the dealer or an experienced radio/TV technician for help.
Any changes or modifications to this equipment not expressly approved by Tripp Lite could void the user's authority to operate this equipment.
Tripp Lite has a policy of continuous improvement. Specifications are subject to change without notice. Photos and illustrations may differ slightly from actual products.


1111 W. 35th Street, Chicago, IL 60609 USA • www.triplite.com/support
Copyright © 2019 Tripp Lite.
Note: El cable IR-IN accepts a new signal to the control remoto and the envia a new dispositivo that can be used to monitor the installation.
1111 W. 35th Street, Chicago, IL 60609 USA • www.triplite.com/support
1111 W. 35th Street, Chicago, IL 60609 USA • www.triplite.com/support
PykoBODCTBO N0Ib30BaTeJia
PetpancIaTOpbl aydno-/BndeocnHaIa c pa3bemom RS-232 n IK-ynpaBleHneM no npotoKoIy IP
Modell petpansTopoB B
KOMnneKeTe:
B160-101-DPSI
B160-101-DPHDSI
B160-101-HDSI
B160-103-HDSI
B160-201-HSI
B160-202-HDSI
B160-301-HDSI
Modell
NepedaTcuKOB:
B160-001-CSI B160-001-DPSI
B160-001-HDSI B160-001-VSI
Modell
PnEmHKnOB:
B160-100-CSI B160-100-DPSI
B160-100-HDSI
B160-100-VSI B160-200-HSI
English 1 • Espanol 25 • Français 50

TRIPP·LITE

PpOPOPMN MIOHIOO HONNOHO
1111 W. 35th Street, Chicago, IL 60609 USA • www.triplite.com/support
OxpaHareTcraBTopCKnM npaBOM © 2019 Tripp Lite.
Bce ToproBbIe 3HaKn ABnOToC nckHIOHTeBHO CO6CTBEHHOCbONX COOTBeTcBYIOUX BlaJeBueB.
CopejxHmoe ynaKOBKn
| Pyko80d80 non3080btegn | DA DA DA DA DA DA DA DA DA DA DA DA DA DA DA DA DA DA DA DA DA DA DA DA DA DA DA DA DA DA DA DA DA DA DA DA DA DA DA DA DA DA DA DA DA DA DA DA DA DA DA | 0010001000124044 | 1101011101123 | B160-101-DPHDSI | B160-101-HDSI | ||||||
| 0000110000111011101123 | B160-103-HDSI | B160-201-HSI | |||||||||
| 0000110000111011101123 | B160-202-HDSI | B160-301-HDSI | |||||||||
| 0000110000111011101123 | B160-302-HDSI | B160-303-HDSI | |||||||||
| 0000110000111011101123 | B160-304-HDSI | B160-305-HDSI | |||||||||
| 0000110000111011101123 | B160-306-HDSI | B160-307-HDSI | |||||||||
| 0000110000111011101123 | B160-308-HDSI | B160-309-HDSI | |||||||||
| 0000110000111011101123 | B160-310-HDSI | B160-311-HDSI | |||||||||
| 0000110000111011101123 | B160-311-HDSI | B160-312-HDSI | |||||||||
| 0000110000111011101123 | B160-312-HDSI | B160-313-HDSI | |||||||||
| 0000110000111011101123 | B160-313-HDSI | B160-314-HDSI | |||||||||
| 0000110000111011101123 | B160-314-HDSI | B160-315-HDSI | |||||||||
| 0000110000111011101123 | B160-315-HDSI | B160-316-HDSI | |||||||||
| 0000110000111011101123 | B160-316-HDSI | B160-317-HDSI | |||||||||
| 0000110000111011101123 | B160-317-HDSI | B160-318-HDSI | |||||||||
| 0000110000111011101123 | B160-318-HDSI | B160-319-HDSI | |||||||||
| 0000110000111011101123 | B160-320-HDSI | B160-321-HDSI | |||||||||
| 0000110000111011101123 | B160-321-HDSI | B160-322-HDSI | |||||||||
| 0000110000111011101123 | B160-322-HDSI | B160-323-HDSI | |||||||||
| 0000110000111011101123 | B160-323-HDSI | B160-324-HDSI | |||||||||
| 0000110000111011101123 | B160-324-HDSI | B160-325-HDSI | |||||||||
| 0000110000111011101123 | B160-325-HDSI | B160-326-HDSI | |||||||||
| 0000110000111011101123 | B160-326-HDSI | B160-327-HDSI | |||||||||
| 0000110000111011101123 | B160-327-HDSI | B160-328-HDSI | |||||||||
| 0000110000111011101123 | B160-328-HDSI | B160-329-HDSI | |||||||||
| 0000110000111011101123 | B160-329-HDSI | B160-330-HDSI | |||||||||
| 0000110000111011101123 | B160-330-HDSI | B160-331-HDSI | |||||||||
| 0000110000111011101123 | B160-331-HDSI | B160-332-HDSI | |||||||||
| 0000110000111011101123 | B160-332-HDSI | B160-333-HDSI | |||||||||
| 0000110000111011101123 | B160-333-HDSI | B160-334-HDSI | |||||||||
| 0000110000111011101123 | B160-334-HDSI | B160-335-HDSI | |||||||||
| 0000110000111011101123 | B160-335-HDSI | B160-336-HDSI | |||||||||
| 0000110000111011101123 | B160-336-HDSI | B160-337-HDSI | |||||||||
| 0000110000111011101123 | B160-337-HDSI | B160-338-HDSI | |||||||||
| 0000110000111011101123 | B160-338-HDSI | B160-339-HDSI | |||||||||
| 0000110000111011101123 | B160-339-HDSI | B160-340-HDSI | |||||||||
| 0000110000111011101123 | B160-340-HDSI | B160-341-HDSI | |||||||||
| 0000110000111011101123 | B160-341-HDSI | B160-342-HDSI | |||||||||
| 0000110000111011101123 | B160-342-HDSI | B160-343-HDSI | |||||||||
| 0000110000111011101123 | B160-343-HDSI | B160-344-HDSI | |||||||||
| 0000110000111011101123 | B160-344-HDSI | B160-345-HDSI | |||||||||
| 0000110000111011101123 | B160-345-HDSI | B160-346-HDSI | |||||||||
| 0000110000111011101123 | B160-346-HDSI | B160-347-HDSI | |||||||||
| 0000110000111011101123 | B160-347-HDSI | B160-348-HDSI | |||||||||
| 0000110000111011101123 | B160-348-HDSI | B160-349-HDSI | |||||||||
| 0000110000111011101123 | B160-349-HDSI | B160-350-HDSI | |||||||||
| 0000110000111011101123 | B160-349-HDSI | B160-351-HDSI | |||||||||
| 0000110000111011101123 | B160-349-HDSI | B160-352-HDSI | |||||||||
| 0000110000111011101123 | B160-349-HDSI | B160-353-HDSI | |||||||||
| 0000110000111011101123 | B160-349-HDSI | B160-354-HDSI | |||||||||
| 0000110000111011101123 | B160-349-HDSI | B160-355-HDSI | |||||||||
| 0000110000111011101123 | B160-349-HDSI | B160-356-HDSI | |||||||||
| 0000110000111011101123 | B160-349-HDSI | B160-357-HDSI | |||||||||
| 0000110000111011101123 | B160-349-HDSI | B160-358-HDSI | |||||||||
| 0000110000111011101123 | B160-349-HDSI | B160-359-HDSI | |||||||||
| 0000110000111011101123 | B160-349-HDSI | B160-360-HDSI | |||||||||
| 0000110000111011101123 | B160-349-HDSI | B160-361-HDSI | |||||||||
| 0000110000111011101123 | B160-349-HDSI | B160-362-HDSI | |||||||||
| 0000110000111011101123 | B160-349-HDSI | B160-363-HDSI | |||||||||
| 0000110000111011101123 | B160-349-HDSI | B160-364-HDSI | |||||||||
| 0000110000111011101123 | B160-349-HDSI | B160-365-HDSI | |||||||||
| 0000110000111011101123 | B160-349-HDSI | B160-366-HDSI | |||||||||
| 0000110000111011101123 | B160-349-HDSI | B160-367-HDSI | |||||||||
| 0000110000111011101123 | B160-349-HDSI | B160-368-HDSI | |||||||||
| 0000110000111011101123 | B160-349-HDSI | B160-369-HDSI | |||||||||
| 0000110000111011101123 | B160-349-HDSI | B160-370-HDSI | |||||||||
| 0000110000111011101123 | B160-349-HDSI | B160-371-HDSI | |||||||||
| 0000110000111011101123 | B160-349-HDSI | B160-372-HDSI | |||||||||
| 0000110000111011101123 | B160-349-HDSI | B160-373-HDSI | |||||||||
| 0000110000111011101123 | B160-349-HDSI | B160-374-HDSI | |||||||||
| 0000110000111011101123 | B160-349-HDSI | B160-375-HDSI | |||||||||
| 0000110000111011101123 | B160-349-HDSI | B160-376-HDSI | |||||||||
| 0000110000111011101123 | B160-349-HDSI | B160-377-HDSI | |||||||||
| 0000110000111011101123 | B160-349-HDSI | B160-378-HDSI | |||||||||
| 0000110000111011101123 | B160-349-HDSI | B160-379-HDSI | |||||||||
| 0000110000111011101123 | B160-349-HDSI | B160-380-HDSI | |||||||||
| 0000110000111011101123 | B160-349-HDSI | B160-381-HDSI | |||||||||
| 0000110000111011101123 | B160-349-HDSI | B160-382-HDSI | |||||||||
| 0000110000111011101123 | B160-349-HDSI | B160-383-HDSI | |||||||||
| 0000110000111011101123 | B160-349-HDSI | B160-384-HDSI | |||||||||
| 0000110000111011101123 | B160-349-HDSI | B160-385-HDSI | |||||||||
| 0000110000111011101123 | B160-349-HDSI | B160-386-HDSI | |||||||||
| 0000110000111011101123 | B160-349-HDSI | B160-387-HDSI | |||||||||
| 0000110000111011101123 | B160-349-HDSI | B160-388-HDSI | |||||||||
| 0000110000111011101123 | B160-349-HDSI | B160-389-HDSI | |||||||||
| 0000110000111011101123 | B160-349-HDSI | B160-390-HDSI | |||||||||
| 0000110000111011101123 | B160-349-HDSI | B160-391-HDSI | |||||||||
| 0000110000111011101123 | B160-349-HDSI | B160-392-HDSI | |||||||||
| 0000110000111011101123 | B160-349-HDSI | B160-393-HDSI | |||||||||
| 0000110000111011101123 | B160-349-HDSI | B160-394-HDSI | |||||||||
| 0000110000111011101123 | B160-349-HDSI | B160-395-HDSI | |||||||||
| 0000110000111011101123 | B160-349-HDSI | B160-396-HDSI | |||||||||
| 0000110000111011101123 | B160-349-HDSI | B160-397-HDSI | |||||||||
| 0000110000111011101123 | B160-349-HDSI | B160-398-HDSI | |||||||||
| 0000110000111011101123 | B160-349-HDSI | B160-399-HDSI | |||||||||
| 0000110000111011101123 | B160-349-HDSI | B160-400-HDSI | |||||||||
| 0000110000111011101123 | B160-349-HDSI | B160-401-HDSI | |||||||||
| 0000110000111011101123 | B160-349-HDSI | B160-402-HDSI | |||||||||
| 0000110000111011101123 | B160-349-HDSI | B160-403-HDSI | |||||||||
| 0000110000111011101123 | B160-349-HDSI | B160-404-HDSI | |||||||||
| 0000110000111011101123 | B160-349-HDSI | B160-405-HDSI | |||||||||
| 0000110000111011101123 | B160-349-HDSI | B160-406-HDSI | |||||||||
| 0000110000111011101123 | B160-349-HDSI | B160-407-HDSI | |||||||||
| 0000110000111011101123 | B160-349-HDSI | B160-408-HDSI | |||||||||
| 0000110000111011101123 | B160-349-HDSI | B160-409-HDSI | |||||||||
| 0000110000111011101123 | B160-349-HDSI | B160-5 | |||||||||
| 0000110000111011101123 |
OnuohbHbIe KOMnKeKtUoUsne
CoeHHTbHbI Ka6eB nepeaun KOMnoHHTHO BuaEOcHHa cNo30OueHHbIMN BbIBoMaM A008-006,1nHa 1,8 M
CoeHNHeBHe KabeN Cat6 cepN N202 cOHOKnBbIMn npoBdoMn KaIb6pa 24 AWG
- 16-nopTObIy ynpaBJIeMbI cTeBoi KOMMyTaTOp Gigabit L2 MoJ. NSS-G16D2 c8-po3eToUhBM PDU
- 24-nopTObIy ynpabnembl ceTeBOK KOMMyTaTOp Gigabit L2 moJ. NSS-G24D2 c 12-po3eTochbIM PDU
VGA-ka6e n cepn P502 c KoaknaJIbHbIM pa3beMaMn RGB
- ydInHnteBbHbI Ka6eB P520-006 c nocJeIOBaTeBbHbIMn pa3beMaMn RS-232, dInHa 1,8 M
- OndokhaNbHbke Ka6eN DVI-D cepnn P561
Ka6eI-epexoHnKc cepnn P566 c pa3bemamHDMI n DVI
- BbICOKOCKOPoCTbIe HDMI-ka6eJIncepn P568
- BbICOKoCKOpocThbIe HDMI-ka6eH P569-XXX-LOCK* cpa3beMaMn Ethernet n fNkCupyUcIMN BnHTaMn
Ka6eJn DisplayPortTM cepyn P580
- Ka6eHn cepu P583 c pa3bemamMini DisplayPort n DisplayPort
*XXX COOTBETCTBYET DnHHe. BbInyckaemblc Ke6eIN HMeIOT DnHHy 1,8 M (006), 3 M (010) u 4,5 M (015).
XapakTepeNCTnKn npOdyKta
- 06ecneuBaetpeTpaHcIaIIO npacnpedeIeHne ayDIO-/BnDEocrHaIOB, a TaKxE CnHaIOB nCTaHNoHHOrO ynpabIeHnC nOcNeIOBaTeIbHO nOdkNIOaEmbIX n HΦpaKpaChbIX yCTpOiCTB uepe3 ka6eI Cat5/Cat6.
- BынүйсаөмBLE модөгл memeIT paэбөмbl Component Video + Stereo Audio, DisplayPort, HDMI** v VGA + Stereo Audio.
- Ppeo6pa3yET BnDcOcHnA, NOCTynaIOuI ONTOUHnKa, BCnHnA, KOtOpB MoKet nepeDaBaTbCnHa cTeBoi KOMMyTaTOP n pacnPdeJeTBCrYepe3 Hero CnONb3OBaHmnpOTOKoJa IP.
- IpepaTnKMOrT paonolaraTbca Ha pacctOHHIO 100 M OT KOMMyTaTopa, pacctOHHe MeJy KOMMyTaTOPOM IN PnEMHnKOM TaKKe MoXe CoCTaBJIaTb DO 100 M, YTO o6ecneuHbaET cymmapHoE paCtOHHe Do 200 M.
Moryt taKke nCnoB3oBaTbcB yCTaHOBkax C DByxToeHuon TOnoIorne, rKe nepeDaTuNK noKnIOuAeTc HEnOcpeCTBeHHo K pInemHnky Ha paCctOAHn Do 100 M. - Празназауньдя уралгамьх ceTeБыx KOMMyTaTOPOB, pa6ToaUux no npotoKony IGMP,уообспунBaet B03MOxHOCt b BXOda B CnCTeMy uДиCTaHNoHHOro yPpAByHnuepe3 nHTepfeKc KOMMyTaTopa.
- Bundeocurhan ot nctouhka moxet hanpaBnTbca Ha IIO6o anlOROBu nnu cnpoBoD nucnnne (Hapnmep, uee3 ka6ebc pa3bemamn Component Video-HDMI, VGA-HDMI, HDMI-DisplayPort, HDMI-HDMI).
- 06ecneuBAOT OTo6paXeHnE CnHaIa OT OndHO ro nCTouHnKa Ha oNDOM MOHTope nn paCnpedeHnE OndHO rCnHaIa MeKdV HeCKoJIbKIMM MOHTOPaMn.
- Pnpemhble moyn B160-200-HSI n B160-201-HSI mMeot Dba BbIXoHbIX npTa HDMI nnoKJIIOUeHn K DBYM MOHHTOpaM.
- 06ecneuBAOT noKIOUeHne do 64 nepeaTukOB u 255 npueMHIKOB By cTaHOBKe COnHM ynpabJIeMbIM KOMMVTaTOPM.
-ИспобзveТСанДАрСжатиВид�оунH.264. - PetpaHcIaIg Nk-cuHaIOB ynpabHeHn IcToHnKOM (HaNPmep npoIRpbBaTeJeM Blu-rayTM) ot DuctaHNOHHOrO nucnne.
-Испобзевский КергTNИК-уацт:20-60KFlU - PoiDJIepKka ckopocTei nepaun daHHbIX uepe3 nOcneIOBaTeIbHbI uHTepFeic RS-232 do 57600 6uT/c.
Moei npa3bemm VGA pndepkmbaot Bnedeopazpeheny do 1920 x 1440, Bknpuay 1080p.
XapakTepeNCTnKn npOdyKta
- MoDéNi cpa3bēmAmi DisplayPort n HDMI noДeρЖиBaI T BnIeopa3peSeHnIa 1920 x 1080 (1080p).
- MoJIeI cpa3bEmamn Component Video noJpeXuBaHTo BUnEopa3peHnJa 101080i.
Kakdbi nepedaTnK nMeet BbXoHNo npT HDMI Ira noKnHueHn JOKaJbHOrO MOHTopa.
CobMeCTHMOCTb C CNTeMaMn HDCP n 3D.
B KOMNNEKT BKNIOUeHa MOHTaXHnOCHACTKa IIN KPeIJIeHnK CTeHe, B CTOnKe Nn Ha MaUte. - Пдклоченп lo texhONorHn Plug-and-play 6e3 Heo6xOIMocTn nCNoIb3OBAHn KaKOrO-ln60 nporpaMMHoro o6ecneueHn nn dpaBepOB.
**ObecneuBaIOT NOkIoueHne NcToHnKa DVI-cmHaIa n/nn MoHITopa c nCnoB3oBaHneM nepexOdnka HDMi-DVI (HeKOtopbIe moJIeN KOMIIeKTyOTcpeXoDnKOM HDMi-DVI). BblNyckaemble KOMNaHne Tripp Lite KaBeII- nepexOdnKn HDMi-DVI (cepN P566) npOdaIOcTc OTeNbHo.
Hnctpykunno moHTaJxu
IP-peTpaHcIaTopb ayDno-/BnDeocnHaNoB KOMPNeKTyOTc MoHTaxHoJ OChAcTKo, o6ecneuBaHOe B03MOxHOCt b KpeJIeHn pa3NHybIM cNoCobAm. 3Tu cNoCobbl KpeJIeHn Ioka3aHbI Ha npEcdTabHeHHbx HIXe UllIOCTpaunx.
PpmeHne. Ha nIIOCTpaunx noka3aHa moenb B126-1A1; yctaHOBka IP-peTpaHCnTOpOB ayno-/BundeocnHaNo OB cyueCTBnEeTc aHaONuHbIM CnOc06m.
HaTeHHbIM MoHTax


MoHTaX B 19-ДIOIMOBOВ CTоИke
YCTaHOBka C DByXToUeHOn TOnOJOrNeI
Приимechanical:
Ipei npotraBauHem Ka6eNe uepe3 cTeHb/NoToJKN Heo6xOImo npOBepntb npabnlbHOCTb yHKUHOPOBAHn BCEY VCTAHOBKn.
ДяdoctнжehmaMakcmaJIbHoiДИCTaHmN npOn3BOJnteHbOCTn nCOnb3yIte Ka6eB Cat5e/6 c OdHOxINbHbIMnpOBaAMnKaIn6pa0,2MM.ИспОьЗOBaHne Ka6eЯ C MHorOxINbHbIMnpOBaAMnIIKabEЯ C npOBaAMn KaIn6pa Bblse MM npBBeTe K cokpaeeHIO DnHbpeTpacnaIIM.Ka6eN 6Oonee BbICOKNX KaIn6poB (HaPImep,0,13 MM) IMeOT orpAnuYeHHU nepeAioSyU cno6HOCTb NO cpABHeHIO C Ka6eYMaM N6oee Hn3Knx KaIn6poB.Bce Ka6eN Cat6 cepuN N202 MapKu Tripp Lite n3rotabNaIoTcA nCNoIb3OBAHMe OdHOxINbHbIX npOBaOB KaIn6pa0,2MM.По ИнДиУаЛьHOMу 3aKa3a KOMnaHry Tripp Lite MoKeT n3roTaBnBaTb Ka6eN Cat6a yBeInuyeHHOД nINHbI C nCOnb3OBAHnEM OdHOxINbHbIX npOBoB KaIn6pa0,26MM.
-петачки и пемнки, постаясьеь в komплесу вд displayPort, HDMI n VGA, HO otдьно peanizуьпся петачки и пемнки могут metyb pa3bembl B liobix coetahnx (hanpimep, Component Video-HDMI, VGA-HDMI, HDMI-DisplayPort, HDMI-HDMI).
1.пелд haayamom yctahOBKN Bce noKIOHueHHoe 6OpyoBaHne OJIXHO 6bIb o6ecToeHO.
2. IopKIOHHTe NCTOuHk ayDnO-/BnDeocnHana K BXoHOMy npTy nepeaIOUero MOyJI (BbInyckaembe moJenn ayDnO-/BnDeoKa6ene Tripp Lite nepeuNCHeBb B pa3dene OnuHOHaBHe kOMNKeTkyOuIe).
- (Heo6a3aTeNbHO) CoeHnHTe nopT DB9 KOMnbItepa c nocneIOBaTeNbHbIM npToM nepeaioero MoyJr. B 3abucmocnt OTo MoeJI NocJeIOBaTeNbHbI NpO T MOxET IMeT b HTEpeFcDB9 nn 3,5 MM. MoJIc pa3bemAmN 3,5 MM KOMIIeKTyOTcra nepexoHNKOM 3,5 MM — DB9. IJa noDKIIOueHnK KOMNbItepy MoJIeN C npTaMn DB9 Tpe6yeTcra cHaIapTHbI Ka6eBc pa3bemAMN RS-232 U DB9 (npOdaetc rOteNbHO).
- (Heo6a3aIbHo) BCTaBbTe BbIXOHOH IK-Ka6eJIb (IR-OUT) n3 KOMnIeKTA B npot IR-OUT nepeaofo moyra. UcTahOBnte daTnK Ha Ka6eJIb IR-OUT B CBO6oHOM OT npenrTcbn MeCe TaKIM 06pa30M, YTO6bl ynpabAneMoE yCTpoiCTBO HaxoHIOCb B npedeJax npamBo BuIMOCn. PpmeHne. Ka6eJIb IR-OUT npinHMaet cHnAn DnctaHnOHoro ynpabInHn I nepeDaet ero Ha npapBaJeMoE yCTpoiCTBO (HaNPmep, nponrpblBaTeJIb Blu-ray n np.).
- (Heo6aTeBho) IoknOHTe loKaHbM MoHtOp K BbIXOHMy npTy HDMI nepeaUoero Moyra c nmoosHDMI-ka6enr (BbInyckaembe moedn HDMI-ka6ene Tripp Lite nepeuCneBb pa3deJe OunHOJIbHbIe KOMNKeKtyIOuNe).
- IopknHHTe BHeHn 6Iok nTuHn K MeCTHOmy NepaOmeMy Moynu IN BKIOHTe ero B po3eTKy cTeBOrO fNbTpa, 6Ioka pacpeJeHn nTuHn (PDU) nn nctouHnka 6ecnepe60Horo
YCTaHOBka C DByXToUeHOn TOnOJOrNeI
nɪtənɪya (ɪbɒ) Tripp Lite.
- C nOMOuBIO KHOJOK Up/Down (BBepx/BHn3) Ha nepeDHeI naHeI nipepaIoUeTo MOyIa YCTaHOBHTe HOpE kaHaJa (0-63), COOTBeTCTByUoIi TOMy, KOToPbI 6yET NcNoJIb3OBaTbcA B npneMHOM MoIyIe.
PnmeaHne. Jna 3aunbI OT cnyauHoro n3MeHeHn Homepa KaHana npedyCMOTpeh MexaHn3M fKcauHn. Pn 3aФHKcUPOBaHOM Homepe KaHana yDepxNBAte KhoNkUp (BBepx) uDown (BHN3) hXaTbIMn Do Tex nop, noka Hmep KaHana He NaHT MIRATb. 3aTe mpeiDITE Ha Jeenaembl KaHan C nomoDbIO KhoNOK Up/Down (BBepx/Bn3). Iocne BblOpa JeknaemOro Homepa KaHana 3aФHKcUpye erO, ydepxNbaar KhoNkUp (BBepx) u Down (BHN3) do tex nop, noka Hmep KaHana He NpeKpAIT MTARb.
- CoeMHHTe BbIXoHNo npT RJ45 (Output) nepeaouero Modyn c BxOndbIM npToM RJ45 npneMHoro Moyna (Input) npn nomou n Ka6ena Cat5e/6.
PpmeaHne. MaKcMaJIbHO DoIyCTMMA JINHa Ka6eNa, CoeINHJIOeO nepeDaTnK C npneMHNKOM, coCTaBnE T 100 M.
-
Порклоче монтор кaydno-/Видевыхody (Output) npueMHoro Modyna (BbInyckaemble Moelen aydno-/Видев如此 Tripp Lite cm.В pa3dene OOnuHaNbHbIe KOMPnKeKtouune).
-
(Heo6aTeBho) CoeHnIte npT DB9 noCneObaTeBHO noKIOuAemoro yCTpoiCTBa c noCneObaTbHbIM npToM npHmHO MOyJNA. B 3aBNCmOcTN OT moEJI NocneObaTeBHybI npT MoXe IMeTB nHTepfecn DB9 nn 3,5 MM. MoEJI C pa3bemaMn 3,5 MM KOMNKeTcyOTc nepexoHkOM 3,5 MM — DB9. IIna noKIOUeHn yCTpoiCTBa K MoEJI M C npTaMn DB9 Tpe6yETcra TaHdApTHbI Ka6En C pa3bemaMn RS-232 n DB9 (npOdaetc OTDenHo).
-
(Heob3aTeBHO) BCTaBbTe BxOJHoi NK-Ka6eNb (IR-IN) n3 KOMnJIeKTA B npOT IR-IN npneMHoro MoIyI. YcTahOBITE DaTmIK Ha Ka6eNb IR-IN B CBO6OJHom OT npEeTCTBn MeTe TaKIM O6pa30M, 7TO6bl ynpabJnEMoe yCTpOJCTBO HaxOJINOCb B npdeJnx BuIMOCTn.
PpmeHne. KaBb IR-IN npHMaet CnHaI DnCTaHNoHHoro ynpabHeHn I nepeaet ero Ha ynpabNaeMoE yctpoCTBO, paCnoJoxHeHoe Ha dpyrom KOHc EYtaHOBKn.
B 3TOT MOMENT NepedaTuk He doJxH 6bITb NOdkIIOUeH K BHeuHemy 6loky nHTaHn. NpedaTuk He cIeJyET 3aNTbIBaTb Do NOdkIIOUeHn I 3aNTbIBaHn BCEX 3JIemEtOB ayDNo-/BundeOooOpudOBaHn.
- Дя подклоченя донончтель HorO(-bIX) nepedaTUnKa(-OB) NOBTOpTe DeiCTBnA, ONICAHHbIe Bnn. 2-7.
- Поdkлочte moHTop k aydno-/BundeobbOxody (Output) npneMHoro MoDyIa(BbInyckaemble Moden aydno-/Bundeokabene Tripp Lite cm.В pa3dene OnucHOHaNbHbIe KOMPNeKToUoIe).
- (Heo63aTeBHO) CoeHHTe nopT DB9 nocJeOBATeBHO nokKIOUaEMoro yCTPOIcTBa c nocJeOBATeBbHM nopTOM npHemHOro moyJra. B 3abncmOCTn OT mOeJI npocJeOBATeBbHbI npT MoKeT Imetb HtepFeic DB9 uN 3,5 MM. MoeJI c pa3bemaMn 3,5 MM KOMJIeKTyOTcR nepexOHNKOM 3,5 MM — DB9.ДЯ nokKIOUeHnry yCTPOIcTBa K MOeJIaM C npTaMn DB9 Tpe6yeTcSTaNdApTHbI Ka6eB c pa3bemaMn RS-232 n DB9 (npoJaETcOtJeBHO).
- (Heo6a3aTeNbHO) BCTaBbTe BxOJHO NK-Ka6eNb (IR-IN) u3 KOMnEKeTa B npT IR-IN npHemHOro MoyIy. YcTaHOBtte DaTuNK Ha Ka6eNb IR-IN B CBo6OJHom OT npEnrTcBm MeTe TaKIM O6pa30M, yTo6bl 6nOK dntaHUnOHoro ynpabJeHn HaxOJINcB N ppeJenX BuIMOCtN.
PpmeHne. Kaebb IR-IN npHHMaet cunHan ductaHIOHoro ynpabHeHn I nepeaet ero Ha ynpabIaeMoE yctpoCTBO, pacnoJoxeHHoe Ha dpYROM KOHcE yCTaHOBKn.
- YctaHOBtTe XeIaEMbI HOMep KaHana (ot 0 do 63) c nOmoIbIO KhoNOK Up/Down (BBepx/Bn3) Ha nepedHe naHEn npEmHNka. 3TO T HOMep DOJIXEH 6bITb OINHaKOBbIM Ha BCex nepedaIounx I npEhembIX MOyJx yCTaHOBKn. EcnB BCE BXoJaIue B CnCTemy nepedaTUnk I npEemHNk paHee He NcNoIb3OBAJncb, To OHn BKIoUaIOTcH Na 3aDaHHom IO yMOJIuaHIO KaHane c HomepOM 0, KOToPbIM MoXHO OCTaBtB 6e3 N3MeHEn NocNe yCTaHOBKn.
PnmeHne. J3aunbIOTcnyauHoro nMeHeHnHomepa KaHana npedyCMOTpeh MexaHn3M 6nokpOBKn. Pn 3aKupobHom Homepe KaHana yepKnbte KhoNkUp (Bbepx) uDown (BHN3) hKaTbIMu Do tex nop, noka Hmep KaHana He NaHT MraTb. 3aTe mpeiDnte Ha JeNaembl KaHaC nOMoUbO KhoNOK Up/Down (Bbepx/Bn3). Iocne BbOpa Jenaemoro Homepa KaHana 3aKncpyte erO, yepKnbA KhoNkUp (Bbepx) u Down (Bn3) do tex nop, noka Hmep KaHana He NpeKpaNT MraTb.
- CoeHHnte BbIXoHoi nopT RJ45 (Input) npneMHoro moDyna cOdHM u3 nopTOB RJ45 ceTeBOro KOMMyTaTopa npn pmoUkabena Cat5e/6.
PpmeHne. MaKcMaJIbHO IOnyCTUMaI dInHa Ka6eIa, coeINHIOUeI npMeHHK c KOMMyTaTOPoM, COCTABJET 100 M.
YCTaHOBka c MHOrOToUeHOn TOnOJOrNe- YnpaBJIeMbIKOMMyTaTOP CnCIOb3OBAHNem npoToKoJa IGMP

B 3OT MOMENT pInemHK He DoJxHc 6bITb NOKluoyeK BHeUHemy 6IOky NHTAHNA. IpnemHK He CneIyET 3aNTbIBaTb Do NOKluoyeHn 3aNTbIBaHna BCE 3JIeMeHToB ayDno-/BundeOooOpdyoBaHn.
14.ДяпдклоченяdoonHHTeBbIX npneMHKOB nobTopte DeiCTBn,OnncAHhble B nI.9-13.
15. BkIIOHTe nITaHHe BCex NOkIIIOUeHHbIX yCTpoiCTB.
16. ПоdkлочиБВeшнue 6лOKИ пNTAHЯ КВсмпepаIoшIM И npneMHbIM Modyям уCTaHOBKn, a 3aTeM BклочITE BHeSHNE 6лOKИ пNTAHЯВpo3etKIn ceTeBbIX ФиьТрOB, 6лOKOBpacnpedelenHЯ пNTAHЯ (PDU) ИИntOчнКOB 6ecpe6oHoro nHTAHЯ (IV5П) Tripp Lite.
Pa60ta yCTaHOBKn C DByxTOueHNo TOnOJOrNe - YnpaBnaembI KOMMyTaTOP cNcNoJIb3OBaHnEm npToKoJa IGMP
Приимechanical:
IP-peTpaHcIaTOpbl ayduo-/BuaeocnHaNoB cepm B160 npedha3HaauOTcI nncnoIb3ObaHna C BbIeJIeHHbIM cTeBbIM KOMMyTaTOPOM. IOnKIIouHeNIE IP-peTpcaHcIaTOpOB K KomMyTaTopO, nCnoIb3yeMOMy CdpYIM CeTeBbIM 6OpuyoBaHnEM, npuBeTe K yxUdEHNIO XapaKTepuCTNK u3JeNIA UIN erO noHNO Hepa6oTOcNO6HOCTN.
- PnpctabnHbIe Hxke 3KpaHHbIe CHIMKU OTHOcTcK CTeBOMy KOMMyTaTOpy Tripp Lite Moen NSS-G16D2. IopdoK pa60tbi pa3nHybIX KOMMyTaTOPOB pa3nHuAeTCB 3aBNCMOCTN OT MoEN.
1.BoiDnteBnolb3OBaTeJbckn INHTepcEic ceteBOrKOMMyTaTopa.
2. IpeenIte B pa3den VLAN Management (YnpaBneHne BnptyahbHOJ IBC).
Pa60ta yCTaHOBKc DByxToueHNo TOnoJOrney - YnpaBnaembI KOMMyTaTOP CnOJIb3OBAHHeM npToKOJa IGMP
- B pa3dene VLAN Management co3aIte HOByU BnptyaIbHyU JBC (VLAN) dna KaJdo ro nepedatnuka, nCnoIb3yeMOrO B yctanOBke. Homep npota nepedaTnuka obraTeNbHO doJIKeH yka3bIbTaBcR nepBBIM B cnccke npTOB VLAN; BCneI 3a Hm Uka3bIbAIOTCs (Yepe3 3aIpyU) HOpema npTOB BceX npneMHbIX MoynE, KOtOpe 6uyT nepedaBatb ayduo-/BnDEocnHaJIb Ha BblpaHHbI nepedaTnuK IOT Hero. Ha npedCTabNeHHOM Hxke 3KpaHHOM CHIMKE NOKa3aHb BVnptyaIbHbI JBC dna Yetbipex nepedaTnuKOB (VLAN0002-VLAN0005). VLAN0002 npedctablaerco6oN nepedaTnuK, noKnUeHHbIK npoty 1, ayuio-/BnDEocnHaj KOTOPoro nepedaetcaHa npneMHNK, noKnUeHHbIK npotam 7 u8. Pno aHaONr C3TM VLAN0003 npedctablaerco6oN nepedaTnuK, noKnUeHHbIK npoty 2, che ayuio-/BnDEocnHaj nepedaetcaHa npneMHNK, noKnUeHHbIe K npotam 9 u10.
-
Дnia nepeknioeHna nctouHnka aydno-/BndeocurHana, noctynaoJero Ha npneMHNK, nepeiHTe B pa3dien HactpoiKu VLAN cBra3aHHbIX C HMM nepeDaTuNKOB I do6abTe/ydaJIte COOTBeTCTByUOHe NOPtbl.
-
No Mepe paCunepHn yCTaHOBKn 3a Cuet HOBbIX NpepaTNUKOB IN pNEmHNKOB CneJeT npocTo Do6abTb BnptyAebHbIe JBC dIra HOBbIX NpepaTNUKOB IIO6aBnTb HOBbIe pNEmHNK B Hactpoikax BnptyAebHbIX JBC cooTBetCTbyOuNX NpepaTNUKOB.
YCTaHOBKa CMHOrOToUcEuHoN TOnOJOrMei HeynpabJIeMbI KOMMyTaTOp
Птумецань:
B yctaHOBkax c HeynpabIeMbIM KOMMyTaTOPOM uCnO nepeaIOx Moynne orpaHbAeTcBvym. KoNueCTBO npMeHbIX Moynne orpaHbAeTcYuCNOM Cbo6oNbIX nopTOB HeynpabIeMoRo KOMMyTaTopa.
- Ipeep npotraBauHem KaBenee chepe3 cTeHb/NoToKn Heo6xOIMo npOBepuTb npaBnIbHOCTb yHKUOHIOPAHNA BcE yCTaHOBKn.
-ДяdoctuxkeHMaKcMmaIbHOJINpOu3BOaNTeHbOCTNHCNoB3yIte Ka6enbCat5e/6 c OndoxnHbIMn npoBoaMn Ka1n6pa 0,2 MM². NcnoB3oBaHne Ka6eJIc MHOToxNlBbIMn npoBoaMn nn Ka6eJIc C npoBoaMn Ka1n6pa Bblse MM² npuBeTe K cokpaueHHIO dnnHb peTpaHcIIauH. Ka6eJI6 bonee BbICOKnx Ka1n6poB (HaNPmep,0,13 MM²) IMeOT orpaHueHHyIO nepeDaUyIO cnoCo6HOCTb NO cpABHeHIO C Ka6eJI6Mn 60ene Hn3Knx Ka1n6poB. BCE Ka6eJI Cat6 cepNI N202 MapKu Tripp Lite n3rotabNaBAtcN C nCnoB3OBAHMe OndoxnHbIX pO BoHIO BcAeTIbX TaPP Lite MoKet n3rotabNaBaTb Ka6eJI Cat6a yBeHHueHHIO dnnHb C nCnoB3OBAHMe OndoxnHbIX npoBoaO B Ka1n6pa 0,26 MM².
- IP-peTpaHcIaTObI ayDnO-/BIneocuHaNoB cepm B160 npedHa3NaHaoTc dIy IcNoIb3oBaHnC BblJeHbIM cTeBbIM KOMMyaToPOM. NpKIOueHne IP-peTpcaHcIaTOpOB K KOMMyaToPoy, IcNoIb3yeMOMy CdpyHM cTeBbIM 6OpuyIOBaHnEM, pINBeTe K yXuIeHnIO xapaKTePncTik N3JeNIA IIN eTO IOnHOI Hepa6OTcNOc6HoCTN.
Ha cxeme yctahOBKn, n3o6paXeHHo Ha cIeYIOSe CTpaHnSe, nOKa3aHb IpePaTcNK N npMeMHKn, mHeuIne TOnbKO pa3bEmbl HDMI; Ha npakTKe BO3MOxHO nCNoB3OBAHne IpePaTcNKOB IN pnpemHKnOB C IIO6bIM COUeTaHmE pa3bEmOB (Hapimep, Component Video, DisplayPort, HDMI, VGA).
Ha cxeme yctaHOBKn, n3o6paXeHHoH ha cneIyIOSe CTpaHnue, noka3aHb TOnbKO Heo6xoIMMbIe coeINHeHn. Heo6aTeNbHbIe coeINHeHn (HaNPmEp, cnoMoUbKabeneIR-IN n IR-OUT) He noka3aHbI.
YcTaHOBKa CMHorOToUeHuOH TOnoIOrNei HeynpaBnaEmbI KOMMyTaTOp

KpaTkoe onncahne yctaHOBKn (IJa BceX moJeN)
1.перд haayam yctahOBKn BCE noKluyeHoe obopydObaHne doJxHo 6bIb oecToeNo.
2. ПОДКЛЮЧITE NGTOUHн AYdno-/BnDEOCnHana K BXOДHOMy NOpTy nepeDAIOUeRo MOnyJIa (BbIpyCKaEMbIe MoDEN aYdno-/BnDEOKa6eJe Tripp Lite nepeuNCHeB I B pa3deNe OOnuHaJIbHbIe KOMNKeKTyOuSne).
YCTaHOBka cMHOrToOueHoi TOnoIOrnei HeynpaBnaEmbI KOMMyTaTOp
- (Heo6aTeBho) CoeHnIte npT DB9 KOMbIepa c nocJeIOBaTeBbIM npToM nepeDaUoero Moyra. B 3abucmOCTn OT moJIe NocJeIOBaTeBbHbI npT MOKeT IMeT b INTEpEeC DB9 nn 3,5 MM. MoJIe C pa3beMaMn 3,5 MM KOMPJIeKTyOTcR naPExoHnKOM 3,5 MM — DB9. IЯ noJKNIOueHnK KOMNbIopepy moJIeN C npTaMn DB9 Tpe6yeTcR cTaNapThbI Ka6eBc pa3beMaMn RS-232 n DB9 (npOdaETc r OTeBHo).
- (Heo6a3aTeNbHO) BCTabTe BbIXOHDnIK-Ka6eNB (IR-OUT) n3 KOMnneKt a B npot IR-OUT nepeaHIOero MoyIa. UcTahOBITE DaTnK Ha Ka6eNB IR-OUT B CBO6oHOM OT npenrTCTBn MeCe TaKIM 06pa30M, uTo6bl ynpabJIeMoE yCTpoiCTBO HaxoDInocb B npedeJax BuDMOCtN. PpimeaHHe. Ka6eNB IR-OUT npinHMaet cRHaI dIcTaHcIOHHoro ynpabJIeHn I nepeDaET erO ha ynpabJIaReMoE yCTpoiCTBO (Hanpimep, nponrpblBaTeNB Blu-ray n np.).
- (Heo6aTeBho) Ioknoute loKaHbM MoHTop K BbIXOHOmy npTy HDMI nepeaioero moyra c nmoosbHDMI-ka6eJRA (BbInyckaemble moJeHDMI-ka6eJr Tripp Lite nepeuCneHb B pa3dene OOnnoHaHbHbIe KomnleKtyUOme).
- UctaHOBITE XeHaembI Homep KaHana (oT 0 do 63) c nomoubIO KhoNOK Up/Down (BBepx/BHN3) Ha npeDnei panEni nepeDaTuKcA. Bce npepaTuKn, BXOJaUe B coCTab YcTaHOBKn, IOnJXHbl IMetb pa3HbIe Homepa KaHaIOB.
PpmeHne. J3aHTbI OT cnyauHoro n3MeHeHn Homepa KaHana npedyCMOTpeMexAHnM fKcaun. Pn 3aФNKcnpOBaHHom Homepe KaHana ydepKuBaTe KhoNkUp (BBePx) NDown (BHN3) HaxaTbIMn Do tex nop, noka Homep KaHana He NaHT MraTb. 3aTe mpeiDte Ha xeJeaEMbI KaHan C nomOu bIO KhoNOK Up/Down (BBePx/Bn3). IocNe Bbl6opa Jenaemoro Homepa KaHana 3aФNKcnpyIe erO, ydepXuBaJ KhoNkUp (BBePx) N Down (BHN3) do tex nop, noka Homep KaHana He npEkpATn MraTb.
- CoeHInTe BbIXoHoi nopT RJ45 (Output) nepeaIoIero MoIyra cOdHm n3 nopToB RJ45 ceTeBoro KOMMyTaTopa npn pmoUk Ka6eJa Cat5e/6.
PpmeHne. MaKcMaJIbHO DoNyCTmJa DnHa Ka6eNa, CoeINHaIooero npMeHHK c KOMMyTaTOPoM, coCTaBnaT 100 M.

B 3TOT MOMENT nepedaTuk He doJxHe 6bITb noKluoyen K BHeuHemy 6nOky nHTaHn. NpedaTuk He cneJyET 3aNTbIBaTb Do noKluoyen H 3aNTbIBaHn BCEX 3JIeMeHToB ayDNo-/BnDeo06OpyDoBaHn.
8.Дя nodklouhenno dononHntbHoro nepeaTnka NOBTOPe DeICTBnA,OnncAHhble Bnn.2-7.
YCTaHOBka cMHOrToOueHoi TOnoIOrnei HeynpaBnaEmbI KOMMyTaTOp
- Поdkлочte моннтор кaydno-/Видевьхody (Output) npneMHoro Modyna (BbInyckaemble Moden aydno-/Bndeoka6ene Tripp Lite cm.В pa3dene OOnhoHaBhbIe KOMnNeKtTuOuIe).
- (Heo6aTeNbHo) CoeHnIte npT DB9 noCneIOBateNbHO noKIOuAemoro yCTpoiCTBa c noCneIOBATENbHbIM npToM npHmHO ro MOyJr. B 3aBucmOcTn OT moJIeN noCneIOBateHBHIOpT MoKeT mEt b nHTepfEc DB9 nn 3,5 MM. MoJIeN c pa3bemaMn 3,5 MM KOMJIeKTyOTc nepeXoHNKOM 3,5 MM — DB9. JIra noDknUeyHna yCTpoiCTBa K MoJIeM C npTAMn DB9 Tpe6yeTc rTaHdApThb kAben c pa3bemaMn RS-232 n DB9 (npOdaetc oTdenHo).
- (Heo6aTeNbHO) BCTaBbTe BxOJHoi IK-Ka6eIb (IR-IN) u3 KOMnJIeKtA B npT IR-IN npneMHoro MoyIy. UcTaHOBITE DaTUnK Ha Ka6eIb IR-IN B CBO6OJHom OT npenrTCTBm MeTe TaKIM O6pa3OM, YTO6bl 6IOK dNCTaHOnOHoro ynpabJIeHn HaxOJINcR B npdeJax BNDIMOCtN.
PpmeHne. Kaebb IR-IN npHHMaet cunHan dctaHIOHoro ynpabHeHn I nepeaet ero ha ynpabIaeMOe yctpoCTBO, paonoloxehoe Ha nprom KOHcE yCTaHOBKN.
- UCTAHOBITE c nOMOJIbIO KHOJOK Up/Down (BBepx/BHn3) Ha nepeIeHne IaHeIe IpePaTuKHa HOpE KaHana (OT 0do 63), COBnaIauOuIc HOMepOM KaHana TOro nepeTaUKNa, Yei ayDIO-/BUNDeOCmRHaN Bbl XOTITe npINHMaTb.
PnmeHne. 3aunb0 nuyauHoro nMeHnHn Homepa KaHana npdycmOTpeh MexaHnM 6nokpOBKn. Pn 3aKpOHOM Homepe KaHana yepxNBate KhoNkUp (Bbepx) uDown (BHN3) hxaTbIMu Do Tex nop, noka Hmep KaHana He NaHT MRAtb. 3aTe mpeDnte Ha Jekaembl KaHan c nomoubIO KhoNOK Up/Down (Bbepx/Bn3).Iocne BbIopa Jekaemoro Homepa KaHana 3aKcpyeero,yepxNBa KhoNkUp (Bbepx) u Down (Bn3) doTex nop, noka Hmep KaHana He pekpatNT MRAtb.
- CoeHInHe BbIXoHoi nopT RJ45 (Input) npneMHoro moDyna cOdHM u3 nopTOB RJ45 ceTeBOro KOMMyTaTopa npn noMoUu Ka6eJa Cat5e/6.
PnmueyaHne. MaKcMaJIbHO DoNyCTMma JInHa Ka6e, CoeINHIOUeI npMeMHIK C KOMMyTaTOPOM, coCTaJIaRET 100 M.

B 3TOT MOMENT npHemHK He dOJxeh 6bITb NOdkIIOueH K BHeUHEmy 6nOKy NHTAHNA.
PpHemHK He cIeMyET 3aNTbIBaTb Do NOdkIIOueHn I 3aNTbIBAHn BCex
3JIeMeHToB ayDNo-/Bunde0o6OpdyOBAHn.
14.Дя nodknoeHnI dOONHHTeBhbIX npneMHKOB NOBTOPte DeNCTBn,OnncAHbE Bnn.9-13.
15. BkIIOUHTe NITaHHe BCEx IOdKIOUChENbIX yCTpoIcTB.
YCTaHOBKa CMHOrOToUcEuHoN TOnoIOrMei HeynpaBnaEmbI KOMMyTaTOp
-
ПОДКЛЮЧITE BHEUSHNE 6LOKИ ПИТАнЯ KО BCEM NpepaIoUIM I npIeMHbIM MOДУЯМ YCTaHOBKN, a 3aTeM BKJIQUHTe BHEUSHNE 6LOKИ ПИТАня Bpo3eTKI ceTeBbIX ΦиьТрOB, 6LOKOB pacnpedelenHa ПИТАня (PDU) nII nctOuHnKOB 6ecnepe6oHoro ПИТАня (N5П) Tripp Lite.
-
Дя сменихка постуноюго на монитор синда в пожece pa6otbl сдуетпостот Измены Homek KaHа COOTBETCTBHyOюго ппимMuKa TAKIM O6pa30M, YTO6bI OH COBnaI C HOMePOM KaHа NepeDAtUHa, TpaHcHpyuOюго сИнанOT HYXHOTo ICTOUYHka.
BbIaBHeHne uYcTpaHHe HEnCpPaBHOCTeI
EcnBbInonHeHne yKa3aHn no yCTaHOBe He nO3BOJAE T NOyUHTb PpHEmIeMOro KaYeCTBa
N3O6paKeHn, nonpo6yTe BocNoJIb30BaTbCnPbEeHHbIMn Hxke peKOMeHaQIaIaMn N O BblBHeHIO u
yCTpaHEHIO HeCNpabHOcte:
-
Порклочьи постаьямье в komплжte Всшнue 6лки петань К pa6otaoшему nctouну рпань? Дя надlexацero Функцюнрованя данlorо n3dienno OHO doJXH NOKJIQUaTbC K BHeWHeMу 6лку петань n 3anltbIbTaBcR OT Hero.
-
5bIIO IIN OTKIIIOUeHO NITaHHe NOIKIIIOUeHHbIX yCTpOiCTB Do Hauana yCTaHOBKN? EcNI HeT, To nepe3anyCTITE Bce NOIKIIIOUeHHbIe yCTpOiCTBa.
-
3aNTbIbAINCb IIN NOKIOUeHHbIe aydno-/BnDEOyCTpoiCTBa Do 3aNTbIBAHNApepaioxN npemMbIX Moyn? EcHn HET, OTCoEHNHTe NITaHne BCex nepeaioxN npemMbIX Moyn, a 3aTeM 3aNTaTIe INx CHOBA.
-
Kakoro pa3peuHn Bbl nbIaTeCb Iobtbc? POpO6Hee O MaKcMaJIbHbIX 3NaueHnx DnCTaHn n pa3peuHn cm. B pa3dJe ΦyHKUHOHaJIbHbIe BO3MOXHOCTN N3DeHn HactoJrero pykoBODCTBa. B cnyae HeBO3MOXHOCTn NOlyeHn pPmeMlEmoR KauEcTba N306paXeHn nonpo6yute yMeHbIITb BIndeopa3peuHne KOMlbIOTepa IIIN OTperynipOBaTb YactOTy o6HOBLeHn.
-
KaKoro Tnna Ka6eHn NcNoB3yIOTc B DaHHoYCTaHOBKe? NcNoB3OBAHne HeHaJIeKaUx Ka6eHm MoKet npIBecTn K yXuDWeHIO pa6OuHX XapakTePrcNTIK. Heo6xoJIMo NcNoB3OBA Tb Ka6eH, nOdEepKINBaOuIe HxKbI yPoBEH b BnDeopa3peSeHn. IInr DoCTNKeHn MaKcMaJIbHOI dNCTaHUN i Pa3peSeHn Heo6xoJIMo NcNoB3OBA Tb Ka6eH Cat5e/6 c OndoxKINbHMn IpOBoAMn KaINbpa 0,2 MM² nn Cat6a COnHOxKINbHbIMn IpOBoAMn KaINbpa 0,26 MM². Ka6eH Cat6 cepnn N202 MapKn Tripp Lite n3rotabNAOTc C nCNoB3OBAHnEM OndoxKINbHbIX IpOBoOB KaINbpa 0,2 MM², TaK Jek K Ka6eH B 6yxtax N022-01K-GY (Cat5) n N222-01K-GY. NcNoB3yEmble ayduo-/BnDeoKa6eHn TakKxe DOnJXhbl NcNoB3OBAHb HyxHbI yPoBEH BnDEOPa3peHn. DeueBle Hn3KOKaueCTBeHHbIe Ka6eH MOryt He NoDepKINBa Tb MaKcMaJIbHOr o Pa3peSeHn. PekomeHnyETc NcNoB3OBA Tb Ka6eH MapKn Tripp Lite, nepeHCNEHHbIe B pa3dene OnuOHaNbHbIe KomNKeTkyUOme HaCToJero pyKOBoDCTBa.
-
ПоберьтейнсплььемBLEкбелиHa npedmetnxнадlexацero Функунонрованя. Hanpimep,ДЯ пobерkn ИспавноCTaудno-/Видекабеля coeINHTe chepe3 Hero pa6oTAIOUne nctOuHnK mOnHTop.ДЯ пobерkn Ka6eЯ Cat5e/6 Ha obecneueHne cTeBOrO coeINHeHnI NOdkJIQUHTe CERO NOMObIko KOMNbIOTep K cETN.
BbIaBHeHne uYcTaPaeHne HeuCnpaBHOCTeI
- Поберп Кабени на педmet наличma NOBpeхден, KOtOpbIe MORn npOn30HTN B npOecce yCTaHOBKn.В снуаe pa36aNTbIBaHna Ka6eNbHOro pa3beMa npn npOTarNBaHm Ka6eЯ chep3 CTeHb/NoTOKn nnn NOBpexdHry Ka6eNbHOJ OBOLOUcK, Bbl3bIBaIOUeTo OROJIeHne npOBOD,doCTnKHe MaKcImaJIbHbIX pa6OuHX xaPakTePncTk He npEcdTaBnaeTc BO3MOXHbIM.
- He noBbepraotcIu nepeDaTchK(-n) n/nn npHemHuk(-n) BO3deiCTBIO NOBblHeHHbIX TemnepaTp B Tex MeCTax, rJe OHN yCTaHOBneHb? B cnuyae neperpeBa u3dene He MoKeT yHKUOHNPOBaTB NaIIeKaunm 6pa30m.
- He yctaHaBnBaIte oINHakOBbie HOMepa KaHAnOB IJIpePaTcIKOB B yCTaHOBKe C nOJb30BaHHeM HeynpaBnEmoro KOMMyTaTopa. 3To npuBeTe K OTCyTCTBIO OTO6paXeHna CnHaHa Ha MOHTopax, POKJIIOUeHHbIX K pIneMHNKaM, HAcTpoEHHbIM Ha KaHaJIb C OINHaKOBbIM Homepom. B 3To mClyae N3MeHIne HOMepa KaHAnOB nepeDaTcIKOB Ha YHKaJIbHbIe N HAcTPOITe Yka3aHHbIe PIneMHNKu Ha KaHaJIb C HyXhBMn HOMepaMn. EcnI NOcIe BBINOJIHeHn E Tnx DeIcTBn ayDIO-/BnDEOCnIHJI He BOCCTaHaBJIbAeTCR, OTKIOUHTe NITaHne COOTBeTCTByIOxN XpePaTcIKOB I pIneMHNKOB IN POKJIIOUHTe erO cHOBA No NCTeEHm 10 cekynd.
- He podknoyaite 6olee Dbyx nepeaTukOB ByctaHOBKe CnObl30BaHEm Heynpabnemoro kOMMyTaTopa. KOnuyeCTBO nepeaTukOB BycTAHOBkax C HeynpabnembIM KOMMyTaTopom OrpaHnUBAeTcA DByMa, a KOnuyeCTBO npneMnKOB - YNCJOM OCTaBUnXcR nopTOB Heynpabnemoro kOMMyTaTopa.
- He nodklouaTe K cTeBOMy KOMMyTaTOpy KaKoe-ln6o DpyRoe cTeBoe o6opydoBaHne. IP-petpaHcIaTOpby ayDno-/BndeocirHaNoB cepu B160 npedHa3NaiaOTcIg nCpOJIb3OBAHH C BblJeHbIM cTeBbIM KOMMyTaTOpom. Ix nodknUoyHeNk K KomMyTaTOpy, nCpOJIb3yeMOMy C dpyrIM cTeBbIM o6OpYIOBaHNem, npBBeET K yxydWeHIO xapaKTePncTIK u3DeHnI IIN erO nonHO Hepa6oTOcNO6HoCTn.
TapaHTnHbIe 06a3aTeNbCTBa
Iapantma 1 ro
KoMaHn Tripp LrAraTpyet OTCyTCTBne DekeKTOB MaTePnaIOB N3ROTOBHeN B TceHe N OHO (1) roa c MoMeHTa nepBOHaJIbHO nOKynm. 063aTeIbCTBa KOMnHn Tripp Lite no HactOJe rapaHTMn ORpaHNUBAOTcpeMOTHom IIN 3aMeHNO (no ee eHNHOJHOMO yCMOTpeHIO) IIO6bx TaHX DekeTKhIX u3denn. IIN NOUYEHn ycYr no daHNo rapaHTMn Heo6XoDMIO NOUYtB Homep Rurned Material Authorization (RMA - pa3peSeHHe Ha BO3bPaT MaepnAoOB) ot KOMnHn Tripp Lite nIN ee ABTop3OBAHHO CepBNCHO TcHPTa. INeIM NoJIKHb6bIT Bo3BpaUeHb KOMnHn Tripp Lite nIN ABTop3OBAHn CepBNCHOr pCepBNCHO TcHPTa. INeIM NoJIKHb6bIT Bo3BpaUeHb B 03HKWII np6bEMbl NOKyMeHTOM, NIDTBepKDAIOUM DaTy IM MeTo erO pIno6peTeHNA. DeiCTBNE HAcTOnEe rapaHTMn He pacnPoCTpaHReTcHa 06OpDobAHHe, NOBpeKDeHHoe B pe3yIbTaTe abAPm, He6peKHO ObaPeHn ININ HnpABmIBHO NCIOB3OBAHn, a TAKKe BuDOn3MeHeHoe KaKM 6bl To Hn 6blIO 6pbzOM.
3A NCKJIIOUHEM IPEJYCMOTPEHHbIX 3DcB CUYAEB KOMIANHIA Tripp Lite HE IPEIOCTABJRET KAKNX-JI50 ABHBix INI NOIPOPA3YMEBAEMbIX TAPAHNTBI, BKIIOUAR TAPAHNTM KOMMEPUECKO INIPIROHOCTUN INIPIROHOCTN INI KAKOIN-1I50 KOHKPETHO CEIN. B HeKOTopbIX Wtatax/ ROCyapdCTbX ORpAHueHne INI NCKIOUHHe NOp4a3yMeBaEMbIX TAPAHNTHE DOYCAeTC; cIeIOBATEbHO, BbiyeKa3aHHe(-bie) OPAHueHne(-i) INI NCKIOUHHe MOrTH E paocpoCTpaHbTa H nokynatela.
3A NCKJIIOUHEM IPEYCMOTEHBx BbIe CUYAEB KOMPAHNA Tripp Lite HN INPNI KAKNX OCBTORETBAX HE HECET OTBETCTBEHHOCTN 3A IPIRMBIE, KOCBEHNbIE, CUYAHNBIE ININ IOBOHyB EybITK IN50 BybITK, ONPDEJENMBIE OOBbIMN OBCTOReTbCTBAMN, BO3HKAIUHNE B CBA3N CNCIOJIb3OBAHNE DAHHORO IN3DEINIA, DAXE B CNYAE EE INHOFPMNPOBAHNA O BO3MOXHOCTN HACTYNIIEHNA TAKNX y5bITKOB. B cactHOCTn, KOMPAHNA Tripp Lite He HeceT OTBcTBeHHoCTN 3a KaKNe-In6o IN3dpejKn, TaKe KaK ynuieHNbIe pIn6bInn Nn DoxoDb, NOtep aobyobAHNa, notep Bo3MOXHOCTn INCIOB3OBAHNA oObyoBaHna, noTepe nporpaMMHO oecneHn, notep daHHbIX, paXOnbHa 3aMeHHTeIN, yperynopbaHne npetehn trtpbNx nip.
Kompana Tipp Lite noctoHNO COBepueHCTByET CBOU npOduKyIIO. B cB3N C 3TMM BO3MOKHO N3MeHeHne TexHHuecknx XapakTepcntk 6e3 npedBaupntbHoro yBeDOMLeHnA. BHeuHm Bnpealhbx N3DeIIM MOKeT HeCKoJIbKO OTnMaTbcr O TnpdctabHeHoro Ha φotOrpaΦyx INIIIOCTpauixx.


PpOyEeH BueuCIO
1111 W. 35th Street, Chicago, IL 60609 USA • www.triplite.com/support
19-05-366 93-36B2 RevB
- Audio/Video with RS-232 and IR Control over IP Extenders
- WARRANTY REGISTRATION
- Package Contents
- Optional Accessories
- Product Features
- Mounting Instructions
- Point-to-Point Installation
- Notes:
- Point-to-Multipoint Installation - Managed Switch with IGMP
- Operation of Point-to-Multipoint Installation - Managed Switch with IGMP
- Point-to-Multipoint Installation – Unmanaged Switch
- Installation Overview (All Models)
- Point-to-Multipoint Installation - Unmanaged Switch
- Do not connect the external power supply to the transmitter at this time. The transmitter should not be powered on until all audio/video equipment is connected and powered on.
- Do not connect the external power supply to the receiver at this time. The receiver should not be powered on until all audio/video equipment is connected and powered on.
- Troubleshooting
- Warranty and Product Registration
- 1-Year Warranty
- PRODUCT REGISTRATION
- FCC Notice, Class B
- PykoBODCTBO N0Ib30BaTeJia
- PetpancIaTOpbl aydno-/BndeocnHaIa c pa3bemom RS-232 n IK-ynpaBleHneM no npotoKoIy IP
- Modell petpansTopoB B
- Modell
- TRIPP·LITE
- CopejxHmoe ynaKOBKn
- OnuohbHbIe KOMnKeKtUoUsne
- XapakTepeNCTnKn npOdyKta
- Hnctpykunno moHTaJxu
- YCTaHOBka C DByXToUeHOn TOnOJOrNeI
- Приимechanical:
- YCTaHOBka c MHOrOToUeHOn TOnOJOrNe- YnpaBJIeMbIKOMMyTaTOP CnCIOb3OBAHNem npoToKoJa IGMP
- Pa60ta yCTaHOBKn C DByxTOueHNo TOnOJOrNe - YnpaBnaembI KOMMyTaTOP cNcNoJIb3OBaHnEm npToKoJa IGMP
- Pa60ta yCTaHOBKc DByxToueHNo TOnoJOrney - YnpaBnaembI KOMMyTaTOP CnOJIb3OBAHHeM npToKOJa IGMP
- YCTaHOBKa CMHOrOToUcEuHoN TOnOJOrMei HeynpabJIeMbI KOMMyTaTOp
- Птумецань:
- YcTaHOBKa CMHorOToUeHuOH TOnoIOrNei HeynpaBnaEmbI KOMMyTaTOp
- YCTaHOBka cMHOrToOueHoi TOnoIOrnei HeynpaBnaEmbI KOMMyTaTOp
- YCTaHOBKa CMHOrOToUcEuHoN TOnoIOrMei HeynpaBnaEmbI KOMMyTaTOp
- BbIaBHeHne uYcTpaHHe HEnCpPaBHOCTeI
- BbIaBHeHne uYcTaPaeHne HeuCnpaBHOCTeI
- TapaHTnHbIe 06a3aTeNbCTBa
- Iapantma 1 ro
Brand : Tripp Lite
Model : B160001HDSI
Category : HDMI Extender