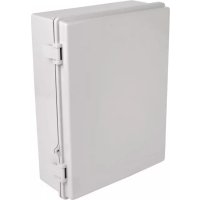
EN1511N4LATCH - Electrical enclosure Tripp Lite - Free user manual and instructions
Find the device manual for free EN1511N4LATCH Tripp Lite in PDF.


| Product Type | Waterproof Enclosure for Wi-Fi Access Point |
| Brand | Tripp Lite |
| Model | EN1511N4LATCH |
| Protection Rating | NEMA 4 (Dust and Water Splash Proof) |
| Material | Robust Weather-Resistant Plastic |
| Dimensions (H x W x D) | Approx. 26 x 21 x 13 cm |
| Weight | Approx. 1.5 kg |
| Color | Light Gray |
| Mounting | Wall mount, with included mounting feet |
| Capacity | One Wi-Fi access point (supports Cisco, Aruba, etc.) |
| Locking | Latch with security lock hole for padlock (not included) |
| Warranty | 5-year limited warranty |
| Included Accessories | Mounting screws, single-use ties, security tab, access point bracket |
| Operating Temperature | -40°C to 85°C (estimated per NEMA 4 standard) |
| Maintenance | Clean with a soft dry cloth. Avoid harsh chemicals. |
| Security | Use a tamper-proof padlock on the latch; firmly anchor to wall with appropriate screws. |
| Repairability | Replacement parts available via Tripp Lite support (www.tripplite.com/support) |
| Installation | Requires a drill, level, and screws/anchors suited to the wall. |
Frequently Asked Questions - EN1511N4LATCH Tripp Lite
User questions about EN1511N4LATCH Tripp Lite
0 question about this device. Answer the ones you know or ask your own.
Ask a new question about this device
Download the instructions for your Electrical enclosure in PDF format for free! Find your manual EN1511N4LATCH - Tripp Lite and take your electronic device back in hand. On this page are published all the documents necessary for the use of your device. EN1511N4LATCH by Tripp Lite.
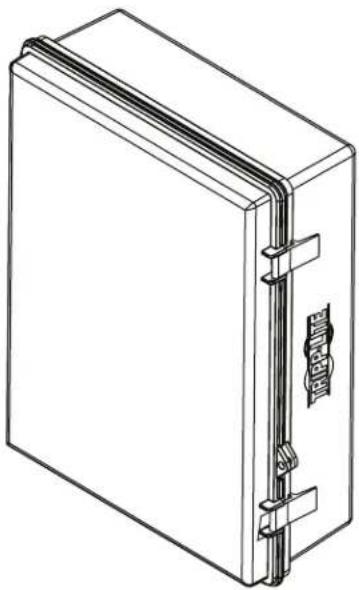
USER MANUAL EN1511N4LATCH Tripp Lite
NEMA-4 Plastic Wi-Fi Access Point Enclosure
Model: EN1511N4LATCH
natural_image
Line drawing of a rectangular book or folder with a clasp and decorative handle (no text or symbols)Español 7 • Français 13 • Русский 19
WARRANTY REGISTRATION
Register your product today and be automatically entered to win an ISOBAR surge protector in our monthly drawing!

www.tripplite.com/warranty


Manufacturing Excellence.
Components List
IMPORTANT:
Ensure you have received all parts according to the component checklist prior to installing. If any parts are missing or faulty, visit www.tripplite.com/support for service.

Installation
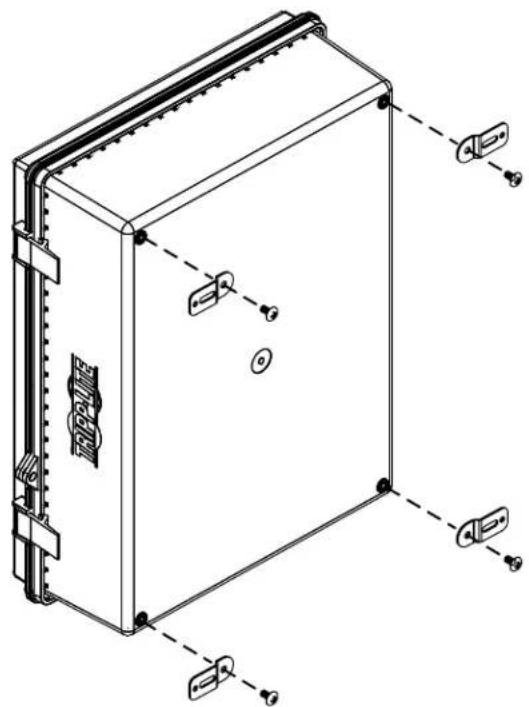
1. Attach Mounting Feet to the Rear of the Enclosure
natural_image
Technical line drawing of a rectangular electronic device with mounting hardware (no text or symbols)2
Installation
- Mount Enclosure to Wall
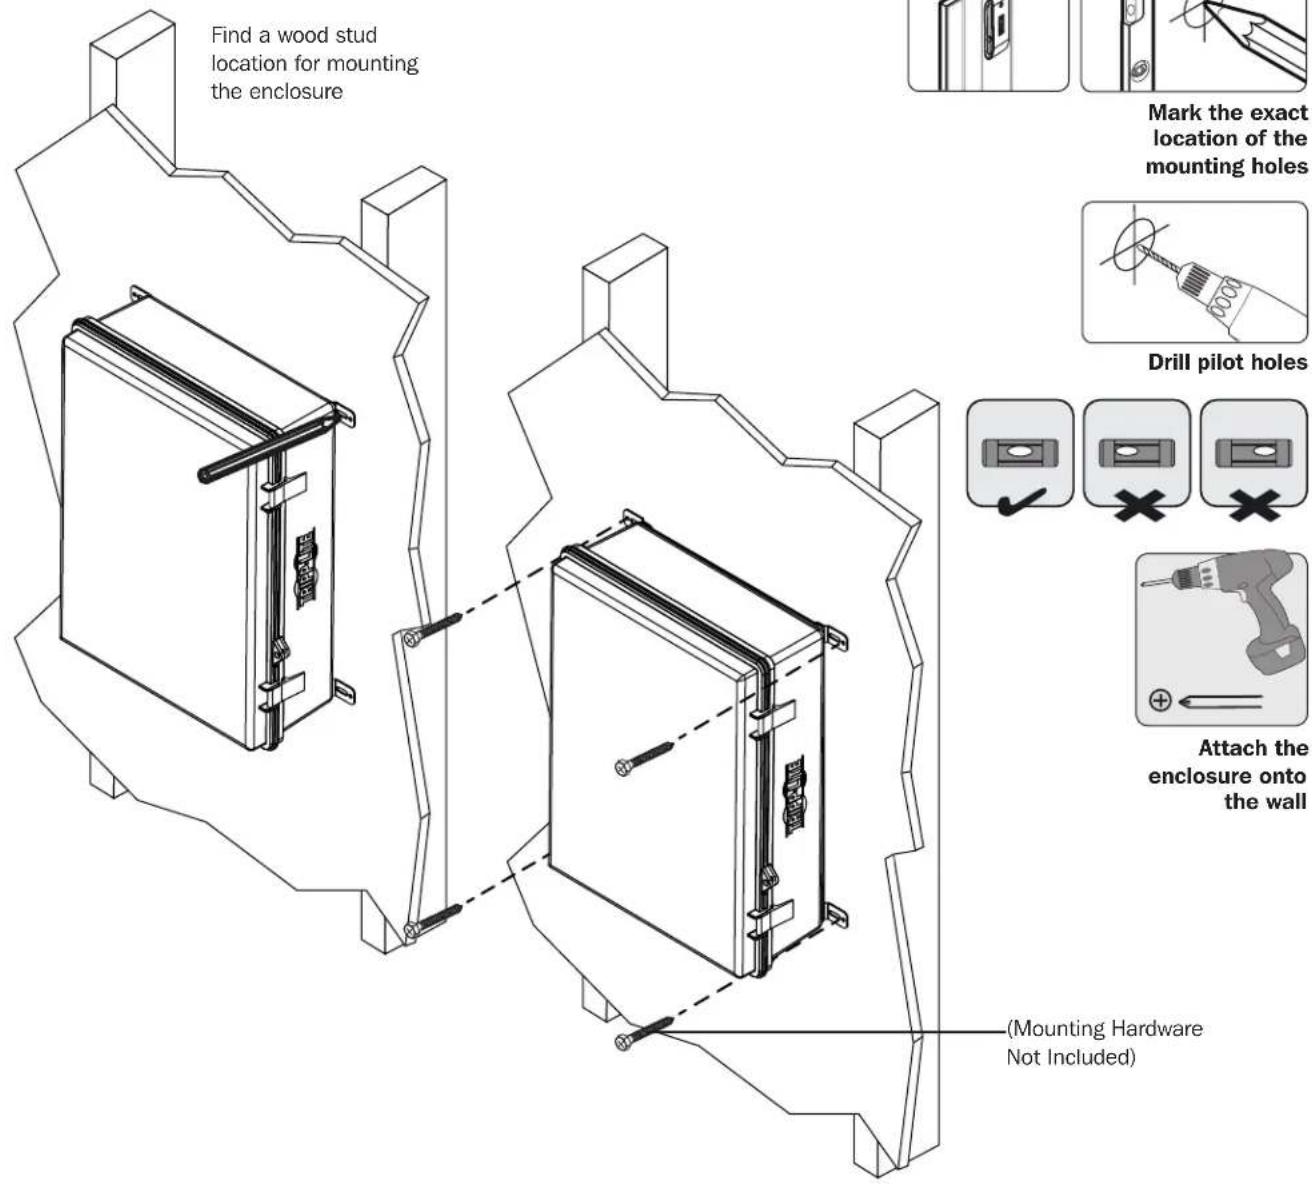
- Installers are responsible for providing wall-mounting hardware. Use a minimum of two #10 x 2" or larger screws (not included) to secure the enclosure in place.
- Make sure mounting screws are anchored into the center of the studs. Use of a stud finder is highly recommended.
- If there is no stud at the mounting location, it is recommended you use four anchors to secure the enclosure in place. Due to the weight of the enclosure, plastic expansion wall anchors are not recommended for drywall installations. Suitable anchors include: threaded drywall anchors, threaded drywall toggles, sleeve-type hollow wall anchors (a.k.a. molly bolts) or toggle bolts.
- If placing the enclosure over a telecommunications receptacle, remove the wall plate, then fasten the enclosure to the wall. Once secured, fasten the wall plate over the receptacle.
- If no telecommunications receptacle is available, a surface mount box (or biscuit jack) and equipment cord can be mounted inside the unit.
- Use an adhesive-backed surface mount box.
Installation
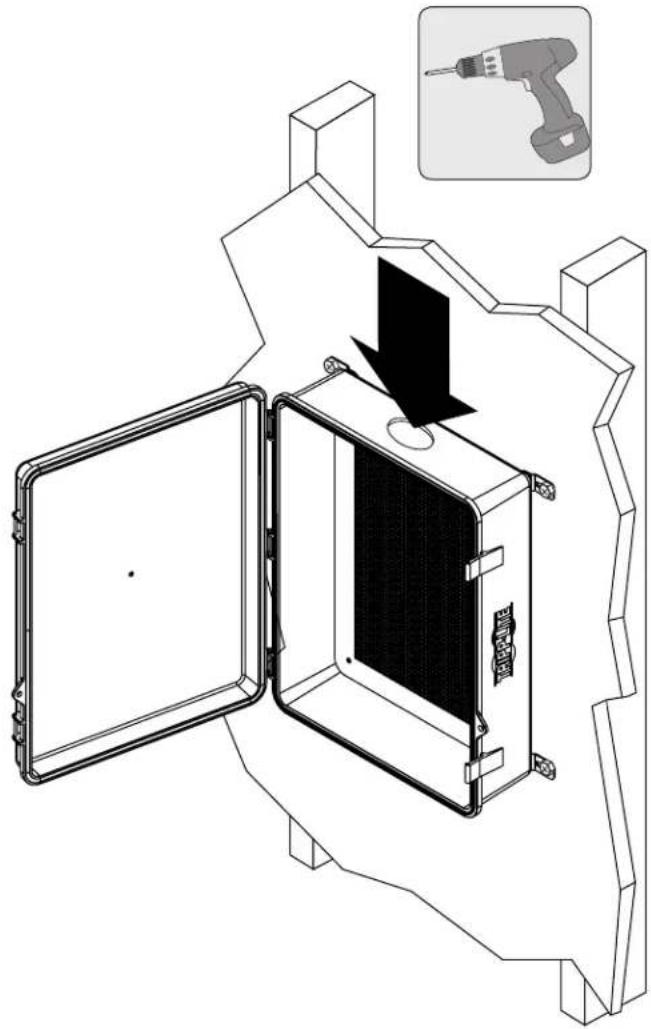
- Use a Drill to Create a Rear or Side Conduit Cutout
natural_image
Technical diagram of an open electrical enclosure with a drill bit and a tool inserted, showing internal components (no text or symbols)- Run Data and Power Cable (If Required) Through the Conduit Cutout
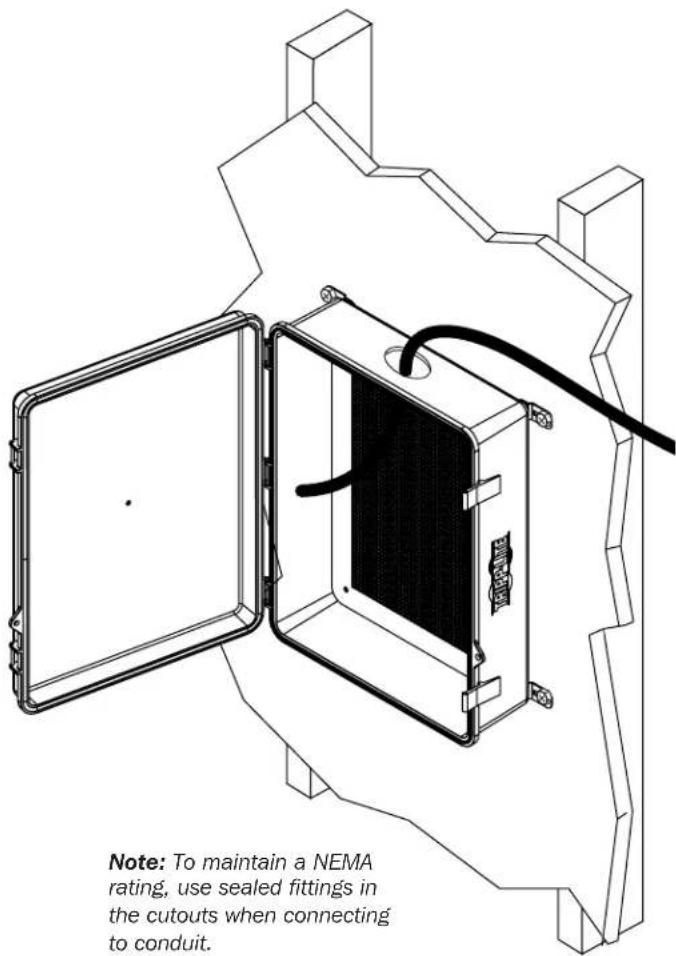
Installation
5. Using the Provided Screws, Attach the Access Point

IMPORTANT:
Attach all data and power cables to the access point prior to attaching to the enclosure.
5a. Cisco Universal Bracket (AIR-AP-BRACKET-2)* Installation
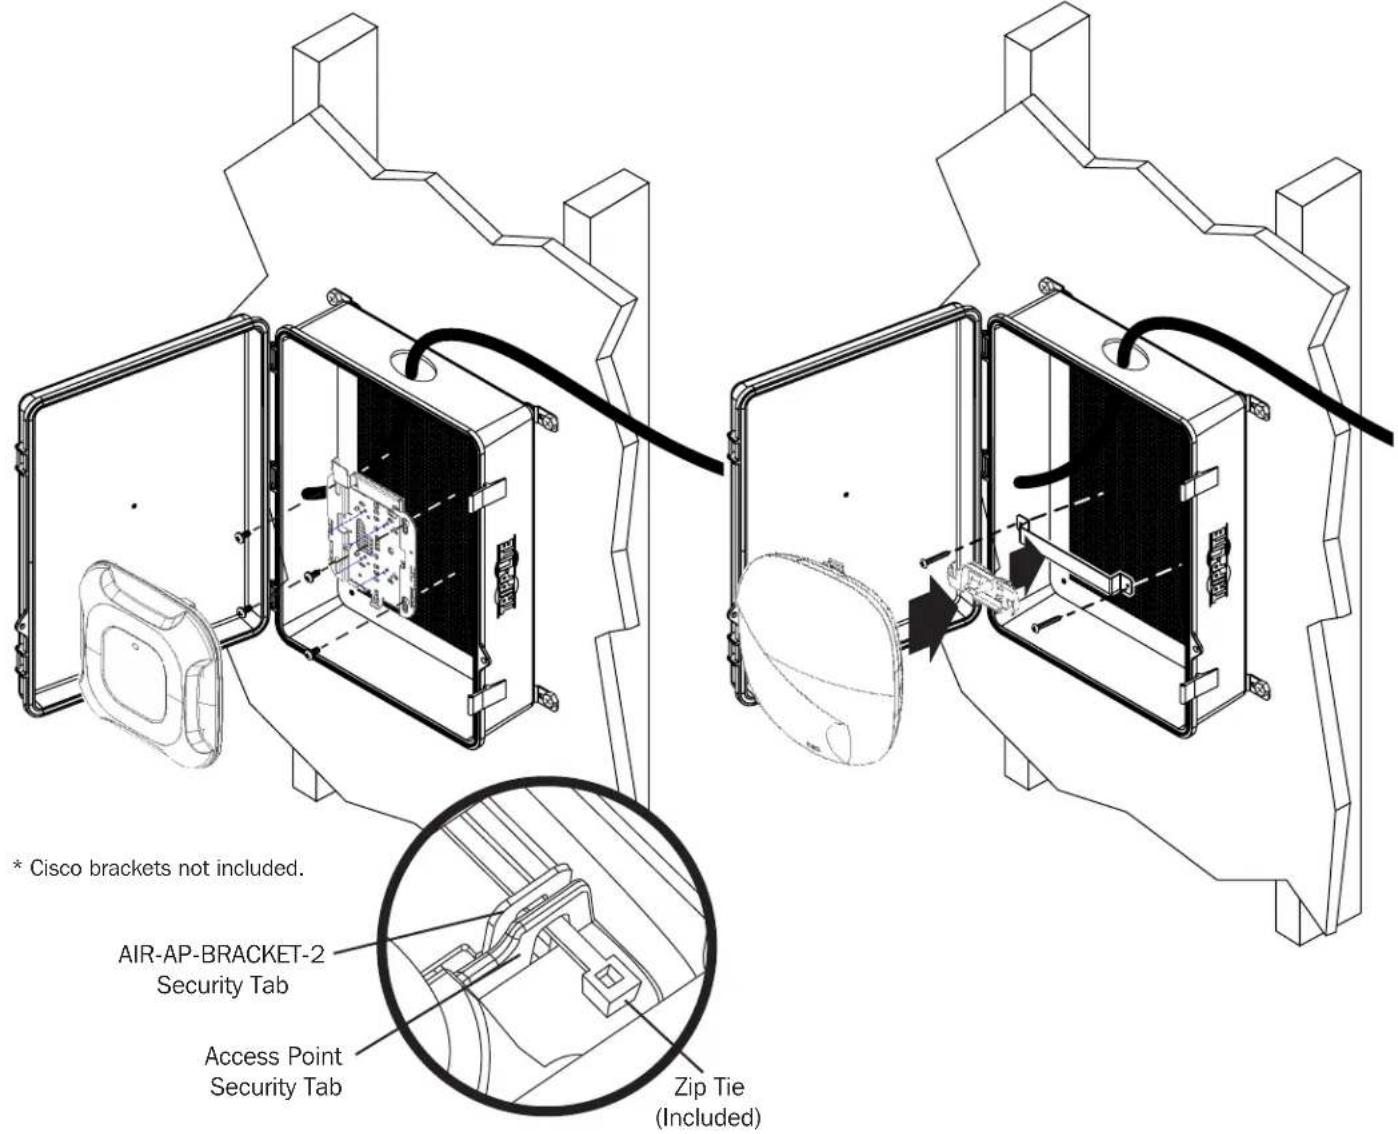
5b. Aruba or Other T-Bar Mounted Access Point Installation
Installation
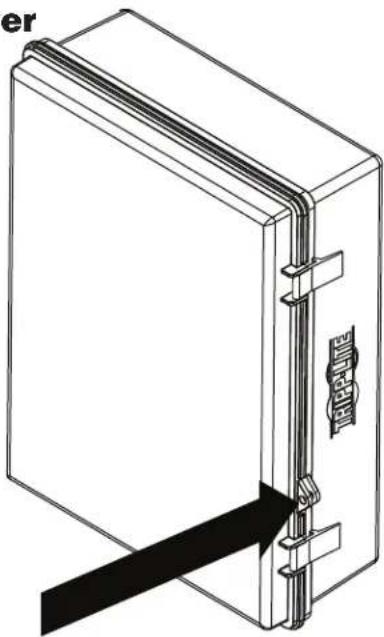
6. Secure the Enclosure Cover
Note: For an added level of security, attach a padlock or tamper seal to the security hole next to the enclosure latch.
natural_image
Line drawing of a closed book with a bookmark and a black arrow pointing to its cover (no text or symbols)Warranty and Product Registration
5-year Limited Warranty
Seller warrants this product, if used in accordance with all applicable instructions, to be free from original defects in material and workmanship for a period of 5 years from the date of initial purchase. If the product should prove defective in material or workmanship within that period, Seller will repair or replace the product, in its sole discretion.
THIS WARRANTY DOES NOT APPLY TO NORMAL WEAR OR TO DAMAGE RESULTING FROM ACCIDENT, MISUSE, ABUSE OR NEGLECT. SELLER MAKES NO EXPRESS WARRANTIES OTHER THAN THE WARRANTY EXPRESSLY SET FORTH HEREIN. EXCEPT TO THE EXTENT PROHIBITED BY APPLICABLE LAW, ALL IMPLIED WARRANTIES, INCLUDING ALL WARRANTIES OF MERCHANTABILITY OR FITNESS, ARE LIMITED IN DURATION TO THE WARRANTY PERIOD SET FORTH ABOVE; AND THIS WARRANTY EXPRESSLY EXCLUDES ALL INCIDENTAL AND CONSEQUENTIAL DAMAGES. (Some states do not allow limitations on how long an implied warranty lasts, and some states do not allow the exclusion or limitation of incidental or consequential damages, so the above limitations or exclusions may not apply to you. This warranty gives you specific legal rights, and you may have other rights which vary from jurisdiction to jurisdiction).
WARNING: The individual user should take care to determine prior to use whether this device is suitable, adequate or safe for the use intended. Since individual applications are subject to great variation, the manufacturer makes no representation or warranty as to the suitability or fitness of these devices for any specific application.
PRODUCT REGISTRATION
Visit www.triplite.com/warranty today to register your new Tripp Lite product. You'll be automatically entered into a drawing for a chance to win a FREE Tripp Lite product!*
* No purchase necessary. Void where prohibited. Some restrictions apply. See website for details.
Tripp Lite has a policy of continuous improvement. Specifications are subject to change without notice. Photos and illustrations may differ slightly from actual products.


1111 W. 35th Street, Chicago, IL 60609 USA • www.tripplite.com/support
Guía de Instalación
natural_image
Line drawing of a rectangular book or folder with a clasp and decorative elements on the side (no text or symbols)English 1 • Français 13 • Русский 19


natural_image
Technical line drawing of a rectangular electronic device with mounting hardware and internal components (no text or symbols)8
Instalación
natural_image
Line drawing of a closed book with a bookmark and a black arrow pointing to its cover (no text or symbols present)Garantía
natural_image
Line drawing of a rectangular book or folder with a clasp and decorative elements on the side (no text or symbols)English 1 • Español 7 • Русский 19


1111 W. 35th Street, Chicago, IL 60609 USA • www.tripplite.com/support
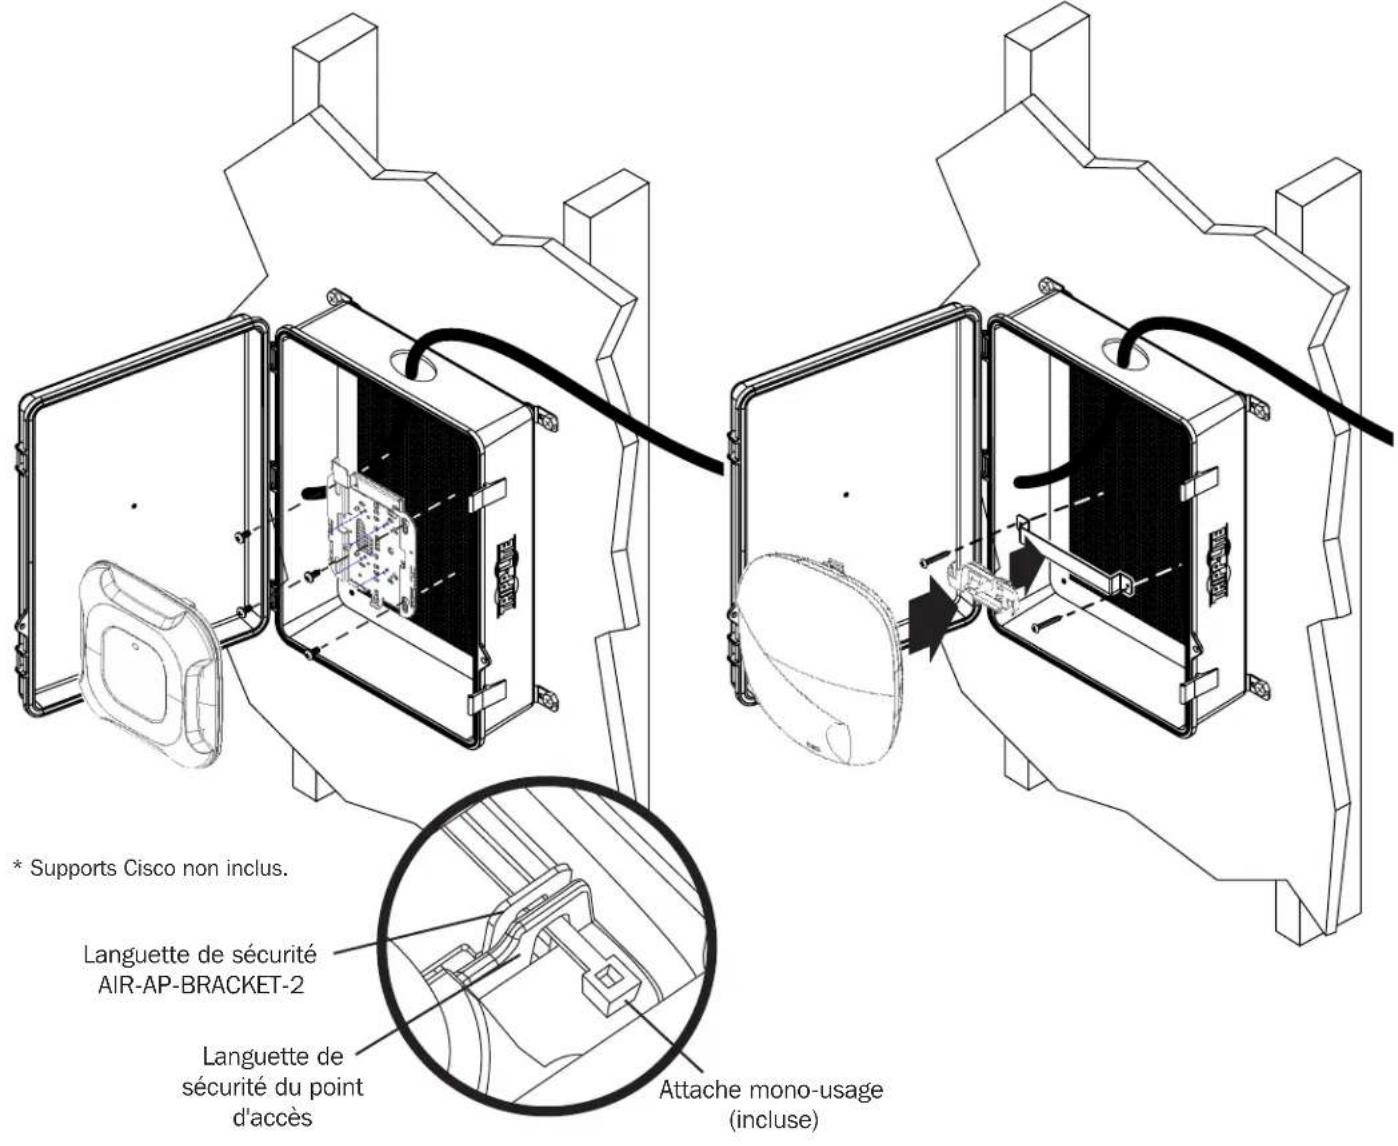
5a. Installation du support universel Cisco (AIR-AP-BRACKET-2)*
natural_image
Line drawing of a closed book with a bookmark and a black arrow pointing to its cover (no text or symbols present)Garantie
1111 W. 35th Street, Chicago, IL 60609 USA • www.tripplite.com/support
natural_image
Line drawing of a rectangular book with a vertical spine and decorative clasp (no text or symbols)English 1 • Español 7 • Français 13


1111 W. 35th Street, Chicago, IL 60609 USA • www.tripplite.com/support
natural_image
Technical line drawing of a rectangular electronic device with mounting hardware (no text or symbols)20
Установка
natural_image
Technical line drawing of an open electrical enclosure with a drill bit and a tool inserted, showing internal components (no text or symbols)natural_image
Line drawing of a closed book with a bookmark and a black arrow pointing to its cover (no text or symbols present)
1111 W. 35th Street, Chicago, IL 60609 USA • www.tripplite.com/support

- NEMA-4 Plastic Wi-Fi Access Point Enclosure
- WARRANTY REGISTRATION
- Components List
- IMPORTANT:
- Installation
- Attach Mounting Feet to the Rear of the Enclosure
- Using the Provided Screws, Attach the Access Point
- Secure the Enclosure Cover
- Warranty and Product Registration
- 5-year Limited Warranty
- PRODUCT REGISTRATION
- Guía de Instalación
- Instalación
- Garantía
- Garantie
- Установка
Brand : Tripp Lite
Model : EN1511N4LATCH
Category : Electrical enclosure