Induction Pro ZSEPR01 - Cooker Zavor - Free user manual and instructions
Find the device manual for free Induction Pro ZSEPR01 Zavor in PDF.
User questions about Induction Pro ZSEPR01 Zavor
0 question about this device. Answer the ones you know or ask your own.
Ask a new question about this device
Download the instructions for your Cooker in PDF format for free! Find your manual Induction Pro ZSEPR01 - Zavor and take your electronic device back in hand. On this page are published all the documents necessary for the use of your device. Induction Pro ZSEPR01 by Zavor.
USER MANUAL Induction Pro ZSEPR01 Zavor
natural_image
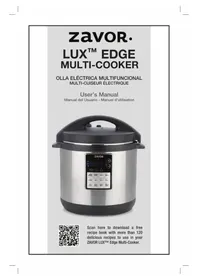
Black TZVOIR electric stove with digital display and control buttons (no visible text or symbols on the appliance body)User's Manual
Manual del Usuario
Introduction to Induction 2
How does induction work? 2
What are the benefits of cooking with an induction cooktop? 2
What type of cookware can I use on induction? 3
General Safety Regulations 4
Important Safeguards 6
Installing the Induction Cooktop 8
Operating the Induction Cooktop....9
How to Use the Touch Controls....9
Using Your Induction Cooktop....10
Selecting A Cooking Temperature 10
Temperature Levels and Suggestions of Use 11
Automatic Safety Shutdown 11
Using the Timer....12
Using the Child Safety Lock 12
Cleaning and Maintenance....13
Troubleshooting....14
FCC Compliance 17
ESPAÑOL....19
FRANÇAIS 37
Recipes for the Portable Induction Cooktop 54
Limited Warranty 62
Introduction to Induction
How does induction work?
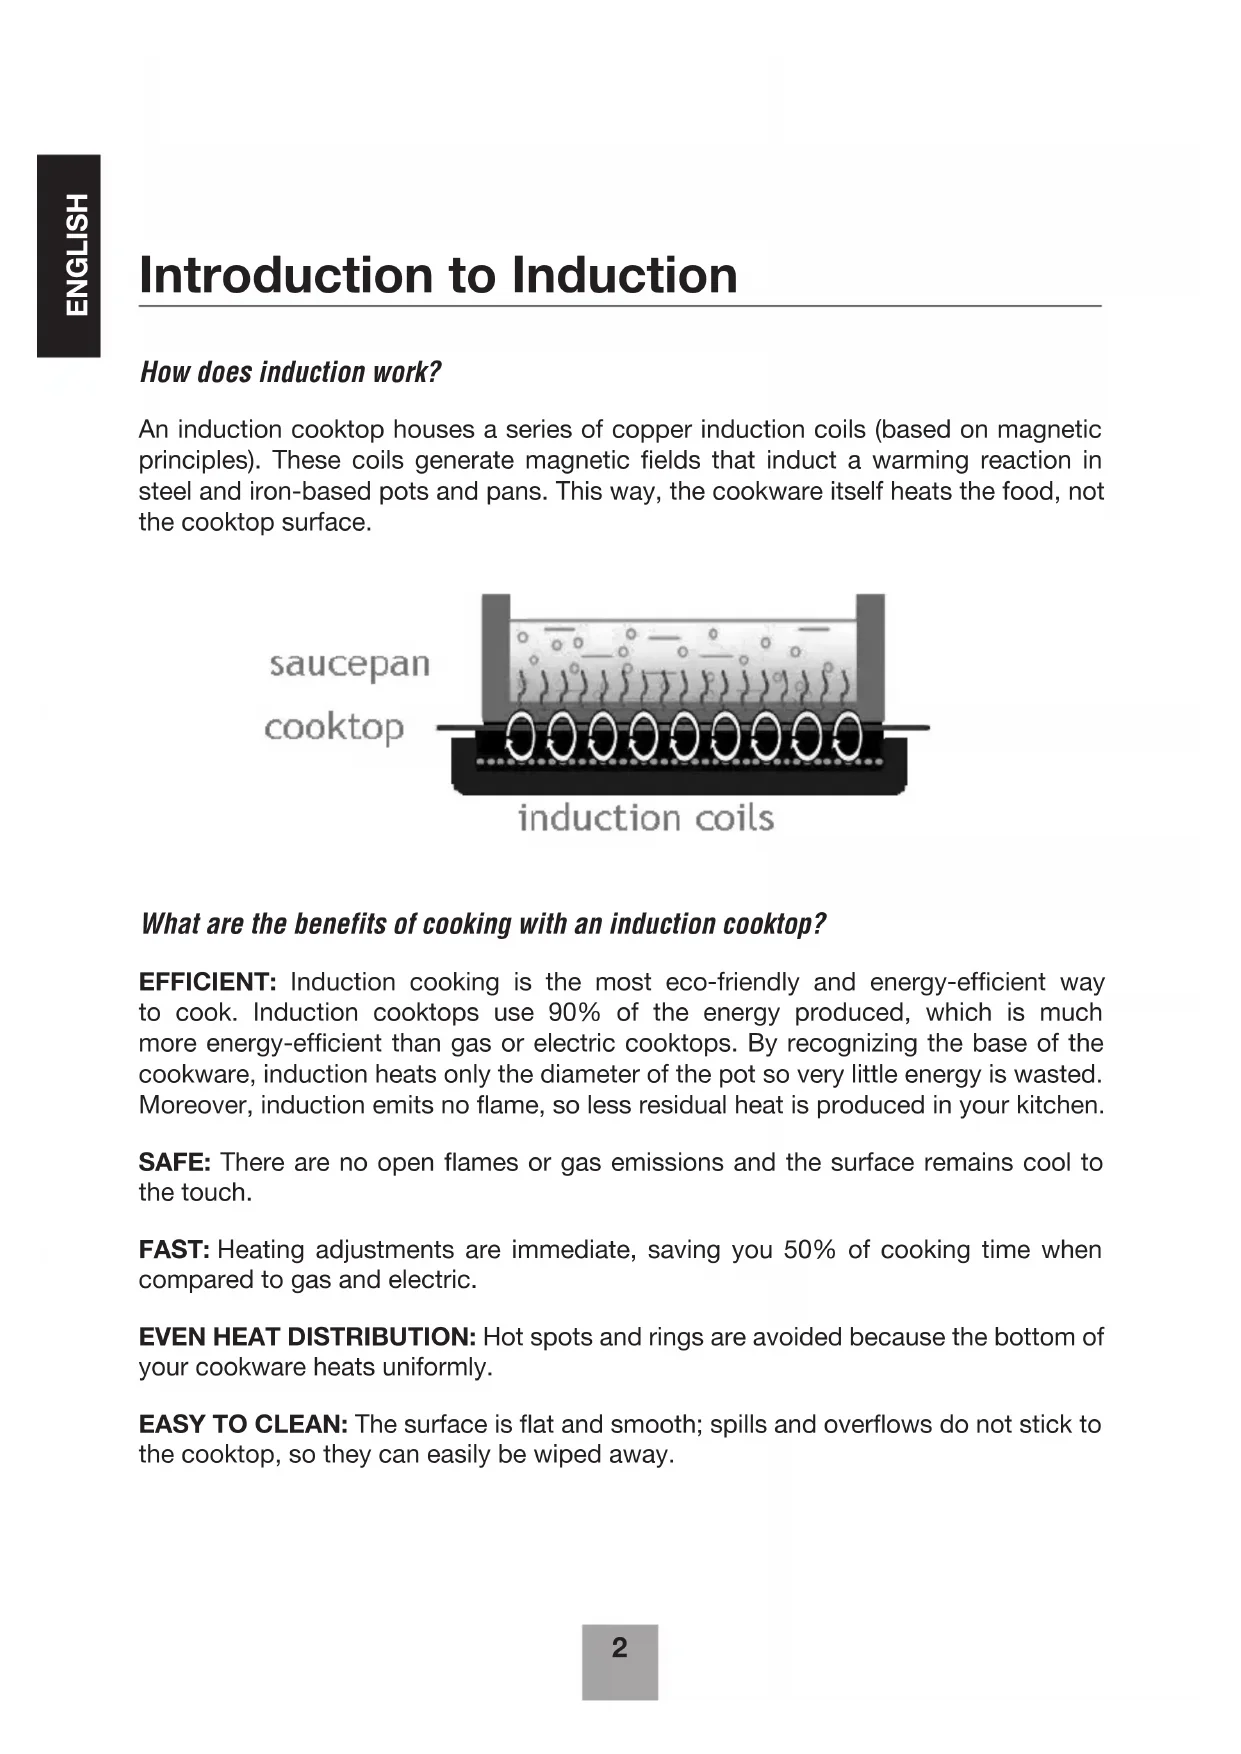
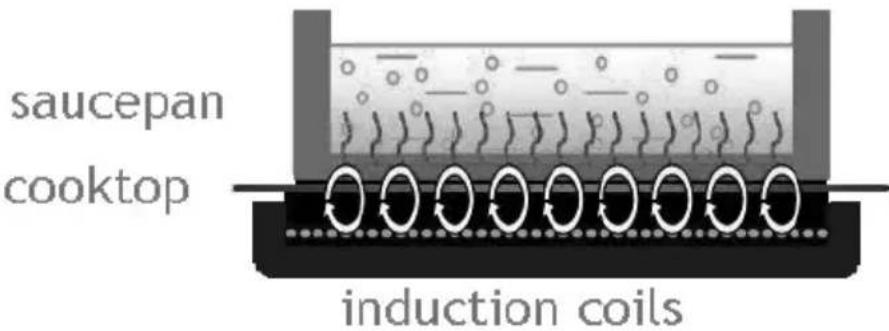
An induction cooktop houses a series of copper induction coils (based on magnetic principles). These coils generate magnetic fields that induct a warming reaction in steel and iron-based pots and pans. This way, the cookware itself heats the food, not the cooktop surface.
text_image
saucepan cooktop induction coilsWhat are the benefits of cooking with an induction cooktop?
EFFICIENT: Induction cooking is the most eco-friendly and energy-efficient way to cook. Induction cooktops use 90% of the energy produced, which is much more energy-efficient than gas or electric cooktops. By recognizing the base of the cookware, induction heats only the diameter of the pot so very little energy is wasted. Moreover, induction emits no flame, so less residual heat is produced in your kitchen.
SAFE: There are no open flames or gas emissions and the surface remains cool to the touch.
FAST: Heating adjustments are immediate, saving you 50% of cooking time when compared to gas and electric.
EVEN HEAT DISTRIBUTION: Hot spots and rings are avoided because the bottom of your cookware heats uniformly.
EASY TO CLEAN: The surface is flat and smooth; spills and overflows do not stick to the cooktop, so they can easily be wiped away.
What type of cookware can I use on induction?
Since induction is based on magnetic principles, the cookware used must have a ferrous (iron-based, magnetic) bottom. Some types of cookware are made of natural magnetic metals (such as pure iron), while others are made to be magnetic by “sandwiching” a thin layer of a ferrous metal within the base. This layer in the base is what will be affected by the magnetic field of the induction cooktop and distribute the heat.
Induction Compatible Cookware:
- Stainless Steel (Note: Not all stainless steel cookware has magnetic properties. Check with a magnet before use*)
- Cast iron
- All ZAVOR cookware and stainless steel pressure cookers
Non-Induction Compatible Cookware:
- Copper
- Glass
- Aluminum
- Pottery type vessels
ATTENTION:
Please be advised that with ETL regulations this induction cooktop temperature settings are based on stabilized voltage supply with cast iron pot at a temperature tolerance of (+/-68^) . Any other induction cookware used with this unit might result in different temperature tolerances.
Cookware used on the ZAVOR Induction Pro must have a flat, magnetic bottom of at least 5 inches in diameter.
General Safety Regulations
The product you have purchased is a state of the art induction cooktop. It adheres to all of the latest safety and technology standards, however, as with any electric appliance, there are some potential risks. Only operate this induction cooktop in accordance with the instructions provided and only for its intended household use.
ATTENTION - In order to prevent possible injuries or electric shock, please observe the following safety rules:
- Never touch the induction cooktop and the power plug with wet hands.
- Be sure to operate the unit on a flat, leveled and stable surface.
- Do not connect the induction cooktop to the same outlet as other household appliances such as microwaves, toaster ovens, etc. as this could overload the outlet and trip a circuit breaker.
- When using an extension cord to connect the cooktop, please note that a damaged extension cord can cause the unit to malfunction. Always check your extension cord for damage and be sure it is compliant with the required voltage. Be sure not to place cord where people can trip over it.
- Please do not use cookware on the induction cooktop that is more than 12-inches in diameter.
- Please keep your cookware centered on the induction cooktop at all times. Your cookware should never cover the display or the control panel. Your cookware should never touch the plastic edgings as this will damage the unit.
- Never attempt to unplug the induction cooktop by pulling on the power cable.
- Do not move the induction cooktop while cooking or with hot cookware on top of it.
- Do not place any empty cookware on the induction cooktop while it is functioning. An empty piece of cookware will heat up very rapidly and can cause material damage or personal injury.
- Do not place any metal objects on the induction cooktop (other than the cookware you intend to cook in).
- Check the power cable for damage from time to time. Never operate the induction cooktop when the cable is damaged. If the power cable shows any signs of defect, let a qualified electrician repair it.
-
Do not heat up any unopened cans of food on the induction cooktop. A heated can of food could explode. Only cook or heat food in induction compatible cookware.
-
Although the surface of the induction cooktop remains cool to the touch because heat is transferred directly to the pot, the residual heat from the cookware will eventually warm up the cooking surface, especially the area directly underneath the pot. Be careful when handling the cooktop after use and let it cool down before storing.
- Persons with a pacemaker or similar medical device should exercise caution using or standing near an induction unit while it is in operation, as the electromagnetic field may affect the functionality of the pacemaker or similar medical device. We advise consulting your doctor or the pacemaker/medical device manufacturer about your particular situation.
- Do not place any magnetized objects like credit cards, cassettes etc. on the glass surface while the induction cooktop is in operation. The magnetic properties of the unit can damage these items.
- In order to avoid overheating, do not place any aluminum foil or metal plates on the cooking surface.
- ATTENTION: Do not insert any objects like wires or tools into the ventilation slots. This may cause electric shock.
- Never use the induction cooktop when it is not functioning properly, shows signs of damage or if it has been dropped.
- Do not leave the induction cooktop unsupervised during operation. Keep children away from the induction cooktop. Children should be supervised at all times when in or around the kitchen. As an extra precaution, we recommend you activate the child safety lock function when children are present during the operation of this unit (Refer to pg. 12 for instructions on activating and deactivating the child safety lock).
- This appliance is not intended for use by children or persons with reduced physical, sensory or mental capabilities, lack of familiarity with the safety and operating instructions found in this manual, or lack of experience with the functioning of the appliance -unless they are closely supervised and have been given proper instructions.
- Do not submerge the induction cooktop in water or other liquids and do not wash it in the dishwasher.
- Do not operate the induction cooktop on any metal table or surface.
- Only qualified experts may perform repair and maintenance work on the induction cooktop using authentic ZAVOR replacement parts and accessories. Never attempt to disassemble and repair the induction cooktop yourself!
- This product is not intended for commercial or outdoor use; it is for indoor and household use ONLY.
IMPORTANT SAFEGUARDS
When using electrical appliances, basic safety precautions should always be followed. Important safeguards to use include the following:
- Read all instructions carefully.
- Do not touch hot surfaces. Use handles or pot holders when managing an electrical appliance.
- To protect against electrical shock, do not immerse cord, plugs, or any electrical parts of the appliance in water or other liquids.
- Close supervision is necessary when any appliance is used by or near children.
- Unplug the unit from the outlet when not in use and before cleaning. Allow to cool before moving and/or cleaning the cooktop.
- Do not operate any appliance with a damaged cord/plug, after the appliance malfunctions or if it has been damaged in any manner. Return the appliance to the nearest authorized service facility for examination, repair, or adjustment.
- The use of accessories or attachments not recommended by the appliance manufacturer may cause injuries to yourself or damage to your unit.
- Do not use outdoors.
- Do not let the cord hang over the edge of your table or counter, or touch hot surfaces.
- Do not place on or near a hot gas or electric burner, or in a heated oven.
- To disconnect, turn unit completely off and then remove plug from wall outlet.
- Do not use appliance for anything but its intended use as described in this manual.
- Do not cook on a broken cooktop; If the portable induction cooktop should break, cleaning solutions and spillovers may penetrate the broken cooktop and create a risk of electric shock.
- Clean the cooktop with caution; If a wet sponge or cloth is used to wipe spills on a hot cooking area, be careful to avoid steam burn. Some cleaners can produce noxious fumes if applied to a hot surface.
- Do not place metal objects such as knives, forks, spoons and lids on the surface of the induction cooktop since the residual heat could potentially make the metal objects very hot.
- The unit comes with a short power-supply cord to reduce the risk of a tripping hazard. Longer extension cords may be used if necessary. If a long extension cord is used:
a) The electrical rating of the extension cord should be at least as great as the electrical rating of the appliance.
b) The longer cord should be placed so that it will not drape over the counter top or table top where it can be pulled on by children or tripped over unintentionally.
SAVE THESE INSTRUCTIONS
NOTICE: This appliance has a polarized plug (one blade is wider than the other). To reduce the risk of electric shock, this plug is intended to fit into a polarized outlet only one way. If the plug does not fit fully into the outlet, flip the plug over and try again. If it still does not fit, contact a qualified electrician. Do not attempt to modify the plug in any way.
Technical Data:
| Rating Voltage: 120V, 60Hz | 1800W |
| Temperature Range: 140°F | - 465°F |
| Preset Cooking Programs: | Warm, Simmer, Boil, Rapid Boil, Sauté, Brown, Sear and Stir-Fry. |
| Timer Range: | 0 - 180 minutes (between 140°F - 260°F).0 - 60 minutes (higher than 260°F). |
Installing the Induction Cooktop
- Place the induction cooktop on a stable and leveled surface.
- Never place the unit on a flammable surface (e.g. table cloth, carpet, etc.).
- Do not block the ventilation slots of the cooktop. This may overheat the unit. Keep the unit at a minimum distance of 2 to 4 inches from walls or other items.
- Do not place the induction cooktop next to devices or objects which react sensitively to magnetic fields (e.g. radios, TVs, mobile phones, credit cards, etc.).
- Do not place induction units next to open fires, heaters or other sources of heat.
- Make sure that the power cord is not damaged or squashed beneath the induction cooktop.
- Make sure that the power cord does not come into contact with sharp edges and/or hot surfaces.
- Prior to connecting the cooktop, check whether the voltage indicated on the rating plate corresponds to the voltage supply in your home. A wrong connection may lead to grave damage of the unit and injury to persons.
- If you absolutely must move an appliance containing hot oil or other hot liquids, EXTREME caution must be used. You must NEVER move the induction cooktop while cooking or with hot cookware on top of it.
- Persons with a pacemaker should keep a minimum distance of 24 inches from the cooktop while it is in operation.
- In the event of unit damage, even if it is only a small crack on the glass surface, disconnect the induction cooktop from the power supply immediately and contact our customer service department by calling 1-855-928-6748.
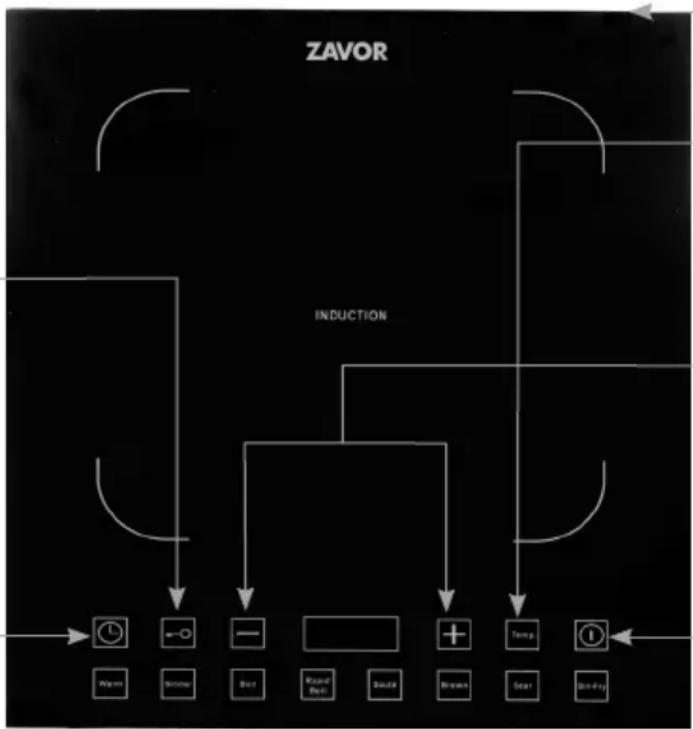
Operating the Induction Cooktop
AIR VENT
Do not block air vent slots.
CHILD LOCK:
Press button to lock. Press and hold button to unlock.
TIMER:
Built-in timer of up to 180 minutes.
flowchart
graph TD
    A["ZAVOR"] --> B["INDUCTION"]
    B --> C["+"]
    B --> D["Temperature"]
    B --> E["Solar"]
    C --> F["Boat"]
    D --> G["Boat"]
    E --> H["Boat"]
    F --> I["Warm"]
    G --> J["Solar"]
    H --> K["Boat"]
    I --> L["Boat"]
    J --> M["Boat"]
    K --> N["Boat"]
    L --> O["Boat"]
    M --> P["Boat"]
    N --> Q["Boat"]
    O --> R["Boat"]
    P --> S["Boat"]
    Q --> T["Boat"]
    R --> U["Boat"]
    S --> V["Boat"]
    T --> W["Boat"]
    U --> X["Boat"]
    V --> Y["Boat"]
    W --> Z["Boat"]
    X --> AA["Boat"]
    Y --> AB["Boat"]
    Z --> AC["Boat"]
    AA --> AD["Boat"]
    AB --> AE["Boat"]
Heat resistant glass cooking surface.
TEMP.
Press this button to activate the cooktop and begin cooking at the default of 180^ F.
PLUS/MINUS:
Press either the + or - button to increase or decrease temperature, and cooking time.
QUICK LAUNCH BUTTONS:
Quickly takes unit to the 8 preset cooking functions.
ON/OFF:
Press to turn cooktop on and off.
How to Use the Touch Controls:
This cooktop is equipped with a touch control panel with the latest safety features. You will find that the touch control buttons are not as sensitive to the touch as other touch screens or touch pads found in household electronics. This is for safety reasons, to prevent children from turning the cooktop on easily, and also to allow spills to be wiped from the cooking surface without changing the settings.
Using Your Induction Cooktop:
- Place the cooktop on a flat, stable and non-metal surface.
- Place the induction compatible cookware on the center of the cooking zone.
- Plug unit into an outlet, the unit will beep and the light above the ON/OFF button will blink.
- Press the ON/OFF button once, the red indicator light above this button will turn on and the display will remain blank until the Quick Launch function or temperature level is selected. If no further operation is performed in the next 60 seconds, the red light will start blinking again and the cooktop will go back to standby mode.
Selecting A Cooking Temperature:
Conventional Method
- Press the ON/OFF button once.
- Press the TEMP. button once and the indicator light above TEMP. will illuminate red. The appliance will begin working at a default temperature of 180^ F. You can increase or decrease the temperature by 10 degrees each time you tap the PLUS/MINUS buttons; the corresponding temperature is displayed on the digital screen. The temperatures range from 140^ F - 465^ F.
Quick Launch Method
- Press the ON/OFF button once.
- Press the desired Quick Launch function, the indicator light above the selected program will turn on and the appliance will begin working at the default temperature which will be displayed on the digital screen (please refer to cooking table on pg. 11). You can then increase or decrease the temperature by 10 degrees each time you tap the PLUS/MINUS buttons; the corresponding temperature is displayed on the digital screen. The temperatures range from 140^ F - 465^ F.
Once you have finished cooking with one of the above cooking methods, tap the ON/OFF button once to turn the cooktop off. After turning the unit off, the internal fan will continue circulating to cool the unit down. Once the fan has stopped, you can unplug the unit. Make sure you wait for the unit to cool off completely before storing. The display will show "H" if the temperature of the cooking zone is above 140^ F.
Temperature Levels and Suggestion of Use:
| Preset Function Temperature (Fahrenheit) | Timer Range | Operating Time Limitation | |
| WARM 140°F 0-180 minutes 2 hours | |||
| SIMMER (Medium Low) 180°F 0-180 minutes 2 hours | |||
| BOIL 212°F 0-180 minutes 2 hours | |||
| RAPID BOIL (Medium) 260°F 0-180 minutes 2 hours | |||
| SAUTÉ 300°F 0-60 minutes 2 hours | |||
| BROWN (Medium High) 360°F 0-60 minutes 2 hours | |||
| SEAR 420°F 0-60 minutes 2 hours | |||
| STIR-FRY 465°F 0-60 minutes 2 hours | |||
Automatic Safety Shutdown:
The cooktop has an automatic safety shutdown feature that will turn the cooktop off automatically after 2 hours in case the cooktop is left on accidentally. You can override this automatic shutdown feature by programming the Timer (see the next section in this manual). The cooktop also has an anti-overheating shutdown feature that will turn the cooktop off if it becomes overheated.
Using the Timer:
The timer allows you to program your desired cooking time, after which the cooktop will turn itself off.
- To begin using the timer, follow steps 1-3 from the “Using Your Induction Cooktop” section (pg. 10). Then select a function from the “Selecting A Cooking Temperature” section (pg. 10).
- Press the TIMER button to begin setting your time. Tap the PLUS button to increase the programmed time by intervals of 1 minute. To “fast advance” your programmed time, press and hold the PLUS button until the desired time is displayed.
If you want to decrease the time, tap the MINUS button. To “fast decrease” your programmed time, press and hold the MINUS button until the desired time is displayed.
Once you have selected the desired cooking time, the timer will start to count-down and the screen will alternate between displaying the cooking temperature and the remaining cooking time.
- To change the programmed time while it's counting down, tap the TIMER button once, then use the PLUS/MINUS buttons to increase or decrease the time. To stop the timer, press and hold the TIMER button.
NOTE: To continue using the cooktop after the programmed cooking time, press the ON/OFF button and then the TEMP. button or select a Quick Launch function.
The cooking time can be programmed for up to 3 hours when you're at any given temperature between 140^ - 260^ . At any temperature that is higher than 260^ the maximum programmable cooking time is 60 minutes.
EXAMPLE: If you start cooking your meal at 180^ F, you can program the timer for up to 3 hours. If you decide to increase the temperature to 300^ F while cooking, then the cooktop detects the temperature change and will automatically drop the timer to 60 minutes.
Using the Child Safety Lock:
To prevent children from turning the cooktop on accidentally or changing the cooking settings, press the CHILD LOCK button. The red light on top of the button will turn on and the cooktop will not respond to temperature, Quick Launch or timer changes. You can press the child lock button either when the cooktop is operating, or when it's in standby mode.
When the CHILD LOCK is on, the only two buttons that will function are the CHILD LOCK button and the ON/OFF button.
To turn the child lock off, it is not sufficient to just tap on the CHILD LOCK button. You have to press and hold the button for a couple of seconds until you hear a beep and the red light turns off.
Cleaning and Maintenance
- Unplug the induction cooktop prior to cleaning. Do not use any abrasive cleaning products on your induction cooktop and make sure that water does not drip or leak into the induction cooktop.
- Never immerse the induction cooktop, its cables or the plug into water or other liquids.
- Wipe off the glass cooktop with a damp cloth or use a mild, non-abrasive soap solution once the unit has cooled.
- Wipe off the casing and the operating panel with a soft cloth or a mild detergent.
- Do not use any oil based cleaning products to avoid damaging the plastic parts or casing.
- In order to keep your cooktop looking new, make sure that the bottom of your cookware does not scrape the glass surface, although a scratched surface will not impair the use of the induction cooktop.
- Make sure to properly clean the unit before storing it in a cool, dry place.
Troubleshooting
In order to ensure best results when using the ZAVOR Induction Pro, read all of the operating instructions and safety regulations in this manual. The following are practical tips and solutions to some common problems you may experience when using the ZAVOR Induction Pro. If you cannot determine the cause of the error and correct it, contact our customer service department by calling 1-855-928-6748.
| Problem: The | unit keeps beeping and does not generate heat after the cookware has been placed on the cooktop's surface and the ON/OFF button followed by the TEMP. or a Quick Launch button have been pressed. |
| Reason: The | induction cooktop is not detecting the cookware. This could occur because:1. The bottom of the cookware is not flat.2. The cookware is not induction compatible. |
| Solution: 1. | All cookware used on an induction cooktop must have a completely flat bottom. If your pot does not have a flat bottom you will not be able to use it on the induction cooktop.2. Check that the cookware you want to use is compatible with induction by trying to stick a magnet to its bottom. If the magnet doesn't stick, the cookware will not work on an induction cooktop. Please refer to page 3 for cookware that will be compatible with the induction cooktop. |
| Problem: I have a stainless steel pot, however, it does not work on my induction cooktop. | |
| Reason: Not all types of stainless steel are induction compatible, as some do not have magnetic properties.Usually stainless steel pots have an aluminum sandwich bottom, which consists of one layer of aluminum between two layers of stainless steel. The top layer is usually 18/10 stainless steel which is not magnetic, and the bottom layer is usually a layer of magnetic stainless steel (also called “ferrous” or 18/0 stainless steel). This type of pot will work on induction. However, if your pot is all 18/10 stainless steel and does not have a sandwich bottom, it will not have the magnetic properties needed to make it induction compatible.Solution: If you are unsure whether your cookware is induction compatible, check with a magnet first. If the magnet doesn't stick, you will not be able to use that particular pot on an induction cooktop. | |
| Problem: The | cooktop emits a humming noise when I place cookware on the surface and start cooking. |
| Reason: A low humming noise is normal when operating an induction cooktop. The humming sound indicates that the magnetic field is being generated and the cookware is heating up. If you are cooking between 140°F and 180°F, the humming will be intermittent. On all other temperatures it will be constant. | |
| Solution: This | is normal operation. As a general rule, the higher-quality cookware you use (the thicker the bottom), the lower the humming noise will be. |
| Problem: I have turned the cooktop off after cooking, but I can still hear the fan working. | |
| Reason: Even | after the cooktop has been turned off, the internal fan will keep working for a few seconds or minutes to finish cooling down the interior of the cooktop. |
| Solution: This | is normal operation. The fan will turn off by itself after the cooling down process is complete. Do not unplug the unit before the fan is off. If you must unplug the unit, make sure you let the unit cool down completely before storing it. |
If the cooktop detects an internal/external error or a wrong connection, it will display an error message with a code on the display panel and will stop functioning. These codes will allow you to identify the cause of the error and help you find the solution to the problem. If the problem has been solved, the error message will disappear and you will be able to continue using your cooktop. If the error persists, please call our customer service for assistance at 1-855-928-6748.
| E0: Internal circuit error. | |
| Self-help: Call | our customer service department for assistance. |
| E1: There is no cookware on the ceramic plate or incompatible cookware is being used. | |
| Self-help: Place | the cookware on the cooktop. Check if the cookware is compatible with a magnet. |
| E2: Overheating protection on IGBT (Insulated-Gate Bipolar Transistor). | |
| Self-help: The | temperature of IGBT is higher than 180°F and this E2 error will appear in the display, the unit will shut itself off and turn its internal fan on. Please wait till the fan stops running, unplug the unit and then plug in again to restart. |
| E3: Electronic | control of excess voltage. |
| Self-help: Please | make sure the appliance is connected to the voltage indicated on the rating label. |
| E4: Electronic | control of low voltage. |
| Self-help: Please | make sure the appliance is connected to the voltage indicated on the rating label. |
| E5: The sensor | underneath the ceramic glass has opened or has short circuited. |
| Self-help: Please | call our customer service department for assistance. |
| E6: The sensor | of IGBT (Insulated-Gate Bipolar Transistor) has opened or has short circuited. |
| Self-help: Please | call our customer service department for assistance. |
WARNING: Any changes or modifications made to this unit not expressly approved by the manufacturer could void the user's authority to operate the equipment.
NOTE:
- This equipment has been tested and found to comply with the limits for consumer ISM (Industrial, Scientific and Medical) equipment, pursuant to Part 18 of the FCC (Federal Communications Commission) Rules.
- These limits are designed to provide reasonable protection against harmful interference.
- This equipment generates, uses, and can radiate radio frequency energy and, if not installed and used in accordance with the instruction manual, may cause harmful interference to radio communications.
-
If this equipment does cause harmful interference to radio, cell phone, or television reception, which can be determined by turning it off and on, the user is encouraged to try to correct the interference by one or more of the following measures:
-
Reorient or relocate the receiving antenna
- Increase the separation between the equipment and receiver
- Connect to an outlet on a circuit different from the receiver
- Consult an experienced radio or television technician for help
- Please read your User's Manual thoroughly before using your Induction Cooktop for the first time. Failure to follow the guidance provided by the User's Manual will void the warranty.
Índice
Recipes for the Portable Induction Cooktop
NOTE: All cookware used when cooking on the portable induction cooktop must be induction ready.
CHOCOLATE COVERED FRUIT
Serves: 2-4
Recommended Cookware: 4 Quart Induction Ready Sauce Pan
Cooking Time: N/A
Ingredients:
2 quarts fruit - strawberries, sliced peaches, sliced banana, etc.
1 (10 oz.) bag 60% cocoa chocolate chips
Directions:
-
Set induction cooktop to WARM and add chocolate chips to a 4 quart sauce pan. Stir chocolate until chips melt, about 4 minutes.
-
Dip fruit pieces into chocolate, one at a time. Allow excess chocolate to drip back into pan. Place dipped fruit onto a plate coated with a sheet of waxed paper. Once all fruit is dipped, place plate in a refrigerator until chocolate hardens, approximately 1 hour. Serve cold.
MEDITERRANEAN PAELLA
Serves: 4
Recommended Cookware: 12.5" Paella Pan
Cooking Time: 29 min.
Ingredients:
2 tablespoons olive oil
1 pound boneless, skinless chicken thighs cut into 2-inch pieces
6 oz. smoked sausage, cut in 12 -inch pieces
1 large onion, chopped
3 cloves garlic, minced
1 cup Arborio rice
14 teaspoon saffron threads, crushed
12 teaspoon dried thyme
1 teaspoon smoked paprika
12 teaspoon sea salt
1 small red pepper, diced
2 / 3 cup white wine
14 oz. chicken stock
12 cup peas, fresh or frozen
Directions:
- Set induction burner to SAUTÉ and heat olive oil in a 12 inch paella pan. Cook chicken and sausage, stirring frequently until chicken has lost its raw exterior.
- Add onion, garlic and rice and sauté for 2 minutes. Add thyme, paprika, salt and saffron. Stir and sauté 1 minute more. Add red peppers and cook an additional minute.
- Add wine and chicken stock. Raise temperature to 350^ F and cook until mixture starts to bubble. Reduce heat to SIMMER and cook stirring frequently until rice is tender and liquid is absorbed, about 20 minutes.
- Stir in peas and cook an additional 5 minutes.
BEEF STEW
Serves: 6
Recommended Cookware: ZAVOR 6 Quart Pressure Cooker
Pressure Cooking Time: 18 min.
Ingredients:
2 tablespoons olive oil
2 pounds boneless beef chuck, cut into 1-inch cubes
3 large carrots, peeled and cut into 2-inch pieces
2 medium onions, cut into wedges
1 (14oz.) can diced tomatoes
2 bay leaves
1 teaspoon dried rosemary
12 teaspoon dried thyme
14 teaspoon ground black pepper
1 cup dry red wine
8 oz. button mushrooms, halved
12 cup pitted Kalamata olives
2 tablespoons all-purpose flour
2 cloves garlic, minced
1 teaspoon grated orange zest
2 tablespoons chopped fresh parsley
Salt and Pepper, to taste
Directions:
- Set induction burner to SEAR and add olive oil to a 6 quart pressure cooker. Once the oil is hot, add the beef in batches and cook, turning occasionally until browned, about 6 minutes per batch.
- Transfer the beef to a plate once browned and season with salt and pepper. Once the browned cubes are seasoned, combine beef, carrots, onions, tomatoes, bay leaves, rosemary, thyme, and pepper in the pressure cooker. Add wine, mushrooms and olives.
- Cover and lock lid, then bring the pressure cooker to high pressure using the STIR-FRY setting on the induction burner.
- Once the pressure is reached, switch to the SIMMER setting to stabilize pressure and cook for 18 minutes. Release pressure using the cold water method. Remove the pressure cooker from the portable induction cooktop, place it in the sink and run cold tap water over the lid
until the steam dissipates and the pressure indicator goes down. When putting the pressure cooker in the sink, tilt it so the cold water doesn't run over the pressure regulator. Open the pressure cooker once all the pressure has been completely released. Carefully remove the lid and discard the bay leaves.
- In a small bowl, mix the flour and 12 cup of the cooking liquid from the pressure cooker. Blend and whisk the mixture into the sauce in the cooker.
- Cook the sauce on the induction cooktop using the SIMMER setting, stirring occasionally until thickened, about 2 minutes. Stir in the garlic, orange zest and parsley and serve.
BOLOGNESE SAUCE
Serves: 8
Recommended Cookware: ZAVOR 6 Quart Pressure Cooker
Pressure Cooking Time: 8 min.
Ingredients:
1½ pounds lean ground beef
2 large cloves garlic
2 medium onions
1 large carrot
1 large celery stalk
1 (28 oz.) can chopped tomatoes
1 (6 oz.) can tomato paste
12 cup dry red wine
2 teaspoons dried basil
2 teaspoons dried oregano
^3/_4 teaspoon sugar
Salt and pepper, to taste
Parmesan cheese
Directions:
- Set induction cooktop to BROWN setting and cook beef in a 6 quart pressure cooker until well browned, approximately 8 minutes.
- Mince garlic and chop the onions, carrot and celery into small uniform pieces.
- When the meat is browned, stir in the vegetables and cook 3 minutes.
- Add the tomatoes, tomato paste, wine, basil, oregano and sugar.
- Cover and lock lid, then bring the pressure cooker to high pressure using the SIMMER setting on the induction cooktop.
- Once the pressure is reached, switch to the BOIL setting to stabilize pressure and cook for 8 minutes. Release pressure using the natural release method; move the pressure cooker to a cool burner and wait for the pressure indicator to go down.
- Open cooker and add salt and pepper to taste. Top with Parmesan and serve.
CHICKEN MARSALA
Serves: 4
Recommended Cookware: 11" Induction Ready Sauté Pan
Cooking Time: 27 min.
Ingredients:
4 boneless chicken breast halves without skin
14 cup all-purpose flour
12 teaspoon salt
14 teaspoon pepper
12 teaspoon dried leaf basil
3 tablespoons butter
3 tablespoons olive oil
4 to 8 ounces fresh mushrooms, sliced
1 cup Marsala wine
Directions:
- Between 2 sheets of plastic wrap, pound chicken to 14 " thickness.
- Combine flour, salt, pepper, and basil; mix well.
- Heat oil and butter in an 11" sauté pan using the BROWN setting on the induction cooktop.
- Dredge chicken in seasoned flour mixture. Cook chicken until lightly browned on first side, about 4 minutes. Turn chicken and cook about 2 minutes longer.
- Remove chicken and add mushrooms. Cook about 6 minutes until lightly browned.
- Switch induction cooktop to SIMMER setting and add Marsala wine. Let simmer for 2 minutes.
- Add chicken, cover and lower the cooking temperature to 160^ F. Cook for 5-10 minutes or until chicken is cooked through and serve.
MANGO DAL
Serves: 8
Recommended Cookware: ZAVOR 6 Quart Pressure Cooker
Pressure Cooking Time: 12 min.
Ingredients:
1 tablespoon canola oil
1 cinnamon stick
12 teaspoon cardamom
12 teaspoon ground turmeric
1 / 2 teaspoon cumin seeds
12 teaspoon ground coriander
14 teaspoon cayenne pepper
1½ cups yellow lentils/split peas
3 cups vegetable broth
1 teaspoon salt, divided
1 medium onion, chopped
4 cloves garlic, minced
1 tablespoon minced fresh ginger
1 mango, peeled and diced
12 cup chopped fresh cilantro
Directions:
- Place lentils/split peas in a colander and rinse well.
- Set induction cooktop to SAUTÉ and add canola oil to a 6 quart pressure cooker. Add all of the dry spices (cinnamon, turmeric, cumin, coriander, and cayenne) and cook stirring until fragrant (about 20 seconds).
- Add onion; cook, stirring, until soft and beginning to brown, 4 minutes (add a little vegetable broth if spices brown too much).
- Add garlic, ginger, salt and cook, stirring, for 1 minute more.
- Add remaining vegetable broth and stir well to pick up any spices or onions that are on the bottom of the pressure cooker. Add peas/lentils and mango, stir, then close and lock the pressure cooker lid.
- Use STIR-FRY setting to bring cooker up to high pressure.
- Once pressure is reached, switch to the SIMMER setting to stabilize pressure and cook for 12 minutes.
- Release pressure using the natural release method; move the pressure cooker to a cool burner and wait for the pressure indicator to go down. Open the lid, stir in cilantro and serve.
PAN SEARED SIRLOIN WITH RED WINE SAUCE
Serves: 4
Recommended Cookware: 10" Induction Ready Fry Pan
Cooking Time: 22 min.
Ingredients:
1 pound sirloin steak (about 1" thick)
2 tablespoons canola oil
1 shallot, chopped
12 cup red wine
12 cup beef broth
Splash red wine vinegar
2 tablespoons unsalted butter
Salt and pepper, to taste
Directions:
- Rub steak with salt and pepper and let sit for about 15 minutes.
- Set induction cooktop to SEAR and heat the oil in a 9.5" skillet.
- When oil just begins to smoke, put the steak in. Cook 2-3 minutes per side for medium rare.
- Remove steaks to a side plate and discard 12 the oil.
- Add the shallot and cook for 1-2 minutes until soft.
- Add the red wine and beef broth, deglazing the bottom of the pan with a wooden spoon.
- Reduce liquid by half. Add red wine vinegar. Cook for 1-2 minutes until the sauce slightly thickens.
- Add butter, stirring constantly.
- Return steak to pan and coat with the sauce and serve.
PASTA E FAGIOLI
Serves: 4
Recommended Cookware: 6 Quart Induction Ready Stock Pot
Cooking Time: 15 min.
Ingredients:
2 tablespoons olive oil
3 cloves garlic, minced (or more to taste)
12 teaspoon hot pepper flakes
1 tablespoon dried oregano
1½ cups pasta sauce (homemade or store bought)
3 cups vegetable stock
^3/_4 cup d'italini pasta
1 (15 oz.) can organic cannelloni beans, not drained
Grated cheese
Salt & pepper, to taste
Directions:
- Set induction cooktop to SAUTÉ and heat olive oil. Add garlic, pepper flakes and oregano and stir for 1 minute.
- Add pasta sauce and broth, then cover. Bring to a boil using the BOIL setting on the induction cooktop. Add the pasta, cover and switch to SIMMER setting.
- Cook for about 10 minutes, stirring frequently so pasta does not stick, or until the pasta is tender.
- Add the beans and cook for another 3-4 minutes, until they are heated through.
- Serve topped with cheese.
PASTA PRIMAVERA
Serves: 6
Recommended Cookware: 11" Induction Ready Sauté Pan
Cooking Time: 16 min.
Ingredients:
1 pound Rotini, cooked according to package instructions
2 tablespoons olive oil
1 medium onion, sliced
1 medium red bell pepper, cut into thin slices
1 medium green bell pepper, cut into thin slices
1 cup white mushrooms, quartered
1 yellow squash, cut in half length wise and then cut into ¼ inch slices
1½ to 2 cups marinara sauce
Salt and pepper, to taste
Directions:
- Set induction cooktop to STIR-FRY and heat the oil in an 11" sauté pan. When the oil becomes hot, add the onion and cook for 2 minutes.
- Add the bell peppers and white mushrooms and cook for 3 minutes.
- Add salt, pepper, and yellow squash, then cook for 3 minutes.
- Add the Rotini pasta and cook for 3 minutes.
- Pour in the marinara sauce and mix well. Switch induction cooktop to SIMMER and cook for an additional 2 minutes until bubbly and serve.
SEARED SCALLOPS WITH LEMON BUTTER SAUCE
Serves: 4
Recommended Cookware: Induction Ready Grill Pan
Cooking Time: 4 min.
Ingredients:
1 pound large fresh sea scallops
Kosher salt and white pepper, to taste
1 lemon, zested
3 tablespoons lemon juice
3 tablespoons olive oil
2 tablespoons unsalted, sweet cream butter
Chopped fresh, flat leaf parsley for garnish
Lemon, quartered for garnish
Directions:
- Pat scallops until very dry. Toss the scallops with 2 tablespoons of olive oil, salt and pepper.
- Set induction cooktop to SEAR and heat the oil in a grill pan. When the oil becomes hot, add the scallops and cook the scallops on one side until golden brown, about 2-3 minutes.
- Add the butter to the pan. Just as the butter melts completely, turn the scallops over and add the lemon juice.
- Cook scallops an additional minute and remove to a warm plate. Add lemon zest to pan and stir sauce to blend.
- Spoon sauce of choice in the pan over the scallops, and sprinkle the parsley over the top.
- Serve Immediately.
Limited Warranty
This manufacturer's product warranty extends to the original consumer purchaser of the product. Neither the retailer nor any other company involved in the sale or promotion of this product is a co-warrantor of this manufacturer warranty.
WARRANTY DURATION: All materials and workmanship are warranted to the original consumer purchaser for a period of two (2) years from the original purchase date.
WARRANTY COVERAGE: This product is warranted against defective materials or workmanship. This warranty is void if the product has been damaged by accident, in shipment, unreasonable use, misuse, neglect, improper service, commercial use, repairs by unauthorized personnel or other causes not arising out of defects in materials or workmanship. This warranty is effective only if the product is purchased and operated in the USA and Canada, and does not extend to any units which have been used in violation of written instructions furnished by manufacturer or to units which have been altered or modified or to damage to products or parts thereof which have had the serial number removed, altered, defaced or rendered illegible.
A valid proof-of-purchase is required. A valid proof-of-purchase is a receipt specifying item, date purchased and cost of the item. A gift receipt with date of purchase and item is also an acceptable proof of warranty.
WARRANTY DISCLAIMERS: This warranty is in lieu of all warranties expressed or implied and no representative or person is authorized to assume for manufacturer any other liability in connection with the sale of our products. There shall be no claims for defects or failure under any theory of tort, contractor commercial law including, but not limited to, negligence, gross negligence, strict liability, breach of warranty and breach of contract.
WARRANTY PERFORMANCE: During the above two year warranty period, a product with a defect will be either repaired or replaced with a reconditioned comparable model (at manufacturer's option). The repaired or replacement product will be in warranty for the balance of the two year warranty period and an additional one-month period. No charge will be made for such repair or replacement.
SERVICE AND REPAIR: If service is required for an appliance, you should call toll free 1-855-928-6748 between the hours of 8:30am and 5pm Eastern Standard Time and ask for CUSTOMER SERVICE. If repairs become necessary during the warranty period, you might need to return the unit, postage pre-paid to:
MARKET SOLUTIONS GROUP
1 Orient Way STE F #266
Rutherford, NJ 07070
NOTE: Manufacturer cannot assume responsibility for loss or damage during incoming shipment. For your protection, carefully package the product for shipment, and insure it with the carrier. Be sure to enclose the following items with your appliance: your full name, return address and daytime phone number; a note describing the problem you experienced; a copy of your sales receipt or other proof of purchase to determine warranty status. C.O.D. shipments cannot be accepted.
For spare parts or assistance not requiring the return of the product itself, please contact our Customer Service Department at 1-855-ZAVOR4U (1-855-928-6748).
ZAVOR Induction Pro WARRANTY REGISTRATION CARD
MR./MRS./MS.:
TELEPHONE:
ADDRESS:
ITEM NUMBER (On the rating label): ZSEPRO1
DATE OF PURCHASE: ____
NAME OF STORE WHERE PURCHASED: ____
EMAIL:
You can register your ZAVOR Induction Pro online at: www.zavoramerica.com or fill out and mail this warranty registration card to: MARKET SOLUTIONS GROUP, INC. PO BOX 704, LYNDHURST, NJ 07071
The manufacturer reserves the right to modify the items described in this brochure.