KRH40GSX - Cooker ZANKER - Free user manual and instructions
Find the device manual for free KRH40GSX ZANKER in PDF.



User questions about KRH40GSX ZANKER
0 question about this device. Answer the ones you know or ask your own.
Ask a new question about this device
Download the instructions for your Cooker in PDF format for free! Find your manual KRH40GSX - ZANKER and take your electronic device back in hand. On this page are published all the documents necessary for the use of your device. KRH40GSX by ZANKER.
USER MANUAL KRH40GSX ZANKER
text_image
Technical diagram showing a mechanical assembly with labeled parts A and B, including a magnified inset view.Care and cleaning. 19
Troubleshooting_19____
Installation 21
Technical information 23 ____
Energy efficiency 24 ____
Subject to change without notice.
⚠️ Safety information
Before the installation and use of the appliance, carefully read the supplied instructions. The manufacturer is not responsible if an incorrect installation and use causes injuries and damages. Always keep the instructions with the appliance for future reference.
Children and vulnerable people safety
- This appliance can be used by children aged from 8 years and above and persons with reduced physical, sensory or mental capabilities or lack of experience and knowledge if they have been given supervision or instruction concerning use of the appliance in a safe way and understand the hazards involved.
- Do not let children play with the appliance.
- Keep all packaging away from children.
- Keep children and pets away from the appliance when it operates or when it cools down. Accessible parts are hot.
- If the appliance has a child safety device, we recommend you activate it.
- Cleaning and user maintenance shall not be made by children without supervision.
- Children of less than 3 years should be kept away unless continuously supervised.
General Safety
- The appliance and its accessible parts become hot during use. Do not touch the heating elements.
- Do not operate the appliance by means of an external timer or separate remote-control system.
-
Unattended cooking on a hob with fat or oil can be dangerous and may result in fire.
-
Never try to extinguish a fire with water, but switch off the appliance and then cover flame e.g. with a lid or a fire blanket.
- Do not store items on the cooking surfaces.
- Metallic objects such as knives, forks, spoons and lids should not be placed on the hob surface since they can get hot.
- Do not use a steam cleaner to clean the appliance.
- If the supply cord is damaged, it must be replaced by the manufacturer, an authorized Service or similarly qualified persons in order to avoid a hazard.
- Where the appliance is directly connected to the power supply, an all-pole isolating switch with a contact gap is required. Complete disconnection in compliance with the conditions specified in overvoltage category III must be guaranteed. The earth cable is excluded from this.
- When you route the mains cable, make sure that the cable doesn't come into direct contact (for example using insulating sleeving) with parts that can reach temperatures of more than 50^ above room temperature.
Safety instructions
This appliance is suitable for the following markets:
BELU
Installation

Warning! Only a qualified person must install this appliance.
- Remove all the packaging.
- Do not install or use a damaged appliance.
- Obey the installation instruction supplied with the appliance.
- Keep the minimum distance from the other appliances and units.
• Always be careful when you move the appliance because it is heavy. Always wear safety gloves.
- Seal the cut surfaces with a sealant to prevent moisture to cause swelling.
- Protect the bottom of the appliance from steam and moisture.
- Do not install the appliance adjacent to a door or under a window. This prevents hot cookware to fall from the appliance when the door or the window is opened.
- If the appliance is installed above drawers make sure that the space, between the bottom of the appliance and the upper drawer, is sufficient for air circulation.
- The bottom of the appliance can get hot. Make sure to install a non-combustile separation panel under the appliance to prevent access to the bottom.
Electrical Connection

Warning! Risk of fire and electrical shock.
- All electrical connections should be made by a qualified electrician.
• The appliance must be earthed. - Before carrying out any operation make sure that the appliance is disconnected from the power supply.
- Make sure that the electrical information on the rating plate agrees with the power supply. If not, contact an electrician.
- Make sure the appliance is installed correctly. Loose and incorrect electricity mains cable or plug (if applicable) can make the terminal become too hot.
- Use the correct electricity mains cable.
- Do not let the electricity mains cable tangle.
- Make sure that a shock protection is installed.
- Use the strain relief clamp on the cable.
-
Make sure the mains cable or plug (if applicable) does not touch the hot appliance or hot cookware, when you connect the appliance to the near sockets
-
Do not use multi-plug adapters and extension cables.
- Make sure not to cause damage to the mains plug (if applicable) or to the mains cable. Contact our Authorised Service Centre or an electrician to change a damaged mains cable.
- The shock protection of live and insulated parts must be fastened in such a way that it cannot be removed without tools.
- Connect the mains plug to the mains socket only at the end of the installation. Make sure that there is access to the mains plug after the installation.
- If the mains socket is loose, do not connect the mains plug.
- Do not pull the mains cable to disconnect the appliance. Always pull the mains plug.
- Use only correct isolation devices: line protecting cut-outs, fuses (screw type fuses removed from the holder), earth leakage trips and contactors.
- The electrical installation must have an isolation device which lets you disconnect the appliance from the mains at all poles. The isolation device must have a contact opening width of minimum 3 mm.
Gas connection
- All gas connections should be made by a qualified person.
- Before installation, make sure that the local distribution conditions (nature of the gas and gas pressure) and the adjustment of the appliance are compatible.
- Make sure that there is air circulation around the appliance.
- The information about the gas supply is on the rating plate.
- This appliance is not connected to a device, which evacuates the products of combustion. Make sure to connect the appliance according to current installation regulations. Pay attention to requirements regarding adequate ventilation.
Use

Warning! Risk of injury, burns and electrical shock.
- Remove all the packaging, labelling and protective film (if applicable) before first use.
- Use this appliance in a household environment.
- Do not change the specification of this appliance.
- Make sure that the ventilation openings are not blocked.
- Do not let the appliance stay unattended during operation.
-
Set the cooking zone to "off" after each use.
-
Do not put cutlery or saucepan lids on the cooking zones. They can become hot.
- Do not operate the appliance with wet hands or when it has contact with water.
- Do not use the appliance as a work surface or as a storage surface.
- When you place food into hot oil, it may splash.

Warning! Risk of fire and explosion
- Fats and oil when heated can release flammable vapours. Keep flames or heated objects away from fats and oils when you cook with them.
- The vapours that very hot oil releases can cause spontaneous combustion.
- Used oil, that can contain food remnants, can cause fire at a lower temperature than oil used for the first time.
- Do not put flammable products or items that are wet with flammable products in, near or on the appliance.

Warning! Risk of damage to the appliance.
- Do not keep hot cookware on the control panel.
- Do not let cookware to boil dry.
- Be careful not to let objects or cookware fall on the appliance. The surface can be damaged.
- Do not activate the cooking zones with empty cookware or without cookware.
- Do not put aluminium foil on the appliance.
- Use only stable cookware with the correct shape and diameter larger than the dimensions of the burners.
- Make sure cookware is centrally positioned on the burners.
- Make sure the flame does not go out when you quickly turn the knob from the maximum to the minimum position.
- Use only the accessories supplied with the appliance.
- Do not install a flame diffuser on the burner.
- The use of a gas cooking appliance results in the production of heat and moisture. Provide good ventilation in the room where the appliance is installed.
- Prolonged intensive use of the appliance may call for additional ventilation, for example opening of a window, or more effective ventilation, for example increasing the level of mechanical ventilation where present.
- This appliance is for cooking purposes only. It must not be used for other purposes, for example room heating.
- Do not let acid liquids, for example vinegar, lemon juice or limescale remover, touch the hob. This can cause matt patches.
Care and cleaning
- Clean regularly the appliance to prevent the deterioration of the surface material.
- Deactivate the appliance and let it cool down before you clean it.
- Disconnect the appliance from the electrical supply before maintenance.
- Do not use water spray and steam to clean the appliance.
- Clean the appliance with a moist soft cloth. Only use neutral detergents. Do not use abrasive products, abrasive cleaning pads, solvents or metal objects.
- Do not clean the burners in the dishwasher.
Product description
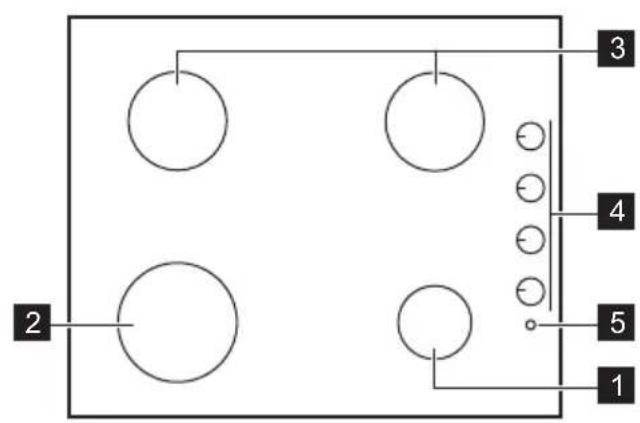
Cooking surface layout
flowchart
graph TD
    A[" "] --> B[" "]
    C[" "] --> D[" "]
    E[" "] --> F[" "]
    G[" "] --> H[" "]
    I[" "] --> J[" "]
    K[" "] --> L[" "]
    M[" "] --> N[" "]
    O[" "] --> P[" "]
    Q[" "] --> R[" "]
    S[" "] --> T[" "]
    U[" "] --> V[" "]
    W[" "] --> X[" "]
    Y[" "] --> Z[" "]
Control knob
| Symbol Description | |
| no gas supply / off position | |
| maximum gas supply | |
Daily use

Warning! Refer to Safety chapters.
Disposal

Warning! Risk of injury or suffocation.
- Contact your municipal authority for information on how to discard the appliance correctly.
- Disconnect the appliance from the mains supply.
- Cut off the mains cable and discard it.
- Flat the external gas pipes.
Service
• To repair the appliance contact an Authorised Service Centre.
- Use original spare parts only.
1 Auxiliary burner
2 Rapid burner
3 Semi-rapid burner
4 Control knobs
5 Button for the spark generator
| Symbol Description | |
| minimum gas supply | |
 | ignition |
Burner overview

text_image
A B C DA. Burner cap
B. Burner crown
C. Ignition candle
D. Thermocouple
Ignition of the burner

Always light the burner before you put on the cookware.

Warning! Be very careful when you use open fire in the kitchen environment. The manufacturer declines any responsibility in case of the flame misuse.
- Push and hold the spark generator button.
- At the same time push the control knob down and turn it counterclockwise to the maximum gas supply position (☐)
- Release the spark generator button when burner lights but keep the control knob on this position for
Hints and tips

Warning! Refer to Safety chapters.
Cookware

Caution! Do not use cast iron pans, potstones, earthenware, grill or toaster plates. The stainless steel can become tarnished if it is too much heated.
equal or less than 10 seconds; this will let thermocouple to warm up. If not, the gas supply will be interrupted.
- Adjust the flame after it is regular.

If after some tries the burner does not light, check if the crown and its cap are in correct positions.

Warning! Do not keep the control knob pushed for more than 15 seconds. If the burner does not light after 15 seconds, release the control knob, turn it into off position and try to light the burner again after minimum 1 minute.

Caution! In the absence of electricity you can ignite the burner without electrical device; in this case approach the burner with a flame, turn the control knob counter-clockwise to maximum gas supply position and push it down. Keep the control knob pushed for equal or less than 10 seconds to let the thermocouple warm up.

If the burner accidentally goes out, turn the control knob to the off position and try to light the burner again after minimum 1 minute.

The spark generator can start automatically when you switch on the mains, after installation or a power cut. It is normal.
Turning the burner off
To put the flame out, turn the knob to the off position
●

Warning! Always turn the flame down or switch it off before you remove the pans from the burner.

Warning! Do not put the same pan on two burners.

Warning! Do not put unstable or damaged pots on the burner to prevent from spill and injury.

Caution! Make sure that the bottoms of pots do not stand above the control knob, otherwise the flame heats the control knob up.

Caution! Make sure that pot handles are not above the front edge of the cooktop.

Caution! Make sure that the pots are placed centrally on the burner in order to get maximum stability and to get lower gas consumption.
Diameters of cookware

Use cookware with diameters applicable to the size of burners.
Care and cleaning

Warning! Refer to Safety chapters.
General information
- Clean the hob after each use.
• Always use cookware with clean bottom. - Scratches or dark stains on the surface have no effect on how the hob operates.
- Use a special cleaner applicable for the surface of the hob.
- Wash stainless steel parts with water, and then dry them with a soft cloth.
Pan supports

The pan supports are not resistant to washing in a dishwasher. They must be washed by hand.
- Remove the pan supports to easily clean the hob.
Be very careful when you replace the pan supports to prevent the hob top from damage. - The enamel coating occasionally can have rough edges, so be careful when you wash the pan supports by hand and dry them. If necessary, remove stubborn stains with a paste cleaner.
- After you clean the pan supports, make sure that they are in correct positions.

Troubleshooting

Warning! Refer to Safety chapters.
| Burner Diameter of cook-ware (mm) | |
| Rapid 180 - 260 | |
| Semi-rapid 120 - 220 | |
| Auxiliary 80 - 160 | |
- For the burner to operate correctly, make sure that the arms of the pan supports are aligned with the centre of the burner.
Cleaning the hob
- Remove immediately: melted plastic, plastic foil, and food with sugar. If not, the dirt can cause damage to the hob.
- Remove when the hob is sufficiently cool: limescale rings, water rings, fat stains, shiny metallic discoloration. Clean the hob with a moist cloth and some detergent. After cleaning, rub the hob dry with a soft cloth.
- To clean the enamelled parts, cap and crown, wash them with warm soapy water and dry them carefully before you put them back.
Cleaning the spark plug
This feature is obtained through a ceramic ignition candle with a metal electrode. Keep these components well clean to prevent difficult lighting and check that the burner crown holes are not obstructed.
Periodic maintenance
Speak to your local Authorised Service Centre periodically to check the conditions of the gas supply pipe and the pressure adjuster, if fitted.
What to do if...
| Problem Possible cause | Remedy | |
| There is no spark when you try to activate the spark generator. | The hob is not connected to an electrical supply or it is connected incorrectly. | Check if the hob is correctly connected to the electrical supply. |
| The fuse is released. Make sure that the fuse is the cause | of the malfunction. If the fuse releases again and again, contact a qualified electrician. | |
| Burner cap and crown are placed in- | correctly. | Place the burner cap and crown correctly. |
| The flame extinguishes immediately after ignition. | Thermocouple is not heated up sufficiently. | After lightning the flame, keep the spark generator activated for equal or less than 10 seconds |
| The flame ring is uneven. Burner crown is blocked with food residues. | Make sure that the injector is not blocked and the burner crown is clean. | |
If you cannot find a solution...
If you cannot find a solution to the problem yourself, contact your dealer or an Authorised Service Centre. Give the data from the rating plate. Make sure, you operated the hob correctly. If not the servicing by a
service technician or dealer will not be free of charge, also during the warranty period. The instructions about the Service Centre and conditions of guarantee are in the guarantee booklet.
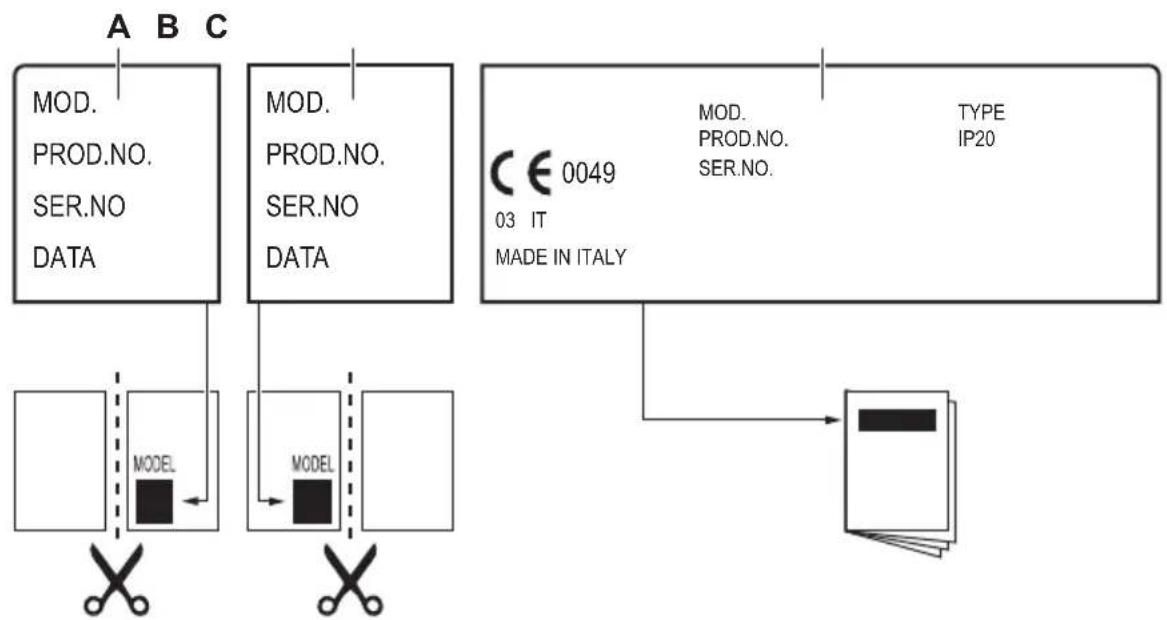
Labels supplied with the accessories bag
Stick the adhesive labels as indicated below:
flowchart
graph TD
    A["MOD.<br>PROD.NO.<br>SER.NO<br>DATA"] --> B["MODEL"]
    C["MOD.<br>PROD.NO.<br>SER.NO<br>DATA"] --> D["MODEL"]
    E["CODE 0049<br>03 IT<br>MADE IN ITALY"] --> F["TYPE IP20"]
    G["×"] --> H["×"]
    style A fill:#f9f,stroke:#333
    style C fill:#f9f,stroke:#333
    style E fill:#ccf,stroke:#333
    style G fill:#cfc,stroke:#333
A. Stick it on Guarantee Card and send this part (if applicable).
B. Stick it on Guarantee Card and keep this part (if applicable).
C. Stick it on instruction booklet.
Installation

Warning! Refer to Safety chapters.
Before the installation
Before you install the hob, write down the information bellow from the rating plate. The rating plate is on the bottom of the hob.
Model ......
PNC
Serial number ....
Gas Connection

Warning! The following instructions about installation, connection and maintenance must be carried out by qualified personnel in compliance with standards and local regulations in force.
It is necessary that the connection to the gas mains are carried out by means of an AGB tap. Choose fixed connections or use a flexible pipe in AGB (stainless steel) in compliance with the regulation in force (NBN D
51.003). If you use flexible metallic pipes, be careful they do not come in touch with mobile parts or they are not squeezed. Also be careful when the hob is put together with an oven.

Make sure that the gas supply pressure of the appliance obeys the recommended values. The adjustable connection is fixed to the comprehensive ramp by means of a threaded nut G 1/2". All the components shown in the figure have already been assembled in the factory. The appliance, before leaving the factory, has been tested in order to give you the best results.
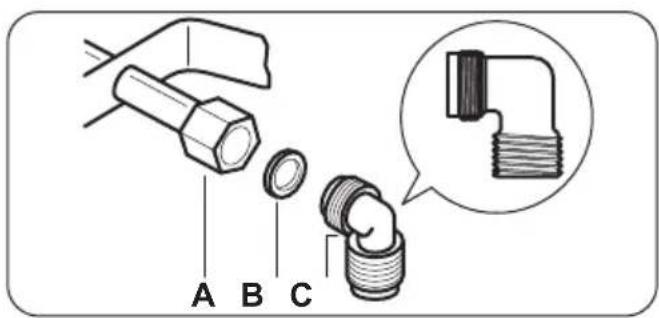
text_image
A B CA. End of shaft with nut
B. Washer
C. Elbow (if needed)
Liquid gas
Use the rubber pipe holder for liquid gas. Always engage the gasket. Then continue with the gas connection.
The flexible pipe is prepared for apply when:
- it can not get hot more than room temperature, higher than 30°C;
- it is no longer than 1500 mm;
- it shows no throttles;
- it is not subject to traction or torsion;
- it does not get in touch with cutting edges or corners;
- it can be easily examined in order to make sure its condition.
The control of preservation of the flexible pipe consists in checking that:
- it does not show cracks, cuts, marks of burnings on the two ends and on its full length;
- the material is not hardened, but shows its correct elasticity;
• the fastening clamps are not rusted;
• expired term is not due.
If one or more defects are visible, do not repair the pipe, but replace it.

Warning! When installation is complete, make sure that the seal of each pipe fitting is correct. Use a soapy solution, not a flame!
Injectors replacement (only for Belgium)
- Remove the pan supports.
- Remove the caps and crowns of the burner.
- With a socket spanner 7 remove the injectors and replace them with the ones which are necessary for the type of gas you use (see table in "Technical Information" chapter).
- Assemble the parts, follow the same procedure backwards.
- Replace the rating plate (it is near the gas supply pipe) with the one for the new type of gas supply.
You can find this plate in the package supplied with the appliance.
If the supply gas pressure is changeable or different from the necessary pressure, you must fit an applicable pressure adjuster on the gas supply pipe.
Adjustment of minimum level (only for Belgium)
To adjust the minimum level of the burners:
- Light the burner.
- Turn the knob on the minimum position.
- Remove the knob.
- With a thin screwdriver, adjust the bypass screw position (A).
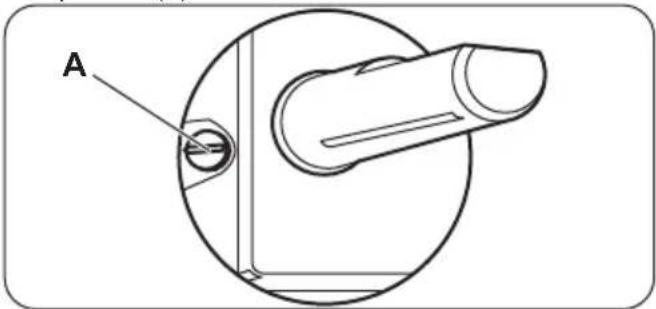
text_image
A- If you change:
• from natural gas G20/G25 20/25 mbar to liquid gas, fully tighten the bypass screw in.
• from liquid gas to natural gas G20/G25 20/25 mbar, undo the bypass screw approximately 1/4 of a turn.

Warning! Make sure the flame does not go out when you quickly turn the knob from the maximum position to the minimum position.
Electrical connection
• Make sure that the rated voltage and type of power on the rating plate agree with the voltage and the power of the local power supply.
- This appliance is supplied with a mains cable. It has to be supplied with a correct plug which can hold the load that the rating plate rates. Make sure that you install the plug in a correct socket.
• Always use a correctly installed shockproof socket.
- Make sure that there is an access to the mains plug after the installation.
- Do not pull the mains cable to disconnect the appliance. Always pull the mains plug.
- There is a risk of fire when the appliance is in connection with an extension cable, an adapter or a multiple connection. Make sure that the ground connection agrees with the standards and regulations.
- Do not let the power cable to heat up to a temperature higher than 90^ C .

Make sure that you connect the blue neutral cable to the terminal with a letter "N" on it. Connect the brown (or black) phase cable to the terminal which has a letter "L". Keep the phase cable connected at all times.
Connection cable
To replace the connection cable use only the special cable or its equivalent. The cable type is: H05V2V2-F T90.
Make sure that the cable section is applicable to the voltage and the working temperature. The yellow / green earth wire must be approximately 2 cm longer than the brown (or black) phase wire.
Building In
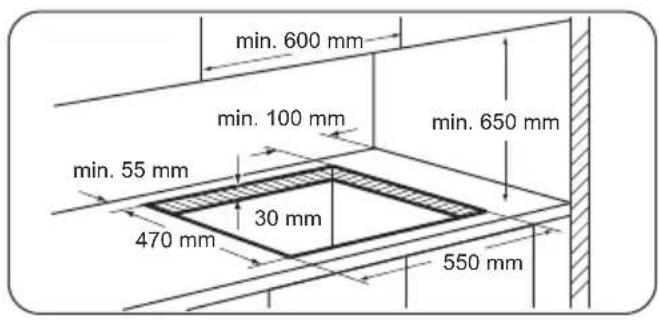
text_image
min. 600 mm min. 100 mm min. 650 mm min. 55 mm 30 mm 470 mm 550 mm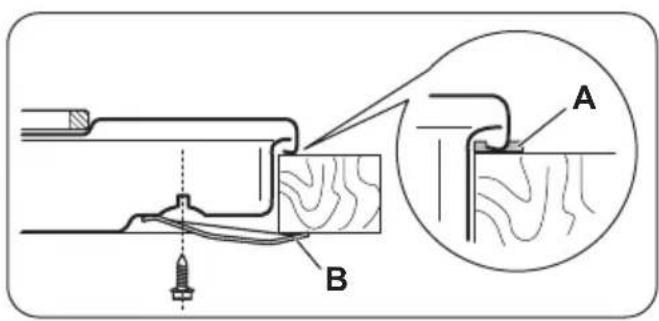
text_image
Technical diagram showing a mechanical assembly with labeled components A and B, including a magnified inset view.Technical information
Hob dimensions
Width 580 mm
Depth 500 mm
A. supplied seal
B. supplied brackets

Caution! Install the appliance only on a worktop with flat surface.
Possibilities for insertion
The panel installed below the hob must be easy to remove and let an easy access in case a technical assistance intervention is necessary.
Kitchen unit with door
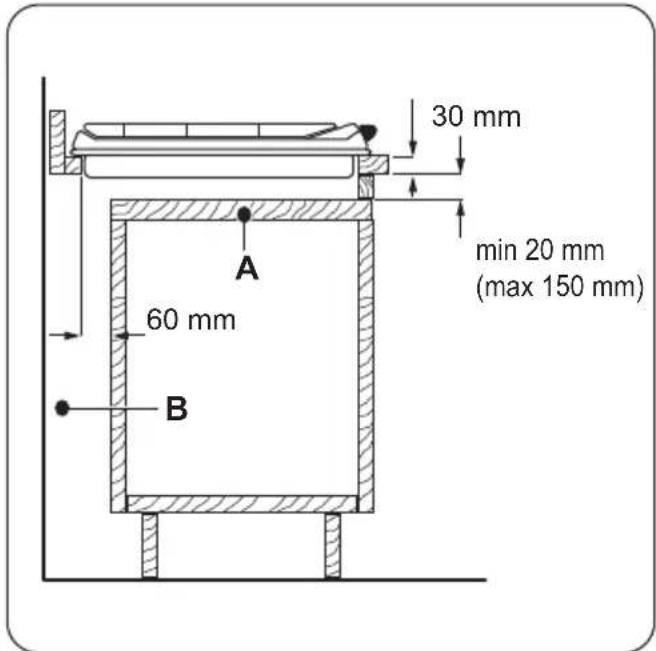
text_image
30 mm min 20 mm (max 150 mm) 60 mm A BA. Removable panel
B. Space for connections
Kitchen unit with oven
The electrical connection of the hob and the oven must be installed separately for safety reasons and to let easy remove oven from the unit.
Other technical data
Bypass diameters
| BURNER ∅ BYPASS 1/100 mm | |
| Rapid 42 | |
| Semi-rapid 32 | |
| Auxiliary 28 | |
Gas burners for NATURAL GAS G20/G25 20/25 mbar (BE) - G20 20 mbar (LU)
| BURNER NORMAL POWER kW MINIMUM POWER kW INJECTOR MARK 1/100 | mm | ||
| Rapid 3,0 0,75 119 | |||
| Semi-rapid 2,0 0,45 96 | |||
| Auxiliary 1,0 0,33 70 | |||
Gas burners for LPG G30/G31 28-30/37 mbar
| BURNER NORMAL POWER kW | MINIMUM POWER kW | INJECTOR MARK 1/100 mm | NOMINAL GAS FLOW g/h | ||
| G30 28-30 mbar | G31 37 mbar | ||||
| Rapid 2,8 0,75 | 86 | 204 | 200 | ||
| Semi-rapid | 2,0 | 0,45 | 71 | 145 | 143 |
| Auxiliary | 1,0 | 0,33 | 50 | 73 | 71 |
Energy efficiency
Product information according to EU 66/2014
| Model identification | KRH40GSX | |
| Type of hob | Built-in hob | |
| Number of gas burners | 4 | |
| Energy efficiency per gas burner (EE gas burner) | Left rear - Semi-rapid | 59.2% |
| Right rear - Semi-rapid | 59.2% | |
| Right front - Auxiliary | not applicable | |
| Left front - Rapid 59.3% | ||
| Energy efficiency for the gas hob (EE gas hob) | 59.2% |
EN 30-2-1: Domestic cooking appliances burning gas - Part 2-1 : Rational use of energy - General
Energy saving
- Before use, make sure that the burners and pan supports are assembled correctly.
- Use cookware with diameters applicable to the size of burners.
- Center the pot on the burner.
- When you heat up water, use only the amount you need.
- If it is possible, always put the lids on the cookware.
- When the liquid starts to boil, turn down the flame to barely simmer the liquid.
- If it is possible, use a pressure cooker. Refer to its user manual.
ENVIRONMENT CONCERNS
Recycle the materials with the symbol. Put the packaging in applicable containers to recycle it. Help protect the environment and human health and to recycle waste of electrical and electronic appliances. Do
not dispose appliances marked with the symbol with the household waste. Return the product to your local recycling facility or contact your municipal office.
Table des matières
Supports de casserole

flowchart
graph TD
    A["MOD.<br>PROD.NO.<br>SER.NO<br>DATA"] --> B["MODEL"]
    C["MOD.<br>PROD.NO.<br>SER.NO<br>DATA"] --> D["MODEL"]
    E["CODE 0049<br>03 IT<br>MADE IN ITALY"] --> F["TYPE<br>IP20"]
    G["Model"] --> H["SCissors"]
    I["PROD.NO.<br>SER.NO."] --> J["TYPE<br>IP20"]
    K["PROD.NO.<br>SER.NO."] --> L["TYPE<br>IP20"]
    M["PROD.NO.<br>SER.NO."] --> N["TYPE<br>IP20"]
text_image
Technical diagram showing a mechanical assembly with labeled parts A and B, including a magnified inset view.A. joint fourni
