Power MAX UD70161 - Vacuum Cleaner DIRT DEVIL - Free user manual and instructions
Find the device manual for free Power MAX UD70161 DIRT DEVIL in PDF.

User questions about Power MAX UD70161 DIRT DEVIL
0 question about this device. Answer the ones you know or ask your own.
Ask a new question about this device
Download the instructions for your Vacuum Cleaner in PDF format for free! Find your manual Power MAX UD70161 - DIRT DEVIL and take your electronic device back in hand. On this page are published all the documents necessary for the use of your device. Power MAX UD70161 by DIRT DEVIL.
USER MANUAL Power MAX UD70161 DIRT DEVIL
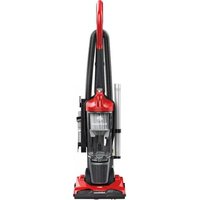
Carpet + Hard Floor Cyclonic Upright
My Model is:
1·2·3...
USER MANUAL
961151970 / ID115147 / R1 5/17
©2015 All rights reserved
Français - page 21
Español - página 41
REPLACEMENT PARTS
· BELT STYLE 5
- PRE-MOTOR FILTER F112
- EXHAUST FILTER F111

natural_image
Black and white photo of a vacuum cleaner with attached hose and control panel (no visible text or symbols)LET'S GO.™
HI. WELCOME.
Congrats on purchasing your new Dirt Devil® Upright Carpet + Hard Floor Cyclonic Upright Vacuum. Inside, you’ll find everything you want to know from the tools to how to.
So what are you waiting for? LET'S GO.™

PRODUCT REGISTRATION
Warranty Registration
Be sure to register your product online at www.DirtDevil.com or call 1-800-321-1134 to register by phone.
Hint: Attach your sales receipt to this Owner's manual. Verification of date of purchase may be required for warranty service of your Dirt Devil® product.
For quick reference, please record your product information below.
Model #: ____
Mfg. Code: ____
(Mfg. code located on the back or bottom of product)
Find GENUINE Replacement Parts at www.dirtdevil.com

natural_image
Illustration of cleaning and inspection tools including a filter, circular components, and rolled paper (no text or symbols)This product uses the following parts:
BELT STYLE 5
PRE-MOTOR FILTER F112
EXHAUST FILTER F111
TABLE OF CONTENTS
1·2·3...
Quick Start Assembly 6
natural_image
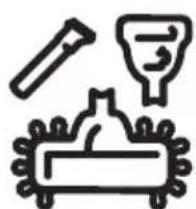
Simple line icons depicting a funnel, a pen, and a mechanical component (no text or symbols)Tools 8
How to 12

Troubleshooting 18

Limited Warranty 19
WARNING
IMPORTANT: READ CAREFULLY BEFORE ASSEMBLY AND USE. THIS PRODUCT IS INTENDED FOR HOUSEHOLD USE ONLY. IF USED COMMERCIALLY WARRANTY IS VOID.
IMPORTANT SAFETY INSTRUCTIONS
When using an electrical appliance, basic precautions should always be followed, including the following:
READ ALL INSTRUCTIONS BEFORE USING THIS APPLIANCE.
WARNING: TO REDUCE THE RISK OF FIRE, ELECTRIC SHOCK OR INJURY:
• Fully assemble before operating.
- Operate cleaner only at voltage specified on data plate on bottom of cleaner.
- Do not leave appliance when plugged in. Unplug from outlet when not in use and before cleaning or servicing.
- Do not use outdoors or on wet surfaces.
- Do not allow to be used as a toy. Not intended for use by children age 12 and under. Close attention is necessary when used by or near children. To avoid injury or damage, keep children away from product, and do not allow children to place fingers or other objects into any openings.
- Use only as described in this manual. Use only manufacturer's recommended attachments.
- Do not use with damaged cord or plug. If appliance is not working as it should, has been dropped, damaged, left outdoors, or dropped into water, return it to a service center for inspection prior to continuing use.
- Do not pull or carry by cord, use cord as handle, close a door on cord, or pull cord around sharp edges or corners. Do not place product on cord. Do not run appliance over cord. Keep cord away from heated surfaces.
- Do not unplug by pulling on cord. To unplug, grasp the plug, not the cord.
- Do not handle plug or appliance with wet hands.
- Do not put any objects into openings. Do not use with any opening blocked; keep free of dust, lint, hair, and anything that may reduce air flow.
- Keep hair, loose clothing, fingers, and all parts of body away from openings and moving parts. Brushroll continues to rotate when in upright position.
- Turn off all controls before unplugging.
- Use extra care when cleaning on stairs. To avoid personal injury or damage, and to prevent the cleaner from falling, always place cleaner at bottom of stairs or on floor.
Do not place cleaner on stairs or furniture, as it may result in injury or damage.
- Do not use to pick up flammable or combustible liquids, such as gasoline, or use in areas where they may be present.
- Unplug before connecting Turbo Tool.
- Do not pick up anything that is burning or smoking, such as cigarettes, matches, or hot ashes.
- Do not use without filters and/or dirt cup in place.
- WARNING: This product contains chemicals known to the State of California to cause cancer, birth defects or reproductive harm. WASH HANDS AFTER USING.

CAUTION: TO REDUCE THE RISK OF DAMAGE:
- Avoid picking up hard, sharp objects with this product, as they may cause damage.
- Store appropriately indoors in a dry place. Do not expose machine to freezing temperatures.
- Do not use sharp objects to clean out hose as they can cause damage.
- With brushroll on, do not allow cleaner to sit in one location for an extended period of time, as damage to floor can result.
- Brushroll continues to turn while product is turned on and the handle is in the upright position. To avoid damage to carpet, rugs, and flooring, avoid tipping cleaner or setting it on furniture, fringed area rugs or carpeted stairs during tool use.
SAVE THESE INSTRUCTIONS

WARNING:
To reduce the risk of electric shock, this appliance has a polarized plug (one blade is wider than the other). This plug will fit in a polarized outlet only one way. If the plug does not fit fully in the outlet, reverse the plug. If it still does not fit, contact a qualified electrician to install the proper outlet. Do not change the plug in any way.

NOTICE A THERMAL PROTECTOR HAS BEEN DESIGNED INTO YOUR CLEANER TO PROTECT IT FROM OVERHEATING. WHEN THE THERMAL PROTECTOR ACTIVATES THE CLEANER WILL STOP RUNNING.
If this happens proceed as follows:
- Turn cleaner OFF and unplug it from the electrical outlet.
- Empty dirt cup.
- Inspect the nozzle inlet, hose connector, hose, dirt cup inlet, cyclonic filter, rinsable filter, and HEPA filter. Clear obstructions if present.
- When cleaner is unplugged and motor cools for 30 minutes, the thermal protector will deactivate and cleaning may continue.
If the thermal protector continues to activate after following the above steps, your cleaner needs servicing.
QUICK START
1
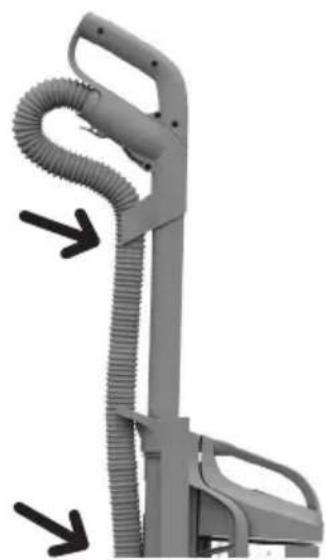
natural_image
3D rendering of a vacuum cleaner with coiled hose and handle (no text or symbols visible)INSERT CLEANING WAND INTO TOP OF VAC. SECURE YOUR HOSE HERE AND HERE.
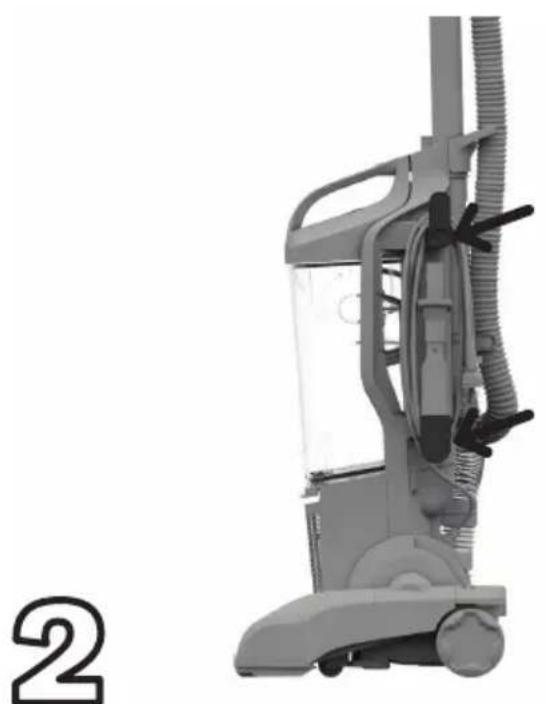
2
natural_image
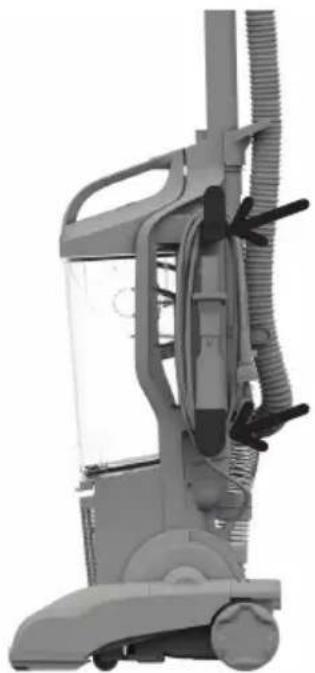
Exterior view of a gray vacuum cleaner with coiled tubing and control panel (no text or symbols visible)NOW, WRAP THE CORD AROUND CORD HOOKS!
text_image
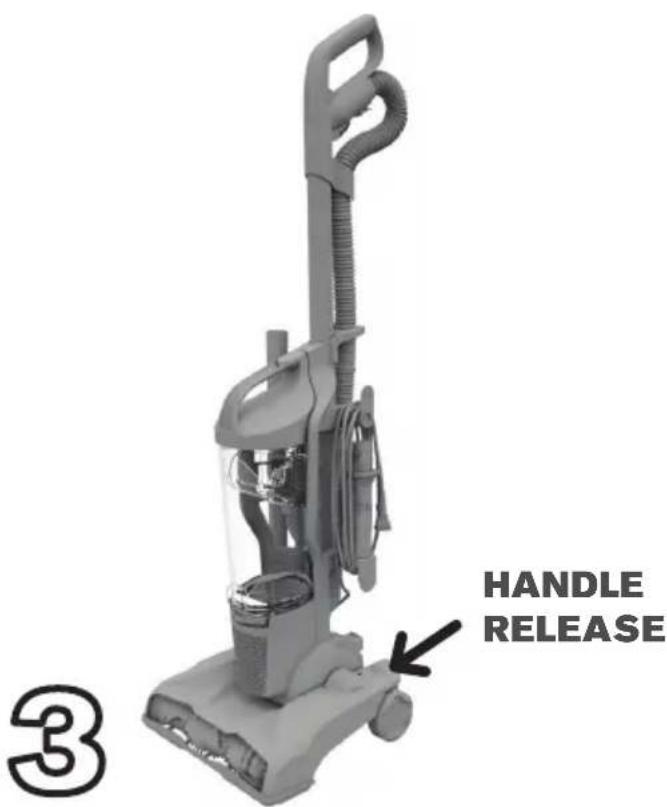
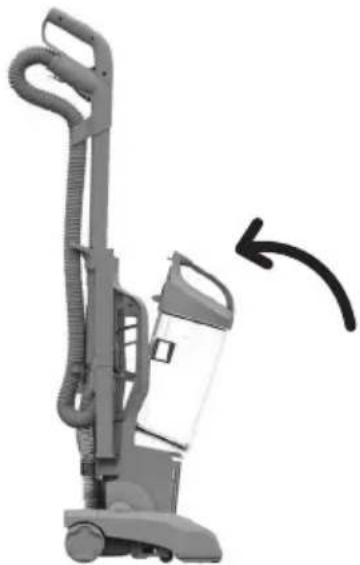
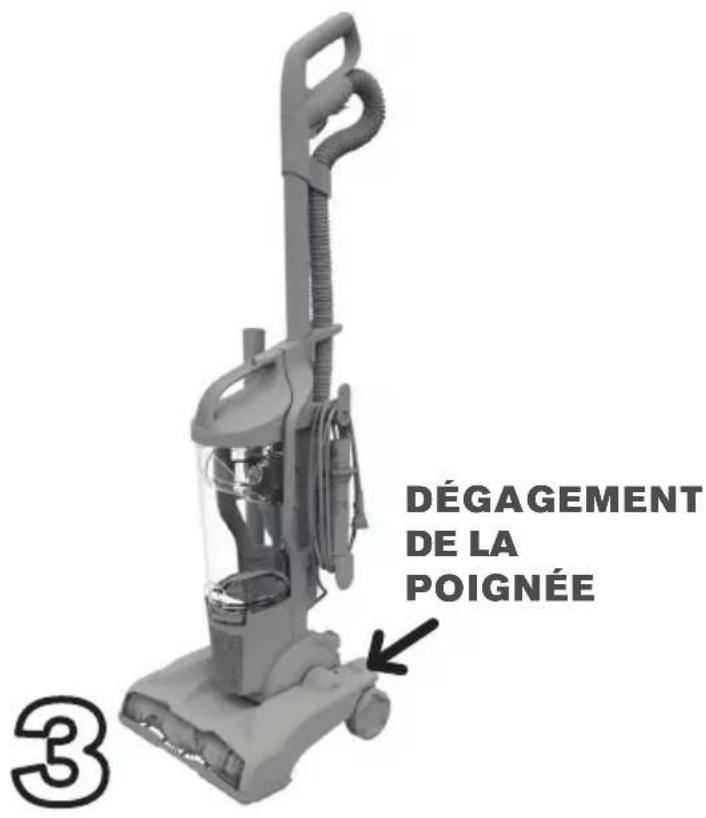
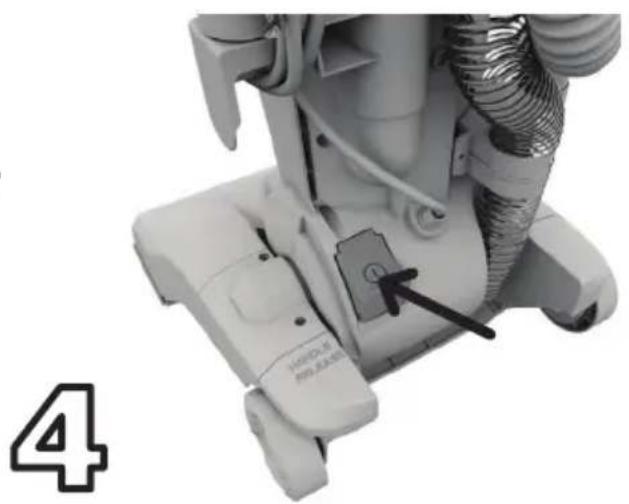
HANDLE RELEASE ③PUSH HERE AND PULL HANDLE BACKWARDS TO RECLINE.
natural_image
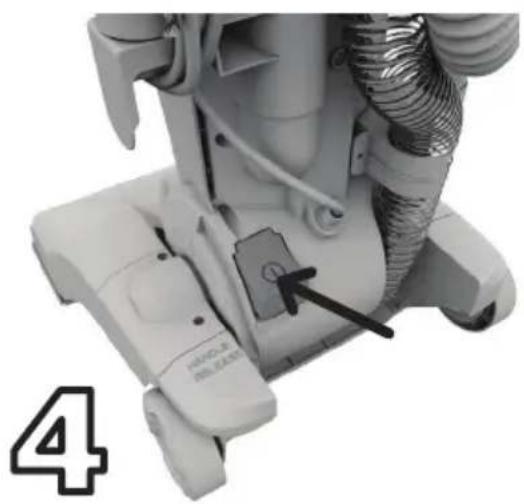
Close-up of a white industrial vacuum cleaner with coiled tubing and a black arrow pointing to a component (no visible text or symbols)PLUG IN THE CORD AND PRESS HERE TO POWER UP.
Go to dirtdevil.com/support or contact our Customer Service Department at (800) 321-1134
8:00 a.m. - 7:00 p.m. EST Mon. - Fri. Pick up the conversation on...

Facebook.com/DirtDevil

Twitter@DirtDevil
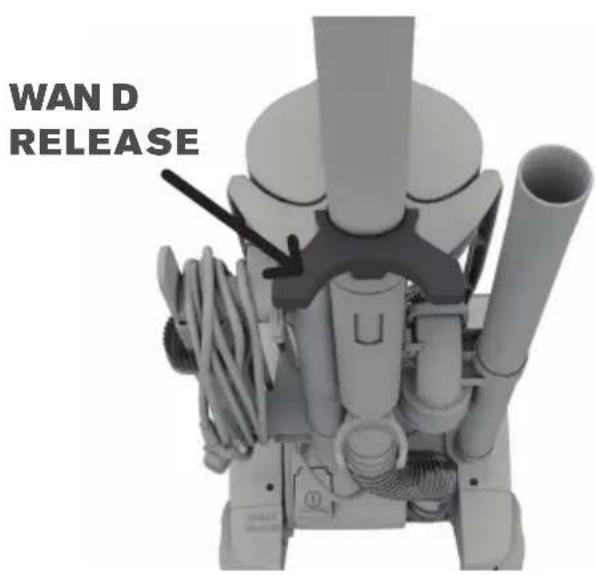
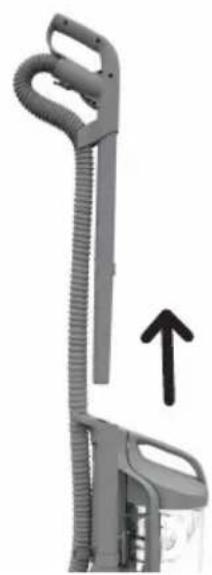
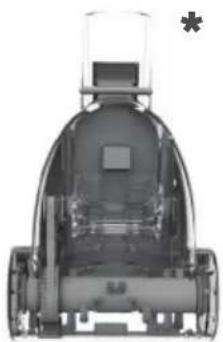
ON-DEMAND CLEANING WAND
- Press the wand release button.
text_image
WAND RELEASE- Pull wand up & out.
natural_image
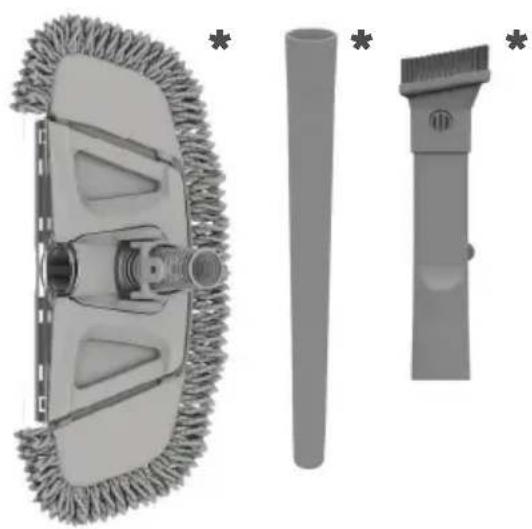
Side view of a vacuum cleaner with a coiled hose and upward arrow indicator (no text or symbols)- Push the tools on the wand* for convenient cleaning. When you're done, twist & pull to take them off.
natural_image
Three grayscale product photos: a mop, a cylindrical tube, and a push-button tool (no text or symbols visible)*Accessories not included on all models.
TOOL
COMPLETE ON-BOARD TOOLKIT
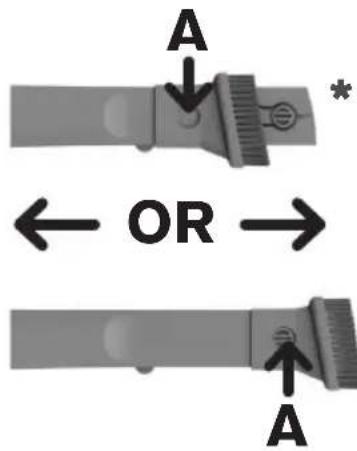
text_image
A OR A2-IN-1 COMBO TOOL: Use the Crevice Tool for tight spaces, corners and along stair edges and baseboards. Try the Dusting Brush for furniture, table tops, lamps, blinds and more. Press the lock button (A) down and slide to switch between modes.
natural_image
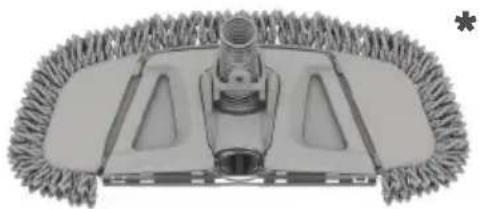
Top-down view of a cleaning mop with a brush and handle (no text or symbols visible)VAC+DUST FLOOR TOOL WITH SWIPES™*: Vacuum and dust most hard floor surfaces.

CAUTION
Not to be used for grooming a pet.

WARNING
Unplug vacuum before connecting hose, wand or tools.

EXTENSION WAND: Attach to cleaning wand for longer reach on above and hard floor cleaning.
natural_image
Top-down view of a robotic arm with visible internal components and a small asterisk symbol (no text or labels)TURBO TOOL®: For upholstered furniture, draperies, mattresses and stairs.
HARD FLOOR CLEANING WITH SWIPES ^TM \*
Vac+Dust Floor Tool with SWIPES™ Washable Microfiber Dusting Pad picks up dirt, dust, debris & pet hair. Your Featherlite® will get the rest.
- Slide one side in pocket and then the other.
- The vacuum picks up dirt and debris from your hard floors while the Microfiber SWIPES™ pad picks up the rest.
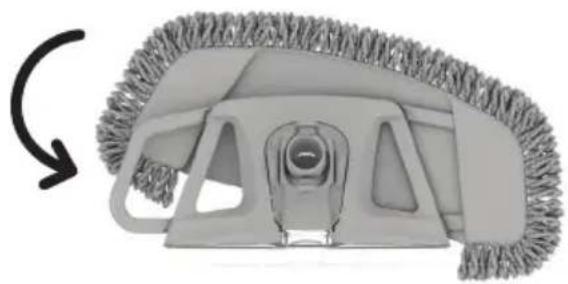
natural_image
Close-up of a cleaning mop with a circular cutter head and mesh texture (no text or symbols visible)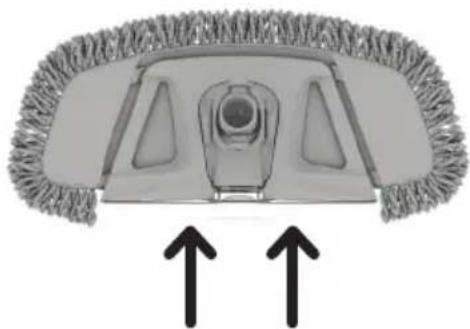
natural_image
Diagram of a mop with two upward arrows indicating motion or force (no text or symbols)SUCTION
ABOVE FLOOR CLEANING
-
Remove On-Demand Cleaning Wand for convenient above floor cleaning.
-
Attach extension wand and 2-in-1 tool for improved cleaning.
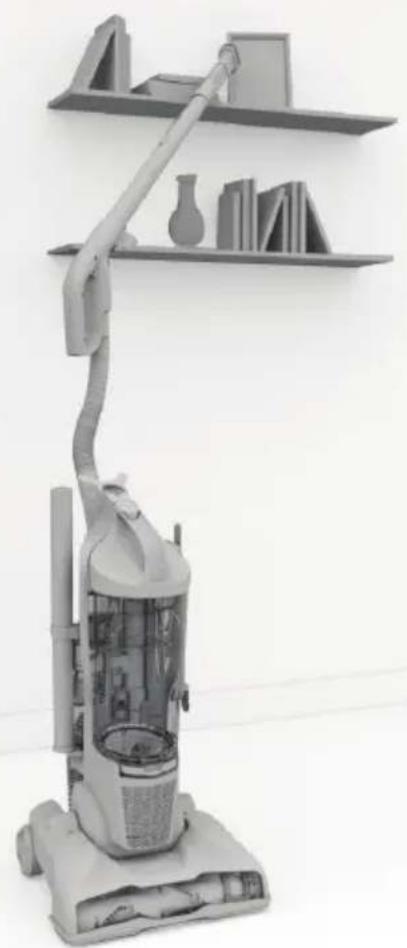
natural_image
Exterior view of a vacuum cleaner on a shelf with bookshelves in the background (no text or symbols visible)
CAUTION
Use extra care when cleaning on stairs. To avoid personal injury or damage, and to prevent the cleaner from falling, always place cleaner at bottom of stairs or on floor. Do not place cleaner on stairs or furniture, as it may result in injury or damage. When using tools, always ensure handle is in upright position.
*Accessories not included on all models.
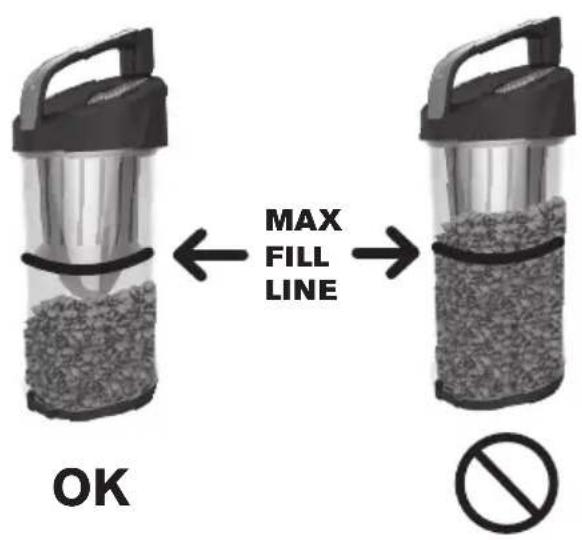
EMPTY THE DIRT CUP
- Dump the dirt when it's full.
- Push the release button (A) then pull out the dirt cup.
text_image
MAX FILL LINE OK No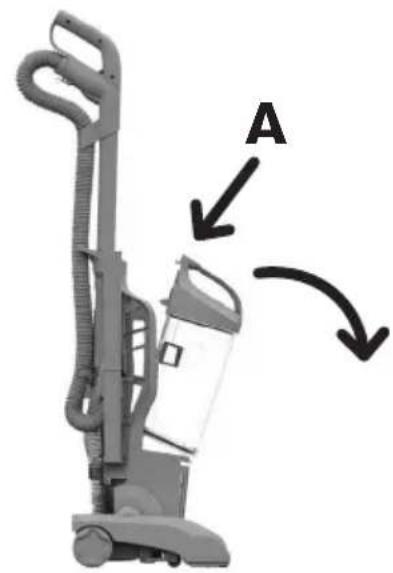
natural_image
Diagram of a vacuum cleaner with labeled component A, showing mechanical parts and directional arrows (no text or symbols beyond labels)
This would be a good point to check the condition of your filter. Dirty? Check out page 13 for cleaning steps.
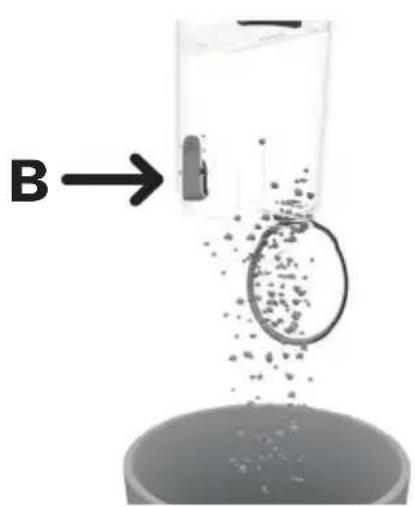
- Now ditch the dirt by pushing the lower button (B). Give it a wipe to remove dust.
text_image
B →- Place back in bottom first. Push the top of the cup against the back panel and it'll click into place.
natural_image
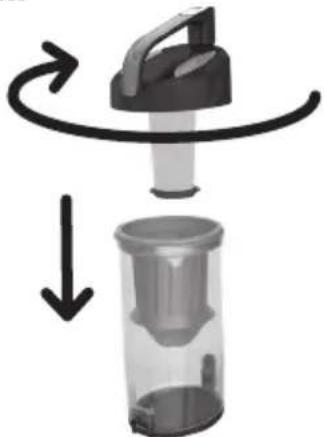
Side view of a vacuum cleaner with a curved arrow indicating motion (no text or symbols)CLEAN THE RINSABLE FILTER
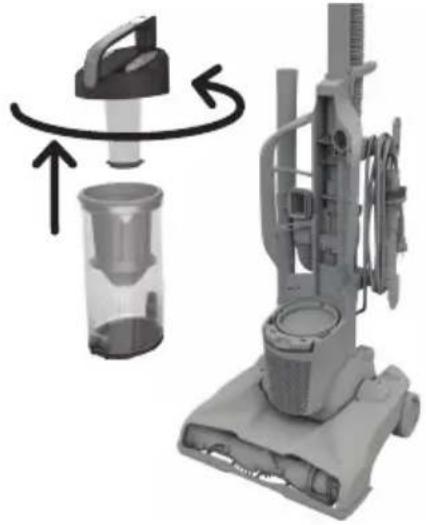
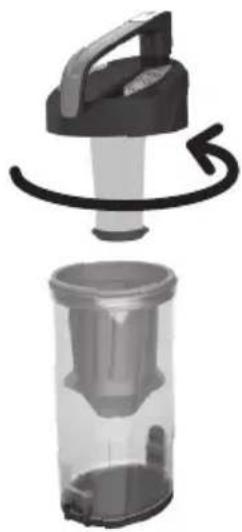
- Remove the dirt cup. Twist the handle to remove the top from the dirt cup. Gently remove the filter from the the handle.
natural_image
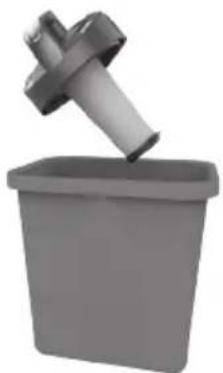
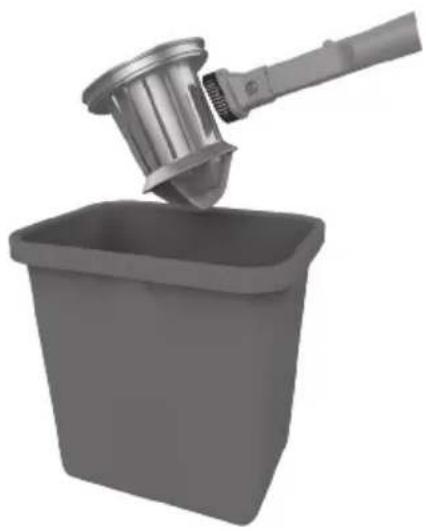
Illustration of a vacuum cleaner with a brush and fan assembly, showing internal components and motion arrows (no text or symbols)- Tap clean into a trashcan.
natural_image
3D rendered image of a gray plastic bucket with a cross-shaped handle above it (no text or symbols)- All pieces are rinsable. Allow to dry 24 hours before using.
natural_image
Two grayscale 3D-rendered objects: a rectangular object and a hammer-like tool, both with handles and a base (no text or symbols)- TWIST the filter back into the handle, place the handle back on the dirt cup and twist to close. Replace the dirt cup into the vacuum.
natural_image
Diagram of a blender with a handle and lid, showing a rotating arrow and a downward arrow (no text or symbols)HOW TO

WARNING
To reduce the risk of personal injury - Unplug before cleaning or servicing. Do not use vacuum without dirt cup or filters in place.
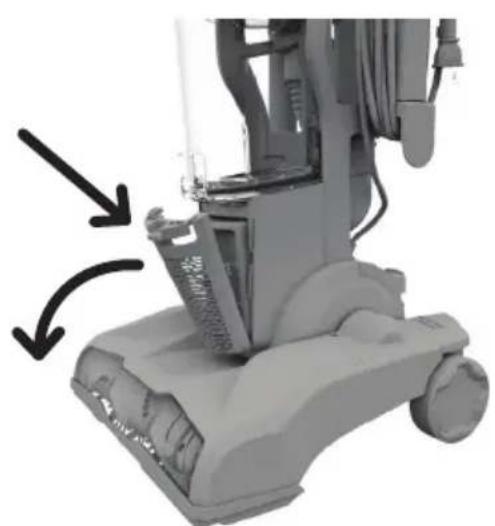
CLEAN THE EXHAUST FILTER
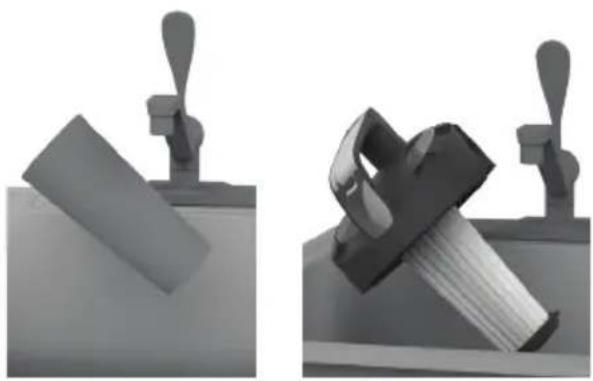
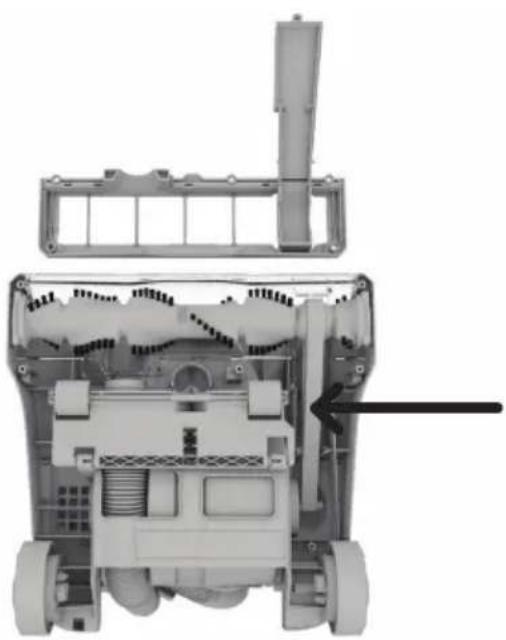
- Push the tab on the front of the cover to pivot out.
natural_image
Close-up of a vacuum cleaner's base with arrows indicating motion direction (no text or symbols visible)- Pull out the filter, rinse dirt from both sides, and let air dry for 24 hours before reinstalling or until dry.
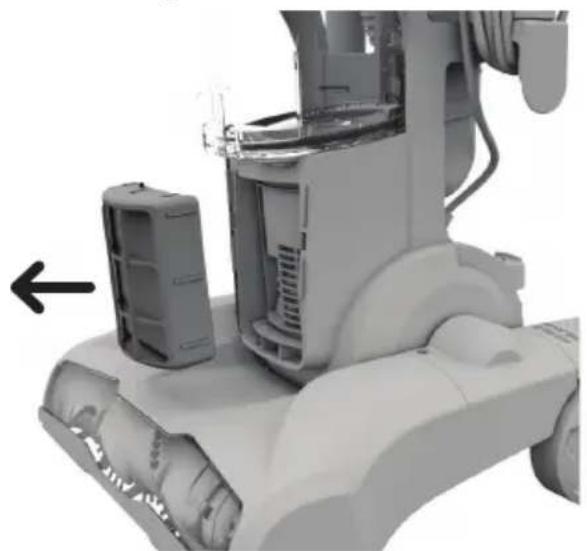
natural_image
3D rendering of a mechanical device with visible internal components and a black arrow pointing to a specific part (no text or symbols)- Put the dry filter back. Now line up the filter cover with the bottom tabs first and then snap back into place.
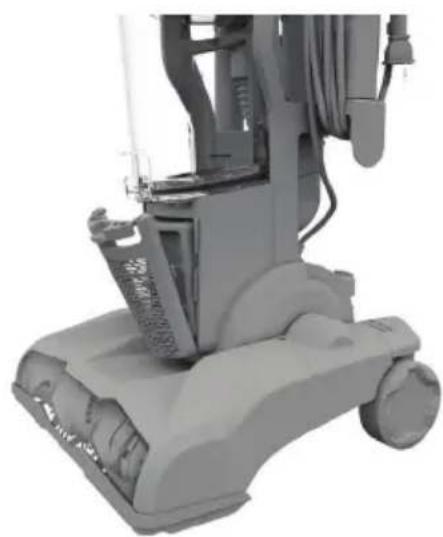
natural_image
Exterior view of a vacuum cleaner (no visible text or symbols)For replacement filter F111 visit dirtdevil.com or call us at (800) 321-1134.
HOW TO

WARNING
To reduce the risk of personal injury – Unplug before cleaning or servicing. Do not use vacuum without dirt cup or filters in place.
CLEAN THE CYCLONIC ASSEMBLY
- Twist counter-clockwise to open the dirt cup. Pull cyclonic assembly out of dirt cup.
natural_image
Close-up of a blender with a handle and spool, showing internal structure (no text or symbols visible)- Use the Dusting Tool to clean the cyclonic assembly.*
natural_image
Gray plastic bin with a hand holding a waste bin, no text or symbols visibleCLEAN THE BRUSHROLL
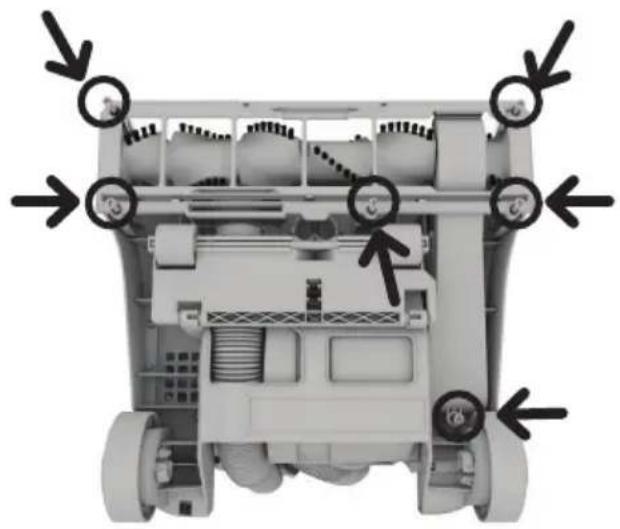
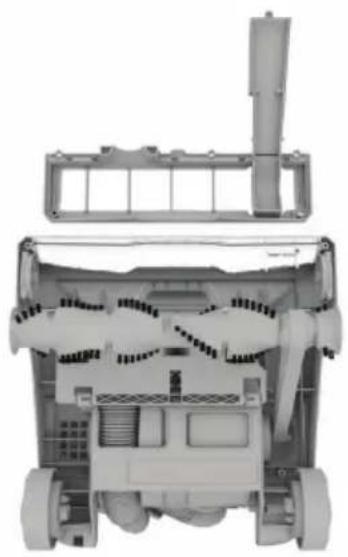
- Turn your vacuum over. Use a Phillips screwdriver to take off the 6 screws. Remove the bottom plate.
natural_image
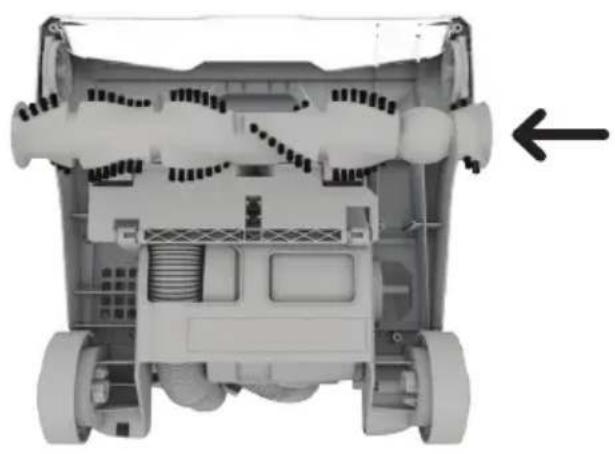
Top-down view of a toy car showing internal components and directional arrows (no text or symbols)- Clean the brushroll.
natural_image
Top-down view of a small wheeled robot's front wheel and chassis, showing internal components and no visible text or symbols.- Slide on belt with the lettering on the outside.
natural_image
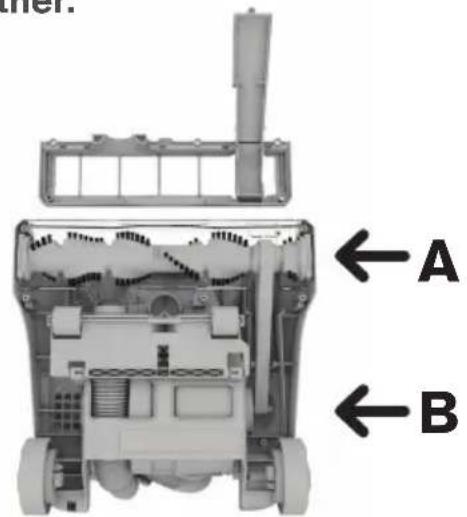
Cross-sectional diagram of a mobile robot showing internal components and wiring (no text or labels)REPLACE THE BELT
- Turn your vacuum over. Use a Phillips screwdriver to take off the 6 screws. Remove the bottom plate.

natural_image
Top-down view of a small wheeled robot chassis with visible internal components and directional arrows indicating movement or force (no text or symbols)- Slip belt around the brushroll in area without bristles (A) and metal pin (B). Each end of the brushroll will fit into pockets on each side of the nozzle (C). Put the plate back on and screw together.
text_image
A B- Then take off that old belt. Slide on a new belt with the lettering on the outside.
natural_image
Top-down view of a small wheeled robot with visible wheels, front panel, and top bracket (no text or symbols)
LUBRICATION:
The motor and brushroll are equipped with bearings which contain sufficient lubrication for their lifetime. The addition of lubricant could cause damage. Do not add lubricant to motor or brushroll.

natural_image
Illustration of a person pouring liquid into a container with a downward arrow, labeled 'C' (no text or symbols on the diagram itself)
NOTE: Any other servicing should be done by an authorized service representative. If appliance is not working as it should, has been dropped, damaged, left outdoors or dropped into water, take it to a service center prior to continuing use.
For replacement belt style 5 visit dirtdevil.com or call us at (800) 321-1134.
TROUBLESHOOTING
Any other servicing should be done by an authorized service representative. If appliance is not working as it should, has been dropped, damaged, left outdoors, or dropped into water, take it to a service center prior to continuing use.

WARNING
To reduce the risk of personal injury - Unplug before cleaning or servicing.
PROBLEM POSSIBLE CAUSE POSSIBLE SOLUTION
| Vacuum won't run | 1. Power cord not firmly plugged into outlet. | 1. Plug unit in firmly. |
| 2. No voltage in wall plug. | 2. Check fuse or breaker in home. | |
| 3. Blown fuse or tripped breaker. | 3. Replace fuse/reset breaker in home. | |
| 4. Thermal Protector activated. 4. Unplug and allow vacuum to cool for 30min. (This willl reset the thermal protector) | ||
| Dust escaping from vacuum | 1. Dirt cup full. 1. Empty dirt cup. | |
| 2. Dirt cup not installed correctly. | 2. Review Dirt Cup removal & replacement. | |
| 3. Hose not installed correctly. 3. Review Hose installation. | ||
| 4. Rinsable and/ or Filter made with HEPA media not installed completely. | 4. Review Filter Removal and Cleaning. | |
| Smoky/burning smell detected | 1. Belt broken or stretched. 1. Replace brushroll belt. | |
| 2. Brushroll is clogged. 2. Clear/remove debris from brushroll. | ||
| Vacuum tools won't pick-up | 1. Hose clogged 1. Remove hose and tools; remove obstruction. | |
| 2. Dirt cup full 2. Empty dirt cup. | ||
| 3. One or both filters are clogged. | 3. Remove both filters and clean. | |
| 4. Release handle/wand to actuate internal valve. | 4. Pull handle up and out of unit. | |
| 5. Vacuum not picking up debris. | 5. Brushroll could be turned off or the belt could be broken. | |

NOTE: Any other servicing should be done by an authorized service representative. If appliance is not working as it should, has been dropped, damaged, left outdoors or dropped into water, take it to a service center prior to continuing use.

LIMITED WARRANTY
WHAT THIS WARRANTY COVERS
When used and maintained in normal household use and in accordance with the Owner's Manual, your Dirt Devil® product is warranted against original defects in material and workmanship. During the Warranty Period, We will provide labor and parts, at no cost to you, to correct any such defect in products purchased in the United States, U.S. Military Exchanges and Canada.
HOW TO MAKE A WARRANTY CLAIM
If this product is not as warranted, take or send the product to a Dirt Devil® Authorized Warranty Service Dealer along with proof of purchase. For an automated referral to authorized service outlets in the U.S.A., phone: 1-800-321-1134 OR visit Dirt Devil® online at www.DirtDevil.com. For additional assistance or information concerning this Warranty or the availability of warranty service outlets, phone the Dirt Devil® Consumer Response Center, Phone 1-800-321-1134, Mon-Fri 8am-7pm EST.
WHAT THIS WARRANTY DOES NOT COVER
This Warranty does not cover: use of the product in a commercial operation (such as maid, janitorial and equipment rental services), brushroll, belt, bags, filters, improper maintenance of the product, damage due to misuse, acts of God, nature, vandalism or other acts beyond the control of Royal Appliance Mfg. Co. ("Royal", "we"), owner's acts or omissions, use outside the country in which the product was initially purchased and resales of the product by the original owner. This warranty does not cover pick up, delivery, transportation or house calls.
This warranty does not apply to products purchased outside the United States, including its territories and possessions, outside a U.S. Military Exchange and outside of Canada. This warranty does not cover products purchased from a party that is not an authorized retailer, dealer, or distributor of Royal products.
OTHER IMPORTANT TERMS
This Warranty is not transferable and may not be assigned. This Warranty shall be governed and construed under the laws of the state of Ohio. The Warranty Period will not be extended by any replacement or repair performed under this Warranty. THIS WARRANTY IS THE EXCLUSIVE WARRANTY AND REMEDY PROVIDED BY ROYAL. ALL OTHER WARRANTIES, EXPRESSED OR IMPLIED, INCLUDING WARRANTIES OF MERCHANTABILITY OR FITNESS FOR PARTICULAR PURPOSE, ARE DISCLAIMED. IN NO EVENT WILL ROYAL BE LIABLE FOR ANY SPECIAL, INDIRECT, INCIDENTAL OR CONSEQUENTIAL DAMAGES OF ANY KIND OR NATURE TO OWNER OR ANY PARTY CLAIMING THROUGH OWNER, WHETHER BASED IN CONTRACT, NEGLIGENCE, TORT OR STRICT PRODUCTS LIABILITY OR ARISING FROM ANY CAUSE WHATSOEVER. Some states do not allow the exclusion of consequential damages, so the above exclusion may not apply to you. This warranty gives you specific rights; you may also have others that vary from state to state.

natural_image
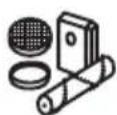
Illustration of industrial components including a perforated plate, circular filter, and rolled document (no text or symbols)Find GENUINE Replacement Parts at www.dirtdevil.com
This product uses the following parts: BELT STYLE ____ 5 PRE-MOTOR FILTER ____ F112 EXHAUST FILTER ____ F111

Call our Customer Service Department at (800) 321-1134 8:00 a.m. - 7:00 p.m. EST Mon. - Fri. www.dirtdevil.com
OUR VACS SPEAK VOLUMES
Pick Up the Conversation On...

Facebookcom/DirtDevil

Twitter@DirtDevil
Dirt Devil® Upright
natural_image
Illustration of cleaning and inspection tools including a filter, plate, and rolled paper (no text or symbols)natural_image
Simple line icons depicting a funnel, a pen, and a mechanical component (no text or symbols)Accessoires 28
Comment faire — 32

Dépannage 38

Limitée garantie 39
! AVERTISSEMENT !
IMPORTANT : LISEZ ATTENTIVEMENT AVANT L'ASSEMBLAGE ET L'UTILISATION. CET APPAREIL EST DESTINÉ UNIQUEMENT À UN USAGE DOMESTIQUE. UNE UTILISATION À DES FINS COMMERCIALES ANNULERA LA GARANTIE.
CONSIGNES DE SÉCURITÉ IMPORTANTES
natural_image
3D rendering of a vacuum cleaner with coiled hose and handle, labeled with number 1 (no text or symbols on the device itself)INSÉREZ LE TUBE DE NETTOYAGE SUR LE DESSUS DE L'ASPIRATEUR. FIXEZ LE TUYAU ICI ET LÀ.
natural_image
Side view of a vacuum cleaner with coiled tubing and control panel (no visible text or symbols)ENTOUREZ LE CORDON AUTOUR DE SES CROCHETS.
text_image
DÉGAGEMENT DE LA POIGNÉE ③APPUYEZ ICI ET TIREZ LA POIGNÉE VERS L'ARRIÈRE POUR L'INCLINER.
natural_image
Close-up of a white industrial vacuum cleaner with coiled tubing and a black arrow pointing to a component (no visible text or symbols)BRANCHEZ LE CORDON ET APPUYEZ ICI POUR METTRE L'APPAREIL SOUS TENSION.
VOTRE DIRT DEVIL EST PRÊT À NETTOYER!
LET'S GO.™

DÉPANNAGE
text_image
IF DE MENTnatural_image
Close-up of a gray vacuum cleaner with a coiled hose and handle, showing an upward arrow (no text or symbols visible)natural_image
Three grayscale product photos: a mop, a cylindrical brush, and a push-button tool (no text or symbols visible)natural_image
Close-up of a mechanical component with a circular detail and an arrow pointing to label 'A' (no text or symbols on the object itself)natural_image
Illustration of a mop handle with a rack and handle, no text or symbols presentnatural_image
Top-down view of a robotic vacuum cleaner with visible internal components and a marked asterisk (no text or symbols)natural_image
3D rendering of a mop with a circular head and spout, shown with a curved arrow indicating rotation (no text or symbols)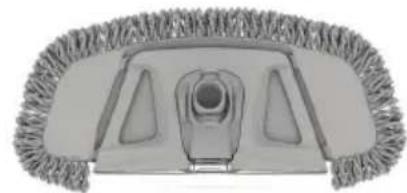
natural_image
Illustration of a mop with a decorative fringed rim (no text or symbols)↑↑ SUCCION
NETTOYAGE DES SURFACES SURÉLEVÉES
natural_image
Exterior view of a vacuum cleaner on a wall with bookshelves in the background (no text or symbols visible)MISE EN GARDE
natural_image
Side view of a vacuum cleaner with labeled component 'A' and directional arrows indicating motion (no text or symbols on the device itself)
natural_image
Side view of a vacuum cleaner with a curved arrow indicating motion (no text or symbols)COMMENT FAIRE
POUR NETTOYER LE FILTRE LAVABLE
natural_image
Illustration of a vacuum cleaner with a brush and handle, showing internal components and motion arrows (no text or symbols)natural_image
3D rendered image of a gray plastic bucket with a metallic cross above it (no text or symbols)natural_image
Two grayscale images showing mechanical components: a tilted rectangular block and a hammerhead with a wooden handle, both mounted on a stand (no text or symbols visible)natural_image
Diagram of a blender with a handle and spool, showing a rotating top and bottom casing (no text or symbols)natural_image
Close-up of a vacuum cleaner's base with arrows indicating motion direction (no text or symbols visible)natural_image
Close-up of a mechanical device with visible internal components and a directional arrow (no text or symbols)natural_image
Exterior view of a gray vacuum cleaner (no visible text or symbols)natural_image
Close-up of a hand mixer with a handle and spool, showing internal components (no text or symbols visible)natural_image
Gray plastic bin with a hand holding a gavel above it, symbolizing waste sorting or recycling (no text or symbols present)POUR NETTOYER LE ROULEAU-BROSSE
natural_image
Top-down view of a robotic vehicle showing internal components and directional arrows (no text or symbols)natural_image
Top-down view of a vehicle's rear wheel assembly showing internal components and structural lines (no text or symbols)natural_image
Cross-sectional diagram of a robotic device showing internal components and a cylindrical structure (no text or symbols)POUR REMPLACER LA COURROIE
natural_image
Top-down view of a toy vehicle showing internal components and directional arrows (no text or symbols)natural_image
Top-down view of a small wheeled robot with visible wheels, ventilation ducts, and a handle (no text or symbols)
natural_image
Illustration of a robotic arm with a downward arrow, no text or symbols present
PROBLÈME CAUSE POSSIBLE SOLUTION
natural_image
Illustration of industrial components including a perforated plate, cylindrical rollers, and a rolled document (no text or symbols)natural_image
Illustration of cleaning tools including a filter, plate, and rolled paper (no text or symbols)natural_image
Simple line drawing of a funnel, a pen, and a mechanical component (no text or symbols)Herramientas 48
CAUTION: TO REDUCE THE RISK OF DAMAGE:
natural_image
3D rendering of a vacuum cleaner with coiled hose and directional arrows indicating motion (no text or symbols)natural_image
Exterior view of a vacuum cleaner with coiled tubing and control panel (no text or symbols visible)natural_image
Close-up of a white industrial vacuum cleaner with coiled tubing and a button, labeled '4' (no text or symbols on the device itself)natural_image
Side view of a gray vacuum cleaner with a handle and hose, showing an upward arrow (no text or symbols visible)natural_image
Three grayscale product photos: a mop, a cylindrical tube, and a handheld brush (no text or symbols)natural_image
Top-down view of a cleaning mop with a brush and handle (no text or symbols visible)natural_image
Cross-sectional diagram of a robotic vehicle showing internal components and a marked point (no text or symbols)natural_image
Exterior view of a vacuum cleaner on a pedestal shelf with bookshelves in the background (no text or symbols visible)PRECAUCION
text_image
LLENADO MÁXIMO OKnatural_image
Diagram of a vacuum cleaner with labeled component A, showing airflow direction (no text or symbols beyond label)
natural_image
Side view of a gray vacuum cleaner with a curved arrow indicating motion (no text or symbols visible)INSTRUCCIONES DE USO
LIMPIEZA DEL FILTRO ENJUAGABLE
natural_image
Two views of a vacuum cleaner: one with a handle and arrow indicating rotation, the other with a base-mounted device (no text or symbols visible)natural_image
Two grayscale 3D-rendered objects: a rectangular object and a cross-shaped object, both with handles, against a plain background (no text or symbols)natural_image
3D rendered image of a gray plastic bucket with a cross-shaped handle inserted into it (no text or symbols)natural_image
Diagram of a blender with a handle and arrow indicating rotation or process (no text or symbols)INSTRUCCIONES DE USO
ADVERTENCIA
natural_image
Close-up of a gray vacuum cleaner with attached filter array and mechanical components (no visible text or symbols)natural_image
Exterior view of a vacuum cleaner (no visible text or symbols)natural_image
Close-up of a mechanical device with visible components and a black arrow pointing to a specific part (no text or symbols)INSTRUCCIONES DE USO
natural_image
Exterior view of a kitchen blender with handle and side panel (no text or symbols visible)ADVERTENCIA
natural_image
Gray plastic bin with a hand holding a tool above it, symbolizing waste sorting or recycling (no text or symbols present)INSTRUCCIONES DE USO

PRECAUCIÓN
natural_image
Top-down view of a small wheeled robot with visible wheels, gears, and control buttons (no text or symbols)natural_image
Cross-sectional diagram of a mobile washing machine showing internal components and wiring (no text or labels)natural_image
Top-down view of a vehicle chassis showing internal components and a directional arrow (no text or symbols)INSTRUCCIONES DE USO
REPLACE THE BELT
natural_image
Top-down view of a small wheeled robot with visible internal components and directional arrows indicating motion (no text or symbols)natural_image
Cross-sectional diagram of a robot's internal components, labeled A and B (no text or symbols beyond labels)
PRECAUCIÓN
natural_image
Top-down view of a small wheeled robot with visible internal components and a cylindrical top component (no text or symbols)