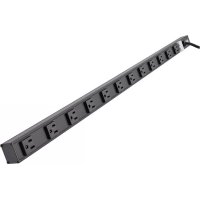
PS3612B - Power strip Tripp Lite - Free user manual and instructions
Find the device manual for free PS3612B Tripp Lite in PDF.


User questions about PS3612B Tripp Lite
0 question about this device. Answer the ones you know or ask your own.
Ask a new question about this device
Download the instructions for your Power strip in PDF format for free! Find your manual PS3612B - Tripp Lite and take your electronic device back in hand. On this page are published all the documents necessary for the use of your device. PS3612B by Tripp Lite.
USER MANUAL PS3612B Tripp Lite
Models: PS120406, PS120410, PS120420, PS240406, PS2408, PS2408B, PS2408RA, PS240810, PS3612, PS3612B, PS3612RA, PS361206, PS361220, PS480806, PS4816, PS4816B, PS6020, PS7224, PS7224-20 and PS7224-20T
(AGIB7019) (AGIB7019)
PS-Series Power Strips are designed to provide convenient access to multiple AC outlets.
Note: The Power Strip models listed above DO NOT provide your connected equipment with surge or line-noise protection.
Important Safety Instructions 2
Equipment Connection 2
Wall Mounting 2
Specifications 3
Warranty and 4
Product Registration
Espanol 5
Français 9
PROTECT YOUR INVESTMENT!
Register your product for quicker service and ultimate peace of mind.
You could also win an ISOBAR6ULTRA surge protector—a $100 value!

www.triplite.com/warranty



1111 W. 35th Street, Chicago, IL 60609 USA • www.triplite.com/support
Copyright © 2016 Tripp Lite. All rights reserved.
Important Safety Instructions

SAVE THESE INSTRUCTIONS
- DO NOT connect the power strip to an ungrounded outlet.
- DO NOT use the power strip with 2-wire extension cords or adapters.
- This power strip is designed for indoor use only. Install the power strip away from heat-emitting appliances such as radiators or heat registers.
- Do not install where excessive moisture is present.
- Do not plug extension cords into the power strip.
- Never install electrical, telephone, network or coaxial wiring during a lightning storm.
- Do not drill into any part of the housing or open the housing for any reason. There are no user-serviceable parts inside.
- Use of this equipment in life support applications where failure of this equipment can reasonably be expected to cause the failure of the life support equipment or to significantly affect its safety or effectiveness is not recommended. Do not use this equipment in the presence of a flammable anesthetic mixture with air, oxygen or nitrous oxide.
Equipment Connection
Plug your equipment into the Power Strip's AC receptacles. DO NOT plug in equipment that draws more total amps than your Power Strip's amperage rating (see label on Power Strip for amperage rating), or you will trip the circuit breaker. If the circuit breaker trips, remove overload and depress breaker to reset. Leave enough clearance at the end of the Power Strip to allow the circuit breaker to operate normally.
Note: Select models with a power switch feature a protective switch cover. To access the switch, flip open the attached cover.
Wall Mounting
All Power Strip models feature clips for horizontal or vertical mounting on a variety of surfaces. The user must supply other mounting hardware (screws, etc.) and determine its suitability for use with the chosen mounting surface.

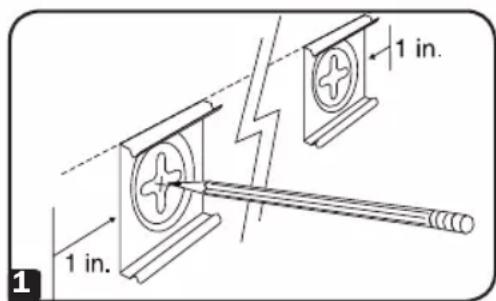
Mark a straight horizontal or vertical line where you want to mount the Power Strip. At each end of the line, mark where the edges of the Power Strip will be located. Place a mounting clip on the mounting surface 1" in from these edges and mark where the screws must be driven into the wall. For strips longer than 48" (120 cm), also mark a screw hole for a third mounting clip midway between the other two.
Wall Mounting (Continued)

Keyhole Mounting (Style A): Drive #8 screws directly into the mounting surface. Snap the mounting clips onto the Power Strip 2a, then hang the Power Strip on the screws by the keyhole slots on its mounting clips 2b.


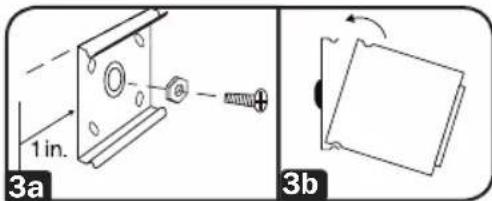
Clip Mounting (Style B): Pre-drill holes in the mounting surface, if necessary. Thread #8-32 screws onto the hex nuts. Drive screws through the centers of the mounting clips and into the mounting surface 3a. Place the Power Strip inside one edge of the mounting clips, then snap the Power Strip into place 3b.
Specifications
| Model | Amperage Rating | Outlet Qty. x Type Input Plug | Cord Length | Overall Length Breaker | Mounting Clip Style† | ||
| PS120406 | 15A 4 x 5-15R 5-15P 6 ft. 12 in. | 15A B | |||||
| PS120410 | 15A 4 x 5-15R 5-15P 10 ft. 12 in. | 15A B | |||||
| PS120420 | 20A 2 x 5-20R, 2 x 5-15R 5-20 P 15 ft. 12 in. | 20A B | |||||
| PS240406 | 15A 4 x 5-15R 5-15P 6 ft. 24 in. | 15A A | |||||
| PS2408 | 15A 8 x 5-15R 5-15P 15 ft. 24 in. | 15A A | |||||
| PS2408B* | 15A 8 x 5-15R 5-15P 15 ft. 24 in. | 15A A | |||||
| PS2408RA | 15A 8 x 5-15R | 5-15P† | 15 ft. | 24 in. | 15A B | ||
| PS240810 | 15A 8 x 5-15R 5-15P 10 ft. 24 in. | 15A A | |||||
| PS3612RA | 15A 12 x 5-15R | 5-15P† | 15 ft. | 36 in. | 15A B | ||
| PS361206 | 15A | 12 x 5-15R | 5-15P 6 ft. | 36 in. | 15A A | ||
| PS3612 | 15A | 12 x 5-15R | 5-15P | 36 in. | 15A | A | |
| PS3612B* | 15A | 12 x 5-15R | 5-15P 15 ft. | 36 in. | 15A | A | |
| PS361220 | 20A | 2 x 5-20R, 10 x 5-15R | 5-20P 15 ft. | 36 in. | 20A | A | |
| PS480806 | 15A 8 x 5-15R 5-15P 6 ft. 48 in. | 15A A | |||||
| PS4816 | 15A | 16 x 5-15R | 5-15P 15 ft. | 48 in. | 15A A | ||
| PS4816B* | 15A | 16 x 5-15R | 5-15P 15 ft. | 48 in. | 15A A | ||
| PS6020 | 15A | 20 x 5-15R | 5-15P 15 ft. | 60 in. | 15A A | ||
| PS7224 | 15A | 24 x 5-15R | 5-15P 15 ft. | 72 in. | 15A A | ||
| PS7224-20 | 20A | 2 x 5-20R, 22 x 5-15R | 5-20P 15 ft. | 72 in. | 20A | A | |
| PS7224-20T | 20A | 2 x 5-20R, 22 x 5-15R | L5-20P | 15 ft. | 72 in. | 20A | A |
- Black Housing. † Right Angle. † See Wall Mounting section for an explanation of clip styles.
Warranty and Product Registration
Lifetime Limited Warranty
Seller warrants this product, if used in accordance with all applicable instructions, to be free from original defects in material and workmanship for its lifetime. If the product should prove defective in material or workmanship within that period, Seller will repair or replace the product, in its sole discretion. Service under this Warranty can only be obtained by your delivering or shipping the product (with all shipping or delivery charges prepaid) to: TRIPP LITE; 1111 W. 35th Street, Chicago, IL 60609. Seller will pay return shipping charges. Visit www.triplite.com/support before sending any equipment back for repair.
THIS WARRANTY DOES NOT APPLY TO NORMAL WEAR OR TO DAMAGE RESULTING FROM ACCIDENT, MISUSE, ABUSE OR NEGLECT. SELLER MAKES NO EXPRESS WARRANTY OTHER THAN THE WARRANTY EXPRESSLY SET FORTH HEREIN. EXCEPT TO THE EXTENT PROHIBITED BY APPLICABLE LAW, ALL IMPLIED WARRANTYES, INCLUDING ALL WARRANTYES OF MERCHANTABILITY OR FITNESS, ARE LIMITED IN DURATION TO THE WARRANTY PERIOD SET FORTH ABOVE; AND THIS WARRANTY EXPRESSLY EXCUSES ALL INCIDENTAL AND CONSEQUENTIAL DAMAGES. (Some states do not allow limitations on how long an implied warranty lasts, and some states do not allow the exclusion or limitation of incidental or consequential damages, so the above limitations or exclusions may not apply to you. This Warranty gives you specific legal rights, and you may have other rights which vary from jurisdiction to jurisdiction.)
WARNING: The individual user should take care to determine prior to use whether this device is suitable, adequate or safe for the use intended. Since individual applications are subject to great variation, the manufacturer makes no representation or warranty as to the suitability or fitness of these devices for any specific application.
PRODUCT REGISTRATION
Visit www.triplite.com/warranty today to register your new Tripp Lite product. You'll be automatically entered into a drawing for a chance to win a FREE Tripp Lite product!*
- No purchase necessary. Void where prohibited. Some restrictions apply. See website for details.
Regulatory Compliance Identification Numbers
For the purpose of regulatory compliance certifications and identification, your Tripp Lite product has been assigned a unique series number. The series number can be found on the product nameplate label, along with all required approval markings and information. When requesting compliance information for this product, always refer to the series number. The series number should not be confused with the marketing name or model number of the product.
Tripp Lite has a policy of continuous improvement. Specifications are subject to change without notice.


1111 W. 35th Street, Chicago, IL 60609 USA • www.triplite.com/support
Modelos: PS120406, PS120410, PS120420, PS240406, PS2408, PS2408B, PS2408RA, PS240810, PS3612, PS3612B, PS3612RA, PS361206, PS361220, PS480806, PS4816, PS4816B, PS6020, PS7224, PS7224-20 y PS7224-20T
(AGIB7019) (AGIB7019)
1111 W. Street, Chicago, IL 60609 EE UU • www.triplite.com/support
1111 W. 35th Street, Chicago, IL 60609 USA • www.triplite.com/support
Montage mural (suite)

1111 W. 35th Street, Chicago, IL 60609 USA • www.triplite.com/support