
PureOxygen Allergen 300 - Air purifier ELECTROLUX - Free user manual and instructions
Find the device manual for free PureOxygen Allergen 300 ELECTROLUX in PDF.
| Product Type | Air Purifier |
| Brand | Electrolux |
| Compatible Models | ELAP15, ELAP30, ELAP40, ELAP45 |
| Power Supply | 120 V, 60 Hz |
| Maximum Power | Up to 110 W (depending on model) |
| Air Quality Sensor | Built-in, detects pollutants and adjusts fan speed |
| PlasmaWave™ Technology | Generates negative and positive ions to neutralize pollutants |
| Fan Speed | Silent, Low, High, Turbo |
| Operating Modes | Manual, Auto, Turbo |
| Filtration | 4 stages (ELAP15/30/40) or 5 stages (ELAP45) |
| Pre-filter Type | Charcoal with Cleancel™ antibacterial coating |
| HEPA Filter Type | HEPA captures 99.9% of particles 0.3 micron |
| Light Sensor | Adjusts indicator brightness and fan speed in Auto mode |
| Remote Control | Included for ELAP30/40/45, range 6 m |
| Air Quality Indicator | Indicates quality: white, orange, red |
| Filter Replacement Indicator | "Check Filter" indicator |
| Sensor Cleaning | Gentle vacuum every 3 months |
| HEPA Filter Replacement | Approximately 12 months (depending on usage) |
| Charcoal Pre-filter Replacement | Every 3 months (ELAP15/30) or 12 months (ELAP40/45) |
| Washable Filters | Model ELAP45: pre-filter, HEPA, and charcoal washable |
| Warranty | 1 year limited |
| Customer Service | 1-800-896-9756 (United States and Canada) |
Frequently Asked Questions - PureOxygen Allergen 300 ELECTROLUX
User questions about PureOxygen Allergen 300 ELECTROLUX
0 question about this device. Answer the ones you know or ask your own.
Ask a new question about this device
Download the instructions for your Air purifier in PDF format for free! Find your manual PureOxygen Allergen 300 - ELECTROLUX and take your electronic device back in hand. On this page are published all the documents necessary for the use of your device. PureOxygen Allergen 300 by ELECTROLUX.
USER MANUAL PureOxygen Allergen 300 ELECTROLUX
Important safeguards 2-3
Air cleaner components 4
Features 5-6
Control panel 6
Set-up .7-9
Filter replacement 10-11
Care and maintenance 11
Remote control 12
Replacement parts 12
Trouble shooting 13
Warranty information 14
French user's manual 15-27
Spanish user's manual 28-40
IMPORTANT SAFEGUARDS
When using electrical appliances, basic safety precautions should always be followed, including the following:
- Read all instructions.
- Do not use this appliance for other than its intended use.
- Close supervision is necessary when any appliance is used by or near children, or by others who may need supervision.
- To protect against electric shock, do not place cord, plugs, or appliance in water or other liquid.
- Do not use outdoors or on wet surfaces.
- Do not use in humid places such as bathrooms. If liquid enters the air cleaner, turn it off and have it inspected by an authorized Electrolux service center.
- Do not use near flammable gases.
- Do not place directly beneath a smoke detector, as this could reduce the smoke detector's sensitivity.
- Connect to a power supply only as directed on the rating plate.
- Do not operate any appliance with a damaged cord or plug. If the appliance malfunctions, or has been damaged in any manner, return the appliance to the nearest authorized
service center for inspection, repair, or adjustment.
- Do not pull or carry this equipment by its cord. Do not use cord as a handle, close a door on cord, or pull cord around sharp edges or corners. Do not let cord hang over the edge of a counter or table where it can be pulled on by children or tripped over unintentionally.
- Do not place the air cleaner near a heater.
- Keep cord away from heated surfaces.
- Do not put any object into openings. Do not use with any opening blocked; keep free of dust, lint, hair and anything that may reduce airflow.
- Do not put objects on top of or inside of unit, and do not block the grills.
- Do not use without filters in place.
- Do not unplug the power cord before air cleaner has cooled down.
- Unplug from outlet when not in use and before cleaning.
- Do not use detergent to clean the unit.
- Do not wash and reuse the HEPA filter or the High Deodorization Anti-Odor Carbon Filter (ELAP40) or the Carbon Pre-Filter (ELAP15 and ELAP30). These filters are non-washable.
IMPORTANT SAFEGUARDS
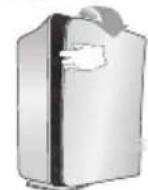
- Hold the handle on the back of the unit to transport. Do not hold by the front panel.
- WARNING: This product contains chemicals known to the State of California to cause cancer, birth defects or reproductive harm. WASH HANDS AFTER HANDLING.
Polarized plug
This appliance has a polarized plug (one blade is wider than the other). To reduce the risk of electric shock, this plug will fit in a polarized outlet only one way. If the plug does not fit fully into the outlet, reverse the plug and reinsert. If it still does not fit, contact a qualified electrician. Do not modify the plug in any way.

CAUTION
Short cord instructions: Your appliance is fitted with a short power supply cord as a safety precaution to prevent personal injury or property damage resulting from pulling, tripping or becoming entangled with a longer cord. Do not allow children to use or be near this appliance without close adult supervision. If an extension cord is used, (1) the marked electrical rating of the cord set or extension cord should be at least as great as the electrical rating of the appliance, and (2) the cord should be arranged so that it will not drape over the countertop or tabletop where it can be pulled on by children or tripped over.

WARNING
Electrical power: If the electric circuit is overloaded with other appliances, your appliance may not operate properly. It should be operated on a separate electric circuit from other appliances.
SAVE THESE INSTRUCTIONS
Consumer Safety Information
THIS UNIT IS FOR HOUSEHOLD USE ONLY
PRODUCT SPECIFICATIONS
Model numbers .ELAP15D7PW, ELAP30D7PW, ELAP40D8PW, ELAP45D8PW
Power supply 120V 60Hz
Motor . ELAP15D7PW: BLDC Motor, max power 40W
ELAP30D7PW: BLDC Motor, max power 60W
ELAP40D8PW: BLDC Motor, max power 110W
ELAP45D8PW: BLDC Motor, max power 110W
Dimensions. ELAP15D7PW: 19" H x 14" W x 9" D
ELAP30D7PW: 19'' H × 16'' W × 10'' D
ELAP40D8PW: 22" H x 19" W x 12" D
ELAP45D8PW: 22" H x 19" W x 12" D
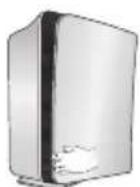
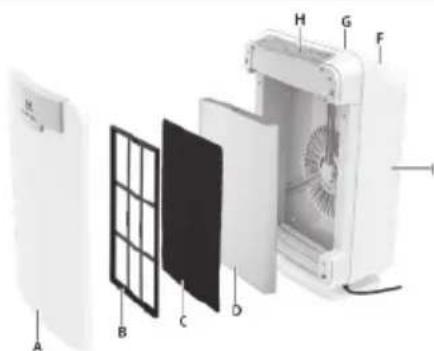
AIR CLEANER COMPONENTS
ELAP15
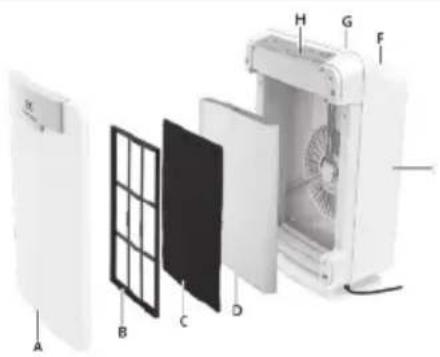
A. Front panel
B. Filter frame
C. Carbon Pre-Filter (treated with anti-bacterial coating Cleancel®)
D. HEPA filter
E. Main body
F. PlasmaWave® fan
G. Air Outlet
H. Control Panel
ELAP30
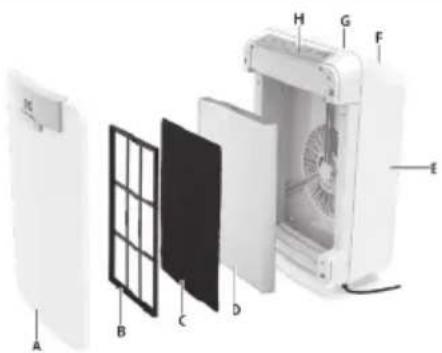
A. Front panel
B. Filter frame
C. Carbon Pre-Filter (treated with anti-bacterial coating Cleancel®)
D. HEPA filter
E. Main body
F. PlasmaWave® fan
G. Air outlet
H. Control panel
ELAP40
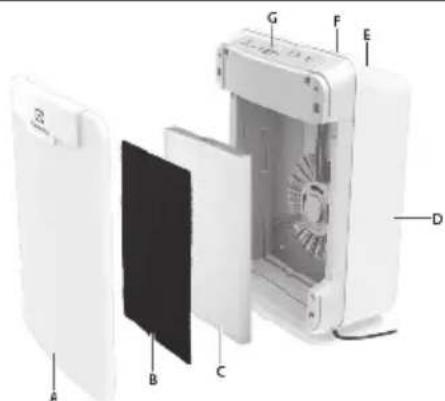
A. Front panel
B. High Deodorization Anti-Odor Carbon Filter (treated with anti-bacterial coating Cleancel®)
C. HEPA filter
D. Main body
E PlasmaWave® fan
F. Air outlet
G. Control panel
ELAP45
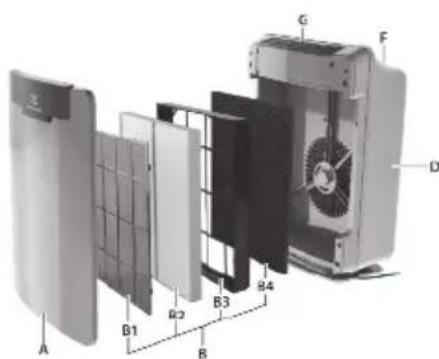
A. Front panel
B. Filter Cassette consists of the following:
B1. Washable Cleancel® Pre-Filter (treated with anti-bacterial coating Cleancel®)
B2. Washable HEPA filter set
B3.Filter frame
B4. Washable Anti-Odor Carbon Filter
D. Main body
E. PlasmaWave® fan
F. Air outlet
G. Control panel
ELAP15, ELAP30, ELAP40, ELAP45
CAUTION: Fully assemble air filter before using (See air cleaner set-up)
Note: Features vary according to model.
Quiet operation
With a four-speed fan with quiet operation that is ideal for nighttime.
Air quality sensor
Built with an air quality sensor that detects the presence of various pollutants in the air.
Light sensor
The built-in light sensor detects when the room is dark and automatically dims the lights of the control panel and lowers the fan speed for quiet and energy-efficient operation. Once the room is dim, the fan does not increase speed despite what the air quality sensor detects.
Automatic air cleaning (AUTO mode)
The air quality sensor detects the amount of impurities in the air and automatically adjusts the fan speed accordingly to keep your air purified.
ELAP15, ELAP30, ELAP40 - 4 stage filtration
The Carbon Pre-Filter (High Deodorization Anti-Odor Carbon Filter for ELAP40) absorbs gases and odors such as those generated by cigarette smoke, pets, ammonia or cooking. For best performance, replace every 3 months (every 12 months for High Deodorization Anti-Odor Carbon Filter). The Cleancel® anti-microbial coating prevents the growth of micro organisms.
The HEPA filter captures 99.9% of particles and impurities as small as 0.3 microns, including smoke, dust, pollen, and other allergens. Replace when the CHECK FILTER indicator light turns on. PlasmaWave Technology uses positive and negative ions to clean the air of harmful pollutants breaking them down and converting them to naturally occurring oxygen and hydrogen.
ELAP45 - 5 stage filtration
The first stage of filtration consists of a pre-filter coated with Cleancel. The Cleancel anti-microbial coating prevents the growth of micro organisms. The activated Anti-Odor Carbon Filter specializes in absorbing odors such as those caused by cigarettes, pets, and cooking. The Anti-Odor Carbon Filter will also trap gases such as ammonia and formaldehyde. The HEPA filter set captures 99.9% of particles and impurities as small as 0.3 microns, including smoke, dust, pollen, and other allergens. PlasmaWave Technology uses positive and negative ions to clean the air of harmful pollutants breaking them down and converting them to naturally occurring oxygen and hydrogen.
The Cleancel® Pre-Filter set, HEPA filter and Anti-Odor Carbon Filter are washable.
CONTROL PANEL
ELAP15, ELAP30, ELAP40, ELAP45

I. Air Quality Sensor: Automatically monitors the air quality level and adjusts fan speed accordingly when in "AUTO."
J. Reset: Resets the "Check Filter" indicator light.
K. Check Filter Indicator: Signals when to replace filters.
L. Auto: Automatically adjusts the fan speed according to the amount of impurities.
M. PlasmaWave: Shows that the technology is active.
N. Air Quality Indicator: Lights indicate the quality of the air.
O. Fan Speed Indicator: Shows current fan speed setting (Turbo / High / Low / Quiet).
P. Fan Speed Selector: Adjusts fan speed setting (Turbo / High / Low / Quiet).
Q. On-Off: Turns the unit "On" and "Off."
R. Light Sensor: Dims the control panel lights and sets the fan speed to "Quiet" when the room is dark (only works when in "AUTO").
ELAP15, ELAP30
Place the unit away from drafty areas, as the sensors may not react accurately. Do not place near curtains, furniture, or other items that might inhibit air flow. Place the unit on a stable surface.

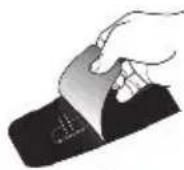
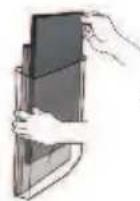
- Remove protective film from the control panel.
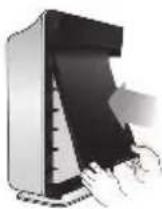
- Remove the front panel by pulling gently from the top portion of the panel.
- Remove the HEPA filter and the Carbon Pre-Filter from the plastic wrapper.
- Install the HEPA filter with the arrow showing "air flow" pointing in toward the back of the air cleaner; the white tabs at the top and bottom of the HEPA filter will point out to the front of the unit.
- Install the Carbon Pre-Filter in front of the HEPA filter.
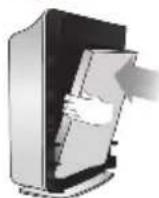
- Replace the front panel by hooking the panel on the bottom of the unit.
- Plug the power cord into a wall outlet.
- Press and hold the POWER button until a short "beep" sounds.
- The air cleaner will take 3-4 minutes to calibrate the air quality sensor. During this time the sensor lights will flash on and off. Once the sensor has calibrated, the lights will be on "AUTO" mode.
ELAP40
Place the unit away from drafty areas, as the sensors may not react accurately. Do not place near curtains, furniture, or other items that might inhibit air flow. Place the unit on a stable surface.
- Remove protective film from the control panel.
- Remove the front panel by pulling gently from the top portion of the panel.

- Remove the HEPA filter and the High Deodorization Anti-Odor Carbon Filter from the plastic wrapper.
- Install the HEPA filter with the arrow showing "air flow" pointing in toward the back of the air cleaner; the white tabs at the top and bottom of the HEPA filter will point out to the front of the unit.
- Install the High Deodorization Anti-Odor Carbon Filter in front of the HEPA filter.
-
Replace the front panel by hooking the panel on the bottom of the unit.
-
Plug the power cord into a wall outlet.
-
Press and hold the POWER button until a short "beep" sounds.
-
The air cleaner will take 3-4 minutes to calibrate the air quality sensor. During this time the sensor lights will flash on and off. Once the sensor has calibrated, the lights will be on "AUTO" mode.
ELAP45
Place the unit away from drafty areas, as the sensors may not react accurately. Do not place near curtains, furniture, or other items that might inhibit air flow. Place the unit on a stable surface.

- Remove protective film from the control panel.
- Remove the front panel by pulling gently from the top portion of the panel.
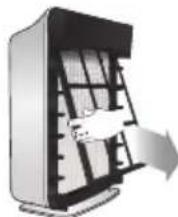
- Remove the Filter Cassette and remove the plastic wrapper from it.

- Install the Filter Cassette by gently sliding the entire cassette into the air cleaner. It should fit perfectly.
- Replace the front panel by hooking the panel on the bottom of the unit.
- Plug the power cord into a wall outlet.
- Press and hold the POWER button until a short "beep" sounds.
- The air cleaner will take 3-4 minutes to calibrate the air quality sensor. During this time the sensor lights will flash on and off. Once the sensor has calibrated, the lights will be on "AUTO" mode.
ELAP15, ELAP30
There are two separate filters: Carbon Pre-Filter and HEPA filter.
- The Check Filter indicator will signal when to replace the HEPA filter. The replacement period will vary depending on the hours of usage, air quality, and location of the unit. However, in most cases of normal use, the filter will need to be replaced annually.
- For best performance, change the Carbon Pre-Filter every three months.
The filters should be disposed off when changed. Do not wash and reuse the HEPA filter or the Carbon Pre-Filter as they will not work effectively.
CAUTION: Turn off the air cleaner and unplug the electrical cord before performing any maintenance.
Carbon Pre-Filter replacement
- Turn off the air cleaner and unplug the electrical cord.
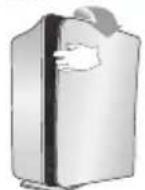
- Remove the front panel by pulling gently from the lower portion of the panel. Do not force, the panel should remove easily.
- Remove the Carbon Pre-Filter by gently pulling out from the bottom and down from the top.
- Remove the Carbon Pre-Filter and dispose of it.
- Remove a replacement Carbon Pre-Filter from the resealable plastic bag and reseal to maintain the freshness of the remaining filter.
- Install the Carbon Pre-Filter.
ELAP40
There are two separate filters: High Deodorization Anti-Odor Carbon Filter and HEPA filter.
- The Check Filter indicator will signal when to replace the HEPA filter. The replacement period will vary depending on the hours of usage, air quality, and location of the unit. However, in most cases of normal use, the filter will need to be replaced annually.
- For best performance, change the High Deodorization Anti-Odor Carbon Filter every 12 months. The filters should be disposed off when changed. Do not wash and reuse the HEPA filter or the High Deodorization Anti-Odor Carbon Filter as they will not work effectively.
CAUTION: Turn off the air cleaner and unplug the electrical cord before performing any maintenance.
High Deodorization Anti-Odor Carbon Filter replacement
- Turn off the air cleaner and unplug the electrical cord.
- Remove the front panel by pulling gently from the lower portion of the panel. Do not force, the panel should remove easily.
- Remove the High Deodorization AntiOdor Carbon Filter by gently pulling out from the bottom and down from the top.
- Remove the High Deodorization AntiOdor Carbon Filter and dispose of it.
- Remove a replacement High Deodorization Anti-Odor Carbon Filter from its plastic bag.
- Install the High Deodorization Anti-Odor Carbon Filter.
ELAP45
CAUTION: Turn off the air cleaner and unplug the electrical cord before performing any maintenance.
| Filter Service Life Cleaning Cycle How to | ||
| Washable Cleancel® Pre-Filter | 12 months | Every 3 months |
| Washable HEPA Filter set | 12 months | Every 3 months |
| Washable Anti-Odor Carbon Filter | 12 months | Every 3 months |
| Filter Cassette | 12 months | -- |
The Check Filter indicator will signal when to replace the Filter Cassette. The replacement period will vary depending on the hours of usage, air quality, and location of the unit. However, in most cases of normal use the filter will need to be replaced annually. This Filter Cassette should be disposed of when changed.
Filter Cassette replacement
- Turn off the air cleaner and unplug the electrical cord.
- Remove the front panel by pulling gently from the top portion of the panel.
- Remove the Filter Cassette by gently pulling out from the bottom and down from the top.
-
Remove all the filters from the plastic frame and dispose of the filters only. Keep the frame.
-
Remove the replacement filters from the plastic bag and replace them.
- Replace the front panel by hooking the panel on the bottom of the unit.
- Plug in air cleaner and press POWER button until short "beep" sounds.
- Press the RESET FILTER button by gently inserting a paperclip into the
RESET FILTER hole on the control panel. The light will flash 5 times before a "beep" sounds to indicate the filter has been reset.
CARE AND MAINTENANCE
ELAP15, ELAP30, ELAP40, ELAP45
CAUTION: Turn off the air cleaner and unplug the electrical cord before performing any maintenance.
- Clean unit as necessary by wiping with a dry, soft cloth; for stubborn stains, use a warm, damp cloth.
- Do not use volatile fluids such as benzene, paint thinner or scouring powder, as they may damage the surface. Keep the unit dry.
- Lightly vacuum air quality sensor every three months.
ELAP30, ELAP40, ELAP45
Operate the remote control facing the air cleaner. Operate within 18 feet / 6 metres of the air cleaner. The remote control has a separate wall-mountable storage cradle that can be conveniently attached to any wall using a screw.
S. POWER: Use the power button to turn the power on and off. A short "beep" will sound when the unit turns on and off.
T. AUTO mode: Use the AUTO button to put air cleaner in AUTO mode.
U. FAN SPEED: By pressing up or down, the unit will change fan speeds and enter into manual mode.

V. TURBO: Use this button to switch from automatic operation and start the maximum amount of room air cleaning and air movement. It will remain in Turbo speed until changed into Auto or manual mode.
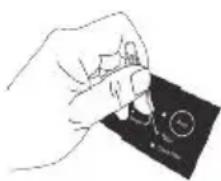
Battery replacement
-
Squeeze tabs of battery cover and at the same time pull cover out of remote.
-
Insert battery as shown and close battery cover.
-
Always use 3V lithium battery CR2025. Incorrect battery usage may cause battery fluid leakage and/or damage.
| Electrolux replacement parts | Fits models Part number | |
| 1 HEPA Filter and 4 Carbon Pre-Filters | ELAP15 | EL041 |
| 1 Filter Frame | ELAP15 | 68691 |
| 1 HEPA Filter and 4 Carbon Pre-Filters | ELAP30 | EL042 |
| 1 Filter Frame | ELAP30 | 68692 |
| 1 HEPA Filter and 1 High Deodorization Anti-Odor Carbon Filter | ELAP40, ELAP45 | EL043 |
| 1 Washable HEPA Filter Set, 1 Washable Anti-Odor Carbon Filter and 1 Cleancel® Pre-Filter | ELAP40, ELAP45 | EL044 |
| 1 Filter Frame | ELAP40, ELAP45 | 68694 |
To order replacement parts, visit us online at www.electrolux.com or call 1-800-896-9756.
DISPOSAL

Recycle the materials with the recycle symbol. Put the packaging in
applicable containers to recycle it. Help protect the environment and human health and to recycle waste of electrical and electronic appliances.
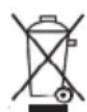
Do not dispose appliances marked with this symbol with household waste.
Return the product to your local
recycling facility or contact your municipal office.
ELAP15, ELAP30, ELAP40, ELAP45
| Occurrence | Possible causes / solution |
| Can I wash my filter? | No, the filters that come with the unit will be ruined by water. Replace with new washable filter.(ELAP45 filters are washable.) |
| Can I vacuum my filter? | No, vacuuming will spread the dust back into the air. Replace with new filter.(ELAP45 Washable Pre-Filter can be cleaned with a vacuum cleaner or soft brush.) |
| There is an odor coming from my new unit. | The unit has been concealed in a tightly wrapped package of corrugated cardboard and plastic. It may give off an odor; this should wear off in several days. |
| Will this clean a bigger area than what it is rated for? | CADR ratings are provided from a controlled testing environment, if that environment changes, it can affect the performance. If you have a slightly larger room than what the CADR rating is, it will help improve the air, but take longer. |
| Where should I place the unit? | Allow proper air circulation around the sides and in front of the unit. If there are doors or hallways it may reduce the airflow. |
| The AIR QUALITY light is orange or red, but the air seems clean. | • Clear the sensor with a vacuum cleaner, as it may be blocked or clogged. • Sometimes a can of compressed air may unclog the dust in the sensor. |
| You can see dust in the air or on my furniture. | The unit will capture most dust and particles, however with opening doors, windows, central HVAC etc., there may still be some level of dust that you can see. |
| There is nothing holding the filters in place. | The filters are meant to rest inside the unit. Once the unit is turned on, the force of air pulled through the machine will create a tight seal of the filters. |
| I can hear revving of the fan motor. | This is normal, especially at night when all environmental sounds are quiet, you may hear the motor running in repetition. |
| The unit has stopped removing odors effectively, or is emitting an odor. | • Make sure the air quality sensor is not blocked or clogged. • Move the unit closer to the offending odors. • Replace filters more frequently. They may have reached their capacity to absorb pollutants. |
| The CHECK FILTER indicator remains lit after replacing the HEPA filter. | Press the RESET FILTER button by gently inserting a paper-clip into the RESET FILTER button hole. Hold for 3-5 seconds until a “beep” sounds to indicate the unit has been reset. |
| Can I turn off the sleep mode? | No, but you can manually push to the fan speed you prefer which will stay at that speed until you change it. |
| Unit makes a ticking sound. | This is due to PlasmaWave® technology, it may come and go, but as long as the PlasmaWave® light is on, the function is working. |
| The remote control does not work. | • Make sure the remote control battery is inserted correctly. • Replace a worn-out battery. • Make sure that the remote control has a clear line of sight to the air cleaner. |
| The air quality light is white, but there is still dust/odor. | • Make sure the sensor is not blocked or clogged. • Replace the filter. |
| The unit is running on high all the time. | • Clear the sensor with a vacuum cleaner, as it may be blocked or clogged. • Sometimes a can of compressed air may unclog the dust in the sensor. |
| The CHECK FILTER indicator remains lit after replacing the Filter Cassette. | Press the RESET FILTER button by gently inserting a paper-clip into the RESET FILTER button hole. Hold for 3-5 seconds until a “beep” sounds to indicate the unit has been reset. |
SMALL DOMESTIC APPLIANCE WARRANTY
Your appliance is covered by a one year limited warranty. For one year from your original date of purchase, Electrolux will repair or replace the appliance or parts, at Electrolux's option, that prove to be defective in materials or workmanship when the appliance is installed, used, and maintained in accordance with the provided instructions. Labor and all costs associated with returning the appliance or parts to us and our returning the appliance or parts to you are excluded under this warranty. As a matter of warranty policy, Electrolux will not refund the consumer's purchase price. If a product or part under warranty is no longer available, Electrolux will replace with a comparable product of equal or greater value.
Exclusions: This warranty does not cover the following:
1 Products with original serial numbers that have been removed, altered or cannot be readily determined.
2 Products that have been transferred from the original owner to another party or removed outside the USA or Canada.
3 Rust on the interior or exterior of the unit.
4 Products purchased "as-is".
5 Food loss due to product failure.
6 Products used in a commercial setting or anything but single family household use.
7 Labor or service visits under any circumstance.
8 Glass parts or containers, filters, non-stick surfaces.
9 Ordinary wear and tear.
10 Damages caused by improper use, installation, or service; use of parts other than genuine Electrolux parts; negligence; abuse; misuse; inadequate or excessive power supply; accidents; fires; or acts of God.
Keep your receipt or some other appropriate payment record to establish the warranty period. Should warranty service be required, you must show proof of purchase.
If you need service:
To obtain warranty service in the USA or Canada, call 1-800-896-9756. Please have the model number, serial number, and date of purchase information available.
DISCLAIMER OF IMPLIED WARRANTY; LIMITATION OF REMEDIES:
CUSTOMER'S SOLE AND EXCLUSIVE REMEDY UNDER THIS LIMITED WARRANTY SHALL BE, AT ELECTROLUX'S SOLE DISCRETION, PRODUCT OR PART REPAIR OR REPLACEMENT AS PROVIDED HEREIN. CLAIMS BASED ON IMPLIED WARRANTYES, INCLUDING WARRANTYES OF MERCHANTABILITY OR FITNESS FOR A PARTICULAR PURPOSE, ARE LIMITED TO ONE YEAR OR THE SHORTEST PERIOD ALLOWED BY LAW. ELECTROLUX SHALL NOT BE LIABLE FOR CONSEQUENTIAL OR INCIDENTAL DAMAGES SUCH AS PROPERTY DAMAGE AND INCIDENTAL EXPENSES RESULTING FROM ANY BREACH OF THIS WRITTEN LIMITED WARRANTY OR ANY IMPLIED WARRANTY. SOME STATES AND PROVINCES DO NOT ALLOW THE EXCLUSION OR LIMITATION OF INCIDENTAL OR CONSEQUENTIAL DAMAGES, OR LIMITATIONS ON THE DURATION OF IMPLIED WARRANTYES, SO THESE LIMITATIONS OR EXCLUSIONS MAY NOT APPLY TO YOU. THIS WRITTEN WARRANTY GIVES YOU SPECIFIC LEGAL RIGHTS. YOU MAY ALSO HAVE OTHER RIGHTS THAT VARY FROM STATE TO STATE.
This warranty only applies to products purchased in the USA and CANADA. In the USA, your appliance is warranted by Electrolux Home Care Products, Inc. In Canada, your appliance is warranted by Electrolux Home Care Products Canada Inc. Electrolux authorizes no person to change or add to any obligations under this warranty. Product features or specifications as described or illustrated are subject to change without notice.
USA
1-800-896-9756
Electrolux Home Care Products, Inc.
10200 David Taylor Drive
Charlotte, NC 28262
CANADA
1-800-896-9756
Electrolux Home Care Products Canada Inc.
5855 Terry Fox Way
Mississauga, ON, Canada L5V 3E4
Thinking of you
Electrolux

AIR CLEANER / PURIFICATEUR D'AIR / PURIFICADOR DE AIRE
Modelos ELAP15, ELAP30, ELAP40, ELAP45
www.electroluxappliances.com/Owner-Support/Product-Registration
TABLE DES MATIÈRES
Précautions importantes 15-16
Dimensions. ELAP15D7PW: 19" H x 14" W x 9" D
ELAP30D7PW: 19^ × 16^ × 10^
ELAP40D8PW: 22" H x 19" W x 12" D
ELAP45D8PW: 22^ × 19^ × 12^
ÉléMENTS DU PURIFICATEUR D'AIR
ELAP15
Electrolux Home Care Products, Inc.
10200 David Taylor Drive
Charlotte, NC 28262
Canada
1-800-896-9756
Electrolux Home Care Products Canada Inc.
5855 Terry Fox Way
Mississauga, ON, Canada L5V 3E4
www.electroluxappliances.com/Owner-Support/Product-Registration
INDICE
ISalvaguardas importantes 28-29
Electrolux Home Care Products, Inc.
10200 David Taylor Drive
Charlotte, NC 28262
CANADÁ
1-800-896-9756
Electrolux Home Care Products Canada Inc.
5855 Terry Fox Way
Mississauga, ON, Canada L5V 3E4