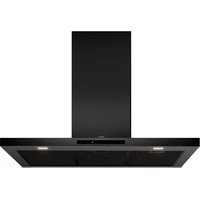
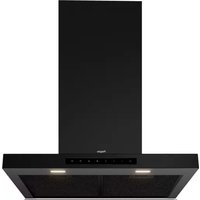
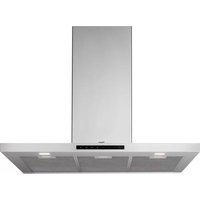
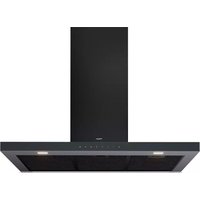
ISWA0960WIT - Basket Pelgrim - Free user manual and instructions
Find the device manual for free ISWA0960WIT Pelgrim in PDF.

User questions about ISWA0960WIT Pelgrim
0 question about this device. Answer the ones you know or ask your own.
Ask a new question about this device
Download the instructions for your Basket in PDF format for free! Find your manual ISWA0960WIT - Pelgrim and take your electronic device back in hand. On this page are published all the documents necessary for the use of your device. ISWA0960WIT by Pelgrim.
USER MANUAL ISWA0960WIT Pelgrim
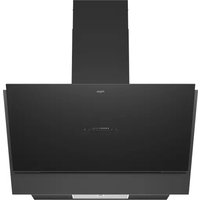
Introduction Congratulations on choosing this Pelgrim cooker hood. This product is designed with simple operation and optimum comfort in mind. This extractor hood has AutoAir functionality. Via a hob with AutoAir function, the cooker hood can then be controlled in 3 different ways: manually, semi-automatically, and fully automatically. Choose the way that suits you best. Of course, you can always adjust the settings yourself. These instructions for use explain how you can make best use of this appliance. These instructions contain information about the operation of the appliance and background information that may be of help to you during its use. First read the safety instructions before using the appliance! Read these instructions thoroughly before you first use the appliance, and keep the instructions for future use. You can find the most recent version of the instructions for use on our website.EN 5 OPERATION Control panel The additional AutoAir functions that are available if a connection has been made with a hob, are described in a separate chapter (see ‘Operation with a connected hob’). A B C D E A. Lighting button and timer function B. On/Off button (Speed 1) C. Speed button 2 and Clean Air function D. Speed button 3 and intensive setting (Boost) E. Automatic mode button Switching the fan on and off
1. Select the desired extraction setting by pressing the corresponding button.
▷ The cooker hood switches on. ▷ The Indicator light on the button shows which setting has been selected.
2. Shortly press and release the on/off button.
▷ The cooker hood switches off. Switching the intensive setting (Boost) on and off The cooker hood is switched on.
1. Press and hold speed button 3 for three seconds.
▷ The intensive setting is switched on. ▷ The Indicator light on the button is flashing. ▷ The intensive setting switches off automatically after 6 minutes. The previous extraction setting will be reactivated after this period.
2. Press the on/off button or any other speed button to stop the intensive setting at any time.EN 6
OPERATION Switching the lighting on and off
1. Shortly press and release the lighting button.
▷ The lighting switches on.
2. To turn off the lighting, shortly press and release the lighting button again.
When a connected hob is switched on, the lighting of the cooker hood always switches on automatically. You can continuously adjust the brightness of the hood via the hob. When switching off a connected hob, the lighting remains on. Manually switch off the lighting with the lighting key on your AutoAir hob, with your remote control or via your hood. Switching on the Clean Air function
1. Press and hold speed button 2 for three seconds.
▷ The Clean air function is activated. ▷ The cooker hood will be switched on for 10 minutes every hour for the next 24 hours. ▷ The indicator light on the button flashes during extraction. ▷ The cooker hood switches off after 10 minutes, and the Indicator light continues to flash. ▷ The Clean Air function cannot be used when the intensive setting has been selected. Switching on the timer function
1. Select the desired extraction setting by pressing the corresponding button.
2. Press and hold the lighting button for three seconds.
▷ The timer is switched on. ▷ The indicator light on the speed button flashes during extraction. ▷ The cooker hood stays switched on at the set speed for 30 minutes. The cooker hood then switches off. ▷ The timer function cannot be used when the intensive setting or the Clean Air function has been selected.EN 7 OPERATION Grease filter indication The indicator lights on the buttons 2 and 3 are lit continuously after the extractor hood has been in use for 100 hours. This is to indicate that the grease filter needs to be cleaned. Reset of the grease filter indication The cooker hood is switched off.
1. Press and hold speed button 3 for three seconds
▷ All indicator lights will flash three times to confirm that the setting has been reset. Carbon filter indication The indicator lights on the buttons 2 and 3 will flashs after 200 hours use of the cooker hood (when the carbon filter indication has been activated), to warn that the carbon filter must be replaced. Activate/deactivate the carbon filter indication
1. Switch on the lighting.
2. Activate the carbon filter indication by pressing and holding the on/off button for three
seconds. ▷ All indicator lights will flash two times to confirm that the setting has been activated.
3. Deactivate the carbon filter indication by pressing and holding the on/off button for three
seconds. ▷ All indicator lights will flash one time to confirm that the setting has been deactivated. Reset of the carbon filter indication The cooker hood is switched off.
1. Press and hold speed button 3 for three seconds
▷ All indicator lights will flash three times to confirm that the setting has been reset.EN 8
OPERATION WITH THE REMOTE CONTROL
Remote control The remote control replaces the functions of the control panel. The symbols that are shown are generic. Your appliance may have different symbols. The additional AutoAir functions that are available if a connection has been made with a hob, are described in a separate chapter (see ‘Operation with a connected hob’).
A. LED signal (flashing red; low battery level) B. On/off button (Speed 1) C. Plus button D. Minus button E. Intensive button/Automatic mode F. Lighting button G. Timer button/Clean Air function H. Bluetooth buttonEN 9 Making the connection between remote control and cooker hood Making a connection
1. Turn off the hood and the lighting.
2. Press and hold the plus button on the remote control for five seconds.
▷ The indicator lights on the on/off button and speed button 2 of the cooker hood will flash simultaneously for a maximum of two minutes.
3. The connection is successful when the indicator lights on the on/off button and speed
button 2 of the cooker hood are illuminated continuously for two seconds. If the indicator lights on the on/off button and speed button 2 of the cooker hood are no longer illuminated within two minutes, the connection was not successful. Repeat the procedure. If necessary, clear the hood’s memory (see “Disconnecting”). Disconnecting
1. Turn off the hood and the lighting.
2. Press and hold the intensive button and lighting button simultaneously on the remote control
for five seconds. ▷ The indicator lights on the on/off button and speed button 2 of the cooker hood will flash five times simultaneously. ▷ The remote control is no longer connected. Activating bluetooth
1. Press and hold the lighting button and bluetooth button on the remote control
simultaneously for five seconds. ▷ The green LED signal flashes four times. ▷ Bluetooth is activated. Activating the remote control
1. Press and hold the on/off button and lighting button on the remote control simultaneously
for five seconds. ▷ The green LED signal flashes twice. ▷ The remote control is activated.
OPERATION WITH THE REMOTE CONTROLEN 10
Switching the fan on and off
1. Shortly press and release the on/off button.
▷ The cooker hood switches on. ▷ The indicator light on the button of the cooker hood shows which setting has been selected.
2. Select the desired extraction setting by pressing the plus button or minus button.
3. Shortly press and release the on/off button.
▷ The cooker hood switches off. Switching the intensive setting (Boost) on and off The cooker hood is switched on.
1. Shortly press and release the intensive button.
▷ The intensive setting is switched on. ▷ The indicator light on the button of the cooker hood is flashing. ▷ The intensive setting switches off automatically after 6 minutes. The previous extraction setting will be reactivated after this period.
2. Press the on/off button or intensive button to stop the intensive setting at any time.
Switching the lighting on and off
1. Shortly press the lighting button.
▷ The lighting switches on at maximum strength.
2. Touch and hold the lighting button for approximately 3 seconds to dim the lighting strength.
3. To set the lighting back to maximum strength, shortly touch and release the lighting button.
4. To turn off the lighting when the light is dimmed, touch and hold the lighting button for
approximately 3 seconds.
5. To turn off the lighting when the light is at maximum strength, shortly touch and release the
lighting button. When a connected hob is switched on, the lighting of the cooker hood always switches on automatically. You can continuously adjust the brightness of the hood via the hob. When switching off a connected hob, the lighting remains on. Manually switch off the lighting with the lighting key on your AutoAir hob, with your remote control or via your hood.
1. Press and hold the timer button for three seconds.
▷ The Clean air function is activated. ▷ The cooker hood will be switched on for 10 minutes every hour for the next 24 hours. ▷ The indicator light on the button of the cooker hood flashes during extraction. ▷ The cooker hood switches off after 10 minutes, and the indicator light on the button of the cooker hood continues to flash. ▷ The Clean Air function cannot be used when the intensive setting has been selected. Switching on the timer function
1. Select the desired extraction setting.
2. Shortly press the timer button.
▷ The timer is switched on. ▷ The indicator light on the speed button of the cooker hood flashes during extraction. ▷ The cooker hood stays switched on at the set speed for 30 minutes. The cooker hood then switches off. ▷ During these 30 minutes, you can adjust the extractor setting in the meantime. ▷ The timer function cannot be used when the intensive setting or the Clean Air function has been selected.EN 12
OPERATION WITH A CONNECTED HOB
Making the connection between cooker hood and hob The connection to an AutoAir hob is not active by default. First the connection to the hob must be activated. At the same time, a setting must also be made on the hob; see the hob manual for this. Check our website for the full range of hobs that can be connected to your cooker hood. Making a connection
1. Turn off the hood and the lighting.
2. Press and hold the lighting button on the hood for three seconds, or press and hold the plus
button on the remote control for five seconds. ▷ The indicator lights on the on/off button and speed button 2 of the cooker hood will flash simultaneously for a maximum of two minutes. ▷ On your hob, activate the pairing mode in the user menu (see the hob manual). The connection to the hob is established.
3. The connection is successful when the indicator lights on the on/off button and speed
button 2 of the cooker hood are illuminated continuously for two seconds. If the indicator lights on the on/off button and speed button 2 of the cooker hood are no longer illuminated within two minutes, the connection was not successful. Repeat the procedure. If necessary, clear the hood’s memory (see “Disconnecting”). Disconnecting
1. Turn off the hood and the lighting.
2. Press and hold the on/off button of the cooker hood for three seconds, or press and hold
the intensive button and lighting button simultaneously on the remote control for five seconds. ▷ The indicator lights on the on/off button and speed button 2 of the cooker hood will flash five times simultaneously. ▷ The hob is no longer connected.EN 13
OPERATION WITH A CONNECTED HOB
Automatic mode The hob can control the extraction of the cooker hood in 3 different ways: manually, semi- automatically, and fully automatically. The automatic mode is for the user who wants the extraction level to be automatically adjusted to the cooking intensity. Extraction starts automatically as soon as a cooking zone is active and the extraction level depends on how the hob is used. When the hob is switched off, the extraction continues for 10 minutes and then stops automatically. In automatic mode, the hob can only switch on speed 1 or 2 for this hood. Switching on/off the automatic mode on the cooker hood The indicator light for the automatic mode on the cooker hood only lights up when the hob is active and set to automatic mode. The hood is switched on and on the hob the automatic mode is active.
1. Shortly press and release the automatic mode button of the cooker hood, or press and hold
the intensive button on the remote control for three seconds. ▷ The indicator light on the automatic mode button of the cooker hood iluminates; the automatic mode on your cooker hood is now switched on.
2. Shortly press and release the automatic mode button of the cooker hood, or press and hold
the intensive button on the remote control for three seconds. ▷ The indicator light on the automatic mode button of the cooker hood is no longer iluminated; the automatic mode on your cooker hood is switched off. Activated intensive setting on the hob If the intensive setting for the hood has been set on the hob, it will automatically switch back to speed 3 after six minutes. Activated timer function on the hob If the timer for the hood is set on the hob, the hood will continue to operate at speed 1 (according to the countdown time that is displayed) after switching off the hob until the set time has elapsed.EN 14 Lighting When a connected hob is switched on, the lighting of the cooker hood always switches on automatically. You can continuously adjust the brightness of the hood via the hob. When you use the hob again (after you have switched the hob off) , the lighting comes on at the preset brightness. When switching off a connected hob, the lighting remains on. Manually switch off the lighting with the lighting key on your AutoAir hob, with your remote control or via your hood.
OPERATION WITH A CONNECTED HOBEN 15
MAINTENANCE Cleaning Attention! Before performing any maintenance operation, isolate the hood from the electrical supply by switching off at the connector and removing the connector fuse. Or if the appliance has been connected through a plug and socket, then the plug must be removed from the socket. The cooker hood should be cleaned regularly (at least with the same frequency with which you carry out maintenance of the fat filters) internally and externally. Do not use abrasive products. Do not use alcohol! Attention! Failure to carry out the basic cleaning recommendations of the cooker hood and replacement of the filters may cause fire risks. Therefore, we recommend oserving these instructions. The manufacturer declines all responsibility for any damage to the motor or any fire damage linked to inappropriate maintenance or failure to observe the above safety recommendations. Cooker hood Clean the cooker hood with soapy water and a soft cloth. Then wipe with clean water to rinse. Do not use aggressive cleaning agents such as soda. The cooker hood paintwork will stay looking nice if you wax it occasionally.. Stainless steel canopy hoods Do not use any sort of scourer. Treat with a stainless steel care product and polish with the structure of the stainless steel. Metal grease filters These must be cleaned once a month (or when the filter saturation indication system – if envisaged on the model in possession – indicates this necessity) using non aggressive detergents, either by hand or in the dishwasher, which must be set to a low temperature and a short cycle. The openings must be placed downwards to let the water run out of the filters. The cleaning agents will make the aluminium filter turn dull, this is normal.EN 16 MAINTENANCE Removing the grease filters Switch off the electricity! Remove the plug from the socket or switch the electricity off at the mains. Open the panel and pull the special handle to remove the filter. Replacing the carbon filter The carbon filter must always be used if the cooker hood is not ducted. Depending on your own situation, a recirculation facility has been installed. Follow the instruction applicable to this facility. LED lighting LED lighting may only be replaced by a qualified technician. The lamp in this household appliance is intended exclusively for lighting this appliance. The lamp is not suitable for lighting a household area.EN 17 ENVIRONMENTAL ASPECTS Disposal of packaging and appliance This appliance is made from sustainable materials. This appliance must be disposed of in a responsible manner at the end of its service life. Contact the local authorities for information about the method. The packaging of the appliance is recyclable. The following materials may have been used:
- CFC-free polystyrene (hard PS foam). These materials must be disposed of in a responsible manner and in accordance with government regulations. The appliance is marked with a crossed out wheeled bin symbol to draw your attention to the requirement for the separate disposal of domestic electrical appliances. This means that the appliance may not be disposed of in unsorted household waste at the end of its service life. The appliance must be taken to a special municipal waste processing location for separated waste or to a dealer who provides this service. Collecting and disposing of domestic appliances separately avoids detrimental consequences for humans and the environment. This ensures that the materials used to make the appliance can be recovered and that substantial savings in the use of energy and raw materials can be achieved. Declaration of conformity We hereby declare that our products conform to the applicable European Directives, Regulations and requirements, as well as all requirements in the standards to which reference is made.EN 18EN 19861699 / VER 1 / 18-05-2021