
RDH330 - Humidifier Royal Sovereign - Free user manual and instructions
Find the device manual for free RDH330 Royal Sovereign in PDF.
| Product Type | Dehumidifier |
| Brand | Royal Sovereign |
| Model | RDH-330 |
| Dehumidification Capacity | 14 liters per 24 hours (30°C, 80% RH) |
| Power Supply | 115 V ~ 60 Hz, 4.0 A |
| Refrigerant | R410A, 4.94 oz (140 g) |
| Adjustable Humidity Range | 35% to 80% RH or continuous mode (CO) |
| Fan Speeds | High, Medium, Low |
| Programmable Timer | 0.5 to 24 hours (auto on/off) |
| Automatic Defrost | Yes |
| Continuous Drainage | Via standard hose connection (GHT) |
| Internal Pump | No (on this model) |
| Water Tank | Capacity not specified, manual drain |
| Air Filter | Washable, clean every 2 weeks |
| Full Tank Indicator | Yes, with auto shut-off |
| Dirty Filter Indicator | Yes (after 250 hours of operation) |
| Child Lock | Yes, hold Timer button 3 seconds |
| Preset Modes | Sleeping Space, Living Space, Basement |
| Casters | Yes, 4 casters included |
| Warranty | 1 year (parts and labor) |
Frequently Asked Questions - RDH330 Royal Sovereign
User questions about RDH330 Royal Sovereign
0 question about this device. Answer the ones you know or ask your own.
Ask a new question about this device
Download the instructions for your Humidifier in PDF format for free! Find your manual RDH330 - Royal Sovereign and take your electronic device back in hand. On this page are published all the documents necessary for the use of your device. RDH330 by Royal Sovereign.
USER MANUAL RDH330 Royal Sovereign
Read and retain these instructions for future reference. By Customer Support needs, please choose the Support tab on
www.royalsovereign.com (USA) www.royalsovereign.ca (Canada)
Royal Sovereign International Inc.
DEHUMIDIFIER
RDH-300 SERIES
INTRODUCTION
Thank you for choosing Royal Sovereign to provide you and your family with premium "Air Comfort" solutions for your home, apartment, or office. This Dehumidifier can be set-up in just minutes and if properly maintained, will give you many years of trouble free operation. This manual will provide you with valuable information necessary for the proper care and maintenance for your new appliances. Please take a few moments and read the instructions thoroughly.
Why Dehumidify?
Moisture in the air can lead to mold and mildew leaving a room smelling musty. Dehumidifiers remove the moisture in the air making it better quality to breathe and protect the furnishings in a room from being damaged.
CONTENTS
Page
Important Safety Instructions 4~5
Operation 6-7
Parts 8
Choosing A Location 9
Automatic Defrost 9
Continuous Mode- Garden Hose Installation And Setup 9
Continuous Draining Using The Pump (Only On Pump Models) 10
Maintenance 10
Trouble Shooting 11-12
Error Code 12
Specification 12
Warranty 13
Contact information 13
Page en français 14
IMPORTANT SAFETY INSTRUCTIONS
Read all instructions before use
Your safety and the safety of others is very important.
We have provided many important safety messages in this manual and on your appliance. Always read and obey all safety messages.
This is the safety alert symbol. This symbol alerts you to potential hazards that can hurt you and others.
All safety messages will follow the safety alert symbol and either the word "WARNING" or "CAUTION". These words mean:
WARNING This symbol indicates the possibility of death or serious injury.
CAUTION This symbol indicates the possibility of injury or damage to property.
Basic safety precautions
WARNING To reduce the risk of fire, electric shock, or injury to persons when using this appliance, follow basic precautions, including the following:
Do not attempt to repair or replace any part of your dehumidifier unless it is specifically recommended in this manual. All other services should be referred to a qualified technician.
- If the power cord becomes worn or damaged, the cord should only be replaced by a qualified service technician using genuine replacement parts.
The dehumidifier should be plugged into its own grounded (13A, 60Hz, 115VAC circuit)
- Do not plug other appliances into the same outlet; it can overload the circuit and cause a fire or electric shock.
- Do not remove the round grounding prong from the plug. It can result in the risk of electric shock.
This apies is not designed for use by young children. Young children should be supervised to ensure that they do not play with or climb on the unit.
- Be sure all packaging materials are removed from the appliances before use. It can result in personal injury.
- Do not disassemble or modify the appliances or the power cord. It can result in the risk of electric shock or fire.
- Do not place the power cord or appliances near a heater, radiator, or other heat source. It can result in the risk of electric shock or fire.
- Do not use this or any appliance near flammable gases or liquids or other combustibles, such as gasoline, benzene, thinner, etc. It can result in the risk of electric shock or fire.
- Make sure the power cord is plugged firmly and completely into the outlet. It can result in the risk of electric shock or fire.
Read all instructions before use
- Do not start or stop operation by plugging in or unplugging the power cord. It can result in the risk of electric shock.
If the appliances are making unusual sounds or is emitting smoke or an unusual odor, unplug it immediately. It can result in the risk of electric shock or fire. - Do not use if the electrical socket is loose or damaged. It can result in the risk of electric shock or fire.
- Do not operate with wet hands or in a excessive damp environment. It can result in the risk of electric shock.
- Do not use this or any electrical appliance if you smell gas. It can result in the risk of fire or explosion.
- Turn off and unplug the appliances before cleaning to avoid the risk of electric shock.
- Do not clean the unit with water. Water can enter the unit and damage the insulation, creating a shock hazard. If water enters the unit, unplug it immediately and contact Customer Service. It can result in the risk of electric shock.
Basic safety precautions
CAUTION To reduce the risk of fire, electric shock, or injury to persons when using this appliances, follow basic precautions, including the following:
- To avoid possible cuts, avoid contacting the metal parts of the appliances when removing or re-installing the filter. It can result in the risk of personal injury.
- Do not block the air inlet or outlet of the appliance. Reduced air flow will result in poor performance and could damage the unit.
- Always grasp the plug when plugging in or unplugging the appliance. Never unplug by pulling on the cord. It can result in the risk of electrical shock and damage.
- Always turn off and unplug the appliances when it will not be used for extended period of time. This conserves energy and reduces the chance of accidents.
Install the appliance on a sturdy, level floor capable of supporting up to 110 lbs (50 kg). Installation on a weak or unlevel floor can result in the risk of property damage and personal injury.
Make sure the appliance is the correct size for the area you wish to dehumid. Using an appliance that is the wrong size can waste energy and damage the unit.
- Close all doors and windows to the room for most efficient operation.
- To prevent damage to the surface finish, use only a soft cloth to clean the appliances. Do not use wax, thinner, or a strong detergent.
- To prevent spills and property damage, be sure to drain the appliance properly.
Read all instructions before use
- To prevent the coils from freezing, do not operate the appliances if the room temperature is lower 41^ F(5°C).
- Do not position the appliances so that pets or house plants are exposed to the direct air flow. It can result in the risk of injury to pets or house plants.
- This appliance is designed for normal household use.
- Do not drink the water from the bucket. Dispose of it properly outdoors or down the drain.
- Do not operate appliance without the filter securely in place. Operation without the filter could damage the unit.
- Clean the filter every two weeks, or more often if needed.
Electrical safety
WARNING Electrical Shock Hazard
- Failure to follow these instructions can result in death, fire, or electrical shock.
- This unit must be properly grounded.
- Do not, under any circumstances, cut or remove the ground prong.
If you do not have a properly grounded outlet, or if there is any doubt that the outlet is not properly grounded, a qualified electrician should check the outlet and circuit, and, if necessary, install a properly grounded outlet.
This dehumidifier must be plugged into a grounded 60 Hz, 115 VAC outlet protected by a 13 amp time delay fuse or circuit breaker. - This dehumidifier must be installed in accordance with national wiring codes.
- Do not alter or modify the plug or cord of this dehumidifier. If the power cord becomes worn or damaged, the cord should only be replaced by a qualified service technician using genuine replacement parts.
- Do not use an extension cord.

OPERATION
Control Panel
1) When first operating the dehumidifier, run it in Continuous mode for 24 hours.
2) Power On and Off- Press the POWER button once to manually turn the unit on. Press the POWER button once more to turn the unit off.
3) Humidity Selection- Press the or buttons to choose the desired relative humidity in the room. Each press of the button will change the desired room humidity by 5% . The room humidity is selectable from 35% - 80% or continuous. The unit will cycle on and off to maintain the humidity level chosen on the digital display. If you want the dehumidifier to operate continuously regardless of the room humidity, press the MODE button until you see "CO" on the digital display. This will enable continuous operation and the "Continuous" indicator will light up
4) Fan Speed Control- Press the FAN SPEED Button to cycle through the different fan speeds: High, Medium, and Low. The fan speed can be visually distinguished by the fan speed indicators on the control panel.
5) Timer Auto On- To program the unit to automatically turn on, press the TIMER button when the unit is off. Press or to increase or decrease the timer in 30 min increments (0.5 hours) up to 10 hours. After 10 hours, each press of the button will increase the timer in 1 hour increments up to 24 hours.
Timer Auto Shut-Off-To program the unit to automatically turn off, press the TIMER button when the unit is on. Each press of the or buttons will change the timer setting in 30 min increments (0.5 hours) up to 10 hours. After 10 hours, each press of the or buttons will increase or decrease the timer in 1 hour increments up to 24 hours. Once the desired time is over, the unit will automatically power off. Once the desired time is reached-the unit will automatically turn on. NOTE: Fan will continue to run even when the compressor is off. This is normal and allows the unit to circulate air and operate more efficiently.
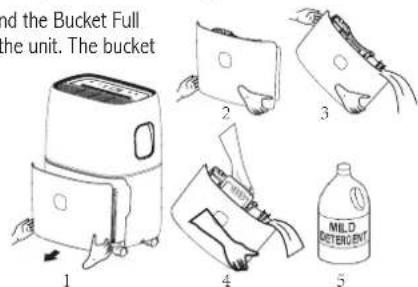
6) Bucket Full- When the water bucket is full of water, the unit will automatically shut off, make a beeping noise, and the Bucket Full Indicator will light up. The dehumidifier will not function until the water bucket is emptied and placed back inside the unit. The bucket should be cleaned every few weeks to prevent the growth of mold, mildew and bacteria. Use a mild detergent to clean the bucket. Once clean, completely dry the bucket and place it back inside the dehumidifier.
NOTE: Hold bucket with both hands when emptying.
NOTE: When the bucket is full or removed from the machine, the compressor will turn off, but the fan will continue to run for a few minutes. This is completely normal. The dehumidifier will not be removing moisture from the air at this time.
NOTE: When removing moisture from the air, the dehumidifier will exhaust warm air from the side exhaust vent. NOTE: Do not place a full bucket on the floor, because the bottom is uneven.
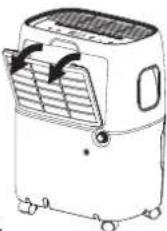
7) Clean Filter- When the filter needs to be cleaned, the filter indicator will light up (after 250 hours of use). Remove the filter from the back of the unit by using your thumbs to press down on the filter tabs directly above the filter. Clean the filter with warm, soapy water. Dry thoroughly before replacing the filter. Once the filter is completely dry, place the filter back in the unit and press the FILTER button to reset the filter indicator.
CAUTION: do not operate the dehumidifier without the filter
NOTE: Do not clean filter in dishwasher
8) Preset Modes- Preset humidity level settings allow the user to easily move the dehumidifierroom-to-room and select the corresponding mode for the location in which the dehumidifier is operating for optimum performance. Press the MODE button to choose from Sleeping Space, LivingSpace or Base-ment.
9) Child-Lock Mode- To lock the control panel, press and hold the TIMER button for 3 seconds.Lock-ing the control panel prevents someone from accidentally changing the settings. When locked, the LOCK Indicator will light up. Press and hold the TIMER button for 3 seconds to unlock the control panel.
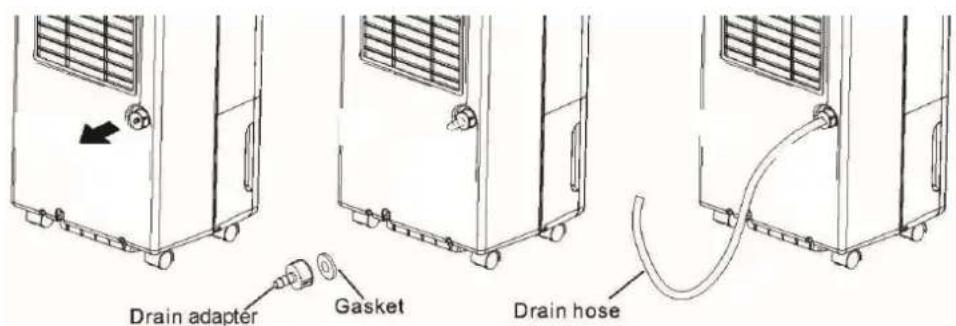
10) Internal Pump Mode- The internal pump allows the unit to operate without having to empty the bucket and requires the installation of the included pump drain hose kit. To install the kit, remove the drain cap on the back of the unit. Insert the included gasket into the front of the included pump adapter. Force the included clear drain hose on to the pump adapter and turn adapter clockwise on to the garden hose type nozzle on the back of the unit. Once securely installed, lead the drain hose to a nearby drain, sink or out a window. Turn on the dehumidifier and press the PUMP button to activate the internal pump. The "PUMP" LED indicator should illuminate.
NOTE: Water can be pumped up to 16 ft. Make sure there are no kinks or knots in the hose.

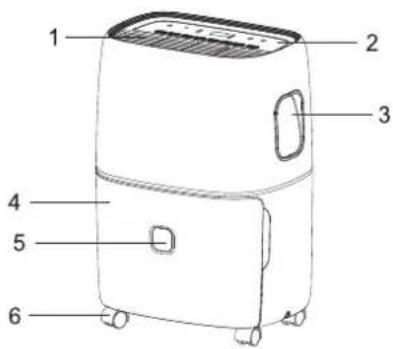
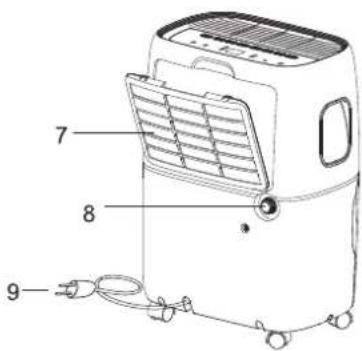
PARTS
Key parts and compon
- Air Outlet Grill
- Control Panel
- Carrying Handle
- Bucket
- Water Level
- Casters
- Air Intake Grill
8.Drain hole - Power Cable
- Product manual(Not Shown)
Caster installation
- Remove casters from bucket.
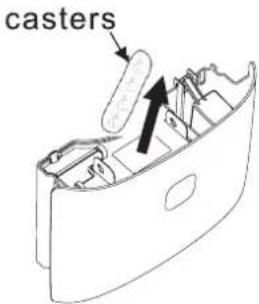
- Install the caster.
Tilt t he dehumidifier no more than 45 degrees. Do not insert the caster wheels by force, as it should easily slide into position. Make sure the ring around the caster is flush against the bottom of the dehumidifier.

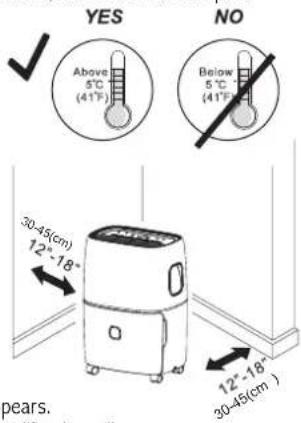
CHOOSING A LOCATION
A Dehumidifier operating in a basement will have little or no effect in drying out an adjacent enclosed storage area, such as a closet, unless there is adequate circulation of air in and out of the area. YES NO
-
Do not use outdoors.
-
This dehumidifier is intended for indoor use only. Place the dehumidifier on a smooth, level floor surface that is strong enough to support the unit with a full bucket of water.
- ALLow at least 12"-18" of air flow on all sides.
- Place the dehumidifier in an area where the temperature will not fall below 41^(5^) . The coils can become covered with frost at temperatures below 41^(5^) , which may reduce performance.
- Use the dehumidifier in cooking, laundry, bathing and dishwashing areas that have excessive moisture. NOTE: Place the dehumidifier away from a clothes dryer.
- Use the dehumidifier to prevent moisture damage anywhere books or valuables are stored.
- Use the dehumidifier in a basement to help prevent moisture.
The dehumidifier must be operated in an enclosed area to be most effective. - Close all doors, windows and other outside openings to the room.
AUTOMATIC DEFROST
When frost builds up on the evaporator coils, the compressor will cycle off and the fan will continue to run until the frost disappears. When the coils are completely defrosted, the compressor or fan (depending on the model) will automatically restart and dehumidification will resume.
CONTINUOUS MODE- GARDEN HOSE INSTALLATION AND SETUP
Water can be automatically emptied by attaching a hose to the continuous drainage port on the back of the dehumidifier. This will allow the unit to run continuously (depending on the selected humidity level) without having to empty the water bucket. To drain, simply attach a standard garden hose (not included). The thread standard for garden hoses in the US and its territories is known as GHT or "garden hose thread" which has an outer diameter of 11/16 inches(1.0625 inches or 27.0 mm) and a pitch of 11.5 TPI.
- Place dehumidifier on a level surface.
- Unscrew the cap on the back of the unit to access the garden hose nozzle
- Thread a garden hose (not supplied) onto the accessible nozzle, lead to a floor drain and cut to length.Make sure that there are no kinks or knots in the garden hose.
- Turn on the unit and press the MODE button until set to CONTINUOUS.

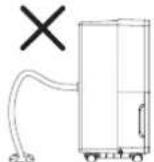

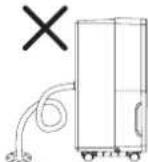
Garden Hose Installation Reference Guide

Important notes:
Placing the dehumidifier on an uneven surface or improper hose installation may result in water filling up the bucket and causing the unit to shut off. Empty bucket if
CONTINUOUS DRAINING USING THE PUMP (ONLY ON PUMP MODELS)
The patentd huy dty pump system allows water removal of up to 13 ft (4m) in height. If you want the water to flow directly to a drain, connect the condensation discharge tub
Note: With the condensation discharge hose missing and the pump switched ON, the display will show the symbol PUMP blinking. To eliminate this problem:
- Check the hose is correctly positioned;
- Disconnect and reconnect the plug.
MAINTENANCE
Note: Make sure power is off and the power cord is not plugged into an electrical outlet prior to performing any maintenance on the unit.
Clean or Replace Filter- Refer to Operating Instructions Clean Filter section.
Clean the Unit Housing
1)Keep the unit from being exposed directly to the sun to prevent color fading
2) Clean the surface with a damp cloth and dry it with a soft towel.
Storing the Unit for an Extended Period of Time or Transporting the Unit
1) Clean or replace filter- Refer to Operating Instructions Clean Filter section.
2) Unplug the unit.
3) Empty any excess water
4) The unit should be stored in a cool dry place.
Tips on Setting Humidity Levels
Basements or crawl spaces
Basements are often overridden with moisture. There is often a substantial amount of moisture coming through the concrete. For a basement, it is recommended to keep moisture at least under 65% although the optimal room humidity would be between 40% - 50% .
Bedrooms
For some people having too much humidity in their bedroom is very uncomfortable. It also affects a lot of people with asthma and allergies, some to the point where it decreases their quality of sleep. The healthy humidity level for a bedroom is between 40% and 60% , although the recommended dehumidifier settings should be between 40% and 50% .
Garage
More and more people are finishing their garages; many are even using them as workshops for various projects. The ideal dehumidifier humidity setting for a garage is between 40% and 60% .
TROUBLE SHOOTING
Before calling for service
Before you call for service, review this list. It may save you time and expense. This list includes common occurrences that are not the result of a defect in workmanship or materials.
| Problem Possible Causes Solutions | |
| Dehumidifier does not start | The dehumidifier is unplugged. • The fuse is blown/circuit breaker is tripped. • Dehumidifier has reached its present level or the bucket is full. • Bucket is not in the proper position. • Power Failure. |
| Dehumidifier does not dry the air as it should | Not enough time allowed for unit to remove moisture. Airflow is restricted. Dirty filter. The Humidity Control may not be set low enough. Doors and windows may not be closed tightly. Clothes dryer may be blowing moist air into the room. Room temperature is too low. |

| Problem Possible Causes Solutions | |
| Dehumidifier runs too much | The area to be dehumidified is too large. Doors and windows are open. The dehumidifier has recently been turned on or the room temperature is below 41°F (5°C). This is normal. Frost will usually disappear within 60 minutes. |
| Frost appears on the coils | |
| Controls cannot be set | The compressor will turn off and the fan will automatically continue to run for approximately 3 minutes at a fixed setting. Air is moving through the unit. This is normal. Wait approximately 3 minutes and set the fan speed at the desired level. This is normal. |
| Water on the floor | Hose connection may be loose. Hose is attached but not draining Check the hose connection. See the CONTINUOUS MODE- GARDEN HOSE INSTALLATION AND SET UP Section Disconnect the hose if using the bucket or place the hose near a drain. |
ERROR CODE
| Error code | EH | E1 or E2 | E3 | E5 | P1 |
| Description | Humidity sensor fault | Temperature sensor fault | Lack of gas to protect | Pump sensor fault | Tank dislocation or removed |
SPECIFICATIONS
| Model Capacity (Pints/Day) Power input Amps | High side pressure Low side pressure | Refrigeration | ||||
| RDH-330 30P | int/24Hrs 115V 60Hz 4.0A 530Psig(3.7Mpa) 3 | 20Psig(2.2Mpa) | R410A/4.940z | |||
| RDH-370 73P | int/24Hrs 115V 60Hz 8.1A 530Psig(3.7Mpa) 3 | 20Psig(2.2Mpa) | R410A/9.520z | |||
| RDH-370 73P | int/24Hrs 115V 60Hz 8.1A 530Psig(3.7Mpa) 3 | 20Psig(2.2Mpa) | R410A/9.520z | |||
FULL ONE YEAR WARRANTY
Royal Sovereign warrants each Dehumidifier to be free from defects in material and workmanship. Our obligation under this warranty is limited to the repair or replacement, free of charge, when delivered to an authorized Royal Sovereign service center, of any defective part(s) thereof, other than parts damaged in transit. This warranty is in effect to the original purchaser, for a period of one year from the date of purchase and is not transferable. This warranty shall apply only if the dehumidifier is used on Alternating Current (AC) circuit, in accordance with the factory provided instructions which accompany it.
EXCLUSIONS
This warranty excludes and does not cover defects, malfunctions or failures of your Royal Sovereign Dehumidifiers, caused by repairs by unauthorized persons or service centers, mishandling, improper installation, modification or unreasonable use including incorrect voltage, acts of God, or failure to provide reasonable and necessary maintenance. This warranty is in lieu of any and all expressed warranties. In no event shall Royal Sovereign be liable for consequential or incidental damages. This limitation would not apply if you live in a location that does not permit the exclusion of limitation of incidental or consequential damages. This warranty gives you specific legal rights and you may also have other rights which vary from state to state.
ROYAL SOVEREIGN INTERNATIONAL, INC.
2 Volvo Drive Rockleigh, NJ 07647 USA
www.royalsovereign.com
RS INTERNATIONAL CANADA INC.
5610 Timberlea Blvd, Mississauga Ontario L4W 4M6 CANADA
TEL: +1) 905-461-1095 TF: +1) 866-961-6673
FAX: +1) 905-461-1096
www.royalsovereign.ca
Français

GUIDE D'UTILISATION
DÉSHUMIDIFICATEUR
SERIE RDH-300
Page en Francais 14
www.royalsovereign.ca (Canada)
Royal Sovereign International Inc.
DÉSHUMIDIFICATEUR
SERIE RDH-300
INSTRUCTIONS
www.royalsovereign.com
RS INTERNATIONAL CANADA INC.
5610 Timberlea Blvd, Mississauga Ontario L4W 4M6 CANADA
TEL: +1) 905-461-1095 TF: +1) 866-961-6673
FAX: +1) 905-461-1096
www.royalsovereign.ca
Espanol

www.royalsovereign.ca (Canada)
Royal Sovereign International Inc.
DESHUMIDIFICADOR
SERIE RDH-300
INTRODUCCION
www.royalsovereign.com
RS INTERNATIONAL CANADA INC.
5610 Timberlea Blvd, Mississauga Ontario L4W 4M6 CANADA
TEL: +1) 905-461-1095 TF: +1) 866-961-6673
FAX: +1) 905-461-1096
www.royalsovereign.ca

- DEHUMIDIFIER
- INTRODUCTION
- Why Dehumidify?
- CONTENTS
- IMPORTANT SAFETY INSTRUCTIONS
- Read all instructions before use
- Basic safety precautions
- Electrical safety
- OPERATION
- Control Panel
- PARTS
- Key parts and compon
- Caster installation
- CHOOSING A LOCATION
- AUTOMATIC DEFROST
- CONTINUOUS MODE- GARDEN HOSE INSTALLATION AND SETUP
- Important notes:
- CONTINUOUS DRAINING USING THE PUMP (ONLY ON PUMP MODELS)
- MAINTENANCE
- Clean the Unit Housing
- Storing the Unit for an Extended Period of Time or Transporting the Unit
- Tips on Setting Humidity Levels
- Basements or crawl spaces
- Bedrooms
- Garage
- TROUBLE SHOOTING
- Before calling for service
- ERROR CODE
- SPECIFICATIONS
- FULL ONE YEAR WARRANTY
- EXCLUSIONS
- GUIDE D'UTILISATION
- DÉSHUMIDIFICATEUR
- INSTRUCTIONS
- DESHUMIDIFICADOR
- INTRODUCCION
Brand : Royal Sovereign
Model : RDH330
Category : Humidifier