GN4925 - Food Processor KRUPS - Free user manual and instructions
Find the device manual for free GN4925 KRUPS in PDF.
| Product type | Food processor (hand mixer) |
| Brand | Krups |
| Model | GN4925 |
| Power | 300 W (estimated) |
| Power supply | 120 V ~ 60 Hz |
| Speeds | 10 speeds + Turbo |
| Functions | Mix, whisk, knead, pause, progressive timer |
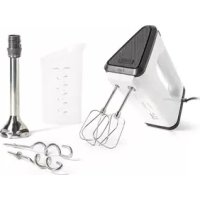
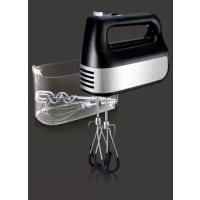
| Included accessories | 2 silicone beaters, 2 dough hooks, 1 balloon whisk, storage case |
| Accessory material | Stainless steel with silicone coating (beaters) |
| Control type | Digital screen with buttons |
| Safety | Automatic shutdown in case of overload, overheat protection, soft start |
| Cleaning | Dishwasher-safe accessories; wipe motor unit with a damp cloth |
| Maximum operating time | 15 minutes continuous |
| Housing color | White / Gray (not specified) |
| Warranty | 2 years (manufacturer international) |
| Repairability | Parts available 5 to 7 years after manufacture |
| Weight | Approximately 1.5 kg (estimated) |
| Cable length | Approximately 1.2 m (estimated) |
Frequently Asked Questions - GN4925 KRUPS
User questions about GN4925 KRUPS
0 question about this device. Answer the ones you know or ask your own.
Ask a new question about this device
Download the instructions for your Food Processor in PDF format for free! Find your manual GN4925 - KRUPS and take your electronic device back in hand. On this page are published all the documents necessary for the use of your device. GN4925 by KRUPS.
USER MANUAL GN4925 KRUPS
Helps keep the cord out of your way
C Storage case
Clip-in storage box keeps all attachments and cord organized and tangle-free.
D Digital display
D1. Speed level
D2. TURBO
D3. Count-up timer - displays how long you've been mixing
D4. PAUSE
E Pause button
Holds your settings while you prepare or add ingredients.
F ON|OFF
G 10 speeds plus turbo boost
Electronically controlled to spin at a precise speed no matter what the load. Press boost for momentary burst of power.
H Beaters with Silicone Coating
Mix to the edges without clanging to maximize contact with the bowl, leaving lumps nowhere to hide.
I Dough hooks
Combine, mix and knead heavier batter and dough.
J Balloon whisk
Maximum aeration for light ingredients and egg whites.
DESCRIPTION
A Touche d'éjection
B Cordon articulé
When using electrical appliances, basic safety precautions should always be followed including the following:
- Read all instructions.
- To protect against risk of electrical shock do not put motor unit in water or other liquid.
- Close supervision is necessary when any appliance is used by or near children.
- Unplug from outlet when not in use, before putting on or taking off parts, and before cleaning.
-
Avoid contacting moving parts. Keep hands, hair, clothing, as well as spatulas and other utensils away from beaters during operation to reduce the risk of injury to persons, or damage to the mixer.
-
Remove beaters from mixer before washing.
- Do not operate any appliance with a damaged cord or plug or after the appliance malfunctions, or is dropped or damaged in any manner. Return appliance to the nearest authorized service facility for examination, repair or electrical or mechanical adjustment.
- The use of attachments not recommended or sold by the manufacturer may cause fire, electric shock or injury.
- Do not use outdoors.
- Do not let cord hang over edge of table or counter.
- Do not let cord contact hot surface, including the stove.
- A food mixer shall be marked with the following specific markings in addition to any other markings required by the standard:
a) Portable - Unplug before inserting or removing parts.
b) Hand supported - The marking required by (a) and (c) shall be located adjacent to the beater drives.
c) Hand supported - Do not put in water.
This appliance has been designed for household use only. In case of any commercial use, inappropriate use or failure to comply with the instructions, the manufacturer accepts no responsibility and the warranty will not apply.
a) Keep hands and utensils out of container to reduce the risk of injury to persons or damage to the mixer.
b) Never add to container while appliance is operating.
c) Container must be properly in place before operating appliance.
SAVE THESE INSTRUCTIONS

Environment protection first!
1 Your appliance contains valuable materials which can be recovered.
- Leave it at a local civic waste collection point.
POLARIZATION INSTRUCTIONS
This appliance has a polarized plug (one blade is wider than the other). To reduce the risk of electric shock, this plug is intended to fit into a polarized outlet only one way. If the plug does not fit fully into the outlet, reverse the plug. If it still does not fit, contact a qualified electrician. Do not attempt to modify the plug in any way.
USE
- Clean the attachments before use. Rinse and dry them.
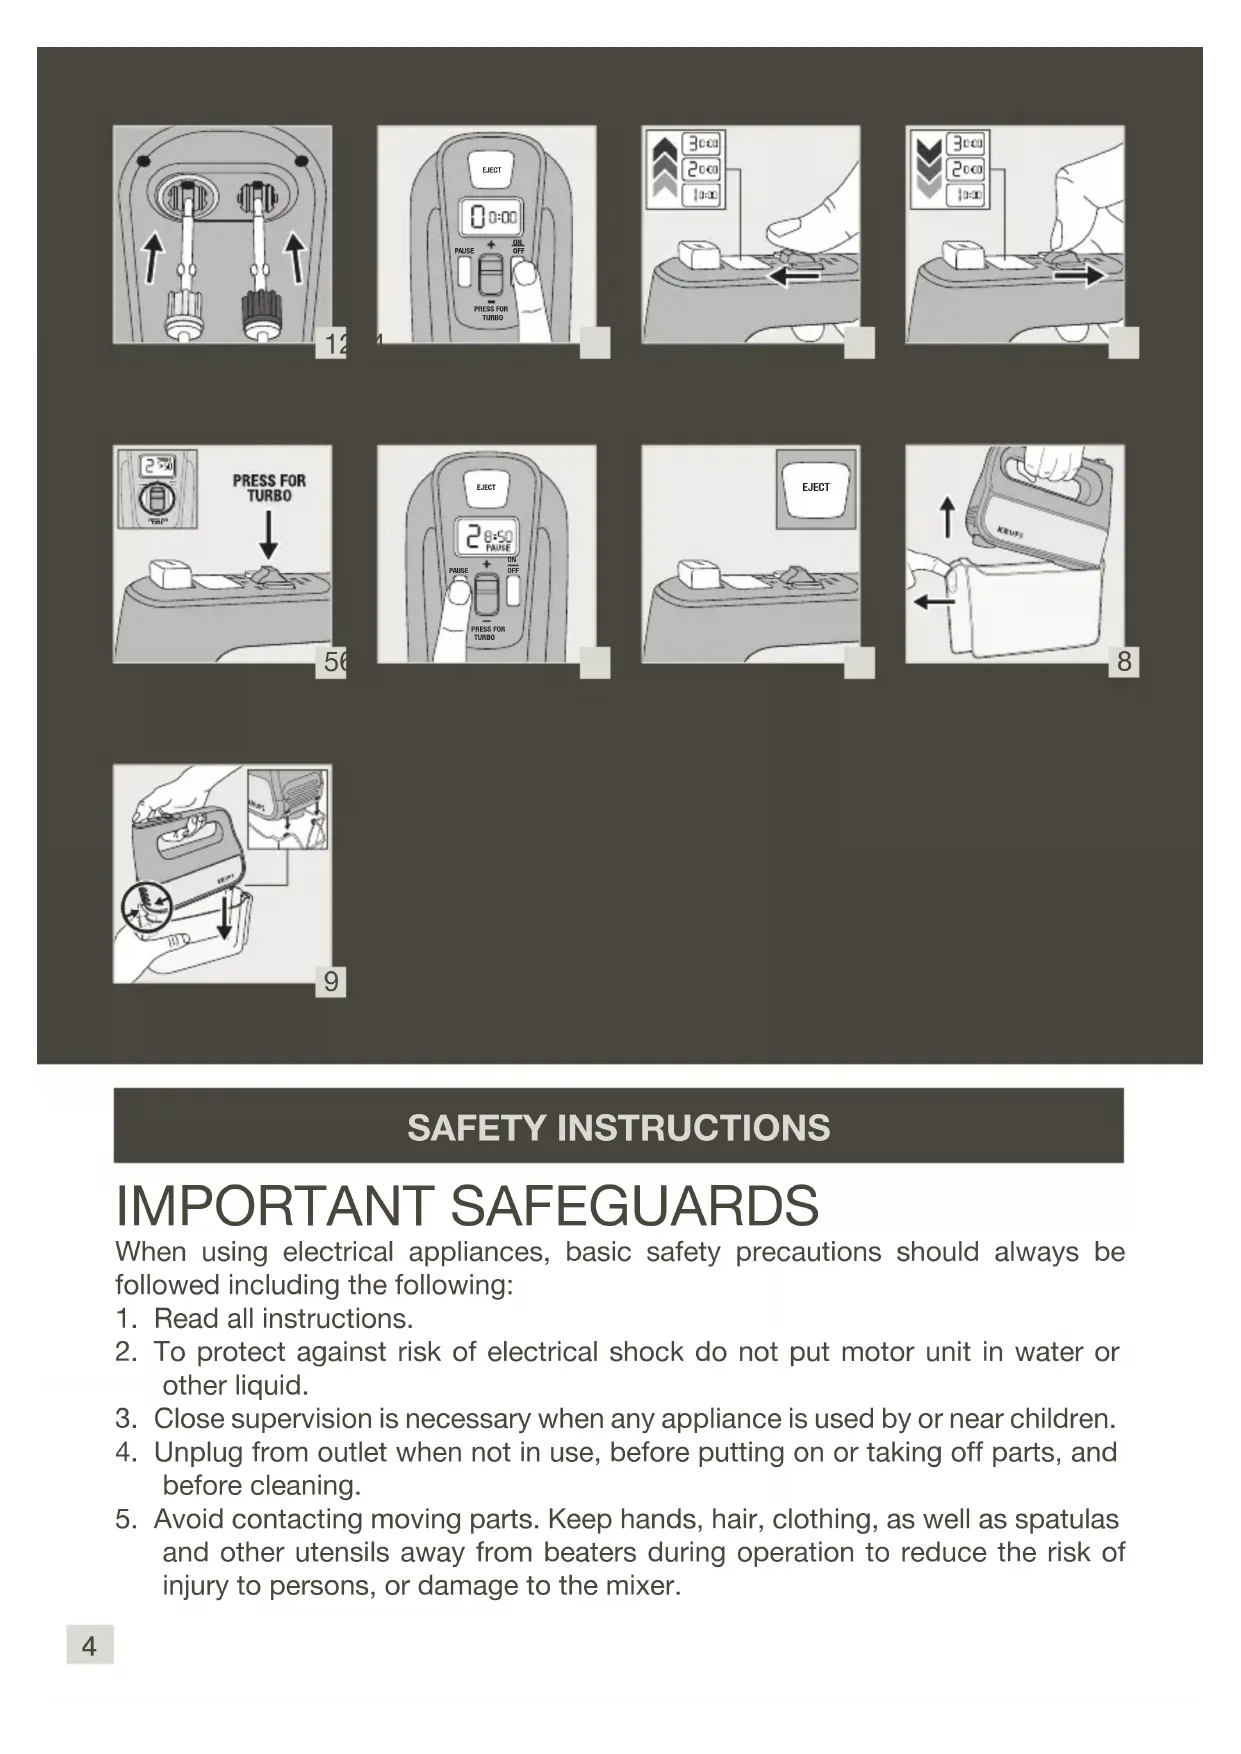
- Insert your desired attachment, you will feel the beater lock into place and should not be able to pull it out without pushing the Eject button. Make sure they are fully locked in place before operating.
Note: The attachments are equipped with a color-coded collar. Those with a gray collar should be inserted into the hole with a gray ring (fig 1). Note that the Whisk attachment also has a red collar and should only be inserted into the hole without the gray ring.
- Plug in the hand-mixer.
- Add ingredients to a properly sized mixing bowl.
- Press the ON/OFF button to turn on the mixer.
- Adjust speed using the speed control. Push forward to increase speed (fig 3), push back to decrease speed (fig 4). You can hold in the forward or backwards position to adjust speed more quickly.
Note: The hand mixer is equipped with a slow-start to prevent splashing.
Note: To avoid overheating, the hand mixer can operate for up to 15 minutes.
a. Turbo (G) - press down (fig 5) on the speed control for an extra burst of power
b. Pause (E) allows you to momentarily stop. Press the button (fig 6) and the mixing and count-up will be paused. If desired, you can adjust speed with the speed control prior to resuming. Press the button again to start back up.
- When you have finished, return the speed to position "0" or simply press either the PAUSE button or the ON/OFF button.
- Unplug the hand-mixer.
- Remove the attachments by pressing the ejection control (A) (fig.7).
RECIPES
Frosted Cinnamon Rolls
Prep Time: 45 minutes
Total Time: 2 hours 15 minutes
Serves: 15
Rolls
3 1/2 cups all-purpose flour, 1/4 cup granulated sugar, 1 teaspoon salt, 1 pkg (1/4 oz) quick rise yeast, 1/4 cup water, 3/4 cup milk, 1/4 cup butter, 1 egg
Filling
3 tablespoons butter, softened, 1/4 cup granulated sugar, 2 teaspoons cinnamon
Frosting
1 1/2 cups powdered sugar, 2 tablespoons butter, softened, 1/2 teaspoon vanilla, 2 tablespoons milk
In large mixing bowl, combine flour, 1/4 cup sugar, salt and yeast. Beat with dough hooks on Speed #2 for 1 minute or until mixed. In small microwavable bowl, combine water, milk and butter. Microwave on High 1 minute or until warm (110°F to 115°F). Add to dry ingredients along with eggs. Beat on Speed #1 with dough hooks until mixed, then increase to Speed #4 for 5 minutes or until smooth. Turn dough out onto floured work surface. Knead 5 or 6 times until smooth. Let rest 5 minutes.
Grease 13x9-inch baking pan. Roll dough into 15x12-inch rectangle. Spread with 3 tablespoons butter. Sprinkle with 1/4 cup sugar and cinnamon. Roll up starting at long edge; seal edges. Cut in 15 (1-inch) slices. Place in greased pan. Press tops until edges touch. Cover; let rise in warm place 1 to 1 1/2 hours or until doubled.
Heat oven to 375^ F. Bake 23 to 25 minutes or until deep golden brown and no longer doughy. Cool 15 minutes. Meanwhile, in medium bowl, mix powdered sugar, 2 tablespoons butter, vanilla and 2 tablespoons milk with beaters on Speed #1 until mixed. Then beat on Speed #4 for 1 minute or until smooth and creamy. Frost cinnamon rolls.
Chocolate Fig Bundt Cake with Chocolate Ganache
Prep Time: 35 minutes
Total Time: 3 hours
Serves: 16
1 cup chopped dried figs, 1 1/4 cups strong hot coffee, 1/2 cup butter, softened, 1 1/2 cups sugar, 2 eggs, 1 teaspoon vanilla, 1/2 cup vegetable oil, 2 oz unsweetened chocolate, melted, 2 cups all-purpose flour, 1/4 cup unsweetened cocoa powder, 1 1/2 teaspoons baking soda, 1/2 cup whipping cream, 1 bar (4-oz) semisweet chocolate (chopped)
Heat oven to 350^ (325°F for dark or nonstick pan). Generously grease and flour 12-cup fluted tube pan. In small bowl, mix figs and coffee. Set aside. In large mixing bowl, beat butter, sugar, eggs and vanilla with beaters on Speed #1 until mixed, then increase to Speed #4 until smooth and creamy. Add oil and melted chocolate. Beat on Speed #1 until mixed, then increase to Speed #4 until creamy. Add flour, cocoa powder and baking soda. Beat on Speed #1 until mixed. Drain figs, adding coffee to batter. Beat on Speed #1 until mixed, then increase to Speed #4 for 2 minutes. By hand, stir in figs. Pour into pan. Bake 40 to 45 minutes or until toothpick inserted in center comes out clean. Cool in pan 10 minutes. Turn onto cooling rack. Cool 1 hour.
In small saucepan, heat whipping cream until hot but not boiling. Remove from heat. Stir in chopped semisweet chocolate until melted and smooth. Cool 5 minutes or until mixture is cool enough to begin to mound. Spoon on top of cake and allow to drip down sides of cake. Let stand 30 minutes or until slightly set before cutting.
Mixed Berry Meringue Dessert
Prep Time: 30 minutes
Total Time: 5 hours
Serves: 6
Meringue, 3 egg whites, 1/4 teaspoon cream of tartar, 3/4 cup sugar, 1/2 teaspoon vanilla
Filling
3/4 cup whipping cream, 6 oz cream cheese, softened, 1 cup marshmallow creme
Topping
2 cups mixed fresh berries (sliced strawberries, blueberries, raspberries), 2 tablespoons sugar
Heat oven to 250^ . Line large cookie sheet with parchment paper. In large metal or glass bowl (free of all grease) beat egg whites and cream of tartar with whisk on Speed #10 until foamy. Gradually add sugar, while beating on Speed #10. Continue beating on Speed #10 for 10 to 12 minutes or until stiff peaks form and sugar is completely dissolved. Spread meringue on parchment paper in 9-inch circle. Push some of center meringue to edges, forming a raised edge. Bake 1 1/2 hours or until completely dry. Turn oven off. Leave meringue in oven 2 hours with door closed. Remove from oven. Cool completely, about 1 hour.
In medium bowl, beat whipping cream with whisk on Speed #8 until stiff peaks form. In medium bowl, beat cream cheese and marshmallow cream with beaters on Speed #4 until smooth and creamy. Fold whipped cream into cream cheese mixture. Spread over cooled meringue. Cut in wedges to serve.
In small bowl, mix berries and 2 tablespoons sugar; let stand 5 minutes. Spoon over individual servings of dessert.
Cheese Souffle
Prep Time: 20 minutes
Total Time: 45 minutes
Serves: 6
1/4 cup butter plus 1 tablespoon for dish, 1/4 cup all-purpose flour, 1 teaspoon Dijon mustard, Dash of cayenne pepper, 1 cup milk, 1 1/2 cups shredded sharp Cheddar cheese (6 oz), 4 eggs, separated, 1/4 teaspoon cream of tartar
Heat oven to 375^ F. Butter 1 1/2-quart casserole or souffle dish. Melt 1/4 cup butter in medium saucepan. Stir in flour, mustard and cayenne. Cook until bubbly. Stir in milk. Cook and stir until mixture boils. Cook and stir 1 minute. Stir in cheese until melted; set aside.
In large bowl, beat egg whites and cream of tartar with whisk on speed #10 until stiff peaks form; set aside. In medium bowl, beat egg yolks with whisk on Speed #8 for 3 minutes or until thick and light lemon-color. Switch to beaters and beat on Speed #3, adding cheese sauce, until mixed. Fold mixture into egg whites. Pour into casserole. Bake 25 to 30 minutes or until deep golden brown and set. Serve immediately.
Cherry Nut Cookie Jar Cookies
Prep Time: 25 minutes
Total Time: 1 hour
Serves: 4 to 4 1/2 dozen
3/4 cup butter, softened, 1/2 cup shortening, 1 1/2 cups firmly packed brown sugar, 1/2 cup granulated sugar, 2 eggs, 2 teaspoons vanilla, 3 1/2 cups all-purpose flour, 1 1/2 teaspoons baking soda, 1 cup shelled roasted salted pistachios, coarsely chopped, 1 cup white chocolate baking chips, 1 cup dried tart cherries, coarsely chopped
Heat oven to 350^ . Line large cookie sheets with parchment paper. In large mixing bowl, beat butter, shortening, brown sugar, granulated sugar, eggs and vanilla with beaters on Speed #5 until smooth and creamy. Add flour and baking soda. Beat on Speed #1 for 30 seconds or until mixed, then increase to Speed #5 until smooth. By hand, stir in pistachios, baking chips and cherries.
Drop by rounded tablespoons 2 inches apart on cookie sheets. Bake 11 to 13 minutes or until edges start to brown. Cool on cookie sheets 2 minutes. Remove to cooling rack. Repeat until all cookies are baked. If baking 2 sheets at a time, rotate sheets half-way through baking time.
Herbed Cheese Shortbread Crisps
Prep Time: 20 minutes
Total Time: 35 minutes
Serves: 24 crisps
1/2 cup butter, softened, 1/2 cup crumbled blue cheese, 1/2 cup grated Parmesan cheese
1 cup all-purpose flour, 1 tablespoon chopped fresh thyme leaves, 1/2 teaspoon coarse ground black pepper
Heat oven to 375^ . In medium bowl, beat butter and blue cheese with beaters on Speed #5 until creamy, about 2 minutes. Add remaining ingredients then decrease to Speed #1 until crumbly and dough starts to form. Roll dough into 1-inch balls. Place 3 inches apart on large cookie sheets (shiny aluminum works best). Dip flat bottom of drinking glass in flour and flatten balls to 2 1/2-inch diameter. Bake 11 to 13 minutes or until golden brown. Cool on cookie sheets 2 minutes. Remove to cooling racks.
CLEANING
Unplug the appliance.
We recommend that you clean the attachments immediately after use.
The attachments and storage case can be washed in warm soapy water. The attachments can also be washed in the dishwasher.
Use a damp sponge to clean the body of the appliance and dry it carefully.
Do not clean the appliance or the storage case in a dishwasher.
Do not use abrasive sponges or objects with metal parts.
■ Do not immerse the motor unit in water. Wipe it clean with a dry or slightly damp cloth.
TROUBLESHOOTING
| PROBLEM CAUSE SOLUTION | ||
| The appliance has stopped working. Your | your appliance is installed with a microprocessor which controls the power of the appliance. For safety reasons, if the functioning time is too long and/or if there is too much food in the bowl, the appliance will stop working. | To restart your appliance, turn the speed control button (G) to position '0'. Allow your appliance to cool down for a few minutes. Then you can continue to prepare your recipe. |
| The appliance has stopped working and the display shows E0:00 | The motor has stalled. To resume operation, turn off the appliance, and then turn on the appliance again using the ON/OFF button. | |
| Appliance stopped working 1. Display shows nothing 2. Display shows EHot | The motor has overheated. Unplug the mixer and let it cool down. To resume operation, plug in the appliance and turn it on again using the ON/OFF button. | |
| My appliance does not turn on. Your appliance is not plugged in. Check the plug, | power cord and power supply. | |
| The turbo does not work You have already arrived | reached the maximum speed with the speed setting (G) Note: Turbo speed is equivalent to max speed 10. | The turbo allows you to directly reach the maximum speed without using the speed setting. (G) |
| I am unable to plug the attachments. Incorrectly attached. Ensure the attachments are correctly plugged (fig.1). | ||
KRUPS INTERNATIONAL LIMITED GUARANTEE

www.krups.com
This product is repairable by KRUPS during and after the guarantee period.
KRUPS endeavours to keep most of the stock of the spare parts available for the repair of your product for up to 5 to 7 years
on average, from the last date of production.
Attaches, consumables and end-user replaceable parts can be purchased, if locally available, as described on the
KRUPS internet site www.krups.com
The Guarantee
This product is guaranteed by KRUPS (company address and details included in the country list of the KRUPS International Guarantee) against any manufacturing defect in materials or workmanship for a period of 2 years starting from the initial date of purchase or delivery date.
The international manufacturer's guarantee by KRUPS is an extra benefit which does not affect consumer's Statutory Rights. The international manufacturer's guarantee covers all costs related to restoring the proven defective product so that it conforms to its original specifications, through the repair or replacement of any defective part and the necessary labour. At KRUPS's choice, a replacement product may be provided instead of repairing a defective product. KRUPS's sole obligation and your exclusive resolution under this guarantee are limited to such repair or replacement.
Conditions & Exclusions
The international KRUPS guarantee only applies within the guarantee period and for those countries listed in the country list attached and is valid only on presentation of a proof of purchase. The product can be taken directly in person to an authorised service centre or must be adequately packaged and returned, by recorded delivery (or equivalent method of postage), to a KRUPS authorised service centre. Full address details for each country's authorised service centres are listed on KRUPS website (www.krups.com) or by calling the appropriate telephone number as set out in the country list to request the appropriate postal address.
KRUPS shall not be obliged to repair or replace any product which is not accompanied by a valid proof of purchase.
This guarantee will not cover any damage which occurs as a result of misuse, negligence, failure to follow KRUPS instructions, use on current or voltage other than as stamped on the product, or a modification or unauthorised repair of the product. It also does not cover normal wear and tear, maintenance or replacement of consumable parts, or the following:
- using the wrong type of water or consumable
- ingress of water, dust or insects into the product
damage as a result of lightning or power surges - scaling (any de-scaling must be carried out according to the instructions for use)
-mechanical damages,overloading
-damages or poor results due to wrong voltage or frequency - accidents including fire, flood, thunderbolt, etc
- professional or commercial use
damage to any glass or porcelain ware in the product
This guarantee does not apply to any product that has been tampered with, or to damages incurred through improper use and care, faulty packaging by the owner or mishandling by any carrier.
In order to offer the best possible after-sales service and constantly improve customer satisfaction, KRUPS may send a satisfaction survey to all customers who have had their product repaired or exchanged in a KRUPS authorised service centre.
The international KRUPS guarantee applies only for products purchased in one of the countries listed, and used for domestic purposes only in one of the countries listed on the Country List. Where a product purchased in one listed country and then used in another listed country:
a) The international KRUPS guarantee does not apply in case of non conformity of the purchased product with the local standards, such as voltage, frequency, power plugs, or other local technical specifications
b) The repair process for products purchased outside the country of use may require a longer time if the product is not locally sold by KRUPS
c) In cases where the product is not repairable in the new country, the international KRUPS guarantee is limited to a replacement by a similar product or an alternative product at similar cost, where possible.
Consumer Statutory Rights
This international KRUPS guarantee does not affect the statutory rights a consumer may have or those rights that cannot be excluded or limited, nor rights against the retailer from which the consumer purchased the product. This guarantee gives a consumer specific legal rights, and the consumer may also have other legal rights which vary from State to State or Country to Country. The consumer may assert any such rights at his sole discretion.
*** Please keep this document for your reference should you wish to make a claim under the guarantee
CONSIGNES DE SECURITÉ
PRECAUTIONS IMPORTANTES
PROBLEM CAUSE SOLUTION
EN. P. 4-10
FR. P. 11-16
ES. P. 17-22