70595 - Food Processor HAMILTON BEACH - Free user manual and instructions
Find the device manual for free 70595 HAMILTON BEACH in PDF.

User questions about 70595 HAMILTON BEACH
0 question about this device. Answer the ones you know or ask your own.
Ask a new question about this device
Download the instructions for your Food Processor in PDF format for free! Find your manual 70595 - HAMILTON BEACH and take your electronic device back in hand. On this page are published all the documents necessary for the use of your device. 70595 by HAMILTON BEACH.
USER MANUAL 70595 HAMILTON BEACH
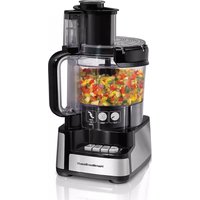
Big Mouth™ Food Processor
READ BEFORE USE
Robot culinaire Big Mouth
LIRE AVANT
UTILISATION
Visit hamiltonbeach.com for delicious recipes and to register your product online!
Français 13
Canada:1-800-267-2826
When using electrical appliances, basic safety precautions should always be followed, including the following:
- Read and save all instructions.
- To protect against risk of electrical shock, do not immerse base, motor, cord, or plug in water or other liquid.
- Close supervision is necessary when any appliance is used by or near children.
- This appliance should not be used by children.
- Unplug cord from outlet when not in use, before putting on or taking off parts, and before cleaning.
- Avoid contacting moving parts.
- Do not operate any appliance with a damaged cord or plug or after the appliance malfunctions or is dropped or damaged in any manner. Call our toll-free customer service number for information on examination, repair or electrical or mechanical adjustment.
- The use of attachments not recommended or sold by the appliance manufacturer, may cause fire, electric shock, or injury.
- Do not use your food processor if any part is broken.
- Do not use appliance outdoors.
- Do not let cord hang over edge of table or counter, or touch hot surfaces.
- Keep hands and utensils away from moving blade and disc while processing food to reduce the risk of severe personal injury and/or damage to the food processor. A rubber scraper may be used but ONLY when the food processor is not running.
-
The blade and disc are sharp. Handle carefully. Store out of reach of children.
-
To reduce the risk of injury, never place cutting blade or disc on base without first putting bowl properly in place.
- Be certain lid is securely locked in place before operating appliance.
- Never feed food into food chute by hand. Always use food pusher.
- Do not attempt to defeat the lid interlock mechanism.
- Make sure the blade or disc has come to a full stop before removing lid.
- To reduce the risk of injury, be sure to insert or remove blade and disc using hubs provided for this purpose. Use caution when removing blade and disc from the bowl, when emptying the bowl, and when cleaning.
- Be sure to turn switch to OFF (O) position after each use. Always use the pusher to clear the food chute. When this method is not possible, turn the motor off and disassemble unit to remove the remaining food.
- The appliance is not intended for commercial, professional or industrial use. It is designed and built exclusively for household use only.
- Never use appliance for a longer period or with a larger amount of ingredients other than that recommended by appliance manufacturer.
- The maximum rating of this unit is based on using the Chopping/Mixing Blade. Using the Slicing/Shredding Disc may draw significantly less power.
- Do not place on or near a hot gas or electric burner or in a heated oven.
- Do not use appliance for other than intended use.
SAVE THESE INSTRUCTIONS!
Other Consumer Safety Information
This appliance is intended for household use only.
WARNING! Shock Hazard: This appliance has a polarized plug (one blade is wider than the other). To reduce the risk of electric shock, this plug is intended to fit into a polarized outlet only one way. If the plug does not fit fully into the outlet, reverse the plug. If it still does not fit, contact a qualified electrician. Do not attempt to modify the plug in any way.
To avoid an electrical circuit overload, do not use another high wattage appliance on the same circuit with your food processor.
The length of the cord used on this appliance was selected to reduce the hazards of becoming tangled in, or tripping over a longer cord. If a longer cord is necessary, an approved extension cord may be used. The electrical rating of the extension cord must be equal to or greater than the rating of the appliance. Care must be taken to arrange the extension cord so that it will not drape over the countertop or tabletop where it can be pulled on by children or accidentally tripped over.
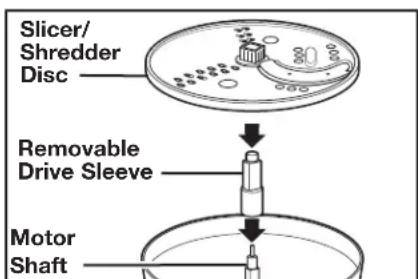
Parts and Features
BEFORE FIRST USE: Unpack processor. Handle Chopping/Mixing Blade and Slicer/Shredder Disc carefully; they are very sharp. Wash all parts except base in hot, soapy water. Rinse then dry.
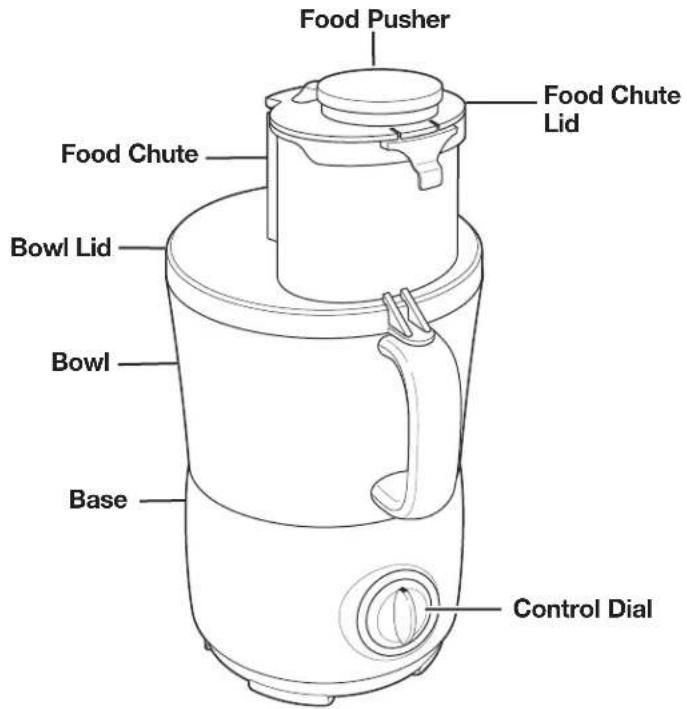
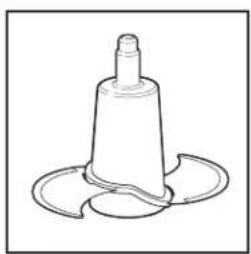
Chopping/Mixing Blade
Removable Drive Sleeve
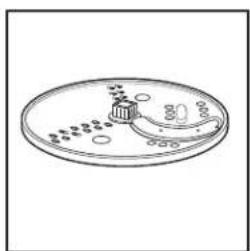
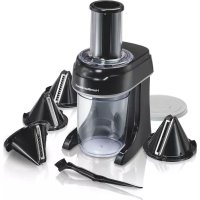
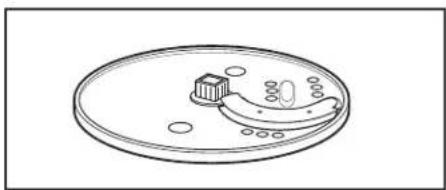
Reversible Slicer/ Shredder Disc
Optional Accessories
6.0mm Slicing Blade
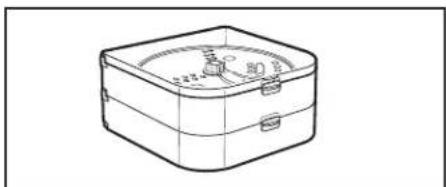
Storage Case

French Fry Blade
To Order Optional Accessories:
1-800-851-8900 (USA)
1-800-267-2826 (Canada)
Using Your Food Processor
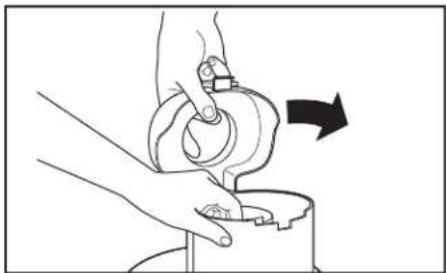
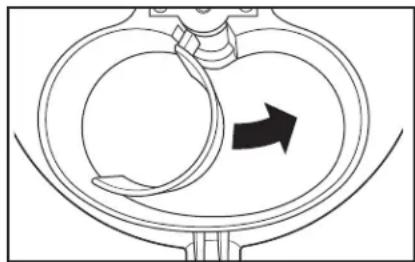
How to Lock the Bowl
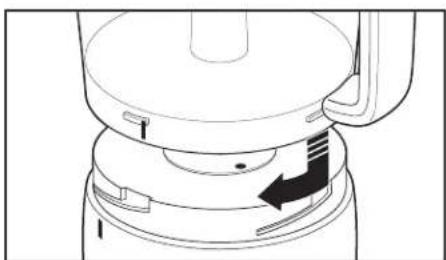
Align base and bowl as illustrated. Turn bowl clockwise until it locks into place. The bowl will lock onto the base in 4 different positions for user convenience.
NOTE: The food processor will not work unless the bowl is locked into position.
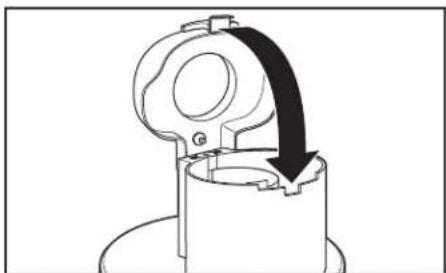
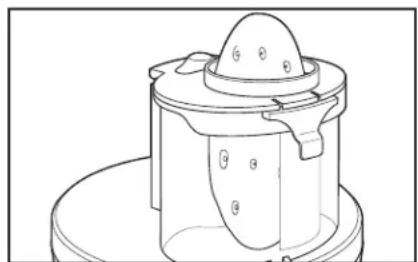
How to Assemble and Lock the Lid
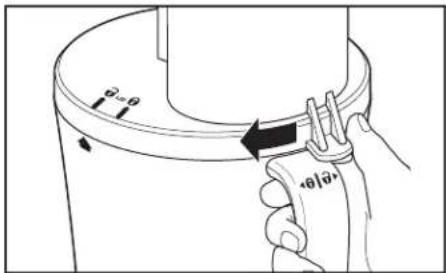
Align lid as illustrated by placing thumb on lid tab and twisting lid clockwise. Four visual alignment markers are provided (see illustration), one on bowl, one on handle and two on bowl lid.
NOTE: The food processor will not work unless the lid is locked into position.
Food chute lid hinges onto back of food chute. Push down lid to latch onto food chute.
Before removing lid, switch to OFF (O) position and wait until blade stops rotating.
To remove food chute lid for cleaning, place one hand in food pusher opening and the other on food chute. Rotate hand from left to right and lift up. This will disengage left notch from slot and then right notch from slot. Reverse the directions to place food chute lid back on food chute.
How to Operate the Controls
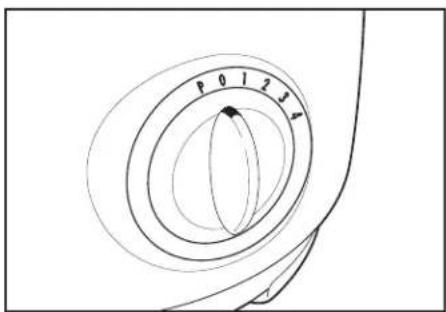
The control dial is conveniently located on the front of the base. Rotate the knob clockwise to select a speed:
1 and 2 for Low
3 and 4 for High
The processor will run continuously. For instant on and off control, use the PULSE (P) button by rotating knob counterclockwise.
Processing Tips and Techniques
-
This food processor is excellent to chop, mix, slice, or shred most foods. However, to maintain peak performance, do not use your food processor for the following: grinding grain, coffee beans or spices; slicing frozen meat; or crushing ice.
To achieve maximum capacity, use Chopping/Mixing blade of Big Mouth and add food no higher than the maximum fill line on food chute. See Food Processing Charts for more information. -
Operating time will depend on quantity of food being processed. Most foods can be sliced, chopped, or shredded in seconds. If unit is operated for 2 minutes continuously, let the processor rest about 4 minutes before continuing.
Processing Using Chopping/Mixing Blade

-
For a more uniform consistency, start with pieces of food that are similar in size. Carrots, for example, should all be cut in 1-inch (2.5 cm) chunks. Do not process 4-inch (10 cm) pieces with 12 -inch (1 cm) pieces.
-
Do not puree or mash starchy vegetables like potatoes. They will be over-processed in a second and turn gummy.
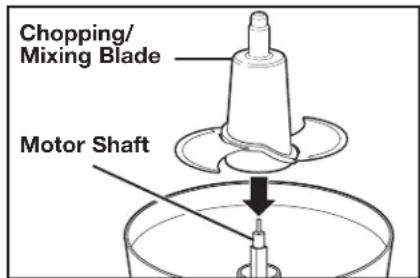
The Chopping/Mixing Blade can be used to coarsely chop, finely mince, mix, or puree food to a smooth consistency.
- Make sure the Control Switch is turned to OFF (O) and the unit is unplugged.
- Lock the bowl onto base. (See "How to Lock the Bowl" on page 4.)
- Place the Chopping/Mixing Blade onto motor shaft of food processor in center of bowl. Turn slowly until blade drops into place. Handle carefully; the blade is sharp.
- Lock lid onto bowl. Insert food pusher into food chute.
- Plug in unit and process food. The processing speed and time will determine the finished consistency of the food. The Pulse button can help you avoid overprocessing. Reference the food processing chart for recommended processing times and speeds.
- When finished processing, select OFF (O) or release from PULSE position. Wait until blade has stopped rotating before removing lid. Unplug the unit.
Processing Using Slicer/Shredder

- To slice or shred cheese, select firm cheese like Cheddar, Monterey Jack, or Swiss. Place cheese in freezer for 30 minutes before processing.
-
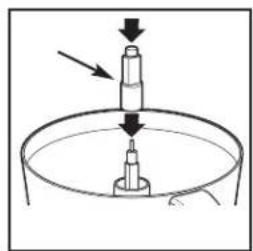
The Reversible Slicer/Shredder Disc has a slicing blade on one side and shredding teeth on the other. The name engraved on the blade, facing up, is the function selected. Place on motor shaft with desired cutting edge facing up.
-
To julienne vegetables, slice then remove from bowl and restack the vegetables. Pack into food chute with slices vertical. Slice again to make match-stick cut vegetables.
-
Make sure the Control Switch is turned to OFF (O) and the unit is unplugged.
- Lock the bowl onto base. (See "How to Lock the Bowl" on page 4.)
- Place Removable Drive Sleeve on Motor Shaft. Put Slicer/Shredder Disc on Removable Drive Sleeve with the desired side facing up for either slicing or shredding. Lock lid onto bowl. (See "How to Assemble and Lock the Lid" on page 5.)
- To slice/shredd large foods (such as chunk of cabbage, green pepper, whole tomato) open food chute lid by lifting latch. Depress food holder to the right. Insert food and lock lid.
To slice/shredd long, thin foods (such as potato, pepperoni, carrots, celery). Lock lid.
Long foods can be inserted into the chute opening and processed as long as the food chute lid is closed.
- Insert food pusher in chute. Always use the food pusher to feed food into the chute. NEVER PUSH FOOD THROUGH CHUTE WITH HANDS.
- Plug in unit.
- Select speed. While pressing on food pusher, select 1 or 2 for optimum slicing and shredding performance or PULSE to process food. Reference the food processing chart for recommended processing times and speeds.
NOTE: The food chute lid is designed to pivot towards the right when processing food that fills the whole food chute capacity.
- When food chute is empty, select OFF (O) or release from PULSE position. Wait until blade has stopped rotating before removing lid. Unplug the unit.
Food Processing Charts
Chopping/Mixing Blade
| FOOD | MINIMUM AMOUNT RECOMMENDED | SPEED | TIME | YIELD |
| Apple | 1 medium peeled or unpeeled, cored and cut into wedges | 1-2 | 5 sec. coarse 7 sec. fine | 1 cup (250 ml) |
| Bread | 2 slices, cut into squares | PULSE | 1 cup (250 ml) | |
| Cabbage | ½ medium head, cored and cut into 1-inch (2.5 cm) chunks | 3-4 | 5 sec coarse 10 sec. fine | 2 to 2½ cups (500 to 625 ml) |
| Carrot | 1 medium, peeled, cut into 1-inch (2.5 cm) pieces | 3-4 | 5 sec coarse 10 sec. fine | ½ cup (125 ml) |
| Celery | 2 firm ribs, strings removed, cut into 1-inch (2.5 cm) pieces | 3-4 | 3 sec coarse 5 sec. fine | ½ cup (125 ml) |
| Cheese, Parmesan | 5 ounces, (140 g) cut into 1-inch (2.5 cm) pieces | PULSE | 1 cup (250 ml) | |
| Graham Crackers | 11 squares | PULSE | ¾ cup (175 ml) | |
| Eggs | 1 hard cooked, chilled and shelled; dry well | 1-2 | 1 sec. coarse 3 sec. fine | ½ cup (80 ml) |
| Garlic | 1 large clove, peeled | 3-4 | 10 sec. | ½ tsp. (2.5 ml) |
| Mushrooms | 9 medium | 1-2 | 3 sec. coarse 5 sec. fine | 2 cups (500 ml) |
| Nuts (hard and soft) | 1 cup (250 ml) | PULSE | ¾ to 1 cup (175 to 250 ml) | |
| Nut Butter | 1 cup (250 ml) nuts | 3-4 | 2 to 2½ min | ½ cup (125 ml) |
| Onions | 1 medium, cut in quarters | 1-2 | 3 sec coarse 5 sec. medium 7 sec. fine | ¾ cup (175 ml) |
| Parsley | ½ cup (125 ml) packed; dry; remove stems | 3-4 | 5 sec coarse 10 sec. fine | ¼ cup (60 ml) |
| Peppers, Green | 1 medium; remove seeds | PULSE | ¾ to 1 cup (175 to 250 ml) |
NOTE: Maximum recommended food quantities:
Fruit = 14 cups (3.5L)
Vegetables = 9 cups (2.25 L)
Cheese, Parmesan = 15 ounces (425g)
Whole Nuts = 8 cups (2 L)
Slicer Disc
| FOOD | MINIMUM AMOUNT RECOMMENDED | SPEED | YIELD |
| Apple | 1 medium peeled or unpeeled | 1-2 | 2 cups (500 ml) |
| Cabbage/Lettuce | ½ medium head, cut to fit in chute | 1-2 | 1 1/2 to 2 1/2 cups (375 to 625 ml) |
| Carrots | 2 medium | 1-2 | 1 cup (250 ml) |
| Celery | 2 firm ribs, strings removed | 1-2 | ½ to ¼ cup (125 to 175 ml) |
| Cheese | 4-ounce piece (115 g), chilled | 1-2 | 2 cups (500 ml) |
| Cucumber | 1 large, peeled or unpeeled | 1-2 | 2 1/2 cups (625 ml) |
| Mushrooms | 9 medium, arranged on sides in chute | 1-2 | 1 1/2 to 1 1/4 cups (375 to 425 ml) |
| Onions | 1 medium | 1-2 | 1 1/2 cup (125 ml) |
| Peppers, Green | 1 medium, remove seeds | 1-2 | 1 1/2 cups (375 ml) |
| Potatoes | 1 medium | 1-2 | 2 cups (500 ml) |
NOTE: Maximum capacity is when the bowl is filled to the slicer/shredder disc.
Shredder Disc
| FOOD | MINIMUM AMOUNT RECOMMENDED | SPEED | YIELD |
| Cabbage | 1/2 medium head, cut to fit in chute | 1-2 | 1 1/2to 2 1/2 cups (375 to 625 ml) |
| Carrots | 1 medium, cut to fit horizontally in the chute | 1-2 | \( 1/2 \) to \( 3/4 \) cup (125 to 175 ml) |
| Soft Mozarella | 2-ounce (55 g) piece, chilled | 1-2 | 1/2 cup (125 ml) |
| Semi-Soft Cheese (Cheddar, Swiss) | 2-ounce (55 g) piece, chilled | 1-2 | 1/2 cup (125 ml) |
| Chocolate | 1-ounce (30 g) square 4-ounce (115 g) bar | 1-2 | 1/2 cup (125 ml) fine 1 cup (250 ml) fine |
| Coconut | 1 small coconut, peeled, cut in chunks | 1-2 | 2 1/2 cups (625 ml) |
| Potatoes | 1 medium (place in cold water to prevent darkness) | 1-2 | 1 cup (250 ml) |
NOTE: Maximum capacity is when the bowl is filled to the slicer/shredder disc.
Troubleshooting Guide
Before calling the Customer Service Number, carefully check the list below for a possible solution to your question.
| POTENTIAL PROBLEM | PROBABLE CAUSE/SOLUTION |
| Unit does not operate on any speed or Pulse. | ·Is the unit plugged in? Does the outlet work? ·Are the bowl, bowl lid, and food chute lid all locked in place? See pp. 4-5 “How to Assemble.” |
| Food is not chopped, sliced or shredded uniformly. | ·Packing too much food in the food chute, or pushing too hard on the food pusher may cause the processed food to be irregularly sliced or shredded. Refer to the food processing charts for recommended sizes and quantities. ·Are you using the recommended speed? See pp. 8-9 “Food Processing Charts.” |
| Unit stops and will not come back on. | ·Are the bowl, bowl lid, and food chute lid all locked in place? They may have moved slightly during processing. See pp. 4-5 “How to Assemble.” ·Is the outlet still working? Check it by plugging in a working lamp or other appliance. You may have overloaded the circuit and blown a fuse or tripped the circuit breaker. ·Turn unit OFF, allow to stand for 3 to 4 minutes, then turn back ON. If none of these suggestions correct the problem, DO NOT attempt to repair the unit. Call the Customer Service number to get the name of your nearest Authorized Service Center. |
| Unit has a burning smell. | ·There may be a residue left on the motor from the manufacturing process, causing a slight odor during initial use. This will go away. If a strong odor or any visible smoke appears, unplug the unit IMMEDIATELY and call the Customer Service number. |
| Motor seems weak. | ·Are you using the recommended speed for the item you are processing? See pp. 8-9 “Food Processing Charts.” ·Are you using the recommended food size and quantity to be processed? Refer to the food processing charts for recommended food sizes and speeds. See pp. 8-9 “Food Processing Charts.” |
Cleaning, Storage and Maintenance
- Wash bowl, lids, blade, discs, removable drive sleeve and food pusher in hot, soapy water. Rinse and dry thoroughly. See page 5 for information on how to remove food chute lid for cleaning. To clean food thoroughly from the bowl and bowl lid/food chute, immerse in hot, soapy water. NOTE: Do not store unit with lid in locked position; this may put strain on interlock tab.
-
Wipe base, control panel, and cord with a damp cloth or sponge. To remove stubborn soil, use a mild non-abrasive cleanser.
-
To store, place bowl on base. Then place Chopping/Mixing Blade on motor shaft and Slicer/Shredder Disc on Chopping/Mixing Blade. The Removable Drive Sleeve may be stored in the bowl. Place lid on bowl but do not lock.
- Monthly place a drop of vegetable oil on each screw in the food chute.
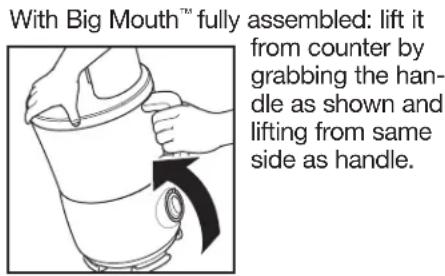
How to Release Suction Cup Feet After Use
The suction cup feet on the bottom of your Big Mouth™ Food Processor are designed to keep the unit stationary during use. To maximize the life of your Big Mouth™ please review the following directions:
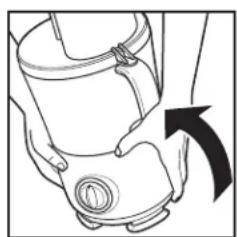
With Big Mouth™ fully
assembled: lift it from counter by placing hands under unit as shown and lifting to one side.
OR
OR
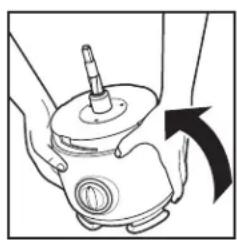
With bowl and lid removed from Big
Mouth: lift it from counter by placing hands under unit as shown and lifting to one side
Customer Service
If you have a question about your food processor, call our toll-free customer service number. Before calling, please note the model, type, and series numbers and fill in that information below. These numbers can be found on the bottom of your food processor. This information will help us answer your question much more quickly.
MODEL:
TYPE:
SERIES:
This warranty applies to products purchased in the U.S. or Canada.
LIMITED WARRANTY
This product is warranted to be free from defects in material and workmanship for a period of one (1) year from the date of original purchase, except as noted below. During this period, we will repair or replace this product at our option. THE FOREGOING WARRANTY IS IN LIEU OF ANY OTHER WARRANTY OR CONDITION, WHETHER EXPRESS OR IMPLIED, WRITTEN OR ORAL INCLUDING, WITHOUT LIMITATION, ANY STATUTORY WARRANTY OR CONDITION OF MERCHANTABILITY OR FITNESS FOR A PARTICULAR PURPOSE. ANY LIABILITY IS EXPRESSLY LIMITED TO AN AMOUNT EQUAL TO THE PURCHASE PRICE PAID, AND ALL CLAIMS FOR SPECIAL, INCIDENTAL AND CONSEQUENTIAL DAMAGES ARE HEREBY EXCUSED. There is no warranty with respect to the following, which may be supplied with this product, including without limitation: glass parts, glass containers, cutter/strainers, blades, seals, gaskets, clutches, motor brushes, and/or agitators, etc. This warranty extends only to the original consumer purchaser and does not cover a defect resulting from abuse, misuse, neglect including failure to clean product regularly in accordance with manufacturer's instructions, use for commercial purposes, or any use not in conformity with the printed directions. This warranty gives you specific legal rights, and you may also have other legal rights which vary from state to state, or province to province. Some states or provinces do not allow limitations on implied warranties or special, incidental or consequential damages, so the foregoing limitations may not apply to you.
If you have a claim under this warranty, DO NOT RETURN THE APPLIANCE TO THE STORE! Please call our CUSTOMER SERVICE NUMBER. (For faster service please have model, series, and type numbers ready for operator to assist you.)
CUSTOMER SERVICE NUMBERS
In the U.S. 1-800-851-8900
In Canada 1-800-267-2826
hamiltonbeach.com
KEEP THESE NUMBERS FOR FUTURE REFERENCE!
PRECAUTIONS IMPORTANTES
CONSERVEZ CES INSTRUCTIONS!
Mixcoac MEXICO 03910 D.F.
Tel: 01 55 5563 8723
Fax: 01 55 5615 1856