GX610 - Coffee grinder KRUPS - Free user manual and instructions
Find the device manual for free GX610 KRUPS in PDF.

| Product Type | Conical Burr Coffee Grinder |
| Brand | Krups |
| Model | GX610 |
| Bean Hopper Capacity | 250 g |
| Dimensions (W x H x D) | 135 x 385 x 230 mm |
| Power | 150 W, 120 V, 60 Hz |
| Number of Grind Settings | 24 |
| Burr Type | Italian hardened steel conical burrs |
| Functions | Continuous grinding (On/Off) and grinding on demand (Auto) |
| Body Material | Reinforced cast metal |
| Warranty | 2 years parts and labor, 5 years on motor |
| Included Accessories | Cleaning brush, preparation mat, outlet cover |
| Care and Cleaning | Clean burrs every 3 weeks for daily use; hopper and container washable in warm soapy water; do not immerse motor block |
| Safety | Unlock button for burr removal; non-slip feet; do not use if cord damaged |
| Recommended Use | Whole coffee beans only |
| Ground Coffee Container Capacity | Not specified |
Frequently Asked Questions - GX610 KRUPS
User questions about GX610 KRUPS
0 question about this device. Answer the ones you know or ask your own.
Ask a new question about this device
Download the instructions for your Coffee grinder in PDF format for free! Find your manual GX610 - KRUPS and take your electronic device back in hand. On this page are published all the documents necessary for the use of your device. GX610 by KRUPS.
USER MANUAL GX610 KRUPS
MAIN FUNCTIONS p. 10
OPERATING THE APPLIANCE. p. 10
ADJUSTING THE GRIND SETTING. p. 11
CARE AND CLEANING 12
MANUFACTURER'S WARRANTY. p. 13
IMPORTANT SAFEGUARDS
SAFETY PRECAUTIONS
- When using electrical appliances, basic safety precautions should always be followed including the following.
- Read all instructions.
- Check the grinding bowl for the presence of foreign objects before using.
- Always operate the grinder with the ground coffee container properly inserted in the grinder.
- Do not place your hand in or near the burrs while the grinder is in operation.
- Always place the unit on a flat, level surface.
- Switch off and unplug at power point before cleaning.
- Do not attempt to re-grind ground coffee.
Listed below are precautions which are essential for the safe use of an electrical appliance:
- Read carefully and save all the instructions provided with an appliance.
- Always turn the power off at the power outlet before you insert or remove a plug. Remove by grasping the plug - do not pull on the cord.
- Turn the power off and remove the plug when the appliance is not in use, before putting on or taking off parts, and before cleaning.
- Always use your appliance from a power outlet of the voltage (A.C. only) marked on the appliance.
- This appliance is not intended for use by young children or infirm persons unless they have been adequately supervised by a responsible adult to ensure that they can use the appliance safely.
- Close supervision is necessary when any appliance is used by or near children.
- Never leave an appliance unattended while in use.
- Do not use an appliance for any purpose other than its intended use.
- Do not place an appliance on or near a hot gas flame, electric element or on a heated oven. Do not place on top of any other appliance.
- Do not let the power cord of an appliance hang over the edge of a a table or counter or bench top or touch any hot surface.
- Do not operate any electrical appliance with a damaged cord or plug or after the appliance malfunctions, or is dropped or damaged in any manner. If damage is suspected, return the appliance to the nearest KRUPS Service Center for examination, repair or adjustment.
- To protect against risk of electrical shock, do not immerse the appliance in water or any liquid.
- Ensure the above safety precautions are understood.
- Avoid contacting moving parts.
- The use of attachments not recommended or sold by the manufacturer may cause fire, electric shock or injury.
- Do not use outdoors.
SAVE THESE INSTRUCTIONS
CAUTION
- This appliance complies with applicable technical rules and standards at the time of manufacture.
- This appliance is intended for household use only. Do not use it for commercial purposes. Any servicing other than cleaning and user maintenance should be performed by the nearest authorized KRUPS Service Center.
- Check voltage to be sure that the voltage indicated on the rating label matches your voltage.
- To reduce the risk of fire or electric shock, do not remove the base. No user serviceable parts inside. Repairs should be done by an authorised KRUPS Service Center only.
- Never clean with harsh or abrasive cleaners or sponges.
- Clean using gentle dishwashing liquid and warm water. Dry all parts carefully before next use.
- Do not place or use the appliance on hot surfaces such as stoves, hotplates, or near open gas flames.
- Only use the appliance on a stable working surface away from water splashes.
SHORT CORD INSTRUCTIONS
- Do not operate any electrical appliance with a damaged cord or after the appliance has been damaged in any manner. If damage is suspected, return the appliance to the nearest KRUPS Service Centre for examination, repair or adjustment.
A.We do not recommend using an extension cord with this device.
B.If an extension cord is absolutely necessary,
1) the marked electrical rating of the extension cord should be at least as great as the electrical rating of the machine,
2) the longer cord should be arranged so that it will not drape over the counter top or table top where it can be pulled on by children or tripped over.
C.The extension cord should be a grounding-type 3-wire cord.
Do not unplug the unit by pulling on the cord. Instead grasp plug and pull to disconnect.
In the interest of improving products, Krups reserves the right to change specifications without prior notice.
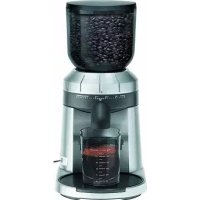
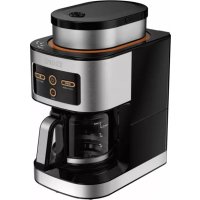
DESCRIPTION
1 Bean hopper lid
2 250g bean hopper
The 250g capacity bean hopper has a shutter release mechanism for easy removal and preventing accidental spills.
It allows the user to transfer any un-used beans to an ideal storage unit to preserve freshness.
3 Burr shield
4 Grind adjustment collar
Large and easy to use, the collar has a wide range of 24 grind settings. The coffee maker can select a fine grind to suit commercial espresso or adjust the setting for other brewing styles - from Turkish to plunger.
With such precise settings the user controls the particle size and ultimately the quality of the brew.
5 Ground coffee container lid
6 Ground coffee container
7 Group handle locator
7a Commercial size group handle locator
7b Domestic size group handle locator
8 Preparation mat
Positioned under the grinding spout the preparation mat is ideal for catching loose coffee grinds while filling directly into the group handle. The mat can also be used on the bench as a tamping pad.
9 Rubber feet
The non-slip rubber feet ensure the grinder remains stable and prevents slipping on the bench top during use.
10 Italian conical burrs
Italian designed and manufactured, the metal conical burr design achieves excellent grind consistency and minimises heat transfer to the coffee due to the slowly rotating burrs.
11 Grinding spout
12 Die-cast metal housing
Built to last, the heavy-duty die-cast metal body encases a powerful motor, supported by a 5 year guarantee and provides a stable base for the grinder.
13 Grind on demand button
Position the group handle into the group handle locator, push against the button and freshly ground coffee will flow directly into the basket, pull the handle away and grinding will stop.
14 Cord wrap
Cord wraps away to keep bench top clean.
15 Operation switch
Switch to 'On' to grind continuous quantities directly into the storage container, 'Off' to stop or alternatively switch to 'Auto' for grinding directly into the group handle.
16 Silicon spout cover
Simply slide the spout cover onto the grinder spout. This minimises the drop of coffee from the grinder spout to the coffee filter, thus reducing coffee waste.
17 Burr cleaning brush
Strong bristles help sweep out grinds from the burrs.
TECHNICAL CHARACTERISTICS
| Power 150 W | |
| Voltage 120V | - 60Hz |
| Dimensions L: H: W: | 135 mm 385 mm 230 mm |
| 24 grind setting | |
| Removable burrs | |
MAIN FUNCTIONS
Slow speed grinding
The combination of a powerful gear-driven motor and conical burr design delivers a slow speed grinding process. This minimises the heat transferred to the coffee, protecting its aromatic profile.
Dual mode settings
For convenience there are two methods of operation - the 'Auto' function for grinding coffee as it's required or 'On' for grinding continuous quantities directly into the storage container.
Grind On Demand
As with commercial bar grinders, the 'Auto' function allows coffee beans to be freshly ground directly into the group handle on demand as required by the coffee maker, providing complete dosing control and most importantly a fresh grind without loss of aroma and flavour.
OPERATING THE APPLIANCE
Before using the coffee grinder, wipe the base exterior with a damp cloth. Wash the bean hopper, hopper lid and ground coffee container in warm soapy water, then rinse and dry.

Important: Do not immerse the burrs in water or any other liquid. Do not place any parts of the coffee grinder in the dishwasher.
Place the coffee grinder on a dry, level surface.
To attach the bean hopper, position bean hopper onto the top of the motor base, push down and turn clockwise. (fig. 1).
■Fill the bean hopper with coffee beans.
Tip: Remember to keep the hopper full at all times. Having an even weight bearing down on the burrs is important to ensure a consistent grind.
This coffee grinder is intended to grind whole coffee beans only.
Place the hopper lid onto the bean hopper.
■Select the grind by turning the grind adjustment collar to the desired setting. (fig. 2).
Plug the power cord into a 120V AC power outlet and switch the power on.
Refer to the grind setting table on page 11 to assist you in selecting the correct grind level for the desired brewing method.
FOR G R I N D I N G CONTINUOUS QUANTITIES
- Remove the lid from the ground coffee container and slide onto the preparation mat. The coffee container will fit comfortably into the domestic size group handle locator.(fig. 3).
To grind coffee, flip the switch to the 'On' position. (fig. 4).
■ When the desired amount of coffee has been ground, flip the switch to the 'Off' position. Remove the coffee container and scoop out the ground coffee.
FOR G R I N D I N G INTO THE GROU P H A N D L E
Position the group handle into the group handle locator. (fig. 5).

Important: There are two group handle locators provided: a smaller size to fit domestic handles and a larger size for commercial handles.
■Flip the switch to the 'Auto' position. (fig. 6).
To grind coffee, press the group handle against the button located in the centre of the group handle locator. (fig. 7).
■ When the basket is full, pull the group handle off the button. Collapse the coffee in the basket by tapping
it on the bench and repeat until the desired amount of coffee has been ground.
Note: Foreign objects like stones or twigs can sometimes be found in whole bean coffee and can cause the coffee grinder to jam. Should this occur refer to the Care and Cleaning section as these objects need to be removed immediately.
ADJUSTING THE GRIND SETTING
Grind setting table
| SETTING BREWING METHOD |
| 2-6 Turkish |
| 12-16 Espresso |
| 12-16 Stove Top |
| 20-23 Drip Filter |
| 20-23 Plunger |
The wide-range of 24 grind settings allows for precision adjustment. The coffee maker has complete control of the particle size and ultimately the quality of the resulting brew. Some things to remember when using the coffee grinder:
- The smaller the particle size the longer it will take to grind.
- When using the finer settings the coffee may become stuck, we recommend tapping on the lid of the bean hopper to dislodge any clumps of coffee blocking the flow.
- After long periods of using the finer settings we recommend removing the upper burr and sweeping away any residual coffee to avoid clogging. See the Care and Cleaning section for more details.
Tips:
■ Select the correct grind for the brewing method you are using. 24 grind settings are available to ensure precision adjustment. Setting 1 produces the finest grind, 12 to 16 are medium grinds appropriate for espresso coffee makers, and 24 is the coarsest grind you can achieve.
Experiment with the grind settings to achieve the ideal brew that best suits your tastes.
For drip filter coffee machines, a good starting point is to use 8 grams (1 scoop) of coffee for every cup of brew water as measured with the carafe. Finer grinds usually require less coffee, but using too fine a grind will result in a brew that is bitter in flavour.
For those that prefer weaker coffee, continue to use the recommended amount of ground coffee and then dilute the resulting brew with fresh hot water. Doing this will maximise flavour and minimise bitterness.
■ Coffee that is ground too fine for a particular brewing process will result in over-extraction and the coffee will taste bitter. On the other hand, coffee that is too coarse for a particular brewing method will result in under-extraction and the coffee will be thin and poor in flavour.
Once coffee is ground it quickly loses its flavour and aroma. For the best results we recommend you grind beans immediately prior to brewing.
■Buy fresh whole coffee beans weekly.
To retain freshness, store whole coffee beans in an airtight container in a cool, dark, dry place. It is not recommended that you store beans in the grinder's bean hopper for a prolonged period.
To ensure the best results from the coffee grinder clean the bean hopper and conical burrs regularly.
CARE AND CLEANING

Important:
Spots and marks on the surface of the burrs are part of the hardening process. These marks do not affect the performance of the grinder or the taste of the coffee.
■ Ensure the coffee grinder is switched off and unplugged from the power outlet prior to cleaning.
■Do not immerse the motor base of the coffee grinder in water.
■Do not immerse any part of the burr assembly in water or any other liquid.
■Do not place any parts of the coffee grinder in the dishwasher.
■Do not use abrasive cleansers or scouring pads.
CLEANING THE MOTOR BASE, BEAN HOPPER AND COFFEE CONTAINER
■Remove the bean hopper from the motor base push down and turn anti-clockwise and store unused beans in an airtight container to preserve their freshness. (fig. 8).
■Wipe the motor base exterior with a damp cloth and dry.
■Wash the bean hopper and coffee container in warm soapy water, then rinse and dry.
CLEANING THE BURRS
If the coffee grinder is used frequently (every day), the burrs need to be cleaned every three weeks to ensure best performance of the coffee grinder. Regular cleaning helps the burrs achieve consistent grinding results, which is especially important when grinding coffee for espresso.
- Ensure the coffee grinder is switched off and unplugged from the power outlet. Remove the bean hopper from the motor base, push down and turn anti-clockwise. (fig. 8).
- To remove the top burr turn the grind adjustment collar in an anti-clockwise direction until it stops. (fig. 9).

Important:
The top burr can only be removed when the graphic arrow on the grind adjustment collar is aligned with the arrow on the motor base.
- Press and hold down the 'UNLOCK' button at the rear of the motor base and with the other hand turn the grind adjustment collar anti-clockwise until the graphic arrow on the collar is aligned with the arrow on the motor base. (fig. 10).
- Lift out the top burr from the grind adjustment collar using the handle. (fig. 11). Clean using the burr-cleaning brush.
- Lift the grind adjustment collar away from the motor base and clean with the brush. (fig. 12).
- Clean the bottom burr using the burrcleaning brush. (fig. 13).
- Once both burrs are cleaned, return the grind adjustment collar to its position in the motor base.
- With the grind adjustment collar in hand align the arrow on the collar with the arrow on the rear of the motor base, press down.
- Replace the top burr back into position in the grind adjustment collar and turn clockwise to the desired grind setting.
ADJUSTING THE BURRS FOR WEAR
The conical burrs are made of tool hardened steel for extra long life. However after prolonged use the burrs will require adjustment to compensate for wear. A sign of this is when the grinds are not as fine as they used to be, check by rubbing some of the grinds between two fingers or for espresso the extraction will also show signs that the grind needs adjusting.
REPLACING THE BURRS
To inquire about having the burrs replaced contact nearest Krups Service Center.
MANUFACTURER'S WARRANTY

: www.krups.com
With a strong commitment to the environment, most of Krups products are repairable during and after the warranty period. Before returning any defective products to the point of purchase, please call Krups consumer service directly at the phone number below for repair options.
Your help to sustain the environment is appreciated!
The Warranty
This product is guaranteed by Krups for a period of 2 years against any manufacturing defect in materials or workmanship, starting from the initial date of purchase.
The manufacturer's warranty by Krups is an extra benefit which does not affect consumer's Statutory Rights.
The Krups warranty covers all costs related to restoring the proven defective product so that it conforms to its original specifications, through the repair or replacement of any defective part and the necessary labor. A replacement product may be provided instead of repairing a defective product. Krups's sole obligation and your exclusive resolution under this warranty are limited to such repair or replacement.
Conditions & Exclusions
The Krups warranty only applies within USA, Canada & Mexico, and is valid only on presentation of a proof of purchase. The product can be taken directly in person to an authorized service centre or must be adequately packaged and returned, by recorded delivery (or equivalent method of postage), to a Krups authorized service centre. Full address details for each country's authorized service centre are listed on the Krups website (www.krups.com) or by calling the appropriate telephone number listed below to request the appropriate postal address.
Krups shall not be obliged to repair or replace any product which is not accompanied by a valid proof of purchase.
This warranty will not cover any damage which could occur as a result of misuse, negligence, failure to follow Krups instructions, use on current or voltage other than as stamped on the product, or a modification or unauthorized repair of the product. It also does not cover normal tear and wear, maintenance or replacement of consumable parts, and the following:
- using the wrong type of water
- scaling (any de-scaling must be carried out according to the instructions for use);
- ingress of water, dust or insects into the product;
- mechanical damages, overloading
- damages or bad results due to wrong voltage or frequency
- accidents including fire, flood, lightning, etc
- professional or commercial use
- damage to any glass or porcelain ware in the product
This warranty does not apply to any product that has been tampered with, or to damages incurred through improper use and care, faulty packaging by the owner or mishandling by any carrier.
The Krups manufacturer's warranty applies only for products purchased and used in USA, Canada & Mexico. Where a product purchased in one country and then used in another one:
a) The Krups guarantee duration is the one in the country of usage of the product, even if the product was purchased in another listed country with different guarantee duration.
b) The Krups guarantee does not apply in case of non conformity of the purchased product with the local standards, such as voltage, frequency, power plugs, or other local technical specifications.
c) The repair process for products purchased outside the country of use may require a longer time if the product is not locally sold by Krups
d) In cases where the product is not repairable in the new country, the Krups guarantee is limited to a replacement by a similar product or an alternative product at similar cost, where possible.
Consumer Statutory Rights
This Krups manufacturer's warranty does not affect the statutory rights a consumer may have or those rights that cannot be excluded or limited, nor rights against the retailer from which the consumer purchased the product. This warranty gives a consumer specific legal rights, and the consumer may also have other legal rights which vary from State to State or Country to Country or Province to Province. The consumer may assert any such rights at his sole discretion.
Additional information
Accessories, Consumables and end-user replaceable parts can be purchased, if locally available, as described in Krups internet site.
| CANADA | GROUPE SEB CANADA345 Passmore AvenueToronto, ONM1V 3N8 | MEXICO | Groupe Seb MexicoS.A de C.V.Goldsmith 38 Desp.401 Col. PolancoDelegation Miguel Hildalgo11 560 Mexico D.F.MEXICO | U.S.A. | GROUPE SEB USA2121 Eden RoadMillville, NJ 08332 |
| 1-800-418-3325 | 01800 112 | 83 25 800-526-5377 |

: www.krups.com
TABLE DES MATIERES
MISES EN GARDE IMPORTANTES. p. 16
DESCRIPTION. 18
CARACTERISTIQUES TECHNIQUES. p. 18
FONCTIONS PRINCIPALES 19
UTILISATION DE L'APPAREIL 19
RéGLAGE DE LA MOUTURE 20
ENTRETIEN ET NETTOYAGE. p. 21
GARANTIE DU FABRICANT. p. 22