
VPLVW290ES - Projector SONY - Free user manual and instructions
Find the device manual for free VPLVW290ES SONY in PDF.
| Product Type | LCD Projector |
| Brand | Sony |
| Model | VPL-VW290ES |
| Display Technology | LCD |
| Lamp | LMP-H220 (optional) |
| Supplied Accessories | Remote control RM-PJ28, AA batteries (2), lens cap, power cord, quick reference guide |
| Input Connectors | HDMI (x2), LAN |
| Image Presets | CINEMA FILM 1, CINEMA FILM 2, REF, TV, PHOTO, GAME, BRT CINE, BRT TV, USER |
| Lens Adjustments | Focus, zoom, shift motorized via remote control |
| Network Functions | Control via web browser, LAN port |
| 3D Compatibility | Yes, via Bluetooth 3D glasses (not supplied) |
| Menu Languages | French, English, German, Spanish, Italian, Chinese, Japanese and others |
| Power Supply | Mains, 3-wire power cord with grounding |
| Power Consumption | Not specified in the manual |
| Dimensions (W x D x H) | Not specified in the manual |
| Weight | Not specified in the manual |
| Installation | On table or ceiling (requires a certified Sony technician) |
| Maximum Operating Altitude | 1,500 m (high altitude mode available) |
| Operating Temperature | Not specified in the manual |
| Maintenance | Cleaning ventilation slots, lamp replacement |
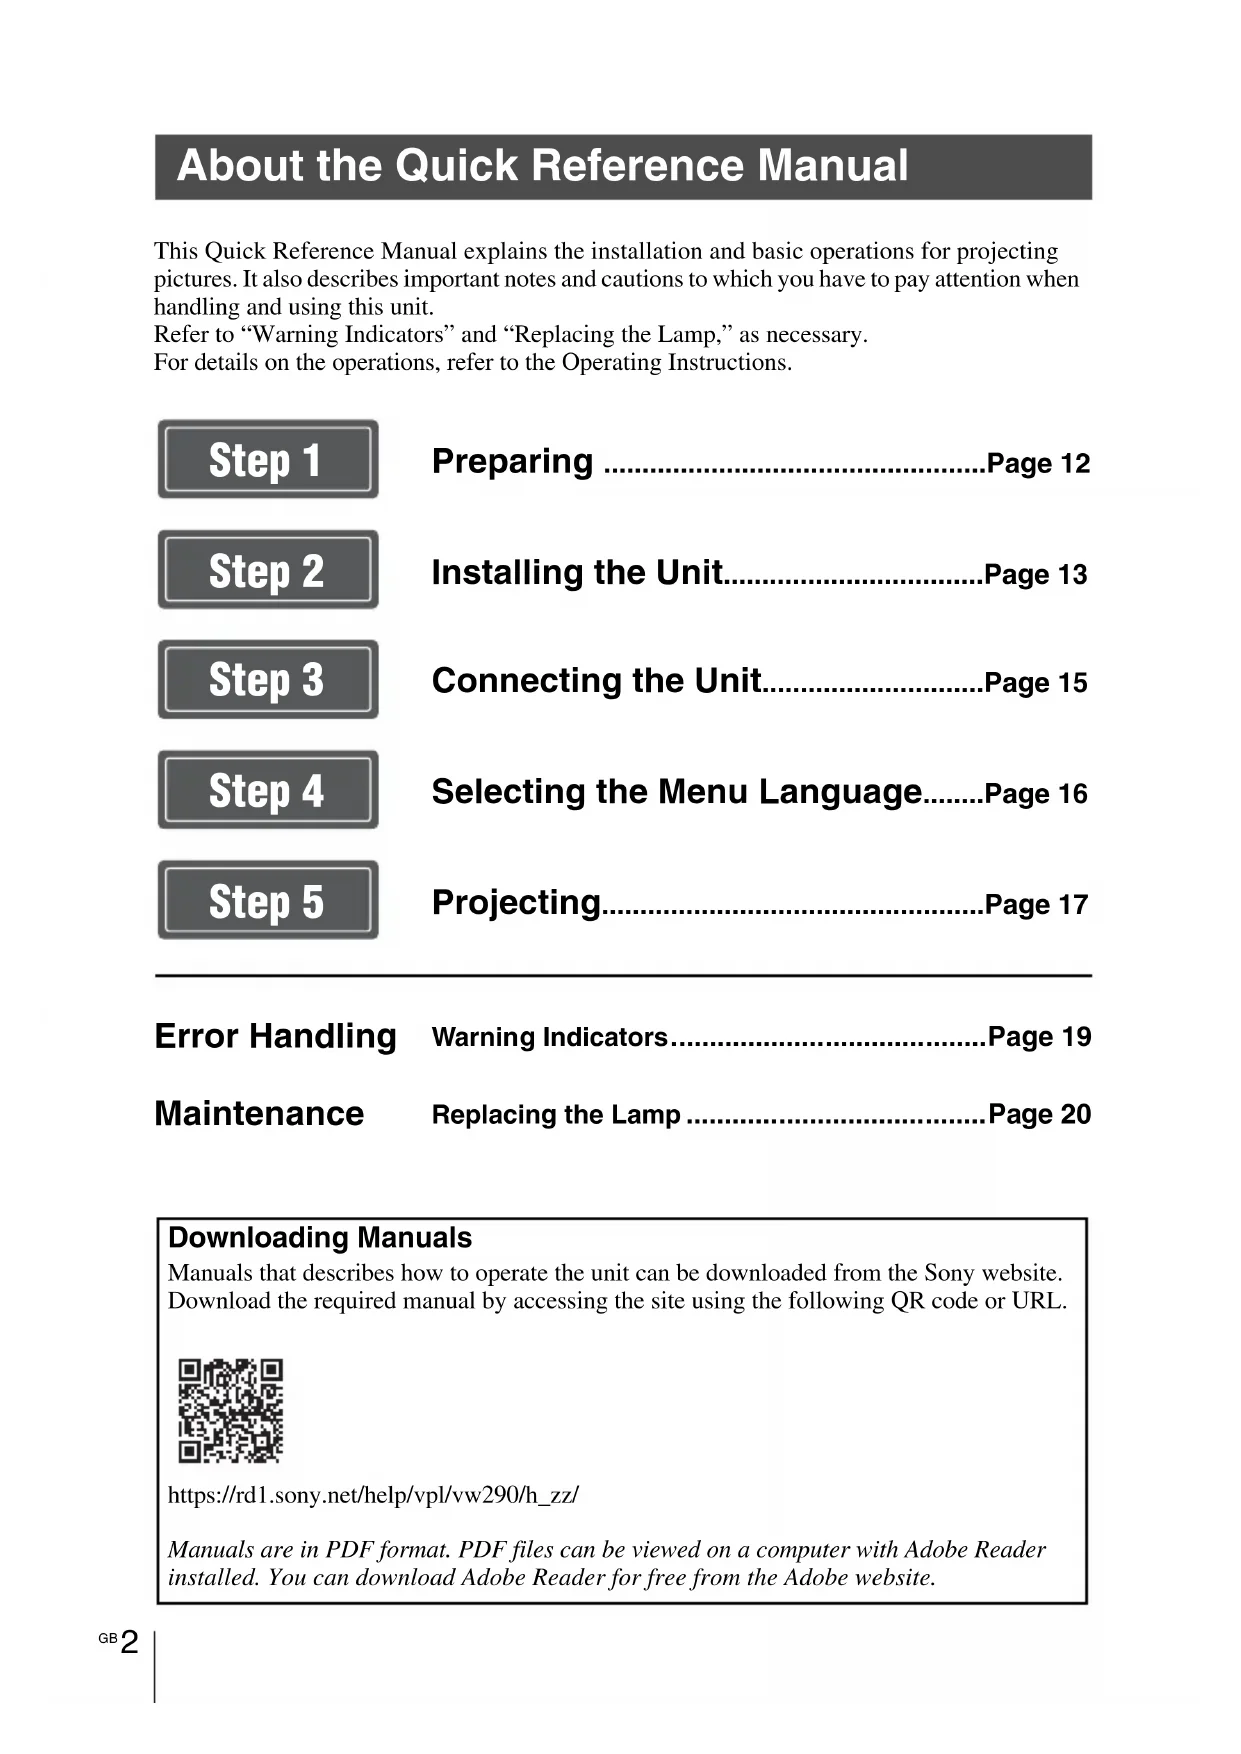
| Safety | Do not look into the beam (RG2), grounding required, do not block ventilation |
| Warranty | Sony limited warranty (see website) |
Frequently Asked Questions - VPLVW290ES SONY
User questions about VPLVW290ES SONY
0 question about this device. Answer the ones you know or ask your own.
Ask a new question about this device
Download the instructions for your Projector in PDF format for free! Find your manual VPLVW290ES - SONY and take your electronic device back in hand. On this page are published all the documents necessary for the use of your device. VPLVW290ES by SONY.
USER MANUAL VPLVW290ES SONY
This Quick Reference Manual explains the installation and basic operations for projecting pictures. It also describes important notes and cautions to which you have to pay attention when handling and using this unit.
Refer to “Warning Indicators” and “Replacing the Lamp,” as necessary.
For details on the operations, refer to the Operating Instructions.
Step 1
Preparing ......Page 12
Step 2
Installing the Unit......Page 13
Step 3
Connecting the Unit......Page 15
Step 4
Selecting the Menu Language......Page 16
Step 5
Projecting......Page 17
Error Handling
Warning Indicators......Page 19
Maintenance
Replacing the Lamp Page 20
Downloading Manuals
Manuals that describes how to operate the unit can be downloaded from the Sony website. Download the required manual by accessing the site using the following QR code or URL.

https://rd1.sony.net/help/vpl/vw290/h_zz/
Manuals are in PDF format. PDF files can be viewed on a computer with Adobe Reader installed. You can download Adobe Reader for free from the Adobe website.
English
Before operating the unit, please read this manual thoroughly and retain it for future reference.
When using the product, do not use it for purposes other than those described in the instruction manual.
WARNING
To reduce the risk of fire or electric shock, do not expose this apparatus to rain or moisture.
To avoid electrical shock, do not open the cabinet. Refer servicing to qualified personnel only.
WARNING
This apparatus must be earthed.
WARNING
When installing the unit, incorporate a readily accessible disconnect device in the fixed wiring, or connect the power plug to an easily accessible socket-outlet near the unit. If a fault should occur during operation of the unit, operate the disconnect device to switch the power supply off, or disconnect the power plug.
CAUTION
For safety, do not connect the connector for peripheral device wiring that might have excessive voltage to the following port: LAN connector
WARNING
- Use the approved Power Cord (3-core mains lead) / Appliance Connector / Plug with earthing-contacts that conforms to the safety regulations of each country if applicable.
- Use the Power Cord (3-core mains lead) / Appliance Connector / Plug conforming to the proper ratings (Voltage, Ampere).
If you have questions on the use of the above Power Cord / Appliance Connector / Plug, please consult a qualified service personnel.
CAUTION
- Danger of explosion if battery is incorrectly replaced. Replace only with the same or equivalent type recommended by the manufacturer.
- When you dispose of the battery or the product, you must obey the law in the corresponding area or country. Do not dispose of the battery or the product in a fire or a hot oven, or mechanically crush or cut the battery. It may explode or cause a fire. Do not subject the battery to extremely low air pressure that may result in an explosion or the leakage of flammable liquid or gas.
- Do not place the battery in a high temperature place, such as under direct sunlight or near fire. It may ignite, explode, or cause a fire. Do not immerse or wet the battery in water or seawater. This may cause an electric shock.
CAUTION
The following size and number of batteries are required for the remote control.
- Size AA (R6)
- Two
To avoid risk of explosion, use only the following type of battery. - Size AA (R6) manganese or alkaline batteries
Caution on replacement/disposal of the battery for the 3D glasses
Danger of explosion if battery is incorrectly replaced.
Replace only with the same or equivalent type recommended by the manufacturer. When you dispose of the battery, you must obey the law in the relative area or country.
About 3D Glasses
The 3D Glasses communicate with the projector via Bluetooth technology to display 3D signals.
(a) frequency band(s) in which the radio equipment operates:
2.4 - 2.4835 GHz
(b) maximum radio-frequency power transmitted in the frequency band(s) in which the radio equipment operates: 4.30 dBm (E.I.R.P.)
As with any bright light source, do not stare into the beam, RG2 IEC 62471-5:2015.

This symbol is intended to alert the user to the presence of hot surfaces.
For the customers in the U.S.A.
This equipment has been tested and found to comply with the limits for a Class B digital device, pursuant to part 15 of the FCC Rules. These limits are designed to provide reasonable protection against harmful interference in a residential installation. This equipment generates, uses and can radiate radio frequency energy and, if not installed and used in accordance with the instructions, may cause harmful interference to radio communications. However, there is no guarantee that interference will not occur in a particular installation. If this equipment does cause harmful interference to radio or television reception, which can be determined by turning the equipment off and on, the user is encouraged to try to correct the interference by one or more of the following measures:
- Reorient or relocate the receiving antenna.
- Increase the separation between the equipment and receiver.
- Connect the equipment into an outlet on a circuit different from that to which the receiver is connected.
- Consult the dealer or an experienced radio/TV technician for help.
You are cautioned that any changes or modifications not expressly approved in this manual could void your authority to operate this equipment.
All interface cables used to connect peripherals must be shielded in order to comply with the limits for a digital device pursuant to Subpart B of part 15 of FCC Rules.
If you have any questions about this product, you may call;
Sony Customer Information Service Center 1-800-222-7669 or http://www.sony.com/
Supplier's Declaration of Conformity
Trade Name: SONY Model: VPL-VW290ES Responsible party: Sony Electronics Inc. Address: 16535 Via Esprillo, San Diego, CA 92127 U.S.A.
Telephone Number:858-942-2230
This device complies with part 15 of the FCC Rules. Operation is subject to the following two conditions: (1) This device may not cause harmful interference, and (2) this device must accept any interference received, including interference that may cause undesired operation.
This transmitter must not be co-located or operating in conjunction with any other antenna or transmitter.
For the customers the U.S.A.
Radiated Exposure Statement:
The product complies with the US portable RF exposure limit set forth for an uncontrolled environment and is safe for intended operation as described in this manual. The further RF exposure reduction can be achieved if the product can be kept as far as possible from the user body or if the device is set to lower output power if such function is available.
For the customers the U.S.A. and Canada
Radiated Exposure Statement:
The product complies with the US/Canadian portable RF exposure limit set forth for an uncontrolled environment and is safe for intended operation as described in this manual. The further RF exposure reduction can be achieved if the product can be kept as far as possible from the user body or if the device is set to lower output power if such function is available.
For the customers in Canada
CAN ICES-3 (B)/NMB-3(B)
For the customers in Canada
This device complies with Industry Canada's applicable licence-exempt RSSs. Operation is subject to the following two conditions: (1) This device may not cause interference; and
(2) This device must accept any interference, including interference that may cause undesired operation of the device.
For kundene i Norge
Dette utstyret kan kobles til et IT-strømfordelingssystem.
CE
| Bulgarian | С настоящото, Sony Corporation декларира, че това оборудване е в съответствие с Директива 2014/53/EU.Цялостният текст на ЕС декларацията за съответствие може да се намери на следния интернет адрес: http://www.compliance.sony.eu/ |
| Croatian | Sony Corporation ovime izjavljuje da je ova oprema u skladu s Direktivom 2014/53/EU.Cjeloviti tekst EU izjave o sukladnosti dostupan je na sljedećoj internetskoj adresi: http://www.compliance.sony.eu/ |
| Czech | Sony Corporation tímto prohlašuje, že toto zařízení je v souladu se směrnicí 2014/53/EU.Úplné znění EU prohlášení o shodě je k dispozici na této internetové adrese: http://www.compliance.sony.eu/ |
| Danish | Herved erklærer Sony Corporation, at dette udstyr er i overensstemmelse med direktiv 2014/53/EU.Den fulde ordlyd af EU-overensstemmelseserklæringen er tilgængelig på følgende internetadresse: http://www.compliance.sony.eu/ |
| Dutch | Hierbij verklaart Sony Corporation dat deze radioapparatuur conform is met Richtlijn 2014/53/EU.De volledige tekst van de EU-conformiteitsverklaring kan worden geraadpleegd op het volgende internetadres: http://www.compliance.sony.eu/ |
| English | Hereby, Sony Corporation declares that this equipment is in compliance with Directive 2014/53/EU.The full text of the EU declaration of conformity is available at the following internet address: http://www.compliance.sony.eu/ |
| Estonian | Käesolevaga deklareerib Sony Corporation, et käesolev seade vastab direktiivi 2014/53/EL nõuetele.ELi vastavusdeklaratsiooni täielik tekst on kättesaadav järgmisel internetiaadressil: http://www.compliance.sony.eu/ |
| Finnish | Sony Corporation vakuuttaa, että tämä laite on direktiivin 2014/53/EU mukainen.EU-vaatimustenmukaisuusvakuutuksen täysimittainen teksti on saatavilla seuraavassa internetosoitteessa: http://www.compliance.sony.eu/ |
| Greek | Με την παρούσα Sony Corporation δηλώνει ότι, αυτή η συσκευή πληροί τους όρους της οδηγίας 2014/53/EU.To πλήρες κείμενο της δήλωσης συμμόρφωσης ΕΕ διατίθεται στην ακόλουθη ιστοσελίδα στο διαδίκτυο: http://www.compliance.sony.eu/ |
| Hungarian | A Sony Corporation igazolja, hogy ez a készülék megfelel a 2014/53/EU irányelvnek.Az EU-mcgfelelőségi nyilatkozat teljes szövege elérhető a következő internetes címcn: http://www.compliance.sony.eu/ |
| Latvian | Ar šo Sony Corporation deklarē, ka ši iekārta atbilst direktīvai 2014/53/ES.Pilns ES atbilstības deklarācijas teksts ir pieejams šādā interneta vietnē:http://www.compliance.sony.eu/ |
| Lithuanian | Mes, Sony Corporation, patvirtiname, kad šis įrenginys atitinka direktyvą 2014/53/ES.Visas ES atitikties deklaracijos tekstas pasiekiamas šiuo internetiniu adresu:http://www.compliance.sony.eu/ |
| Norwegian | Herved erklærer Sony Corporation at utstyrstypen er i samsvar med direktiv 2014/53/EU.EU-erklæring fulltekst finner du på Internett under:http://www.compliance.sony.eu/ |
| Polish | Sony Corporation niniejszym oświadcza, że to urządzenie jest zgodne z dyrektywą 2014/53/UE.Pełny tekst deklaracji zgodności UE jest dostępny pod następującym adresem internetowym: http://www.compliance.sony.eu/ |
| Portuguese | O(a) abaixo assinado(a) Sony Corporation declara que o presente equipamento está em conformidade com a Diretiva 2014/53/UE.O texto integral da declaração de conformidade está disponível no seguinte endereço de Internet: http://www.compliance.sony.eu/ |
| Romanian | Prin prezenta, Sony Corporation declară că acest echipament este în conformitate cu Directiva 2014/53/UE.Textul integral al declarației UE de conformitate este disponibil la următoarea adresă internet: http://www.compliance.sony.eu/ |
| Slovak | Sony Corporation týmto vyhlasuje, že zariadenie je v súlade so smernicou 2014/53/EU.Úplné vyhlásenie EÚ o zhode je k dispozícii na tejto internetovej adrese:http://www.compliance.sony.eu/ |
| Slovenian | Sony Corporation potrjuje, da je ta oprema skladna z Direktivo 2014/53/EU.Celotno besedilo izjave EU o skladnosti je na voljo na naslednjem spletnem naslovu: http://www.compliance.sony.eu/ |
| Swedish | Härmed försäkrar Sony Corporation att denna utrustning överensstämmer med direktiv 2014/53/EU.Den fullständiga texten till EU-försäkran om överensstämmelse finns på följande webbadress: http://www.compliance.sony.eu/ |
| Turkish | Sony Corporation, bu cihazın 2014/53/EU Direktifi ile uyumlu olduğunu beyan eder.AB uygunluk beyanının tam metni aşağıdaki internet adresinde mevcuttur:http://www.compliance.sony.eu/ |
For the customers in Europe
Manufacturer: Sony Corporation, 1-7-1 Konan Minato-ku Tokyo, 108-0075 Japan For EU product compliance: Sony Belgium, bijkantoor van Sony Europe B.V., Da Vincilaan 7-D1, 1930 Zaventem, Belgium.
For the customers in the U.S.A. SONY LIMITED WARRANTY - Please visit http://www.sony.com/psa/warranty for important information and complete terms and conditions of Sony's limited warranty applicable to this product.
For the customers in Canada SONY LIMITED WARRANTY - Please visit http://www.sonybiz.ca/pro/lang/en/ca/article/resources-warranty for important information and complete terms and conditions of Sony's limited warranty applicable to this product.
For the customers in Europe
Sony Professional Solutions Europe - Standard Warranty and Exceptions on Standard Warranty. Please visit https://pro.sony/support-services/primesupport/support-professional-solutions-europe-standard-product-warranty for important information and complete terms and conditions.
For the customers in Korea SONY LIMITED WARRANTY - Please visit http://bpeng.sony.co.kr/handler/BPAS-Start for important information and complete terms and conditions of Sony's limited warranty applicable to this product.
Precautions
On safety
- Check that the operating voltage of your unit is identical with the voltage of your local power supply.
- Should any liquid or solid object fall into the cabinet, unplug the unit and have it checked by qualified personnel before operating it further.
- Unplug the unit from the wall outlet if it is not to be used for several days.
- To disconnect the cord, pull it out by the plug. Never pull the cord itself.
- The wall outlet should be near the unit and easily accessible.
- The unit is not disconnected to the AC power source (mains) as long as it is connected to the wall outlet, even if the unit itself has been turned off.
- Do not look into the lens while the lamp is on.
- Do not place your hand or objects near the ventilation holes. The air coming out is hot.
- Make sure to remove the protective packaging lens cap before projection. Projection with the cap attached may melt the cap by heat.
- Do not place any object just in front of the lens that may block the light during projection. Heat from the light may damage the object. Use the picture muting function to cut off the picture.

natural_image
Simple line drawing of a 3D object with a rectangular block and a diagonal bar, no text or symbols present.On preventing internal heat build-up
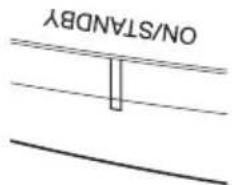
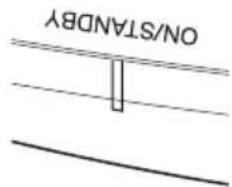
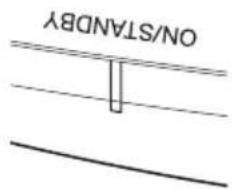
After you turn off the power with the I/⏻ (ON/STANDBY) button, do not disconnect the unit from the wall outlet while the cooling fan is still running.
Caution
This unit is equipped with ventilation holes (intake) and ventilation holes (exhaust). Do not block or place anything near these holes, or internal heat build-up may occur, causing picture degradation or damage to the unit.
On repacking
Save the original shipping carton and packing material; they will come in handy if you ever have to ship your unit. For maximum protection, repack your unit as it was originally packed at the factory.
On watching 3D video images
Safety precautions
- You should only use the 3D glasses for watching 3D video images.
- If you observe flickering or flashing, turn off the lighting in the room.
- Not for use by children without proper adult supervision.
- Be careful not to pinch your fingers in hinges of the 3D glasses when bending the temple frames.
- Do not drop or modify these 3D glasses.
- If these glasses are broken, keep broken pieces away from your mouth or eyes.
On LCD Projector
The LCD projector is manufactured using high-precision technology. You may, however, see tiny black points and/or bright points (red, blue, or green) that continuously appear on the LCD projector. This is a normal result of the manufacturing process and does not indicate a malfunction.
Also, when you use multiple LCD projectors to project onto a screen, even if they are of the same model, the color reproduction among projectors may vary, since color balance may be set differently from one projector to the next.
On condensation
If the room temperature where the projector is installed changes rapidly, or if the projector is moved suddenly from a cold to a warm place, condensation in the projector may occur. As the condensation may cause malfunction, be careful in adjusting
temperature settings of the air conditioner. If condensation occurs, leave the projector turned on for about two hours before use.
Notes on security
- SONY WILL NOT BE LIABLE FOR DAMAGES OF ANY KIND RESULTING FROM A FAILURE TO IMPLEMENT PROPER SECURITY MEASURES ON TRANSMISSION DEVICES, UNAVOIDABLE DATA LEAKS RESULTING FROM TRANSMISSION SPECIFICATIONS, OR SECURITY PROBLEMS OF ANY KIND.
- Depending on the operating environment, unauthorized third parties on the network may be able to access the unit. When connecting the unit to the network, be sure to confirm that the network is protected securely.
- From a safety standpoint, when using the unit connected with the network, it is strongly recommended to access the Control window via a Web browser and change the access limitation settings from the factory preset values.
Also, it is recommended that you set a password with a sufficiently long character string that is hard to guess by others, and that you store it safely.
- Do not browse any other website in the Web browser while making settings or after making settings. Since the login status remains in the Web browser, close the Web browser when you complete the settings to prevent unauthorized third parties from using the unit or harmful programs from running.
- When connecting this product to a network, connect via a system that provides a protection function, such as a router or firewall. If connected without such protection, security issues may occur.
Do not place this product close to medical devices
This product (including accessories) has magnet(s) which may interfere with pacemakers, programmable shunt valves for hydrocephalus treatment, or other medical devices. Do not place this product close to persons who use such medical devices. Consult your doctor before using this product if you use any such medical device.
SONY WILL NOT BE LIABLE FOR DAMAGES OF ANY KIND RESULTING FROM THE USE OF THIS UNIT FOR PURPOSES OTHER THAN GENERAL HOME USE, EITHER DURING THE WARRANTY PERIOD OR AFTER EXPIRATION OF THE WARRANTY.
Notes on Installation and Usage
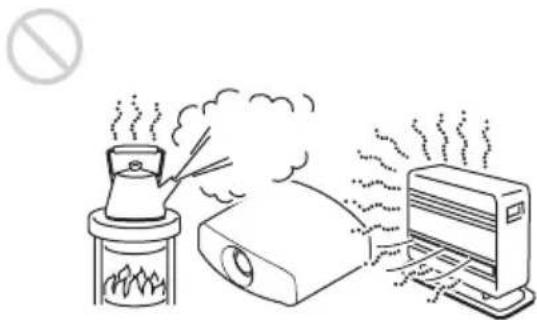
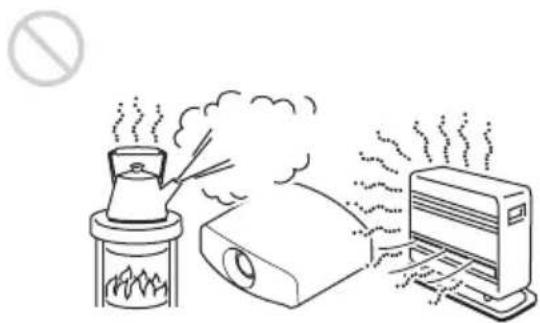
Unsuitable installation
Do not place the unit in the following situations, which may cause malfunction or damage to the unit.
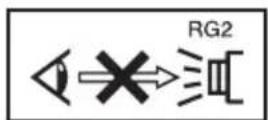
Near walls
To maintain the performance and reliability of the unit, leave space between walls and the unit as illustrated.
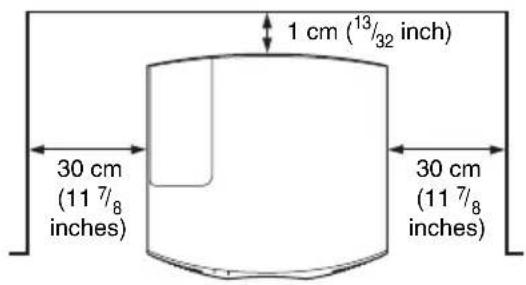
Air from air conditioners or the ventilation holes of this unit or other devices, may cause oscillation on the screen. Be sure not to install this unit in the area where the air from air conditioners or the ventilation holes of these devices reach to the front side of this unit.
Poorly ventilated location
Leave space of more than 30 cm ( 11^7/_8 inches) around the unit.
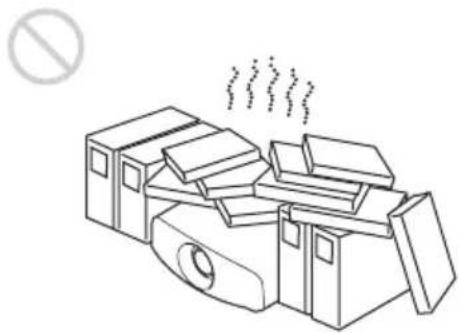
natural_image
Line drawing of a cluttered mechanical device emitting steam, with no text or symbols present.Hot and humid

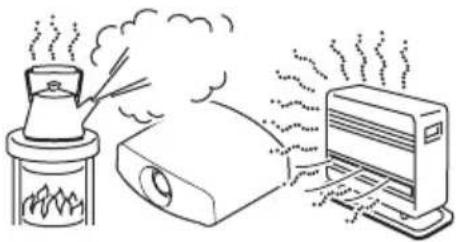
natural_image
Illustration of a steam rising from a steaming machine to a server unit (no text or symbols present)Locations subject to direct cool or warm air from an air-conditioner
Installing the unit in such a location may cause a malfunction of the unit due to moisture condensation or rise in temperature.
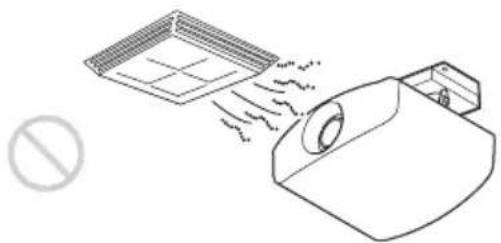
natural_image
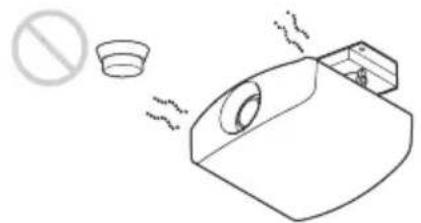
Line drawing of a spray gun emitting particles from a tray, with no text or symbols present.Near a heat or smoke sensor
Malfunction of the sensor may occur.
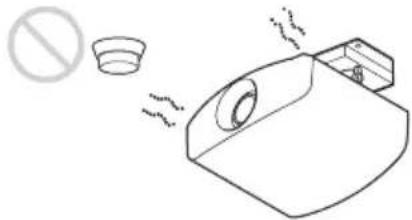
natural_image
Simple line drawing of a toilet with a stopper and a circular cup, emitting exhaust smoke (no text or symbols)Very dusty and extremely smoky locations
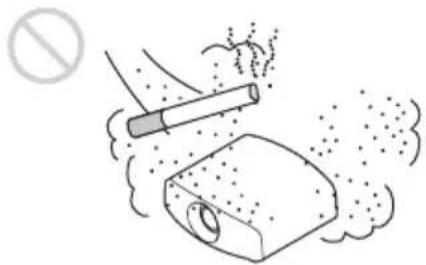
natural_image
Illustration of a cigarette emitting exhaust smoke from a bottle, with no text or symbols present.Unsuitable Conditions
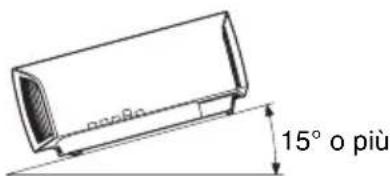
Do not do any of the following while using the unit.
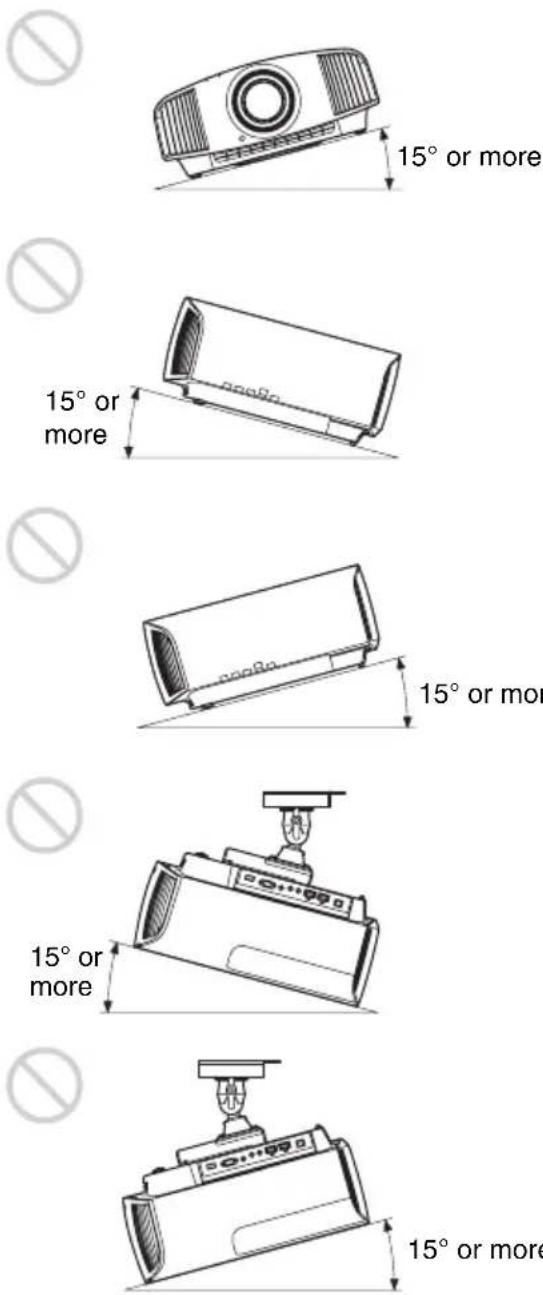
Tilting front/rear and left/right
Avoid using the unit tilted at an angle of more than 15 degrees.
Do not install the unit anywhere other than on a level surface or on the ceiling. Installing the unit in such a location may result in uneven color uniformity or reduce the reliability of the effects of the lamp.
If the unit is tilted up or down, the image on the screen may be trapezoidal.
Position the unit so that the lens is parallel to the screen.
When installing the unit at high altitudes
When using the unit at an altitude of 1,500 m (approx. 4,900 ft) or higher, set "High Altitude Mode" on the Setup menu to "On". Failing to set this mode when using the unit at high altitudes could have
adverse effects, such as reducing the reliability of certain components.
Safety precautions for installing the unit on a ceiling
- Never mount the projector on the ceiling or move it by yourself. Be sure to consult with qualified Sony personnel (charged).
- When installing the unit on a ceiling, be sure to use a safety wire, etc., to prevent the unit from falling. Entrust the installation to an experienced contractor or installer.
For dealers
- When the projector is mounted on the ceiling, a Sony bracket or recommended equivalent must be used for installation.
- Be sure to secure the cabinet cover firmly when installing to the ceiling firmly.
Checking the Supplied Accessories
Check the carton to make sure it contains the following items:
- Remote control RM-PJ28 (1)
- Size AA (R6) batteries (2)
- Lens cap (1)
When you purchase the projector, a lens cap is on the lens. Remove the lens cap before you use the projector.
- AC power cord (1)
- Quick Reference Manual (this manual) (1)
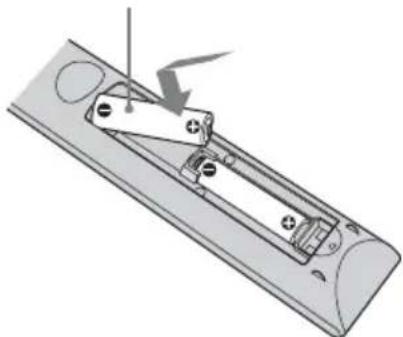
Inserting the Batteries into the Remote Control
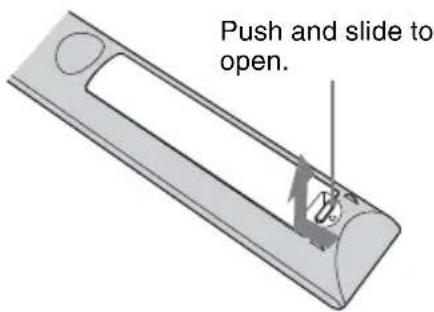
Insert the batteries ⚡ side first.
natural_image
Diagram of a remote control panel with a switch and battery, showing no text or symbolsCaution about handling the remote control
- Handle the remote control with care. Do not drop or step on it, or spill liquid of any kind onto it.
- Do not place the remote control in a location near a heat source, a place subject to direct sunlight, or a damp room.
Step 2
Installing the Unit
1 Position the unit so that the lens is parallel to the screen.
2 After connecting the AC power cord to the unit, plug the AC power cord into a wall outlet.
Rear of the unit
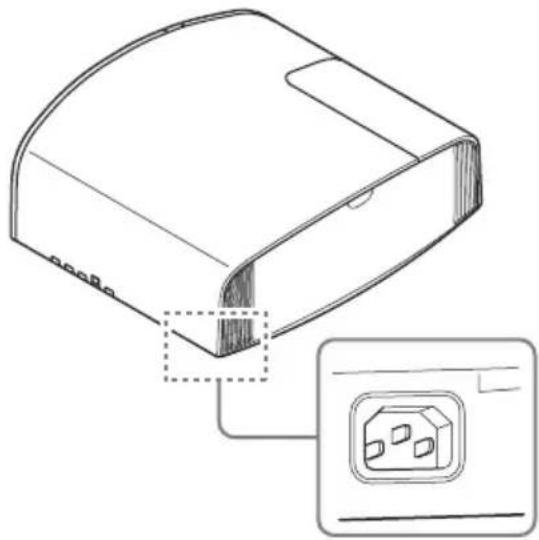
natural_image
Technical line drawing of a device housing with an inset showing a plug socket (no text or symbols present)Front of the unit
Lights in red.
Note
After connecting the AC power cord to the unit, the ON/STANDBY indicator may blink in orange.
You may not be able to control the unit while the indicator is blinking, but this is not a malfunction. Wait until it stops blinking and remains lit in red.
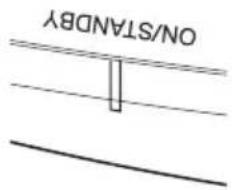
3 Press the I/⏻ (ON/STANDBY) button to turn on the unit.
Front of the unit
Flashes in green for tens of seconds and then lights in green.
4 Project an image on the screen, then adjust the focus, size, and position.
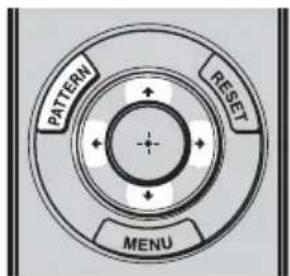
①Adjust the focus.
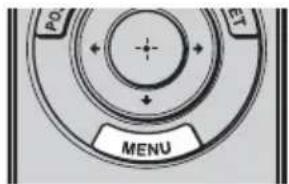
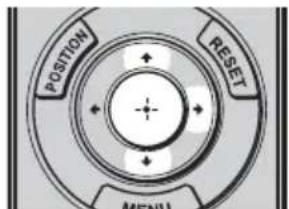
Press the PATTERN button repeatedly to display the Lens Focus adjustment window (test pattern). Then adjust the focus of the picture by pressing the ↑/↓/←/→ buttons.
②Adjust the picture size.
Press the PATTERN button repeatedly to display the Lens Zoom adjustment window (test pattern). Then adjust the size of the picture by pressing the ↑/↓/←/→ buttons.
③Adjust the picture position.
Press the PATTERN button repeatedly to display the Lens Shift adjustment window (test pattern). Then adjust to the proper position of the picture by pressing the ↑/↓/←/→ buttons.
To adjust the tilt of the installation surface
If the unit is installed on an uneven surface, use the front feet (adjustable) to keep the unit level.
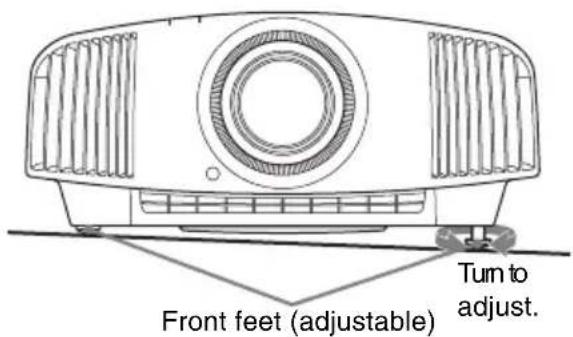
Notes
- If the unit is tilted up or down, the projected image may be trapezoidal.
- Be careful not to catch your finger when turning the front feet (adjustable).
Lens adjustment window (test pattern)
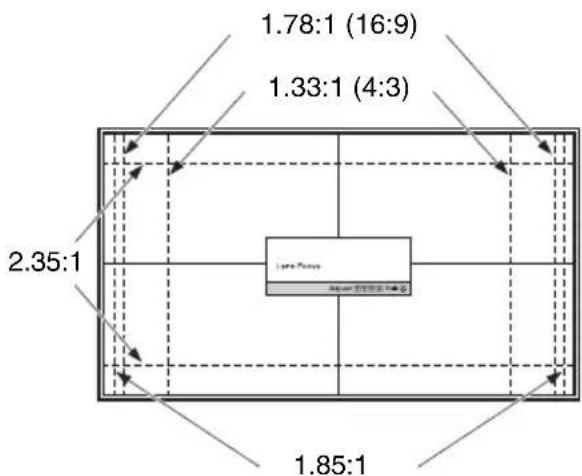
The dashed lines show the screen sizes of each aspect ratio.
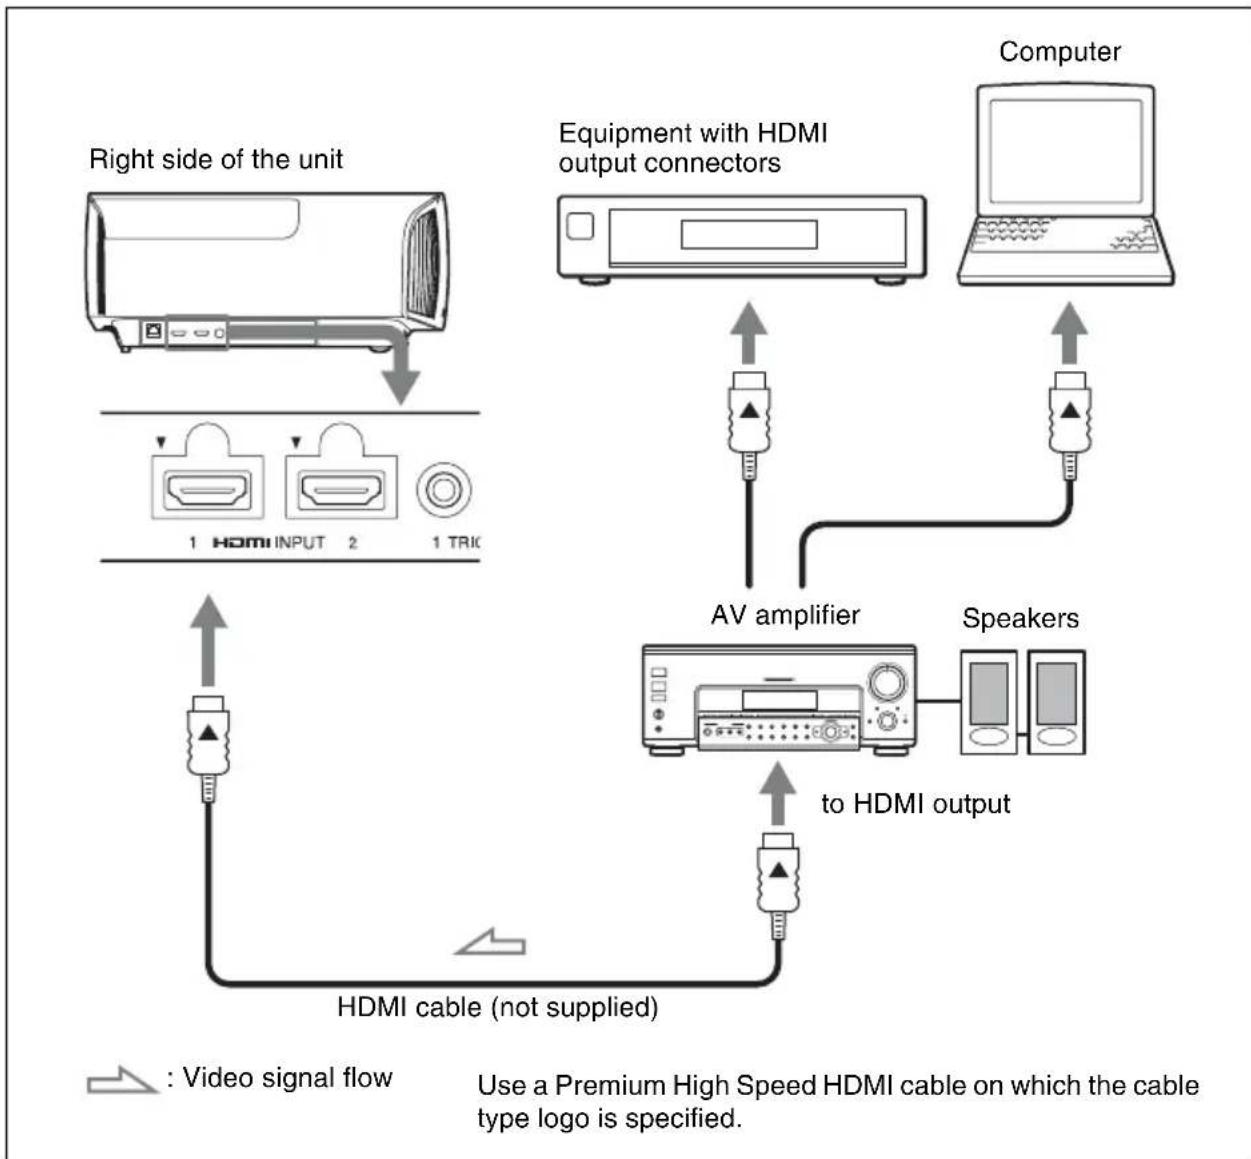
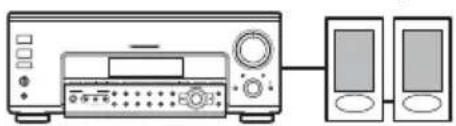
For more information, refer to "Connections and Preparations" in the Operating Instructions.
When making connections, be sure to do the following:
- Turn off all equipment before making any connections.
- Use the proper cables for each connection.
- Insert the cable plugs properly; poor connection at the plugs may cause a malfunction or poor picture quality. When pulling out a cable, be sure to pull it out from the plug, not the cable itself.
- Refer to the operating instructions of the connected equipment.
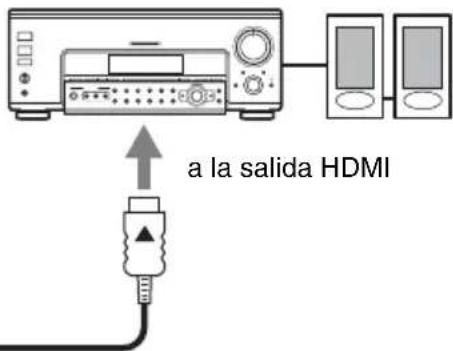
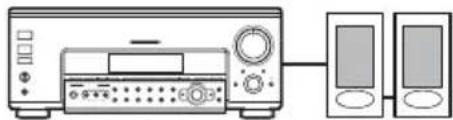
flowchart
graph TD
    A["Right side of the unit"] --> B["Device with HDMI INPUT"]
    B --> C["Device with HDMI connector"]
    C --> D["Computer"]
    D --> E["AV amplifier"]
    E --> F[" Speakers"]
    F --> G["To HDMI output"]
    G --> H["HDMI cable (not supplied)"]
    H --> I["Video signal flow"]
    style A fill:#f9f,stroke:#333
    style D fill:#ccf,stroke:#333
    style F fill:#cfc,stroke:#333
    style G fill:#fcc,stroke:#333
    note right of A: Right side of the unit
    note right of G: HDMI cable (not supplied)
    note right of H: Use a Premium High Speed HDMI cable on which the cable type logo is specified.
When you monitor and control the projector via the network, access the Setup page of the projector (refer to “Using Network Features” in the Operating Instructions) via a Web browser and enable the desired control protocol.
For more information, refer to “Connections and Preparations” in the Operating Instructions.
Step 4
Selecting the Menu Language
You can select the language for displaying the menu and other on-screen displays. To change the current menu language, set the desired language with the menu screen.
1 Press MENU.
The menu appears.
2 Press ↑/↓ to select the Setup menu, and press → or ⊕

The setting items of the selected menu appear.
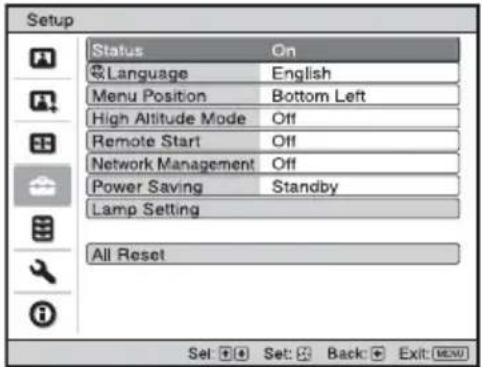
3 Press ↑/↓ to select “Language,” and press → or ⊕
4 Press ↑/↓/←/→ to select a language, and press ⊕
The menu changes to the selected language.
To clear the menu
Press MENU.
Projecting the Picture
1 Turn on both the unit and the equipment connected to the unit.
2 Press INPUT to display the input palette on the screen.
3 Select the equipment from which you want to display images.
Press INPUT repeatedly or press ↑/↓/ ⊕ (enter) to select the equipment from which to project.
Example: To view the picture from the video equipment connected to the HDMI 1 connector of this unit.
Turning Off the Power
1 Press the I/⏻ (ON/STANDBY) button.
A message “POWER OFF?” appears on the screen.
2 Press the I/⏻ (ON/STANDBY) button again before the message disappears.
The ON/STANDBY indicator flashes in green and the fan continues to run to reduce the internal heat.
The fan stops and the ON/STANDBY indicator changes from flashing green to remaining red.
The power is turned off completely, and you can disconnect the AC power cord.
Note
Never disconnect the AC power cord while the indicator is flashing.
Tip
You can turn off the unit by holding the I/ ^① (ON/STANDBY) button for about 1 second, instead of performing the above steps.
For more information, refer to "Projecting" in the Operating Instructions.
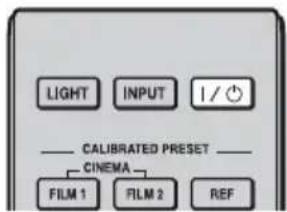
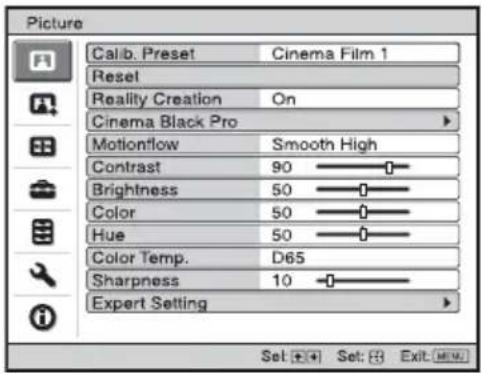
Selecting the Picture Viewing Mode
Press one of the CALIBRATED PRESET buttons.
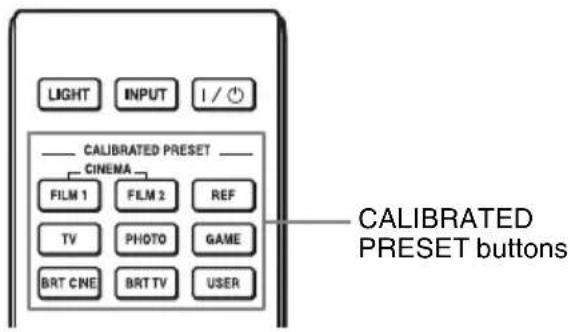
| Setting items Description | |
| CINEMA FILM 1 Picture quality | suited to reproducing the highly dynamic and clear images typical of master positive film. |
| CINEMA FILM 2 Picture quality | suited to reproducing the rich tone and color typical of a movie theater, based on the Cinema Film 1. |
| REF A picture quality setup suitable for when you want to reproduce faithfully the original image quality, or for enjoying image quality, without any adjustment. | |
| TV Picture quality suited for watching TV programs, sports, concerts, and other video images. | |
| PHOTO Ideal for projecting still images taken with a digital camera. | |
| GAME Picture quality suited to gaming, with well-modulated colors and fast response. | |
| BRT CINE Picture quality suited for watching movies in a bright environment, such as a living room. | |
| BRT TV Picture quality suited for watching TV programs, sports, concerts, and other video images in a bright environment, such as a living room. | |
| USER Adjusts the picture quality to suit your taste then saves the setting. The factory default setting is the same as “REF.” | |
For more information, refer to "Projecting" in the Operating Instructions.
Error Handling
Warning Indicators
The ON/STANDBY or WARNING indicator lights up or flashes if there is any trouble with your projector.
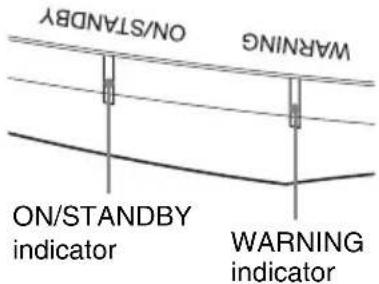
| Flashing/Lighting indicators The number of flashes | Cause and Remedy |
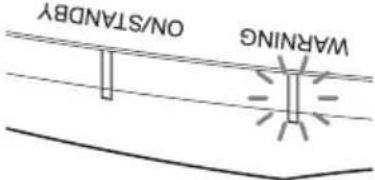 (Flashes in red)(Lights in red) (Flashes in red)(Lights in red) | Twice Close the lamp cover securely, then tighten the screws securely. |
| Three times The temperature of lamp is unusually high.Turn off the power and wait for the lamp to cool, then turn on the power again.If the symptom persists, the lamp may be at the end of its service life. In this case, replace the lamp with a new one. | |
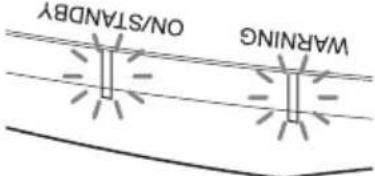 (Flashes in red)(Flashes in red)Both indicators flash (Flashes in red)(Flashes in red)Both indicators flash | Twice The internal temperature is unusually high.Check to ensure that if nothing is blocking the ventilation holes or whether or not the unit is being used at high altitudes. |
| Three times The fan is broken. Consult with qualified Sony personnel. |
Note
If the symptom persists even after carrying out the above methods, consult with qualified Sony personnel. If the indicator starts flashing in a way of other than the above, turn off, and then turn on the power with the I/ ^① (On/Standby) button on the remote control or control panel of the unit. If the symptom is shown again, consult with qualified Sony personnel.
If there is any problem or an error message appears on the screen, refer to "Error Handling" in the Operating Instructions.
Maintenance
The lamp used for the light source has a certain lifespan. When the lamp dims, the color balance of the picture becomes strange, or “Please replace the Lamp.” appears on the screen, the lamp may be exhausted. Replace the lamp with a new one (not supplied) without delay.
Tip
The lifespan of the lamp used for the light source changes depending on the installation environment or use conditions. You can use the lamp longer by avoiding turning the lamp off until several minutes pass after turning the lamp on.
Tools you need to get started:
- Projector Lamp LMP-H220 (Optional)
- Standard Phillips screwdriver
- Cloth (for scratch protection)
Caution
- The lamp remains hot after the unit is turned off with the I/⏻ (ON/STANDBY) button. If you touch the lamp, you may burn your fingers. When you replace the lamp, wait for at least 1 hour for the lamp to cool.
- Do not touch the surface of the lamp. If you touch it, wipe off the fingerprints with a soft cloth.
- Pay special attention to replacing the lamp when the unit is installed on the ceiling.
- When replacing the lamp of a unit which is on the ceiling, do not stand directly under the lamp cover. When removing the lamp door (inner cover), avoid twisting it. If the lamp explodes, fragments may cause injury.
- When removing the lamp unit, make sure it remains horizontal, then pull straight up. Do not tilt the lamp unit. If you pull out the lamp unit while tilted and if the lamp breaks, the pieces may scatter, causing injury.
Notes
- Be sure to use a specified projector lamp for the replacement. If you use lamps other than the specified projector lamp, the unit may malfunction.
- Be sure to turn off the unit and unplug the power cord before replacing the lamp, then check the ON/STANDBY indicator has already been turned off.
Replacing the Lamp
1 Turn off the unit and unplug the AC power cord.
2 When setting the unit on a flat surface such as a desk etc., put a cloth to prevent the surface from being scratched. Place the unit on the cloth.
Note
Be sure that the unit is placed on a stable surface.
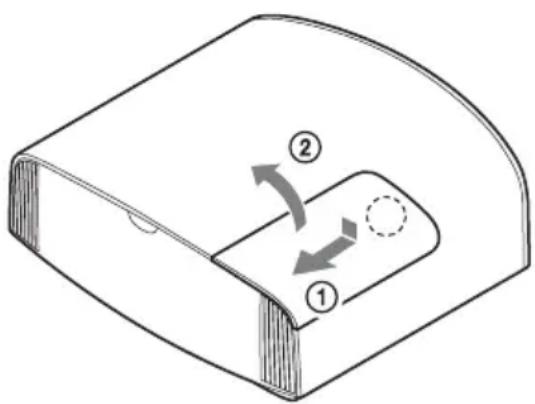
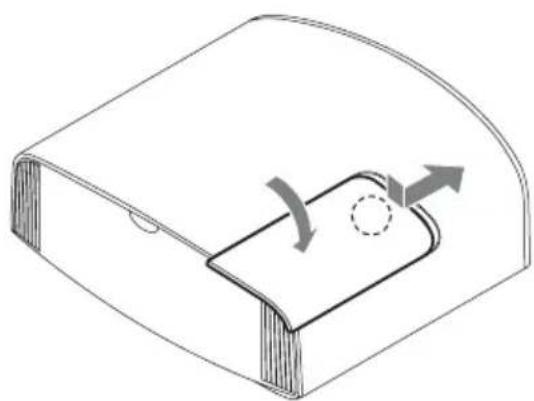
3 While pressing the part indicated in the lamp cover illustration, slide ① and then open ② the lamp cover.
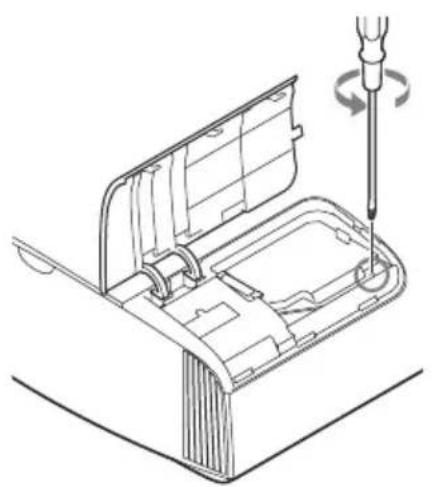
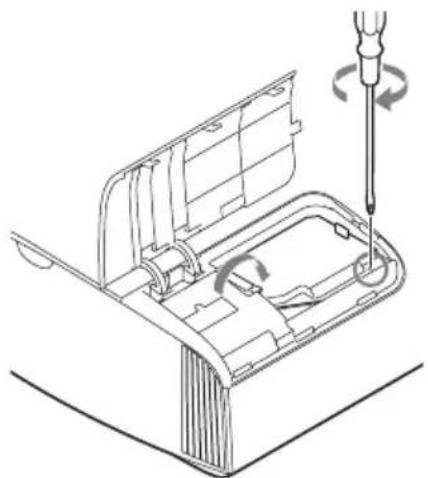
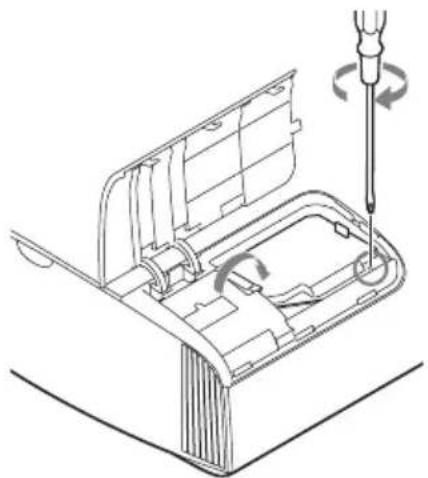
4 Loosen the lamp door (inner cover) screw with a Phillips screwdriver, and then open the lamp door.
natural_image
Technical line drawing of a mechanical assembly with a screwdriver inserted, showing internal components and motion (no text or symbols)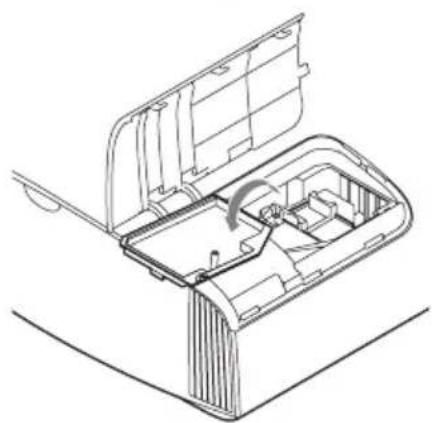
natural_image
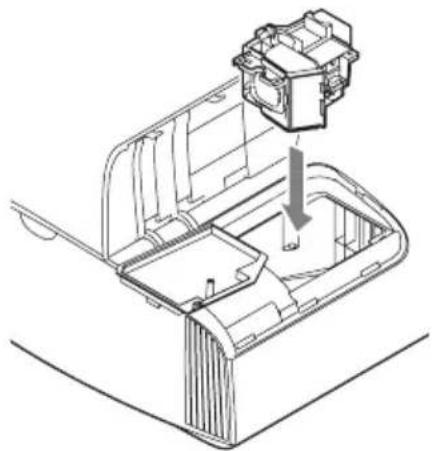
Technical line drawing of a mechanical device with internal components and a curved arrow indicating rotation (no text or symbols)5 Loosen the 3 screws on the lamp with the Phillips screwdriver. Hold up the handle, then pull the lamp straight out.
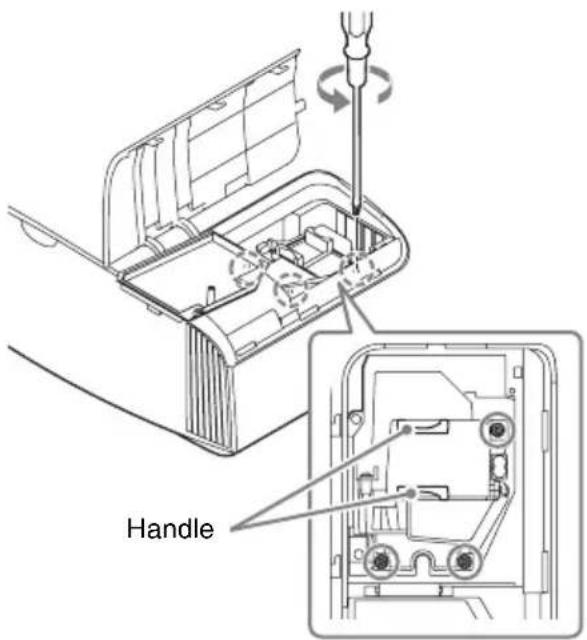
Notes
- Do not loosen other screws except the 3 specified screws.
- Hold the lamp by the handle to remove and attach it.
6 Push in the new lamp by the handle securely until it reaches the end, and then tighten the 3 screws.
natural_image
Technical line drawing of a mechanical component with an arrow indicating assembly or insertion (no text or symbols present)Note
Be careful not to touch the optical block inside the unit.
7 Close the lamp door (inner cover), and then tighten the screw.
natural_image
Technical line drawing of a mechanical assembly with a screwdriver and rotating component (no text or symbols)8 Close the lamp cover.
natural_image
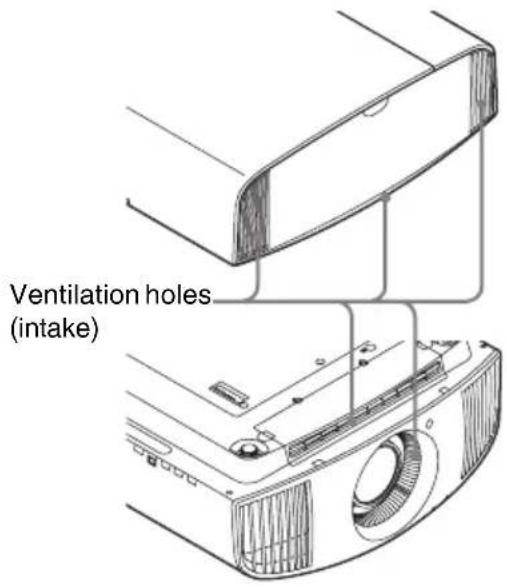
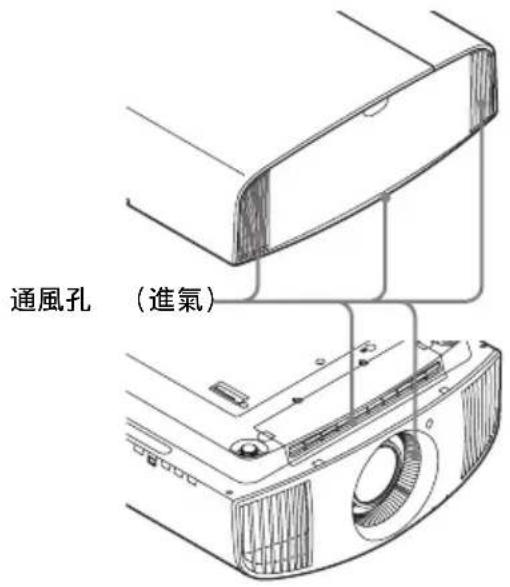
Diagram of a curved mechanical component with internal rotation arrows and a dashed circle (no text or symbols)9 Wipe dust off the ventilation holes (intake) with a soft cloth.
10 Turn on the unit, then select the lamp setting item on the Setup menu. The menu screen below will be appeared.
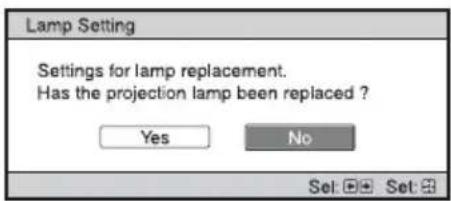
Tip If "Settings Lock" is set to "Level B," set to "Off" once.
11 Select "Yes."
Caution
Do not put your hands into the lamp replacement slot, and do not allow any liquid or other objects into the slot to avoid electrical shock or fire.
Notes
- The unit will not turn on unless the lamp is securely installed in place.
- The unit will not turn on unless the lamp cover are securely closed.
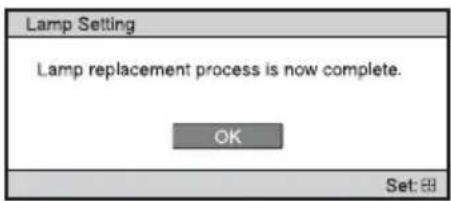
• To clear a message displayed on the screen, press any button either on the remote control or the control panel of the unit once.
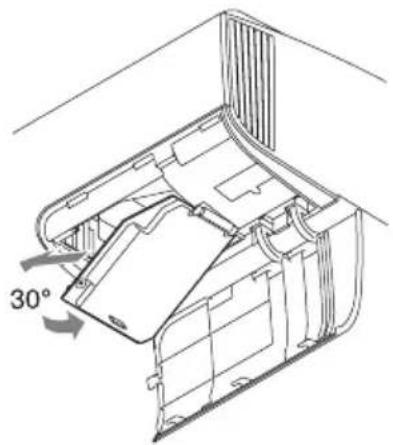
Note on replacing the lamp when broken, in the case of a ceiling installation
If the lamp breaks, broken lamp pieces may scatter and cause injury.
When the unit is on the ceiling, remove the lamp door (inner cover) by sliding it horizontally slowly after raising it with 30 degree opened. Avoid twisting the lamp door (inner cover).
Note
The lamp contains mercury. The disposal rules for used fluorescent tubes depend on where you live. Follow the waste disposal policy in your area.
https://rd1.sony.net/help/vpl/vw290/h_zz/
natural_image
Simple line drawing of a rectangular object with a shaded rectangular block and a circular symbol above (no text or labels)natural_image
Line drawing of a mechanical device emitting steam (no text or symbols)natural_image
Illustration of a steam heating setup with a boiler, air purifier, and fan (no text or symbols)natural_image
Diagram of a dust collector emitting particles from a filter array, with no text or symbols present.natural_image
Simple line drawing of a toilet with a stopper and a cup, emitting exhaust smoke (no text or symbols)natural_image
Illustration of a cigarette emitting smoke from a bag, with no text or symbols present.natural_image
Mechanical assembly diagram showing a lever mechanism with a downward arrow indicating motion (no text or symbols present)natural_image
Technical line drawing of a device housing with an inset showing a socket socket (no text or symbols)Avant de l'appareil
S'allume en rouge.
Remarque
natural_image
Technical line drawing showing two views of a device's internal structure with a screwdriver (no text or symbols)natural_image
Technical line drawing of a mechanical component with an arrow indicating assembly or insertion (no text or symbols present)Remarque
natural_image
Technical line drawing of a mechanical device with a screwdriver inserted, showing internal components and motion arrows (no text or symbols)natural_image
Technical line drawing of a mechanical component with curved surfaces and a circular feature, no text or symbols presentnatural_image
Technical line drawing of a mechanical device with a 30-degree angle标注 (no text or symbols beyond the angle indicator)Remarque
https://rd1.sony.net/help/vpl/vw290/h_zz/
natural_image
Simple 3D diagram of a rectangular object with a shaded rectangular block and a circular symbol above it (no text or labels)natural_image
Line drawing of a mechanical device emitting steam, with no text or symbols present.natural_image
Illustration of a portable air conditioner emitting steam from a chimney, with a monitor nearby (no text or symbols)natural_image
Diagram showing a spray nozzle emitting particles from a tray onto a device, with no text or symbols present.natural_image
Simple line drawing of a toilet with a stopper and a circular cup, no text or symbols presentnatural_image
Illustration of a cigarette emitting exhaust smoke from a rolled paper towel, with no text or symbols present.natural_image
Diagram of a remote control panel with a switch and battery, showing no text or symbolsnatural_image
Technical line drawing of a device housing with an inset showing a plug socket (no text or symbols present)natural_image
Diagram showing two connected devices: a server and a laptop, with no text or symbols present.
natural_image
Pure electrical circuit lines without any symbolsAmplificador AV
natural_image
Technical line drawing of a mechanical device with a screwdriver inserted, showing internal components and motion (no text or symbols)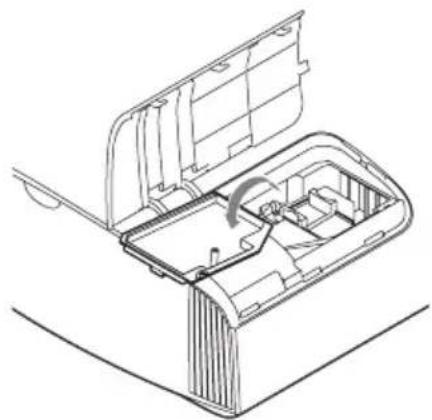
natural_image
Technical line drawing of a mechanical device with internal components and a curved arrow indicating motion (no text or symbols)natural_image
Technical line drawing of a mechanical component with an inset view showing a bracket and internal structure (no text or symbols)Nota
natural_image
Technical line drawing of a mechanical component with a screwdriver inserted, showing internal parts and rotation arrows (no text or symbols)natural_image
Diagram of a curved mechanical component with internal rotation arrows and a dashed circle (no text or symbols)natural_image
Technical line drawing of a mechanical component with a 30-degree angle标注 (no text or symbols beyond the angle indicator)Nota
https://rd1.sony.net/help/vpl/vw290/h_zz/
natural_image
Simple line drawing of a 3D object with a rectangular block and a diagonal line, no text or symbols present.natural_image
Line drawing of a cluttered office or storage unit with steam rising (no text or symbols)natural_image
Illustration of a steam heating setup with a cooling tower emitting smoke, next to a portable air conditioner unit (no text or symbols)natural_image
Diagram showing a exhaust pipe emitting exhaust from a grid array and a machine, with no text or symbols present.natural_image
Simple line drawing of a 3D printer with a cup and emitting smoke (no text or symbols)natural_image
Illustration of a hand using a cigarette to smoke or exhaust from a cylindrical object, with no visible text or symbols.natural_image
Technical line drawing of a rectangular object with a curved top and diagonal base, showing a dimension arrow (no text or symbols)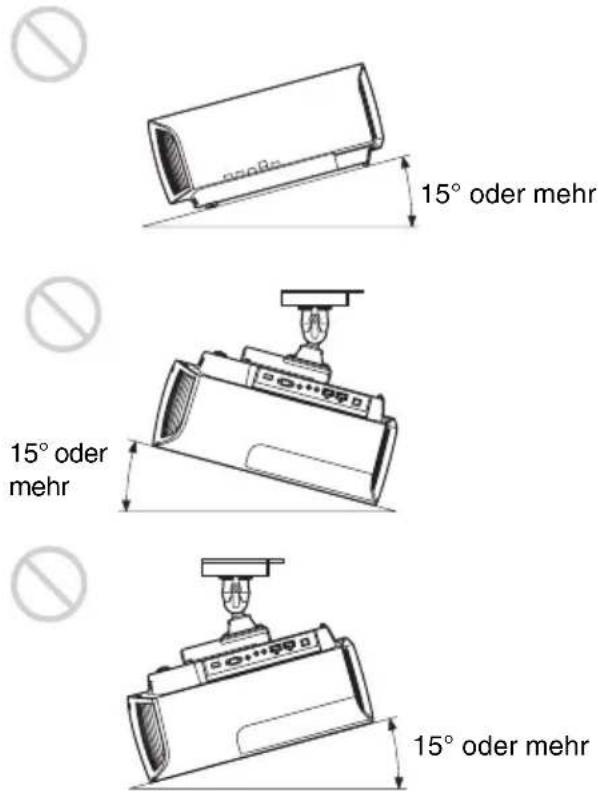
natural_image
Mechanical assembly diagram showing a lever mechanism with a downward arrow indicating motion (no text or symbols present)natural_image
Technical line drawing of a device with an inset showing a plug socket (no text or symbols present)natural_image
Diagram showing two connected devices: a server and a laptop, with no text or symbols present.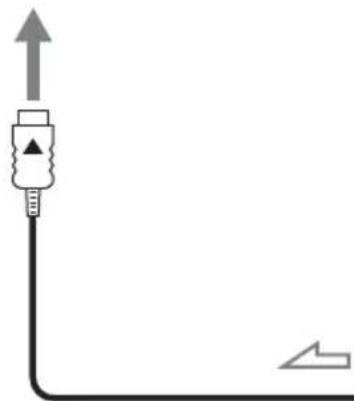
natural_image
Pure electrical circuit lines without any symbolsAV-Verstärker
natural_image
Diagram of a desktop computer setup with two speakers and a front panel (no text or labels)natural_image
Technical line drawing showing two views of a device's internal structure with a screwdriver (no text or symbols)natural_image
Technical line drawing of a mechanical component with an arrow indicating assembly or insertion (no text or symbols present)Hinweis
natural_image
Technical line drawing of a mechanical device with a screwdriver inserted, showing internal components and motion arrows (no text or symbols)natural_image
Diagram of a curved mechanical component with internal rotation arrows and a circular feature (no text or symbols)natural_image
Technical line drawing of a mechanical component with a 30-degree angle标注 (no text or symbols beyond the angle indicator)Hinweis
https://rd1.sony.net/help/vpl/vw290/h_zz/
natural_image
Simple line drawing of a rectangular object with a gray rectangular clip and a circular symbol above it (no text or labels)natural_image
Line drawing of a cluttered mechanical device emitting steam, with no text or symbols present.Caldo e umido
natural_image
Illustration of a portable stove emitting steam from a chimney next to a computer, with no text or symbols present.natural_image
Line drawing of a spray gun emitting particles from a tray, with no text or symbols present.natural_image
Simple line drawing of a toilet with a stopper and a bowl nearby (no text or symbols)natural_image
Illustration of a hand using a cigarette to smoke or dust over a rolled paper (no text or symbols)natural_image
Technical line drawing of a rectangular object with an angled base and vertical dimension line (no text or symbols)
natural_image
Technical line drawing of a mechanical component with no visible text or symbols

natural_image
Mechanical device with lever mechanism and adjustment arrow (no text or symbols)natural_image
Technical line drawing of a device housing with an inset showing a socket (no text or symbols)natural_image
Technical line drawing of a mechanical device with a screwdriver inserted, showing internal components and motion (no text or symbols)
natural_image
Technical line drawing of a mechanical device with internal components and an arrow indicating rotation (no text or symbols)natural_image
Technical line drawing of a mechanical assembly with a component labeled '1' (no text or symbols present)Nota
natural_image
Technical line drawing of a mechanical assembly with a screwdriver inserted, showing internal components and motion arrows (no text or symbols)natural_image
Diagram of a curved mechanical component with internal components and directional arrows indicating motion (no text or symbols)https://rd1.sony.net/help/vpl/vw290/h_zz/
natural_image
Simple line drawing of a rectangular object with a gray rectangular block and a circular symbol above it (no text or labels)關於防止內部積熱
natural_image
Line drawing of a cluttered industrial machine emitting steam, with a no-smoking symbol above (no text or labels)高溫和潮濕
natural_image
Illustration of a portable stove emitting steam from a chimney and a server, with no visible text or symbols.會遭受空調機直接冷風或暖風吹到的位置
natural_image
Diagram showing a filtration device emitting particles from a tray, with no text or symbols present.靠近熱量或煙霧偵測器
偵測器可能會故障。
natural_image
Simple line drawing of a toilet with a stopper and a cup, emitting exhaust smoke (no text or symbols)多塵和多煙的地方

natural_image
Illustration of a cigarette emitting smoke from a bottle, with no text or symbols present.不適合的條件
使用本機時,切勿進行以下任何一項操作。
前 / 後和左 / 右傾斜
natural_image
Diagram of a remote control panel with a lightning bolt indicating the switch (no text or symbols present)處理遙控器時的注意事項
natural_image
Technical line drawing of a device housing with an inset showing a plug socket (no text or symbols present)本機正面
亮起紅燈。
註
natural_image
Diagram showing two connected devices with USB connectors, no text or symbols present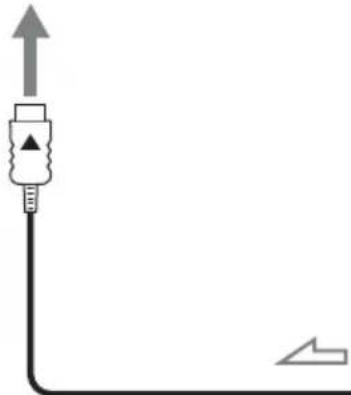
natural_image
Pure electrical circuit lines without any symbolsAV 放大器
natural_image
Diagram of a desktop computer setup with front panel, control panel, and two speakers (no text or labels)natural_image
Technical line drawing of a mechanical assembly with a screwdriver inserted (no text or symbols)
natural_image
Technical line drawing of a mechanical device with internal components and a handle (no text or symbols)natural_image
Technical line drawing of a mechanical component with an arrow indicating assembly or insertion (no text or symbols present)註
小心不要觸碰本機內部的光學區塊。
7關閉照明燈門(內蓋),然後旋緊螺絲。
natural_image
Technical line drawing of a mechanical component with a screwdriver inserted, showing internal structure and rotation arrows (no text or symbols)8關閉照明燈蓋。

natural_image
Diagram of a curved mechanical component with internal components and directional arrows indicating motion (no text or symbols)9用軟布擦掉通風孔 (進氣)上的灰塵。
natural_image
Technical line drawing of a mechanical component with a 30-degree angle标注 (no text or symbols beyond the angle indicator)註