
GT660 - Hedge trimmers BLACK & DECKER - Free user manual and instructions
Find the device manual for free GT660 BLACK & DECKER in PDF.
| Product type | Hedge trimmer |
| Brand | Black & Decker |
| Model | GT660 |
| Power input | 600 W |
| Mains voltage | 230 V AC |
| Blade length | 60 cm |
| Blade spacing | 27 mm |
| Weight | 4.2 kg |
| Sound pressure level (LpA) | 94 dB(A) |
| Sound power level (LWA) | 107 dB(A) (guaranteed 109 dB(A)) |
| Hand-arm vibration level | 3.8 m/s² |
| Blade stroke (no load) | 1,460 min⁻¹ |
| Blade stopping time | Less than 0.5 s |
| Safety device | Double switch (on/off) preventing accidental start-up |
| Assembly required | Adjustable front handle, protective guard, blade cassette |
| Maintenance | Regular cleaning and oiling of blades; cleaning of ventilation slots |
| Double insulation | Yes (earth connection not required) |
| Warranty | 24 months (domestic use) |
| Environmental protection | Recycling via Black & Decker authorized repairer |
Frequently Asked Questions - GT660 BLACK & DECKER
User questions about GT660 BLACK & DECKER
0 question about this device. Answer the ones you know or ask your own.
Ask a new question about this device
Download the instructions for your Hedge trimmers in PDF format for free! Find your manual GT660 - BLACK & DECKER and take your electronic device back in hand. On this page are published all the documents necessary for the use of your device. GT660 by BLACK & DECKER.
USER MANUAL GT660 BLACK & DECKER
natural_image
Technical line drawing of a mechanical tool with a long-handled groove, labeled GT65 (no text or symbols on the diagram itself)GT650
GT660
GT670
English 7
Deutsch 15
Français 22
Italiano 29
Nederlands 35
Español 41
Português 48
Svenska 55
Norsk 61
Dansk 67
Suomi 73
Ελληνικα 79
A
natural_image
Illustration of a hand using a tool to adjust or install a mechanical component, labeled D2 (no text or symbols on the diagram itself)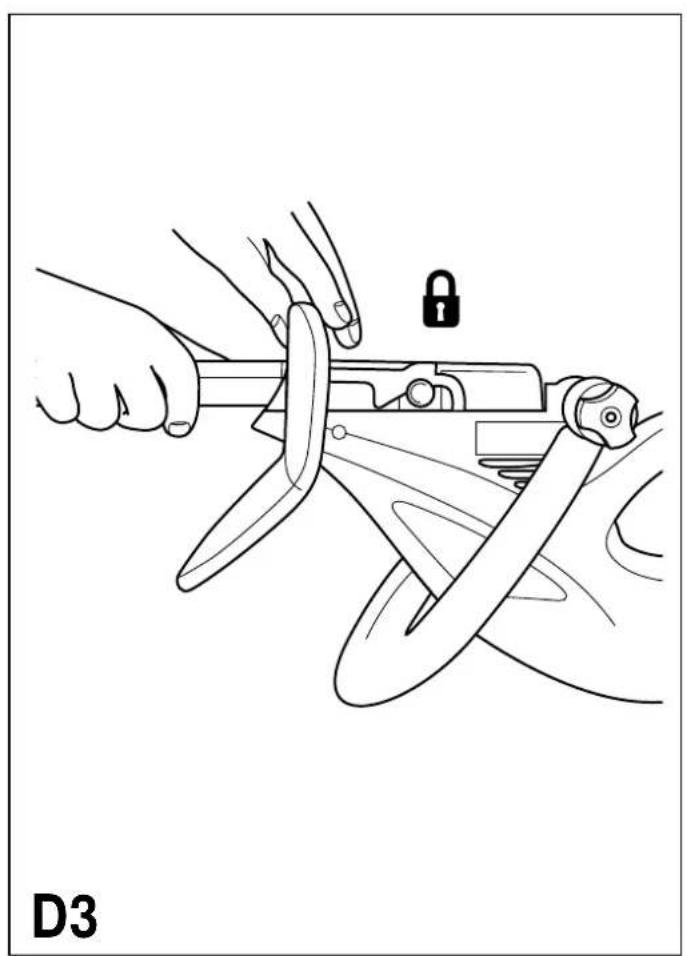
natural_image
Line drawing of a hand using a pliers to lift a car, with no text or symbols present.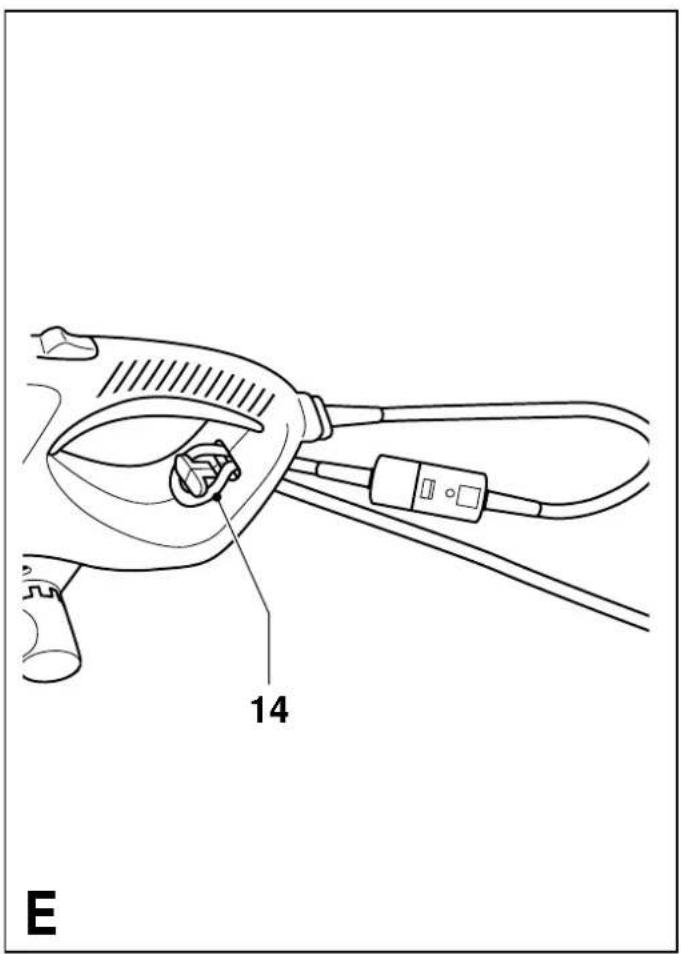
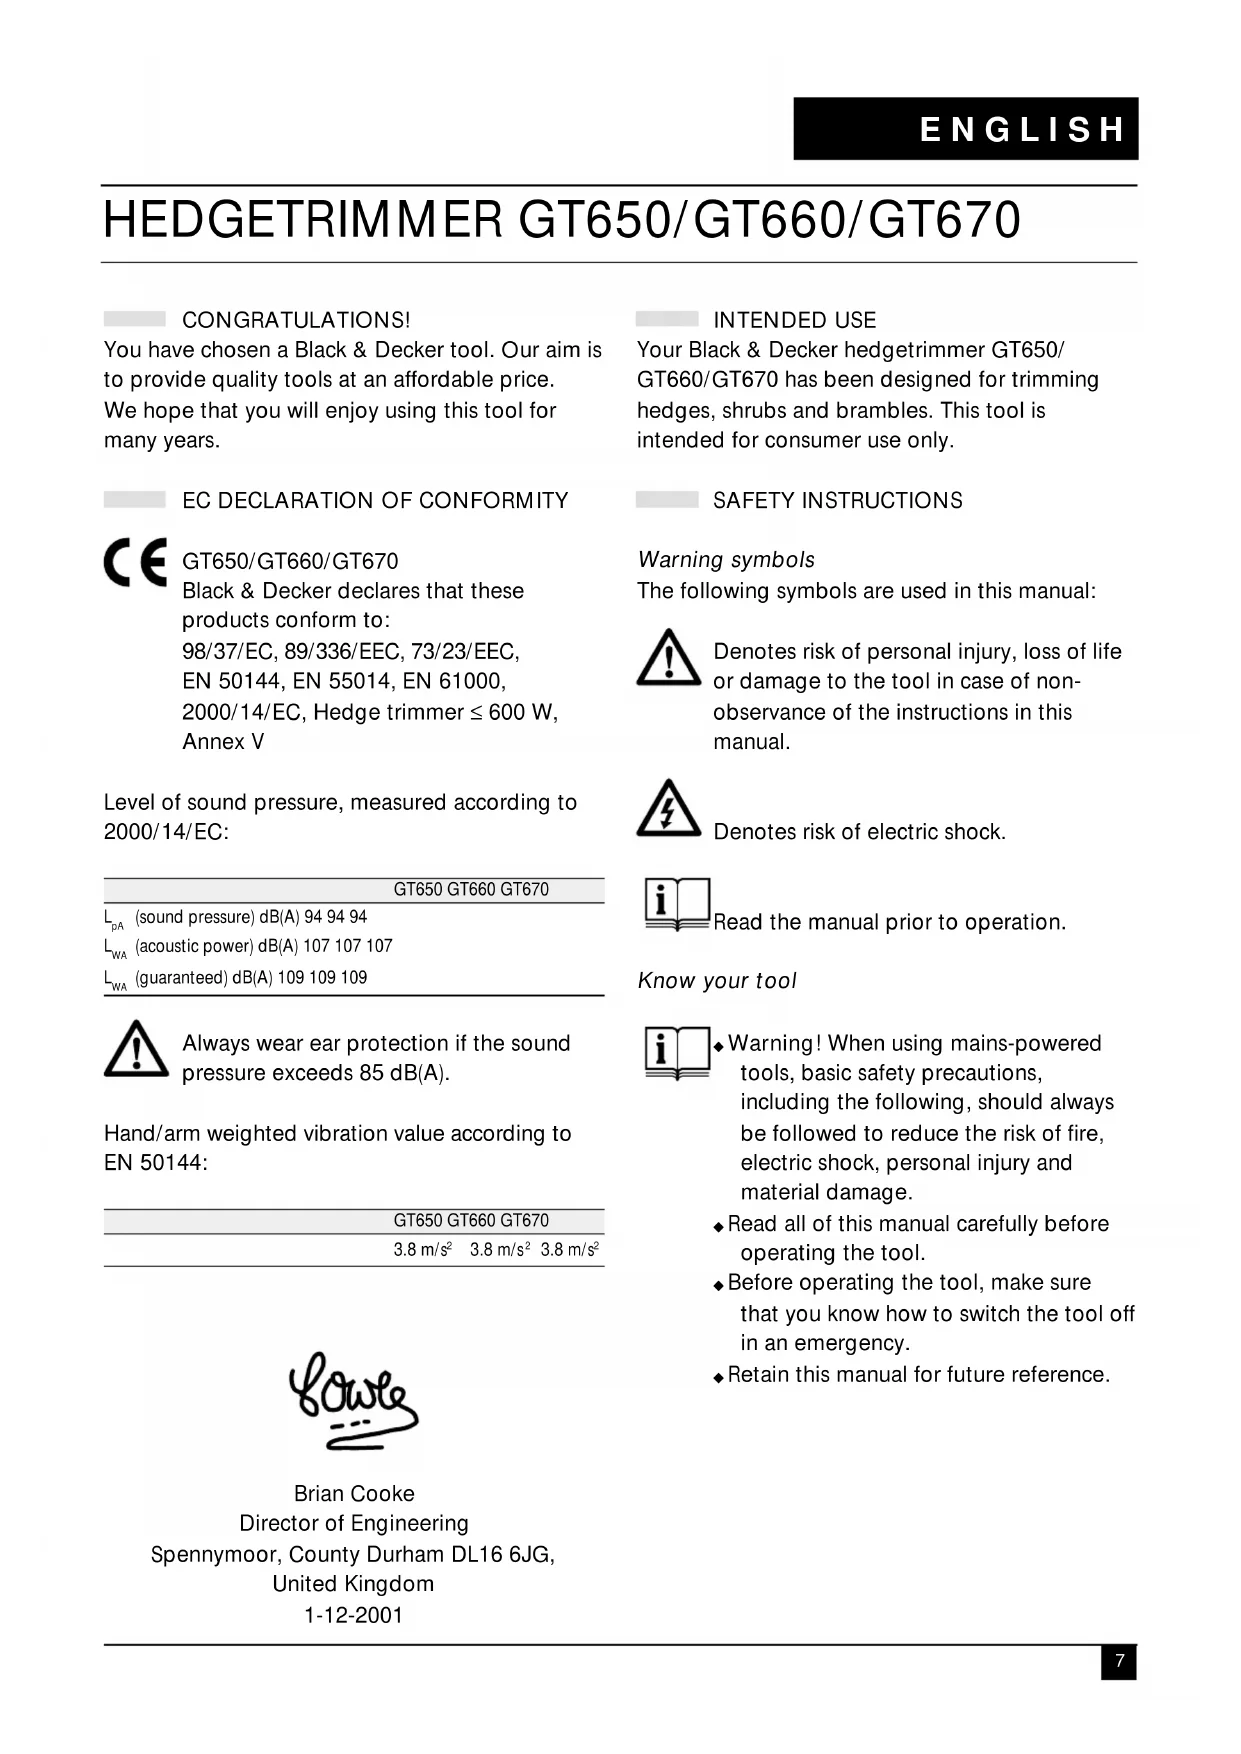
HEDGETRIMMER GT650/GT660/GT670
CONGRATULATIONS!
You have chosen a Black & Decker tool. Our aim is to provide quality tools at an affordable price.
We hope that you will enjoy using this tool for many years.
EC DECLARATION OF CONFORMITY

GT650/GT660/GT670
Black & Decker declares that these products conform to:
98/37/EC, 89/336/EEC, 73/23/EEC,
EN 50144, EN 55014, EN 61000,
2000/14/EC, Hedge trimmer ≤ 600 W,
Annex V
Level of sound pressure, measured according to 2000/14/EC:
GT650 GT660 GT670
L_pA
(sound pressure) dB(A) 94 94 94
L_WA
(acoustic power) dB(A) 107 107 107
L_WA
(guaranteed) dB(A) 109 109 109

Always wear ear protection if the sound pressure exceeds 85 dB(A).
Hand/arm weighted vibration value according to EN 50144:
GT650 GT660 GT670
3.8m / s^2 3.8m / s^2 3.8m / s^2

Brian Cooke
Director of Engineering
Spennymoor, County Durham DL16 6JG,
United Kingdom
1-12-2001
INTENDED USE
Your Black & Decker hedgetrimmer GT650/GT660/GT670 has been designed for trimming hedges, shrubs and brambles. This tool is intended for consumer use only.
SAFETY INSTRUCTIONS
Warning symbols
The following symbols are used in this manual:

Denotes risk of personal injury, loss of life or damage to the tool in case of non-observance of the instructions in this manual.

Denotes risk of electric shock.

Read the manual prior to operation.
Know your tool

- Warning! When using mains-powered tools, basic safety precautions, including the following, should always be followed to reduce the risk of fire, electric shock, personal injury and material damage.
◆ Read all of this manual carefully before operating the tool.
◆ Before operating the tool, make sure that you know how to switch the tool off in an emergency.
◆ Retain this manual for future reference.
General
- Consider work area environment Do not expose the tool to rain. Do not use the tool in damp or wet conditions. Keep the work area well lit. Do not use the tool where there is a risk of causing fire or explosion, i.e. in the presence of flammable liquids and gases. Keep the work area free from debris and obstacles.
- Keep children away Do not allow children, visitors or animals to come near the work area or to touch the tool or mains cable.
- Dress properly Do not wear loose clothing or jewellery, as these can be caught in moving parts. Preferably wear rubber gloves and non-slip footwear when working outdoors. Wear protective hair covering to keep long hair out of the way.
- Personal protection Always use safety glasses. Use a face or dust mask whenever the operations may produce dust or flying particles. Wear ear protection whenever the sound level seems uncomfortable.
- Guard against electric shock Prevent body contact with earthed or grounded surfaces (e.g. metal railings, lamp- posts etc.). Electric safety can be further improved by using a high-sensitivity (30 mA/30 mS) residual current device (RCD).
- Do not overreach Keep proper footing and balance at all times.
- Stay alert Watch what you are doing. Use common sense. Do not operate the tool when you are tired.
- Secure workpiece Where appropriate, use clamps or a vice to hold the workpiece. It is safer and it frees both hands to operate the tool.
- Remove keys and adjusting wrenches Always check that keys and adjusting wrenches are removed from the tool before operating the tool.
-
Extension cables Before use, inspect the extension cable and replace if damaged. Only use extension cables intended for outdoor use.
-
Use appropriate tool The intended use is described in this instruction manual. Do not force small tools or attachments to do the job of a heavy-duty tool. The tool will do the job better and safer at the rate for which it was intended. Do not force the tool.
Warning! The use of any accessory or attachment or performance of any operation with this tool other than those recommended in this instruction manual may present a risk of personal injury. -
Check for damaged parts Before use, carefully check the tool and mains cable for damage. Check for misalignment and seizure of moving parts, breakage of parts, damage to guards and switches and any other conditions that may affect its operation. Ensure that the tool will operate properly and perform its intended function. Do not use the tool if any part is damaged or defective. Do not use the tool if the switch does not turn it on and off. Have any damaged or defective parts repaired or replaced by an authorised repair agent. Never attempt any repairs yourself. If the supply cord is damaged, it must be replaced by an authorised repair agent in order to avoid a hazard.
-
Unplug the tool Unplug the tool when it is not in use, before changing any parts of the tool, accessories or attachments and before servicing.
-
Avoid unintentional starting Do not carry the tool with a finger on the on/off switch. Be sure that the tool is switched off when plugging in.
-
Do not abuse cord Never carry the tool by its cord or pull it to disconnect from the socket. Keep the cord away from heat, oil and sharp edges.
-
Store idle tools When not in use, tools should be stored in a dry, locked up or high place, out of reach of children.
-
Maintain tools with care Keep cutting tools sharp and clean for better and safer performance. Follow the instructions for maintenance and changing accessories. Keep handles and switches dry, clean and free from oil and grease.
18. Repairs
This tool complies with relevant safety requirements. Repairs should only be carried out by qualified persons using original spare parts; otherwise this may result in considerable danger to the user.
Additional safety instructions for hedgetrimmers

Wear safety glasses or goggles when operating this tool.

Wear gloves when operating this tool.

Wear ear protection when operating this tool.

Immediately disconnect the cable from the mains if it is damaged or cut.

Do not expose the tool to rain or high humidity.
◆ Keep the cable away from the blades while using this tool.
If you have not used a hedgetrimmer before, preferably seek practical instruction by an experienced user in addition to studying this manual.
◆ Never touch the blades while the tool is running.
◆ Never attempt to force the blades to come to a standstill.
◆ Do not put the tool down until the blades have come to a complete standstill.
◆ Regularly check the blades for damage and wear. Do not use the tool when the blades are worn or damaged.
Take care to avoid hard objects (e.g. metal wire, railings) when trimming. Should you accidentally hit any such object, immediately switch the tool off and check for any damage.
- Should the tool start to vibrate abnormally, immediately switch it off and check for any damage.
- If the tool stalls, immediately switch it off.
Unplug the tool before attempting to remove any obstructions.
◆ After use, place the blade sheath supplied over the blades. Store the tool, making sure that the blade is not exposed.
◆ Always ensure that all guards are fitted when using the tool. Never attempt to use an incomplete tool or a tool with unauthorised modifications.
◆ Never allow children to use the tool.
Additional safety instructions for Australia and New Zealand
◆ This appliance is not intended for use by young or infirm persons without supervision. Children must be supervised to ensure they do not play with the appliance.
If the supply cord is damaged, it must be replaced by the manufacturer or an authorised Black & Decker Service Centre in order to avoid a hazard.
ELECTRICAL SAFETY
The electric motor has been designed for one voltage only. Always check that the power supply corresponds to the voltage on the rating plate.

This tool is double insulated; therefore no earth wire is required.
Mains plug replacement
(U.K. & Ireland only)
- Should your mains plug need replacing and you are competent to do this, proceed as instructed below. If you are in doubt, contact an authorised repair agent or a qualified electrician.
◆ Disconnect the plug from the supply and remove the fuse from the plug.
◆ Cut off the plug and dispose of it safely; a plug with bared copper conductors is dangerous if engaged in a live socket outlet.
ENGLISH
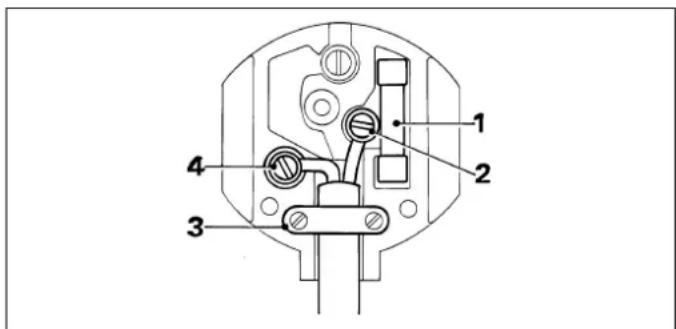
◆ Only fit 13 Amperes BS1363A approved plugs fitted with the correctly rated fuse (1).
◆ The cable wire colours, or a letter, will be marked at the connection points of most good quality plugs. Attach the wires to their respective points in the plug (see above). Brown is for Live (L) (2), blue is for Neutral (N) (4).
Before replacing the top cover of the mains plug ensure that the cable restraint (3) is holding the outer sheath of the cable firmly and that the leads are correctly fixed at the terminal screws.
◆ If the plug has a fuse cover, make sure that the fuse cover is fitted. Do not use the plug if the fuse cover is missing or damaged.

Never use a light socket.
Using an extension cable
Always use an approved extension cable suitable for the power input of this tool (see technical data). The extension cable must be suitable for outdoor use and marked accordingly. When using a cable reel, always unwind the cable completely.
Cable connection system
Black & Decker continually makes every effort to achieve the highest standards in performance, quality and reliability. We recommend the use of a new outdoor cable connection system, which gives additional protection against the possibility of water or moisture entering into the cable connector during normal use.

The new connection system does not release the operator of the tool from the safety precautions and safe working practices given in the manual. Particular attention is drawn to the fact that this connection system is ‘weather resistant’, but not suitable for immersion, submersion or being subjected to water jets. Take care to prevent the cable from lying in or trailing through pools of water or from splashing with hose pipes.
The following items are available:
A6615 20 m cable, socket, 13 Amp plug A6616 20 m cable, socket, 13 Amp plug and Cable Tidy frame
A6617 30 m cable, socket, 13 Amp plug and Cable Tidy frame
A6613 40 m cable, socket, 13 Amp plug and Cable Tidy reel
Existing cable systems
Your tool either comes with a cable attached (the cat. no. ends with a C) or with a male connector built into the tool. If you already own an outdoor cable system with the old female connector shown below, we recommend that you replace this connector with the new female connector, which is available from most major DIY outlets and from Black & Decker service centres (cat. no. A6624S).
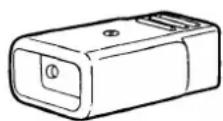
old female connector new female connector
Follow the instructions supplied with the connector. If in doubt, consult a qualified electrician.
Existing outdoor tools
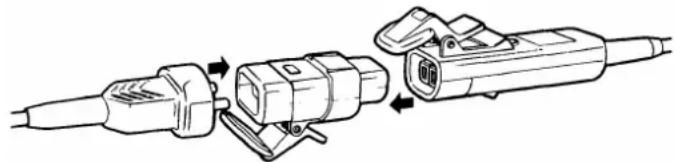
To connect existing Black & Decker outdoor tools to the new system, you will need an adaptor (see below), which is available as an accessory from most major DIY outlets and from Black & Decker service centres (cat. no. A6623S).
natural_image
Technical line drawing of a mechanical device with two connected components and directional arrows indicating assembly (no text or symbols)
This adaptor is only suitable for products rated up to 500 W. It is not recommended for use with hover mowers, rotary mowers with grass collection, chainsaws, shredders and blower vacs. Please contact your local service centre if you need further advice.
Fitting your own extension cable
- When making your own extension cable, fit a 13 Amp plug to one end of the cable (see “Mains plug replacement”) and a female connector to the other end.
For wiring instructions, see those supplied with the female connector.
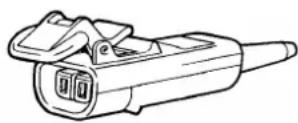
◆ A male connector (see below) is already attached to the power supply cable on your tool. It is non-rewireable and should not be removed. If the connector is damaged and needs replacement, take the tool to a Black & Decker service centre.
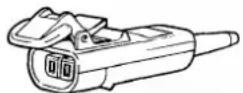
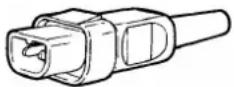
female connector male connector

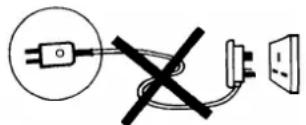
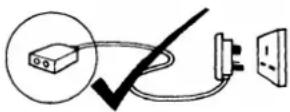
Never wire an extension cable with anything other than the female connector supplied and a 13 Amp BS1363A approved plug with the recommended fuse. Never wire a male connector to the extension cable. Never wire an extension cable with a plug of any kind at each end of the cable. This is extremely dangerous and results in the pins being live, which may cause a fatal electric shock.
CARTON CONTENTS
The carton contains:
1 Hedgetrimmer
1 Blade sheath
1 Guard
6 Screws
1 Instruction manual
◆ Carefully unpack all parts.
◆ Please note that additional items may be found in the carton, depending on the letter suffix following the catalogue number of your tool.
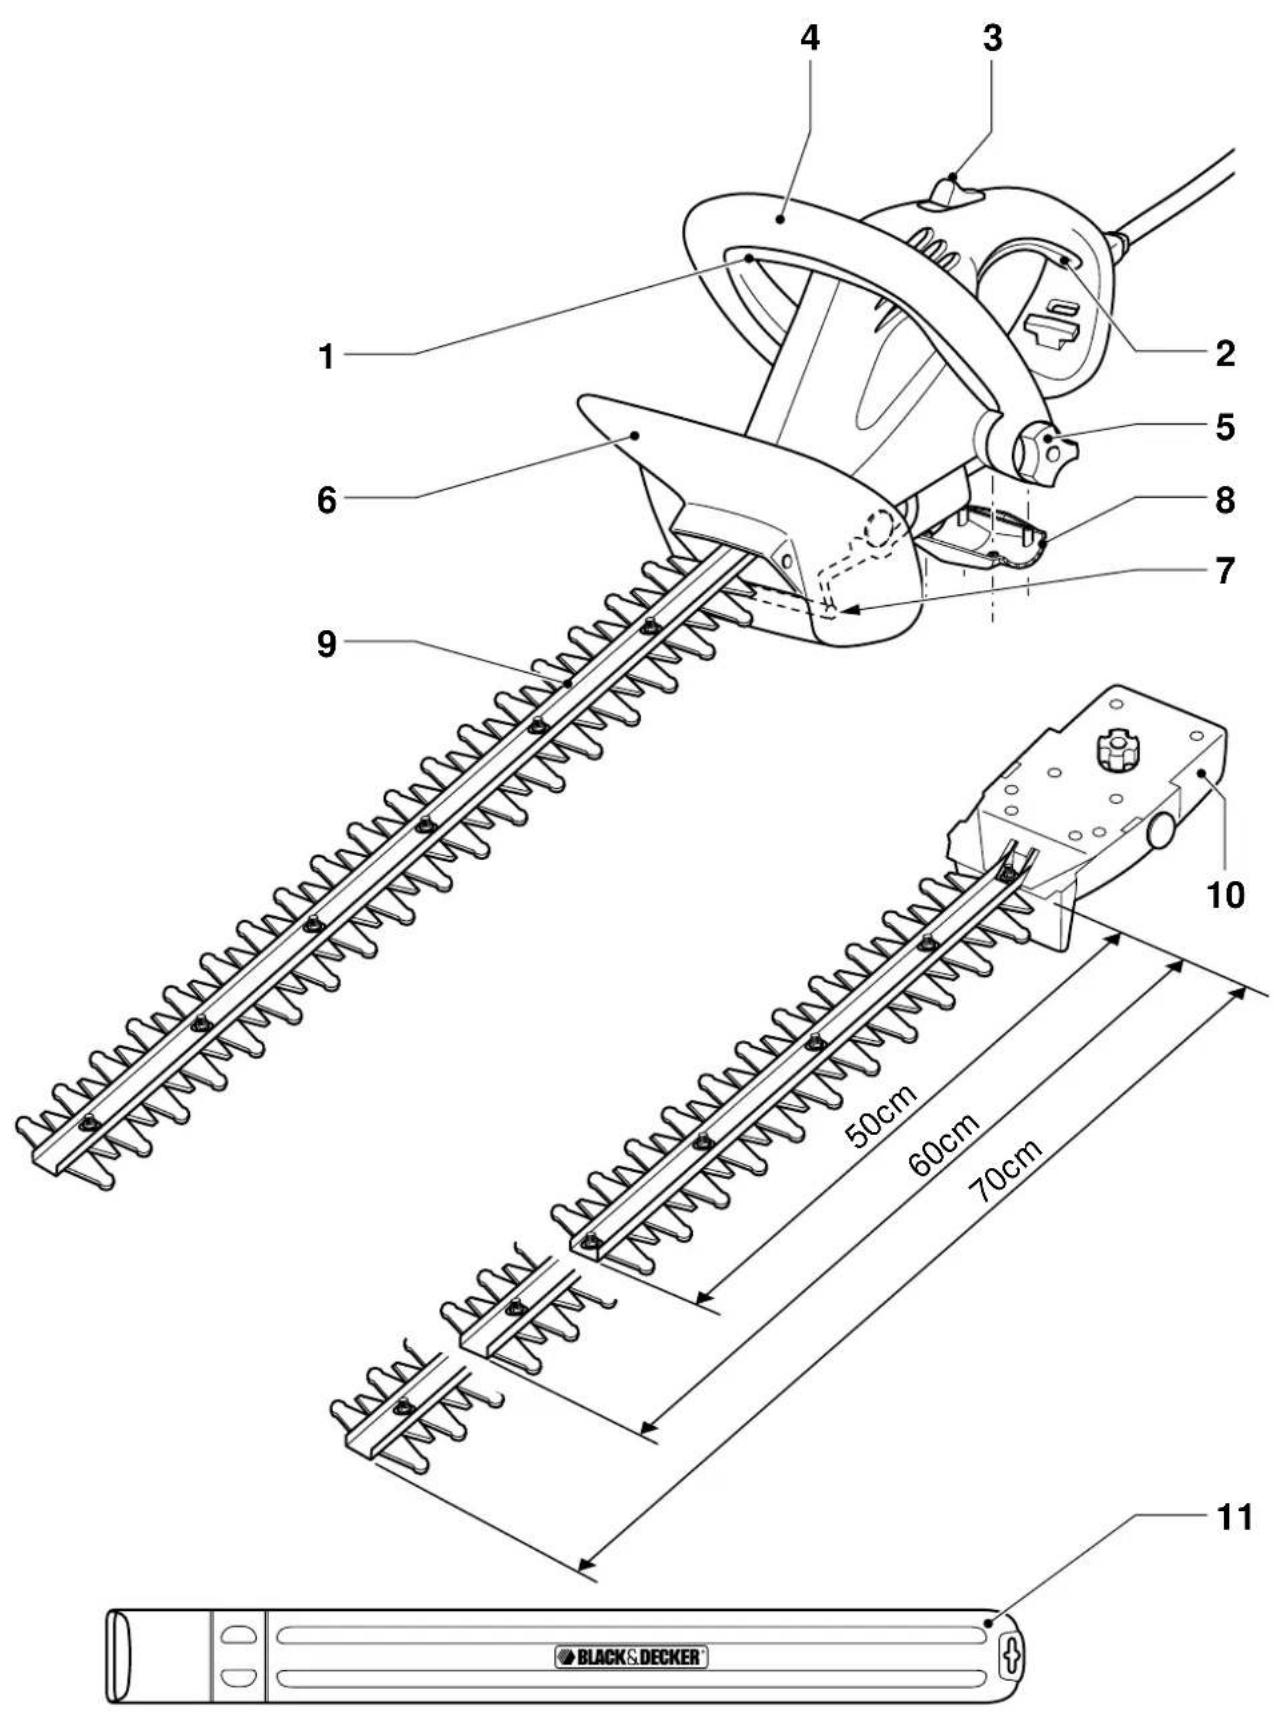
OVERVIEW (fig. A)
- Front handle switch
-
Trigger switch
-
Lock-off button
- Front handle
- Locking knob for front handle
- Guard
- Locking handle for cassette
- Handle cover
- Blade
- Blade cassette
- Blade sheath
ASSEMBLY

Before assembly, make sure that the tool is switched off and unplugged.
Fit the blade sheath over the blades.
You will need a number 2 Posidrive screwdriver for assembly.
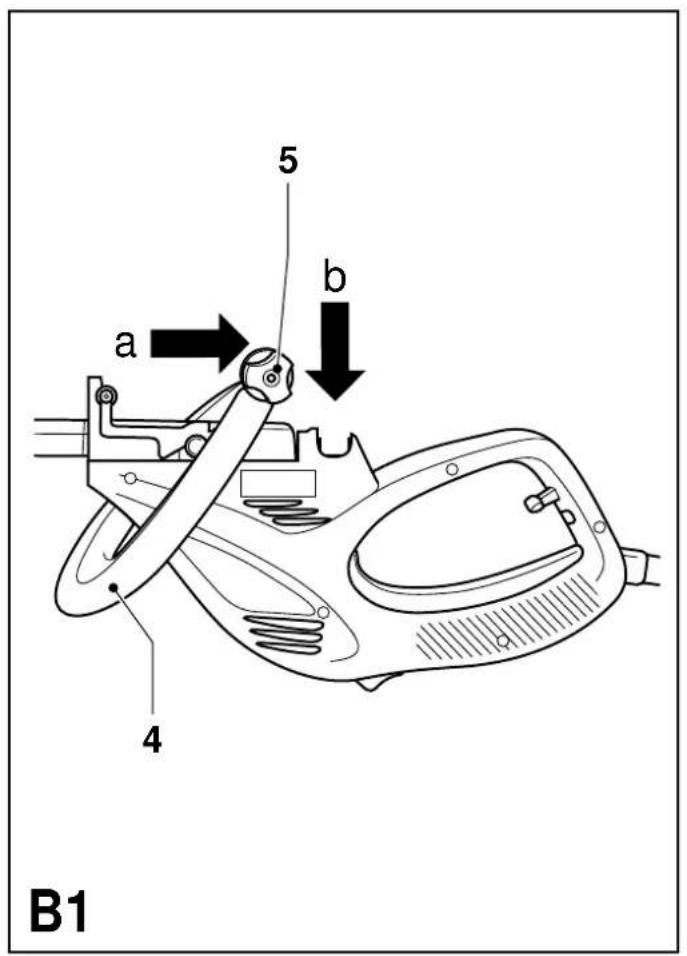
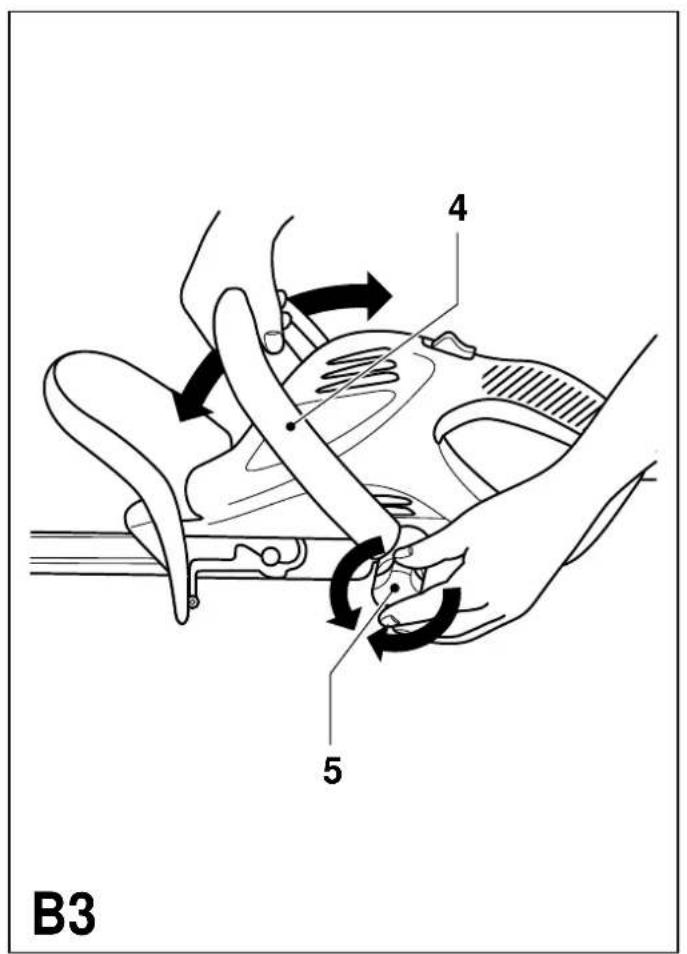
Fitting the front handle (fig. B1 - B3)
◆ Loosen the locking knob (5) a few turns (fig. B1).
◆ Slide the handle (4) into position (A).
◆Press the handle into the location on the bottom of the tool (B).
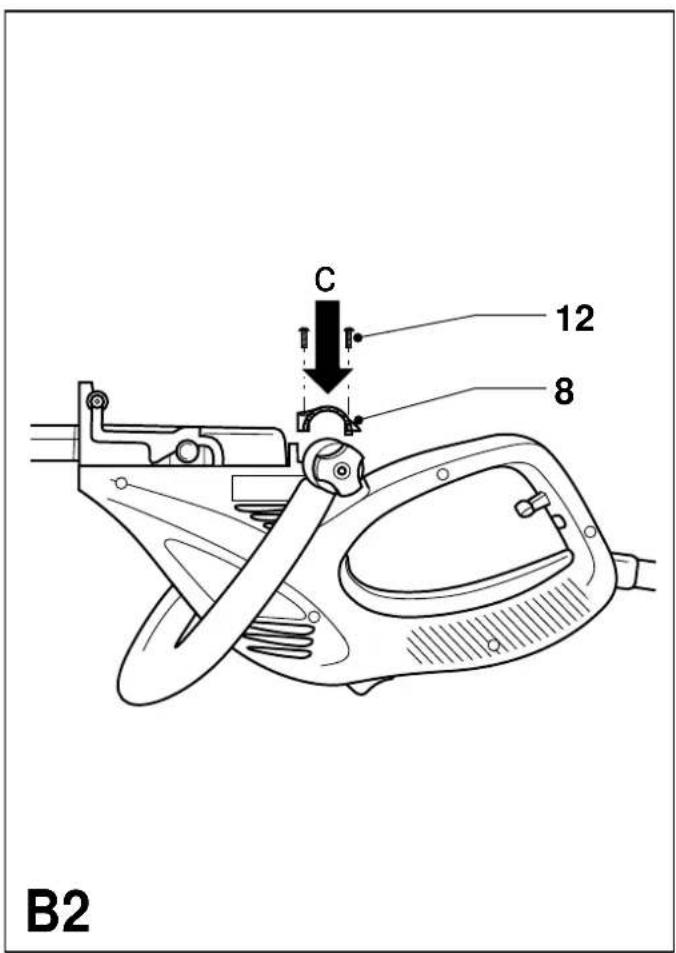
◆ Fit the handle cover (8) in place and secure it with the 4 screws (12) supplied (fig. B2).
◆ Set the front handle (4) to a comfortable operating position (fig. B3).
◆ Secure the handle by tightening the locking knob (5).
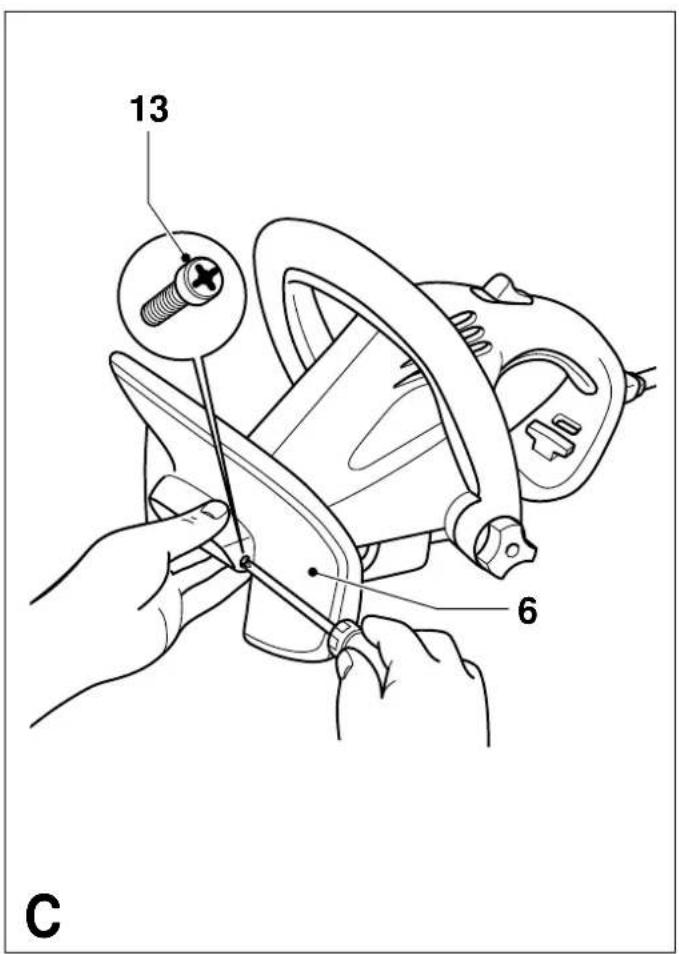
Fitting the guard (fig. C)
◆ Place the guard (6) onto the tool as shown.
◆ Secure the guard using the two screws (13) supplied.

Never use the tool without the guard.
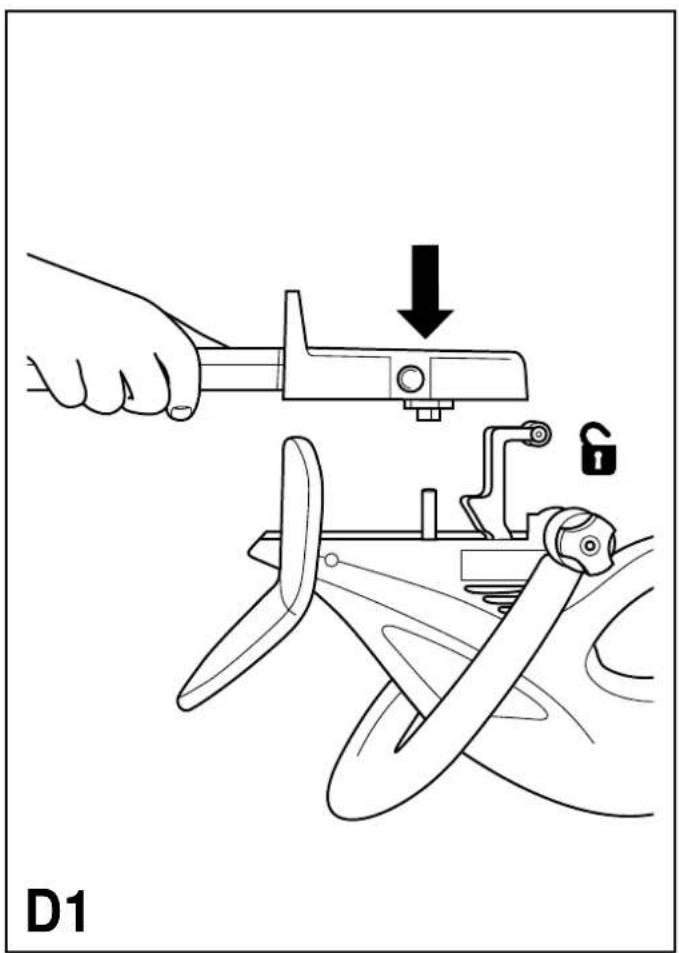
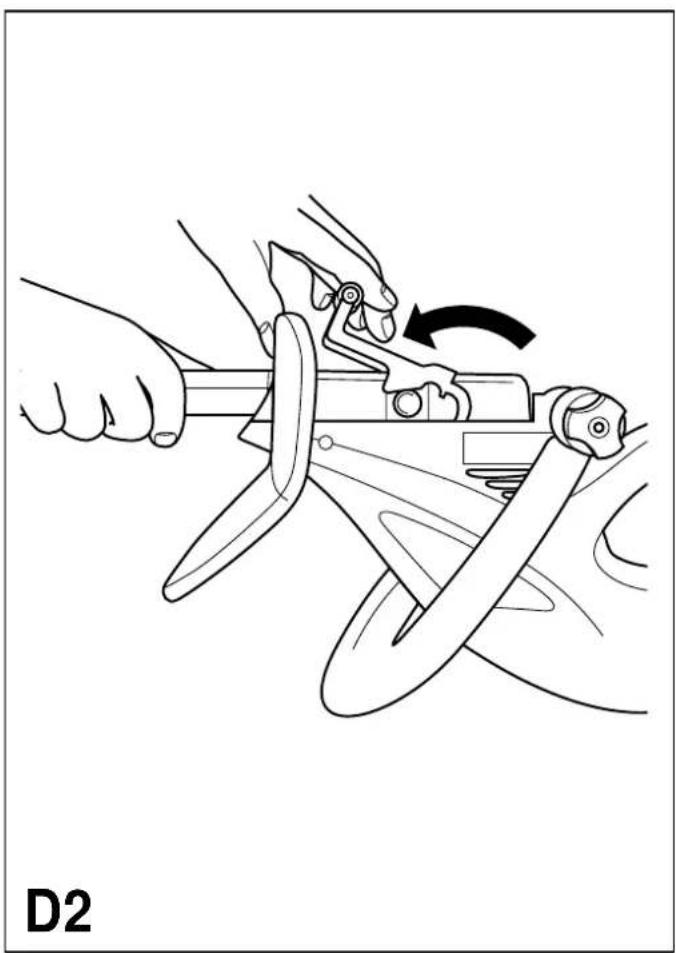
Fitting the blade cassette (fig. D1 - D3)
◆ Set the locking handle (7) to the unlocked position (fig. D1).
◆ Place the blade cassette (10) onto the motor unit, aligning the 3 pins on the motor unit with the holes in the cassette.
◆ Set the locking handle to the locked position (fig. D2) to secure the cassette (fig. D3).
ENGLISH
Connecting the tool to the mains (fig. E)
Unless the tool is fitted with a mains cable, you will need to connect an extension cable to the power inlet.
◆ Connect the female socket of a suitable extension cable to the power inlet.
- Loop the extension cable through the cable restraint (14) as shown to prevent it from becoming detached during use.
◆ Insert the mains plug into a mains outlet.

The extension cable must be suitable for outdoor use.
[Table_Title]
USE

Let the tool work at its own pace. Do not overload.
◆ Carefully guide the cable in order to avoid accidentally cutting it. A good way to control the cable is by putting it over your shoulder.
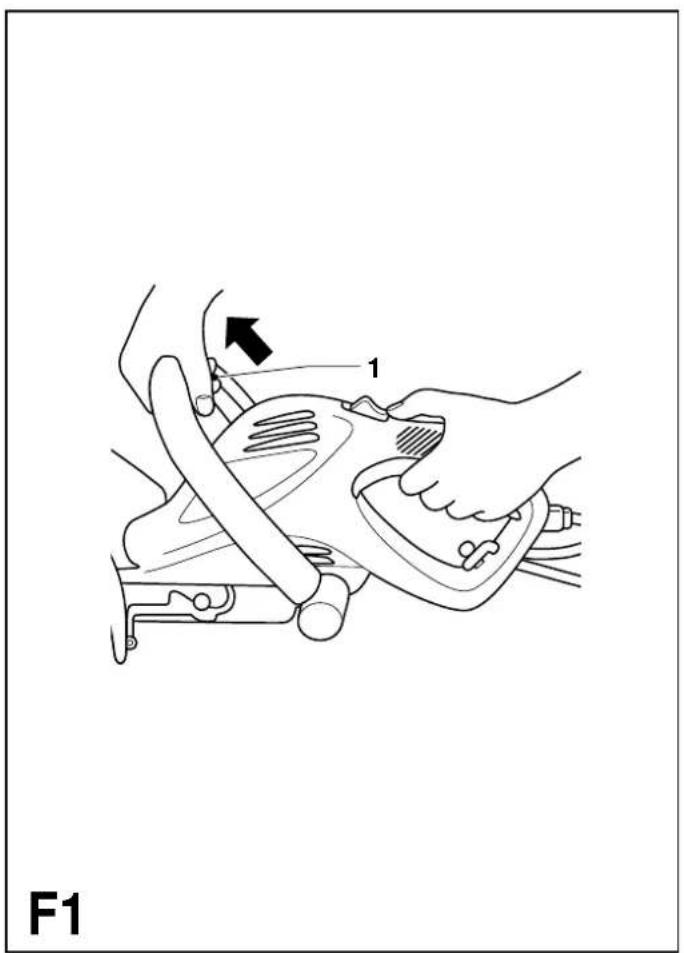
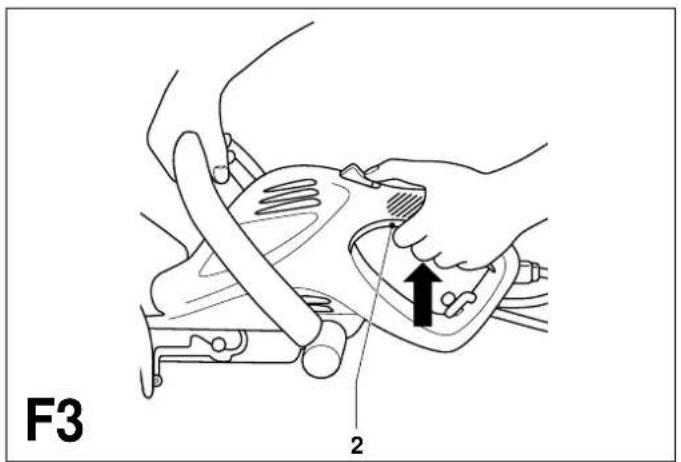
Switching on and off (fig. A, F1 - F3)
For your safety, this tool is equipped with a double switching system. This system prevents starting the tool inadvertently and will only allow operation while holding the tool with both hands.
Switching on
◆ Keep the front handle switch (1) depressed (fig. F1).
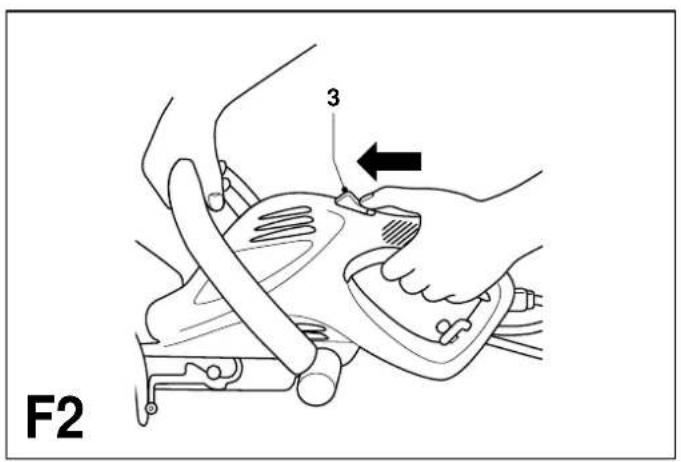
◆ Slide the lock-off button (3) forward (fig. F2).
◆ Press the trigger switch (2) (fig. F3).
◆ Release the lock-off button.
Switching off
◆ Release the front handle switch (1) or the trigger switch (2).

Never attempt to lock a switch in the on position.
Adjusting the front handle (fig. B3)
◆ Loosen the locking knob (5) a few turns.
◆ Set the front handle (4) to a comfortable operating position.
◆ Secure the handle by tightening the locking knob (5).
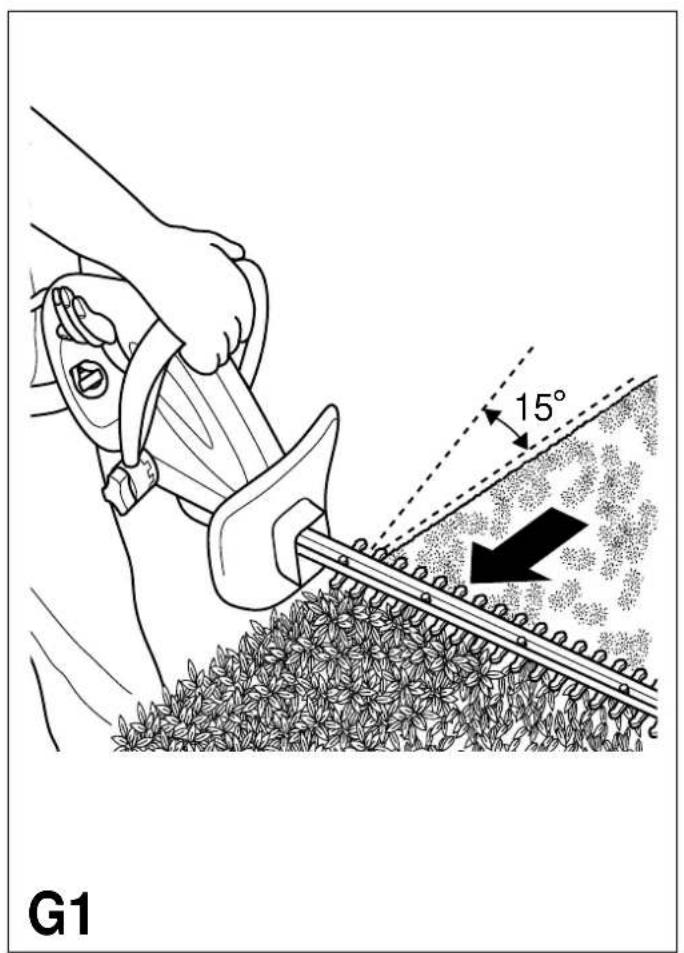
Hints for optimum use
◆ Slightly tilt the tool (up to 15^ relative to the line of cut) so that the blade tips point slightly towards the hedge (fig. G1). This will cause the blades to cut more effectively.
◆ Start by trimming the top of the hedge.
Hold the tool at the desired angle and move it steadily along the line of cut. The double-sided blade allows you to cut in either direction.
◆ In order to obtain a very straight cut, stretch a piece of string along the length of the hedge at the desired height. Use the string as a guideline, cutting just above it.
In order to obtain flat sides, cut upwards with the growth. Younger stems move outwards when the blade cuts downwards, causing shallow patches in the hedge.
Take care to avoid any foreign objects.
Especially avoid hard objects such as metal wire and railings, as these could damage the blades.
◆ Regularly oil the blades.
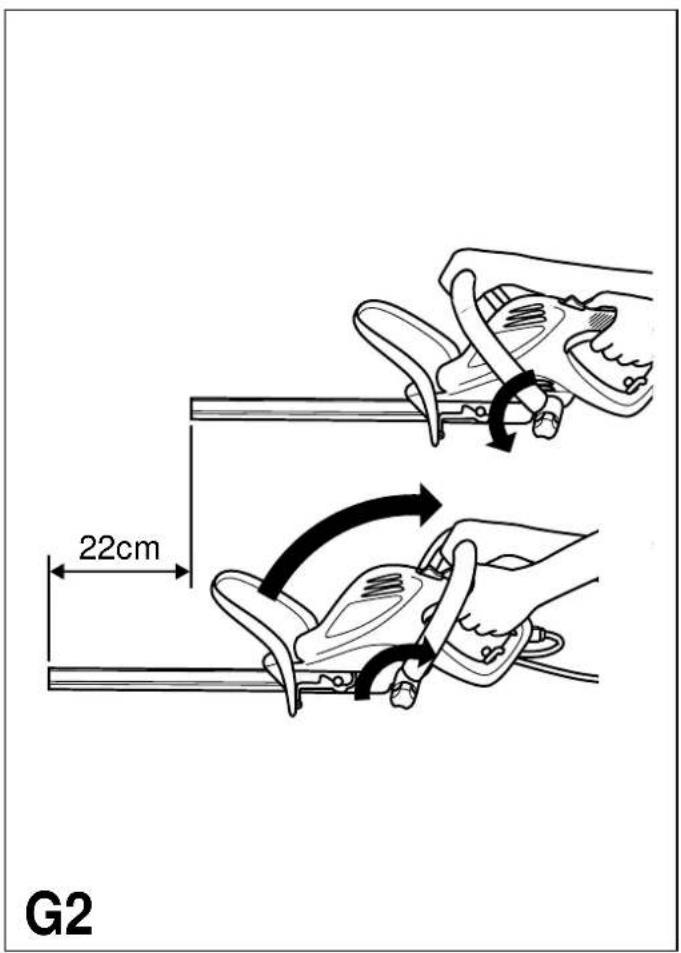
◆ To extend your reach, set the front handle to the fully back position as shown in fig. G2.
Guidelines for trimming (UK & Ireland)
♦ Trim hedges and shrubs with seasonal leaves (new leaves every year) in June and October.
♦ Trim evergreens in April and August.
◆ Trim conifers and other fast growing shrubs every six weeks from May until October.
Guidelines for trimming (Australia & New Zealand)
♦ Trim hedges and shrubs with seasonal leaves (new leaves every year) in December and March.
◆ Trim evergreens in September and February.
◆ Trim conifers and other fast growing shrubs every six weeks from October until March.
Accessories
The following accessories are available from your retailer:
- Shrubber cassette GTB20 for trimming shrubs
- Saw cassette GTB10 for use as
a pruning saw
MAINTENANCE
Your Black & Decker tool has been designed to operate over a long period of time with a minimum of maintenance. Continuous satisfactory operation depends upon proper tool care and regular cleaning.

Before performing any maintenance, switch off and unplug the tool.
◆ After use, carefully clean the blades.
After cleaning, apply a film of light machine oil to prevent the blades from rusting.
◆ Regularly clean the ventilation slots in your tool using a soft brush or dry cloth.
◆ Regularly clean the motor housing using a damp cloth. Do not use any abrasive or solvent-based cleaner.
PROTECTING THE ENVIRONMENT

Black & Decker provides a facility for recycling Black & Decker products once they have reached the end of their working life. This service is provided free of charge. To take advantage of this service please return your product to any authorised repair agent who will collect them on our behalf.
You can check the location of your nearest authorised repair agent by contacting your local Black & Decker office at the address indicated in this manual. Alternatively, a list of authorised Black & Decker repair agents and full details of our after-sales service and contacts are available on the Internet at: www.2helpU.com.
Technical data
| GT650 GT660 GT670 | |
| Voltage V _AC (Australia & New Zealand) V_AC | 230 230 230240 240 240 |
| Power input W 600 600 600 | |
| Blade strokes (no load) min ^-1 | 1,460 1,460 1,460 |
| Blade length cm 48 60 68 | |
| Blade gap mm 27 27 27 | |
| Blade brake time s <0.5 <0.5 | <0.5 |
| Weight kg | 3.7-4.2 3.7-4.2 3.7-4.2 |
GUARANTEE
Black & Decker is confident of the quality of its products and offers an outstanding guarantee. This guarantee statement is in addition to and in no way prejudices your statutory rights.
The guarantee is valid within the territories of the Member States of the European Union and the European Free Trade Area.
If a Black & Decker product becomes defective due to faulty materials, workmanship or lack of conformity, within 24 months from the date of purchase, Black & Decker guarantees to replace defective parts, repair products subjected to fair wear and tear or replace such products to ensure minimum inconvenience to the customer unless:
◆ The product has been used for trade, professional or hire purposes;
◆ The product has been subjected to misuse or neglect;
◆The product has sustained damage through foreign objects, substances or accidents;
◆ Repairs have been attempted by other persons than authorised repair agents or Black & Decker service staff.
To claim on the guarantee, you will need to submit proof of purchase to the seller or an authorised repair agent. You can check the location of your nearest authorised repair agent by contacting your local Black & Decker office at the address indicated in this manual. Alternatively, a list of authorised Black & Decker repair agents and full details of our after-sales service and contacts are available on the Internet at: www.2helpU.com.
ENGLISH
OTHER OUTDOOR TOOLS
Black & Decker has a full range of outdoor power tools that make life in the garden easy. If you would like further information on the following products, please contact our Service and Information Centre (see the address page towards the end of this manual) or your local Black & Decker retailer.
String trimmers Chainsaws Cordless shear Hedgetrimmers Lawnmowers Lawnrakers Leafbusters Shredders
Not all products are available in all countries.
HECKENSCHERE GT650/GT660/GT670
HERZLICHEN GLÜCKWUNSCH!
Director of Engineering
Spennymoor, County Durham DL16 6JG,
United Kingdom
1-12-2001
98/37/CEE, 89/336/CEE, 73/23/CEE,
EN 50144, EN 55014, EN 61000,
Spennymoor, County Durham DL16 6JG,
Royaume-Uni
1-12-2001
UTILISATION PREVUE
Spennymoor, County Durham DL16 6JG,
United Kingdom
1-12-2001
USO PROGETTATO
Brian Cooke, Director of Engineering Spennymoor, County Durham DL16 6JG, United Kingdom 1-12-2001
GEBRUIK VOLGENS BESTEMMING
Director of Engineering
Spennymoor, County Durham DL16 6JG,
United Kingdom
1-12-2001
ANVÄNDNINGSOMRÅDE
Director of Engineering
Spennymoor, County Durham DL16 6JG,
United Kingdom
1-12-2001
BRUKSOMRÅDER
Director of Engineering
Spennymoor, County Durham DL16 6JG,
United Kingdom
1-12-2001
ANVENDELSESOMRÅDE
Director of Engineering
Spennymoor, County Durham DL16 6JG,
United Kingdom
1-12-2001
KÄYTTÖTARKOITUS
E12654
27 / 01 / 99
| Australia | DEWALT Industrial Power Tool Company7 Clarice Road, Box Hill, Victoria 3128 Fax 03 9899 7465 | Tel. 03 9895 9200 |
| Belgique/België Black & Decker (Belgium) N.V. Tel. 02/719.07.11Weihoek 1, 1930 Zaventem Fax 02/719.08.10 | ||
| Danmark Black & Decker Tel. 70 20 15 10Hejrevang 26B, 3450 Allerød Fax 48 14 13 99Internet: www.blackdecker.dk | ||
| Deutschland Black & Decker GmbH Tel. 06126/21 24 83Black & Decker Str. 40, D - 65510 Idstein Fax 06126/21 26 01 | ||
| Ελλάς Black & Decker (Ελλάς) A.E. Τηλ. (01) 8981-616Στράβωνος 7 & Bouλιαγμένης 159 Φαξ (01) 8983-570Γλυφάδα 16674, Ελλάδα Service (01) 8982-630 | ||
| España Black & Decker Spain Tel. 934 797 400Parque de Negocios “Mas Blau” Fax 934 797 419Edificio Muntadas, c/Bergadá, 1, Of. A608820 El Prat de Llobregat (Barcelona) | ||
| France | Black & Decker (France) S.A.S.B.P. 21, 69571 Dardilly Cédex | Tel. 04 72 20 39 20Fax 04 72 20 39 00 |
| Helvetia | Eduard LuggenBlack & Decker-Service SchweizIndustriestrasse 1 / Postfach 3238157 Dielsdorf | Tel. 01/854 01 01Fax 01/854 02 02 |
| Italia | Black & Decker Italia SpAViale Elvezia 220052 Monza (MI) | Tel. 039-23871Fax 039-2387592/2387594Numero verde 800-213935 |
| Nederland | Black & Decker (Nederland) BVFlorijnstraat 10, 4879 AH Etten-Leur | Tel. 076-5082000Fax 076-5038184 |
| New Zealand | Black & Decker Tel. 09 579 760081 Hugo Johnson DrivePenrose, Auckland, New Zealand | Fax 09 579 8200 |
| Norge | Black & Decker (Norge) A/SPostboks 248, Leirdal, 1011 OsloInternet: www.blackdecker.no | Tlf. 22 90 99 00Fax 22 90 99 01 |
| Österreich | Black & Decker Vertriebsges.m.b.HErlaaerstraße 165, 1231 Wien | Tel. 01 66116-0Fax 01 66116-14 |
| Portugal | Black & Decker Tel. 214667500Rua Egas Moniz 173,2766-651 S. João do Estoril | Fax 214667575 |
| South Africa | Black & Decker South Africa (Pty) LtdPhysical address:146 Lechwe Street, Corporate parkRandjiesfontein, MidrandPostal address:Postnet Suite 107, Private Bag X65Halfway House 1685 | Tel. (011) 653-1400Fax (011) 653-1499 |
| Suomi Black & Decker Oy Palotie 3, 01610 Vantaa Brandvägen 3, 01610 Vanda | Puh: (09) 825 4540Fax: (09) 825 45 444Tel: (09) 825 4540Fax: (09) 825 45 444 | |
| Sverige | Black & Decker ABBox 603, 421 26 Västra Frölunda,Besöksadr. Ekonomivägen 11 | Tel: 031-68 60 00Fax: 031-68 60 08 |
| Türkiye | Black & Decker Merkez ServisDudullu Cad. Kerembey Sok. No. 1Küçükbakkalköy/Istanbul | Tel. 0216 455 89 73Faks 0216 455 20 52 |
| United Kingdom | Black & Decker Tel. 01753 511234210 Bath RoadSlough, Berkshire SL1 3YD | Fax 01753 551155Helpline 01753 574277 |
| Dealer address Date of purchaseHändleradresse KaufdatumCachet du revendeur Date d’achatIndirizzo del rivenditore Data d’acquistoAdres van de dealer AankoopdatumDirección del detallista Fecha de compraMorada do revendedor Data de compraÄterförsäljarens adress InköpsdatumForhandlerens adresse InnkjøpsdatoForhandler adresse IndkøbsdatoJälleenmyyjän osoite OstopäiväΔιεύθυνση αντιπροσώπου Ημερομηνία αγοράς |
| Name Name Nom NomeNaam Nombre Nome NamNavn Navn Nimi Ovoa:Address Adresse AdresseIndirizzo Adres Dirección MoradaAdress Adresse Adresse OsoiteΔεύθυνση:Town Ort Ville Cittá PlaatsCiudad Localidade Ort By ByPaikkakunta Πόλη:Postal code Postleitzahl Code postal Codice postale PostcodeCódigo Código postal Postnr.Postnr. Postnr. PostinumeroΚωδικός | Is this tool a gift? Ist dieses Gerät ein Geschenk? S'agit-il d'un cadeau?Si tratta di un regalo? Kreeg u de machine als cadeau? ¿Ha recibido usted esta herramienta como regalo?Recebeu esta ferramenta como presente? Är verktyget en gåva?Er verktøyet en gave? Er verktøjet en gave? Onko kone lahja?To εργαλείο είναι δώρο?Yes Ja Oui Si Ja Sim Sim Ja Ja Ja Kyllä Na!No Nein Non No NeeNo Não Nej Nei NejEi OχIst this tool your first purchase? Ist dieses Gerät ein Erstkauf? Est-ce un 1er achat? Questo prodotto è il suo primo acquisto? Is deze machine uw eerste aankoop? Es esta herramienta la primera de este tipo?Esta ferramenta é a sua primeira compra? Är detta ditt första B&D-verktyg? Er dette ditt første B&Dverktøy? Er dette dit første B&D | verktøj? Onko tämä ensimmäinen B&D-koneesi? Eívai to εργαλείο autó η πρώτη σας αγορά?Yes Ja Oui Si Ja Sim Ja Ja Ja KaKyllä Na!No Nein Non No NeeNo Não Nej Nei NejEi OχIDealer address Händleradresse Cachet du revendeur Indirizzo del rivenditore Adres van de dealerDirección del detallista Morada do revendedor Återförsäljarens adressForhandlerens adresse Forhandler adresse Jälleenmyyjän osoiteΔεύθυνση αντιπροσώπου | □Data protection act: Tick the box if you prefer not to receive further information. Bitte ankreuzen, falls Sie keine weiteren Informationen erhalten möchten. Si vous ne souhaitez pas recevoir d'informations, cochez cette case. Barrate la casella se non desiderate ricevere informazioni.A.u.b. dit vakje aankruisen indien u geen informatie wenst te ontvangen.Señale en la casilla sino quiere recibir información. Por favor, assinale com uma cruz se não desejar receber informação. Vänligen kryssa för i rutan om Ni inte vill ha information.Vennligst kryss av dersom du ikke ønsker informasjon. Venligst sæt kryds i ruden såfremt De ikke måtte ønske at modtage information.Merkitkää rasti ruutuun, mikäli ette halua vastaanottaa informaatiota.Паракалείστε να σημειώσετε εάν δεν θέλετε να πάρετε πληροφορίες. |
Cat. no.:
Disadvon Mtg Black & Decker only EAlaoda.
to acquats used my avpda to积极推动 cars only
EXAVIKA Tabackau kohiz auto to koulati kal taxproplohat

- HEDGETRIMMER GT650/GT660/GT670
- CONGRATULATIONS!
- EC DECLARATION OF CONFORMITY
- INTENDED USE
- SAFETY INSTRUCTIONS
- General
- Repairs
- Additional safety instructions for hedgetrimmers
- Additional safety instructions for Australia and New Zealand
- ELECTRICAL SAFETY
- Mains plug replacement
- ENGLISH
- Fitting your own extension cable
- CARTON CONTENTS
- The carton contains:
- OVERVIEW (fig. A)
- ASSEMBLY
- Fitting the front handle (fig. B1 - B3)
- Fitting the guard (fig. C)
- Fitting the blade cassette (fig. D1 - D3)
- Switching on
- Switching off
- Hints for optimum use
- Guidelines for trimming (UK & Ireland)
- Guidelines for trimming (Australia & New Zealand)
- Accessories
- MAINTENANCE
- PROTECTING THE ENVIRONMENT
- GUARANTEE
- OTHER OUTDOOR TOOLS
- HECKENSCHERE GT650/GT660/GT670
- HERZLICHEN GLÜCKWUNSCH!
- UTILISATION PREVUE
- USO PROGETTATO
- GEBRUIK VOLGENS BESTEMMING
- ANVÄNDNINGSOMRÅDE
- BRUKSOMRÅDER
- KÄYTTÖTARKOITUS
- Cat. no.:
Brand : BLACK & DECKER
Model : GT660
Category : Hedge trimmers