
RR-US300 - Dictaphone PANASONIC - Free user manual and instructions
Find the device manual for free RR-US300 PANASONIC in PDF.

| Brand | PANASONIC |
| Model | RR-US300 |
| Type | Digital Voice Recorder |
| Power Supply | 1 AAA LR03 battery (not included) |
| Recording Formats | HQ (128 kbps) and LP (32 kbps) |
| Maximum Number of Files | 199 |
| Microphone Sensitivity | Adjustable: HI (high) / LO (low) |
| Built-in Speaker | Yes |
| Earphone Jack | Mono mini plug ∅ 3.5 mm |
| Hold Function | Yes |
| Auto Power Off | 30 minutes (pause or stop) |
| Clock Setting | Yes |
| Timer Recording | Yes |
| File Division | Yes |
| Repeat Playback | A-B and Repeat |
| Time Search | Yes |
| USB Connection | Yes (extension cable included) |
| Compatible Operating Systems | Windows XP/Vista/7, Mac OS X 10.2.8 through 10.6 |
| Included Accessories | USB extension cable |
| Maintenance | Soft dry cloth, avoid solvents |
| Safety | Caution with earphones: hearing risk; battery: do not heat |
Frequently Asked Questions - RR-US300 PANASONIC
User questions about RR-US300 PANASONIC
0 question about this device. Answer the ones you know or ask your own.
Ask a new question about this device
Download the instructions for your Dictaphone in PDF format for free! Find your manual RR-US300 - PANASONIC and take your electronic device back in hand. On this page are published all the documents necessary for the use of your device. RR-US300 by PANASONIC.
USER MANUAL RR-US300 PANASONIC
natural_image
Illustration of a silver remote control device with a digital display and control buttons (no text or symbols)Operating Instructions
Bedienungsanleitung
Thank you for purchasing this product.
For optimum performance and safety, please read these instructions carefully.
Before connecting, operating or adjusting this product, please read the instructions completely.
Please keep this manual for future reference.
Supplied accessories

Please check and identify the supplied accessories.
Use numbers indicated in parentheses when asking for replacement parts.
(Product numbers correct as of June 2011.
These may be subject to change.)
☐ 1 USB extension cable [K2ZZ04Y00005]
■ For the United Kingdom and Ireland customers
(Sales and Support Information) Customer Care Centre
• For customers within the UK: 0844 844 3852
• For customers within Ireland: 01 289 8333
- Visit our website for product information www.panasonic.co.uk
• E-mail: customer.care@panasonic.co.uk
Direct Sales at Panasonic UK
• For customers: 0844 844 3856
- Order accessory and consumable items for your product with ease and confidence by phoning our Customer Care Centre
Monday-Thursday 9:00 a.m.-5:30 p.m., Friday 9:30 a.m.-5:30 p.m. (Excluding public holidays)
- Or go on line through our Internet Accessory ordering application at www.pas-europe.com.
- Most major credit and debit cards accepted.
- All enquiries transactions and distribution facilities are provided directly by Panasonic UK.
- It couldn't be simpler!
- Also available through our Internet is direct shopping for a wide range of finished products, take a browse on our website for further details.
Table of contents
Preparation
Supplied accessories....2
Part names 4
Screen display....5
Inserting a battery....6
Turning the power on/off....7
Hold function....7
Setting the time....8
Basic Operations
Recording 9
Playing....10
Deleting files and formatting.... 11
Advanced Operations
Changing the microphone sensitivity...... 12
Changing the sound quality 12
Recording at a specified time
(Timer recording)....13
Changing the playback speed 14
A-B Repeat playback....14
Playback from a specified position
(Time search) 15
Repeat play (Repeat) 15
Dividing files 16
Listening to audio with earphones 17
Recording by connecting an external microphone....18
Connecting to other devices.... 19
Common settings....20
Using the unit with a computer
System requirements....21
Connecting the unit to a computer....22
Opening the folders of the unit 24
Importing files to a computer and organising files 25
File names 26
Others
Q & A (Frequently Asked Questions)......27
Error messages 27
Troubleshooting guide 28
Specifications 33
Care and use....34
Maintenance 35
Useful Information 37
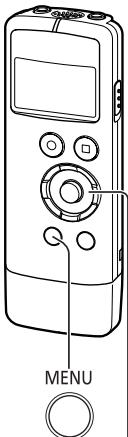
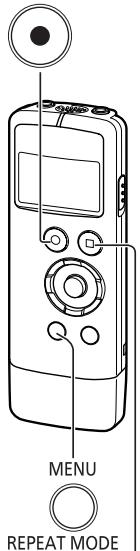
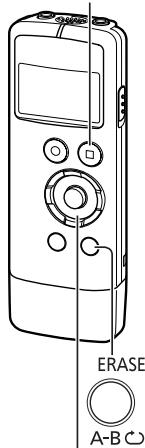
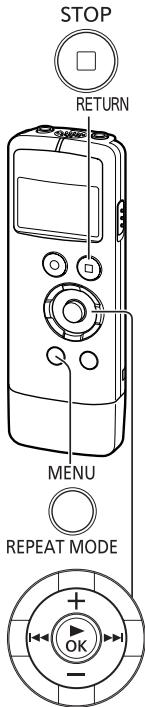
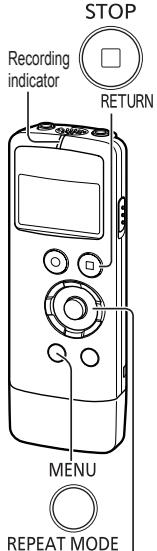
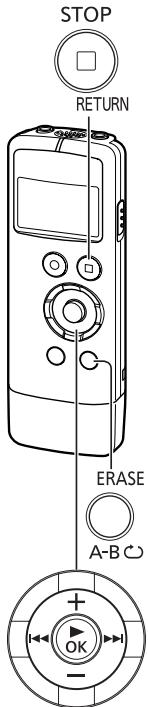
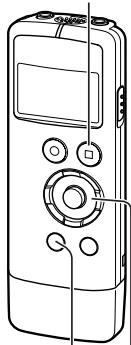
Part names
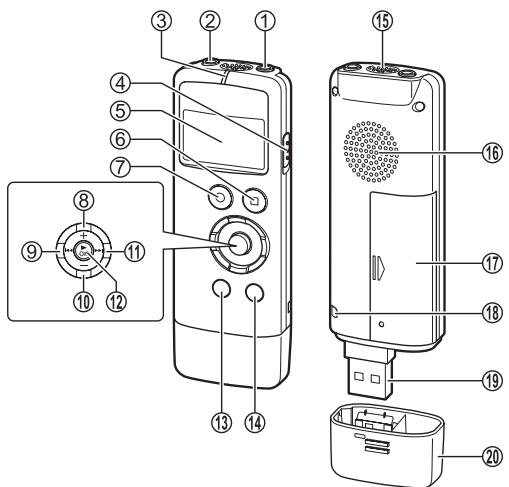
① External microphone jack (i)
(ø 3.5 mm monaural mini jack)
② Headphone/earphone jack ( 🔒 )
(ø 3.5 mm monaural mini jack)
③ Recording indicator (Operation indicator)
④ OPR/HOLD switch
OPR: Operation
⑤ LCD display
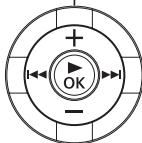
⑥ [■ STOP/RETURN]
⑦ [● REC]
⑧ + (Volume up)
⑨ ◀◀ (Fast backward)
⑩ — (Volume down)
⑪ ▶▶▶ (Fast forward)
⑫ [▶ OK] (Play/OK)
⑬ [MENU/REPEAT MODE]
⑭ [ERASE/A-B]
⑮ Built-in monaural microphone
⑯ Built-in speaker
⑰ Battery cover
⑱ Hand strap hole
⑲ USB plug
⑳ USB plug cover
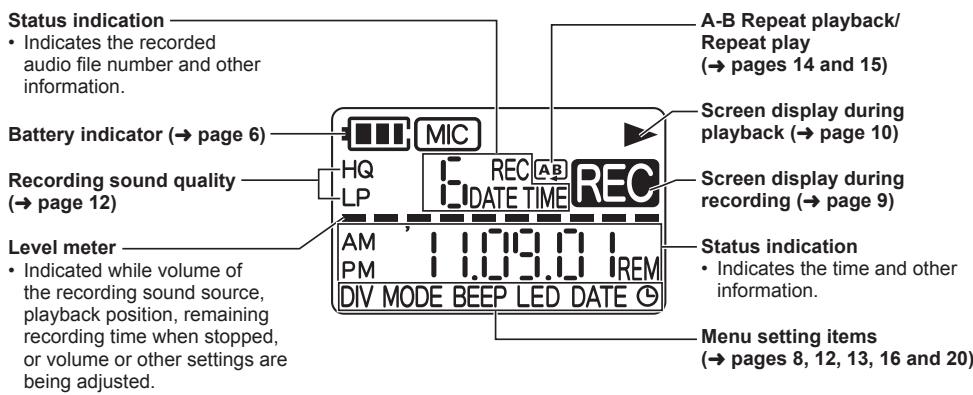
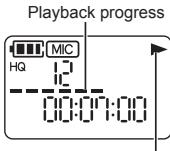
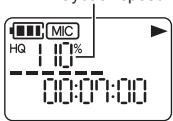
Screen display
The following explains the screen items. Some items may not be displayed simultaneously.
Inserting a battery
Open the battery cover (① and ②)
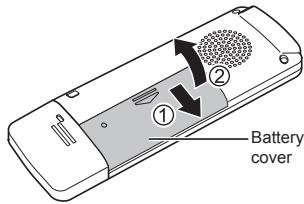
1 AAA LR03 battery (not supplied)
Make sure ⊕ and ⊖ are correctly oriented.
Close the battery cover
(④ and ⑤)
- Use an alkaline battery.
- Remove the battery from the unit when you will not use the unit for a long period of time.
The remaining battery level is indicated as shown below while the unit is operating.

flowchart
graph LR
    A[" "] --> B[" "]
    B --> C[" "]
    C --> D["-"]
    D --> E["Blinking"]
- If the battery runs out, “☐” blinks. Replace the battery as soon as possible.
- When the battery runs out of power, “☐, ☐, RT” is indicated and then the power turns off automatically.
- Depending on the battery state and the operation to be performed, even if the power turned off because the battery ran out of power, the unit may be able to be used for a while if it is turned on again. However, the unit may suddenly turns off during operation due to insufficient battery power.
- A certain level of battery power is required to delete files, format the unit (→ page 11) and divide files (→ page 16). If any of these operations are performed when the battery indicator is “☐”, the power will be turned off because the battery will run out of power.
- Turn the power off before removing the battery.
- If the battery is removed while the power is on, data may be lost or the unit may be damaged.
Set the clock after inserting a battery for the first time or replacing the battery. ( page 8)
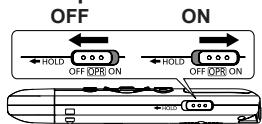
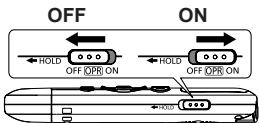
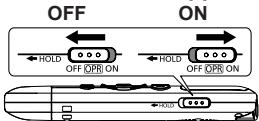
Turning the power on/off
OPR/HOLD switch:
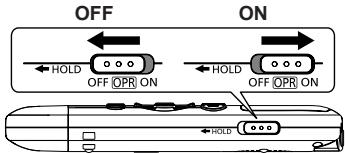
To turn the power on:
Slide the OPR/HOLD switch to the ON side to turn the power on. The display lights up.
To turn the power off:
Slide the OPR/HOLD switch to the OFF side while the unit is in the stop state.
Auto power off:
The power automatically turns off after 30 minutes elapse when the unit is in a recording pause or stop state.
If the power is turned off by the auto power off function, slide the OPR/HOLD switch to the OFF side before turning the power on.
Set the clock after turning the power on for the first time. ( page 8)
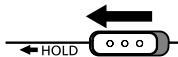
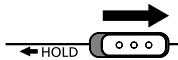
Hold function
Button operations are ignored when the Hold function is on.
To switch the Hold function on:
Slide the OPR/HOLD switch to the "HOLD" side during recording or playback.
"On HOLD" appears and the Hold function turns on.
To switch the Hold function off:
Slide the OPR/HOLD switch in the opposite direction of "HOLD".
"OFF HOLD" appears and the Hold function turns off.
- When the Hold function is on, operation is ignored even if the buttons are pressed while the power is on ("On, Hold" is displayed), enabling you to prevent unintended operations such as the stopping of recording or playback.
- When recording or playback finishes while the Hold function is on, the power turns off automatically.
REPEAT MODE

The clock is used for file names ( page 26) and recording date and time information so set the correct date and time. The date and time need to be set after the battery is replaced.
- Turn the power on beforehand. (→ page 7)
- After turning the power on for the first time after purchase or replacing the battery, proceed to step 3.
1 Press [MENU/REPEAT MODE].
2 Press I◀◀ or ▶▶▶ to select “DATE” and press [▶ OK].
③ Press + or — to set “‘-’” (year) and press ▶▶.
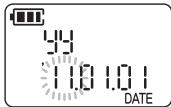
- Set the last two digits of the year. ("11" in the case of 2011)
4 Press + or — to set “ | | | | ” (month) and press ▶▶.
5 Press + or — to set “ did ” (day) and press ▶▶.
- To return to the previous setting item, press ◀◀.
6 Press + or — to select the time display format and press ▶▶.
Select “2” for 24-hour display, and “12H” for 12-hour display.
- The display format that is blinking is currently selected.
7 Press + or — to set “|—|—|” (hour) and press ▶▶.
8 Press + or — to set “ | | | ” (minute).
To change the setting, press ◀◀ and ▶▶I to move between the items, and press + and — again to make the setting.
9 Press [▶ OK] to confirm the setting.
- The date and time are set and the clock starts to operate.
- The clock operates with a monthly loss/gain of approx. ±60 seconds at normal temperature.
- The clock setting will be cleared if the battery completely runs out of power.
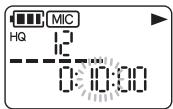
Recording
REC
- Turn the power on beforehand. ( page 7)
- When the unit is not in the stop state, press [■ STOP/RETURN].
- If you press [MENU/REPEAT MODE] during recording, the indication switches between the remaining recording time and elapsed recording time.
1 Press [● REC]. (Recording starts.)
Each press: Pause ⇌ Resume recording
![PANASONIC RR-US300 - Press [● REC]. (Recording starts.) - 1](/content/2019/09/52905/images/eaddcb16d45bd6d138d619830124be5d289719b3aac0cdf2d2df033c9278c63d.jpg)
natural_image
Pure technical line drawing of a mechanical component without any text, numbers, or symbolsThe recording indicator lights. (Blinks while paused.)
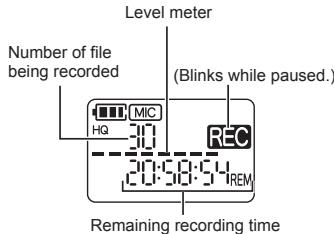
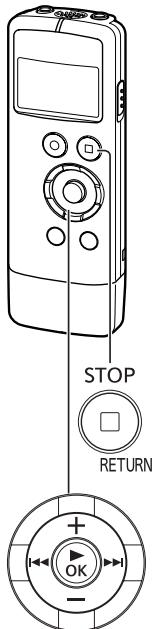
Stopping recording:
Press [■ STOP/RETURN].
File
Recorded audio data from the starting point to the ending point is saved as a file. The saved data is called a file.
- The maximum number of files that can be recorded is 199.
- Before recording, check that there is sufficient battery power remaining.
- If no operation is performed for approx. 30 minutes while recording is paused, the unit turns off.
- Change the microphone sensitivity or sound quality as necessary. (→ page 12)
- Note that if you rub the unit with a hand or an object touches the unit during recording, a rustling sound will be recorded through the microphone.
STOP

RETURN
Playing
VQT3T18
- When the unit is not in the stop state, press [■ STOP/RETURN].
- Select a file beforehand. (See below)
1 Press [▶ OK]. (Playback starts.)
Displayed during playback
Selecting a file
Select a file with ◀◀◀ or ▶▶◀. Each press changes the file number.
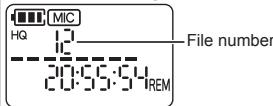
Each press of [■ STOP/RETURN] changes the displayed information (remaining recording time/Total playback time (Length of the selected file (duration of time))/current time/date/recording time/recording date).
Adjusting the volume
Turning up the volume: Press +. Turning down the volume: Press —.
The volume range is 0 to 20.
(The factory setting is "10".)
If you turn the power off with the volume set to 17 or higher, the volume will be set to 16 the next time the power is turned on.
Operations during playback
Jumping (skipping):
Press ◀◀◀ or ▶▶◀ quickly.
Pressing ◀◀ part way through a file jumps to the beginning of that file. To return to the previous file, press ◀◀ within approx. 1 second from the beginning of the file.
Fast backwarding/Fast forwarding (searching):
Press and hold ◀◀ or ▶▶.
Stopping playback:
Press [■ STOP/RETURN].
Deleting files and formatting
STOP

RETURN
Delete unnecessary files.
- When the unit is not in the stop state, press [■ STOP/RETURN].
There are three methods to delete files.
FILE: Select one file and then delete it. FOLDER: Delete all files in the MIC folder (the actual folder is not deleted).
ALL E R A S E: Delete all data in internal memory such as the data in the MIC folder and the data in the DATA folder that you can see when the unit is connected to a computer (format).
1 Press ◀◀ or ▶▶I to select the number of the file to delete.
This step is not necessary for the "FOLDER" and "ALL ERASE" deletion methods.
2 Press [ERASE/A-B].
- To cancel the deletion, press [ERASE/A-B] again or press [■ STOP/RETURN].
3 Press ◀◀ or ▶▶I to select the deletion method and press [▶ OK].
- When you want to delete only one file, select the method while making sure you do not accidentally select "FOLDER" or "ALL ERASE".
4 Press ◀◀ or ▶▶ to select “YES” and press [▶ OK].
The operation indicator blinks during deletion. It may take several minutes for the deletion to complete.
- Deleted files cannot be restored.
- Cancelling is not possible while formatting.
- Before deleting data, check that there is sufficient battery power remaining.
- Do not remove the battery while formatting.
- With file deletion (F || E), only files that can be played on the unit can be deleted.
- After a file is deleted, the subsequent file numbers displayed on the unit are decreased.
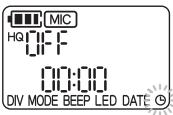
Changing the microphone sensitivity
Change the microphone sensitivity in accordance with the loudness of the sound source. When the sound source is loud, set the sensitivity to “L[” (LOW). When it is quiet, set the sensitivity to “H[” (HIGH).
- When the unit is not in the stop state, press [■ STOP/RETURN].
1 Press [MENU/REPEAT MODE].
2 Press |◀◀ or ▶▶▶ to select “ MIC ”.
3 Press + or — to select “| |” or “| |”.
H I: Sets the microphone sensitivity to the high level.
LQ: Sets the microphone sensitivity to the low level.
(The factory setting is "H I".)
4 Press [▶ OK] to confirm the setting.
Changing the sound quality
You can change the sound quality for recording.
- When the unit is not in the stop state, press [■ STOP/RETURN].
1 Press [MENU/REPEAT MODE].
② Press ◀◀ or ▶▶I to select “MODE”.
③ Press + or — to select “HQ” or “LP”.
HQ: High sound quality mode (128 kbps, monaural)
LP: Long recording mode (32 kbps, monaural)
(The factory setting is "HQ".)
4 Press [▶ OK] to confirm the setting.
- The length of time that recording is possible changes depending on the sound quality. (→ page 33)
Recording at a specified time (Timer recording)

- When the unit is not in the stop state, press [■ STOP/RETURN].
1 Press [MENU/REPEAT MODE].
2 Press ◀◀ or ▶▶I to select “ ⏱ ” and press [▶ OK].
3 Press + or — to select the recording time and press ▶▶▶.
30M: 30 minutes
H: 1 hour
24: 2 hours
ALL: Until there is no empty space
OFF: Disable the timer setting
4 Press + or — to select the hour for the time to start recording and press ▶▶.
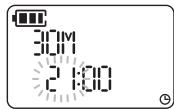
5 Press + or — to select the minute for the time to start recording and press [▶ OK].

After you set a timer recording, “☐” is displayed. At 1 minute before the specified time, the “REC”, recording indicator, and “☐” blink and the unit enters the standby state.
If you press [■ STOP/RETURN] during a timer recording or standby, you can cancel the timer recording.
- If the power is off at the specified time, the power turns on and the timer recording starts, and then the power turns off at the end time.
If the unit is in a playback state, playback stops and the timer recording starts.
- Timer recording is not possible in the following cases:
When the unit is connected to a computer, when the number of recording files has reached 199, when there is no free space in the internal memory, and during recording or while recording is paused.
Changing the playback speed
The playback speed can be adjusted in 21 steps from the slow speed of 0.5 times normal speed (50%) to the fast speed of 2 times normal speed (200%).
1 Press [▶ OK] during playback.
2 Press ◀◀ or ▶▶I to adjust the playback speed.
Playback speed
- ▶▶: Each press of this button increases the playback speed.
- ◀: Each press of this button reduces the playback speed.
The playback speed can be adjusted in 10% steps for speeds faster than normal speed, and 5% steps for speeds slower than normal speed.
- Press [■ STOP/RETURN] to return to 100%.
3 Press [▶ OK].
The setting value is confirmed.
- Normal playback may not be possible depending on the file.
A-B Repeat playback
Set a start point (A) and finish point (B) to repeat playback between those points.
1 Press [ERASE/A-B] during playback.
The start point (A) is set and “ ” (lighting) and “B” (blinking) are displayed.
A-B Repeat indication

2 Press [ERASE/A-B] at the finish point (B).
The indication changes to “AB” (lighting) and A-B repeat playback starts.

Cancelling A-B Repeat:
Press [ERASE/A-B] again. (A-B Repeat can also be cancelled with [■ STOP/RETURN], ◀◀ or ▶▶).
- You cannot set A-B Repeat when the time between the start point (A) and finish point (B) is approx. 2 seconds or less.
- If the file is played to the end while the start point (A) is set, the end of the file is set as the finish point (B) and A-B Repeat starts.
- A range that spans across two files cannot be set for A-B Repeat.
Playback from a specified position (Time search)
Playback is possible from a time-specified position.
1 Press [MENU/REPEAT MODE] during playback.
Playback stops and the current playback position (time) is displayed.
2 Set the playback start position.
Press ◀◀ or ▶▶ I to select “hour”, “minute”, and “second” and press + or — to change the values.
- Press [MENU/REPEAT MODE] or [■ STOP/RETURN] to return to playback.
3 Press [▶ OK].
Playback starts from the specified position.
- Time search playback applies only to the currently selected file.
Repeat play (Repeat)
1 Press [MENU/REPEAT MODE] for at least 2 seconds during playback.
The repeat mode changes each time you press [MENU/REPEAT MODE] for at least 2 seconds.
Repeat mode indication

No indication: Plays back the files normally. The unit enters the stop state after playback of the last file finishes.
(lighting): Plays back only the one selected file repeatedly. (blinking): Plays back all the files repeatedly.
Dividing files
STOP

RETURN
natural_image
Line drawing of a handheld electronic device with control buttons and display screen (no text or symbols)MENU

REPEAT MODE
You can divide 1 file into 2 files at a specified position. A necessary part can be extracted or an unnecessary part can be cut.
1 Press [■ STOP/RETURN] at the position you want to divide the file during playback.
2 Press [MENU/REPEAT MODE].
3 Press ◀◀ or ▶▶ to select "DIV".
“DIV” and “NI” blink.
4 Press + or — to select “YES” and press [▶ OK].
The operation indicator blinks during dividing.
Then, the file is divided into 2 files and the playback stops at the beginning of the second file.
- When "Ok" appears, file dividing is complete.
-
Select "NO" to stop dividing.
-
A file length of approx. 2 seconds or more is required to divide a file.
- A file cannot be divided at the beginning.
- Divided files cannot be restored.
• After a file is divided, one file is added. - If there is no empty space in internal memory or if 199 files have already been recorded, a file cannot be divided.
- For the file names displayed on a computer after the file is divided, see page 26.
Listening to audio with earphones
Connect earphones (not supplied). (Plug type: ∅ 3.5 mm monaural mini plug)
Recommended additional earphones: Panasonic RP-HV154, RP-HJE120
(the product number is correct as of June 2011.)
When stereo type earphones are used, the audio from both the left and right is monaural.
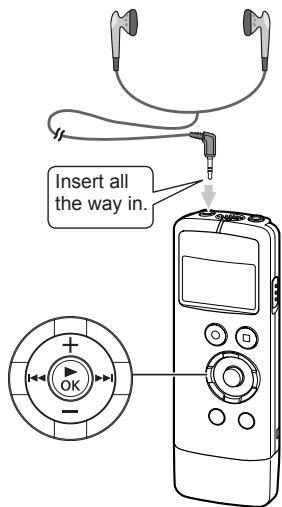
Monitoring the audio during recording
You can listen to the audio to monitor it during recording.
Adjusting the volume:
You can adjust the volume by pressing + or — but the audio that is recorded will not be affected.
Listening to the audio during playback
The audio can be heard from the built-in speaker during playback. In places that are noisy or where it is difficult to hear, listen to the audio through earphones.
- If you connect earphones, the audio will no longer be output from the built-in speaker.
Recording by connecting an external microphone
Record by connecting an external microphone (monaural microphone) to the external microphone jack of the unit. With a stereo microphone, the audio of just the L channel side is recorded in monaural.
1 Connect the external microphone.
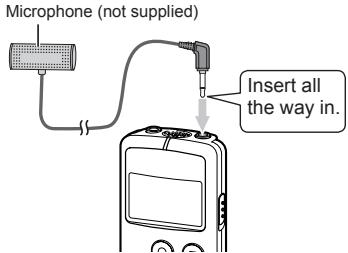
Use a microphone with a plug-in-power function and 3.5 mm mini plug.
2 Press [● REC] to start recording.
For the recording operations, see page 9.
- Also read the operating instructions for the device to be connected.
- If the loudness of the sound source is too low or high, adjust the microphone sensitivity. (→ page 12)
- The built-in microphone of the unit does not work while a device is connected to the external microphone jack.
Connecting to other devices
Recording from the unit to another device (dubbing):
1 Connect as shown below.
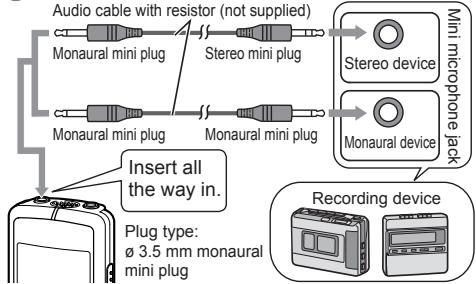
2 Record.
① Start recording on the recording device.
②On the unit, play the file you want to dub.
(→ page 10)
- Also read the operating instructions for the device to be connected.
- Select the connection cable to use in accordance with whether the device to be connected is monaural or stereo. If the wrong cable is used in combination with the unit, recording may not be able to be performed properly. For example, only 1 channel may be recorded.
- The sound quality after dubbing may differ from the sound quality before dubbing.
- To record at a suitable volume, adjust the volume on the unit.
Recording from another device to the unit:
1 Connect as shown below.
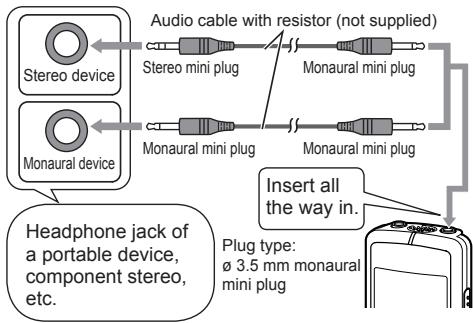
2 Record.
① Start recording on the unit. (→ page 9)
② Start playback on the external device.
- Also read the operating instructions for the device to be connected.
- If the loudness of the sound source is too low or high, adjust the microphone sensitivity ( page 12). Alternatively, adjust the volume of the other device.
- If a stereo type cable is used, the R channel is not recorded.
Common settings
STOP

RETURN

natural_image
Line drawing of a handheld electronic device with control buttons and display screen (no text or symbols)MENU

REPEAT MODE

The following settings of the unit are common to both recording and playback.
Common settings operation
- When the unit is not in the stop state, press [■ STOP/RETURN].
1 Press [MENU/REPEAT MODE].
2 Press I◀◀ or ▶▶▶ to select the setting item (“BEEP” or “LED”).
- The setting item that is blinking is currently selected.
③ Press + or — to change the setting.
- If you press ◀◀ or ▶▶, the setting is confirmed and you can set the next setting item.
4 Press [▶ OK].
For "Setting the time", see page 8.
BEEP (Beep sound)
Set the beep sound for during button operation.
OFF: No beep sound.
On: Beep sound.
(The factory setting is "On".)
- Even if the beep sound is set to “On”, the operation beep sound is not output during recording or while recording is paused.
LED (Recording indicator)
Set whether the recording indicator lights during recording.
OFF: Does not light.
On: Lights.
(The factory setting is "☐n".)
- Even if “LED” is set to “OFF”, the indicator blinks during operations such as file deletion.
System requirements
(As of June 2011)
ENGLISH
| Computer | IBM PC/AT compatible machines, Macintosh | |
| OS | • Windows® XP Home Edition/Professional and SP2, SP3• Windows Vista® Home Basic/Home Premium/Business/Ultimate and SP1, SP2• Windows® 7 Starter/Home Basic/Home Premium/Professional/Ultimate and SP1 | Pre-installed version |
| • Mac OS X 10.2.8 - 10.6 | ||
| Interface | USB port (Operation cannot be guaranteed if you use a USB hub.) | |
| * Even if the system requirements mentioned in this document are fulfilled, some personal computers cannot be used.* (Macintosh) This software operates on the standard driver of OS.* Operation is guaranteed only on a compliant OS. * Operation is not guaranteed on an upgraded OS.* Operation is not guaranteed on home-made computers.* When using Windows Media® Player, your computer must fulfill the system requirements of Windows Media® Player. Please consult Microsoft Corporation for details of Windows Media® Player.* Microsoft, Windows, Windows Media and Windows Vista are registered trademarks or trademarks of Microsoft Corporation of the U.S. and other countries.* MPEG Layer-3 audio coding technology licensed from Fraunhofer IIS and Thomson.* IBM and PC/AT are registered trademarks of International Business Machines Corporation of the U.S.* Macintosh and Mac OS are trademarks of Apple Inc.* Other system names and product names appearing in this document are in general the registered trademarks or trademarks of the respective developer companies. Note that theTM mark and ® mark do not appear in this document.* Depending on the computer environment, malfunctions may occur (e.g. Audio data recorded on this unit cannot be used. etc.). Panasonic and Panasonic dealers cannot be held liable for any lost audio data or other direct or indirect damage except in cases of intentional of gross negligence.* This model is not compatible with TRC/ADPCM format IC recorders made by Panasonic. Also, files recorded on this unit cannot be played on those IC recorders and/or MP3 files recorded on this unit cannot be read using Voice Editing software supplied with those IC recorders.* You can transfer contents recorded on this unit to your PC without using the dedicated software. The computer software (Voice Editing) is not supplied with this unit. | ||
Connecting the unit to a computer
You can import the recording files that were recorded with the unit to a computer.
- Start the computer beforehand.
- Turn the unit off beforehand.
1 Remove the USB plug cover.
Store the removed USB plug cover in a safe place.
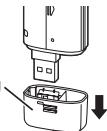
natural_image
Diagram of a device with an open socket and internal components, showing a downward arrow (no text or symbols)- Keep the USB plug cover out of reach of children to prevent swallowing.
2 Insert the unit into the computer.

- If the USB plug cannot be inserted firmly due to the condition around the USB port, use the USB extension cable (supplied).
- Operation is not guaranteed if the unit is connected with a cable other than the supplied USB extension cable.
- Do not use any other USB extension cables except the supplied one.
Do not use the supplied cable with other devices.
Caution: Use only the supplied USB extension cable with a ferrite core when connecting to computer.
- When the unit is connected to your computer, it can operate without the battery, because power is supplied by the computer.
■ The first time you connect the unit to a computer
Because multiple “Found New Hardware” messages will appear, do not disconnect the unit from your computer until all messages disappear.
■ Screen display when connected to a computer
During connection

During file transfer

Never remove the unit during data transfer.
The file data or the unit may be damaged.
The unit cannot be operated while connected to a computer.
- When the unit is connected to a computer, the computer may not start (restart). It is recommended that the unit be disconnected before starting (restarting) the computer.
- Operation is not guaranteed when two or more USB devices are connected to one computer or a USB hub or cable other than the supplied extension cable is used.
- If a computer is started (restarted) or enters standby mode while the unit is connected to it, the computer may not recognise the unit. Disconnect and then reconnect the unit or reconnect the unit after the computer is restarted.
- Please see the Operating Instructions for the computer.
■ Removing the unit
Double-click the icon (Windows XP: [ ], Windows Vista / Windows 7: [ ] on the task tray at the bottom of the computer screen and follow the on-screen instructions for removing the unit. (The icon may not be displayed depending on the operating system settings.)
The unit turns off after it is removed.
■ USB mass storage function
The unit functions as USB memory and is recognised as a computer's external storage device.
The data files on the computer can be transferred and saved to the unit.
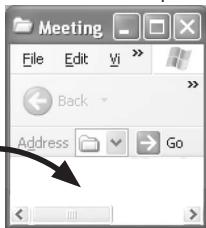
Opening the folders of the unit
The screenshots are for Windows XP (operating system). The display may differ depending on the operating system.
- Connect the unit to a computer beforehand.
(→ page 22)
1 Right-click "My Computer" from the Start menu and select "Open".
The unit is indicated as "IC RECORDER".

The components of the computer and the external storage device shown here are examples. They may differ depending on your computer.
A different letter may be indicated for "G" of "IC RECORDER (G):".
Depending on the computer you use, the unit may be indicated as "Removable Disk".
2 Right-click "IC RECORDER (G:)” (this unit) and select "Open".
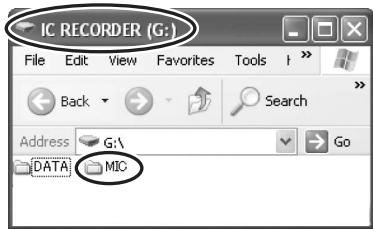
3 Right-click the MIC folder and select "Open".
The recording files on the unit appear.
Importing files to a computer and organising files
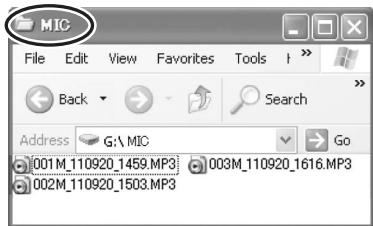
- Open the IC RECORDER (this unit) displayed on the computer screen and open the MIC folder beforehand. (→ page 24)
Importing recording files to a computer
1 Right-click a recording file on the unit and select "Copy".
2 Right-click a folder on the computer and select "Paste" to import the file to the computer.
Folder on the unit
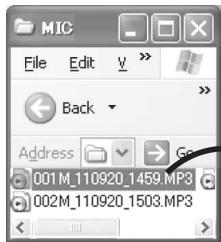
Folder on the computer
Playing recording files from a computer:
Right-click a recording file on the unit and select "Play".
Deleting unnecessary files from a computer:
Right-click a recording file on the unit, select "Delete", and select "Yes" to confirm the deletion.
Do not rename the folder.
If you use a computer to rename the MIC folder, a new MIC folder will be created when you turn on the unit and the files in the folder that was renamed will no longer be able to be played.
- You can also import recording files to a computer by dragging and dropping them.
- Never remove the unit during data transfer. The file data or unit may be damaged or all of the data may be lost.
- Do not use a computer to format the unit.
- The extension of the files displayed on a computer is "MP3".
- The DATA folder is used to store data files. You can see this folder from the computer but it is not displayed on the screen of the unit.
File names
File names displayed on the computer:
Example: In the case of a file recorded at 17:20 on
September 20, 2011
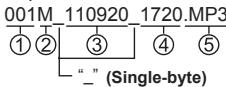
① File number (001 to 199)
② Folder name (MIC)
③ Recording date
(6 single-byte characters)
④ Recording time
(4 single-byte characters)
⑤ File extension
A file name like the one above is displayed on the computer but a number such as 1 is displayed for a file on the screen of the unit.
Automatic changing of file names as a result of file deletion/division:
If a recording file on the unit is deleted, the subsequent files are moved back one place and the file numbers are automatically reassigned accordingly.
Example: When "002M_110925_0905.MP3" is deleted
001M_110920_1720.MP3 001M_110920_1720.MP3
002M_110925_0905.MP3 002M_111003_1233.MP3
003M 111003_1233.MP3 003M 111231_1915.MP3
004M 111231_1915.MP3
The file number parts of all file names following the deleted file are changed.
If a file is divided, one file is added. The file numbers of the files following the added file are automatically increased and the file number parts of the file names are changed.
To return files imported to a computer to the unit:
Returning the files imported to a computer to the original folder on the unit enables them to be played on the unit. (Files that have been renamed cannot be played.)
However, if files on the unit have been renamed as a result of an operation such as deleting a file, the files you are attempting to return will have the same file numbers as files on the unit and may not be able to be played on the unit.
Q & A (Frequently Asked Questions)
| Question | Answer |
| Can I play files recorded on other Panasonic IC recorders? | The unit cannot play files recorded on other Panasonic IC recorders. However, files recorded on the unit can be played on another Panasonic IC recorder if you place them in its MUSIC folder. |
| Can I use the audio editing software (Voice Editing) supplied with other Panasonic IC recorders? | The software cannot be used for files recorded on the unit. |
| Can I use a manganese battery? | A manganese battery and nickel-cadmium battery cannot be used. Panasonic recommends using an alkaline battery. |
ENGLISH
Error messages
| Error message | Checkpoints |
| 199 FULL | This is displayed when you attempt to record more than the maximum number of files (199) that can be recorded. (→ page 9) |
| ALL FULL | This is displayed when you attempt to record to internal memory when there is no space. (→ page 33) |
| NO FILE | This is displayed when you attempt to play a file when there is no file in the folder. |
| Lo BAT | Replace the battery with a new one. |
Troubleshooting guide
Before requesting service, make the following checks. If you are in doubt about some of the check points, or if the remedies indicated in the chart do not solve the problem, consult your dealer for instructions.
| Symptom | Checkpoints |
| Battery | |
| Cannot use a battery that can still be used with another device. | The unit considers the battery to be empty at the point in time when the battery level becomes low. |
| Operations | |
| The unit does not work. | Has the battery become dislodged? Remove the battery completely and then reinsert it properly. Also try replacing the battery with a new one.Is the unit in the hold state? Cancel hold. (→ page 7)The unit cannot be operated when connected to a computer. |
| Cannot operate the unit. | Is the unit in the hold state? Cancel hold. (→ page 7)The unit cannot be operated when connected to a computer. |
| Recording | |
| Memory space is used up quicker than expected. | The length of time that recording is possible greatly differs depending on the sound quality. (→ page 33) Select the sound quality according to the purpose of use. (→ page 12)Is there a large number of files? Organise the files. (→ page 11) |
| I hear a howling noise mixed with the audio when I listen with earphones (not supplied) during recording. | Turn down the volume. (→ page 10)Keep the earphones and unit away from each other.When using an external microphone, keep the earphones and external microphone away from each other. |
| Recording ended part way through. | If the unit is dropped or otherwise subjected to an impact or the battery becomes dislodged or runs out of power during recording, the recording data may not be able to be updated.Has the internal memory run out of space? |
| Recording | |
| Cannot record. | Is there free space in internal memory?Does the folder contain the maximum number of files that can be recorded (199)?If there are 199 files recorded, no more files can be recorded. |
| “ERROR” is displayed during recording. | Writing to internal memory may have become slow. Back up the files to a computer and then format the unit. |
| Sound skipping occurs in the recording file. | Was the unit formatted using a computer? If the internal memory is formatted using a computer, the optimum performance of the unit may not be achieved. Format it with the unit. (→ page 11) |
| Recorded audio includes a rustling noise. | If you rub the unit with a hand or an object touches the unit during recording, a rustling sound will be recorded through the microphone. Try your hardest to avoid contact with an object during recording with a microphone. |
| Recorded sound is distorted.There is a noise at the beginning of the audio. | Lower the microphone sensitivity (→ page 12) or move further away from the recording sound source. |
| Noise is incorporated in the recorded audio, making it difficult to hear. | If you are using the unit and a mobile phone close to each other, keep them away from each other.Set the optimal recording settings by changing the sound quality and microphone sensitivity (→ page 12) and performing trial recordings. |
| Recorded sound is too loud or too quiet. | Change the microphone sensitivity. (→ page 12) |
ENGLISH
Troubleshooting guide
| Symptom | Checkpoints |
| Recording | |
| Cannot perform timer recording. | Is there free space in internal memory?Does the folder contain the maximum number of files that can be recorded (199)?If there are 199 files recorded, no more files can be recorded.The unit cannot be operated when connected to a computer. Remove it from the computer. |
| Playing | |
| No sound is output from the speaker. | Are earphones (not supplied) connected? (→ page 17) |
| Cannot hear any sound. | Adjust the volume. (→ page 10) |
| Cannot play a recording file even though it was recorded on the unit. | Has the file been renamed? Only files in the MIC folder that are named according to the file naming conventions can be played. Even if a file has not been renamed, it cannot be played if its file number is the same as that of another file in the folder. (→ page 26) |
| Cannot play or correctly play files in the MIC folder. | Have MP3 files created with a computer been transferred to the unit?MP3 files created with a computer cannot be played even if they are transferred to the unit. |
| The playback speed is fast or slow. | Did you change the playback speed? (→ page 14) |
| No sound is output from the earphones (not supplied) or the sound is difficult to hear or includes noise. | Is the plug firmly inserted all the way in?Is the plug dirty? (Wipe the plug clean.) |
| Others | |
| Cannot turn the power on. | Has the battery run out of power? Replace the battery with a new one. (→ page 6) |
| The power turns off automatically. | Is the AUTO POWER OFF function operating? (This function turns the power off if there is no operation for 30 minutes when the unit is stopped or recording is paused.) (→ page 7) |
| “ERR OR” is displayed during deletion. | You are trying to delete a file with the read-only file attribute. Connect the unit to a computer and then delete the file from the computer. |
| Cannot divide a file. | Is there free space in internal memory?Does the folder contain the maximum number of files that can be recorded (199)?If there are 199 files recorded, a file cannot be divided.Is the file recording time too short? A file length of approx. 2 seconds or more is required to divide a file. |
| This unit is not recognised when it is connected to a computer. | Is the operating system of the computer not supported by this unit? (→ page 21)Connect the computer and unit correctly. (→ page 22)Remove the unit from the computer and then reconnect it. |
| The file name of the recording file or recording date and time information differ from the real date and time. | Set the clock. (→ page 8) |
ENGLISH
-If you see this symbol-
Information on Disposal for Users of Waste Electrical & Electronic Equipment (private households)

natural_image
Symbol of a trash bin crossed out by two crossed lines (no text or numbers present)This symbol on the products and/or accompanying documents means that used electrical and electronic products should not be mixed with general household waste.
For proper treatment, recovery and recycling, please take these products to designated collection points, where they will be accepted on a free of charge basis.
Alternatively, in some countries you may be able to return your products to your local retailer upon the purchase of an equivalent new product.
Disposing of this product correctly will help to save valuable resources and prevent any potential negative effects on human health and the environment which could otherwise arise from inappropriate waste handling. Please contact your local authority for further details of your nearest designated collection point. Penalties may be applicable for incorrect disposal of this waste, in accordance with national legislation.
For business users in the European Union
If you wish to discard electrical and electronic equipment, please contact your dealer or supplier for further information.
Information on Disposal in other Countries outside the European Union
This symbol is only valid in the European Union.
If you wish to discard this product, please contact your local authorities or dealer and ask for the correct method of disposal.
Specifications
Power
| Battery | DC 1.5 V(1 AAA LR03 battery) |
Audio
| Sampling frequency(The information in brackets is the sound quality) | 44.1 kHz [HQ 128 kbps]16 kHz [LP 32 kbps] |
| Recording format | MP3 |
| Frequency response(-10 dB, during recording/playback)(The information in brackets is the sound quality) | 300 Hz to 21,000 Hz[HQ 128 kbps]300 Hz to 6,700 Hz[LP 32 kbps] |
| Built-in microphone S/N ratio | 41 dB (HQ) Filter (JIS A) |
| USB | USB 2.0 (Hi-Speed)DC 5 V / 150 mA | |
| Audio output | Headphone/earphone jack (Monaural) | 3.5 mm, 16 ,Max. 6.4 mW |
| Speaker output | 20 mm, 8 ,80 mW (RMS) | |
| Audio input | External microphone jack (Monaural) | 3.5 mm, 1.6 mVplug in power |
| Max. dimensions | 37.5 mm x 107.8 mm x 15.7 mm(W x H x D) |
| Cabinet dimensions | 37 mm x 107.5 mm x 15 mm(W x H x D) |
| Weight | Approx. 50 g (with battery) Approx. 39 g (without battery) |
| Operational temperature | 0 °C to 40 °C |
| Operational humidity | 20% to 80% RH (no condensation) |
| Recording capacity (memory capacity) | 2 GB*1 |
*1 Usable capacity will be less.
Battery life
(This may be shorter depending on the operating conditions.)
| Sound quality | Recording*2 | Playback*3 |
| HQ | Approx. 23 hours | Approx. 13 hours |
| LP | Approx. 34 hours | Approx. 15 hours |
Using Panasonic alkaline AAA/LR03 battery
*2 When not monitoring recording and recording indicator OFF
*3 When audio is output from the speaker with the volume set to 10
Estimated possible recording time
(This may be shorter depending on the operating conditions.)
| Sound quality | Recording time | Bit rate |
| HQ | Approx. 34 hours | 128 kbps |
| LP | Approx. 136 hours | 32 kbps |
- These specifications are subject to change without notice.
Care and use
To reduce risk of radio interference caused by headphone-, earphone- or microphone cables, only use adequate accessories with a cable length of less than 3 m.
Unit
- Avoid using or placing this unit near sources of heat.
- To avoid product damage, do not expose this product to rain, water or other liquids.
- The unit's speaker does not have magnetic shielding. Do not place the unit near televisions, personal computers, magnetized cards (bank cards, commuter passes) or other devices easily influenced by a magnet.
■ Batteries
- Do not peel off the covering on batteries and do not use the batteries if the covering has been peeled off.
- Align the poles and correctly when inserting the battery.
- Remove the battery if you do not intend to use the unit for a long time.
- Do not heat or expose to flame.
- Do not leave the batteries in an automobile exposed to direct sunlight for a long period of time with doors and windows closed.
- Do not attempt to recharge dry cell batteries.
- Battery mishandling can cause electrolyte leakage which can damage items the fluid contacts and may cause a fire. If electrolyte leaks from the batteries, consult your dealer. Wash thoroughly with water if electrolyte comes in contact with any part of your body.
- Keep the AAA, LR03 batteries and the USB plug cover out of reach of children to prevent swallowing. Accidental swallowing of batteries can result in stomach and intestinal damage.
- When carrying batteries in a pocket or bag, ensure no metal objects such as necklaces are placed together with them. Contact with metal may cause short-circuiting which can cause a fire. For safety, carry the batteries in the battery carrying case.
Allergies
- Discontinue use if you experience discomfort with the earphones or any other parts that directly contact your skin.
- Continued use may cause rashes or other allergic reactions.
■ Precautions for listening with the Headphones or Earphones
- Do not play your headphones or earphones at a high volume. Hearing experts advise against continuous extended play.
- If you experience a ringing in your ears, reduce volume or discontinue use.
- Do not use while operating a motorized vehicle. It may create a traffic hazard and is illegal in many areas.
- You should use extreme caution or temporarily discontinue use in potentially hazardous situations.
- Even if your headphones or earphones are the open-air type designed to let you hear outside sounds, don't turn up the volume so high that you can't hear what's around you.
CAUTION
Danger of explosion if battery is incorrectly replaced. Replace only with the same or equivalent type recommended by the manufacturer. Dispose of used batteries according to the manufacturer's instructions.
- Excessive sound pressure from earphones and headphones can cause hearing loss.
- Listening at full volume for long periods may damage the user's ears.
Be sure to use the supplied or recommended headphones or earphones.
Based on EN 50332-2:2003
1) Maximum output voltage (earphone output): ≤ 150 mV
2) Wide band characteristic voltage (earphones): ≥ 75 mV
Maintenance
Clean this unit with a dry and soft cloth.
- If the unit becomes too dirty, wring a cloth moistened in water, wipe the dirt with it and clean with a dry cloth.
- Do not use solvents including benzine, thinner, alcohol, kitchen detergent, a chemical wiper, etc. This might cause the exterior case to be deformed or the coating to come off.
This product may receive radio interference caused by mobile telephones during use. If such interference is apparent, please increase separation between the product and the mobile telephone.
■ When discarding of/transferring this unit
When “Erase” or “Format” are performed on this unit or a computer, the data in the internal memory cannot be played back but it is not completely erased.
For security reasons, to ensure that the data has been completely deleted, use a commercially available data erasure software, or format the unit and then record something else such as a soundless environment to overwrite the internal memory.
■ Data when requesting repairs
When the unit is repaired, the internal memory and settings may be returned to the factory settings.
Panasonic Warranty
- The product is warranted for 12 months from the date of purchase. Subject to the conditions of this warranty Panasonic or its Authorised Service Centre will perform necessary service on the product without charge for parts or labour, if in the opinion of Panasonic, the product is found to be faulty within the warranty period.
- This warranty only applies to Panasonic products purchased in Australia and sold by Panasonic Australia or its Authorised Distributors or Dealers and only where the products are used and serviced within Australia or it's territories. Warranty cover only applies to service carried out by a Panasonic Authorised Service Centre and only if valid proof of purchase is presented when warranty service is requested.
- This warranty only applies if the product has been installed and used in accordance with the manufacturer's rights and requirements that are not suitable for restructuring or reasonable care (in the opinion of Panasonic). The warranty covers normal domestic use only and does not cover damage, malfunction or failure resulting from use of incorrect voltages, incorrect installation, accident, misuse, neglect, build-up of dirt or dust, abuse, maladjustment of customer controls, mains supply problems, thunderstorm activity, infestation by insects or vermin, tampering or repair by unauthorised persons (including unauthorised alterations), introduction of sand, humidity or liquids, commercial use such as hotel, office, restaurant, or other buildings. The product is intended to be acquired, exposure to abnormally corrosive conditions or any foreign object matter having entered the product.
llowing items unless the fault or defect existed at the time of purchase: (e) DVD, Blu-ray or Recordable Discs
(f) Video / Audio Heads from wear and tear in normal use (g) Information stored on Hard Disk Drive, USB stick or SD (h) DTV reception issues caused by TV Aerial / Cabling
5. Some products may be supplied with Ethernet connection hardware. The warranty is limited on such products and will not cover
(a) Internet and or DLNA connection / setup related problems
(b) Access fees and or charges incurred for internet connection
(c) The use of incompatible software or software not specifically stipulated in the product operations manual; and
(d) Any indirect or consequential costs associated with the incorrect use or misuse of the hardware, its connection to the internet or any other device.
-
To claim warranty service, when required, you should: • Telephone Panasonic's Customer Care Centre on 132600 or visit our website referred to and use the Service Centre Locator for the name/address of the nearest Authorised Service Centre. • Send or take the product to a Panasonic Authorised Service Centre together with your proof of purchase receipt as a proof of purchase date. Please note that freight and insurance to and / or from your nearest Authorised Service Centre must be arranged by you. • Note that home or pick-up/delivery service is available for the following products in the major metropolitan areas of Australia or the normal operating areas of the nearest Authorised Service Centres: Plasma/LCD televisions / displays (screen size greater than 103 cm):
-
The warranties hereby conferred do not extend to, and exclude, any costs associated with the installation, de-installation or re-installation of a product, including costs related to the mounting, de-mounting or remounting of any screen, (and any other ancillary activities), delivery, handling, freighting, transportation or insurance of the product or any part thereof or replacement of and do not extend to, and exclude, any damage or loss occurring by reason of, during, associated with, or related to such installation, de-installation, re-installation or transit. Panasonic Authorised Service Centres are located in major metropolitan areas and most regional centres of Australia, however, coverage will vary dependant on product. For advice on exact Authorised Service Centre locations for your product, please telephone our Customer Care Centre on 132600 or visit our website and use the Service Centre Locator. In addition to your rights under this warranty, Panasonic products come with consumer guarantees that cannot be excluded under the Australian Consumer Law. If there is a major failure with the product, you can reject the product to elect to have a refund or to have the product replaced or if you wish you may elect to keep the goods and be compensated for the drop in value of the goods. You are also entitled to have the product repaired or replaced if the product fails to be of acceptable quality and the failure does not amount to a major failure. If there is a major failure in regard to the product which cannot be remedied then you must notify us within a reasonable period by contacting the Panasonic Customer Care Centre. If the failure in the product is not a major failure then Panasonic may choose to repair or replace the product and will do so in a reasonable period of time from receiving notice from you.
THIS WARRANTY CARD AND THE PURCHASE DOCKET (OR SIMILAR PROOF OF PURCHASE) SHOULD BE RETAINED BY THE CUSTOMER AT ALL TIMES
require assistance regarding warranty conditions or any other enquiries, please visit the onic Australia website www.panasonic.com.au or contact by phone on 132 600 If phoning in, please ensure you have your operating instructions available.
Panasonic Australia Pty. Limited
ACN 001 592 187 ABN 83 001 592 187
1 Innovation Road, Macquarie Park NSW 2113
PRO-031-F11 Issue: 4.0
Customer Service
Customer Service Directory
Obtain product information and operative assistant; localize the closer distributor or Service Center; buy spare parts and accessories by our web site to Latin American:
http://www.lar.panasonic.com
Also you may contact us directly by our Contact Center:
800-PANA (800-7262)
01-8000-94PANA (01-8000-947262)
1800-PANASONIC (1800-726276)
800-PANA737 (800-7262737)
800-PANA (800-7262)
1-801-811-PANA (1-801-811-7262)
800-390-602
From a cell phone: 797-5000
800-PANA-800 (800-7262-800)
0-800-PANA (0-800-7262)
0800-00726
0800-333-PANA (0800-333-7262)
0810-321-PANA (0810-321-7262)
Panama
Colombia
Ecuador
Costa Rica
El Salvador
Guatemala
Chile
Venezuela
Uruguay
Peru
Argentina
Mexico Service
To obtain information in the Republic of Mexico contact us at:
Or you may contact us in the next following phones numbers:
01800-VIP-PANA (01800-847-7262) - Interior
(55) 5000-1200 - Mexico D.F. and Metropolitan Area
natural_image
Symbol of a trash bin crossed out by two diagonal lines (no text or numbers present)OPR: Funzionamento
natural_image
Symbol of a trash bin crossed out by two diagonal lines (no text or numbers present)natural_image
Symbol of a trash bin crossed out by two crossed lines (no text or numbers present)Interruptor OPR/HOLD:
OPR: Funcionamiento
natural_image
Symbol of a trash bin crossed out by two diagonal lines (no text or numbers present)OPR/HOLD-schakelaar:
OPR: Bediening
(De fabrieksinstelling is "H I".)
4 Druk op [▶ OK] om de instelling te voltooien.
(De fabrieksinstelling is "HQ".)
4 Druk op [▶ OK] om de instelling te voltooien.
(De fabrieksinstelling is "Dn-".)
(De fabrieksinstelling is "Dn").
natural_image
Symbol of a trash bin crossed with no text or labels, representing waste sorting or disposal (no text present)OPR: Betjening
natural_image
Symbol of a trash bin crossed out by two diagonal lines (no text or numbers present)OPR/HOLD-omkopplare:
OPR: Drift
natural_image
Symbol of a trash bin crossed out by two diagonal lines (no text or numbers present)Pursuant to at the directive 2004/108/EC, article 9(2)
Panasonic Testing Centre
Panasonic Marketing Europe GmbH
Winsbergring 15, 22525 Hamburg, Germany

Panasonic Corporation
Web Site: http://panasonic.net
- Supplied accessories
- ■ For the United Kingdom and Ireland customers
- Direct Sales at Panasonic UK
- Table of contents
- Preparation
- Basic Operations
- Advanced Operations
- Using the unit with a computer
- Others
- Part names
- Screen display
- Inserting a battery
- Turning the power on/off
- OPR/HOLD switch:
- To turn the power on:
- To turn the power off:
- Auto power off:
- Hold function
- To switch the Hold function on:
- To switch the Hold function off:
- Recording
- Press [● REC]. (Recording starts.)
- Stopping recording:
- File
- Playing
- Press [▶ OK]. (Playback starts.)
- Selecting a file
- Adjusting the volume
- Turning up the volume: Press +. Turning down the volume: Press —.
- Operations during playback
- Jumping (skipping):
- Fast backwarding/Fast forwarding (searching):
- Stopping playback:
- Deleting files and formatting
- Changing the microphone sensitivity
- Changing the sound quality
- Recording at a specified time (Timer recording)
- Changing the playback speed
- A-B Repeat playback
- Cancelling A-B Repeat:
- Playback from a specified position (Time search)
- Press [MENU/REPEAT MODE] during playback.
- Set the playback start position.
- Press [▶ OK].
- Repeat play (Repeat)
- Press [MENU/REPEAT MODE] for at least 2 seconds during playback.
- Dividing files
- Listening to audio with earphones
- Monitoring the audio during recording
- Adjusting the volume:
- Listening to the audio during playback
- Recording by connecting an external microphone
- Connect the external microphone.
- Press [● REC] to start recording.
- Connecting to other devices
- Record.
- Common settings
- Common settings operation
- BEEP (Beep sound)
- LED (Recording indicator)
- System requirements
- Connecting the unit to a computer
- Remove the USB plug cover.
- Insert the unit into the computer.
- ■ The first time you connect the unit to a computer
- ■ Screen display when connected to a computer
- Never remove the unit during data transfer.
- ■ Removing the unit
- ■ USB mass storage function
- Opening the folders of the unit
- Right-click "My Computer" from the Start menu and select "Open".
- Right-click "IC RECORDER (G:)” (this unit) and select "Open".
- Right-click the MIC folder and select "Open".
- Importing files to a computer and organising files
- Importing recording files to a computer
- Playing recording files from a computer:
- Deleting unnecessary files from a computer:
- Do not rename the folder.
- File names
- File names displayed on the computer:
- Automatic changing of file names as a result of file deletion/division:
- To return files imported to a computer to the unit:
- Q & A (Frequently Asked Questions)
- Troubleshooting guide
- -If you see this symbol-
- Information on Disposal for Users of Waste Electrical & Electronic Equipment (private households)
- For business users in the European Union
- Information on Disposal in other Countries outside the European Union
- Specifications
- Battery life
- Estimated possible recording time
- Care and use
- Unit
- ■ Batteries
- Allergies
- ■ Precautions for listening with the Headphones or Earphones
- CAUTION
- Based on EN 50332-2:2003
- Maintenance
- Clean this unit with a dry and soft cloth.
- ■ When discarding of/transferring this unit
- ■ Data when requesting repairs
- Panasonic Warranty
- THIS WARRANTY CARD AND THE PURCHASE DOCKET (OR SIMILAR PROOF OF PURCHASE) SHOULD BE RETAINED BY THE CUSTOMER AT ALL TIMES
- Panasonic Australia Pty. Limited
- Customer Service
- Customer Service Directory
- http://www.lar.panasonic.com
- Mexico Service
- Panasonic Corporation
Brand : PANASONIC
Model : RR-US300
Category : Dictaphone