
RR-XS450E - Dictaphone PANASONIC - Free user manual and instructions
Find the device manual for free RR-XS450E PANASONIC in PDF.
| Product Type | Voice Recorder (IC recorder) |
| Brand | PANASONIC |
| Model | RR-XS450E |
| Internal Memory | 4 GB (actual capacity lower) |
| Memory Card Support | microSD (up to 2 GB) / microSDHC (4 to 32 GB) |
| Recording Formats | PCM 44.1 kHz, MP3 320/192/128/64/32 kbps |
| Microphone | Built-in, stereo, switchable STEREO/ZOOM |
| Speaker | Built-in |
| Headphone Output | Stereo mini-jack Ø 3.5 mm |
| Power Supply | Rechargeable Ni-MH AAA battery (included) or alkaline AAA LR03 battery |
| Main Functions | Microphone/line recording, playback, A-B repeat, date search, playlist, equalizer, VAS, pre-recording, timer, delay |
| Maintenance | Soft dry cloth; do not use solvents |
| Safety | Do not expose to heat; keep out of reach of children; recycle according to regulations |
| Spare Parts / Accessories | Rechargeable battery HHR-4MVE (Europe) or HHR-4MVT (Asia), USB extension cable included |
Frequently Asked Questions - RR-XS450E PANASONIC
User questions about RR-XS450E PANASONIC
0 question about this device. Answer the ones you know or ask your own.
Ask a new question about this device
Download the instructions for your Dictaphone in PDF format for free! Find your manual RR-XS450E - PANASONIC and take your electronic device back in hand. On this page are published all the documents necessary for the use of your device. RR-XS450E by PANASONIC.
USER MANUAL RR-XS450E PANASONIC
natural_image
Illustration of a silver portable electronic device with control buttons and a screen (no text or symbols)
Operating Instructions
Thank you for purchasing this product.
For optimum performance and safety, please read these instructions carefully.
Before connecting, operating or adjusting this product, please read the instructions completely. Please keep this manual for future reference.
Supplied accessories

Please check and identify the supplied accessories.
Use numbers indicated in parentheses when asking for replacement parts. (Product numbers correct as of May 2012. These may be subject to change.)
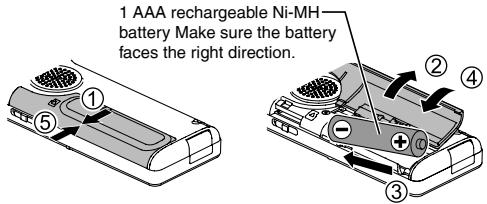
☐ 1 AAA rechargeable Ni-MH battery* [HHR-4AGE]
- Indicated as rechargeable battery in the text.
☐ 1 Battery carrying bag [RFC0156-Q]
☐ 1 USB extension cable [K2ZZ04Y00005]
* Make sure to buy [HHR-4MVE] for Europe or [HHR-4MVT] for Asia and Latin America and use one of the pair when replacing the rechargeable battery.
■ For the United Kingdom and Ireland customers
(Sales and Support Information)
Customer Communications Centre
- For customers within the UK: 0844 844 3899
- For customers within Ireland: 01 289 8333
- For further support on your product, please visit our website: www.panasonic.co.uk
Direct Sales at Panasonic UK
- Order accessory and consumable items for your product with ease and confidence by phoning our Customer Communications Centre
Monday–Thursday 9:00 a.m.–5:30 p.m., Friday 9:30 a.m.–5:30 p.m. (Excluding public holidays) - Or go on line through our Internet Accessory ordering application at www.pas-europe.com.
- Most major credit and debit cards accepted.
- All enquiries transactions and distribution facilities are provided directly by Panasonic UK.
- It couldn't be simpler!
- Also available through our Internet is direct shopping for a wide range of finished products. Take a browse on our website for further details.
Features
Recording
This unit supports the Linear PCM (hereinafter referred to as “PCM”) recording. Also, you can use the zoom recording function to reduce the sounds in the surrounding environment to clearly record the sound source in front of you.
A wide range of recording settings optimised according to recording scene are provided, enabling you to turn on the power, select a recording setting, and then start recording immediately.
Playing back to listen
- Recorded file
• WMA/MP3 music file - Support for playback of files recorded with a device other than this unit
Connecting this unit to a computer
• Support for USB charging
- Move and organise recording/music/data files
Recording/Playback using the Timer
You can record at a specified time. You can also set an alarm to sound or file to play back at a specified time.
Table of contents
Preparation
Supplied accessories....2
Features 3
Part names 5
Screen display 6
Inserting the battery/Charging 7
Turning the Power ON/OFF 9
Hold function....10
Setting the clock....11
File and Folder....12
Selecting the folder....12
Selecting the folder or file in the list screen 13
Basic Operations
Switching microphone position....14
Recording 15
Playing....17
Listening to the audio using earphones....18
Deleting files....19
Advanced Operations
Selecting the recording scene 20
Direct scene....23
Selecting recording mode....25
Switching microphone sensitivity....26
Reducing low frequency noise during recording.....26
Setting the recording level manually....27
Setting the recording EQ 29
Self timer 30
Table of contents
Preventing unnecessary recording (VAS)....31
Past recording function (PRE-RECORD) 32
Recording by connecting an external microphone .....33
Copying to other devices 34
Recording from other devices....35
Index function 38
Changing the playback speed 39
A-B Repeat play 39
Playback from a specified position (TIME SEARCH) ...40
Slight return playback 40
Repeat play (REPEAT) 41
Skip at regular intervals (TIME SKIP)......42
Shadowing....43
Making sound easier to hear (VOICE EMPHASIS) .....44
Setting the playback EQ (SOUND EQ)......45
Using an SD Card....46
Using the file search function 47
Listening to music on this unit (WMA/MP3 music files)......48
Using the playlist function....49
Editing: Dividing files....51
Editing: Combining files 52
Editing: Copying or moving files....53
Recycle bin function 54
Using the timer 55
Common menu....58
Using with a computer
System requirements....62
Connecting this unit to a computer....63
Opening folders of this unit....65
Importing files to a computer/Organising files ......66
File name....67
Folder structure on this unit 69
Transferring music files to this unit....71
Other
Q & A (Frequently Asked Questions)....72
Error messages 72
Troubleshooting guide 77
Specifications 85
Care and use....87
Maintenance....90
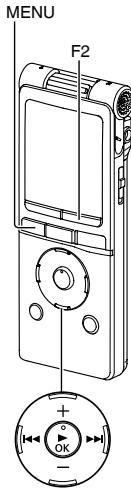
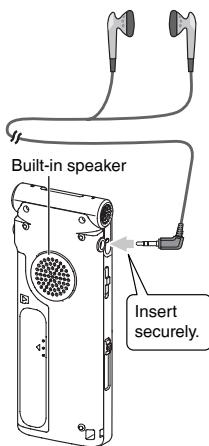
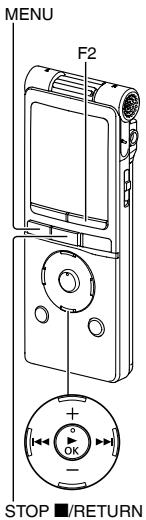
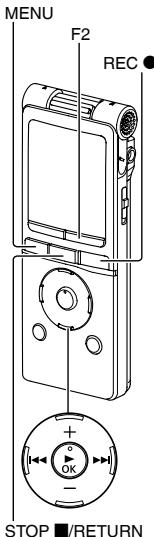
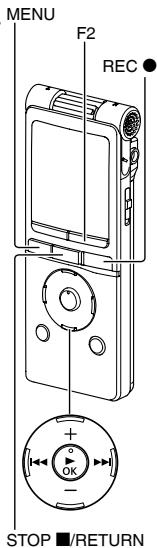
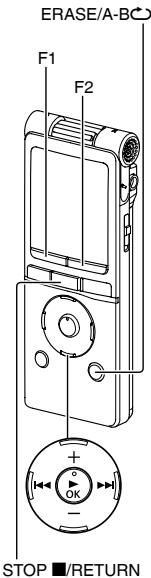
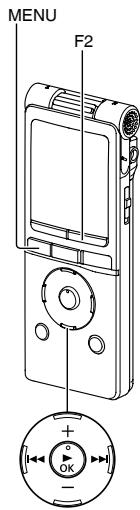
Part names
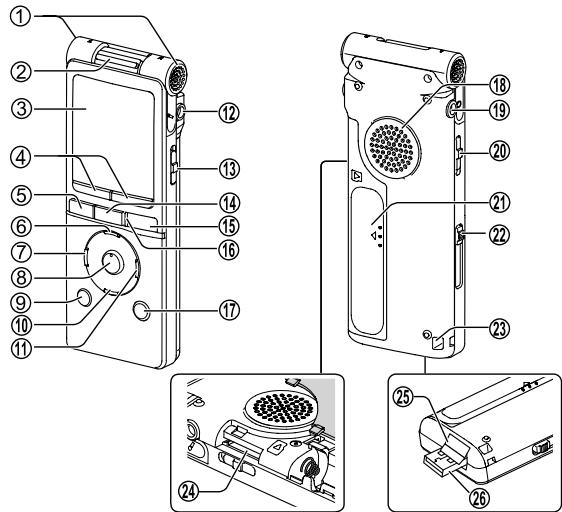
① Built-in microphone
② Zoom/stereo switch
③ LCD display
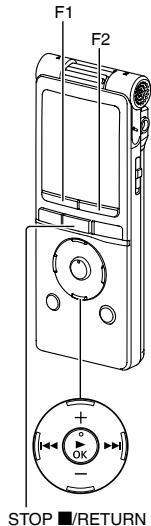
④F1, F2
The F1 and F2 buttons operate the function shown in the display.
⑤ MENU
⑥+ (Volume up)
⑦◀◀ (Fast backward)
⑧▶ OK
⑨LIST
⑩- (Volume down)
⑪▶▶I (Fast forward)
⑫ External microphone/Line-in jack (i)
⑬ OPR/HOLD switch (OPR: Operation)
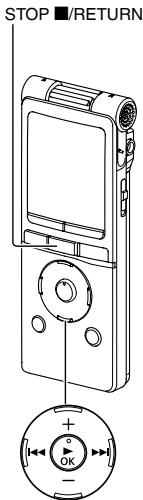
⑭ STOP ■/RETURN
⑮ REC ●
⑯ Recording indicator (Status indicator)
⑰ ERASE/A-B
⑱Built-in speaker
⑲ Headphone/earphone jack (Ω)
⑳ Mic/Line switch
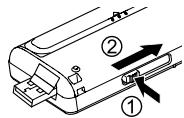
②1 Battery/SD card slot cover
②USB plug lever
②3 Strap eyelet
②4 SD card slot (When ②1 is open)
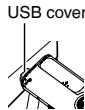
⑲USB cover
It is stored inside the unit when the unit is connected to a computer.
②6 USB plug
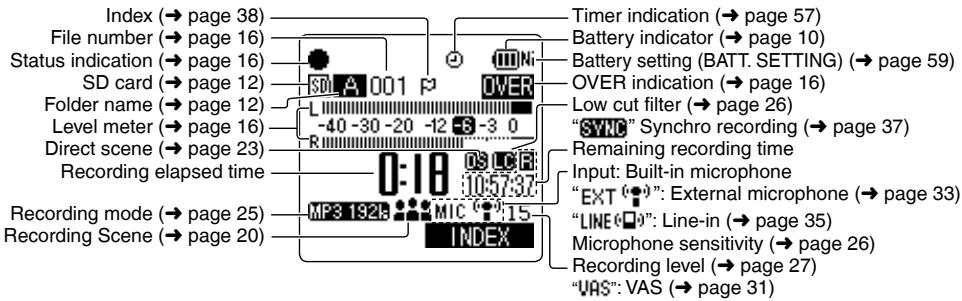
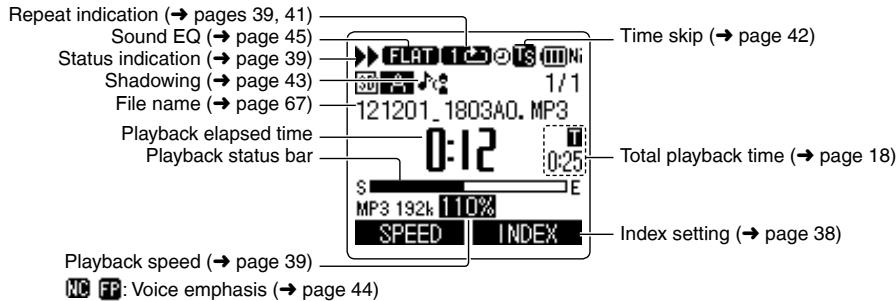
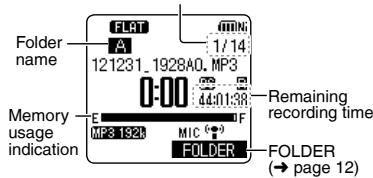
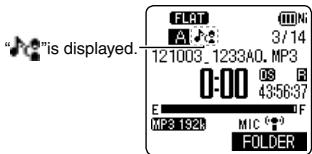
Screen display
- The following screen examples explain each item. Some items may not be displayed simultaneously.
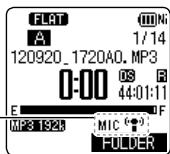
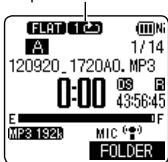
Screen display during recording:
Screen display during playback:
Inserting the battery/Charging
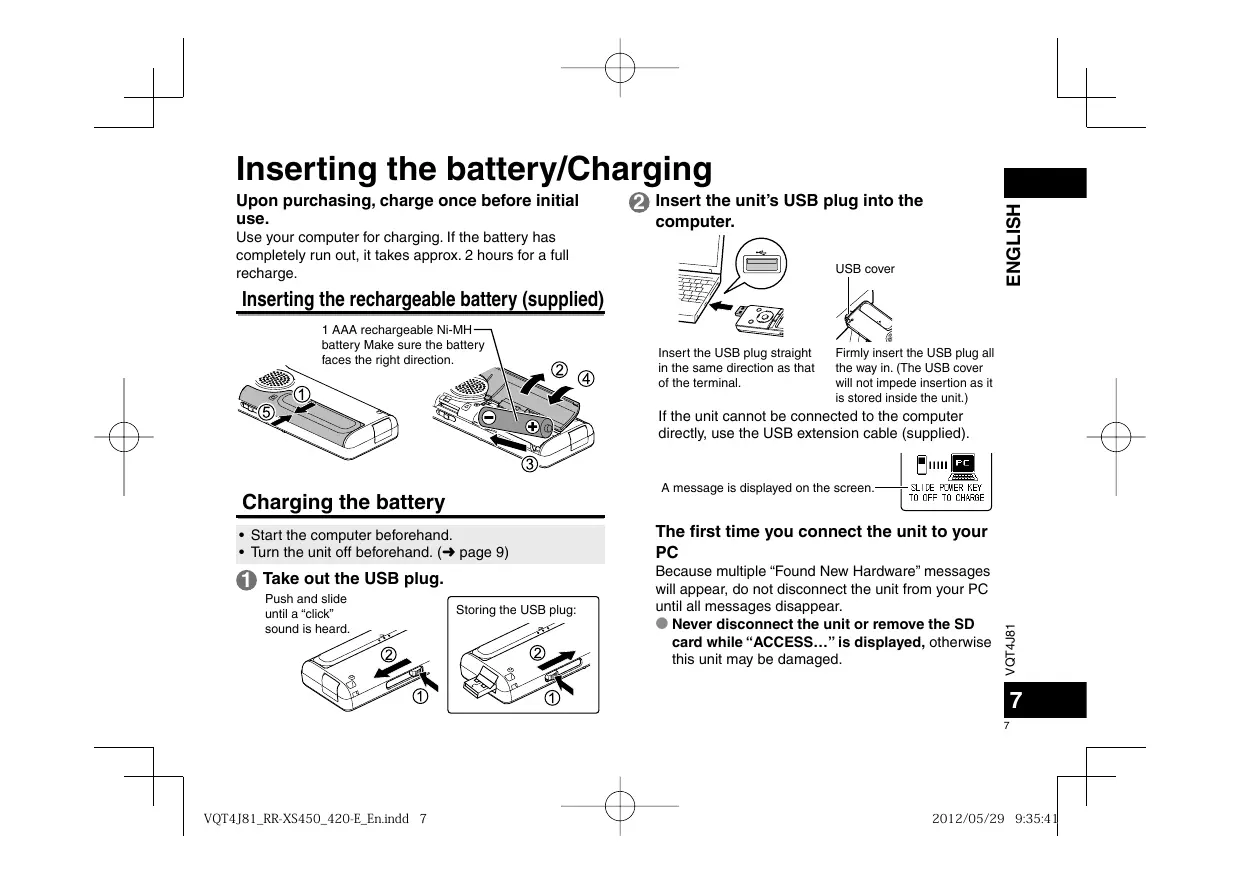
Upon purchasing, charge once before initial use.
Use your computer for charging. If the battery has completely run out, it takes approx. 2 hours for a full recharge.
Inserting the rechargeable battery (supplied)
Charging the battery
- Start the computer beforehand.
- Turn the unit off beforehand. (→ page 9)
① Take out the USB plug.
Push and slide until a "click" sound is heard.
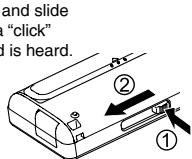
Storing the USB plug:
② Insert the unit's USB plug into the computer.
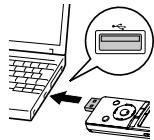
Insert the USB plug straight in the same direction as that of the terminal.
Firmly insert the USB plug all the way in. (The USB cover will not impede insertion as it is stored inside the unit.)
If the unit cannot be connected to the computer directly, use the USB extension cable (supplied).
A message is displayed on the screen.

The first time you connect the unit to your PC
Because multiple “Found New Hardware” messages will appear, do not disconnect the unit from your PC until all messages disappear.
- Never disconnect the unit or remove the SD card while “ACCESS...” is displayed, otherwise this unit may be damaged.
Inserting the battery/Charging
③ Slide the OPR/HOLD switch to the [ON] side.
4 Slide the OPR/HOLD switch to the [OFF] side.
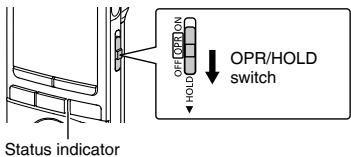
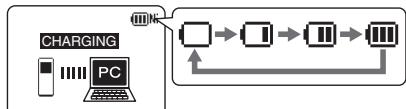
The status indicator lights and recharging starts. Also, “CHARGING” is shown in the unit’s display and the battery indicator changes as shown below.
flowchart
graph TD
    A["CHARGING"] --> B["PC"]
    B --> C["Data Flow"]
    C --> D["Output"]
    style A fill:#f9f,stroke:#333
    style B fill:#ccf,stroke:#333
    style C fill:#cfc,stroke:#333
    style D fill:#fcc,stroke:#333
● While charging, sliding the OPR/HOLD switch to the [ON] side can cancel charging halfway.
- When the status indicator goes out, charging is complete.
■ Disconnecting the unit
Double-click the icon (Windows XP: [ ], Windows Vista/Windows 7: [ ] on the task tray at the bottom of the computer screen and follow the on-screen instructions to remove the unit. (The icon may not be displayed depending on the OS settings.)
After the unit is removed, this unit turns off.
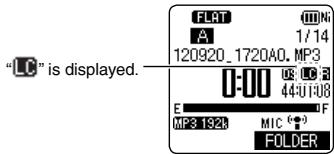
- If BATT. SETTING in the common menu is set to "ALKALINE", the battery cannot be charged.
- When using a rechargeable battery, use the supplied rechargeable battery or the optional rechargeable battery ( page 2). If commercially sold batteries other than the above are used, operation is not guaranteed. Do not charge a dry cell battery.
- If charging does not start, slide the OPR/HOLD switch to the [ON] side once, and then to the [OFF] again.
- If the temperature of this unit has risen, an undesignated rechargeable battery has been inserted, or BATT. SETTING has been set to “ALKALINE”, “☒” is displayed. (→ page 77)
- When the computer is in sleep mode or is restarted, recharging may be impossible.
● Charging is possible even during data transfer. - The rechargeable battery does not need to be fully depleted before recharging.
- The rechargeable battery or this unit may become hot while charging, but this is not a malfunction.
- If the usage time becomes remarkably short even though the battery is fully recharged, the battery has reached the end of its lifespan. Purchase a new rechargeable battery ( page 2).
■ When using a dry cell battery (not supplied)
- An AAA LR03 alkaline battery (not supplied) can also be used.
- If you use an alkaline battery, set the BATT. SETTING in the common menu to "ALKALINE". (→ page 59)
Turning the Power ON/OFF

OPR/HOLD switch
Turning the power ON:
Slide the OPR/HOLD switch to [ON] side to turn the power on. Then, the display lights on.
Set the current date and time when turning this unit on for the first time. ( page 11)
Turning the power OFF:
Slide the OPR/HOLD switch to [OFF] side while the unit is in the stop state.
■ Auto power off
The power automatically turns off after a preset time (the factory setting is 15 minutes) elapses while recording is stopped.
If the power is turned off by the auto power off function, slide the OPR/HOLD switch to the [OFF] side before turning the power on. ( page 59)
Turning the Power ON/OFF
■ About the battery indicator
The remaining battery level is displayed as below while this unit is operating.


Blinking
- If the battery runs out, “☐” blinks. Replace the battery or charge the rechargeable battery as soon as possible.
- Please replace battery within approx. 1 minute for preservation of the clock data.
- Depending on the battery status or the operation content to use, even if the power turns off due to the battery exhaustion, this unit may be used for a while if turned on again. However, the unit may suddenly turn off during operation due to the low level of battery.
Some level of battery is required when recording, or performing Deleting files ( page 19), Dividing files ( page 51), Deleting index ( page 38), FORMAT ( page 60). If the battery indicator shows “☐” (blinking) and these operations are performed, the power turns OFF automatically.
- Remove the battery from the unit if you will not use it for a long period of time.
- Make sure to turn the power off before removing the battery.
- If the battery is removed while the unit is on, data may be lost or this unit may be damaged.
Hold function
Button operations are ignored when the Hold function is on.
To switch the Hold function on:
Slide the OPR/HOLD switch to the [HOLD] side during recording or playback.

To switch the Hold function off:
Slide the OPR/HOLD switch in the opposite direction of [HOLD].

- When the Hold function is on, operation is ignored even if the buttons are pressed while the power is on ("HOLD ON" is displayed), enabling you to prevent unintended operations such as the stopping of recording or playback.
- When recording or playback finishes while the Hold function is on, the power turns off automatically.
Setting the clock
The clock has not been set at the time of purchase.
The clock is used as a file name ( page 67) or to preserve recording date and time information. Set the correct date and time. If the power is turned on when the clock is not set, the screen shown in step 4 is displayed.
- Turn the power on. (→ page 9)
① Press [MENU].
② Press +, – to select “COMMON MENU” and press [▶ OK] to enter.
③ Press +, – to select “DATE & TIME” and press [▶ OK] to enter.
4 Press +, – to set the year and press ▶▶.
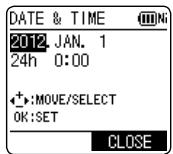
The above illustration is a display example.
5 Press +, - to set the month and press ▶▶.
6 Press +, - to set the date and press ▶▶.
7 Press +, – to set the clock indication method and press ▶▶. “24h” and “AM/PM” are displayed for the 24-hour display and the 12-hour display respectively.
⑧ Press +, – to set the hour and press ▶▶.
⑨ Press +, – to set the minute.
To change the setting, press ◀◀◀, ▶▶▶ to move between the items, and then press +, – again to make the setting.
10 Press [▶ OK] to enter.
The date and time are set and the clock starts to operate.
To exit the setting screen, press [F2 (CLOSE)].
The clock operates with the monthly loss/gain of approx. 60 seconds at normal temperature.
● The clock setting will be lost if the battery is removed or completely exhausted.
File and Folder
File
Recorded audio data from the starting point to the ending point is saved as a file.
The saved data is called a file.
Folder
This is where files are stored. This unit has the following folders.
- “A”, “B”, “C” and “D” folders for microphone recording (→ page 15).
- “L” folder for files recorded from other devices connected to this unit (→ page 35).
- “” folder (Recycle) where deleted files are placed (→ page 54).
- "M" folder for music (→ page 48).
- “☐” (OTHER FOLDER) where the folders created by the device other than this unit are placed (→ page 70). Using each folder according to the purposes of recording enables you to search files easily later. Up to 199 files can be recorded in each recording folder.
Folders are created in the internal memory. When an SD card* ( page 46) is inserted, folders are created in the same way on the SD card.
* In this manual, microSD/microSDHC card is written as "SD card".
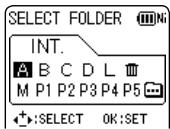
Selecting the folder
- Press [STOP ■/RETURN] to stop the unit.
① Press [F2 (FOLDER)].
② Press +, -, |◀◀, ▶▶| to select the folder and press [▶ OK] to enter.
"P1 to P5" present playlist files ( page 49).
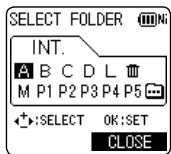
- “☐” (OTHER FOLDER) is for the playback of files recorded by a device other than this unit. This unit can also play music files recorded with (or transferred by) some Panasonic Stereo System devices equipped with the USB recording function.
Switching between the internal memory and SD card:
If the SD card is inserted, the items for SD card are displayed on the screen in step ②. Press [F1 (MEMORY)] to select the memory.
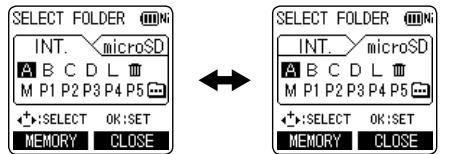
When the internal memory is selected
When the SD card is selected
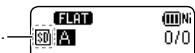
When the SD card is selected,

is displayed on the screen.
Selecting the folder or file in the list screen
- Press [STOP ■/RETURN] to stop the unit.
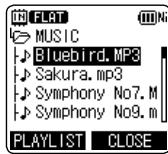
① Press [LIST ♂] for approx. 1 second or more.
Go to step ② if an SD card is inserted ( page 46), and step ③ if not.
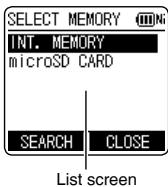
② Press +, – to select “INT. MEMORY” (internal memory) or “microSD CARD” and press [▶ OK] to enter.
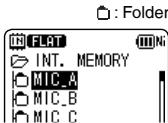
③ Press +, – to select the folder and press [▶ OK] to enter.
If folders have been created in the MUSIC folder or OTHER FOLDER (☐), repeat step 3 to select the target folder.
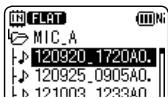
4 Press +, - to select the file and press [▶ OK] to enter.
File playback starts.
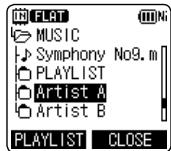
When “MUSIC” or “OTHER FOLDER” is selected in step ③, PLAYLIST folders (only for MUSIC) and folders or files transferred from the computer are displayed. (For details of PLAYLIST, see page 49.) If a folder exists (on the second hierarchy) under the folder (e.g. Artist A), select “Artist A” and press [▶ OK]. Then, the folder under “Artist A” is displayed. (For details of folder hierarchy, see page 69.)
Pressing ◀◀ several times on the screen in step ④ will switch the screen to screens in steps ② or ③. Also, it is possible to move among folder hierarchies to select folders and files.
- When there is no file in the selected folder, "NO FILE" is displayed.
The “A”, “B”, “C”, “D”, “L”, “M”, “(recycle bin)” and “” folders are displayed as “MIC_A (MIC_A_SD), MIC_B (MIC_B_SD), MIC_C (MIC_C_SD), MIC_D (MIC_D_SD), LINE (LINE_SD), MUSIC, RECYCLE and OTHER FOLDER” respectively on the list screen. (The indications in the brackets are displayed when using the SD card.) - Pressing [LIST ♂] while the unit is stopped or during playback will directly display the screen (current folder) shown in step 4.
Switching microphone position
You can switch the microphone position to ZOOM to record with the sound in front of you emphasised. Switch the microphone position depending on the use.
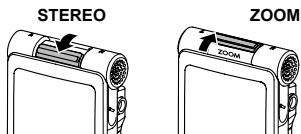
| Microphone position | Recommended uses | * |
STEREO  [1H228]Operates as an ordinary stereo microphone. [1H228]Operates as an ordinary stereo microphone. | Suitable for recording events such as a meeting or performance by a large number of people. | |
| ZOOM [C6=33][C28=1]Records with the sound in front of you emphasised. | Suitable for recording events such as a lecture or interview, where sound is emitted from a specific direction. |

This unit has recording scenes ( page 20) for which the recommended recording settings are registered for each use, and switching the microphone position also changes the recording scene. (Direct scene ( page 23))
- Do not switch the microphone position during recording. The intended recording characteristics will not be obtained.
The microphone position function operates when the built-in microphone is used. It does not operate when an external microphone is connected for recording ( page 33) or when a different device is connected for recording to this unit ( page 35).
Recording

- Turn the power on. (→ page 9)
- Press [STOP ■/RETURN] to stop the unit.
- Select the microphone position. (→ page 14)
① Press [F2 (FOLDER)].
② Press |◀◀, ▶▶▶ to select the recording destination folder and press [▶ OK] to enter.
For microphone recording, select a folder among folders "A", "B", "C" and "D". (The factory setting is "A") When you select a folder except for "A", "B", "C" or "D", recording is automatically saved in "A".
③ Press [REC ●] (Recording starts).

The recording indicator lights on.
4 Press [STOP ■/RETURN] to stop recording.
To pause recording:
① Press [REC ●] during recording. Recording indicator blinks.
② Press [REC ●] again to resume recording.
Change the recording mode or microphone sensitivity as necessary. (→ pages 25, 26)
A function is available for simultaneously retrieving all the recording settings recommended for the recording scene. ( page 20)
- If the file size exceeds 2 GB during recording, the recording stops tentatively at the point when the data reaches 2 GB. Then, the recording resumes with a new file. Recording is not available during the interval (approx. 2 seconds) from when the recording stops to when the recording resumes.
Note if your finger or an object touches this unit during recording, the noise will be recorded through the microphone.
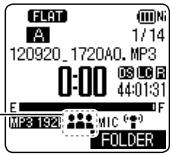
Recording
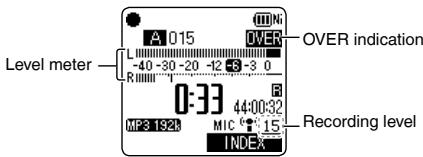
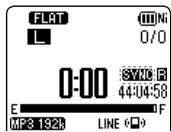
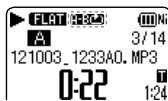
Screen display during recording:
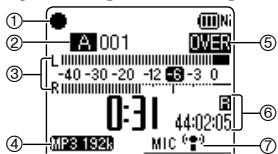
① Status indication
● : During recording
■: During recording pause, recording standby, past recording standby
② Folder name (→ page 12), File number
③ Level meter
Displays the volume input into this unit. (Stereo (L/R))
L and R volumes are displayed respectively during monaural recording ( page 25) as well. Note that the monaural recording data are synthesised from L and R.
④ Recording mode (→ page 25)
⑤ OVER indication
If the input volume is excessive and the level meter swings, "OVER" is displayed.
⑥ Possible remaining recording time
Displays the remaining recording time (possible recording time) in the selected recording mode.
⑦ Microphone sensitivity ( page 26)
See page 6 for other screen displays.
Note when recording
This unit is equipped with a high-sensitivity microphone. Accordingly, if a breath or wind directly hits the microphone during recording, the wind-cutting sound may be recorded or voice may be difficult to hear.
-
This can be prevented by blocking the wind with your body so that the wind does not directly hit the unit.
-
During dictation recording, slightly move this unit from front of your mouth or keep distance.

natural_image
Simple line drawing of a bird perched on a tree with a cloud (no text or symbols)
natural_image
Illustration of a child holding an object with swirling lines and leaves, no text or symbols presentKeep distance

natural_image
Illustration of a person holding a smartphone with a magnifying glass (no text or symbols)Turning the “LOW CUT FILTER” ( page 26) to “ON” reduces the sound of low frequency range. This may help the reduction of the wind-cutting sound.
● Sound may jump during recording (especially PCM recording) depending on use conditions of the internal memory and SD card.
Formatting them on this unit ( page 60) before recording is recommended.
Playing
- Press [STOP ■/RETURN] to stop the unit.
- Select a folder. (→ page 12)
- Select a file. (→ right)
1 Press [▶ OK] (Playback starts).
Adjusting the volume
Turn up the volume: Press +. Turn down the volume: Press -.
Volume range is 0 to 20.
(The factory setting is "10".)
If you turn the unit off with the volume set to 17 or more, the volume will be set to 16 next time the unit is turned on.
Operations during playback
Jump (Skip): Press |◀◀, ▶▶.
Press ◀◀ midway while playing a file and the playback jumps to the beginning of the file. To return to the previous file, press ◀◀ within approx. 1 second from the beginning of the file.
Fast backward/Fast forward (Search):
Press and hold ◀◀, ▶▶.
To stop: Press [STOP ■/RETURN].
Select a file
Press |◀◀, ▶▶| to select.
Each time you press, the file number changes.
File number/Total number of files in the folder
Screen display example while stopped
You can also select the file on the list screen.
(→ page 13)
- The unit remembers the last file played and the stop position for each folder.
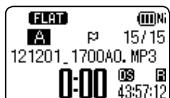
Playing
Checking information
You can check the file information or current time.
- Press [STOP ■/RETURN] to stop the unit.
① Press [STOP ■/RETURN].
The information screen appears.
② Move the information screen up or down using + or −.
The following contents can be confirmed on the information screen.
Current time : Current time
Remaining recording time : Possible remaining
(Possible recording time) recording time in the recording mode currently being set
Recording date and time*: Date and time when the selected file was recorded
Total playback time : Length of the selected file
File format : Format of the selected file
* This is not displayed for the M (MUSIC) folder or OTHER FOLDER (☐).
To exit the information screen:
Press [STOP ■/RETURN].
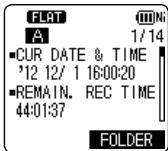
Listening to the audio using earphones
Connect stereo earphones (not supplied).
Recommended additional earphones:
Panasonic RP-HV154, RP-HJE120
(the product number is correct as of May 2012.)
Monitoring the recording in progress
Adjusting the volume:
You can adjust the volume by pressing +, -, but the recording level ( page 27) is not affected.
Listening to the audio during playback
The audio during playback comes from the speaker.
Listening may be difficult in noisy places due to the speaker output. In that case, connect stereo earphones (not supplied).
● The built-in speaker is turned off when earphones are connected.
Deleting files
- Select a file to delete beforehand. (→ page 17)
- Press [STOP ■/RETURN] to stop the unit.
① Press [ERASE/A-B].
② Press +, - to select "FILE" and press [▶ OK] to enter.
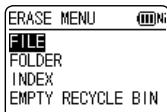
③ Press +, – to select “YES” and press [▶ OK] to enter.
While deleting, the status indicator blinks and "ERASING" is displayed. It may take several minutes until the deletion is complete.
Selecting "FOLDER" in step ② will move to the screen to delete all files in the selected folder.
To exit the deletion screen, press [F2 (CLOSE)].
Deleting files from the list screen
Select files on the list screen ( page 13) and press [ERASE/A-B]. Then, the screen to delete the file appears. Select the folder and press [ERASE/A-B]. Then, the screen to delete all files in the folder appears.
- When the recycle bin function is ON, files are moved to the recycle bin (☑) folder. When the recycle bin function is OFF, files are deleted immediately without being moved to the recycle bin (☑) folder. (→ pages 54 and 60)
- Files in the MUSIC (M) or OTHER FOLDER (☐) are deleted immediately irrespective of the recycle bin settings.
The file numbers displayed on this unit are moved forward after deleting files. (→ page 67) - Read-only WMA/MP3 music files transferred from the computer, files that cannot be played by the unit, subfolders (→ pages 69 and 71) in the MUSIC folder created on the computer, or subfolders in the OTHER FOLDER cannot be deleted using this unit. Delete them on the computer. (→ page 66)
Selecting the recording scene
This unit offers recommended recording settings for each recording scene. Selecting the recording scene enables easy recording with the most appropriate settings.

- Press [STOP ■/RETURN] to stop the unit.
① Press [MENU] for approx. 1 second or more.
The screen to select the recording scene is displayed.
② Press +, – to select the scene and press [▶ OK] to enter.
If you select "USER", skip the step ③.
③ Press +, – to select “LOAD” and press [▶ OK] to enter.
To exit the setting screen, press [F2 (CLOSE)].
The selected recording scene is displayed.
When [REC ●] is pressed, recording is performed with the selected recording scene setting.
- If you select “USER” in step ②, the state immediately before the recording scene was set is restored, and the recording scene indication disappears.
- If you individually change settings such as the recording mode when the recording scene is set, the settings overwrite the “USER” settings, and the recording scene indication disappears.
The recording scene operates when microphone recording is used. Recording scene does not operate when another device is connected and the Mic/Line switch is set to [LINE] ( page 35). - You can also set the recording scene by pressing [MENU] and selecting “SCENE SELECT” from “MIC REC MENU”.
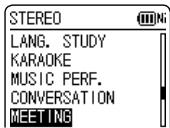
■ The factory setting of recording scenes
| Setting Item(page) | LANG. STUDY | KARAOKE | MUSIC PERF. | CONVERSATION | MEETING | LECTURE | FAVORITE |
| Recording your own voice for pronunciation practice etc. | Loud volume recording such as karaoke | High quality recording such as musical performances | Recording other people's voices for interviews or meetings etc. | Records a broad sound band. For recording meetings etc. | Records sounds such as in classroom lectures etc. | You can register your own settings | |
| Recording mode(25) | MP3:192 kbps | MP3:320 kbps | PCM:44.1 kHz | MP3:64 kbps | MP3:192 kbps | MP3:192 kbps | MP3:192 kbps |
| Microphone sensitivity (26) | HIGH | HIGH | HIGH | HIGH | HIGH | HIGH | HIGH |
| Recording level(27) | AUTO | MANUAL* | MANUAL* | AUTO | AUTO | AUTO | AUTO |
| Low cut filter(26) | ON | OFF | OFF | ON | ON | ON | OFF |
| Recording peak limiter (28) | OFF | ON | OFF | OFF | OFF | OFF | OFF |
| Self timer recording(30) | OFF | OFF | OFF | OFF | OFF | OFF | OFF |
| VAS setting(31) | OFF | OFF | OFF | OFF | OFF | OFF | OFF |
| Past Recording Settings (32) | OFF | OFF | OFF | OFF | OFF | OFF | OFF |
* Preset an appropriate recording level to enable recordings with superior sound. For details, see “Setting the recording level manually” ( pages 27 and 28).
Selecting the recording scene
Changing recording scene settings
The setting details of each recording scene can be changed according to preference.
- Press [STOP ■/RETURN] to stop the unit.
① Press [MENU] for approx. 1 second or more.
② Press +, – to select the recording scene and press [▶ OK] to enter.
③ Press +, – to select "CHANGE SETTING" and press [▶ OK] to enter.
4 Press +, – to select the item you want to change and press [▶ OK] to enter.
⑤ Press +, - to select the setting and press [▶ OK] to enter.
Repeat steps ④ and ⑤ to change other items.
⑥ When you have completed the settings, press +, - to select "OK" and press [▶ OK] to enter.
To select the changed recording scene, select "LOAD" ( page 20).
To exit the setting screen, press [F2 (CLOSE)]. Initialising recording scene settings
Returns individual recording scenes whose settings have been changed to the factory settings.
- Press [STOP ■/RETURN] to stop the unit.
1 Press [MENU] for approx. 1 second or more.
② Press +, – to select the recording scene you want to initialise and press [▶ OK] to enter.
③ Press +, – to select "INITIALIZE" and press [▶ OK] to enter.
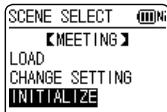
4 Press +, - to select "YES" and press [▶ OK] to enter.
The selected recording scene setting is returned to the factory setting.
To select the initialised recording scene, select "LOAD" ( page 20)
To exit the setting screen, press [F2 (CLOSE)].
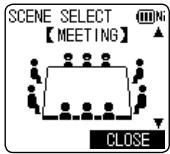
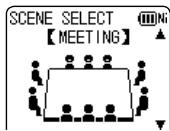
Direct scene
This function is for switching the recording scene ( page 20) linked to switching the microphone position. (The factory setting is “ON”)
You can switch to the recording scene assigned to each microphone position.
| Microphone position | Recording scene* |
STEREO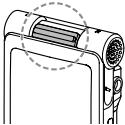 | 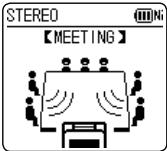 |
ZOOM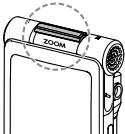 | 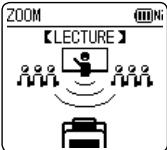 ____ ____ |
* Factory setting
At the time of purchase, "MEETING" is assigned to STEREO, and "LECTURE" is assigned to ZOOM.
You can also change the recording scene assigned to a microphone position. Select the desired recording scene from seven recording scenes. ( page 24)
- Switch the microphone position when the unit is in the stopped state. During an operation such as recording or playback, the recording scene cannot be changed even by switching the microphone position.
- If you wish to switch only the stereo and zoom functions of the microphone without linking the recording scenes, set direct scene setting to "OFF". (→ page 24)
- When an external microphone is connected, the recording scene cannot be switched even by switching the microphone position.
Direct scene
Changing direct scene setting
- Press [STOP ■/RETURN] to stop the unit.
① Press [MENU].
② Press +, – to select “MIC REC MENU” and press [▶ OK] to enter.
③ Press +, – to select “DIRECT SCENE” and press [▶ OK] to enter.
4 Press +, – to select the microphone position (“STEREO” or “ZOOM”) and press [▶ OK] to enter.
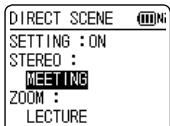
⑤ Press +, – to select the recording scene and press [▶ OK] to enter.
If you wish to change the recording scene for the other microphone position, perform steps ④ and ⑤ to set the recording scene.
To exit the setting screen, press [F2 (CLOSE)].
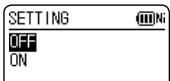
Setting direct scene setting to OFF
- Press [STOP ■/RETURN] to stop the unit.
① Press [MENU].
② Press +, - to select "MIC REC MENU" and press [▶ OK] to enter.
③ Press +, - to select "DIRECT SCENE" and press [▶ OK] to enter.
4 Press +, - to select "SETTING" and press [▶ OK] to enter.
5 Press +, - to select "OFF" and press [▶ OK] to enter.
To exit the setting screen, press [F2 (CLOSE)].

- During playback, recording, or recording standby, "US" is not displayed even if you set direct scene setting to "ON".
Selecting recording mode
You can change the sound quality. This allows you to provide the best sound quality for the particular purpose.
- Press [STOP ■/RETURN] to stop the unit.
① Press [MENU].
② Press +, - to select "MIC REC MENU" and press [▶ OK] to enter.
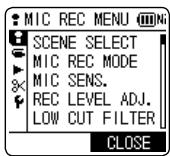
③ Press +, – to select “MIC REC MODE” and press [▶ OK] to enter.
4 Press +, - to select the setting (PCM sampling frequency/MP3 bitrate) and press [▶ OK] to enter.
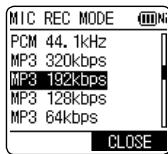
(The factory setting is "MP3 192kbps".)
To exit the setting screen, press [F2 (CLOSE)].
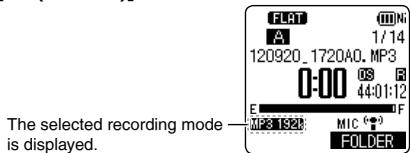
- Depending on the recording mode setting, the sound quality and remaining recording time ( page 86) will differ.
| High quality recording | ||||||
| Long recording | ||||||
| Recording format | PCM44.1 kHz | MP3320 kbps | MP3192 kbps | MP3128 kbps | MP364 kbps | MP332 kbps |
- When the recording mode is set to “MP3 32kbps”, the recording becomes monaural.
Switching microphone sensitivity
Switch the microphone sensitivity according to the volume of the sound source. When the sound source volume is loud, set the sensitivity to "LOW". When it is low, set the sensitivity to "HIGH".
- Press [STOP ■/RETURN] to stop the unit.
1 Press [MENU].
② Press +, – to select “MIC REC MENU” and press [▶ OK] to enter.
③ Press +, – to select “MIC SENS.” and press [▶ OK] to enter.
4 Press +, - to select "HIGH" or "LOW" and press [▶ OK] to enter.
(The factory setting is "HIGH".)
To exit the setting screen, press [F2 (CLOSE)].
* When the microphone position is "ZOOM", "☐" is displayed for High, and "☐" for Low.
Reducing low frequency noise during recording
Sound of low frequency range is reduced during microphone recording. This is effective when reducing noise of air conditioning equipment, etc. while recording at a meeting, etc. (LOW CUT FILTER)
- Press [STOP ■/RETURN] to stop the unit.
① Press [MENU].
② Press +, - to select "MIC REC MENU" and press [▶ OK] to enter.
③ Press +, – to select “LOW CUT FILTER” and press [▶ OK] to enter.
4 Press +, – to select “ON” and press [▶ OK] to enter.
(The factory setting is "OFF".)
To exit the setting screen, press [F2 (CLOSE)].
Setting the recording level manually
The recording level can be adjusted automatically or manually on this unit. When the recording level adjustment is AUTO, the sound distortion is reduced by adjusting the recording level automatically. To record the original sound volume level faithfully such as an instrument playing and nature sound, set the recording level adjustment to MANUAL. (The factory setting is “AUTO”.)
Setting the recording level adjustment to MANUAL
- Press [STOP ■/RETURN] to stop the unit.
① Press [MENU].
② Press +, – to select “MIC REC MENU” and press [▶ OK] to enter.
③ Press +, - to select "REC LEVEL ADJ." and press [▶ OK] to enter.
4 Press +, - to select "MANUAL" and press [▶ OK] to enter.
To exit the setting screen, press [F2 (CLOSE)].
The recording level is displayed.

Adjusting the recording level manually
- Set the recording level adjustment to MANUAL beforehand. (When the recording level adjustment is AUTO, the unit does not enter the recording standby.)
① Press and hold [REC ●] for 1 second or more.
The unit enters the recording standby.
Blinks—
② Aim the microphone at the sound source to record.
③ Press ◀◀, ▶▶ to adjust the recording level (→ page 28).
Adjustment range is 0 to 30.
(The factory setting is "15".)
Pressing [REC ●] starts recording.
Setting the recording level manually
- If the level meter swings and “OVER” is displayed, this means the recording level is too high. Adjust the level within the “-8” range even if the recording sound reaches the highest level.
- The input level (volume input to this unit) for recording is combination of the recording level and microphone sensitivity.
The input level image is as below.
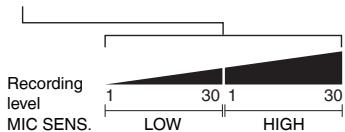
area
| MIC SENS. | Value | | --------- | ----- | | 1 | 1 | | 30 | 30 |- No sound is recorded at the recording level 0, and “*MUTE*” is displayed.
● The recording level can also be adjusted during recording or while recording is paused. - When [MENU] is pressed during recording standby, the microphone sensitivity ( page 26), “LOW CUT FILTER” ( page 26) and recording EQ ( page 29) can be set.
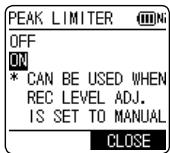
Setting the recording peak limiter to ON
Even if the recording level adjustment is MANUAL, when the excessive volume is input, the recording level is automatically adjusted and the sound distortion is reduced.
- Press [STOP ■/RETURN] to stop the unit.
① Press [MENU].
② Press +, – to select “MIC REC MENU” and press [▶ OK] to enter.
③ Press +, - to select "PEAK LIMITER" and press [▶ OK] to enter.
4 Press +, - to select "ON" and press [▶ OK] to enter. (The factory setting is "OFF".)
To exit the setting screen, press [F2 (CLOSE)].
- When the recording level adjustment is AUTO, the recording peak limiter function will be activated regardless of the above setting.
- If the level meter swings, “OVER” is displayed regardless of the recording peak limiter setting.
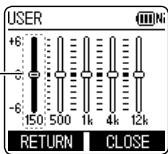
Setting the recording EQ
Using the recording EQ enables you to set bass, middle and treble range of recording level according to your preferred settings for recording.
The recording EQ includes 7 types of fixed mode and the “USER” mode with which you can set the recording level according to each frequency band.
- Set the recording level adjustment to MANUAL beforehand. (→ page 27) (When the recording level adjustment is AUTO, the unit does not enter the recording standby.)
1 Press and hold [REC ●] for 1 second or more.
The unit enters the recording standby.
② Press [MENU].
③ Press +, - to select "REC EQ" and press [▶ OK] to enter.
4 Press +, – to select the recording EQ mode. Press [F1 (CONFIRM)] to confirm the details. Press [F1] again to return to the previous screen.
When you select modes other than "USER", go to step 5.
Setting when selecting "USER":
![① After step ④, press [F1 (EDIT)]. 150 Hz band is selected. USER 12k 150 500 1k 4k 12k](/content/2020/05/105349/images/5cb17e91e68b78f062a943c2e2216b05c3d56f2649fd78ad17604288d0636190.jpg)
② Press ◀◀, ▶▶I to select the frequency band to change, and press +, - to adjust the recording level (±12 dB).
③ When the settings for the frequency band to change are all complete, go to step 5.
⑤ Press [▶ OK] to enter.
To exit the setting screen, press [F2 (CLOSE)].
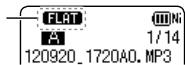
The EQ mode name is not displayed after exiting the setting screen.
Pressing [REC ●] starts recording.
| EQ mode | Effect and application |
| FLAT | This (basic) mode does not emphasise a specific sound range. |
| EXTRA BASS | Emphasise the bass range strongly. |
| BASS | Emphasise the bass range slightly. |
| MIDDLE | Emphasise the middle range. |
| BASS&TREBLE | Emphasise the bass and treble ranges slightly. |
| TREBLE | Emphasise the treble range slightly. |
| EXTRA TREBLE | Emphasise the treble range strongly. |
| USER | This mode enables adjustment of frequency bands of 150 Hz, 500 Hz, 1 kHz, 4 kHz and 12 kHz. |
(The factory setting is "FLAT".)
- When the recording level adjustment is AUTO, the recording EQ does not function.
Self timer
You can select your preferred time period from when [REC ●] is pressed until when the recording starts. This function is very useful where you need time for preparation before recording should start – for example in musical instrument practice.
- Press [STOP ■/RETURN] to stop the unit.
① Press [MENU].
② Press +, - to select "MIC REC MENU" and press [▶ OK] to enter.
③ Press +, – to select “SELF TIMER” and press [▶ OK] to enter.
4 Press +, - to select the time and press [▶ OK] to enter.
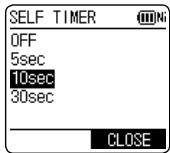
(The factory setting is "OFF".)
To exit the setting screen, press [F2 (CLOSE)].
- When [REC ●] is pressed, countdown starts. Then, recording starts after the set time. The recording indicator blinks during countdown.
Once the self timer is set, the setting is preserved until the self timer setting is set to OFF or the settings of this unit are initialised. (→ page 61) - Pressing [REC ●] during countdown starts recording immediately.
- If you press [STOP ■/RETURN] during countdown, the self timer recording can be stopped.
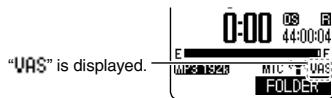
Preventing unnecessary recording (VAS)
When VAS (Voice Activated System) is set, if silence continues for approx. 2 seconds during microphone recording, the recording is paused automatically. If the unit detects sound, the recording resumes.
- Set the recording level adjustment to AUTO beforehand. (→ page 27)
- Press [STOP ■/RETURN] to stop the unit.
① Press [MENU].
② Press +, – to select “MIC REC MENU” and press [▶ OK] to enter.
③ Press +, – to select “VAS” and press [▶ OK] to enter.
4 Press +, – to select “ON” and press [▶ OK] to enter.
(The factory setting is "OFF".)
To exit the setting screen, press [F2 (CLOSE)].
To start VAS recording, press [REC ●].
Adjusting the VAS operation level:
Press ◀◀, ▶▶ during VAS recording.
(The factory setting is "3".)
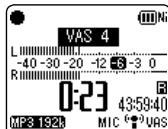
- You can adjust the sound detection level from 1 to 5.
-
If the audio to record is low, increase the VAS value (sensitivity level). If the sound is loud, decrease the VAS value.
-
When the recording level adjustment is MANUAL ( page 27), even if the VAS setting is set to ON, the setting does not change to the VAS recording.
- For important recording, set the VAS setting to OFF.
- If the “LOW CUT FILTER” setting is “ON”, low frequency sound may be cut out and VAS recording may not activate. In this case, change the “LOW CUT FILTER” setting to “OFF”. (→ page 26)
- If the recording is paused with no sound state, “VAS” blinks. When [REC ●] is pressed from this recording pause state, the status is changed to normal recording pause state and “VAS” lights up.
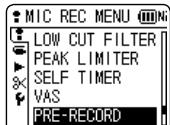
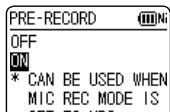
Past recording function (PRE-RECORD)
If you start recording from the standby state of the past recording function, recording can be started with the audio approx. 3 seconds before the recording operation.
To set the past recording to ON:
- Press [STOP ■/RETURN] to stop the unit.
1 Press [MENU].
② Press +, - to select "MIC REC MENU" and press [▶ OK] to enter.
③ Press +, – to select "PRE-RECORD" and press [▶ OK] to enter.
4 Press +, – to select “ON” and press [▶ OK] to enter.
(The factory setting is "OFF".)
To exit the setting screen, press [F2 (CLOSE)].
To record using the past recording function:
When recording mode is PCM, the past recording function does not operate.
- Set the recording mode to MP3. (→ page 25)
- Press [STOP ■/RETURN] to stop the unit.
1 Press and hold [REC ●] for 1 second or more.
The unit enters the past recording standby mode. Changes to 1 sec, 2 sec, 3 sec and stops at 3 sec. The microphone audio data approx. 3 seconds before recording are always updated and the unit is on standby.
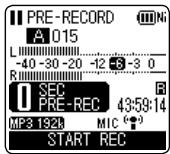
② Press [REC ●].
The recording indicator lights, and recording is started continuing directly after the preserved audio data.
To stop: Press [STOP ■/RETURN].
The sound that occurs when the recording button is pressed is also recorded. (When the built-in microphone is used, etc.)
- When the recording level adjustment ( page 27) is set to MANUAL, the unit enters the past recording standby and recording standby at the same time.
- When the unit enters the standby state again after the microphone position is switched (→ page 14), the past recording standby screen is cancelled on the menu or the stop operation is performed, audio data is freshly-stored from that point.
- The past recording function operates when recording actually starts. It does not operate when recording is paused.
- If the recording remaining time is less than 10 seconds, the past recording function does not operate.
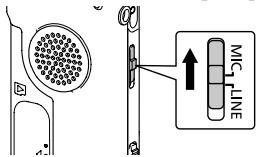
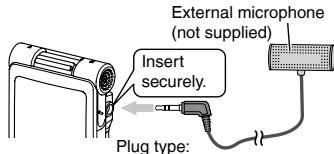
Recording by connecting an external microphone
Use this setting when recording by connecting an external microphone to the external microphone/Line-in jack of this unit.
- Press [STOP ■/RETURN] to stop the unit.
1 Slide the Mic/Line switch to [MIC].
② Connect the external microphone.
③ Press [REC ●] to start recording.
See page 15 for recording operations.
- Read the operating instructions for the connected device.
- If the recording level is too low or high, adjust the microphone sensitivity. (→ page 26)
- The built-in microphone of this unit does not work if another device is connected to the external microphone/Line-in jack.
- If the connected external microphone is monaural, the sound for one channel may only be recorded.
Copying to other devices
1 Connect the headphone/earphone jack (Ω) of this unit with the audio input (mic) terminal of the external device with an audio cable.
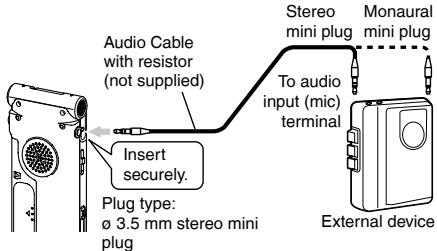
② Start recording on the external device.
③ Play the file that you want to copy on this unit.
- Read the operating instructions for the connected device.
Use the connection cable that matches monaural/stereo of the connected device.
Wrong connection may cause recording trouble (i.e. Only 1 channel is copied.).
● The copied sound quality may differ from the sound quality of this unit. - Adjust the volume on this unit to copy with a proper volume.
Recording from other devices
This is the method to record to the “L” folder by connecting an external device to the external microphone/Line-in jack of this unit.
- Press [STOP ■/RETURN] to stop the unit.
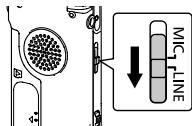
① Slide the Mic/Line switch to [LINE].
② Press [MENU].
③ Press +, - to select "LINE REC" and press [▶ OK] to enter.
4 Press +, - to select "LINE INPUT" and press [▶ OK] to enter.
⑤ Press +, – to select the setting and press [▶ OK] to enter.
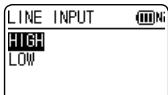
When connecting to the headphone terminal of external device or the line output terminal of portable device, select "HIGH" or "LOW" respectively. (The factory setting is "HIGH".)
⑥ Press [F2 (CLOSE)].
7 Connect the external device

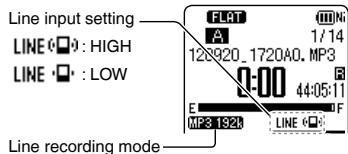
Connect with the external device and slide the Mic/Line switch to "LINE". Then, the selected line input setting and the line recording mode will appear.
(→ page 37)
Recording from other devices
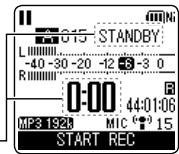
⑧ Press and hold [REC ●] for 1 second or more.
The unit enters the recording standby.
![●] - ing Blinks GOT STANDBY L -40 -30 -20 -12 58 -3 0 R 0:00 44:05:09 MP3 192k LINE () START REC](/content/2020/05/105349/images/86893b61b4daa9896b5fdb187e3b9588ced0c0b1d0f8269f0756921beb809199.jpg)
9 Play back the external device and adjust the input/output level.
① If the level meter swings and “OVER” is displayed, the volume of the external device is too high.
Adjust the volume of the external device to the “-6” range, even if the volume is turned to the maximum.
To reconfigure the line input settings, press [MENU] and follow steps 4 to 6.
② After you finish adjusting the input/output level, stop the sound source of the other device at the position where you want to start recording.
10 Press [REC ●] to start recording.
11 Play the external device.
- Read the operating instructions for the connected device.
- Disconnecting the audio cord during recording will stop recording.
- Change the line recording mode as necessary. (→ page 37)
- The L folder will be automatically selected for recording when line input sound is recorded.
This unit has the following synchro recording function.
This function detects the silence between tracks, etc. and then records each track into different files, such as a first track, second track, etc. If detecting sound from the external device, recording starts automatically. If detecting silence for approx. 2 seconds or more, recording is paused. Detecting sound again will resume recording.
Synchro recording setting
- Press [STOP ■/RETURN] to stop the unit.
① Press [MENU].
② Press +, – to select “LINE REC” and press [▶ OK] to enter.
③ Press +, - to select "SYNCHRO REC" and press [▶ OK] to enter.
4 Press +, – to select “ON (Auto Stop)” or “ON (Manual Stop)” and press [▶ OK] to enter.

Auto: The recording pauses if approx. 2 seconds or more of silence is detected and stops if silence continues approx. 15 seconds or more.
Manual: Even if silence continues, the recording continues to be paused (standby) until [STOP ■/RETURN] is pressed.
(The factory setting is "OFF".)
To exit the setting screen, press [F2 (CLOSE)].
Connect the device, slide the Mic/Line switch to [LINE] and "SYNC" is shown on the display.
● Automatic stop is useful when recording CDs etc. that have more than approx. 2 seconds of silence between tracks using line recording.
- Manual stop is useful when recording onto cassette tapes etc. that need switching from side A to side B causing silence of more than 15 seconds.
- When [MENU] is pressed during recording standby in step 8 on page 36, the synchro recording setting can be made.
- If the start of a track is cut from the recording, turn synchro recording "OFF".
- Synchro recording cannot be used when using timer recording for line recording.
Synchro recording:
- Make the synchro recording setting beforehand.
1 Perform steps 1 to 11 on pages 35 and 36.
- When connecting to the headphone output terminal of the external device, the synchro recording may not function properly.
- When approx. 2 seconds or more of silence cannot be detected, or depending on the combination of external devices, the synchro recording may not function.
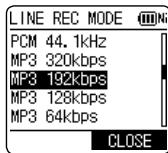
Selecting line recording mode
The sound quality can be changed when recording with line recording. See page 25 for information about recording modes.
- Press [STOP ■/RETURN] to stop the unit.
① Press [MENU].
② Press +, – to select “LINE REC” and press [▶ OK] to enter.
③ Press +, – to select “LINE REC MODE” and press [▶ OK] to enter.
4 Press +, – to select the setting (PCM sampling frequency/MP3 bitrate) and press [▶ OK] to enter.
(The factory setting is "MP3 192kbps".)
To exit the setting screen, press [F2 (CLOSE)].
Index function
By adding Index (position information on the file) to the file, playback position jumps to the specified position by skip operation ( page 17) during playback.
Files within the MUSIC (M) folder, OTHER FOLDER (☐) and recycle bin (☐) folder cannot be indexed. Also, indexes cannot be added during timer recording or playback.
Adding index
1 During recording or playback or while recording is paused, press [F2 (INDEX)] at the position where you want to add an index.
“F” (blinking) and “ADDING INDEX” are displayed.
“F” (lighting) is displayed for the file to which indexes are added.
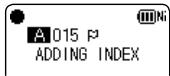
- Up to 36 indexes per 1 file can be added.
- Indexes are deleted when the file is deleted or divided.
- When the battery indicator shows “☐” (blinking), indexes cannot be added. Also, adding the index may be impossible on the border of “☐” and “☐” (blinking).
During playback, even if you press ◀◀◀ at the position within approx. 2 seconds after the index point, playback does not stop at the point.
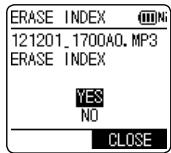
Deleting index
- Select a file which has Index to be deleted. (→ page 17)
- Press [STOP ■/RETURN] to stop the unit.
1 Press [ERASE/A-B].
② Press +, - to select "INDEX" and press [▶ OK] to enter.
③ Press +, - to select "YES" and press [▶ OK] to enter.
Indexes are deleted.
- Deleting index marks from a file does not delete the audio part of the file.
- When more than 1 index are added in 1 file, they cannot be deleted one by one.
Changing the playback speed
The playback speed can be adjusted in 21 steps from the slow speed of 0.5 times normal speed (50%) to the fast speed of 2 times normal speed (200%).
1 Press [F1 (SPEED)] during playback.

② Press [F1 (SLOW)] or [F2 (FAST)] to select the speed and press [▶ OK] to enter.
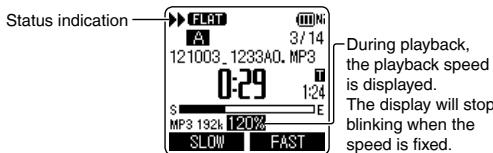
Playback speed:
The playback speed can be adjusted in 10% steps for speeds faster than normal speed (100%), and 5% steps for speeds slower than normal speed.
Status indication during playback:
Normal speed playback, playback faster and playback slower are displayed as “▶”, “▶” and “▶” respectively.
The speed cannot be adjusted for playback using folder cue ( page 49) or timer playback ( page 55).
- When the playback speed is other than 100%, voice emphasis ( page 44) does not work.
A-B Repeat play
Playback repeats between the start point (A) and finish point (B) if those points are set.
① Press [ERASE/A-B] while playing.
The start point (A) is set and "A" (lighting) and "B" (blinking) are displayed.
② Press [ERASE/A-B] at the finish point (B).
The display changes to “ABC” (lighting) and repeat play starts.
Cancelling A-B Repeat:
Press [ERASE/A-B], ◀◀, ▶▶ or [STOP ■/RETURN].
- You cannot set A-B Repeat when the time between the start point (A) and finish point (B) is approx. 2 seconds or less.
- When only the start point (A) is set and playback continues until the end of the file, the end becomes the finish point (B) and A-B Repeat begins.
● A-B Repeat by setting the range using 2 files is not possible.
Playback from a specified position (TIME SEARCH)
Playback is possible from the time-specified position.
- Put the unit into the stopped state or playback state.
① Press [MENU].
(When playback is in progress, go to step 3.)
② Press +, – to select “PLAY MENU” and press [▶ OK] to enter.
③ Press +, – to select “TIME SEARCH” and press [▶ OK] to enter.
4 Set the playback start position.
(Change the value for "TIME" to set the start position.)
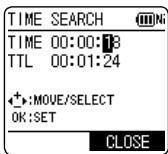
Press ◀◀, ▶▶ to select "00:00:00" (hour:minute:second) and press +, - to change the values.
5 Press [▶ OK].
Playback starts from the specified position.
Press [F2 (CLOSE)] to stop the setting process midway.
● Time search playback applies only to the currently selected file.
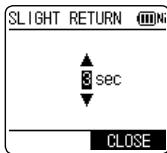
Slight return playback
This function returns a short amount of time during playback to enable you to listen again. It is a useful function for language learning, or if you miss hearing something.
① Press [▶ OK] during playback.
Each time the button is pressed, playback rewinds by approx. 3 seconds (factory setting).
Setting the return time:
- Put the unit into the stopped state or playback state.
1 Press [MENU].
(When playback is in progress, go to step ③.)
② Press +, – to select “PLAY MENU” and press [▶ OK] to enter.
③ Press +, – to select “SLIGHT RETURN” and press [▶ OK] to enter.
4 Press +, - to select the number of seconds (1 to 5) and press [▶ OK] to enter.
(The factory setting is "3 sec".)
To exit the setting screen, press [F2 (CLOSE)].
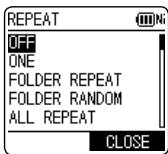
Repeat play (REPEAT)
- Put the unit into the stopped state or playback state.
1 Press [MENU].
(When playback is in progress, go to step 3.)
② Press +, – to select “PLAY MENU” and press [▶ OK] to enter.
③ Press +, – to select “REPEAT” and press [▶ OK] to enter.
4 Press +, - to select type of Repeat play and press [▶ OK] to enter.
(The factory setting is "OFF".)
To exit the setting screen, press [F2 (CLOSE)].
“10”: “ONE”
“FOLDER REPEAT”
“FOLDER RANDOM”
"ALL": "ALL REPEAT"
"ALL": "ALL RANDOM"
Nothing is displayed for "OFF".
Repeat indication
OFF: Playback is performed in succession from the selected file to the last file in one folder, and then playback stops.
ONE: Plays one file repeatedly.
FOLDER REPEAT: Plays all files in the folder repeatedly.
FOLDER RANDOM: Plays all files within the folder repeatedly, in random order.
ALL REPEAT: For the MUSIC (M) or OTHER FOLDER (☐), all files* within the folder are played repeatedly. For other folders, the operation is the same as that for "FOLDER REPEAT".
ALL RANDOM: For the MUSIC (M) or OTHER FOLDER (☐), all files* within the folder are played repeatedly, in random order. For other folders, the operation is the same as that for "FOLDER RANDOM".
* The maximum number of recognised files is 3,000.
- When “FOLDER RANDOM” or “ALL RANDOM” is selected in Repeat play, it is not possible to skip to the previous file during playback.
Skip at regular intervals (TIME SKIP)
This function skips the set time using skip operation ( page 17) during playback. This allows you to quickly move to a position for playback, or repeat playback of the same portion in a file.
Skip at regular intervals
1 Press [▶ OK] for approx. 1 second or more during playback.
The mode switches to time skip mode and
“Ts” is displayed.
The skip mode switches each time the button is pressed.
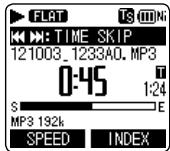
② Press |◀◀, ▶▶.
Each time the button is pressed, 5 seconds are skipped (factory setting).
When playback is stopped, the mode returns to the file skip mode.
To change the skip interval
- Put the unit into the stopped state or playback state.
① Press [MENU].
(When playback is in progress, go to step 3.)
② Press +, – to select “PLAY MENU” and press [▶ OK] to enter.
③ Press +, - to select "TIME SKIP" and press [▶ OK] to enter.
4 Press +, - to select the time and press [▶ OK] to enter.
You can set the skip interval to 5 sec, 10 sec, 30 sec, 1 min, 5 min, 10 min, or 15 min.
(The factory setting is "5sec".)
To exit the setting screen, press [F2 (CLOSE)].
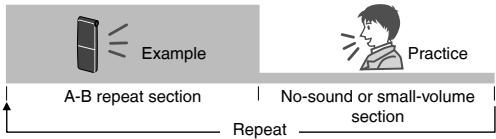
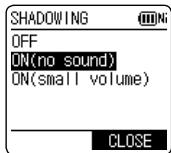
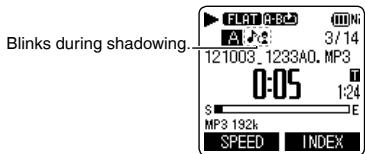
Shadowing
Shadowing is a learning method to repeat an example immediately after it is heard.
You can use the shadowing function of this unit to alternately repeat the A-B repeat section (example) and a no-sound or small-volume section (practice). This is convenient for pronunciation or listening practice for language learning.
- Put the unit into the stopped state or playback state.
Setting shadowing:
① Press [MENU].
(When playback is in progress, go to step ③.)
② Press +, - to select "PLAY MENU" and press [▶ OK] to enter.
③ Press +, - to select "SHADOWING" and press [▶ OK] to enter.
4 Press +, – to select the type of shadowing and press [▶ OK] to enter.
If you select "ON (small volume)", the volume will be approximately a third of the current volume during shadowing.
(The factory setting is "OFF".)
To exit the setting screen, press [F2 (CLOSE)].
Using shadowing function:
1 Perform A-B repeat playback ( page 39)
Shadowing is performed using no-sound or small-volume after A-B repeat playback.
Adjusting the volume for shadowing:
You can adjust the volume of just the shadowing portion separately from the A-B repeat playback portion.
- If A-B repeat is canceled or the shadowing setting is changed during playback, the volume of the shadowing portion is returned to the original setting.
Making sound easier to hear (VOICE EMPHASIS)
This function makes the target sound easier to hear by reducing noise during playback and partially emphasising the stereo sound at the front, left, or right.
- Put the unit into the stopped state or playback state.
① Press [MENU]. (When playback is in progress, go to step ③.)
② Press +, – to select “PLAY MENU” and press [▶ OK] to enter.
③ Press +, – to select “VOICE EMPHASIS” and press [▶ OK] to enter.
4 Press +, – to select the type of voice emphasis and press [▶ OK] to enter.
(The factory setting is "NORMAL".)

To exit the setting screen, press [F2 (CLOSE)].
“NC”: “NOISE CXL L”, “NOISE CXL H” “FP”: “FOCUS FRONT”, “FOCUS LEFT”, “FOCUS RIGHT” Nothing is displayed for “NORMAL”.
The set voice emphasis indication is only displayed during playback.
NORMAL: Plays sound as it was recorded.
NOISE CXL L: Performs a small amount of noise reduction.
NOISE CXL H: Performs a large amount of noise reduction.
FOCUS FRONT: Emphasises the sound at the front.
FOCUS LEFT: Emphasises the sound at the left.
FOCUS RIGHT: Emphasises the sound at the right.
-
The result may not be sufficient depending on the sound source.
● Voice emphasis will not work in the following cases. -
During fast/slow playback (→ page 39)
• During WMA file playback - During playback of a file with a sampling frequency of less than 16 kHz
- When “FOCUS FRONT”, “FOCUS LEFT”, or “FOCUS RIGHT” is selected for playback of a file recorded with the microphone position set to ZOOM or a monaural audio file
Setting the playback EQ (SOUND EQ)
Using the sound EQ enables you to set bass, middle and treble range of volume level according to your preferred settings for playback.
The sound EQ includes 6 types of fixed mode and the “USER” mode with which you can set the volume level according to each frequency band.
The sound EQ is effective only when listening with the earphones.
- Put the unit into the stopped state or playback state.
① Press [MENU].
(When playback is in progress, go to step 3.)
② Press +, – to select “PLAY MENU” and
press [▶ OK] to enter.
③ Press +, – to select “SOUND EQ” and press
[▶ OK] to enter.
4 Press +, – to select the sound EQ mode.
Press [F1 (CONFIRM)] to confirm the details. Press [F1] again to return to the previous screen.
When you select modes other than "USER", go to step 5.
Setting when selecting "USER":
① After step 4, press [F1 (EDIT)].
150 Hz band is selected.
② Press ◀◀, ▶▶I to select the frequency band to change, and press +, - to adjust the volume level (±6 dB).
③ When the settings for the frequency band to change are all complete, go to step 5.
⑤ Press [▶ OK] to enter.
To exit the setting screen, press [F2 (CLOSE)].
The selected sound EQ mode is displayed.
| EQ mode | Effect and application |
| FLAT | The sound equalizer function is not used. You hear the original sound without any change. |
| BASS | Emphasise the bass range strongly. |
| CLEAR | Emphasise the treble range strongly. |
| HEAVY | Emphasise the bass and treble ranges slightly. |
| SOFT | Emphasise the middle range. |
| VOICE | Reduce noise to make human voice easily heard. |
| USER | This mode enables adjustment of frequency bands of 150 Hz, 500 Hz, 1 kHz, 4 kHz and 12 kHz. |
(The factory setting is "FLAT".)
Using an SD Card
You can use a microSD/microSDHC card in addition to the internal memory.
Use this unit to format a new SD card ( page 60) before use.
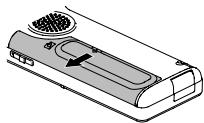
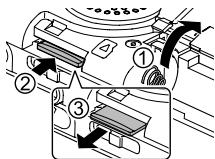
Inserting the SD card
1 Turn off the power and open the battery/SD card slot cover.
natural_image
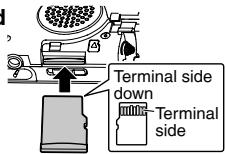
Diagram of a handheld device with a circular vent and directional arrow (no text or symbols)② Insert the SD card and close the battery/SD card slot cover.
Align the SD card in the correct direction (▲) and insert it fully until a “click” sound is heard.
To remove the SD card:
① Turn off the power and open the battery/SD card slot cover.
② Gently push the SD card.
③ When the SD card protrudes slightly, slowly pull the card out.
- You can switch between the internal memory and SD card by pressing [F2 (FOLDER)] for more than 1 second when the stopped screen is displayed.
This unit is compatible with 2 GB microSD cards, and 4 GB to 32 GB microSDHC cards. (As of May 2012) - This unit may not operate correctly depending on the manufacturer or type of SD card.
For details on SD cards that are confirmed to operate correctly according to our manufacturing standards, see the support site below. http://panasonic.net/support/ - If an SD card is inserted but “microSD” is not displayed on the SELECT FOLDER screen, etc., this unit does not recognise the SD card. Turn off the power and reinsert the SD card.
- Keep the Memory Card out of reach of children to prevent swallowing.
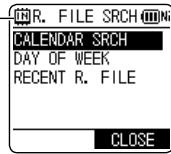
Using the file search function
Using the file search function enables you to search the files recorded on this unit. You cannot search for files in the MUSIC (M) folder or OTHER FOLDER (☐).
■ Types of file search
| CALENDAR SRCH | Recorded files are refined by date and displayed in a list. |
| DAY OF WEEK | Recorded files are refined by day of the week and displayed in a list. |
| RECENT R. FILE | Recorded files are displayed in recording date order, starting from the most recent. (20 files) |
File search
- Press [STOP ■/RETURN] to stop the unit.
1 Press [LIST ♂] for approx. 1 second or more.
Go to step ② if an SD card is inserted ( page 46), and step ③ if not.
② Press +, – to select “INT. MEMORY” (internal memory) or “microSD CARD” and press [F1 (SEARCH)].

③ Press +, - to select the type of file search and press [▶ OK] to enter.
“IN” (internal memory) or “SD” (SD card) is displayed as the search target.
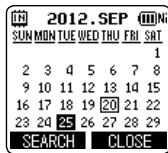
When "CALENDAR SRCH" is selected:
Press +, -, |◀◀, ▶▶| to select the recorded date and press [▶ OK] to enter.
The cursor only moves to dates on which files were recorded.
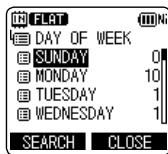
When "DAY OF WEEK" is selected:
Press +, - to select the day of the week and press [▶ OK] to enter.
Only one day of the week can be selected.
4 Press +, - to select the file and press [▶ OK] to enter.
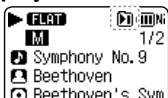
Listening to music on this unit (WMA/MP3 music files)
- Transfer music files to this unit from the computer. (→ page 71)
Selecting a file from folder "M":
See page 12 for selecting a folder and pages 13 and 17 for selecting a file.
1 Select the file and press [▶ OK].
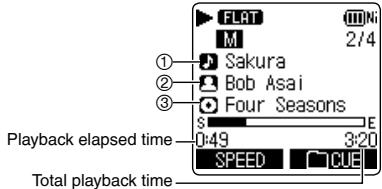
(Length of the selected file (duration of time))
If the file contains track information (ID3 tag, etc.), ① track name, ② artist name and ③ album name are displayed. (If there is no track name, the file name is displayed. If there is no artist name or album name, “UNKNOWN ARTIST” or “UNKNOWN ALBUM” is displayed.) If they are not fitted in the screen, the scroll display will appear.
See page 17 for playback operations.
- Only WMA/MP3 files and PCM (WAV) files recorded on this unit can be played.
In MUSIC folder, up to 199 files per one folder can be recognised and played back. If subfolders are created, number of files playable is reduced by the equivalent number of subfolders created. (→ "Folder structure on this unit", page 69)
● Copyright-protected WMA/MP3 music files cannot be played.
- WMA/MP3 music files with variable bit rate may be played, but the playback elapsed time display or bit rate display may differ from the actuality, or the repeat positions during A-B repeat may differ from the set positions.
- If the ID3 tag* of the file contains data that this unit cannot read, the track name, artist name, etc. may not be displayed properly.
- A file of 2 GB or more in size cannot be played back.
- If playback of a file of 100 hours or more playback time has exceeded 100 hours, the "hour" indication in "hour: minute: second" blinks.
* ID3 tag: track name and other information stored in MP3 files.
Folder cue function
This function enables you to switch subfolders within the MUSIC (M) folder easily while playing back files in the MUSIC folder.
Folder cue cannot be performed while playing a PLAYLIST.
① Press [F2 (☐ CUE)] during playback.
"FOLDER SKIP" is displayed, which changes to the folder cue display "播放".
② Press ◀◀, ▶▶ when “☐” is displayed.
- The first track in the previous or following folder is cued.
- While folder cue is being displayed, the playback speed cannot be changed. Also, Fast forward/Fast backward operations are not available. Also, the MENU or LIST 🔒 button cannot be operated.
Cancelling folder cue:
The setting can be cancelled using any of the following methods. When this is cancelled, files can be skipped using ◀◀, ▶▶.
- Press [F2 (☐ CUE)] again.
- Press [▶ OK].
- Press [STOP ■/RETURN]. (Playback is completed.)
Using the playlist function
You can register tracks in the MUSIC (M) folder to a playlist and play them in the desired order.
Registering your favourite tracks to a playlist
1 Select the MUSIC (M) folder on the list screen ( page 13).
You can also select OTHER FOLDER (☐).
② Press +, – to select the file or the folder and press [F1 (PLAYLIST)] to enter.
When selecting folders or selecting files by switching folders, press ◀◀ and you can move within hierarchies. (For details of file and folder selection methods, see page 13.)
③ Press |◀◀, ▶▶▶ to select the playlist and press [▶ OK] to enter. (Select from PLAYLIST 1 to 5.)
The file or all files within the folder are registered to the selected playlist.
- Playlist files are displayed as "PLAYLIST1.M3U to PLAYLIST5.M3U" in "PLAYLIST" folder within "MUSIC" folder.
- Do not edit PLAYLIST 1 to 5.M3U on a computer.
A maximum of 99 files can be registered to 1 playlist.
Using the playlist function
Playing tracks registered to the playlist
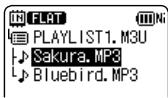
1 Select the playlist (from P1 to P5) ( page 12).
② Press ◀◀, ▶▶ to select the file to play and press [▶ OK].
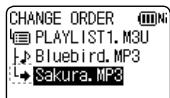
Changing the order of playlist tracks
1 Select the playlist (from P1 to P5) on the list screen ( page 13).
② Press +, – to select the file that you want to change and press [F1 (EDIT)].
③ Press +, – to select “CHANGE ORDER” and press [▶ OK] to enter.
“■” is added to the left side of the selected file name.
4 Press +, – to move the selected file to the desired position and press [▶ OK] to enter.
The track order is changed.
Cancelling tracks registered to the playlist
1 Select the playlist (from P1 to P5) on the list screen ( page 13).
② Press +, – to select the file that you want to erase and press [F1 (EDIT)].
③ Press +, – to select "ERASE FILE" and press [▶ OK] to enter.
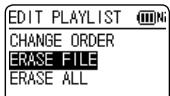
When cancelling all registered tracks:
① Press +, - to select "ERASE ALL" and press [▶ OK] to enter.
4 Press +, - to select "YES" and press [▶ OK] to enter.
Editing: Dividing files
Using the editing settings, you can edit files recorded on this unit in a variety of methods.
Displaying the editing setting screen
- Press [STOP ■/RETURN] to stop the unit.
1 Press [MENU].
② Press +, – to select “EDIT MENU” and press [▶ OK] to enter.
③ Press +, – to select the item to edit and press [▶ OK].
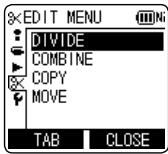
- Press [F1 (TAB)] to switch to other setting screens.
- The setting details and change methods differ according to the item. For details, see the corresponding page.
To exit the setting screen, press [F2 (CLOSE)].
Dividing files
You can divide 1 file into 2 files at a specified position.
1 While playing, press [STOP ■/RETURN] at the point where you wish to divide the file.
② Select “DIVIDE” in the editing setting screen ( left).
③ Press +, – to select “YES” and press [▶ OK] to enter.
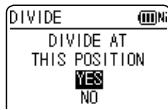
While the file is being divided, the status indicator flashes.
- Files in the MUSIC (M) folder, OTHER FOLDER (☐) or recycle bin (☐) folder cannot be divided.
- A file length of approx. 2 seconds or more is necessary for dividing a file.
- You cannot divide a file at the beginning of the file.
- Divided files cannot be recovered. It is recommended that you make a backup copy of the file in advance.
● After the file is divided, the number of files in the folder increases by one. ( page 67) - If a file containing index marks is divided, the index marks will disappear after the file is divided. (→ page 38)
- If there is no empty space in the internal memory or SD card or if there is already a total of 199 files in the folder, you cannot use this function to divide a file.
Editing: Combining files
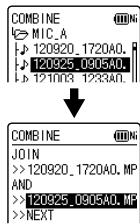
2 files recorded on this unit can be combined into 1 file.
1 Select "COMBINE" in the editing setting screen (→ "Displaying the editing setting screen", page 51).
② Press +, – to select “PREVIOUS FILE” and press [▶ OK] to enter.
③ Press +, – to select the file to be combined and press [▶ OK] to enter.
When selecting the file in another folder, you can move within folder hierarchies by pressing ◀◀. (For details of file and folder selection methods, see page 13.)
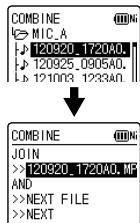
4 Press +, - to select "NEXT FILE" and press [▶ OK] to enter.
5 Press +, - to select the file to be combined at the back of the previous file and press [▶ OK] to enter.
6 Press +, - to select "NEXT" and press [▶ OK] to enter.
7 Press +, - to select "YES" and press [▶ OK] to enter.
While the files are being combined, the status indicator flashes.
- If you press [F2 (CLOSE)] before combining is complete, the combine process is cancelled.
- Combined files cannot be returned to their original state. It is recommended that you make backup copies of the files in advance.
- If indexed files are combined, the indexing is erased.
- The combined file is saved in the same folder as the previous files.
Files cannot be combined in following cases.
- Files in the MUSIC (M) folder, OTHER FOLDER (☐) or recycle bin (☐) folder.
- When the battery indicator displays “☐” (blinking) or “☐”.
- Combining files from the internal memory with files from the SD card.
- If the total file size after combining will exceed 2 GB.
- If there is less free memory space than the size of the "NEXT FILE".
- If the recording mode of the two files is different.
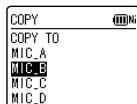
Editing: Copying or moving files
Recorded files can be copied or moved between the internal memory and SD card. Microphone recording files can be copied or moved among folders A, B, C and D.
Copying file
1 Select "COPY" in the editing setting screen (→ "Displaying the editing setting screen", page 51).
② Press +, - to select the file to be copied and press [▶ OK] to enter.
- When selecting the file in another folder, you can move within folder hierarchies by pressing ◀◀. (For details of file and folder selection methods, see page 13.)
- When copying files in the LINE (LINE_SD) folder, go to step 5.
③ Press +, – to select the copy destination (“INTERNAL MEMORY” or “microSD CARD”) and press [▶ OK] to enter.
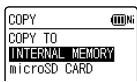
4 Press +, - to select the copy destination folder and press [▶ OK] to enter.
⑤ Press +, – to select “YES” and press [▶ OK] to enter.
While the file is being copied, the status indicator flashes.
Moving files
Select "MOVE" in step 1 on the left to move files. The operation is the same as that for file copy.
- If you press [F2 (CLOSE)] before copying or moving is complete, the process is cancelled.
- Files in the MUSIC (M) folder, OTHER FOLDER (☐) or recycle bin (☐) folder cannot be copied or moved.
- When the battery indicator displays “☐” (blinking) or “☐”, files cannot be copied or moved.
- If the size of the file to be copied or moved exceeds the amount of free space in the destination, the file cannot be copied or moved.
Recycle bin function
When deleting files with the recycle bin function set to ON, deleted files are moved to the recycle bin (☑) folder (excluding MUSIC (M) folder or OTHER FOLDER ☐). Files moved to the recycle bin can be returned to the original folders, so you do not have to worry about deleting files by mistake. If files are deleted with the recycle bin function set to OFF, deleted files are completely erased without being moved to the recycle bin (The factory setting is "ON".).
Returning files in the recycle bin to the original folder
- Press [STOP ■/RETURN] to stop the unit.
1 Press [F2 (FOLDER)].
② Press +, -, |◀◀, ▶▶| to select “☐” and press [▶ OK] to enter.
The recycle bin folders exist in the internal memory and SD card respectively.
③ Use ◀◀, ▶▶ to select the file you want to return, and press [ERASE/A-B○] to enter.
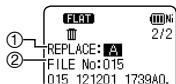
① Stored folder before deletion ② File number before deletion
4 Press +, - to select "RESTORE FILE" and press [▶ OK] to enter.
⑤ Press +, - to select "YES" and press [▶ OK] to enter.
The status indicator flashes, and the selected file is returned to the end of the original folder.
Press [▶ OK] to return to the screen in step ③.
- If “* FOLDER FULL. CAN'T RESTORE” is displayed, * folder has reached the maximum recordable number (199). Delete files in the folder, and then try the procedure again from the beginning.
Emptying the recycle bin folder
When the recycle bin folder is emptied, all of the files in the recycle bin are completely deleted. Be sure to save all required data onto a computer or other external device before emptying the recycle bin folder.
- Press [STOP ■/RETURN] to stop the unit.
1 Press [ERASE/A-B].
② Press +, - to select "EMPTY RECYCLE BIN" and press [▶ OK] to enter.
When the recycle bin folder is selected, select "EMPTY" in step 2 and press [▶ OK].
③ Press +, - to select "YES" and press [▶ OK] to enter.
The status indicator flashes, and the recycle bin folder is emptied.
- When the recycle bin function is “ON”, possible remaining recording time (free space) does not increase even if files are deleted. To increase the remaining recording time, empty the recycle bin (III) folder and erase the files completely.
Using the timer
Audio can be recorded at the set date and time. The timer can also be used as an alarm by playing back files or sounds. Set the clock correctly beforehand. ( page 11)
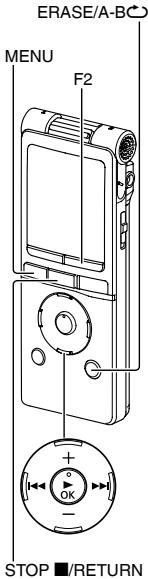
- Press [STOP ■/RETURN] to stop the unit.
1 Press [MENU].
② Press +, – to select “COMMON MENU” and press [▶ OK] to enter.
③ Press +, – to select “TIMER & ALARM” and press [▶ OK] to enter.
4 Set items such as the date and time, and sound source.
For details on the items, see page 56.
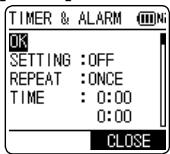
① Press +, - to select the item and press [▶ OK] to enter.
② Press +, -, |◀◀, ▶▶▶ to select the setting and press [▶ OK] to enter.
Repeat steps ① and ② to complete the settings.
5 Press +, - to select "OK" and press [▶ OK] to enter.
To exit the setting screen, press [F2 (CLOSE)].
- Be sure to perform the "OK" operation in step 5. If this operation is not performed, the timer will not operate correctly. If a button such as [F2 (CLOSE)] is pressed while setting the timer, "REGISTER SETTING?" may be displayed. Select "YES" or "NO" and press [▶ OK] to enter.
The sound volume at the timer playback is the same volume as when the timer was set. Set the appropriate sound volume before setting the timer.
Using the timer
| Setting Item | Details |
| SETTING | OFF: Timer does not operate.ON: Timer operates. |
| REPEAT | ONCE: Recording or playback is performed just once.DAILY: Recording or playback is performed daily.SELECT: Recording or playback is performed every week on the selected day.1 Press +, - to select the day and use [▶ OK] to add a check mark. (Press [▶ OK] again to clear the selection.)2 When the day is selected, select “OK” and press [▶ OK]. |
| TIME*1 | Set the start time and end timeSelect the item (select the start hour, minutes, end hour, minutes) using ◀◀, ▶▶l and set using +, -.Up to 12 hours can be set for the period from start time until end time. |
| REC/PLAY | PLAY: Plays a set file, or plays the alarm sound.REC: Records the set sound source. |
| Setting Item | Details |
| PLAY*2 | ALARM: Plays the alarm sound.FILE: Plays a file.The file list of the folder being selected is displayed.Press +, – to select the file and press [▶ OK]. When selecting files by switching folders, press ◀◀ and you can move within hierarchies. (For details of file and folder selection methods, see page 13.) |
| SOURCE*3 | MIC: Microphone recording.LINE: Records sound from an external device. |
| MODE*3 | PCM 44.1kHz, MP3 320kbps,MP3 192kbps, MP3 128kbps,MP3 64kbps, MP3 32kbps |
| REC TO*3 | Select the folder in which to save the recorded file.• If an SD card folder is selected, insert the SD card. |
*1 When setting the start time and end time, do not mix up a.m. and p.m.
AM12:00 and PM12:00 represent 0:00 a.m. and noon respectively. When performing timer recording at 0:00 a.m., set the start time to “AM12:00”.
*2 Displayed when "PLAY" is selected for "REC/PLAY".
*3 Displayed when "REC" is selected for "REC/PLAY".
- Checking the timer condition or execution state
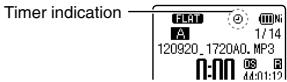
☐: Timer is set. The display flashes when the timer is executed.
When the repeat settings are "ONCE", this is displayed if the timer recording fails. To clear the display, change the settings to "OFF", or set the timer again.
When the repeat setting is “DAILY” or “SELECT”, this is displayed if the timer recording fails. If the next timer operates normally, the “☐” indication is redisplayed.
- If the power is off at the specified time, the power turns on and the timer recording starts, and then the power turns off at the end time. When the power is off at timer playback time, the file playback starts a little behind the scheduled time.
- During timer recording (playback), only stop operation and volume adjustment can be performed. Switch the Hold function to off before operation if it is on.
- To stop an alarm, press one of the buttons on this unit. You can stop an alarm even if the Hold function is on.
- After setting the file to be played for timer playback, if the set file is deleted, the alarm sounds at the timer start time.
- If a file shorter than the period from the start to end is specified for timer playback, that file is played repeatedly.
- When the file playback is assigned as playback source, the files are played back at the scheduled time with the playback settings (SOUND EQ ( page 45) etc.) which have already been set when the timer playback setting was made.
- When MIC or LINE is assigned as recording source, the recording is made at the scheduled time with the recording settings (microphone sensitivity ( page 26), the line input setting ( page 35), etc.) which have already been set when the timer recording setting was made. (excluding the recording mode ( page 25))
- If the clock setting (DATE & TIME) is returned to the factory setting, the timer operation setting (SETTING) is automatically turned OFF.
- 1 minute before the timer recording start time, the recording indicator blinks, and the mode switches to recording standby.
Common menu
The following are the settings used for both recording and playback.
Common settings operation
- Press [STOP ■/RETURN] to stop the unit.
1 Press [MENU].
② Press +, – to select “COMMON MENU” and press [▶ OK] to enter.
③ Press +, - to select the setting item and press [▶ OK] to enter.
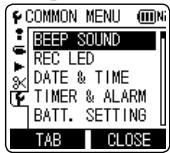
4 Press +, - to change the setting and press [▶ OK] to enter.
To exit the setting screen, press [F2 (CLOSE)].
For details on “DATE & TIME” ( page 11) and “TIMER & ALARM” ( page 55), see the respective pages.
BEEP SOUND
The button operation sound can be set.
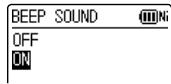
OFF: No operation beep.
ON: Operation beep is ON.
(The factory setting is "ON".)
- When “ON” is selected, press +, – to select your preferred volume and press [▶ OK] to enter. (The factory setting is “MIDDLE”.)
REC LED (Recording indicator)
You can choose whether to set the recording indication light ON or OFF.
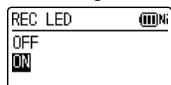
OFF: Not lit ON: Lit
(The factory setting is "ON".)
- Even if it is set to OFF, REC LED lights on (blinks) as a status indicator while charging or editing files.
BATT. SETTING
Set the type of batteries used (rechargeable nickel metal-hydride batteries or alkaline batteries).
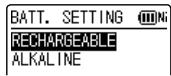
Type of battery
Ni : Rechargeable battery
AI : Alkaline battery
Type of battery: RECHARGEABLE, ALKALINE (The factory setting is "RECHARGEABLE".)
- If the type of battery and setting do not match, the battery indicator is not displayed correctly.
- If BATT. SETTING is set to “ALKALINE”, the rechargeable battery cannot be charged.
AUTO POWER OFF
This function automatically turns the power off if there is no operation for a certain period of time such as when recording is stopped. This function helps you save battery when you forget to turn off the power.
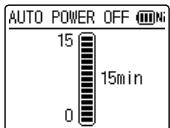
AUTO POWER OFF: 0 min (OFF) to 15 min (The factory setting is "15min".)
- You can set the time in 1-minute increments.
- When “OFF” is set, the “AUTO POWER OFF” function does not operate.
BACKLIGHT
Set the backlight lighting time when the button is pressed.
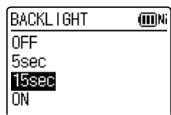
Lighting time: OFF (does not light), 5 sec, 15 sec, always ON
(The factory setting is "15 sec".)
- The backlight may not light when the remaining battery power is low.
- The backlight does not light in the following conditions.
- While a file is being moved, copied or combined.
CONTRAST
Use this function to adjust the contrast of the screen. You can choose from 10 levels for the adjustment.
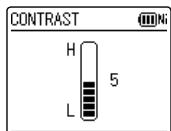
Contrast adjustment: 1 (L) to 10 (H)
(The factory setting is "5".)
Common menu
RECYCLE BIN
When the recycle bin function is used, deleted files are moved to the recycle bin. Before the recycle bin is emptied, deleted files can be restored so you do not have to worry about deleting files by mistake.

OFF: Do not use the recycle bin function
ON: Use the recycle bin function
(The factory setting is "ON".)
- When the recycle bin function is "OFF", files that are deleted cannot be restored.
FORMAT
All files on the internal memory or SD card are deleted. Deleted files cannot be recovered.
① Select "INTERNAL MEMORY" or "microSD CARD" and press [▶ OK] to enter.
② Select "YES" and press [▶ OK] to enter.
- Save necessary files to the computer or external devices before formatting.
- When formatted, files in the recycle bin are also deleted and cannot be restored.
- Cancelling is not possible while formatting.
- Do not remove the battery or SD card while formatting.
- Use this unit to format a new SD card before use.
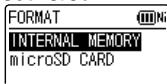
INIT MENU
If the settings of this unit are initialised, settings except for the “DATE & TIME” setting are restored to the default state.
Select "YES", press [▶ OK] to enter and the settings are initialised.

VERSION
You can check the firmware version of this unit.
System requirements
(As of May 2012)
| Computer | IBM PC/AT compatible machines, Macintosh | |
| OS | Microsoft® Windows® XP Home Edition/Professional and Service Pack 2, Service Pack 3Microsoft® Windows Vista® Home Basic/Home Premium/Business/Ultimate and Service Pack 1, Service Pack 2Microsoft® Windows® 7 Starter/Home Basic/Home Premium/Professional/Ultimate and Service Pack 1 | Pre-installed version |
| Mac OS X 10.2.8 - 10.7 | ||
| Interface | USB port (Operation cannot be guaranteed if you use a USB hub.) | |
| * Even if the system requirements mentioned in this document are fulfilled, some personal computers cannot be used.* (Macintosh) This software operates on the standard driver of OS.* Operation is guaranteed only on a compliant OS.* Operation is not guaranteed on an upgraded OS.* Operation is not guaranteed on home-made computers.* When using Windows Media® Player, your computer must fulfill the system requirements of Windows Media® Player. Please consult Microsoft Corporation for details of Windows Media® Player.* Microsoft, Windows, Windows Media and Windows Vista are registered trademarks or trademarks of Microsoft Corporation of the U.S. and other countries.* MPEG Layer-3 audio coding technology licensed from Fraunhofer IIS and Thomson.* IBM and PC/AT are registered trademarks of International Business Machines Corporation of the U.S.* Macintosh and Mac OS are trademarks of Apple Inc.* Other system names and product names appearing in this document are in general the registered trademarks or trademarks of the respective developer companies. Note that theTM mark and® mark do not appear in this document.* Depending on the computer environment, malfunctions may occur (e.g. Audio data recorded on this unit cannot be used. etc.). Panasonic and Panasonic dealers cannot be held liable for any lost audio data or other direct or indirect damage except in cases of intentional of gross negligence. | ||
Connecting this unit to a computer
You can copy files recorded on this unit to the computer.
- Start the computer beforehand.
- Turn the unit off beforehand.
① Take out the unit's USB plug.
Push and slide until a "click" sound is heard.
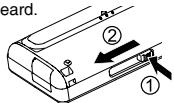
Storing the USB plug:
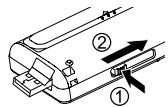
② Connect the unit to a computer using the USB port.

Insert the USB plug straight in the same direction as that of the terminal.
USB cover

Firmly insert the USB plug all the way in. (The USB cover will not impede insertion as it is stored inside the unit.)
If the unit cannot be connected to the computer directly, use the USB extension cable (supplied).
- Do not use any other USB extension cables except the supplied one.
Do not use the supplied cable with other devices.
Caution: Use only the supplied USB extension cable with a ferrite core when connecting to computer.
- The first time you connect the unit to your PC Because multiple “Found New Hardware” messages will appear, do not disconnect the unit from your PC until all messages disappear.
Screen display during connection with PC
During connection
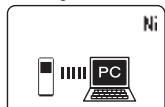
During file transfer
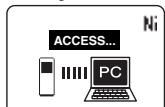
- This unit cannot be operated while connected to the computer.
- When the unit is connected to your PC, it can operate without the battery, because power is supplied by the computer.
- When the unit is connected to the computer, the computer may not start (restart). It is recommended that the unit is removed from the computer when starting (restarting) the computer.
Connecting this unit to a computer
Operation is not guaranteed in the following cases.
- When two or more USB devices are connected to one computer (excluding the mouse and keyboard in normal operation)
- When a USB hub is used
- When a USB extension cable other than the supplied one is used
- When the unit is connected to the computer, if you start (restart) the computer or the computer enters standby mode, the computer may not recognise the unit. Disconnect the unit and reconnect to the computer or reconnect the unit after the computer is restarted.
- Please see the Operating Instructions for the computer.
■ Disconnecting the unit
Double-click the icon (Windows XP: [ ], Windows Vista/Windows 7: [ ] ) on the task tray at the bottom of the computer screen and follow the on-screen instructions to remove the unit. (The icon may not be displayed depending on the OS settings.)
After the unit is removed, this unit turns off.
When this unit is turned on after deleting, etc. files on this unit using the computer, "UPDATING FILE NAME" is displayed. It may take several minutes until updating is complete.
■ USB mass storage function
This unit functions as a USB memory and is recognised as a computer's external storage device.
Data files in the computer can be transferred and saved on this unit.
Opening folders of this unit
The illustrations show Windows XP (OS). The display may differ depending on the OS.
- Connect this unit to a Computer beforehand. (→ page 63)
1. Click [start] → [My Computer].
The internal memory and SD card of this unit are displayed as the following names. Internal Memory: IC RECORDER SD card: IC REC SD*
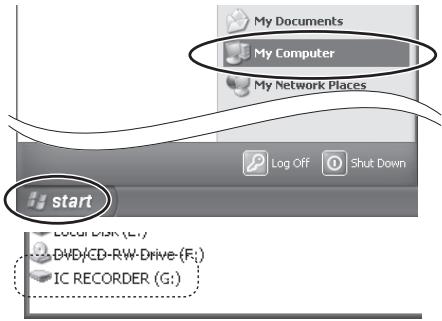
* If an SD card is not inserted or an SD card that was not formatted on this unit is inserted, [Removable Disk] is displayed.
2. Right-click to open the "IC RECORDER (G:) (this unit).
(Folder structure on this unit: → page 69)
3. Right-click to open the folder.
This unit's files are displayed.

- Depending on the computer settings, a file with the extension “.INX” may be displayed. This file contains index information. If this file is deleted from your computer, the index information will be deleted.
Importing files to a computer/Organising files
- Connect this unit to a Computer beforehand.
(→ page 63)
Importing files recorded on this unit to a computer
- Select the recorded file in this unit, right-click and select [Copy].
- Select a folder in the computer, right-click and select [Paste] to import to the computer.
Folder in this unit
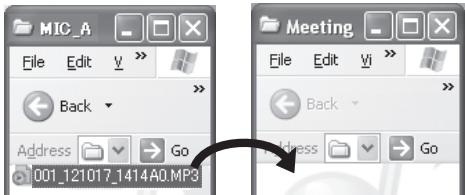
Folder in the computer
Playing recorded files on the computer:
Select the recorded file in this unit, right-click and select [Play].
Delete unnecessary files using the computer:
Select the recorded file in this unit, right-click, select [Delete] and [Yes] to enter.
- Using [drag and drop], you can import the files to the computer as well.
- Never disconnect the unit or remove the SD card while “ACCESS...” is displayed, otherwise this unit may be damaged.
- Do not format this unit or the SD card using a computer.
- File extensions displayed on the computer are "MP3" for MP3 recording files and "WAV" for PCM recording files.
- Use the "DATA" folder to save data files from the computer.
- If you change the names of folders such as "MIC_A(MIC_A_SD), MIC_B(MIC_B_SD), MIC_C(MIC_C_SD), MIC_D(MIC_D_SD), LINE(LINE_SD), MUSIC", etc. of this unit on the computer, new folders of the original names will be generated next time the unit is turned on. (The indications in the brackets are displayed when using the SD card.) The folders with changed names are shown in the OTHER FOLDER (☐) on this unit (→ page 70).
File name
File naming rules when recording on this unit:
Example: Recording information: September 20, 2012, 17:20/folder A/MP3
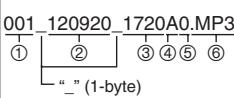
① File number (001 to 199)
② Recording information (1-byte number, 6 characters)
③ Recording time (1-byte number, 4 characters)
④ Folder name (A to D and L)
⑤ Keyword Number (0 in this unit)
⑥ File extension (.MP3/.WAV)
The above file name is displayed on the computer, however, "001_" is not displayed on this unit's screen. "120920_1720A0.MP3" is displayed instead.
Automatic change of file name by file deletion or editing:
Deleting/combining a recorded file on this unit will move subsequent files forward and file numbers are automatically reassigned.
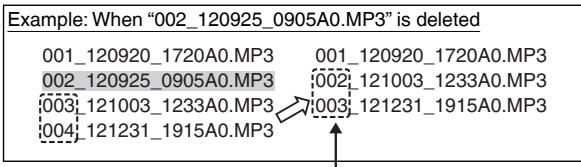
File number parts of all file names following the deleted or combined file are changed.
1 file is newly added by dividing or copying a file, etc. The file numbers of the files followed by the added file are automatically moved backward and file number parts of those file names are changed.
File name
Returning the files imported to the computer to this unit:
By returning the files imported to the computer to this unit, such files can be played back on this unit. (If file names are changed, those files cannot be played.) However, if the names of files on this unit have been changed by deleting files, etc., the files to be returned may duplicate the file numbers of files on this unit. In this case, the returned files may not be played back on this unit. When playing back after returning files that were once imported to the computer to this unit, playback by transferring those files to the MUSIC folder is recommended. ( pages 48, 71)
File name in the MUSIC folder and order of playback:
If numbers are added at the beginning of file names in the MUSIC folder, playback is performed from the file with the smallest number in priority. Up to 3 digits of number can be identified. If additional methods differ such as 1, 01, 001, then "001 to 999" takes the first priority, "01 to 99" takes the second and "1 to 9" takes the third priority. You can change the order of playback according to your preference by adding numbers at the beginning of file names, such as 001musicA.MP3, 002musicB.MP3. The displayed order will also be the same as the playback order.
For transferring files to the MUSIC folder, see page 71. For playback of such files, see page 48.
Folder structure on this unit
Folders "A", "B", "C", "D", "L" and "M" are displayed as "MIC_A", "MIC_B", "MIC_C", "MIC_D", "LINE" and "MUSIC" (for the internal memory) respectively on the computer or the list screen of this unit. The "DATA" folder is used to store data files.
Folder hierarchy of this unit:
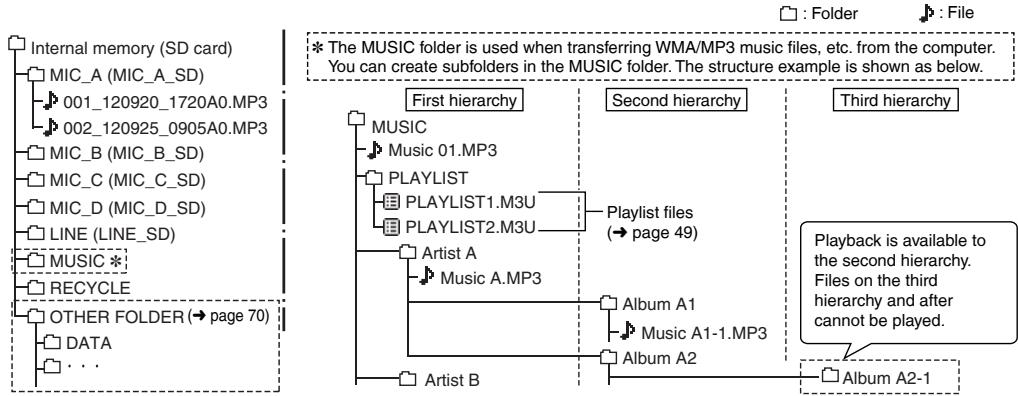
flowchart
graph TD
    A["Internal memory (SD card)"] --> B["MIC_A (MIC_A_SD)"]
    B --> C["001_120920_1720A0.MP3"]
    B --> D["002_120925_0905A0.MP3"]
    B --> E["MIC_B (MIC_B_SD)"]
    E --> F["MIC_C (MIC_C_SD)"]
    E --> G["MIC_D (MIC_D_SD)"]
    E --> H["LINE (LINE_SD)"]
    E --> I["MUSIC *"]
    E --> J["RECYCLE"]
    E --> K["OTHER FOLDER (→ page 70)"]
    K --> L["DATA"]
    K --> M["..."]

    N["* The MUSIC folder is used when transferring WMA/MP3 music files, etc. from the computer. You can create subfolders in the MUSIC folder. The structure example is shown as below."]
    O["First hierarchy"] --> P["MUSIC"]
    P --> Q["Music 01.MP3"]
    Q --> R["PLAYLIST"]
    R --> S["PLAYLIST1.M3U"]
    R --> T["PLAYLIST2.M3U"]
    U["Second hierarchy"] --> V["Playlist files (→ page 49)"]
    V --> W["Album A1"]
    V --> X["Album A2-1"]
    Y["Third hierarchy"] --> Z["Playback is available to the second hierarchy. Files on the third hierarchy and after cannot be played."]
- In MUSIC folder and OTHER FOLDER, up to 199 files per one folder can be recognised and played back. (If subfolders are created, number of files playable is reduced by the equivalent number of subfolders created.)
Folder structure on this unit
OTHER FOLDER

Folders creating using a device other than this unit and the "DATA" folder are displayed in "OTHER FOLDER". "OTHER FOLDER" is displayed on this unit, but the folders are directly displayed without displaying "OTHER FOLDER" on a computer.
Playing files in OTHER FOLDER:
You can select and play files in the same way as with the MUSIC (M) folder ( page 48).
The folder cue function ( page 49) can also be used in the same way.
(Example of folder structure)
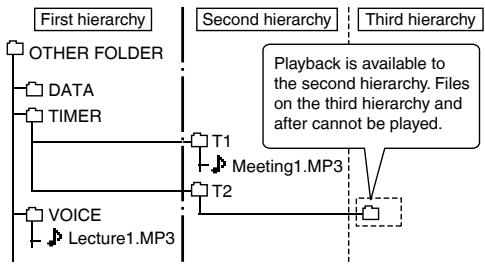
flowchart
graph TD
    A["First hierarchy"] --> B["OTHER FOLDER"]
    B --> C["DATA"]
    B --> D["TIMER"]
    D --> E["T1"]
    E --> F["Meeting1.MP3"]
    F --> G["T2"]
    G --> H[" third hierarchy"]
    H --> I["Playback is available to the second hierarchy. Files on the third hierarchy and after cannot be played."]
    E --> J["VOICE"]
    J --> K["Lecture1.MP3"]
- The types of files that can be played, number of files that can be recognised, and other conditions are the same as for the MUSIC (M) folder (→ page 48).
When there are subfolders in "OTHER FOLDER", files up to the second level can be played. - Files transferred directly to the internal memory or an SD card cannot be played with this unit. Transfer files to the MUSIC (M) folder or insert them in a folder and then transfer them.
■ RECYCLE folder
This is the recycle bin. When the recycle bin function is "ON", deleted recording files are moved to the RECYCLE folder (recycle bin).
- Files in the MUSIC (M) folder or OTHER FOLDER
are not moved to the recycle bin and are pletely deleted from the unit irrespective of the cycle bin function settings.
Numbers such as "001_" are attached to the start of file names for files moved to the recycle bin to show the order in which they were moved. This number is only displayed on a computer.

Transferring music files to this unit
You can enjoy music by transferring music files stored in the computer to this unit.
This unit can play back MP3, WMA, and PCM (WAV) ^* music files.
* Only PCM (WAV) files recorded on this unit.
Transferring music files to this unit from the computer
- Open MUSIC folder of this unit beforehand. (→ page 65)
- Select a music file, right-click and select [Copy].
- Select MUSIC folder of this unit, right-click and select [Paste] to transfer to this unit.
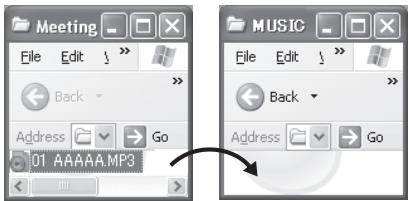
Up to 199 of transferred files can be played on this unit. If subfolders are created, number of files playable is reduced by the equivalent number of subfolders created.
- Never disconnect the unit or remove the SD card while “ACCESS...” is displayed, otherwise this unit may be damaged.
- You can create subfolders in the MUSIC folder to transfer and play back files. For folder structure, see page 69.
- You can play the files in each folder in the desired order by adding numbers to the beginning of file names. (→ page 68)
● This unit does not support PD-DRM and DRM10. - Never disconnect the unit or remove the SD card while “ACCESS...” is displayed, otherwise this unit may be damaged.
- You can create subfolders in the MUSIC folder to transfer and play back files. For folder structure, see page 69.
- You can play the files in each folder in the desired order by adding numbers to the beginning of file names. (→ page 68)
● This unit does not support PD-DRM and DRM10.
Q & A (Frequently Asked Questions)
| Question | Answer |
| Can I play files recorded on other Panasonic IC recorders? | You can play files recorded on IC recorders using MP3 or PCM format by transferring them to MUSIC folder. (→ page 71) However, cannot play files with other formats (i.e. ADPCM and TRC formats) because the recording format is different. |
| What kind of files can be played? | WMA/MP3 files, and PCM (WAV) files recorded on this unit can be played. AAC and other files cannot be played. |
Error messages
| Error message | Checkpoints |
| NO PLAYABLE FILESNO FILE | This is displayed when there are no files in the folder and you attempt to play back, perform Time Search or delete a file. |
| PLEASE INSERT microSD CARD | This is displayed when you attempt to format without the SD card inserted.This is displayed when copying or moving a file within the LINE folder without the SD card inserted. |
| CAN'T READ microSD CARD. INSERT CARD AGAIN | This is displayed when the SD card fails to be recognised or is broken.(→ page 46) Insert the card again. |
| CAN'T READ INTERNAL MEMORY | Format it on this unit. (→ page 60) If the problem persists, the internal memory may be damaged. Consult your dealer. |
| CAPACITY FULL | This is displayed when you attempt to record to the internal memory or SD card without free space.This is displayed when you attempt to combine files when the free space is smaller than the size of back file. |
| FILE FULL | This is displayed when you attempt to record with the number of files exceeding maximum recordable number (199) in each folder. (→ page 12) |
| INDEX FULL | This is displayed when you attempt to add the index exceeding the maximum number (36) of indexes that can be added in 1 file. |
| INDEX ERROR | This is displayed when you attempt to add the index at the same position.This is displayed when you attempt to add the index while the battery indicator shows “☐” (blinking). |
| CAN'T CREATE ANY MORE FILES IN THIS FOLDER | The file cannot be divided because the number of files in the folder has reached the limit (199). Delete unnecessary files and divide. (→ page 19) |
| NOT ENOUGH SPACE FOR DIVIDING | This is displayed when you attempt to divide a file when there is not enough free space required to divide a file. Delete unnecessary files and divide. |
Error messages
| Error message | Checkpoints |
| MEMORY WRITE SPEED IS SLOWmicroSD CARD WRITE SPEED ISSLOW | This may be displayed when recording is performed using a slow write speed SD card, or using the internal memory/SD card whose writing speed is temporarily slow due to fragmentation*. Changing the recording mode to MP3 may remedy the problem. To solve the fragmentation problem, save necessary files to the computer or external device and format the internal memory or SD card on this unit. (→ page 60)If the error persists even after formatting, check if compatibility of your SD card has been verified according to our manufacturing standards. (→ page 46)* If you repeat writing or deleting files, the file alignment becomes discontinuous in the internal memory, and continuous space area may be reduced (called fragmentation). If the fragmentation advances, file-writing speed becomes slow and writing may not be performed properly. |
| CAN'T DIVIDE.REC TIME IS TOO SHORT | This is displayed when you attempt to divide a file of a short recording time (approx. less than 2 seconds). |
| CAN'T DIVIDE FILE AT THIS POSITION | This is displayed when you attempt to divide a file at the position where file division is impossible (around the start or the end of the file). |
| CAN'T COMBINE.TOTAL SIZE EXCEEDS 2GB | This is displayed when the total size of files to be combined exceeds 2 GB. |
| CAN'T COMBINEDIFFERENT FILE FORMATS (REC QUALITY) | This is displayed when you attempt to combine files whose recording modes differ from each other. |
| LOW BATTERY. CHARGE BATTERY BEFORE *** FILESLOW BATTERY. REPLACE BATTERY BEFORE *** FILES | This is displayed when you attempt to copy, combine or move files while the battery indicator shows “☐” (blinking) or “☐”. (→ page 10) |
| COPY/MOVE DESTINATION FOLDER FULL | The file cannot be copied (moved) because the number of files in the copy (move) destination folder has reached the limit (199). Delete files in the copy (move) destination folder or specify another folder as copy (move) destination. |
| EMPTY RECYCLE BIN | This is displayed when you attempt to delete files or folders with the maximum number of files (199) present in the recycle bin folder and no more files can be moved to the recycle bin (III). (→ page 54) |
| * FOLDER FULL CAN'T RESTORE | This is displayed when you attempt to restore files from the recycle bin (III) to the original folder and the maximum number of recordable files are present in the original folder. (* means the folder name for the original folder.) (→ page 54) |
| CAN'T MOVE FILE. EMPTY RECYCLE BIN | This may be displayed when there is no free space on the SD card. (→ page 54) |
| CAN'T FORMAT | The internal memory or the SD card may be damaged. Consult your dealer. |
| CAN'T ADD FILES. PLAYLIST FULL | This is displayed when you attempt to register files with the playlist with the number exceeding maximum number (99) of files that can be registered with each playlist. (→ page 49) |
| CAN'T ADD ALL FILES TO PLAYLIST | This is displayed when not all files can be registered because the number of files exceeds the maximum number (99) of files that can be registered while registering the files with playlist. (→ page 49) |
| CAN'T EDIT PLAYLIST. NO FILE | The editing operation for the playlist is impossible because there are no files registered in the selected playlist (PLAYLIST1 to 5.M3U). (→ page 49) |
Error messages
| Error message | Checkpoints |
| *** USE ONLY ALPHANUMERICS | Some of the character strings in the file name or folder name are not supported (characters other than Japanese and English). Such files and folders cannot be added to the playlist. |
| INSERT microSD CARD FOR TIMER RECORDING | This is displayed when the SD card is not inserted at the completion of the timer recording setting. |
| CAN'T START TIMER OPERATION | This is displayed when the timer has failed such as when the SD card is not inserted or the recording is in progress during timer recording setting. |
| CAN'T ***. FILE IS OUTSIDE PLAY RANGE OF ALL SONG MODE (MAX 3,000 SONGS) | This is displayed when you attempt to select files beyond the playback range (max. 3,000 files) for all repeat (random) of MUSIC or OTHER FOLDER, or when you attempt to set all repeat (random) while selecting files beyond the playback range (max. 3,000 files). (→ page 41) |
“***” indication differs depending on the operations.
Troubleshooting guide
Before requesting service, make the following checks. If you are in doubt about some of the check points, or if the remedies indicated in the chart do not solve the problem, consult your dealer for instructions.
| Symptom | Checkpoints |
| Battery | |
| Cannot use a battery that can still be used on other equipment. | This unit considers the battery as empty even if there is actually power left in it. This is to preserve the clock setting.Did you set the “AUTO POWER OFF” function? (This function turns the power off if there is no operation for a certain period of time* such as when the unit is stopped.) (→ page 59)* The factory setting is 15 minutes. |
| Playback is extremely short despite recharging. | The rechargeable battery life is over. (Number of recharging times of supplied rechargeable battery: Approx. 300) Replace with a new specified rechargeable battery (optional). |
| “☒” is displayed when the battery is recharged.Cannot recharge batteries. | The temperature of this unit has risen. Disconnect the unit from the computer and leave it for a while. Then, recharge the battery again.Are you trying to recharge a battery other than the specified rechargeable battery or an alkaline battery? Insert the specified rechargeable battery (supplied) and recharge it.The rechargeable battery is not properly inserted. Remove the battery completely once. Then, insert it again.Is alkaline battery set in the battery switching setting?Switch the setting to the rechargeable battery setting and recharge it. (→ page 59) |
Troubleshooting guide
| Symptom | Checkpoints |
| Operations | |
| The unit does not start. | Make sure the battery is correctly inserted. Remove the battery completely and then insert it back into the unit again.The battery has run down. When using the specified rechargeable battery (supplied), recharge it. When using the AAA (LR03) battery, replace it with a new one. (→ page 7) |
| No operation. | The Hold function is on. Switch Hold off. (→ page 10)You cannot operate on this unit when the unit is connected to a computer. |
| Recording | |
| The memory is used completely earlier than expected. | Remaining recording time largely differs depending on the recording mode. (→ page 86) Select a suitable recording mode according to the purpose for use. (→ page 25)Is much data stored? Delete unnecessary files. |
| Recording is suspended by itself. | VAS is functioning. (→ page 31) |
| Howling occurs when listening to the recording in progress with earphones. | Turn down the volume. (→ page 17)Keep earphones and this unit separate. (→ page 18)When you are using an external microphone, keep earphones and external microphone separate. |
| Recording ended halfway. | If the unit receives a shock (e.g. it is dropped), if the battery comes off or the battery runs out during recording, recording data may not be updated.There may be no space left in the memory. |
| Recording | |
| Sound skipping on the recorded file. | You formatted the internal memory of this unit or the SD card using the computer. If they are formatted using the computer, the optimum performance of this unit may not be achieved. Format it on this unit. (→ page 60)This unit may not operate correctly depending on the SD card manufacturer or type of SD card.For details on cards that are confirmed to operate correctly according to our manufacturing standards, see the support site below.http://panasonic.net/support/VAS is functioning. (→ page 31) |
| Noise is heard from the recorded voice. | If you brush this unit with your hand or an object touches this unit during recording, noise will be recorded through the microphone. Avoid contact of object during recording. |
| Recorded sound is distorted.There is a noise at the beginning of sound. | Set the microphone sensitivity to “LOW” or keep the microphone distance farther away from the recording source. (→ page 26)If the sound is still distorted, set the Low Cut filter setting to ON (→ page 26), set the recording level adjustment to Manual and adjust the recording level before recording. (→ page 27) |
| Recorded sounds contain noise that make it difficult to hear sounds. | Move a mobile telephone away from this unit when you use the two in the same area.Set the “LOW CUT FILTER” to “ON”. Noise is reduced and listening may become easier. (→ page 26)Perform test recording switching the recording mode (→ page 25) or microphone sensitivity (→ page 26) and set the most appropriate recording environment. |
| Recorded sound differs from the actual sound. | Is Recording EQ (→ page 29) or “LOW CUT FILTER” (→ page 26) set? |
Troubleshooting guide
| Symptom | Checkpoints |
| Recording | |
| Sound is recorded in a recording mode other than the set recording mode. | Did you change the microphone position before recording? When the direct scene setting is set to ON, changing the microphone position will change the recording mode to the set recording mode. (→ page 23) |
| Recorded sound is too loud or too low. | Is the recording level adjustment set to manual? (→ page 27) If so, set the proper recording level (→ page 28) or set the recording level adjustment setting to AUTO.Switch the microphone sensitivity. (→ page 26) |
| The level meter does not move during recording. The recorded file produces no sound. | Is the recording level adjustment set to “MANUAL” and is the recording level set to “0”? Adjust the recording level. (→ page 28) |
| Playing | |
| No sound from the speaker. | There is no sound when you have connected earphones. (→ page 18) |
| Cannot hear any sound. | Adjust the sound volume. (→ page 17) |
| A file in the MIC_A to MIC_D, LINE or RECYCLE folder cannot be played. | The file name was changed. Only files named according to the file naming rules can be played in folder MIC_A through MIC_D, LINE or RECYCLE. Even if file names are not changed, if some file numbers overlaps in the folder, those files cannot be played. (→ page 68) Playback is possible if they are transferred to the MUSIC (M) folder. (→ page 71)The transfer destination is wrong. If the file transferred from the computer is stored in the recording folder, it cannot be played back on this unit. Transfer the file to the MUSIC (M) folder. (→ page 71) |
| Playing | |
| Cannot play a file in the MUSIC (M) folder or OTHER FOLDER (☐), or the playback is not correct. | PCM (WAV) files recorded on this unit and WMA/MP3 files can be played on this unit. Other file formats such as AAC cannot be played.In MUSIC folder and OTHER FOLDER, up to 199 files per one folder can be recognised and played back. (If subfolders are created, number of files playable is reduced by the equivalent number of subfolders created.) Transferred files exceeding the maximum number cannot be played.For MUSIC (M) folder or OTHER FOLDER (☐), playback is available to the second hierarchy. Files on the third hierarchy and after cannot be played (→ page 69).Copyright-protected files cannot be played even if they are transferred via Explorer.Was the file erased after registered with the playlist? Transfer the file as it was or delete the file name from the playlist. (→ page 50) |
| Playback speed is too fast or slow. | You changed the playback speed. (→ page 39) |
| There is no sound from the earphones or it is difficult to hear or noisy. | Ensure the plug is inserted firmly.Wipe the plug clean. |
| The selected file changes on its own.“NO PLAYABLE FILES” is displayed. | If this unit is connected to the computer and then a file on the unit is deleted, the file selected on this unit may change. For the MUSIC folder, the file immediately under the MUSIC folder is selected. If there are no files, “NO PLAYABLE FILES” is displayed. Reselect the file. |
| There is no sound or the volume is low during A-B repeat playback. | Is the shadowing function set to ON? (→ page 43) |
Troubleshooting guide
| Symptom | Checkpoints |
| Timer | |
| Timer recording does not operate properly.(Timer Recording failed.) | Set the clock with correct date and time. (→ page 11)The folder at the recording destination is full. Delete unnecessary files. (→ page 19)The battery has run down. Replace with a new battery. (→ page 7)When using the rechargeable battery, recharge it. (→ page 7)Is there sufficient space in the internal memory? Delete unnecessary files. (→ page 19)Is the unit connected to the computer, etc.? Disconnect it from the computer.If the unit is still used even if the timer playback time comes, the current operation is prioritised. Press [STOP ▪/RETURN] to stop the unit.If another recording is in progress even if the timer recording start time comes, the current recording is prioritised. Stop the recording. However, if you are using the unit for operations other than recording, the timer recording is prioritised. |
| Others | |
| The power cannot be turned on. | The battery may have run out. Replace the battery with the new one or charge the rechargeable battery. (→ page 7) |
| The power automatically turns off. | Did you set the “AUTO POWER OFF” function? (This function turns the power off if there is no operation for a certain period of time* such as when the unit is stopped.) (→ page 59)* The factory setting is 15 minutes. |
| SD card cannot be recognised. | The SD card is not properly inserted. Turn off the unit and reinsert the SD card. (→ page 46)Was the SD card formatted using the computer, etc.? Format it on this unit. (→ page 60) |
| Others | |
| Cannot delete a file or folder. | ·If WMA/MP3 music files transferred from the computer are Read-only, or subfolders are created in the MUSIC folder or OTHER FOLDER, they cannot be deleted on this unit. Delete them on the computer. (→ page 66) |
| Free space does not increase even after files were deleted. | ·Empty the recycle bin folder. (→ page 54) |
| Cannot divide a file. | ·Is there sufficient space in the internal memory?·199 recorded files (maximum recordable number) may be present in the folder. If the folder contains 199 recorded files, dividing a file is not possible.·Is the recording time for the file too short? Use a file with longer recording length. A file length of approx. 2 seconds or more is necessary for dividing a file.·Play the file up to the position where you want to divide it, and then press [STOP ■/RETURN]. (→ page 51) |
| This unit is not recognised by a computer. | ·Connect this unit with the computer properly. (→ page 63)·Disconnect this unit from the computer and connect it again.·Disconnect all USB devices (excluding the mouse and keyboard in normal operation) and connect this unit alone. If the computer is equipped with multiple USB terminals, connect this unit to a different USB terminal.·Is the unit connected via the USB hub? Disconnect the hub once and directly connect this unit to the USB terminal.·The OS on the computer may not be compliant with this unit. (→ page 62)·Is the network drive assigned? If the network drive is assigned, the drive letters (alphabet letters in the drive name) conflict and this unit's drive name may become invisible. Change the assignment of the network drive before connection. |
Troubleshooting guide
| Symptom | Checkpoints |
| Others | |
| The file name of the recorded file or recording date and time information differ from the real date and time. | Set the clock. (→ page 11) |
| Date and time are not displayed correctly. | Has the unit been left for a long period of time after the battery was removed or the battery was exhausted? Set the clock (DATE & TIME) again. (→ page 11) |
| File search does not operate properly. | File search is for searching for files in the recording folder based on the file names assigned at the time of recording (→ page 67). Therefore, it cannot properly search for any file recorded when the clock was not set correctly, renamed using a computer, or moved to the MUSIC folder or another folder using a computer.File search is executed only for the files in the selected memory. Select the memory (internal memory or SD card) before starting file search. |
Specifications
Power
| Rechargeable battery | DC 1.2 V (1 AAA rechargeable Ni-MH (nickel-metal hydride) battery, HHR-4AGE)USB charging (charging time: approx. 2 hours) |
| Dry-cell battery | DC 1.5 V (1 AAA LR03 battery (alkaline battery)) |
Audio
| Sampling frequency(The bracket [ ] shows the recording mode.) | 44.1 kHz [PCM 44.1kHz]44.1 kHz [MP3 320kbps]44.1 kHz [MP3 192kbps]44.1 kHz [MP3 128kbps]22.05 kHz [MP3 64kbps]16 kHz [MP3 32kbps] (Monaural) |
| Recording format | Linear PCM (16 bit)/MP3 |
| Playable bit rate*1 | 16 kbps to 320 kbps (MP3)32 kbps to 192 kbps (WMA) |
| Playable sampling frequency*1 | 8 kHz to 48 kHz (MP3)22.05 kHz to 48 kHz (WMA) |
| Frequency characteristic(-10 dB, during recording/playback.)(The bracket [ ] shows the recording mode.) | 20 Hz to 21,000 Hz [PCM 44.1kHz]20 Hz to 21,000 Hz [MP3 320kbps]20 Hz to 20,000 Hz [MP3 192kbps]20 Hz to 17,000 Hz [MP3 128kbps]20 Hz to 7,500 Hz [MP3 64kbps]20 Hz to 6,700 Hz [MP3 32kbps] |
| Built-in microphone S/N | 45 dB (PCM 44.1 kHz) Filter (JIS A) |
*1 For MUSIC (M) folder and OTHER FOLDER

| USB | USB2.0 (Hi-Speed) DC 5 V / 500 mA | |
| Audio Output | Earphone | 3.5 mm, 16 ,Max. 11 + 11 mW |
| Speaker Output | 20 mm, 8 ,90 mW (RMS) | |
| Audio Input | External Microphone/Line-in | 3.5 mm,0.80 mV plug in power |
| Max. Dimensions (W × H × D) | |
| 40.8 mm × 103.1 mm × 16.2 mm | |
| Cabinet Dimensions (W × H × D) | |
| 38.5 mm × 102.5 mm × 14.8 mm | |
| Mass | Approx. 54 g with battery |
| Approx. 43 g without battery | |
| Operating Temperature | 0 °C to 40 °C |
| Operating Humidity | 20% RH to 80% RH(No condensation) |
| Rechargeable temperature range | 5 °C to 35 °C |
| Internal Memory | 4 GB*2 (RR-XS450)2 GB*2 (RR-XS420) |
*2 Usable capacity will be less.
Specifications
Battery life (may be less depending on the operating conditions.)
When the supplied rechargeable battery (HHR-4AGE) is used
| Recording mode | Rec*1 | Play*2 |
| PCM 44.1kHz (Stereo) | approx. 17 h. 30 min. | approx. 10 h. |
| MP3 320kbps (Stereo) | approx. 20 h. 30 min. | approx. 10 h. 30 min. |
| MP3 192kbps (Stereo) | approx. 20 h. 30 min. | approx. 10 h. 30 min. |
| MP3 128kbps (Stereo) | approx. 21 h. | approx. 10 h. 30 min. |
| MP3 64kbps (Stereo) | approx. 25 h. | approx. 11 h. |
| MP3 32kbps (Monaural) | approx. 27 h. 30 min. | approx. 11 h. |
When the Panasonic alkaline (AAA LR03) battery is used
| Recording mode | Rec*1 | Play*2 |
| PCM 44.1kHz (Stereo) | approx. 25 h. | approx. 19 h. |
| MP3 320kbps (Stereo) | approx. 30 h. | approx. 20 h. 30 min. |
| MP3 192kbps (Stereo) | approx. 30 h. | approx. 20 h. 30 min. |
| MP3 128kbps (Stereo) | approx. 31 h. | approx. 20 h. 30 min. |
| MP3 64kbps (Stereo) | approx. 36 h. 30 min. | approx. 21 h. 30 min. |
| MP3 32kbps (Monaural) | approx. 38 h. | approx. 21 h. 30 min. |
*1 Without recording monitor, Recording indicator: OFF, recording level adjustment setting: AUTO, When using the internal memory
*2 When audio is output from speaker (Volume: 11, Playback speed control: 100%)
Standard recordable time (may be less depending on the operating conditions.)
RR-XS450: When using the internal memory (4 GB)
| Recording mode | Recording time | Bit rate |
| PCM 44.1kHz (Stereo) | approx. 6 h. | 1411 kbps |
| MP3 320kbps (Stereo) | approx. 27 h. | 320 kbps |
| MP3 192kbps (Stereo) | approx. 45 h. | 192 kbps |
| MP3 128kbps (Stereo) | approx. 68 h. | 128 kbps |
| MP3 64kbps (Stereo) | approx. 136 h. | 64 kbps |
| MP3 32kbps (Monaural) | approx. 272 h. | 32 kbps |
RR-XS420: When using the internal memory (2 GB)
| Recording mode | Recording time | Bit rate |
| PCM 44.1kHz (Stereo) | approx. 3 h. | 1411 kbps |
| MP3 320kbps (Stereo) | approx. 13 h. | 320 kbps |
| MP3 192kbps (Stereo) | approx. 22 h. | 192 kbps |
| MP3 128kbps (Stereo) | approx. 33 h. 30 min. | 128 kbps |
| MP3 64kbps (Stereo) | approx. 67 h. | 64 kbps |
| MP3 32kbps (Monaural) | approx. 134 h. | 32 kbps |
- Specifications are subject to change without notice.
Care and use
To reduce risk of radio interference caused by headphone-, earphone- or microphone cables, only use adequate accessories with a cable length of less than 3 m.
Unit
- Avoid using or placing this unit near sources of heat.
- To avoid product damage, do not expose this product to rain, water or other liquids.
- The unit's speaker does not have magnetic shielding. Do not place the unit near televisions, personal computers, magnetised cards (bank cards, commuter passes) or other devices easily influenced by a magnet.
Batteries
- Do not peel off the covering on batteries and do not use the batteries if the covering has been peeled off.
- Align the poles and correctly when inserting the battery.
- Remove the battery if you do not intend to use the unit for a long time.
- Do not heat or expose to flame.
- Do not leave the battery(ies) in a car exposed to direct sunlight for a long period of time with doors and windows closed.
-
Do not attempt to recharge dry cell batteries.
-
Battery mishandling can cause electrolyte leakage which can damage items the fluid contacts and may cause a fire. If electrolyte leaks from the batteries, consult your dealer. Wash thoroughly with water if electrolyte comes in contact with any part of your body.
- Keep the AAA LR03 batteries and the rechargeable batteries out of reach of children to prevent swallowing. Accidental swallowing of batteries can result in stomach and intestinal damage.
- When carrying batteries in a pocket or bag, ensure no metal objects such as necklaces are placed together with them. Contact with metal may cause short-circuiting which can cause a fire. For safety, carry the batteries in the battery carrying case.
■ Rechargeable battery
- To store or carry the rechargeable battery, put the removed battery into the battery case (supplied), avoiding metallic objects (clip, etc.).
Care and use
■ SD card compatibility
microSD card and microSDHC card can be used on devices that support each card. (microSD card can also be used on devices that support microSDHC card.) Using on devices that do not support those cards may format the SD cards or erase the recorded contents. Also, computers or devices that do not support microSDHC card may display a message that encourages you to format the SD card. If you format the SD card, the data will be erased. Erased data cannot be recovered. Do not format the SD card.
■ Notice for when transferring to another party, or disposing of the SD card or the unit
If the internal memory and SD card are formatted or the data on them are deleted, such data cannot be played back, however, the data are not erased completely.
If you want to erase the data completely for security, use a commercially sold data erasing software for computer. Or format the internal memory or SD card and then record up to the end to clear off the data.
Allergies
- Discontinue use if you experience discomfort with the earphones or any other parts that directly contact your skin.
- Continued use may cause rashes or other allergic reactions.
- microSDHC Logo is a trademark of SD-3C, LLC.
This product is protected by certain intellectual property rights of Microsoft Corporation and third parties. Use or distribution of such technology outside of this product is prohibited without a license from Microsoft or an authorized Microsoft subsidiary and third parties.
Precautions for listening with the Headphones or Earphones
- Do not play your headphones or earphones at a high volume. Hearing experts advise against continuous extended play.
- If you experience a ringing in your ears, reduce volume or discontinue use.
- Do not use while operating a motorized vehicle. It may create a traffic hazard and is illegal in many areas.
- You should use extreme caution or temporarily discontinue use in potentially hazardous situations.
- Even if your headphones or earphones are the open-air type designed to let you hear outside sounds, don't turn up the volume so high that you can't hear what's around you.
This unit may receive radio interference caused by mobile telephones during use. If such interference occurs, please increase separation between this unit and the mobile telephone.
CAUTION
- Danger of explosion if battery is incorrectly replaced. Replace only with the type recommended by the manufacturer.
- When disposing the batteries, please contact your local authorities or dealer and ask for the correct method of disposal.
Be sure to use the supplied or recommended headphones or earphones.
Based on EN 50332-2:2003
1) Maximum output voltage(earphone output) : ≤ 150mV
2) Wide band characteristic voltage(earphones): ≥ 75mV
Maintenance
Clean this unit with a dry and soft cloth.
- If the unit becomes too dirty, wring a cloth moistened in water, wipe the dirt with it and clean with a dry cloth.
- Do not use solvents including benzine, thinner, alcohol, kitchen detergent, a chemical wiper, etc. This might cause the exterior case to be deformed or the coating to come off.
Information for Users on Collection and Disposal of Old Equipment and used Batteries

natural_image
Symbol of a trash bin crossed out by two crossed lines, with no text or labels present.These symbols on the products, packaging, and/or accompanying documents mean that used electrical and electronic products and batteries should not be mixed with general household waste. For proper treatment, recovery and recycling of old products and used batteries, please take them to applicable collection points, in accordance with your national legislation and the Directives 2002/96/EC and 2006/66/EC.
By disposing of these products and batteries correctly, you will help to save valuable resources and prevent any potential negative effects on human health and the environment which could otherwise arise from inappropriate waste handling.
For more information about collection and recycling of old products and batteries, please contact your local municipality, your waste disposal service or the point of sale where you purchased the items.
Penalties may be applicable for incorrect disposal of this waste, in accordance with national legislation.

natural_image
Symbol of a trash bin crossed out by two diagonal lines (no text or numbers present)For business users in the European Union
If you wish to discard electrical and electronic equipment, please contact your dealer or supplier for further information.
[Information on Disposal in other Countries outside the European Union]
These symbols are only valid in the European Union. If you wish to discard these items, please contact your local authorities or dealer and ask for the correct method of disposal.
![PANASONIC RR-XS450E - [Information on Disposal in other Countries outside the European Union] - 1](/content/2020/05/105349/images/0120c7bc5d74bc0a23a7d361c0947340a5406fc71a8496d503c6af46b59ddd22.jpg)
natural_image
Symbol of a trash bin crossed out by two diagonal lines (no text or numbers present)Note for the battery symbol (bottom two symbol examples):
This symbol might be used in combination with a chemical symbol. In this case it complies with the requirement set by the Directive for the chemical involved.
Cd
Panasonic Warranty
The product is warranted for 12 months from the date of purchase. Subject to the conditions of this warranty Panasonic or its Authorised Service Centre will perform necessary service on the product without charge for parts or labour, if in the opinion of Panasonic, the product is found to be faulty within the warranty period.
2. This warranty only applies to Panasonic products purchased in Australia and sold by Panasonic Australia or its Authorised Distributors or Dealers and only where the products are used and serviced within Australia or it's territories. Warranty cover only applies to service carried out by a Panasonic Authorised Service Centre and only if valid proof of purchase is presented when warranty service is requested.
3. This warranty only applies if the product has been installed and used in accordance with the manufacturer's recommendations (as noted in the operating instructions) under normal use and reasonable care (in the opinion of Panasonic). The warranty covers normal domestic use only and does not cover damage, malfunction or failure resulting from use of incorrect voltages, incorrect installation, accident, misuse, neglect, build-up of dirt or dust, abuse, maladjustment of customer controls, mains supply problems, thunderstorm activity, infestation by insects or vermin, tampering or repair by unauthorised persons (including unauthorised relationships), humidity or liquids, commercial use such as hotel, office, restaurant, or other business or rental use of the product, exposure to abnormally corrosive conditions or any foreign object or matter having entered the product.
- This warranty does not cover the following items unless the fault or defect existed at the time of purchase: (a) Cabinet Part(s) (e) DVD, Blu-ray or Recordable Discs (b) Visey, A. T. Jones (c) R.P.E. and A. U. W. H. S. and a type of use
(c) SD cards or USB devices (g) Information stored on Hard Disk Drive, USB stick or SD card (d) User replaceable Batteries (h) DTV reception issues caused by TV Aerial / Cabling / Wall socket(s)
- Some products may be supplied with Ethernet connection hardware. The warranty is limited on such products and will not cover (a) Internet data PLNA connection / support related problems
(b) Internet and/or DNA connection setup related problems (c) Access fees and/or charges incurred for internet connection (d) The use of incompatible software or software not specifically stipulated in the product operations manual; and (d) Any indirect or consequential costs associated with the incorrect use or misuse of the hardware, its connection to the internet or any other device.
-
To claim warranty service, when required, you should: • Telephone Panasonic's Customer Care Centre on 132600 or visit our website referred to below and use the Service Centre Locator for the name/address of the nearest Authorised Service Centre. • Send or take the product to a Panasonic Authorised Service Centre together with your proof of purchase receipt as a proof of purchase date. Please note that freight and insurance to and / or from your nearest Authorised Service Centre must be arranged by you. • Note that home or pick-up/delivery service is available for the following products in the major metropolitan areas of Australia or the normal operating areas of the nearest Authorised Service Centres. Plasma/LCD televisions / displays (screen size greater than 103 cm)
-
The warranties hereby conferred do not extend to, and exclude, any costs associated with the installation, de-installation or re-installation of a product, including costs related to the mounting, de-mounting or remounting of any screen, (and any other ancillary activities), delivery, handling, freighting, transportation or insurance of the product or any part thereof or replacement of and do not extend to, and exclude, any damage or loss occurring by reason of, during, associated with, or related to such installation, de-installation, re-installation or transit.
Panasonic Authorised Service Centres are located in major metropolitan areas and most regional centres of Australia, however, coverage will vary dependant on product. For advice on exact Authorised Service Centre locations for your product, please telephone our Customer Care Centre on 132600 or visit our website and use the Service Centre Locator.
In addition to your rights under this warranty, Panasonic products come with consumer guarantees that cannot be excluded under the Australian Consumer Law. If there is a major failure with the product, you can reject the product and elect to have a refund or to have the product replaced or if you wish you may elect to keep the goods and be compensated by the drop in value of the goods. You are also entitled to have the product repaired or not to accept any liability for the acceptance of the product. If you can't want to a prior failure. If there is a major failure in regard to the product which cannot be remedied then you must notify us within a reasonable period by contacting the Panasonic Customer Care Centre. If the failure in the product is not a major failure then Panasonic may choose to repair or replace the product and will do so in a reasonable period of time from receiving notice from you.
THIS WARRANTY CARD AND THE PURCHASE DOCKET (OR SIMILAR PROOF OF PURCHASE) SHOULD BE RETAINED BY THE CUSTOMER AT ALL TIMES
If you require assistance regarding warranty conditions or any other enquiries, please visit the Panasonic Australia website www.panasonic.com.au or contact by phone on 132 600 If phoning in, please ensure you have your operating instructions available.
Panasonic Australia Pty. Limited
ACN 001 592 187 ABN 83 001 592 187
ovation Road, Macquarie Park, NSW
• The following table provides the original text:
PRO-031-F11 Issue: 4.0
For Latin American Countries Only
Useful Information
Customer Service
Customer Service Directory
Obtain products information and operative assistant; localize the closer distributor or Service Center; buy spare parts and accessories by our web site to Latin American:
http://www.lar.panasonic.com
Also you may contact us directly by our Contact Center:
Panama 800-PANA (800-7262)
Colombia 01-8000-94PANA (01-8000-947262) Ecuador 1800-PANASONIC (1800-726276)
Costa Rica 800-PANA737 (800-7262737)
El Salvador 800-PANA (800-7262) Guatemala 1-801-811-PANA (1-801-811-7262)
Chile 800-390-602
From a cell phone: 797-5000
Venezuela 800-PANA-800 (800-7262-800)
Uruguay 0-800-PANA (0-800-7262)
Peru 0800-00726
Argentina 0800-333-PANA (0800-333-7262)
0810-321-FANA (0810-321-7262)
Mexico Service
To obtain information in the Republic of Mexico contact us at:
Or you may contact us in the next following phones numbers:
01800-VIP-PANA (01800-847-7262) - Interior (55) 5000-1200 - Mexico D.F. and Metropolitan Area
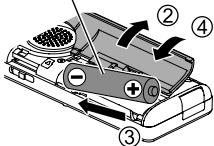
natural_image
Symbol of a trash bin crossed out by two diagonal lines (no text or numbers present)natural_image
Symbol of a trash bin crossed out by two diagonal lines (no text or numbers present)natural_image
Symbol of a trash bin crossed with two opposing diagonal lines (no text or numbers present)
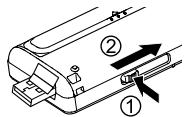
bar
| Category | Value | |---|---| | PCM: 44,1 kHz | 44,1 kHz | | MP3: 320 kb/sec. | 320 kb/sec. | | MP3: 192 kb/sec. | 192 kb/sec. | | MP3: 128 kb/sec. | 128 kb/sec. | | MP3: 64 kb/sec. | 64 kb/sec. | | MP3: 32 kb/sec. | 32 kb/sec. | Registrazione ad alta qualità → Registrazione lunganatural_image
Symbol of a trash bin crossed out by two diagonal lines (no text or numbers present)natural_image
Symbol of a trash bin crossed out by two diagonal lines (no text or numbers present)natural_image
Symbol of a trash bin crossed out by two diagonal lines (no text or numbers present)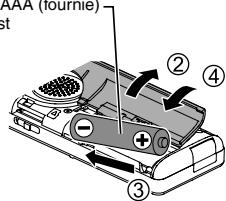
natural_image
Symbol of a trash bin crossed out by two diagonal lines (no text or numbers present)natural_image
Symbol of a trash bin crossed out by two diagonal lines (no text or numbers present)natural_image
Symbol of a trash bin crossed out by two diagonal lines (no text or numbers present)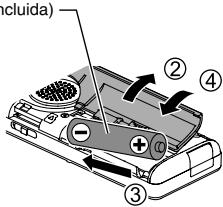
Carga de la pila
① Saque la clavija USB.
① Pulse [F2 (FOLDER)].
② Pulse +, -, |◀◀, ▶▶| para seleccionar la carpeta y pulse [▶ OK] para confirmar.
natural_image
Symbol of a trash bin crossed out by two diagonal lines (no text or numbers present)natural_image
Symbol of a trash bin crossed out by two diagonal lines (no text or numbers present)natural_image
Symbol of a trash bin crossed out by two diagonal lines (no text or numbers present)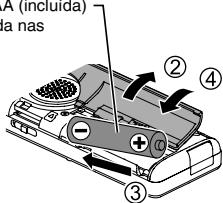
Carregar a pilha
natural_image
Silhouette of a person using a binocular device to generate trash (no text or symbols)BRASIL
natural_image
Symbol of a trash bin crossed out by two diagonal lines (no text or numbers present)natural_image
Symbol of a trash bin crossed out by two diagonal lines (no text or numbers present)natural_image
Symbol of a trash bin crossed out by two diagonal lines (no text or numbers present)Nota para os símbolos de baterias (dois exemplos de símbolos):
Pursuant to at the directive 2004/108/EC, article 9(2)
Panasonic Testing Centre
Panasonic Marketing Europe GmbH
Winsbergring 15, 22525 Hamburg, Germany

Panasonic Corporation
Web Site: http://panasonic.net
© Panasonic Corporation 2012

VQT4J81
- Supplied accessories
- ■ For the United Kingdom and Ireland customers
- Direct Sales at Panasonic UK
- Features
- Recording
- Playing back to listen
- Connecting this unit to a computer
- Recording/Playback using the Timer
- Table of contents
- Preparation
- Basic Operations
- Advanced Operations
- Using with a computer
- Other
- Part names
- Screen display
- Inserting the battery/Charging
- Charging the battery
- ① Take out the USB plug.
- The first time you connect the unit to your PC
- ■ Disconnecting the unit
- ■ When using a dry cell battery (not supplied)
- Turning the Power ON/OFF
- Turning the power ON:
- Turning the power OFF:
- ■ Auto power off
- ■ About the battery indicator
- Hold function
- To switch the Hold function on:
- To switch the Hold function off:
- Setting the clock
- The clock has not been set at the time of purchase.
- File and Folder
- File
- Folder
- Selecting the folder
- Switching between the internal memory and SD card:
- Selecting the folder or file in the list screen
- Switching microphone position
- ① Press [F2 (FOLDER)].
- ③ Press [REC ●] (Recording starts).
- Press [STOP ■/RETURN] to stop recording.
- To pause recording:
- Screen display during recording:
- Note when recording
- Playing
- Press [▶ OK] (Playback starts).
- Adjusting the volume
- Turn up the volume: Press +. Turn down the volume: Press -.
- Operations during playback
- Jump (Skip): Press |◀◀, ▶▶.
- Fast backward/Fast forward (Search):
- Select a file
- Checking information
- ① Press [STOP ■/RETURN].
- ② Move the information screen up or down using + or −.
- Listening to the audio using earphones
- Monitoring the recording in progress
- Adjusting the volume:
- Listening to the audio during playback
- Deleting files
- Deleting files from the list screen
- Selecting the recording scene
- Changing recording scene settings
- To exit the setting screen, press [F2 (CLOSE)]. Initialising recording scene settings
- Direct scene
- Changing direct scene setting
- Setting direct scene setting to OFF
- Selecting recording mode
- Switching microphone sensitivity
- Reducing low frequency noise during recording
- Setting the recording level manually
- Setting the recording level adjustment to MANUAL
- Adjusting the recording level manually
- Setting the recording peak limiter to ON
- To exit the setting screen, press [F2 (CLOSE)].
- Setting the recording EQ
- Setting when selecting "USER":
- Pressing [REC ●] starts recording.
- Self timer
- Preventing unnecessary recording (VAS)
- To start VAS recording, press [REC ●].
- Adjusting the VAS operation level:
- Past recording function (PRE-RECORD)
- To set the past recording to ON:
- To record using the past recording function:
- Press and hold [REC ●] for 1 second or more.
- ② Press [REC ●].
- To stop: Press [STOP ■/RETURN].
- Recording by connecting an external microphone
- Copying to other devices
- Recording from other devices
- Connect the external device
- ⑧ Press and hold [REC ●] for 1 second or more.
- Play back the external device and adjust the input/output level.
- Press [REC ●] to start recording.
- Play the external device.
- Synchro recording setting
- Synchro recording:
- Perform steps 1 to 11 on pages 35 and 36.
- Selecting line recording mode
- Index function
- Adding index
- Deleting index
- Changing the playback speed
- Playback speed:
- Status indication during playback:
- A-B Repeat play
- Cancelling A-B Repeat:
- Playback from a specified position (TIME SEARCH)
- Slight return playback
- Setting the return time:
- Repeat play (REPEAT)
- Skip at regular intervals (TIME SKIP)
- Skip at regular intervals
- To change the skip interval
- Shadowing
- Setting shadowing:
- Using shadowing function:
- Adjusting the volume for shadowing:
- Making sound easier to hear (VOICE EMPHASIS)
- Setting the playback EQ (SOUND EQ)
- The sound EQ is effective only when listening with the earphones.
- Using an SD Card
- Inserting the SD card
- To remove the SD card:
- Using the file search function
- File search
- When "CALENDAR SRCH" is selected:
- When "DAY OF WEEK" is selected:
- Listening to music on this unit (WMA/MP3 music files)
- Selecting a file from folder "M":
- Select the file and press [▶ OK].
- Folder cue function
- ① Press [F2 (☐ CUE)] during playback.
- ② Press ◀◀, ▶▶ when “☐” is displayed.
- Cancelling folder cue:
- Using the playlist function
- Registering your favourite tracks to a playlist
- Select the MUSIC (M) folder on the list screen ( → page 13).
- ② Press +, – to select the file or the folder and press [F1 (PLAYLIST)] to enter.
- ③ Press |◀◀, ▶▶▶ to select the playlist and press [▶ OK] to enter. (Select from PLAYLIST 1 to 5.)
- Playing tracks registered to the playlist
- Changing the order of playlist tracks
- Cancelling tracks registered to the playlist
- When cancelling all registered tracks:
- Editing: Dividing files
- Displaying the editing setting screen
- Dividing files
- Editing: Combining files
- Files cannot be combined in following cases.
- Editing: Copying or moving files
- Copying file
- Moving files
- Recycle bin function
- Returning files in the recycle bin to the original folder
- Emptying the recycle bin folder
- Using the timer
- - Checking the timer condition or execution state
- Common menu
- Common settings operation
- BEEP SOUND
- REC LED (Recording indicator)
- BATT. SETTING
- AUTO POWER OFF
- BACKLIGHT
- CONTRAST
- RECYCLE BIN
- FORMAT
- INIT MENU
- VERSION
- System requirements
- ① Take out the unit's USB plug.
- ② Connect the unit to a computer using the USB port.
- ■ USB mass storage function
- Opening folders of this unit
- Click [start] → [My Computer].
- Right-click to open the "IC RECORDER (G:) (this unit).
- Right-click to open the folder.
- Importing files to a computer/Organising files
- Importing files recorded on this unit to a computer
- Playing recorded files on the computer:
- Delete unnecessary files using the computer:
- File name
- File naming rules when recording on this unit:
- Automatic change of file name by file deletion or editing:
- Returning the files imported to the computer to this unit:
- File name in the MUSIC folder and order of playback:
- Folder structure on this unit
- OTHER FOLDER
- Playing files in OTHER FOLDER:
- ■ RECYCLE folder
- Transferring music files to this unit
- Transferring music files to this unit from the computer
- Q & A (Frequently Asked Questions)
- Error messages
- Troubleshooting guide
- Specifications
- Care and use
- Unit
- Batteries
- ■ Rechargeable battery
- ■ SD card compatibility
- ■ Notice for when transferring to another party, or disposing of the SD card or the unit
- Allergies
- Precautions for listening with the Headphones or Earphones
- CAUTION
- Maintenance
- Clean this unit with a dry and soft cloth.
- Information for Users on Collection and Disposal of Old Equipment and used Batteries
- For business users in the European Union
- [Information on Disposal in other Countries outside the European Union]
- Note for the battery symbol (bottom two symbol examples):
- Panasonic Warranty
- THIS WARRANTY CARD AND THE PURCHASE DOCKET (OR SIMILAR PROOF OF PURCHASE) SHOULD BE RETAINED BY THE CUSTOMER AT ALL TIMES
- Panasonic Australia Pty. Limited
- For Latin American Countries Only
- Useful Information
- Customer Service
- Customer Service Directory
- http://www.lar.panasonic.com
- Mexico Service
- Carga de la pila
- Carregar a pilha
- BRASIL
- Nota para os símbolos de baterias (dois exemplos de símbolos):
- Panasonic Corporation
Brand : PANASONIC
Model : RR-XS450E
Category : Dictaphone