
NVT2SIR - Radio NUVO - Free user manual and instructions
Find the device manual for free NVT2SIR NUVO in PDF.

User questions about NVT2SIR NUVO
0 question about this device. Answer the ones you know or ask your own.
Ask a new question about this device
Download the instructions for your Radio in PDF format for free! Find your manual NVT2SIR - NUVO and take your electronic device back in hand. On this page are published all the documents necessary for the use of your device. NVT2SIR by NUVO.
USER MANUAL NVT2SIR NUVO
The Sound of LiVing.

text_image
NUVO® NV-T25IR Dual SR100S Ready AM/FIN Toner SR 31 MorganNaville 1 FM 2035 34 The RDT The Bo MENU A/S DBP + SAND OK SIRIUS® COR-D-S BERRY 0807-7389 NVA AUDIO SIRIUS L SIRIUS TUNER A AUDIO SIRIUS L SIRIUS TUNER B R INPUT No Input RS 212 SYSTEM NUVO® NEWR NV-T25IR Dual SR100S Ready AM/FIN Toner Data Technologies LLC Control. BY: 2025 www.nuovo.com.cn/ncn/ CAUTION A/R, A/R, C/D, D/C, E/C, F/C, G/C, H/C, I/C, J/C, K/C, L/C, M/C, N/C, O/C, P/C, Q/C, R/C, S/C, T/C, U/C, V/C, W/C, X/C, Y/C, Z/C, AA/C, AB/C, AC/C, AD/C, AE/C, AF/C, AG/C, AH/C, AI/C, AJ/C, AK/C, AL/C, AM/A, AN/A, AO/A, AP/A, AQ/A, AR/A, AS/A, AT/A, AU/A, AV/A, AW/A, AX/A, AZ/A, BA/A, BC/A, BD/A, BE/A, BF/A, BG/A, BH/A, BI/A, BJ/A, BK/A, BL/A, BM/A, BN/A, BO/A, BP/A, BP/B, BP/BA/BA/BA/BA/BA/BA/BA/BA/BA/BA/BA/BA/BA/BA/BA/BA/BA/BA/BA/BA/BA/BA/BA/BA/BA/BA/BA/BA/BA/BA/BA/BA/BA/BA/BA/BA/BA/BA/BA/BA/BA/BA/BA/BA/BA/BA/BA/BA/BA/BA/PA 199-200-201-202-203-204-205-206-207-208-209-210-211-212-213-214-215-216-217-218-219-220-221-222-223-224-225-226-227-228-229-230-231-232-233-234-235-236-237-238-239-240-241-242-243-244-245-246-247-248-249-250-251-252-253-254-255-256-257-258-259-260-261-262-263-264-265-266-267-268-269-270-271-272-273-274-275-276-277-278-279-280-281-282-283-284-285-286-287-288-289-290-291-292-293-294-295-296-297-298-299-300NV-T2SIR
Dual SIRIUS®-Ready/AM/FM Tuner Installation Guide
ENGLISH
Danger
Exposure to extremely high noise levels may cause a permanent hearing loss. Individuals vary considerably to noise induced hearing loss but nearly everyone will lose some hearing if exposed to sufficiently intense noise for a sufficient time. The U.S. Government's Occupational Safety and Health Administration (OSHA) has specified the following permissible noise level exposures:
| DURATION PER DAY (HOURS) | 8 | 6 | 4 | 3 | 2 | 1 |
| SOUND LEVEL (dB) | 90 | 93 | 95 | 97 | 100 | 103 |
According to OSHA, any exposure in the above permissible limits could result in some hearing loss. Ear plugs or protectors in the ear canal or over the ears must be worn when operating this amplification system in order to prevent a permanent hearing loss. If exposure in excess of the limits as put forth above, to insure against potentially harmful exposure to high sound pressure levels, it is recommended that all persons exposed to equipment capable of inducing high sound pressure levels, such as this amplification system, be protected by hearing protectors while this unit is in operation.

text_image
CAUTION RISK OF ELECTRIC SHOCK DO NOT OPEN CAUTION: TO REDUCE THE RISK OF ELECTRIC SHOCK, DO NOT REMOVE CHASSIS. NO USER-SERVICEABLE PARTS INSIDE. REFER SERVICING TO QUALIFIED SERVICE PERSONNEL.AVIS: RISQUE DE CHOC ELECTRIQUE-NE PAS OUVRIR.

THIS SYMBOL IS INTENDED TO ALERT THE USER TO THE PRESENCE OF NON-INSULATED "DANGEROUS VOLTAGE" WITHIN THE PRODUCT'S ENCLOSURE THAT MAY BE OF SUFFICIENT MAGNITUDE TO CONSTITUTE A RISK OF ELECTRIC SHOCK TO PERSONS.

THIS SYMBOL IS INTENDED TO ALERT THE USER TO THE PRESENCE OF IMPORTANT OPERATING AND MAINTENANCE (SERVICING) INSTRUCTIONS IN THE LITERATURE ACCOMPANYING THE UNIT.

APPARATUS SHALL NOT BE EXPOSED TO DRIPPING OR SPLASHING AND THAT NO OBJECTS FILLED WITH LIQUIDS, SUCH AS VASES, SHALL BE PLACED ON THE APPARATUS.
IMPORTANT SAFETY INSTRUCTIONS
- Read all safety and operating instructions before using this product.
- All safety and operating instructions should be kept for future reference.
- Read and understand all warnings listed on the operating instructions.
- Follow all operating instructions to operate this product.
- This product should not be used near water, i.e. Bathtub, sink, swimming pool, wet basement, etc.
- Only use dry cloth to clean this product.
- Do not block any ventilation openings, It should not be placed flat against a wall or placed in a built-in enclosure that will impede the flow of cooling air.
- Do not install this product near any heat sources; such as, radiators, heat registers, stove or other apparatus (including heat producing amplifiers) that produce heat.
- Do not defeat the safety purpose of the polarized or grounding-type plug. A polarized plug has two blades with one wider than the Other. A grounding-type plug has two blades and a third grounding prong. The wide blade or the third prong are provided for your safety. If the provided plug does not fit into your outlet, consult an electrician for replacement of the obsolete outlet.
- Protect the power cord being walked on or pinched, particularly at Plugs, convenience receptacles and the point where they exit from the apparatus. Do not break the ground pin of the power supply cord.
- Only use attachments specified by the manufacturer.
- Use only with the cart, stand, tripod, bracket, or table specified by the manufacturer or sold with the apparatus. When a cart is used, use caution when moving cart/apparatus combination to avoid
injury from tip-over.

- Unplug this apparatus during lightning storms or when unused for long periods of time.
- Care should be taken so that objects do not fall and liquids are not spilled into the unit through the ventilation ports or any other openings.
- Refer all servicing to qualified service personnel. Servicing is required when the apparatus has been damaged in any way; such as, power-supply cord or plug is damaged, liquid has been spilled or objects have fallen into the apparatus, the apparatus has been exposed to rain or moisture, does not operate normally or has been dropped.
- WARNING: To reduce the risk of fire or electric shock, do not expose this apparatus to rain or moisture.
FRENCH
Danger
Note to CATV system installer:
This reminder is provided to call the CATV system installer's attention to Section 820-40 of the NEC, which provides guidelines for proper grounding and, in particular, specifies that the cable ground shall be connected to the grounding systems of the building, as close to the point of cable entry as practical.
FCC Information for the User
Caution:
Changes or modifications by the user that are not expressly approved by the party responsible for compliance could void the user's authority to operate the equipment.
NOTE:
This equipment has been tested and found to comply with the limits for a class B digital device, pursuant to part 15 of the FCC rules. These Limits are designed to provide reasonable protection against harmful interference in a residential installation. This equipment generates, uses and can radiate radio frequency energy and, if not installed and used in accordance with the instructions, may cause harmful interference to radio communications. However, there is no guarantee that interference will occur in a particular Installation. If this equipment does cause harmful interference to radio or television reception, which can be determined by turning the equipment off and on, the user is encouraged to try to correct the interference by one or more of the following measures:
1) Reorient or relocate the receiving antenna.
2) Increase the separation between the equipment and the receiver.
3) Connect the equipment into an outlet on a circuit different from that to which the receiver is connected.
4) Consult the dealer or an experienced radio/TV technician for help.

text_image
ANTENNA LEAD-IN WIRE GROUND CLAMPS ANTENNA DISCHARGE UNIT NEC SECTION 810-20 GROUNDING CONDUCTORS GROUNDS CLAMPS ELECTRIC SERVICE ENTRANCE POWER SERVICE GROUPING ELECTRODE SYSTEM NEC ART 250 PART H NEC NATIONAL ELECTRICAL CODEIntroduction
Congratulations on your purchase of the NuVo T2SIR Dual SIRIUS Ready /AM/FM Tuner. Enjoying broadcast music throughout the home has moved into the 21 ^st century with NuVo's T2 Dual Tuner solutions. Whether your preference is traditional AM/FM listening, or SIRIUS Satellite Radio, the T2SIR offers an affordable, specially designed component for whole-home distribution.
The T2SIR's internal NuVoNet communication allows for very unique and complete feedback to all of the NuVo Control Pads.
Table of Contents:
| T2SIR Quick Setup Guide for Use with NuVoNet | page 2 |
Basic Features
| Front Panel | page 4 |
| Back Panel | page 5 |
| NV-T2RC4 Remote Control | page 6 |
I. Installing the T2SIR in the Home
| Connecting the Audio Outputs | page 7 |
| Setting the Audio Outputs for NuVoNet or Standalone use | page 7 |
| AM/FM Antenna Installation | page 7 |
| Connecting for NuVoNet Use | page 8 |
| IR Control of the T2SIR | page 8 |
| RS232 Serial Control | page 9 |
II. T2SIR Use with SIRIUS Radio
| The SIRIUS 8-pin Connector | page 9 |
| SIRIUS Modules and Subscription | page 9 |
| Installing the SIRIUS Antenna | page 10 |
III. T2SIR Front Panel Menu
| Bands | page 10 |
| Channels | page 11 |
| SIRIUS Info | page 11 |
| T2SIR Options | page 11 |
| Edit Presets | page 11 |
| Tuning Mode | page 12 |
| Skipped Channels | page 12 |
| T2SIR Settings | page 13 |
| Operating Mode | page 13 |
| Enabled Bands | page 13 |
| Tuning | page 13 |
| Diagnostics | page 14 |
| Audio Test | page 14 |
| Reset Memory | page 14 |
IV. NuVoNet Control of the T2SIR
| Tuning Up and Down | page 15 |
| Selecting a Locked Channel | page 15 |
| Changing Bands | page 15 |
| Tuning Modes | page 15 |
| Selecting Tuner A and B | page 15 |
| Control Pad Main Menu | page 16 |
| T2SIR Options | page 16 |
V. Using the Tuner Configurator Software
| 1.0 Start | page 18 |
| 2.0 Config | page 18 |
| 3.0 Presets | page 20 |
| Advanced Settings | |
| 4.0 Advanced Config | page 22 |
| 5.0 Update System | page 23 |
| NV-T2SIR Specifications | page 24 |
T2SIR Wiring Diagram
text_image
Diagram shown using an optional NV-SCH-ANT SIRIUS Outdoor Antenna and two SIRIUS NV-SCH1 Home Tuners. SIRIUS% SIRIUS% ANTENA AUDIO TUNERA AUDIO TUNERB R INPUT MAX/MAX RS 2.25 SYSTEM NUVO CAUTION FC PRODUCTIONS SOURCE INPUTS SOURCE LINK SOURCE STATUS INPUTS ZOM-TRUDDER OUTPUTS PART-TRUOUTPUTS SYSTORM NUTIVEA CORTAL LINE Diagram shown using the Grand Concerto SystemT2SIR Quick Setup Guide for Use With NuVoNet
The T2SIR Dual Tuner is the perfect broadcast music solution for whole-home audio. The internal NuVoNet capability of the T2SIR allows it to easily communicate in real time with the NuVo Grand Concerto and Essentia E6G Control Pads. The following is a step-by-step guide for setting up and installing the T2SIR for use with the Grand Concerto and Essentia NuVoNet Suites.
Step 1: Upon unpacking your T2SIR Tuner, establish which audio inputs, 1-6, the T2's A and B audio outputs will represent. Plug
t h e T 2 i n t o a n AC p o we r s o u r c
Step 2: Attach the audio outputs A and B of the Tuner to the appropriate numbered inputs on the Grand Concerto or Essentia S ys t e m.
Step 3: Connect the CAT5 from the NuVoNet output on the rear panel of the Tuner to one of the Device inputs on the Grand Concerto EZ Port or the Essentia Allport. This will enable communication to the System's Control Pads. Note that a single CAT5 connection provides information from both Tuners A and B. A final CAT5 Connection should then be made to the NuVoNet CAT5 input on the back panel of the Grand Concerto or Essenita main amplifier for the NuVoNet RJ45 on the Grand Concerto EZ Port or the Essentia Allport. This completes the necessary connection for the NuVoNet communication.
Step 4: Complete the antenna connections on the back panel of the Tuner using standard RG6 coaxial cable. Quad shielded cable is recommended. When the antennas are connected, the Tuner will begin receiving a signal for both Tuners A and B.
Step 5: When the Tuner is plugged into an AC power source, the front panel display will move through a boot procedure. When this procedure is completed, a message, Uninitialized State Detected will appear.
Step 6: Following the prompt from the display, touch the OK button on the Tuner's front panel control. This will display a regional tuning selection: USA and Canada, Western Europe, Australia, and New Zealand. Make the appropriate selection to match the Tuner's geographic location.
Step 7: Touching OK on the front panel controls will prompt a second screen on the display. This will read, Set Tuner A Mode, Standalone, Source 1, Source 2, Source 3, Source 4, Source 5, and Source 6. The top selection, Standalone, will be highlighted. This choice is used for any purpose that is not NuVoNet communication. Using the down arrow on the far right of the front panel controls, scroll to the desired source input number and touch OK to select. The display will automatically go to Tuner B setup. Repeat the above steps for setting Tuner B. If NuVoNet is not connected or all available sources have been assigned, than the source selections will be grayed out.
Step 8: When the desired source number is selected, the display will return to the first screen. Both outputs A and B will display the lowest FM band frequency by default. At this point, full tuning capability can be done from the Tuner's front panel or an addressed NuVo Control Pad.
Step 9: When both Tuner outputs are set, make sure the NuVoNet CAT5 connection between the Tuners back panel and the systems t e m E ZP o r t is c o m p l e t e d
The T2SIR Tuner is now ready for NuVoNet communication with either the Grand Concerto or Essentia E6G distributed audio systems teams.
Please see the complete installation guide for understanding the full use of your T2SIR Tuner.
text_image
NV-T2SIR Dual SIRIUS Ready AM/FM Tuner STANDSY 1 2 3 4 5 6 7 8 9 10 11 12 13 14 SIRIUS READY COR-D-S HORU INSURANCE ENERGY USAFront Panel Features
- Standby: This blue LED will light when the T2SIR is plugged into an AC power outlet.
- Tuner Highlight: This highlight bar shifts between the Tuner A and B display to indicate which Tuner is being controlled.
- Broadcast Band Display: This line of the front panel display shows the selected broadcast band and frequency or channel. The bands available are AM, FM and optional SIRIUS.
- Metadata Display: This line of the display scrolls RDS, Radio Data Service, information for FM and SIRIUS Radio broadcast information when a SIRIUS-Ready receiver is connected.
- Preset Number: The T2SIR features up to 5 banks of 20 presets each. This indicates the number of the preset bank of the selected preset.
- Antenna Signal: The level of signal level is indicated with up to five bars, five being the best. When listening to FM, full stereo reception is indicated with an abbreviated ST.
- Menu: This capacitive touch panel allows front access to the T2SIR's controls as well as preset listening selections and tuning parameters.
- Power: This button turns the power for the front panel off when tapped, and causes a soft reboot of the operating system when it is held for 3 seconds.
- A/B: By tapping the A/B button, the highlighted Tuner output and control toggles between A and B.
- Band: The Band button toggles between AM, FM and SIRIUS when it is activated for the highlighted Tuner A or B.
- IR Window: The T2SIR will be control via IR through its front panel IR receiver.
- OK: Ok initiates a highlighted Menu choice.
- Disp: This button toggles through the tuning choices for SIRIUS. This is only functional when SIRIUS reception is activated.
- Up and Down Arrows: These arrow buttons provide multiple functions depending on the mode of the Tuner. In normal operation, they initiate tuning up and down through the selected band. When in menu mode, they scroll up and down through the menu choices.
text_image
USB INV 1274A AN IN R N D IN ANTENNA AUDIO L R SIRU S TUNER A AUDIO L R SIRU S TUNER B IR INPUT NoVON at RS 232 SYSTEM NOVO® Mode I: NV-T 250R Dual S/R N S Ready AM TV Tun e RANSO Technology log: 11.1.1.2 Power SN: 8.7.1.3.0 www.savios.it/tech/123-1-2000-0000000000000000000000000000000000000000000000000000000000000000000000000 CAUTION AVTS: 1966-21-1999 1966-21-1999 1966-21-1999 1966-21-1999 1966-21-1999 1966-21-1999 1966-21-1999 1966-21-1999 1966-21- FC ReHS 123.2 M=7.5MΩ 123.2 M=7.5MΩ 123.2 M=7.5MΩ 123.2 M=7.5MΩ 123.2 M=7.5MΩ 123.2 M=7.5MΩ 123.2 M=7.5MΩ 123.2 M=7.5MΩ 123.2 M=8.5MΩ 123.2 M=8.5MΩ 123.2 M=8.5MΩ 123.2 M=8.5MΩ 123.2 M=8.5MΩ 123.2 M=8.5MΩ 123.2 M=8.5MΩ 123.2 M=8.5MΩ 123.MN 123.2 M=7.5MΩ 123.2 M=7.5MΩ 123.2 M=7.5MΩ 123.2 M=7.5MΩ 123.2 M=7.5MΩ 123.2 M=7.5MΩ 123.2 M=7.5MΩ 123.2 M=7. 123.2 M=7. 123.2 M=7. 123.2 M=7. 123.2 M=7. 123.2 M=7. 123.2 M=7. 123.2 M=7. 123.2 M=7. 123.2 M=7. 123.2 M=7. 123.2 M=7. 7Back Panel Features
- Antenna Input: This single F connector is the coaxial cable connection between the T2SIR and the included NV-T2FAA AM/FM a n t e n n a .
- Audio Output: The audio broadcast for AM, FM, or SIRIUS Satellite Radio received by the Tuner module is available through this stereo RCA output. Tuner A and B offer independent audio outputs for use with the NuVo audio systems or third party receivers and amplifiers.
- SIRIUS: This eight-pin connection is a universal SIRIUS communication port. It allows a third party SIRIUS Tuner module to fully communicate with the Grand Concerto or Essentia E6G NuVoNet Systems.
- IR Input: The T2SIR offers a single stereo mini, 3.5mm connection for independent IR control of both Tuner A and B.
- NuVoNet: This single CAT5 connection provides full NuVoNet communication for both Tuners A and B to the NuVo Grand Concerto and Essentia E6G audio distribution systems. This connection is made at the Grand Concerto EZ Port or the Essentia E6G Allport.
- RS232: This DB9 9-pin connector is used for configuration programming (see page 17, V. Using the Tuner Configurator Software) and bidirectional serial control from a third party home automation controller.
- AC Power: The T2SIR is designed to plug into any AC power source.
text_image
PWR A RED B ORN A/B TUNER TUNE BAND P P C DISP 1 2 3 4 5 6 7 8 9 PRE 0 OK FM AM DAB SAT NUVO T2 Tuner NV-T2RC4 REMOTE CONTROLNV-T2RC4 Remote Control
- Power: The power button turns the Tuner on and off.
- Tune Buttons: These buttons are the equivalent of using the Up and Down arrows on the front panel of the T2SIR to tune.
- Band: This button toggles through the Tuner s available broadcast bands.
- Seek Up and Down: The seek buttons will tune to the next available station with the required signal strength for AM and FM use. The signal threshold can be adjusted higher or lower using the Tuner Configurator software (see pg. 18), or through the T2SIR Options menu on the front panel (see pg. 10).
- Preset Tune: These buttons step through the assigned presets. The T2SIR is capable of 5 banks of 20 presets.
- Category Tune: Category Tune is not implemented on this model.
- Pre: This button is used to establish a preset bank and preset number for the frequency being displayed on the selected Tuner. To tune to a specific preset, push Pre followed by the bank number (1-5) then the 2-digit preset number (01-20).
- Tuner A & B LED: This LED glows red when Tuner A is selected and green when Tuner B is selected. This LED glows only momentarily when a button is pushed.
- A/B: This button toggles between Tuner A and Tuner B operation.
- Disp: This button functions only for North American satellite radio use.
- Numeric Buttons: These buttons (0-9) are used to access a specific station frequency or preset.
- OK: This is a select button used for saving presets or entering an AM or FM frequency.
- Band Buttons: These four buttons are a direct select for the tuning bands available through the T2 Tuners. Actual functionality depends on the model Tuner being controlled.
I. Installing the T2SIR in the Home
Connecting the Audio Outputs (Fig. 1)
| T | h | e | T | 2 | S | l | R | h | a |
| T | h | e | s | e | a | r | e | s | t |
| connected to any device designed to receive an analog stereo | |||||||||
| a | u | d | i | o | s | i | g | n | a |
Setting the Audio Outputs for NuVoNet or Standalone use (Fig. 2)
The outputs A and B are individually set from the front panel display of the T2SIR. When the Tuner is initially plugged into a n A C p o w e r display. A message, Uninitialized State Detected (Press OK) will appear. When OK is pressed, the prompt is to select a regional tuning standard. The choices are USA/Canada, Western Europe, Australia, and New Zealand. Use the Up and Do w n a r r o w s OK button to select this. Once regional tuning has been selected, the display will prompt for the use of each output A and B. Using the Up and Down arrows on the front panel, move the highlight to the appropriate use of the Tuner output and touch OK. The choices are Stand Alone, Source 1, Source 2, Source 3, Source 4, Source 5, and Source 6. For a than with the Essentia E6G or Grand Concerto Systems, select Standalone. This will require IR or serial control of the T2SIR's functions. Highlighting the appropriate Source number input for the NuVo system and touching the OK button sets NuVoNet communication. Once Output A is set, the highlight will move to Output B. For operation, both outputs A and B must be set as Standalone or as a NuVoNet Source.
When the Tuner's outputs are set, they will return to FM 87.9, or the minimum FM band setting for the selected regional tuning parameters. At this point the T2SIR is ready for either NuVoNet communication or standalone use, depending on the s e t t i n g ma d e
Fig. 1
text_image
s t w o i n d e p e n d a r d s t e r e o 1 . A U C I O M T U N E R A T U N E R B A U C I O M T U N E R A T U N E R B S o u D U S U T U N E R D U S U T U N E R D U S U T U N E R D U S U T U N E R D U S U T U N E R D U S U T U N E R D U S U T U N E R D U S U T U N E R D U S U T U N E R D U S U T U N E R D U S U T U N E L D U S U T U N E L D U S U T U N E L D U S U T U N E L D U S U T U N E L D U S U T U N E L D U S U T U N E L D U S U T U N E L D U S U T U N E L D U S U T U N E L D U S U T U N E M D U S U T U N E M D U S U T U N E M D U S U T U N E M D U S U T U N E M D U S U T U N E M D U S U T U N E M D U S U T U N E M D U S U T U N E M D U S U T U N E M D U S U T U N E L D U S U T U N E L D U S U T U N E L D U S U T U N E L D U S U T U N E L D U S U T U N E L D U S U T U N E L D U S U T U N E L D U S U T U N E L D U S U T U N E A D D D D D D D D D D D D D D D D D D D D D D D D D D D D D D D D D D D D D D D D D D D D D D D D D D D D D D D D D D D D D D D D D D D D D D D D D D D D D D D D D D D D D D D D D D D D D D D D D D D D DFig. 2
text_image
Uninitialized State Detected (Press OK) e MENU 0 A/B t h DISP BAND OK e r Regional Setup US and Canada Western Europe Australia MENU A/B DISP BAND OK Set TumerA Mode Standalone Source 1 Source 2 MENU A/B DISP BAND OK fo r b o t h o u t p uAM/FM Antenna Installation (Fig. 3)
T h e T 2 S I R i s antenna. The antenna is designed to work actively with the Tuner using standard 75-ohm coaxial cable. Quad-shielded cable is recommended for this purpose. The advantage of the active antenna technology is the remote location capability, up to 200 feet from the T2SIR location, without the need for an external power supply. The termination at the antenna and Tuner is a standard F style connector. No software application or configuration is necessary beyond making the c ab l e c on n e c t
Note, for best results, the T2FAA antenna should be located as high as possible, either in an attic or outside. If you choose to use a third party antenna, other than the T2FAA, you must use the forced off setting from the menu to allow the signal to pass through to the T2SIR, (see section III. T2SIR Front Panel Menu, Antenna Power, pg. 14).
Connecting for NuVoNet Use (Fig. 4)
Once audio outputs A and B are set for NuVoNet, the T2SIR is ready to communicate in real time with the Grand Concerto or Essentia E6G audio distribution systems. To complete the connection, all that is necessary is a single CAT5 cable from the NuVoNet output on the T2SIR's back panel to one of the Device inputs on either the Grand Concerto EZ Port or the Essentia E6G Allport. Since the outputs of the Tuner must be set as a specific source number input for NuVoNet communication, the number of the Device connection used is irrelevant to the system's operation. Once the connection is complete, the Tuner is ready to fully communicate with NuVoNet.
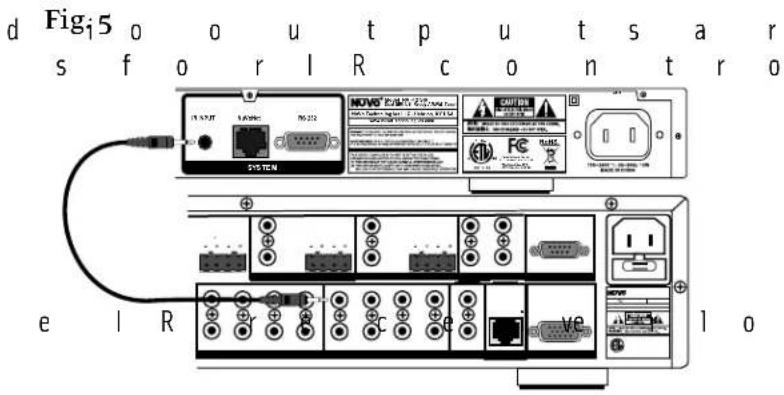
IR Control of the T2SIR (Fig. 5)
The T2SIR can be used without NuVoNet as a standalone AM/FM/SIRIUS-Ready Tuner. The IR receiver is always active, however control through IR is typically done in Standalone mode, (see section I. Setting the Audio Outputs for NuVoNet or Standalone use, p g .7 ).
text_image
Fig. 3 h i p p e d w i t h The NuVo active antenna can be located up to 200 feet from the T2SIR Tuner. NUVo i o n a† eA AUDIO a Sirius cA AUDIO h Sirius TUNERA TUNERS
natural_image
Close-up of a wooden structure with exposed beams and structural supports, no visible text or symbolsFig. 4

text_image
Diagram showing connection between a device and its internal components, including ports, cables, and a display screen.0 n c e t h e a u t h r e e me t h o d your control device using a mono 3.5mm patch cable plugged into the Direct IR input on the back panel of the T2SIR. Tuners A and B feature discrete commands, allowing both Tuners to be controlled independently from one input. The second method for IR control is to attach an IR emitter over the IR receiver on the front panel, and the third method is to aim the remote c o n t r o l a t t h
RS232 Serial Control
The T2SIR features a bidirectional DB9 port for serial control. This enables the Tuner to be controlled via a third party home automation system and will in turn issue present state commands back to the controller. Potentially, all aspects of NuVoNet communication can be emulated using the serial control capability. The necessary protocol for serial use can be downloaded from the NuVo website ProZone at
II. T2SIR Use with SIRIUS Radio
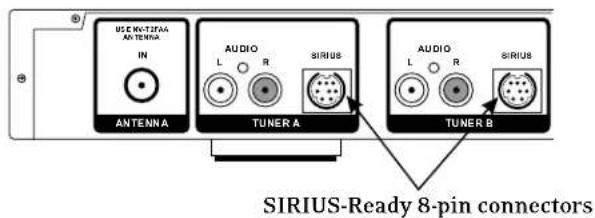
The SIRIUS 8-Pin Connector (Fig. 6)
Each Tuner, A and B, has a SIRIUS-Ready connector on its back panel. This connector is ready to receive the Tuner signal and related metadata from a SIRIUS receiver. Any SIRIUS receiver equipped with the SIRIUS connector will communicate with the T2SIR's input. The cable necessary for this connection is typically supplied with the SIRIUS receiver. Once the 8-pin connection is made from the SIRIUS receiver to the T2SIR, SIRIUS will be recognized as a radio band for either Tuner A or B.
SIRIUS Modules and Subscription (Fig. 7)
There is not a specific SIRIUS receiver that must be used in conjunction with the T2SIR. Several are on the market, and the only pre-requisite is that the receiver used has the 8-pin SIRIUS-Ready connector. NuVo does have the NV-SCH1 home receiver module as a convenient, inexpensive solution for the T2SIR. Each SIRIUS Tuner has an ID associated with it. This number is typically found printed on the SIRIUS Tuner or by going to the receiver must be activated using its ID number.
text_image
d Fig15 o o u t p u t s a r s f o r l R c o n t r o 16.2787 SUS TEN NOV® 2000/2001 USB COMFD FC e l R c e ve 1 oFig. 6
text_image
USE MULTIPARA ANTENNA IN ANTENNA AUDIO L R SIRIUS TUNER A AUDIO L R SIRIUS TUNER B SIRIUS-Ready 8-pin connectorsFig. 7
Diagram shown using a NV-SCH1 SIRIUS Home Tuner

text_image
SIRIUS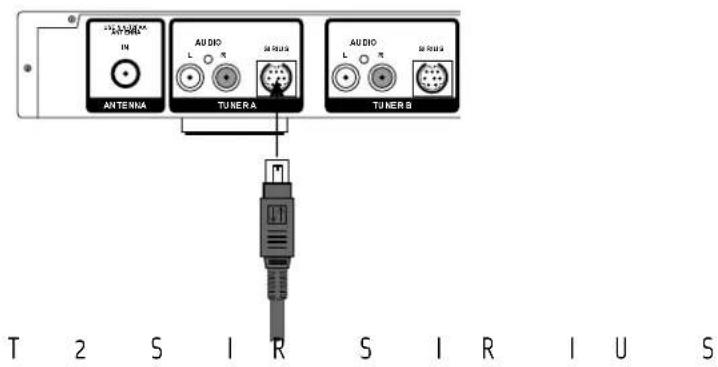
text_image
ANTENA AUDIO TUNERA AUDIO TUNER B T 2 S I R S I R I U SYour SIRIUS Tuners must be activated through SIRIUS. This can be done online at www.SIRIUS.com.
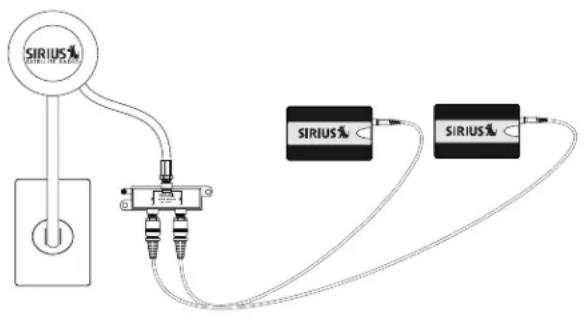
Installing the SIRIUS Antenna (Fig. 8)
There are several versions of SIRIUS antennas on the market. The antennas best suited for use with the T2SIR are designed for outside placement, such as the NV-SCH-ANT also available from Directed Electronics as model 14245. An antenna with an F connector designed for use with coaxial cable is recommended. Often it is necessary for the antenna to have an unimpeded view of the sky to receive a signal. Figure 8 shows this type of application with the NV-SCH-ANT antenna with its included signal splitter for use with two SIRIUS receivers. The T2SIR is shipped with two NV-T2FSD AM/FM/Satellite Diplexers. This allows the AM/FM and SIRIUS signals to be combined and brought to the back of the Tuner. There, the second NV-T2FSD can be used to split the signal a second time. This allows the AM/FM signal to come into the antenna input on the T2SIR back panel and the SIRIUS signal is then routed to the SIRIUS receiver or receivers, depending on the application. It is not necessary to place the AM/FM and SIRIUS antennas in t h e s a m el o c a
It is important to note that Directed Electronics has an outdoor antenna, model 14240, that has a 50 ohm connection intended for RG58 cable. This model is not recommended for use with the NV-T2SIR Tuner.
III. T2SIR Front Panel Menu (Fig. 9)
The Menu button on the front panel of the T2SIR allows access to the tuning and functionality of both Tuners A and B. The menu selections are the same for both, and touching the A/B button moves the highlight between the two Tuner outputs.
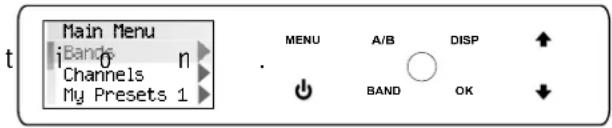
Bands (Fig. 10)
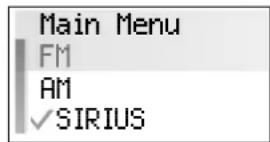
The Bands menu is a simple toggle through the available broadcast bands of each Tuner. SIRIUS is only present if a SIRIUS receiver has been plugged into either Tuner A or B. The currently selected band will be displayed with a check mark.
Fig. 8
flowchart
graph TD
    A["Power Outlet"] --> B["Switch"]
    B --> C["Two USB cables"]
    C --> D["SIRIUS Cable Interface"]
    D --> E["Output"]
    style A fill:#f9f,stroke:#333
    style E fill:#bbf,stroke:#333
Fig. 9
text_image
Main Menu Bands Channels My Presets 1 MENU A/B DISP ↑ BAND OK ↓Fig. 10
Channels (Fig. 11)
The Channel menu is a SIRIUS function. It is a quick access to the categories associated with SIRIUS. When selected, each category will expand to display the associated channels. When the SIRIUS input is not in use, this will appear grayed out.
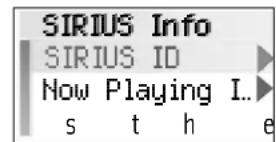
SIRIUS Info (Fig. 12)
There are two sub-menus within this choice. It is only active if the SIRIUS input for the selected Tuner is being used.
SIRIUS ID: T h i s d i s p with the connected SIRIUS Tuner. This number is referenced when activating the Tuner through SIRIUS, or for customer service issues.
Now Playing Info: This scrolls the metadata for a selected SIRIUS Channel.
T2SIR Options (Fig. 13)
The options menu has three main tuning sub-menus. These are t u n i n g d e fa u
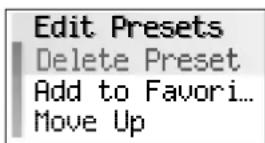
Edit Presets (Fig. 14): This is a great tool for allowing a currently selected channel to be saved as a preset. As a number preset is selected, the display will prompt to Assign to current channel . When selected, the T2SIR will save the frequency and associated short name of the channel. There are 5 banks of 20 presets each available. To add a preset to favorites, highlight and select an existing preset. This will bring up a second menu with several choices: Delete Preset, which will erase the highlighted preset from the list;
Add to Favorites p l a c e into the Favorites menu available at each Control Pad; Move Up and Move Down moves the highlighted preset up or down within the list of presets; Move to Top and Move to
Bottom p l a c e s number 1 position or to the last available p o si t i o n .
Fig. 11

text_image
Channels All SIRIUS Cha Pop RockFig. 12
text_image
SIRIUS Info SIRIUS ID Now Playing I... s t h eFig. 13
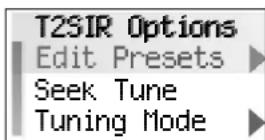
Fig. 14
s t h e h i g h l i g h
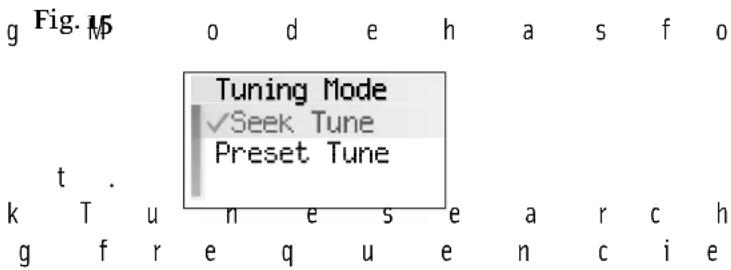
Tuning Mode (Fig. 15): T u n i n that set defaults for the way in which the T2SIR will tune through channels or frequencies. The SIRIUS only functions will be grayed out when a SIRIUS receiver is n o t p r e s e n
Seek Tune (Am/FM only): S e e f o r s t r o n
will stop at the next frequency that meets the set tuning parameters. This menu option turns seek on or off. When Seek Tune is turned off, Step Tune is the default.
Preset Tune: When turned on, the Preset Tune mode will only stop at channels or frequencies that have been saved as presets i n t he c ur r e
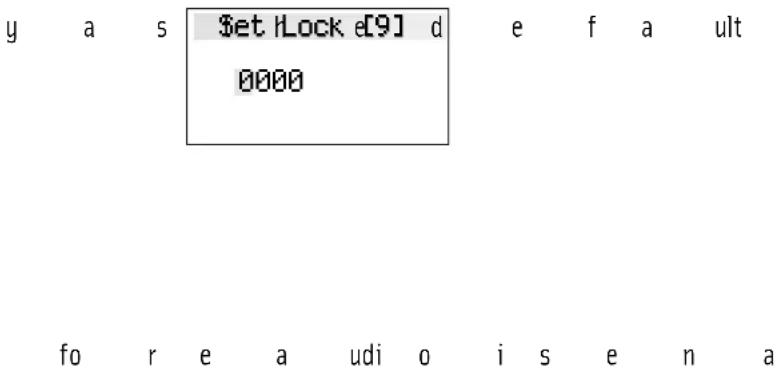
Parental Lock (SIRIUS only) (Fig. 16): T h requires a 4-digit security code. The default parental lock code is 5555. To access the sub-menus, you must enter the default 5555. This is done by using the Up arrow to scroll to the first 5, then touching OK on the front panel moves the highlight to the second number. When 5555 is set, you will then have access to the Parental Lock setup.
Set Security Code (Fig. 17): T hi you set a new code for Parental Lock purposes. The new code is set in the s a me w a described above. Once the new code is set, it will replace the default.
Locked Channels: This is a complete list of the available SIRIUS channels. When specific channels are highlighted and selected, they are added to the Parental Lock feature and will require the 4-digit security
c o d e b e
Skipped Channels (SIRIUS only): This allows you to highlight and select unwanted channels from the SIRIUS channel lineup. These selected channels are removed from SIRIUS tuning. They can be added back in at a later date by highlighting the channel and touching OK, removing the associated check ma r k .
text_image
g Fig. 15 o d e h a s f o Tuning Mode ✓Seek Tune Preset Tune t . k T u n e s e a r c h g f r e q u e n c i eFig. 16

text_image
Lock Code? [9] 5555 n t b a n d .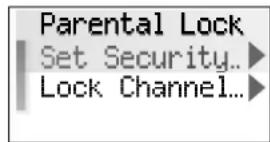
text_image
Parental Lock Set Security... Lock Channel...s le t s
Fig. 17
text_image
y a s $et Lock e[9] d e f a ult 0000 fo r e a udi o i s e n aT2SIR Settings (Fig. 18)
| T | h | e | r | e | a | r | e | s | e | v | e | r | a | T2SIR Settings | e | r | a | t | i |
| c | h | o | i | c | e | : | Operating Mod |
| Operating Mode (Fig. 19): T h i s w choice for each Tuner output A and B with a check m a r k. T h e c |
| Source 3, Source 4, Source 5, and Source 6. Here, the | |||||||
| s | o | u | r | c | e | n | u |
| initial power on setting. Unavailable NuVoNet sources | |||||||
| w | i | l | l | b | e | g | r a |
| Enabled Bands: Broadcast bands associated with each Tuner can be turned off here. This is useful especially for AM where an acceptable AM signal is not possible. If SIRIUS is disabled, all SIRIUS related menu items w i l l b e r e m |
Tuning: There are four sub-menus that set default
| t | u | n | i | n | g | p | a | r | a | m | e | t | e | r | s | f | o | r | th |
Fine Tuning: This reduces the frequency step to 50 kHz in FM and 1 kHz in AM. With today's digital Tuners, this feature is rarely used.
Regional Setup: Regional Setup sets the d e f a u l t t t h e w o r l
Western Europe, Australia, and New Zealand. Custom is grayed out. This must be set using the Configurator Software discussed later in
t h i s m a n u a l
Seek Thresholds (Fig. 20): T h e signal level for AM and FM can be set in this
| m | e | n | u | . | T | h | e | r | e | a | r | e | th | r | e | e | d | |
| b | e | i | n | g | th | e | l | o | w | e | s | t | , | r | eq | u | i | r |
| t | o | b | e | r | e | c | o | g | n | i | ze | d | a | n | d | 3 | b | |
| r | e | q | u | i | r | i | n | g | a | w | e | a | kt | o | m | o | d |
recognized. The default is 2, the middle level.
Brightness: Brightness sets the overall level
| o | f | th | e | d | i | s | p | l | a | y. | T | h | e | r | e | a | r | e |
| b | r | i | g | h | tn | e | s | sto | c | h | o | o | o | s | e | f | r | o |
Fig. 18
| v | e | r | a | T2SIR Settings | e | r | a | t | i |
| Operating Mod | |||||||||
| Enabled Bands | |||||||||
| i | l | l | d | Tuning | p | a | y | t | h |
| aT2SIR Settings | e | r | a | t | i |
| Operating Mod | |||||
| Enabled Bands | |||||
| Tuning p | a | y | t | h | e |
| e | d | Operating Mode: | |
| Tuner A | > | ||
| Tuner B | > | ||
| Operating Mode | |
| Tuner A | |
| Tuner B | |
| Set Tuner A No | ||||||
| e | Standalone | s | o | p | p | o |
| ✓ | Source 1 | |||||
| Source 2 | ||||||
| e | t | e | r | s | f | o | r | th |
Fig. 20
| u | n | i | n | Seek Thresholds | a | n | d | a |
| . | T | h | fM Threshold | o | i | c | e | |
| FM e Threshold | b | s |
| n g s | a | n | d | a |
| FM Threshold | o | i | c | e |
| FM e Threshold | s |
| AM ThresholdLevel 10√ Legel 2nLevel 3 | ze | d |
Antenna Power: T h e c h
Automatic, Forced ON a n d Forced OFF.
Automatic is the default and allows the T2SIR to recognize a present SIRIUS receiver. In Automatic the T2SIR lets the attached SIRIUS receiver supply the 5 volts to both the SIRIUS and T2FAA antennas. In instances where you intend on using a third party FM antenna, the Forced OFF choice is necessary to block DC voltage needed for AM reception. Forced ON supplies DC voltage for AM reception in the presence of a SIRIUS receiver which is not sharing an antenna cable with the NV-T2FAA a n te n n a .
Diagnostics (Fig. 21): Signal strength for AM, FM and SIRIUS reception and the current firmware version number are provided in the Diagnostics menu.
Version: This displays the T2SIR's current firmware version. Upgraded versions are posted on the NuVo website ProZone and are loaded onto the Tuner by downloading a new configuration from the Tuner Configurator software through the RS232 port.
AM/FM Signal Strength (Fig. 22): T h i s
displays two levels for Tuners A and B. RSSI, received signal strength indicator, is a measurement in dBuV, and SNR, signal to n o i s e i s m
SIRIUS Signal Strength (Fig. 23): T h separate measurements are provided in levels 1-4, None, Weak, Good, or Strong. The measurements are SAT (satellite), TERR (terrestrial), and COMBINED.
Audio Test: The test tone is intended to verify an audio signal from an attached SIRIUS receiver. The tone will continue until you tune up or down, or c h a n g e b
Reset Memory (Fig. 24): This should be used only when it is advantageous to remove all settings from the Tuner. Choosing yes to reset memory returns the T2SIR to its factory default.
Fig. 21 i c e s h e r e a r
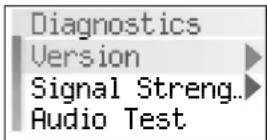
Fig. 22
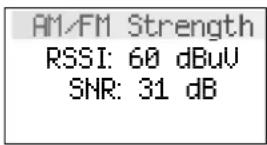
Fig. 23
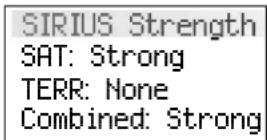
Fig. 24

IV. NuVoNet Control of the T2SIR
N u V o N e t a l l o w Pad to completely control the T2SIR functionality. The important feature of the Control Pad is its multi-line OLED, organic light emitting diode, display which give complete Tu n e r fu n c t i o n fe
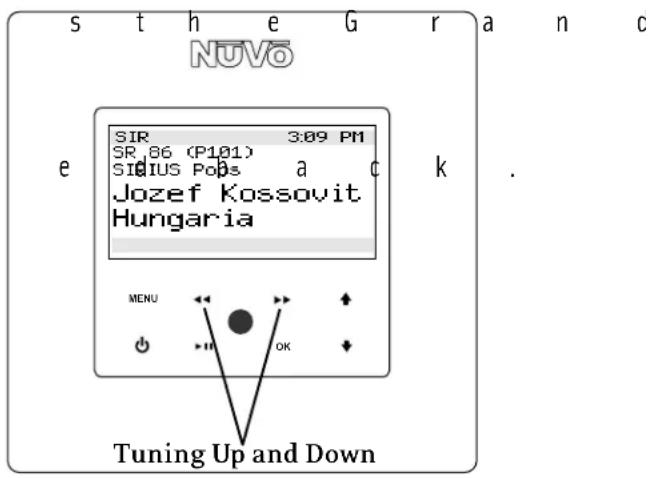
Tuning Up and Down (Fig. 25)
Tuning at the NuVo Control Pad is accomplished by touching arrow forward >> or arrow back <<. A single touch advances one channel or station frequency based on the tuning method selected, and a touch and hold will rapidly change the channel o r fr eq u e n c y.
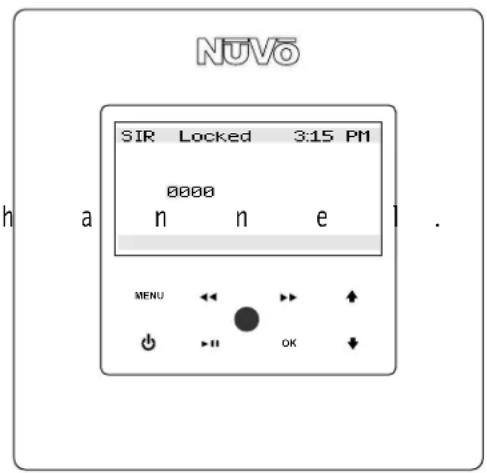
Selecting a Locked Channel (SIRIUS only) (Fig. 26)
If a locked channel is selected, a four-digit security code must be entered to listen to the audio. The code will appear as 0000 on the display with the first 0 highlighted. The up and down arrow buttons are used to scroll to the desired number and touching the OK button advances the highlight to the next 0. Repeat the steps to enter the remaining numbers until all four are entered. Touching the OK button will then allow access to t h e s e l e c t e d
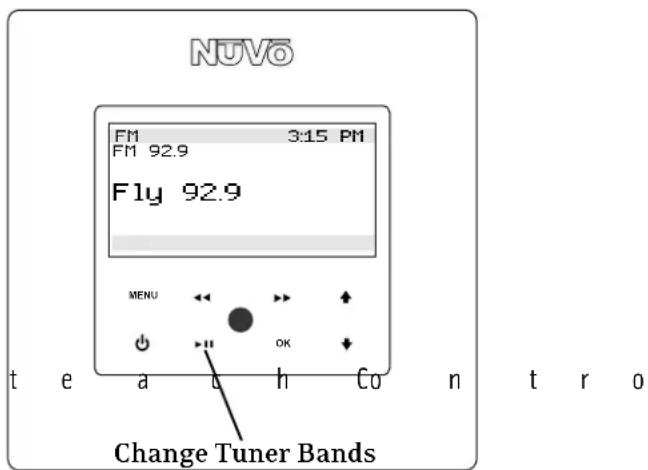
Changing Bands (Fig. 27)
In normal play mode, touching the Play/Pause button changes the broadcast band. This can also be done in the Bands menu selection. If no SIRIUS receiver is present or a band has been turned off, (see III. T2SIR Front Panel Menu, T2SIR Settings, Enabled Bands, pg. 13), only the enabled bands will be present.
Tuning Modes
The available tuning modes are Seek and Preset tune. Seek is an AM/FM function that searches for frequencies strong enough to latch onto. Preset tune moves to the next preset in the list. Touching and holding the Play/Pause button advances to the next tuning mode, seek or preset.
Selecting Tuner A or B
In normal play mode, selecting a new source is done by touching the OK button. Each touch will advance to the next source. Accessing the sources can also be done from the
S o u r c e s me n u a
Fig. 25
text_image
s t h e G r a n c NUVO SIR 3:09 PM SR_86 (P101) SIUS Pobs a c k . Jozef Kossovit Hungaria MENU OK Tuning Up and DownFig. 26
text_image
NUVO SIR Locked 3:15 PM 0000 n n e MENU OKFig. 27
text_image
NUVO FM 3:15 PM FM 92.9 Fly 92.9 MENU OK Change Tuner Bands t e a b h C o n t r oControl Pad Main Menu (Fig. 28)
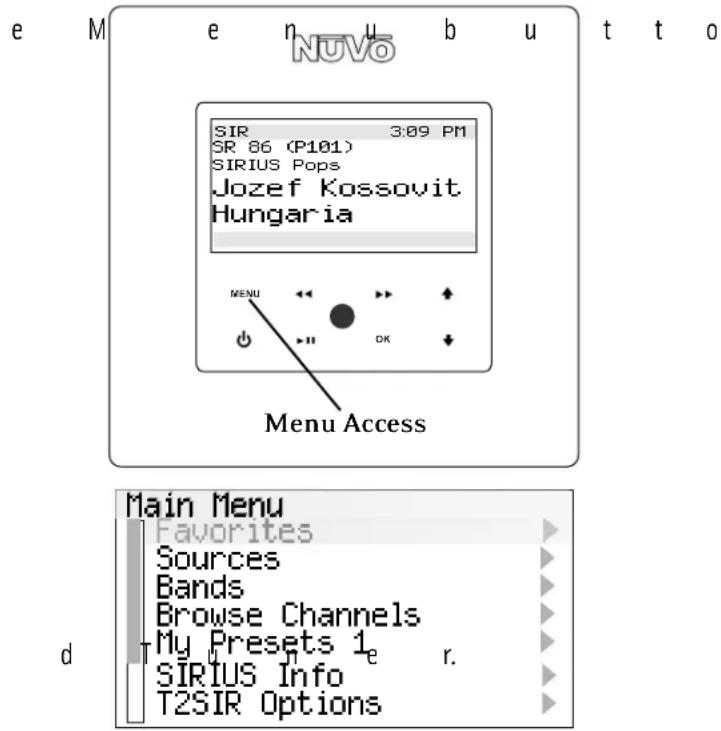
T o u c h i n g t h Main Menu where the user has several control choices. Once in the Control Pad Menu, the arrow Up and Down buttons move the highlight up and down. When the desired choice is highlighted, touch the OK button to initiate the command.
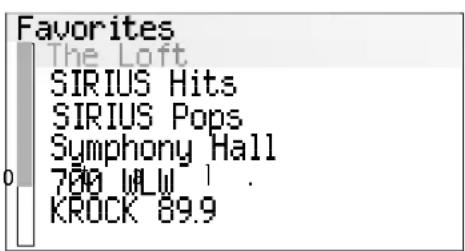
Favorites (Fig. 29): The NuVoNet system places the top 20 presets or playlists for each source in one alphabetical list. This allows the user to make a selection without having to choose that source first.
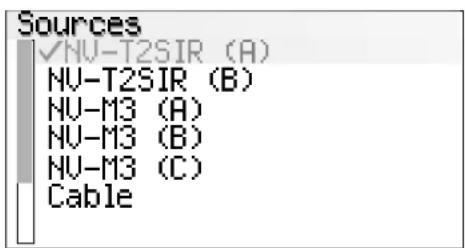
Sources (Fig. 30): Sources 1–6 are listed in this menu for easy access. NuVoNet automatically assigns the names T2SIR (A) and T2SIR (B) when the NuVoNet source number is established at the Tuner, (see
Section I. Setting the Audio Outputs for NuVoNet or Standalone use, p g .7 ) .
Bands: This displays the available broadcast bands for t h e s e l e c t
Browse Channels: This is a SIRIUS function and allows browsing of all the available channels or browsing by c a t e g o r y.
Presets: Presets only appear if channels or frequencies have been saved. The T2SIR allows for 5 banks of 20 presets each. The groups of 20 are automatically defined as My Presets 1, My Presets 2, etc. unless they are given preset group names in the Tuner Configurator Software. When a preset is chosen the front panel will display its bank and preset number. For example, P103 notes preset bank 1 and p r e s e t 3 o f2
SIRIUS Info: Like the front panel menu, the SIRIUS receiver ID is displayed and the specific information for the current audio selection is displayed.
Fig. 28
text_image
e M e n u b u t t o NUVO SIR 3:09 PM SR 86 (P101) SIRIUS Pops Jozef Kossovit Hungaria MENU Menu Access Main Menu Favorites Sources Bands Browse Channels My Presets 1e r. SIRIUS Info T2SIR OptionsFig. 29
text_image
Favorites The Loft SIRIUS Hits SIRIUS Pops Symphony Hall 700 WLW 1 . KROCK 89.9Fig. 30
text_image
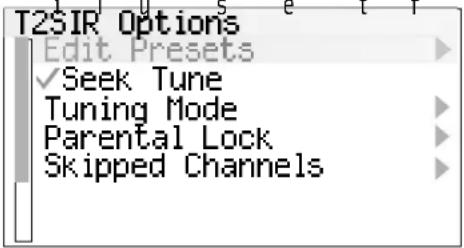
Sources ✓NV-T2SIR (A) NV-T2SIR (B) NV-M3 (A) NV-M3 (B) NV-M3 (C) CableT2SIR Options (Fig. 31): T u n i n T 2 S I R a r e e
menu. There are five sub-menu choices:
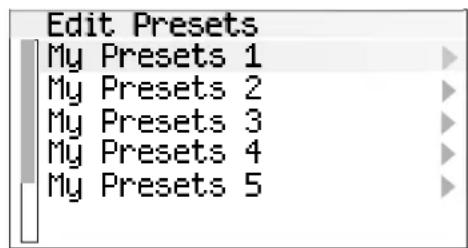
Edit Presets (Fig. 32): This allows the user to establish the current channel or station frequency as a preset. The menu provides five banks of 20 presets each. Choosing a preset bank will then give you the option of saving the current channel. To add a preset to favorites, highlight and select an existing preset. This will bring up a second menu with several choices. Delete Preset, will erase the highlighted preset from the list. Add to
Favorites laces the highlighted preset into the Favorites menu available at each Control Pad. Move Up and Move Down moves the highlighted preset up or down within the list of presets. Move to Top and Move to Bottom places the highlighted preset in the number 1 position or to the last available position.
Seek Tune: Selecting Seek Tune turns the frequency seek function on and off. When check marked, seek is active. This is an AM/FM function that allows the Tuner to search within the selected band until a strong signal is found. The level of signal necessary for the seek function can be set within the T2SIR menu, (see Section III. T2SIR Settings, Seek Threshold, pg. 12).
Tuning Mode: Tuning Mode changes the tuning between Seek Mode and Preset Mode. If Preset is chosen, touching the arrow forward button >>, or arrow back button <<, scrolls through the saved presets.
Parental Lock (Fig. 33): This is a SIRIUS function that allows a set four-digit code lock out for channels with material questionable for children. When a locked channel is selected, four zeros will appear in the center of the display. The first zero will be highlighted. To access a parental lock channel, use the arrow Up and Arrow down buttons to scroll to the desired number, then touch the OK button.
g Fig. 3a a r a m e t e r s a s i l u s e t f r o m
text_image
T2SIR Options Edit Presets ✓Seek Tune Tuning Mode Parental Lock Skipped ChannelsFig. 32
text_image
Edit Presets My Presets 1 My Presets 2 My Presets 3 My Presets 4 My Presets 5
text_image
Assign Preset Assign to Current Chan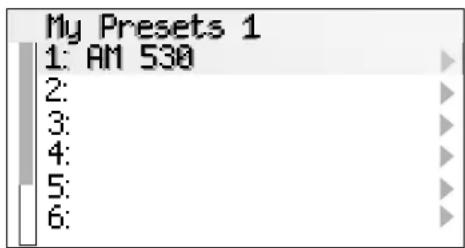
text_image
My Presets 1 1: AM 530 2: 3: 4: 5: 6:Fig. 33

text_image
Parental Lock Set Security Code Locked ChannelsT h i s w i l l m
Repeat the steps to set the next number. When all four numbers have been entered, the channel will be accessible. The default 5555 code must be entered to reach the second menu level which allows a new code to be set, and a list of the available SIRIUS channels allows the specific channels to be selected for parental lock.
Skipped Channels: Undesired SIRIUS channels can be selected from this list of channels and removed from tuning. To select a channel, move the highlight to that channel listing and touch the OK button. This will place a check mark next to that station. When checked, it will not appear when browsing or tuning th ro u g h c h
V. Using the NuVo Tuner Configurator Software
The Configurator Software is tabbed, wizard style software that easily moves you through the T2SIR setup and implementation as a NuVoNet source or as a standalone source controllable by IR or Serially. Within the Configurator you can setup the source address and presets for an installation and download the information to the T2SIR's flash memory prior to its installation. Its non-volatile memory will retain the configuration indefinitely while the Tuner is unplugged.
1.0 Start (Fig. 34)
The start tab allows you to load an existing configuration, create a new one, or retrieve and edit a configuration from the Tuner. When the computer is connected to the Tuner via its RS232 port, you can click on Retrieve Configuration from Tuner and make any necessary edits. When the edited version is downloaded to the Tuner, the previous configuration will be overwritten.
To start a new configuration or open an existing configuration, click on the Load Existing or Create New Configuration button. The File Name field allows you to give a new configuration a new name.
Fig. 34 v e t h e h i g h
text_image
Netto T2G Tuner Configurator - v1 (Modified) File Edit Tools Start | Contig | Pstoio | Updates Open T2G Tuner Configurations File Look in Config Cincinnati, OH.12pc Kansas City.82pc Long Beach, CA.12pc Long Island.82pc Minneapolis.82pc Orlando.82pc San Francisco.82pc Seattle.82pc West Palm Beach.82pc My Documents My Documents My Computer My Network Places File name: None Files of type: T2G Tuner Config Open Cancel < Print Next > < Back Next >2.0 Config (Fig. 35)
The aConfig tab is for the initial setup which determines basic Tuner operation. Within the Config Tab the first step is to establish the correct Tuner model being configured. The choices are NV-T2FXG, NV-T2DXG, NV-T2FXG, NV-T2SIR, NV-T2FAM, and NV-T2DAB. To work with the NV-T2SIR, make that model choice from the Tuner Mode menu.
Fig. 35
text_image
Multi 12G Tuner Configurator -- x1 (Modified) File View Help Start Config Projects Update System Tuner Model NV-T25R NV-T2DFG NV-T2DCG NV-T206B NV-T25R NV-T24M NV-T206B Tuner A: NW-T25R Tuner B: Stand Alone Autocdotly Tun Tuner on when power is applied Beginner: Level 0 (Max) Regional Setup: Region: USA & Canada Disable Alt Band Disable Fix Band Disable Sirius (A) Disable Sirius (B) Reset Config < Back Next >2.1 NuVoNet Operating Mode (Fig. 36):T h i s d allows you to select between Standalone or as a NuVoNet
Source 1-6 . If you are using the Tuner as NuVoNet source with a NuVo System, you must select a unique, dedicated source input for each Tuner (A or B) being configured. Stand alone will set the output for any use other than NuVoNet. Making the appropriate NuVoNet Source selection properly sets the Tuner's outputs for full communication when the
c o n fi g u r a t i o
Fig. 36
text_image
NuTo T2G Tuner Configurator -- Jones v1 (Modified) File Edit Help Start Confio Presents Update System Tunes Mode NM-725(B) NuTo Net Operating Mode Tunes A Source 1 Tunes B Source 1 Automatic Source 2 When pA Source 3 Source 4 Source 5 Source 6 Stand Alone Brightness Level 0 (Max) Regional Setup Region: USA & Canada Disable Alt Band Disable PH Band Disable SIRIUS (A) Disable SIRIUS (B) Reset Config < Back Next >2.2 Regional Setup (Fig. 37): Depending on your geographic location, the Tuner needs to be set for the proper tuning standard. The choices are USA & Canada, Western Europe, Australia, and New Zealand. Countries outside these
g e o g r a p h i c section V. Advanced Settings: 4.1 Custom Regional Setup, pg.21). Note that the NV-T2SIR is specifically designed for USA and Canada use. AM/FM reception will work worldwide, but SIRIUS is only available in North America.
Fig. 37 p d o w n m e

text_image
NuBio 1.2G Tuner Configurator -- Jones v1 (Modified) File Edit Sub Start Config Pixels Update System Tuner Model: NV-T28IN NuBio Net Operating Mode Tunes A Stand Alone Tunes B Stand Alone Automotive Tun Tuner on when power is applied n i s d o w n l o Brightness Level 0 [Max] Regional Setup Region USA & Canada USA & Canada Western Europe Australia New Zealand Double AM Band Double PA Band Double SIRIUS (A) Double SIRIUS (B) Reset Config < Back Next >2.3 Brightness (Fig. 38): This sets the intensity of the display for the Tuner. The factory default is the maximum level, 8.
Fig. 38
text_image
NuTe T2G Tuner Configurator -- Jones v1 (Modified) File View Help Start Config Previse Update System Tuner Model: NM-T2S IR NuTe Net Operating Mode Tunes 2: Stand Alone Tunes 3: Stand Alone Automatically Turn Tuner on of any power is applied Brightness: Level 8 (Max) Regional Setup: Level 1 (Min) Level 2 Peglass: Level 3 Level 4 Level 5 Level 6 Level 7 Level 8 (Max) □ Create A/B Band □ Create B/B Band □ Create SIRIUS (A) □ Create SIRIUS (B) Reset Config < Back Next > o c a t i o n s o2.4 Auto-On (Fig. 39): In the event of loss of power, or if the Tuner is unplugged, the Tuners can be set with this check box to automatically turn on when power is restored. Note that this feature is only necessary for non-NuVoNet use, since NuVoNet causes the Tuners to turn on when a zone within the NuVo System is turned on. The Tuners will turn off when all NuVo
2.5 Disable Bands (Fig. 40): T h i s s e you to remove unwanted Tuner bands from the NV-T2SIR functions. The SIRIUS functions will be grayed out if you do not plug in an active SIRIUS Tuner, but checking the Disable SIRIUS boxes will eliminate any SIRIUS information from displaying on the Control Pads. This is a good option when you have no intention of including SIRIUS radio.
Reset Config: This button will reset all of the configuration information to the original factory default settings.
Fig. 40
text_image
NuVo T2G Tuner Configurator -- Jones v1 (Modified) Start Config Presets Update System Tuner Mode: NV-T25JR Nuvia Net Operating Mode Tunes A: Stand Alone Tunes B: Stand Alone Automatically Turn Tuner on when power is applied Brightness: Level 0 (Max) Regional Setup Region: USA & Canada Disable AM Band Disable FM Band Disable SIRIUS (A) Disable SIRIUS (B) Reset Config < Back Next >3.0 Presets
The Tuner Configurator software is an important setup tool for easily setting Tuner presets and loading them on the NV-T2SIR non-volatile memory prior to the installation. NuVoNet will automatically read the presets and make them available on the C o nt r o l Pa ds .
3.1 Preset Information (Fig. 41): This section provides a display name, band and tuning frequency or channel selection for each preset. As the Preset information fields are populated, the same information will automatically fill the highlighted fields to the left. Each of the 5 available banks of presets will hold 20 separate AM, FM or SIRIUS channel selections. The default setting will show two available banks of 20 with the default names, My Presets 1 and My Presets 2. i e s o f c h e c k b When the AM or FM bands are selected and a station name is typed into the Name field, the Frequency dialer will become active. As you scroll up and down the frequency list, the highlighted Frequency column to the left will automatically populate. When SIRIUS is selected, a drop down menu will appear with all the available SIRIUS channels. Making the selection is simply done by scrolling to the desired channel and left clicking on it. While your computer is connected to the NV-T2SIR via the serial RS232 port, you can click on the Get SIRIUS Channel List from the Tuner button and repopulate the drop down menu with the most current c h a n ne l l i s t .
Favorite: This check box will add any highlighted preset to the Favorites menu on the Control Pads. Up to 20 can be selected for each Tuner band. When a preset is selected, it will appear in the far right column labeled Favorites. Any preset can be added or removed from the list by highlighting and checking or unchecking the Favorite box.
Fig. 41
text_image
NuVo T26 Tuner Configurator -- Jones1 v1 (Modified) File View Help Scan Coding Project Update System Project Information Start: FM Name: VAVY Programm: $0 ✓ Project Reset Reset Gut SPIUS Channel Lethrow Tunes Add Back Rename Back Create Back Reset Project < Back Next > My Project 1 1 WACC PM BLS3 Yes My Project 1 2 My Project 1 3 My Project 1 4 My Project 1 5 My Project 1 6 My Project 1 7 My Project 1 8 My Project 1 9 My Project 1 10 My Project 1 11 My Project 1 12 My Project 1 13 My Project 1 14 My Project 1 15 My Project 1 16 My Project 1 17 My Project 1 18 My Project 1 19 My Project 1 20 My Project 1 21 My Project 1 22 Add Back Rename Back Create Back Reset Project3.2 Add Bank (Fig. 42): I f y o u w a the Add Bank button will bring up a window that allows you to name the bank and automatically add it to the Tuner's p r e s e t s .
Fig. 42
text_image
Nefra T2G Tumor Configurator - Stones v1 (Modified) File View Help Start Config Presets Update System Bank BName Band Frequency My Presets 1 1 WACY FM 31.50 My Presets 1 2 My Presets 1 3 My Presets 1 4 My Presets 1 5 My Presets 1 6 My Presets 1 7 My Presets 1 8 My Presets 1 9 My Presets 1 10 My Presets 1 11 My Presets 1 12 My Presets 1 13 My Presets 1 14 My Presets 1 15 My Presets 1 16 My Presets 1 17 My Presets 1 18 My Presets 1 19 My Presets 1 20 My Presets 2 1 My Presets 2 2 My Presets 2 3 My Presets 2 4 New Preset Bank Bank Name: OK Cancel Add Bank Rename Bank Close Bank Reset Presets Preset Information Band FM Name WACY Frequency 31.50 Close Preset Get SIRIUS Channel List from Tuner < Back Next >3.3 Rename Bank (Fig. 43): This button allows you to rename a b a n k.
Fig. 43
text_image
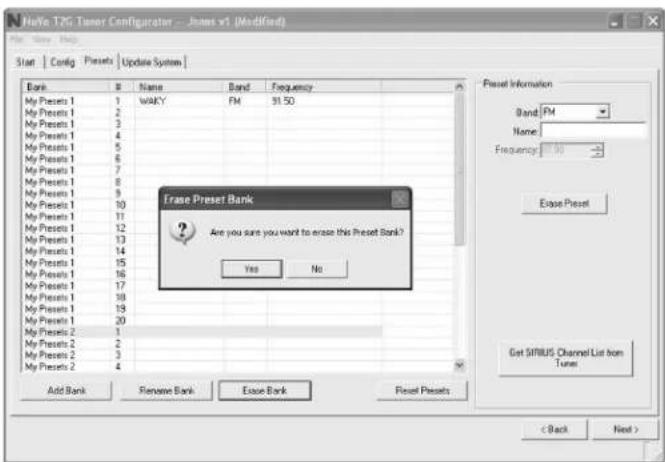
NoVo T2.0 Tuner Configurator -- Jones v1 (Modified) Start | Config | Presets | Update System Bank # Name Bond Frequency My Presets 1 WAVY FM 31.50 My Presets 1 My Presets 1 My Presets 1 My Presets 1 My Presets 1 My Presets 1 My Presets 1 My Presets 1 My Presets 1 My Presets 1 My Presets 1 My Presets 1 My Presets 1 My Presets 1 My Presets 1 My Presets 1 My Presets 1 My Presels 1 My Presels 1 My Presels 1 My Presels 1 My Presels 1 My Presels 1 My Presels 1 My Presels 2 Rename Preset Bank New Bank Name: My Presets OK Cancel Add Bank Rename Bank Enter Bank Reset Presets Preset Information Bend: FM Name: WAVY Frequency: 31.50 Close Preset Get Sirius Channel List from Tuner a Back b Next > n t o a d d3.4 Erase Bank (Fig. 44): All preset banks, with the exception of the first bank, can be erased one bank at a time. You cannot erase the first bank of 20 presets.
Fig. 44
text_image
Make T2G Timer Configator - Jones v1 (Modified) Start | Config | Panels | Update System | Bank Name Band Frequency My Presets 1 1 WAKY FM 31.50 My Presets 1 2 My Presets 1 3 My Presets 1 4 My Presets 1 5 My Presets 1 6 My Presets 1 7 My Presets 1 8 My Presets 1 9 My Presets 1 10 My Presets 1 11 My Presets 1 12 My Presets 1 13 My Presets 1 14 My Presets 1 15 My Presets 1 16 My Presets 1 17 My Presets 1 18 My Presets 1 19 My Presets 1 20 My Presets 2 1 My Presets 2 2 My Presets 2 3 My Presets 2 4 Add Bank Renase Bank Essue Bank Reset Presets Frase Preset Bank Are you sure you want to erase this Preset Bank? Yes No Reset Information Band FM Name: Frequency 30 Escape Preset Get SIRIUS Channel List from Tunes < Back Next >Advanced Settings
T h e T u n e r s o more advanced setup. Clicking on view and selecting
Advanced will expand the tabs as discussed in the next s e c t i o n t o a l
4.0 Advanced Config (Fig. 45)
The Tuner software allows for more advanced settings that, if necessary, allow you to tweak the Tuner's operation. The process for beginning a new configuration or editing an existing one does not change from the standard mode.
Fig. 45
text_image
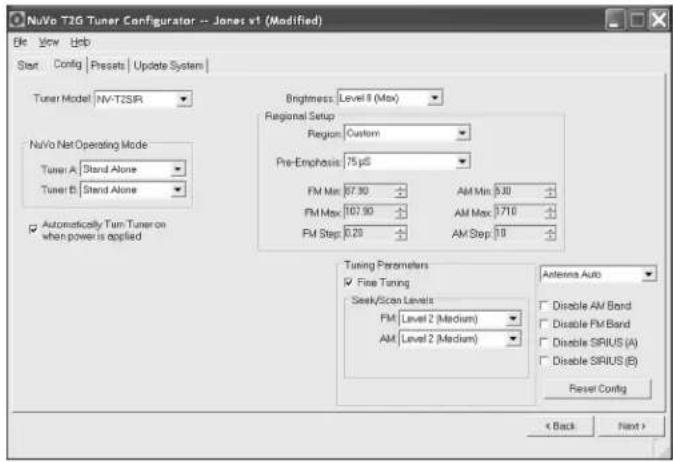
NuVo T2G Tuner Configurator -- Jones v1 (Modified) File View Help Start Config Presets Update System Tuner Model NV-T2SIR NuVo Net Operating Mode Tuner A Stand Alone Tuner B Stand Alone Automatically Turn Tuner on when power is applied Brightness: Level 8 (Max) Regional Setup Region: Custom Pre-Emphasis: 75 µS FM Max: 67.30 AM Max: 0.30 FM Max: 167.90 AM Max: 0.710 FM Step: 0.20 AM Step: 10 Tuning Parameters Fine Tuning Seek/Scan Levels FM Level 2 (Medium) AM Level 2 (Medium) Antenna Auto Disable AM Band Disable FM Band Disable SIRIUS (A) Disable SIRIUS (E) Reset Config < Back Next >4.1 Custom Regional Setup (Fig. 46): S o me c a tuning standard outside the four preset regions. The Custom setting allows specific parameters. One determining factor for tuning is the Pre-emphasis . The two choices for this are S (50 microseconds) and The custom setting also allows for specific setting of the minimum and maximum tuning capability and the individual tuning steps for FM and AM.
Fig. 46
text_image
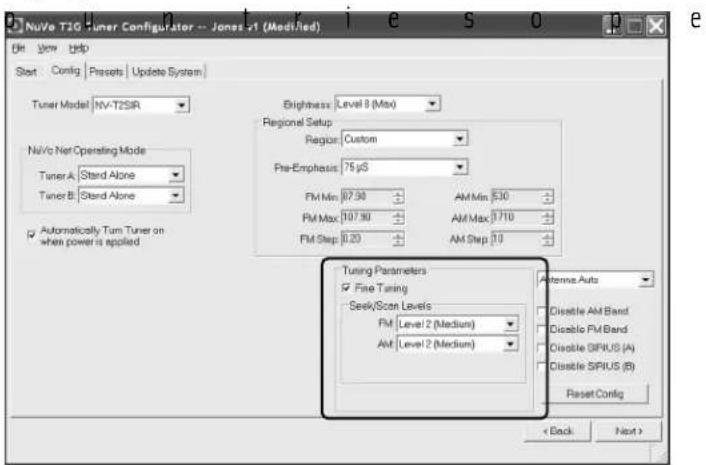
NuVo T23 Tuner Configurator -- Jonas v1 (Modified) File View Help Start Config Presets Update System Tuner Model NV-T25IR NuVo Net Operating Mode Tuner A Stand Alone Tuner B Stand Alone Automatically. Turn Tuner on when power is applied Singleness Level 4 (Max) Region Setup Region Custom Pre-Emphasis: 75 pS FM Min: 87.90 AM Min: 530 FM Max: 107.90 AM Max: 710 FM Step: 0.20 AM Step: 10 Timing Parameters Fine Tuning Seek/Scan Levels FM Level 2 (Medium) AM Level 2 (Medium) Antenna Auto Disable AM Band Disable FM Band Disable SIRIUS (A) Disable SIRIUS (B) Reset Config < Back Next >4.2 Tuning Parameters (Fig. 47): This section determines how the NV-T2SIR tunes up and down. Seek/Scan Levels for each band, FM, AM, and Weatherband sets the signal strength parameter for searching stations. Level 0 (Low), causes the Tuner to stop at any frequency with a very low signal, and Level 4 (High), stops only when a very strong signal is detected. The factory default is Level 2 (Medium), which searches for a moderate signal. This setting changes the necessary signal threshold, which is the minimum signal level
r e q u i r e d f o r t fr e q u e n cy.
Fig. 47
text_image
NuVe T2G Tuner Configulator -- Jones 41 (Modified) Start Config Presets Update System Tuner Model NV-T2SIR NuVe Net Operating Mode Tuner A: Stand Alone Tuner B: Stand Alone Automatically Turn Tuner on when power is applied Brightness Level 8 (Max) Regional Setup Region: Custom Pre-Emphasis: 75 µS FM Min: 07.90 AM Min: 530 FM Max: 107.90 AM Max: 1710 FM Step: 0.20 AM Step: 10 Tuning Parameters Fine Tuning Seek/Scan Levels FM Level 2 (Medium) AM Level 2 (Medium) Antenna Auto Disable AM Band Disable FM Band Disable SIFIUS (A) Disable SIFIUS (B) Reset Config < Back Next >5.0 Update System
5.1 Help About (Fig. 40): W h e n y
your configuration to the T2SIR, connect your computer to the DB9, RS232 port on the back panel of the Tuner. Note that you may need a USB to RS232 cable if your computer is not equipped with a serial port. You can click on Help and then
About to confirm communication between the computer and the Tuner. The initial software screen will appear. If the current Tuner firmware information is listed in the bottom right-hand corner of the screen, you have good communication. If it does not appear, check your cable connections, and make sure the Tuner is powered on. Often, lack of communication is fixed by c l o s i n g a n d
Fig. 40
text_image
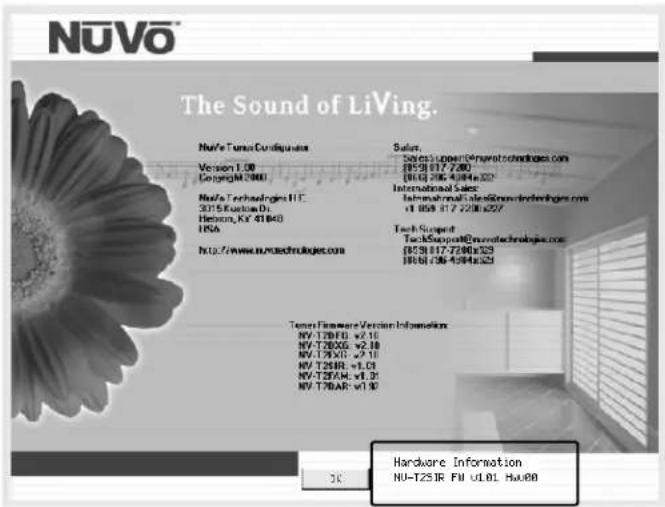
NUVO® The Sound of LiVing. NuVA Tunes Configurations Version 1.00 Copyright 2000 NuVA Technologies LLC 3015 Kurtosis Di Hebron, KY 41840 USA http://www.nuova Technologies.com Sales: $69.55 Upper@nmwatechnologies.com (805) 817-7280 (816) 295-4384a32 International Sales: Informational file: www.nuva Technologies.com +1 858 817-7280e227 Tech Support TechSupport@nmwatechnologies.com (805) 817-7280e229 (806) 236-4384a329 Tenor Firmware Version Information: NV-T25IR v1.01 NV-T26XX v2.10 NV-T29XV v7.10 NV-T29IR v1.01 NV-T29AM v1.01 NV-T29AR v1.02 Hardware Information NU-T25IR FU UL01 Hxu805.2 Download Configuration (Fig. 41): T h e f i setup is to download the configuration to the T2SIR via either its RS232 serial port. A progress bar will indicate the actual d o wn l o a d p r o
Fig. 41
text_image
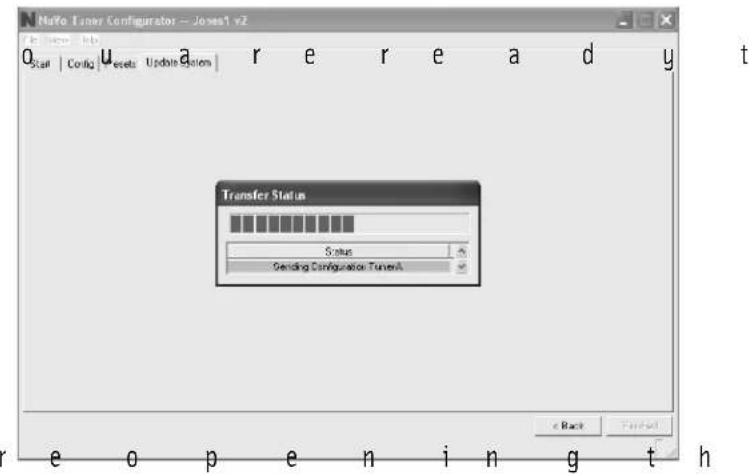
Nufo Tuner Configurator - Jones1 v2 Status: b Config: u a r e r e a d y t Transfer Status Status Sending Configuration TunerA e Back Fintell e o p e n i n g t h5.3 Successful Download (Fig. 42): When the download is complete, a final window will appear indicating that all information has downloaded successfully. Actual download time will vary based on your computer's processing
c a p a b i l i t i e s .
Fig. 42
text_image
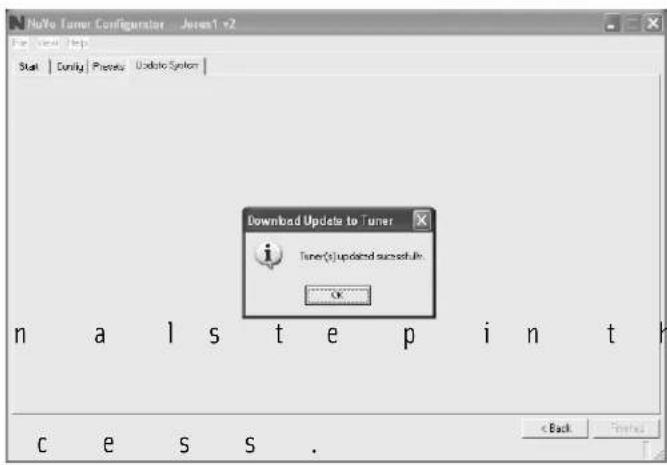
NoTo Tumor Configurator - Jores1 v2 Start | Durity | Physis | Update System | Download Update to Tuner Tuner(s)updated successfully: OK C E S S . < BackNV-T2SIR Tuner
Specifications
Power Requirements
AC Power Input 90-264 VAC 50/60Hz
Power Consumption, operating 3 W max.
Power Consumption, standby 1 W max.
Memory Backup Indefinite
SIRIUS
Requires a SIRIUS signal distribution kit, which can be purchased at most major consumer electronics stores.
Operational Frequencies
Satellite 2322.293/2330.207 MHz
Terrestrial 2326.250 MHz
FM
Tuning Range 87.5 to 108.0 MHz
Total Harmonic Distortion (1 kHz)
Mono % 0.3
Stereo % 0.5
Signal to Noise Ratio
Mono dB 80
Stereo dB 75
Usable Sensitivity μV 1.0
Selectivity (400 kHz) dB 50
Frequency Response (20 Hz to 15 kHz) -3 dB
Stereo Separation (1 kHz) 43 dB
Antenna Input Ω (unbalanced) 75
Usable Sensitivity, 30 dB S/N 14 dBV
Auto Scan Sensitivity Adjustable
Image Rejection 50 dB min.
Limiting Sensitivity 10 dBV
Intermediate Frequency 10.7 MHz
AM
Tuning Range 522 to 1720 kHz
Signal to Noise Ratio 50 dB
Usable Sensitivity 18 μV
Intermediate Frequency 450 kHz
Usable Sensitivity at 25 dB S/N 14 dBV
Auto Scan Sensitivity Adjustable
Image Rejection 50 dB min.
Audio Output Two Stereo Outputs
Level Adjustable
Impedance 560 ohms
Infrared Input
Input Voltage 3–15 V
Input Carrier Frequency 38 kHz nominal
Polarity Active High
Regulatory Approvals
USA Safety Listing (UL 6500)
FCC
Canada Safety Listing (CAN/CSA E60065.00)
ENERGY STAR
Physical Specifications
Unit Size Millimeters 44 H x 430 W x 250 D
Unit Size Inches 1.75 H x 17 W x 9.875 D
Shipping Size Millimeters 205 H x 515 W x 343 D
Shipping Size Inches 8.07 H x 20.3W x 13.5 D
Unit Weight Kilograms 2.36
Unit Weight Pounds 5.20
Shipping Weight Kilograms 6.5
Shipping Weight Pounds 14.3
*NuVo Technologies reserves the right to change specifications without notice.
NV-T2SIR Package Contents
SKU QTY
NV-T2SIR Dual SIRIUS-Ready/AM/FM Tuner* 1
N V-T2FAA AM/FM/WX Active Antenna 1
NV-T2FSD AM/FM Satellite Signal Diplexer 2
NV-T2RC4 Remote Control 1
NV-RCA1 RCA Stereo Audio Cable 2
NV-AC2 2 meter RG6 Antenna Cable 1
NV-REM1U Single Space Rack Ear Mount (pair) 1
NV-NC1 3 meter CAT5 Network Cable 1
NV-PC2-NA North American 2-wire Power Cable 1
* The NV-SCH1 SIRIUS-Ready Tuner module and the NV-SCH-ANT SIRIUS antenna are available from NuVo as recommended SIRIUS Radio components.
NUVO®
SIRIUS READY
NuVo Technologies
3015 Kustom Dr. Hebron, KY 41048, USA
www.nuvotechnologies.com
Ph: 859-817-7200

TNSIR 0838
