DWMT70780 - Sander DEWALT - Free user manual and instructions
Find the device manual for free DWMT70780 DEWALT in PDF.
| Brand | DeWalt |
| Model | DWMT70780 |
| Product Type | Pneumatic Dual Action Sander |
| No-Load Speed (at 90 psi) | 11,000 RPM |
| Orbital Diameter | 4.76 mm (3/16 in) |
| Sanding Pad Type | Adhesive Backed (PSA) |
| Sanding Pad Diameter | 150 mm (6 in) |
| Spindle Diameter | 7.94 mm (5/16 in) |
| Average Air Consumption (at 90 psi) | 9.0 L/s (19 cfm) |
| Net Weight | 1.95 kg (4.3 lb) |
| Air Inlet | 1/4 in NPT Tapered Thread |
| Recommended Hose Size | 10 mm (3/8 in) |
| Maximum Air Pressure | 90 psi (6.2 bar) |
| Exhaust Type | Handle |
| Main Functions | Sanding, Finishing, Polishing |
| Special Features | Cushioned housing cover, keyless spindle lock, long-life vinyl pad, variable speed dial, ergonomic ETP handle |
| Maintenance | Daily lubrication with pneumatic tool oil (SAE #10) |
| Spare Parts | Sanding Pad DWMT72170 (150 mm adhesive) |
| Warranty | 3 years |
| General Information | Heavy duty, hand tool, do not use with water unless equipped with dust collector |
Frequently Asked Questions - DWMT70780 DEWALT
User questions about DWMT70780 DEWALT
0 question about this device. Answer the ones you know or ask your own.
Ask a new question about this device
Download the instructions for your Sander in PDF format for free! Find your manual DWMT70780 - DEWALT and take your electronic device back in hand. On this page are published all the documents necessary for the use of your device. DWMT70780 by DEWALT.
USER MANUAL DWMT70780 DEWALT
If you have questions or comments, contact us.
E. Speed Control Dial
SPECIFICATIONS
| MODEL | DWMT70780 |
| FREE SPEED (@90PSI) | 11000RPM |
| EXHAUST TYPE | Handle |
| ORBIT DIAMATER | 3/16" (4.76MM) |
| PAD TYPE | Stick-On |
| PAD DIAMETER | 6" (150MM) |
| SPINDLE DIAMATER | 5/16" (7.94MM) |
| AVERAGE AIR CONSUMPTION (@90PSI) | 19 SCFM (9.0 L/s) 2.7 CFM (1.3 L/s) |
| NET WEIGHT | 4.3 LBS (1.95Kg.) |
| AIR INTLET SIZE | 1/4" NPT(F) |
| RECOMMENDED HOSE SIZE | 3/8" (10MM) |
| MAX. AIR PRESSURE | 90 PSI |
For replacement sanding pads purchase -
DWMT72170 6" Adhesive Backed Disc
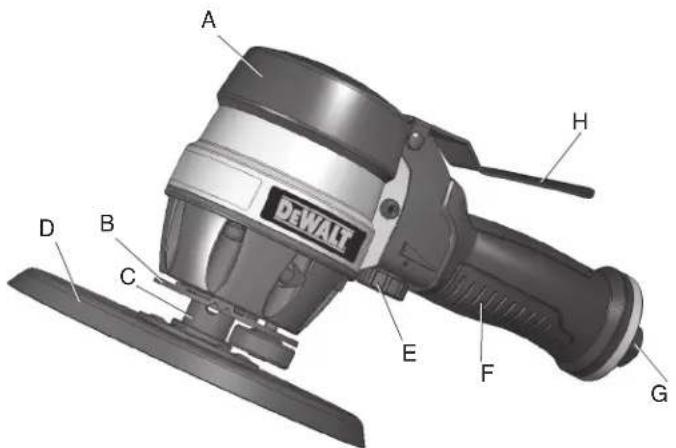
FIG.1
Definitions: Safety Guidelines
The definitions below describe the level of severity for each signal word. Please read the manual and pay attention to these symbols.
DANGER : Indicates an imminently hazardous situation which, if not avoided, will result in death or serious injury.
WARNING: Indicates a potentially hazardous situation which, if not avoided, could result in death or serious injury.
CAUTION: Indicates a potentially hazardous situation which, if not avoided, may result in minor or moderate injury.
CAUTION: Used without the safety alert symbol indicates a potentially hazardous situation which, if not avoided, may result in property damage.
IF YOU HAVE ANY QUESTIONS OR COMMENTS ABOUT THIS OR ANY DEWALT TOOL, CALL US TOLL FREE AT: 1-800-4-DEWALT (1-800-433-9258)
IMPORTANT SAFETY INSTRUCTIONS
WARNING: Some dust created by power sanding, sawing, grinding, drilling, and other construction activities contains chemicals known to the State of California to cause cancer, birth defects or other reproductive harm. Some example of these chemicals are:
-
Lead from lead-based paints
-
Crystalline silica from bricks and cement and other masonry products
-
Arsenic and chromium from chemically-treated lumber Your risk from these exposures varies, depending on how often you do this type of work. To reduce your exposure to these chemicals: work in a well ventilated area, and work with approved safety equipment, al ways wear OSHA/MSHA/NIOSH approved, properly fitting face mask or res pi ra tor when us ing such tools. When using air tools, basic safety precautions should always be followed to reduce the risk of personal injury.
WARNING: This product contains chemicals, known to the State of California to cause cancer, and birth defects or other reproductive harm. Wash hands after handling.
SAVE THESE INSTRUCTIONS
WARNING:

Improper operation or maintenance of this product could result in serious injury and property damage. Read and understand all warnings and operating instructions before using this equipment. When using air tools, basic safety precautions should always be followed to reduce the risk of personal injury.
WARNING:
Read and understand this instruction manual and tool labels before installing, operating or servicing this tool. Keep these instructions in a safe accessible place.
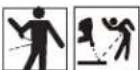
Operators and others in work area must wear ANSI Z87.1 CAN/CSA Z94.3 approved safety glasses with side shields.
Operators and others in work area must wear ear protection.
Oil daily for optimal performance.
WARNING:
- Avoid prolonged use: repetitive motion or exposure to vibration may be harmful to your hands or arms. Use gloves to provide extra cushion, take frequent rest periods, and limit daily time of use.
- Do Not Use oxygen or reactive gases; explosion may occur.
- Do Not Exceed air pressure of 90 PSI.
- Read all manuals included with this product carefully. Be thoroughly familiar with the controls and the proper use of the equipment.
- Only persons well acquainted with these rules of safe operation should be allowed to use the air tool.
- Do not exceed any pressure rating of any component in the system.
- Disconnect the air tool from air supply before changing tools or attachments and during non-operation.
- Always wear safety glasses and ear protection during operation. Always wear approved safety glasses with shields. Always wear approved hearing protection.
- Do not wear loose fitting clothing or apparel which contains loose straps or ties, etc. Which could become entangled in moving parts of the tool and results in serious personal injury.
- Do not wear jewelry, watches, identifications, bracelets, necklace, etc. When operating any tool, they may become caught in moving parts and result in serious injury.
- Do not depress trigger when connecting the air supply hose.
Always use attachments designed for use with air powered tools. - Do not use damaged or worn attachments.
WARNING:
- Never trigger the tool when not applied to a work object. Attachments must be securely attached.
Loose attachments can cause serious injury. - Protect air lines from damage or puncture.
- Never point an air tool at oneself or any other person. Serious injury could occur.
- Check air hoses for weak or worn condition before each use. Make sure all connections are secure.
- Keep all nuts, bolts and screws tight and ensure equipment is in safe working condition.
- Do not put hands near or under moving parts.
WARNING: RISK OF EXPLOSION OR FIRE
WhAT cAn hAPPen how To PreVenT IT
- Abrasive tools such as sanders and grinders, rotating tools such as drills, and impact tools such as wrenches, hammers, and reciprocating saws are capable of generating sparks which could result in ignition of flammable materials.
-
Exceeding the maximum pressure rating of tools accessories could cause an explosion resulting in serious injury.
-
Never operate tools near flammable substances such as gasoline, naptha, cleaning solvents, etc.
Work in a clean, well ventilated area free of combustible materials. -
Never use oxygen, carbon dioxide or other bottled gases as a power source for air tools.
-
Use compressed air regulated to a maximum pressure at or below the rated pressure of any attachments.

WARNING: RISK TO BREATHING (ASPHyXIATION) WhAT cAn hAPPen how To PreVenT IT
- Abrasive tools, such as grinders, sanders, and cut-off tools generate dust and abrasive materials which can be harmful to human lungs and respiratory system.
Some materials such as adhesives and tar contain chemicals whose vapors could cause serious injury with prolonged exposure.
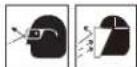
Always wear MSHA/NIOSH approved, properly fitting face mask or respirator when using such tools.
Always work in a clean, dry, well ventilated area.

CAUTION: RISK fROM NOISE hAPPen how To PreVenT IT
- Long term exposure to noise produced from the operation of air tools can lead to permanent hearing loss.
Always wear AnSI (S3.19) hearing protection.

WARNING: RISK Of INJURY
WhAT cAn hAPPen hoW To PreVenT IT
- Tools left unattended, or with the air hose attached can be activated by unauthorized persons leading to their injury or injury to others.
Air tools can propel loose objects or other materials throughout the work area.
Air tools can become activated by accident during maintenance or tool changes.
-
A wrench or a key that is left attached to a rotating part of the tool increases the risk of personal injury.
-
Remove air hose when tool is not in use and store tool in a secure location away from reach of children and/or untrained users.
- Use only parts, and accessories recommended by the manufacturer.
- Keep work area clean and free of clutter. Keep children and others away from work area during operation of the tool.
- Keep work area well lit.
- Remove air hose to lubricate, add, or replace sanding pads, etc., to the tool.
- Never carry the tool by the hose.
- Avoid unintentional starting. Don't carry hooked-up tool with finger on trigger.
Repair service should be done only by an authorized service representative. - Remove adjusting keys and wrench before turning the tool on.
WhAT cAn hAPPen hoW To PreVenT IT
- Using inflator nozzles for duster applications can cause serious injury.
Air tools can cause the work piece to move upon contact leading to injury. -
Loss of control of the tool can lead to injury to self or others
-
Poor quality, improper, or damaged tools such as grinding wheels, chisels, sockets, drill, etc., can fly apart during operation, propelling particles throughout the work area causing serious injury.
DO NOT use inflator nozzles for duster applications.
Use clamps or other devices to prevent movement.
- Never operate tool while under the influence of drugs or alcohol.
- Don't overreach. Keep proper footing and balance at all times.
- Keep handles dry, clean, and free from oil and grease.
- Stay alert. Watch what you are doing. Use common sense. Do not operate tool when you are tired.
Always use tool attachments rated for the speed of the power tool.
- Never use tools which have been dropped, impacted or damaged by use.
- Do not apply excessive force to the tool - let the tool perform the work.
WARNING: RISK Of INJURY (CONTINUED)
WhAT cAn hAPPen hoW To PreVenT IT
-
Improperly maintained tool and accessories can cause serious injury.
There is a risk of bursting if the tool is damaged. -
Maintain the tool with care.
- Check for misalignment or binding of moving parts, breakage of parts, and any other condition that affects the tool's operation. If damaged, have the tool serviced before using.

WARNING: RISK Of EIETRIC SHOCK
WhAT cAn hAPPen hoW To PreVenT IT
-
This tool is not provided with an insulated gripping surface. Contact with a "live" wire will also make exposed metal parts of the tool "live" and can result in electrocution or death.
-
Avoid body contact with grounded surfaces such as pipes, radiators, ranges, and refrigerators. There is an increased risk of electric shock if your body is grounded.
Thoroughly investigate the workpiece for possible hidden wring before performing work.
WARNING: RISK FROM FLYING OBJECTS
WhAT cAn hAPPen hoW To PreVenT IT
Air powered equipment and power tools are capable of propelling materials such as metal chips, saw dust, and other debris at high speed, which could result in serious eye injury.
- Compressed air can be hazardous. The air stream can cause injury to soft tissue areas such as eyes, ears, etc. Particles or objects propelled by the stream can cause injury.
- Tool attachments can be come loose or break and fly apart propelling particles at the operator and others in the work area.
Always wear AnSI Z87.1 cAn/ cSA Z94.3 approved safety glasses with side shields.
- Never leave operating tool unattended. Disconnect air hose when tool is not in use.
- For additional protection use an approved face shield in addition to safety glasses.
Make sure that any attachments are securely assembled.

WARNING: RISK OF CUT OR BURNS
WhAT cAn hAPPen hoW To PreVenT IT
-
Tools which cut, shear, drill, punch, chisel, etc., are capable of causing serious injury.
-
Keep the working part of the tool away from hands and body.

WARNING: RISK OF ENTANGIEMENT
WhAT cAn hAPPen howTo PreVenT IT
-
Tools which contain moving elements, or drive other moving tools such as grinding wheels, sockets, sanding discs, etc., can become entangled in hair, clothing, jewelry and other loose objects, resulting in severe injury.
-
Never wear loose fitting clothes, or apparel which contains loose straps or ties, etc., which could become entangled in moving parts of the tool.
- Remove any jewelry, watches, identifications, bracelets, necklaces, etc., which might become caught by the tool.
- Keep hands away from moving parts. Tie up or cover long hair.
Always wear proper fitting clothing and other safety equipment when using this tool.
WARNING: AIR SUPPLY AND CONNECTIONS
- Do not use oxygen, combustible gases, or bottled gases as a power source for this tool as the tool may explode, possibly causing injury.
- Do not use supply sources which can potentially exceed 200 PSI (13.8 bar) as tool may burst, possibly causing injury.
- The connector on the tool must not hold pressure when air supply is disconnected. If a wrong fitting is used, the tool can remain charged with air after disconnecting and thus will be able to after the air line is disconnected possibly causing injury.
Always disconnect air supply:
1) Before making adjustments;
2) When servicing the tool;
3) When tool is not in use;
4) When moving to a different work area, as accidental actuation may occur, possibly causing injury.
SAVE THESE INSTRUCTIONS FOR FUTURE USE
FEATURES
HOUSING COVER
The air tool has a cushion grip housing cover (A) to provide protection against housing cracks from accidental drops of the air tool.
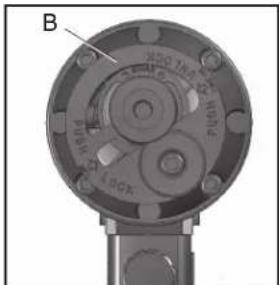
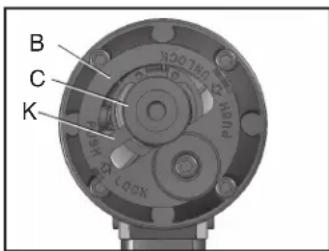
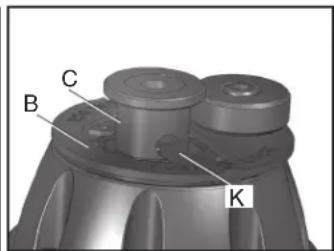
SPINDLE LOCK
The spindle lock (B) is a keyless, quick release for removing and attaching sanding pads. This design allows for easy disassembly of sandpaper pads from the tool.
SANDING PAD
The sanding pad (D) is a long life PSA vinyl pad.
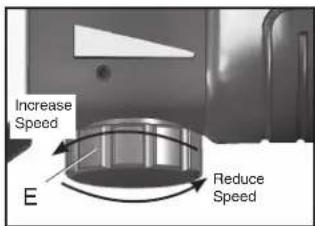
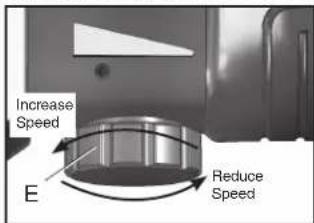
SPEED CONTROL DIAL
The speed control dial (E) allows the operator to vary the speed of the tool. Turning the dial (E) counterclockwise will increase the speed, and turning the dial (E) clockwise will decrease the speed.
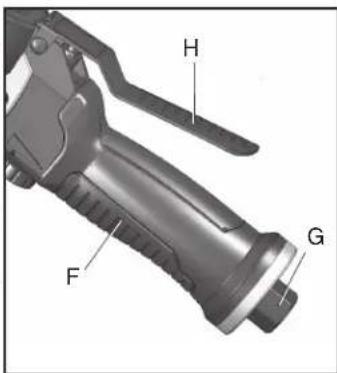
HANDLE
This air tool has an ergonomic grip (F) made of molded thermoplastic elastomer (TPE) design for improved comfort, slippage reduction, and better tool control.
AIR INLET
The tool's air inlet (G) located at the bottom of the handle is used for connecting an air supply with standard 1/4'' NPT American thread.
TRIGGER
The trigger (H) allows the operator to control the start and stop of the air tool.
INSTALLATION
Air Supply
The recommended hook-up is shown in Figure A. Pneumatic tools operate on a wide range of air pressures. For maximum efficiency and longer tool life, the pressure of the air supplied to these tools MUST not exceed the rated PSI at the tool when the tool is running. Using a higher than rated pressure will cause faster wear and drastically shorten the tool's life. A higher air pressure can also cause an unsafe condition and explosion.
The inside diameter of the hose should be increased to compensate for unusually long air hoses (over 25 feet). Minimum hose diameter should be 3/8 I.D. and fittings should have 1/4 NPT thread.
The use of air line lubricators and air line filters is recommended to prevent water in the line that can damage the tool. Drain the air tank daily. Clean the air inlet filter screen on at least a weekly schedule to remove accumulated dirt or other matter that can restrict air flow.
The tool's air inlet used for connecting an air supply has standard 1/4'' NPT American thread.
Safety Rules For Pneumatic Tools
1) Inspect the air hose for cracks or other problems. Replace the hose if worn.
2) Never point an air hose at another person.
3) Disconnect the tool when not in use, or before performing service or changing accessories.
4) Use proper hoses and fittings. Never use quick change couplings attached to the tool. Instead, add a hose and coupling between the tool and the air supply.
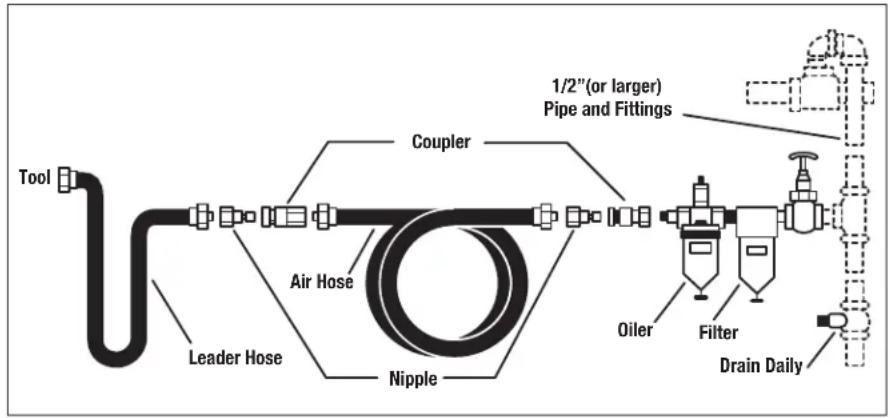
Figure A
PREPARATION FOR USE
Proper Use Of The Tool
Your new Dual Action Sander is designed for cleaning or sanding a variety of materials typically metal, wood, plastic materials, etc. The dual rotary orbital action reduces the amount of abrasive grinding marks and hence is primarily a finishing sanding tool. It can be used with a variety of grades of 150mm (6" diameter) abrasive discs which, according to pad fitted to the tool, can be self adhesive or velcro attached.
The tool, if fitted with dust collection, should not be used with water. If use with water is required, water can act as a dust suppressor and the dust collector would not be required.
Do not use the tool for any other purpose than that for which it has been designed and use only abrasive discs as described.Do not modify the tool without first consulting the manufacturer or an authorized distributor.
Work Stations
Your Dual Action Sander should only be used as a hand operated tool. It is always recommended that the tool is used when standing with solid footing. It can be used in other positions but before any such use, the operator must be in a secure position having a firm grip and footing.
Putting Into Service
Air Supply
CAUTION: This air tool requires lubrication BEFORE initial use, also before and after each additional use.
WARNING: Use a clean lubricated air supply that will give a measured air pressure at the tool of 90 psi/6.2 bar when the tool is running with the trigger fully depressed.
Use recommended hose size. It is recommended that the tool is
connected to the air supply as shown in figure A on page 11. Do not connect the tool to the air line system without incorporating an easy to reach and operate air shut off valve. The air supply should be lubricated. It is strongly recommended that an air filter, regulator, lubricator (FRL) is used as shown in figure A on page 11 as this will supply clean, lubricated air at the correct pressure to the tool. Details of such equipment can be obtained from your supplier. If such equipment is not used then the tool should be lubricated by shutting off the air supply to the tool and then depressurizing the line by pressing the trigger on the tool.
Disconnect the air line and pour into the air inlet 1 teaspoon (5cc.) of a suitable pneumatic motor lubricating oil, preferably incorporating a rust inhibitor. Reconnect tool to air supply and run tool slowly for a few seconds to allow air to circulate the oil.
Lubricate tool daily if used frequently, or when it starts to slow or lose power.
Using A Dual Action Sander
WARNING:
1) Read all instructions before using this tool. All operators must be fully trained in its use and aware of these safety rules.
2) Do not exceed the maximum working air pressure of 90 psi/6.2 bar.
3) Use personal safety equipment.
4) Use only compressed air at the recommended conditions.
5) If the tool appears to malfunction, remove from use immediately and arrange for service and repair.
6) If the tool is used with a balancer or other support device, ensure that it is fixed securely.
7) Always keep hands away from the working attachment fitted to the tool.
8) The tool is not electrically insulated. Never use the tool if there is any chance of it coming into contact with live electricity.
Using A Dual Action Sander Continued
9) When using the tool, always adopt a firm footing and/or position and grip the tool firmly to counteract any forces or reaction forces that may be generated while using the tool.
10) Use only genuine Dewalt spare parts or parts which perform equivalently. Do not make temporary or permanent repairs with unauthorized parts.
11) Do not lock, tape, wire, etc., the on/off trigger in the run position. The trigger must always be free to return to the "off" position when it is released.
(12) Always shut off the air supply to the tool and depress the trigger to release air from the feed hose before fitting, adjusting or removing the working attachment.
13) Check hoses and fittings regularly for wear. Replace if necessary. Do not carry the tool by its hose. Ensure the hand is removed from the on/off trigger when carrying the tool with the air supply connected.
14) Take care against entanglement of moving tool parts with clothing, ties, hair, cleaning rags, etc. This will cause the body to be drawn towards the tool and can be very dangerous.
15) Safe working practices and observe all relevant legal requirements when installing, using or maintaining the tool.
16) Only install the tool when an easily accessible and easily operable on/off switch is incorporated in the air supply.
17) Take care that the tool exhaust air does not cause problems or blow onto another person.
18) Never lay a tool down unless the working attachment has stopped moving.
19) Always begin sanding with sandpaper coarse enough to remove high spots on the surface to be sanded. Progress to finer grit sandpaper until the desired finish is obtained.
20) Always use sandpaper appropriate for the surface being sanded.
PRE-START CHECKLIST
- Drain water from air compressor tank and condensation from air lines. (Please refer to air compressor's operation manual.)
- Lubricate the tool. (Please refer to the "Maintenance" section in the manual.)
WARNING: Risk of unsafe operation. Firmly grasp air hose with hand when installing or disconnecting to prevent hose whip.
WARNING: Risk of bursting. Too much air pressure causes a hazardous risk of bursting. Check the manufacturer's maximum pressure rating for air tools and accessories. The regulator output pressure must never exceed the maximum pressure rating.
PAD ASSEMBLY
- Disconnect the sander from the air supply before attaching the Sanding Pad.
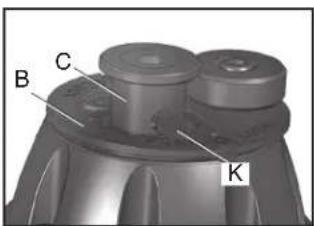
- Position the locking tab (K) of the spindle lock (B) so that it lines up with the side hole on the drive spindle (C).
- Push the spindle lock (B) in order to insert the locking tab (K) into the drive spindle (C). This will prevent the drive spindle (C) from rotating.
NOTE: The spindle lock (B) is marked "PUSH LOCK" and "PUSH UNLOCK".
PAD ASSEMBLY CONTINUED
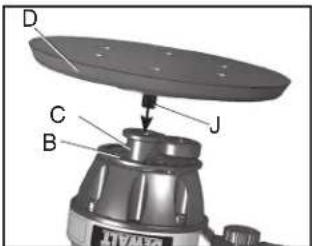
- Hold the spindle lock (B) and insert the threaded post (J) of the sanding pad into the drive spindle (C).
- Tighten the sanding pad (D) by spinning it clockwise until secure.
- Place desired sandpaper onto the sanding pad (D).
NOTE: Only use approved self-adhesive type sandpaper.
- Push the spindle lock (B) on the designated "PUSH UNLOCK" side so the locking tab (K) is no longer in the side hole of the drive spindle (C).
IMPORTANT: The tool MUST be in the unlocked position for orbital action. The Spindle Lock is for attaching and removing the sanding pad only. The tool MUST be in the lock position to install
sandpaper pad. Do not operate the tool with the spindle lock in the locked position or the sander will stall when pressure is applied to the pad.
- Set the speed control dial (E) to the desired variable speed.
Ready for use.
PAD REMOVAL
- Disconnect the sander from the air supply before removing the Sanding Pad (D).
- Position the locking tab (K) of the spindle lock (B) so that it lines up with the side hole on the drive spindle (C).
- Push the spindle lock (B) in order to insert the locking tab (K) into the drive spindle (C). This will prevent the drive spindle (C) from rotating.
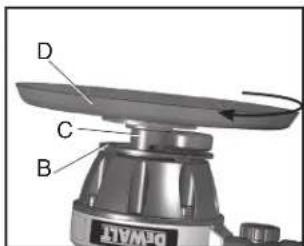
- Hold the spindle lock (B) and rotate the sanding pad (D) counterclockwise to unthread the post (J) of the sanding pad from the drive spindle (C).
- When the sanding pad (D) becomes loose enough, it may be removed from the drive spindle (C).

OPERATING PROCEDURES
Start-up (Fig. 1, pg. 2)
- Connect the tool to air source with the hose of recommended size.
- Turn on the air compressor and allow the air tank to be filled.
- Set the air compressor regulator to 90 PSI. This air tool operates at a maximum of 90 PSI air pressure.
- Depress the trigger to start operating the tool.
OPERATING PROCEDURES CONTINUED SHUT-DOWN (FIG. 1, PG. 2)
- Release the trigger to stop the tool.
- Always disconnect air supply when changing sandpaper pads.
- When job is completed, turn off the air compressor and store the air tool after lubrication.
Tips
- Begin sanding with an abrasive grit sandpaper coarse enough to remove the high spots. Progress to a finer grit sandpaper until the desired finish is obtained.
- Never change from coarse grit sandpaper to a very fine grit sandpaper, always progress gradually to the finer grit.
OPERATING INSTRUCTIONS
- Select a suitable abrasive disc and make sure that it is fixed securely to the tool.
- Connect to suitable air supply as recommended.
- Apply the sander lightly to the work and allow the abrasive disc to cut. Take great care when sanding around sharp edges and surfaces to avoid the disc snagging i.e. the disc may be brought to an abrupt stop or considerably slowed, causing the tool to kick in the hands.
NOTE: Use of safety glasses and a breathing mask is recommended. Sanding certain materials may create hazardous dust which may require special breathing equipment. Check before using the tool. Although the tool has a low noise level, the actual sanding process may cause a noise level such that ear protectors will be required. Safety gloves are recommended.
Do not continue to use abrasive discs that are worn or clogged. Do not use undersized or oversized sanding discs. The disc should be no more than 1/4'' larger in diameter than the pad, and not smaller than the pad.
MAINTENANCE
Lubrication
Air tools require lubrication throughout the lifetime of the tools. The air motor and bearing uses compressed air to power the tool. The compressed air contains moisture that will rust the air motor and other parts in side of the tools, therefore lubrication is required daily. Failure to lubricate the air tool properly will dramatically shorten the life of the tool and will void the warranty
CAUTION: This air tool requires lubrication BEFORE initial use, also before and after each additional use.
To Lubricate The Air Tool Manually:
- Remove any attachments on the air tool.
- Disconnect the tool from the air supply source, place the air inlet face up.
- Depress the trigger and place about 1 teaspoon (5cc.) of air tool oil into the air inlet. (Depressing the trigger will help circulate oil in the motor.)
NOTE: Use SAE #10 weight oil if air tool oil is not available.
- Connect the tool to an air source, cover the exhaust end with a towel and run for about 20 to 30 seconds.
WARNING: Keep out of the reach of children. If taken internally, do not induce vomiting, call a doctor immediately.
WARNING: Any excess oil in the motor is immediately expelled from the exhaust port. Always direct exhaust port away from people or objects.
Storage:
The air tool must be lubricated before storing.
Follow the "Lubrication" instruction with exception of step 4.
SERVICE INFORMATION
Please have the following information available for all service calls: Model Number
Date and Place of Purchase
FULL THREE YEARS WARRANTY
DEWALT heavy duty industrial tools are warranted for 3 years from date of purchase. We will repair, without charge, any defects due to faulty materials or workmanship. For warranty repair information, call 1-800-4-DEWALT. This warranty does not apply to accessories or damage caused where repairs have been made or attempted by others. This warranty gives you specific legal rights and you may have other rights which vary in certain states or provinces.
Latin America: This warranty does not apply to products sold in Latin America. For products sold in Latin America, see country specific warranty information contained either in the packaging, call the local company or see website for warranty information.
FREE WARNING LABEL REPLACEMENT: If your warning labels become illegible or are missing, call 1-800-4-DEWALT for a free replacement.
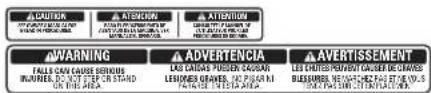
WARNING: BRAIN TONE DAILY OR AFTER EACH USE, COMPOSITION RELICLE-UP-MAK CAUSE COMPOSITION.
FOR THE PRACTITIONER, THE PRACTITIONER AND THE PRACTITIONER ARE RESPONSIVE FOR THE FOLLOW OF THE PROCEDURE (PRACTICE). BY CHART IN ANY CASE ALL RIGHTS AND WILL BE HELD UNDER CONTROL BY LARYN X EUSUALS/EXERCISES.
ADVERTICN ORENE ENI GANO D AIOO DE POMS DE CBA OX. AOCALCION IN CONDICTIONAL
A VARIETISSEMENT ETRROR OF VENCE OCTHTOR DIAMITE CHARGE HETTLEMENT. (100) 2017.
HETTLEMENT: A 100% LIABILLANCE OF THE VENCE OCTHTOR DIAMITE CHARGE HETTLEMENT. (100) 2017.
HETTLEMENT: A 100% LIABILLANCE OF THE VENCE OCTHTOR DIAMITE CHARGE HETTLEMENT. (100) 2017.
CFM: Cubic feet per minute.
SCFM: Standard cubic feet per minute; a unit of measure of air delivery.
PSI: Pounds per square inch; a unit of measure of pressure.
Code Certification: Products that bear one or more of the following marks: UL, CUL, ETL, CETL, have been evaluated by OSHA certified independent safety laboratories and meet the applicable Underwriters Laboratories Standards for Safety.
RPM: Revolutions per minute; is a measure of the frequency of a rotation
BPM: Beats per minute.
NPT: National pipe thread (tapered thread); is a U.S. standard for tapered threads used on threaded pipes and fittings.
ID: Inner diameter
DWMT70780
PONCEUSE À DOUBLE ACTION
ARRET (FIG. 1, PAGE 2)
DEWALT Industrial Tool Co., 701 Joppa Road, Baltimore, MD 21286
Part No.DWMT70780 70100726 Copyright © 2014 DEWALT
The following are trademarks for one or more Dewalt power tools: the yellow and black color scheme; the "D" shaped air intake grill; the array of pyramids on the handgrip; the kit box configuration; and the array of lozenge-shaped humps on the surface of the tool.