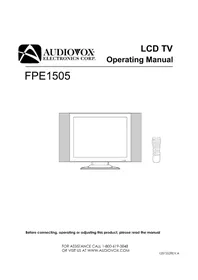
FPE3706 - TV VOXX - Free user manual and instructions
Find the device manual for free FPE3706 VOXX in PDF.


User questions about FPE3706 VOXX
0 question about this device. Answer the ones you know or ask your own.
Ask a new question about this device
Download the instructions for your TV in PDF format for free! Find your manual FPE3706 - VOXX and take your electronic device back in hand. On this page are published all the documents necessary for the use of your device. FPE3706 by VOXX.
USER MANUAL FPE3706 VOXX
Before connecting, operating or adjusting this product, please read the manual completely. Please keep this manual for future reference.
The illustrations and on-screen displays in this operation manual are for explanation purposes and may vary slightly from the actual operations.
Menu items that are not selectable are grayed out.
FOR ASSISTANCE CALL 1-800-619-3848 OR VISIT US AT WWW.AUDIOVOX.COM.
WARNING
To reduce the risk of fire or electric shock, do not expose this apparatus to rain or moisture.
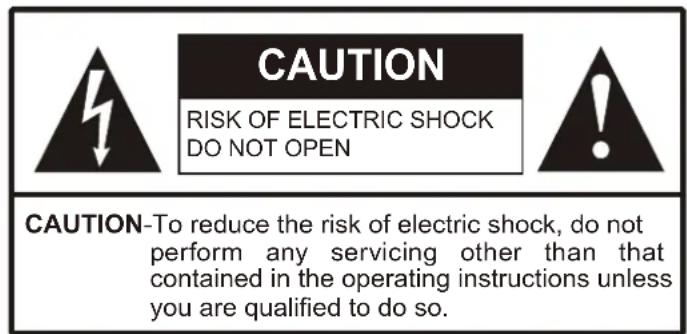

This symbol is intended to alert the user to the presence of uninsulated "dangerous voltage" within the product's enclosure that may be of sufficient magnitude to constitute a risk of electric shock to persons.

This symbol is intended to alert the user to the presence of important operating and maintenance (servicing) instructions in the literature accompanying the appliance.
This product utilizes tin-lead solder, and fluorescent lamp containing a small amount of mercury. Disposal of these materials may be regulated due to environmental considerations. For disposal or recycling information, please contact your local authorities or the Electronic Industries Alliance: www.eia.org
FCC STATEMENT
This equipment has been tested and found to comply with the limits for a Class B digital device, pursuant to p 15 of the FCC Rules. These limits are designed to provide reasonable protection against harmful interference when the equipment is operated in a commercial environment.
This equipment generates, uses, and can radiate radio frequency energy and, if not installed and used in accordance with the instruction manual, may cause harmful interference to radio communications. Operation of this equipment in a residential area is likely to cause harmful interference in which case the user will be required to correct the interference at his own expense.
FCC CAUTION:
Pursuant to 47CFR, Part 15.21 of the FCC rules, any changes or modifications to this monitor not expressly approved by the manufacturer could cause harmful interference and would void the user's authority to operate this device.
WARNING:
This is a CLASS B product. In a domestic environment this product may cause radio interference in which case the user may be required to take adequate measures to counter interference.
IMPORTANT SAFETY INSTRUCTIONS
1) Read these instructions.
2) Keep these instructions.
3) Heed all warnings.
4) Follow all instructions.
5) Do not use this apparatus near water. Apparatus shall not be exposed to dripping or splashing and no objects filled with liquids, such as vases, shall be placed on the apparatus.
6) Clean only with dry cloth.
7) Do not block any ventilation openings. Install in accordance with the manufacturer's instructions.
8) Do not install near any heat sources such as radiators, heat registers, stoves, or other apparatus (including amplifiers) that produce heat.
9) Do not defeat the safety purpose of the polarized or grounding-type plug. A polarized plug has two blades with one wider than the other. A grounding type plug has two blades and a third grounding prong. The wide blade or the third prong are provided for your safety. If the provided plug does not fit into your outlet, consult an electrician for replacement of the obsolete outlet.
10) Protect the power cord from being walked on or pinched particularly at plugs, convenience receptacles, and the point where they exit from the apparatus.
1) Only use attachments/accessories specified by the manufacturer.
12) Use only with the cart, stand, tripod, bracket, or table specified by the manufacturer, or sold with the apparatus.
When a cart is used, use caution when moving the cart/apparatus combination to avoid injury from tip-over.
13) Unplug this apparatus during lightning storms or when unused for long periods of time.
14) Refer all servicing to qualified service personnel. Servicing is required when the apparatus has been damaged in any way, such as power-supply cord or plug is damaged, liquid has been spilled or objects have fallen into the apparatus, the apparatus has been exposed to rain or moisture, does not operate normally, or has been dropped.
Before using your TV, please read these instructions completely, and keep this manual for future reference. Carefully observe and comply with all warnings, cautions and instructions placed on the unit or described in the operating instructions or service manual.
WARNING
To guard against injury, the following basic safety precautions should be observed in the installation, use and servicing of the unit.
Power Sources
This unit should be operated only from the type of power source indicated on the information label.
If you are not sure of the type of electrical power supplied to your home, consult your dealer or local power company.
Grounding or Polarization
This unit is equipped with a polarized AC power cord plug (a plug having one blade wider than the other), or with a three-wire grounding type plug (a plug having a third pin for grounding). Follow the instructions below:
For the unit with a three-wire grounding type AC power cord plug (Class 1 unit)
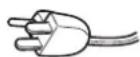
This unit must be connected to an AC power socket outlet with a protective earthing connection.
For the unit with a polarized AC power cord plug
This plug will fit into the power outlet only one way. This is a safety feature. If you are unable to insert the plug fully into the outlet, try reversing the plug.
If the plug still fails to fit, contact your electrician to have a suitable outlet installed. Do not defeat the safety purpose of the polarized plug by forcing it in.
Wall outlet
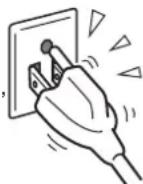
Do not use a poor fitting outlet. Insert the plug fully into the outlet. If it is loose, it may cause arcing and result in fire. Contact your electrician to have the outlet changed.
Wiring
For your safety, unplug the AC power cord when wiring cables.
Electric shock
Do not touch the AC power cord or the unit with a wet hand. If you plug/unplug the AC power cord from the unit with a wet hand, it may cause electric shock.
Never attempt to move the unit unless the AC power cord is disconnected.
Cleaning
- Clean the AC power plug regularly.
- If the plug is covered with dust and it picks up moisture, its insulation may deteriorate and result in fire. Unplug the AC power plug and clean it regularly.
- Unplug the AC power cord when cleaning this unit. If not, it may result in electric shock.
- Clean the cabinet of the TV with a dry soft cloth. To remove dust from the screen, wipe it gently with a soft cloth.
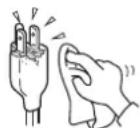
- Stubborn stains may be removed with a cloth slightly dampened with a solution of mild soap and warm water. Never use strong solvents such as thinner or benzine for cleaning.
- If using a chemically pretreated cloth, please follow the instruction provided on the package.
Overloading
Do not overload wall outlets, extension cords or convenience receptacles beyond their capacity, since this can result in fire or electric shock.
Power
Always turn the unit off when it is not being used.
When the unit is left unattended and unused for long periods of time, unplug it from the wall outlet as a precaution against the possibility of an internal malfunction that could create a fire hazard.
Sound
If a snapping or popping sound from the TV is continuous or frequent while the TV is operating, unplug the TV and consult your dealer or service technician. It is normal for TV's to make occasional snapping or popping sounds, particularly when being turned on or off.
AC Power Cord
If you damage the AC power cord, it may result in fire or electric shock.
- Do not pinch, bend, or twist the cord excessively. The core lines may be bared and cut, and cause short-circuit, resulting in fire or electric shock.
- Do not convert or damage the AC power cord.
- Do not put anything heavy on the AC power cord. Do not pull the AC power cord.
- Keep the AC power cord away from heat sources.
- Be sure to grasp the plug when disconnecting the AC power cord. If the AC power cord is damaged, stop using it and replace with a new one.
Ventilation
The slots and openings in the TV are provided for necessary ventilation. To ensure reliable operation of the unit, and to protect it from overheating, these slots and openings must never be blocked or covered. Unless proper ventilation is provided, the unit may gather dust and get dirty. For proper ventilation, observe the following:
- Do not install the unit turned backward or sideways.
- Do not install the unit turned over or upside down.
- Never cover the slots and openings with a cloth or other materials.
- Never block the slots and openings by placing the unit on a bed, sofa, rug or other similar surface.
- Never place the unit in a confined space, such as a bookcase or built-in cabinet, unless proper ventilation is provided.
- Leave some space around the unit. Otherwise, adequate air-circulation may be blocked causing overheating and cause fire or damage the unit.
Heat sources
Do not install near any heat sources such as radiators, heat registers, stoves, or other apparatus (including amplifiers) that produce heat.
Do not use this apparatus near water
For example, near a bathtub, washbowl, kitchen sink, or laundry tub, in a wet basement, or near a swimming pool, and the like.
Do not use immediately after moving from a low temperature to high temperature environment, as this causes condensation, which may result in fire, electric shock, or other hazards.
Apparatus shall not be exposed to dripping or splashing and no objects filled with liquids, such as vases, shall be placed on the apparatus.
Entering of objects and liquids
Never insert an object into the product through vents or openings. High voltage flows in the product, and inserting an object can cause electric shock and/or short internal parts.
For the same reason, do not spill water or liquid on the product.
Lightning
Unplug this apparatus during lightning storms or when unused for long periods of time.
For added protection for this television equipment during a lightning storm, or when it is left unattended and unused for long periods of time, unplug it from the wall outlet and disconnect the antenna. This will prevent damage to the equipment due to lightning and power-line surges.
Servicing
Refer all servicing to qualified service personnel. Servicing is required when the apparatus has been damaged in any way, such as power-supply cord or plug is damaged, liquid has been spilled or objects have fallen into the apparatus, the apparatus has been exposed to rain or moisture, does not operate normally, or has been dropped.
Replacement parts
In case the product needs replacement parts, make sure that the service person uses replacement parts specified by the manufacturer, or those with the same characteristics and performance as the original parts. Use of unauthorized parts can result in fire, electric shock and/or other danger.
Attachments
Only use attachments/accessories specified by the manufacturer. Do not use attachments not recommended by the manufacturer. Use of improper attachments can result in accidents.
Damage requiring service
If any of the following conditions occurs, unplug the power cord from the AC outlet, and request a qualified service person to perform repairs.
a. When the power cord or plug is damaged.
b. When a liquid is spilled on the product or when objects have fallen into the product.
c. When the product has been exposed to rain or water.
d. When the product does not operate properly as described in the operating instructions.
Do not touch the controls other than those described in the operating instructions. Improper adjustment of controls not described in the instructions can cause damage, which often requires extensive adjustment work by a qualified technician.
e. If the product has been dropped or the cabinet has been damaged in any way.
f. When the product displays an abnormal condition or exhibits a distinct change in performance. Any noticeable abnormality in the product indicates that the product needs servicing.
Safety checks
Upon completion of service or repair work, request the service technician to perform safety checks to ensure that the product is in proper operating condition.
Wall or ceiling mounting
When mounting the product on a wall or ceiling, be sure to install the product according to the method recommended by the manufacturer. This is a safety feature.
Panel protection
The panel used in this product is made of glass. Therefore, it can break when the product is dropped or impacted upon by other objects. Be careful not to be injured by broken glass pieces in case the panel breaks.
Pixel defect
The panel is a very high technology product, giving you finely detailed pictures. Occasionally, a few non-active pixels may appear on the screen as a fixed point of blue, green or red. Please note that this does not affect the performance of your product.
Antennas
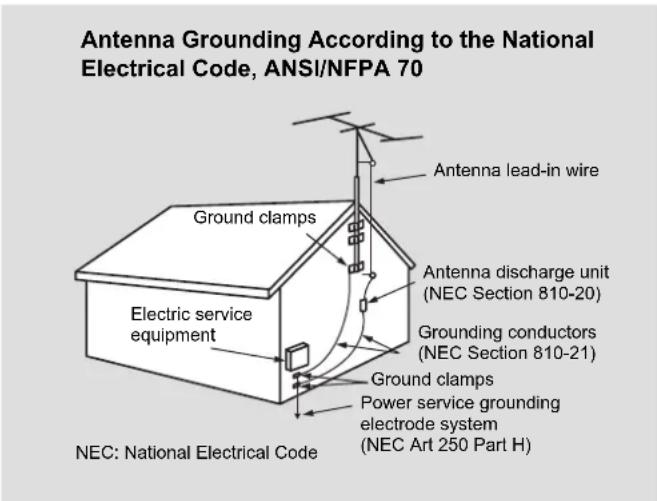
Outdoor Antenna Grounding
If an outdoor antenna is installed, follow the precautions below. An outdoor antenna system should not be located in the vicinity of overhead power lines or other electric light or power circuits, or where it can come in contact with such power lines or circuits.
WHEN INSTALLING AN OUTDOOR ANTENNA SYSTEM, EXTREME CARE SHOULD BE TAKEN TO KEEP FROM CONTACTING SUCH POWER LINES OR CIRCUITS AS CONTACT WITH THEM IS ALMOST INVARIABLY FATAL.
Be sure the antenna system is grounded so as to provide some protection against voltage surges and built-up static charges.
Section 810 of the National Electrical Code (NEC) in USA and Section 54 of the Canadian Electrical Code in Canada provides information with respect to proper grounding of the mast and supporting structure, grounding of the lead-in wire to an antenna discharge unit, size of grounding conductors, location of antenna discharge unit, connection to grounding electrodes, and requirements for the grounding electrode.
Important Information 1
Important Safeguards 2
Table of Contents 4
Introducing the TV 6
Remove the TV from the Box. 6
Installing the TV 6
Carrying or Moving the TV 6
Attach the Speaker to the Display. 7
Remove the Stand 7
TV Controls and Connectors 8
Control Panel 8
Connectors. 9
Connecting the TV 10
Basic Connections 10
Overview 10
Connecting Antenna System. 10
Connecting Cable System 10
Connecting Cable Box 11
Connecting Digital Cable Box 11
Connecting Satellite Receiver 12
Connecting Digital Satellite Receiver 12
Using External Equipment 13
Introduction 13
Equipment with HDMI Connection 13
Equipment with DVI Connection 14
Equipment with Coaxial Digital Audio 14
Connecting a VCR for Playing Back 15
Connecting a VCR for Recording. 15
Connecting a DVD Player with Component Video Connectors 16
Connecting a DVD Player with S-Video and Audio Connectors 16
Connecting a PC 17
Connecting a Camcorder or "PlayStation" 17
Connecting a Second TV or Monitor. 18
Connecting Headphones 18
Introducing the Remote Control 19
Insert Batteries into the Remote Control 19
Using the Remote Control. 19
Button Descriptions 20
Getting Start 22
Running Initial Setup 22
Setting a Secret Number 23
Menu Navigation 23
Watching TV 24
Turning On/Off 24
Introducing Channel Number 24
Selecting Channels 24
Adjusting Volume 25
Using FREEZE button. 25
Using ZOOM button 25
Adjusting MENU Options 27
Picture Control 27
Accessing Picture Menu 27
Selecting Picture Options 27
Adjusting Picture Settings 28
Adjusting Screen Settings 28
Audio Control 29
Accessing Audio Menu 29
Selecting Audio Options 29
Setting Channels 30
Accessing Channels Menu 30
Selecting Channel Options 30
Setting Channel List 30
Setting Favorite Channels 31
Using the FAVORITE button 31
Editing Channel Name 31
Using the Program Guide 32
Accessing Program Guide 32
Using the Program Guide 32
Setting System 33
Accessing Settings Menu 33
Setting Date & Time 33
Setting Timer 33
Input Select 34
Setting Caption Vision 34
Using the CCD button 34
Setting Menu & Display 34
Editing Input Labels 35
Setting Screen Saver 35
Running Reset System 35
Parental Lock Control 36
Accessing Locks Menu 36
Selecting Locks Options 36
Viewing Locked or Blocked Programs 37
Other Information 38
Troubleshooting 38
Care and Maintenance. 40
Specifications 41
Programming your Remote Control 42
Manufacturer's Codes 44
Remove the TV from the Box
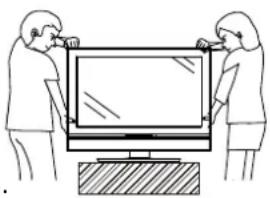
STOP! To safely remove the television from the box It's best to use 2 people to remove the television for stability.
- Remove cardboard holders from the box.
- Remove the cardboard; however, keep the wrapping on the television to protect it while moving.
- Lift onto installation location as the diagram illustrates.
Installing the TV
Select a steady platform with good ventilation to place the TV.
- Keep enough space above and behind the Display.
- The TV should be installed near an easily accessible power outlet.
- To prevent internal heat buildup, do not block the ventilation openings.
- Do not install the TV in a hot or humid place, or in a place subject to excessive dust or mechanical vibration.
- Be sure to take measures to prevent the TV from toppling over and causing injury.
- To obtain the best picture, do not expose the screen to direct illumination or direct sunlight. It is recommended to use spot lighting directed down from the ceiling or to cover the windows that face the screen with opaque drapery. It is desirable to install the TV in a room where the floor and walls are not of a reflective material.
6 inches (15 cm) or more

Cautions:
- Do not install the TV in protruding locations.
- Do not install this unit in restaurants where oily vapors occur. Dust absorbing oil may enter into the unit and damage the unit.
- Do not install this unit outdoors. If the unit is exposed to rain, it may result in fire or electric shock. If the unit is exposed to direct sunlight, the unit may heat up and cause damage to the unit.
- Do not install this unit in a vehicle or hang from the ceiling. Bumping of the vehicle may cause the unit to fall down and cause injury.
- Do not install this unit in a ship or vessel. If the unit is exposed to seawater, it may cause fire or damage the unit.
- If you install the unit on a non-level surface, the unit may fall or drop and cause injury or damage.
- If you place the unit on an unstable surface, the unit may fall and cause injury or damage.
- Do not hang anything on the unit. If you do so, the unit may fall from the stand or wall-mount bracket, causing damage or serious injury.
Carrying or Moving the TV
- When you move the TV, carry it by two or more people.
- When you move the TV, hold the upper and bottom frames of the TV, not the speaker.
- As the glass surface of the TV has a special coating, be careful to avoid touching the glass surface as far as possible.
- When transporting, do not subject the unit to shocks or vibration, or excessive force.
Attach the Speaker to the Display
Cautions:
- Carefully handle the unit during setup and consult authorized service personnel to ensure successful installation.
- Before performing work spread cushion over the base area to lay the Display on. This will prevent it from being damaged.
- Disconnect the AC power cord firstly.
The appearance of the unit may differ from the actual one.
To deattach the speaker, perform the steps in reverse order.
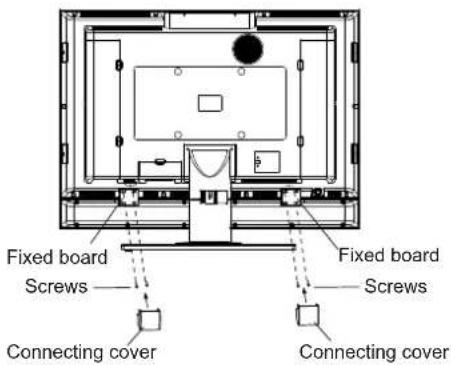
Screw the Speaker and the Fixed board to the unit using the supplied screws and tighten securely, then install the two Connecting covers as the diagram illustrates.
Connect the speaker audio cable between the speaker terminals on the unit and the speaker matching polarity according to the terminals' color.
Remove the Stand
Cautions:
- Carefully handle the unit during setup and consult authorized service personnel to ensure successful installation.
- Before performing work spread cushion over the base area to lay the Display on. This will prevent it from being damaged.
- Disconnect the AC power cord firstly.
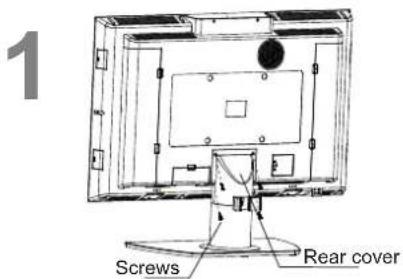
Take off the rear cover.
Do not remove the stand from the Display unless using an optional bracket to mount it.
The appearance of the unit may differ from the actual one.
To attach the stand, perform the steps in reverse order.
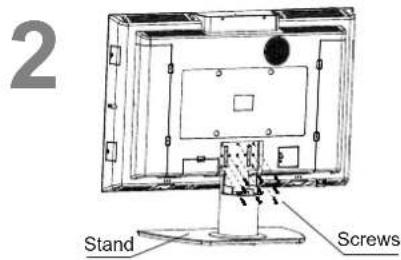
Loosen the screws on the Stand to remove the Stand.
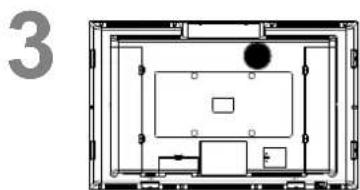
Replace the rear cover
TV Controls and Connectors
Control Panel
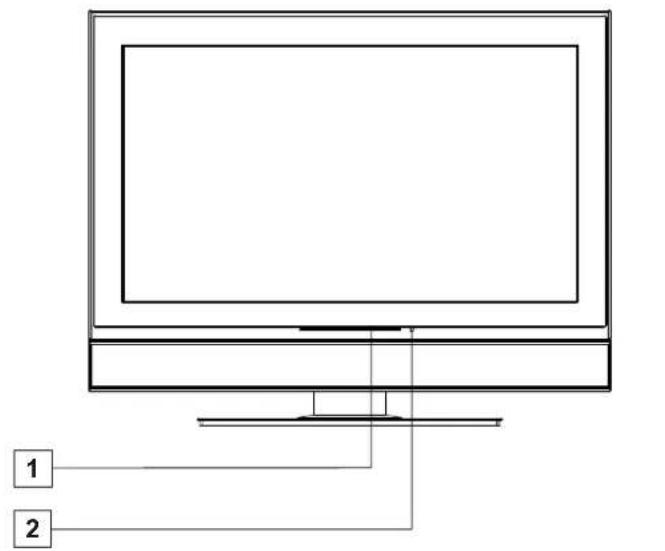
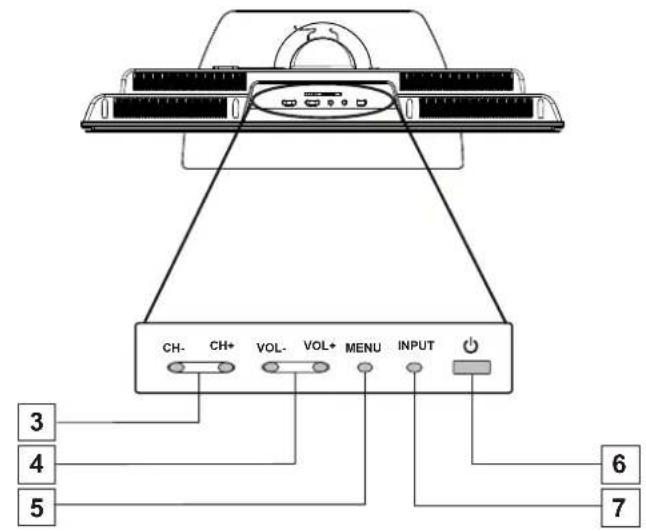
Item Description
1 Power Indicator
2 Remote Sensor Receives IR signals from the remote control.
3 CH-CH+ Press to scan through channels. In menu operations, these buttons serve as down/up buttons.
4 VOL-VOL+ Press to adjust the volume. In menu operations, these buttons serve as left/right buttons.
5 MENU To access the Menu main page.
6 POWER 1 Turn the unit on or off.
7 INPUT To display the INPUT source list or to quickly select input source.
- In normal viewing, press the MENU button first time to access the Menu main page.
In Menu operations, the MENU button is used to confirm or alter the settings of the selected menu item, which means it has the same function with the OK button on the remote control unit.
TV Controls and Connectors
Connectors
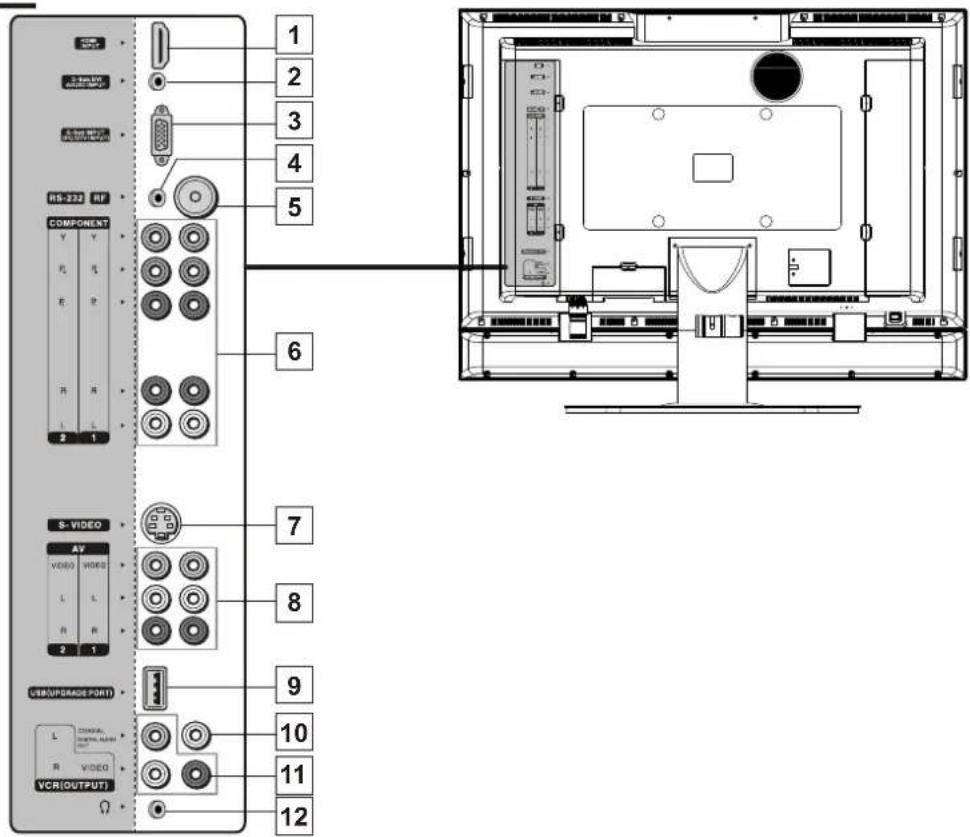
Item Description
| 1 | HDMI IN | HDMI (High-Definition Multimedia Interface) provides an uncompressed, all-digital audio/video interface between this TV and any HDMI-equipped audio/video component, such as a set-top box and DVD player. HDMI supports enhanced, or high-definition video, plus two-channel digital audio. |
| 2 | Audio IN for DVI or D-Sub interface | Use this audio input when you are using DVI connection or D-Sub connection. A HDMI-to-DVI adapter is necessary when you are connecting a DVI-equipped device to this TV |
| 3 | D-Sub IN | Connects to a PC or other Analog RGB devices such as Video Conferencing or Set-top Boxes. |
| 4 | RS-232 terminal | For service only. The user should not use this terminal. |
| 5 | RF IN | RF input that connects to your cable system or outdoor antenna. |
| 6 | Component Video IN ½ / Audio IN | Connect to your DVD player's or digital set-top box's component video (YPbPr) and audio (L/R) jacks. Component video provides better picture quality than the S-VIDEO or the composite video connections. |
| 7 | S-VIDEO input | Connects to the S-VIDEO output jack of your VCR or other video equipment that has S-VIDEO. SVIDEO provides better picture quality than the composite video connection. |
| 8 | Composite Video IN ½ / Audio IN | Connect to the composite video and audio output jacks on your VCR or other video device. |
| 9 | USB Port | For service only. The user should not use this port. |
| 10 | Coaxial Digital Audio OUT | Connects to the digital audio input of a digital audio component. |
| 11 | Video/Audio OUT | Connects to your VCR to record programs as desired or connects to hook up a second TV or monitor. Only analog TV programs, AV1and AV2 input sources can be output through the AV output jacks. |
| 12 | Headphones jack | Connects to your headphones. If your headphones do not match the jack, use a suitable plug adaptor (not supplied). |
Basic Connections
Overview
To display clear crisp pictures, you must connect your TV correctly and choose the correct display format. It is strongly recommended to connect the cable and antenna input using a 75-ohm coaxial cable to receive optimum picture quality signal. A 300-ohm twin lead cable can be easily affected by radio noise and the like, resulting in signal deterioration. If you use a 300-ohm twin lead cable, keep it as far away as possible from the TV.
The way in which you connect your TV will vary, depending on how your home receives a signal (antenna and satellite; cable and cable box).
Do not use an indoor antenna, which is especially susceptible to radio noise.

Disconnect all power sources before making any connections.
Connecting Antenna System
For best results, use this connection if you have an antenna system.
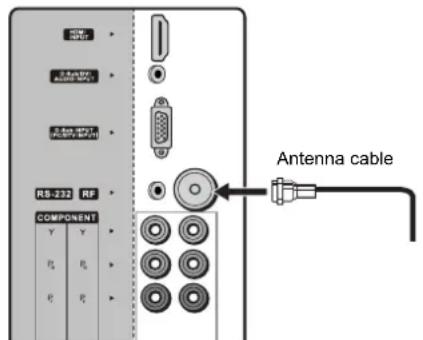

Be sure to choose [Antenna] before you start Auto Program. See chapter [Getting Start] for details.
Connecting Cable System
For best results, use this connection if you have a cable system.
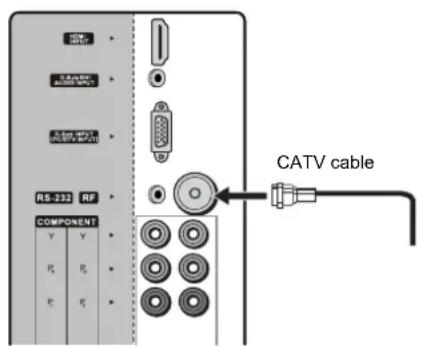

Be sure to choose [Cable] before you start Auto Program. See chapter [Getting Start] for details.
Basic Connections
Connecting Cable Box
For best results, use this connection if you have a cable system and your cable company scrambles some channels, such as premium channels or all channels (which requires you to use a cable box).
Connect the CATV cable to the cable box's input jack. Then use a coaxial cable to connect the cable box's output jack to the TV's RF input jack.
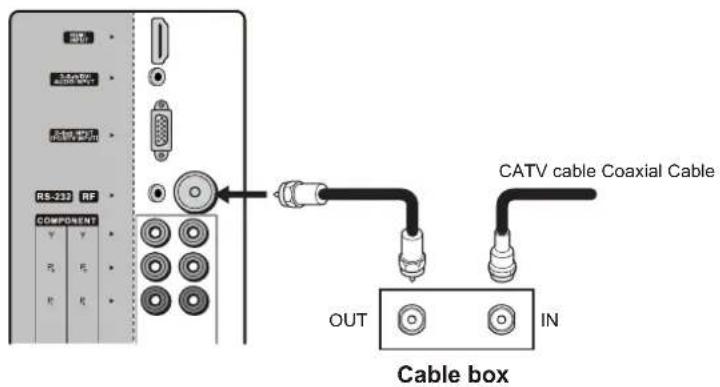
Be sure to choose [Cable] before you start Auto Program. See chapter [Getting Start] for details.
Connecting Digital Cable Box
Connect the RF coaxial cable from the CATV to the input of the digital cable box. Use a component video cable to connect the YPbPr jacks of your digital cable box to the TV's component jacks.
Component video connection is necessary to view digital broadcastsings in 1080i, 720p, 480i and 480p. This TV displays most format types of picture.
The component Jacks do not provide audio, so audio cables must be connected to provide sound.
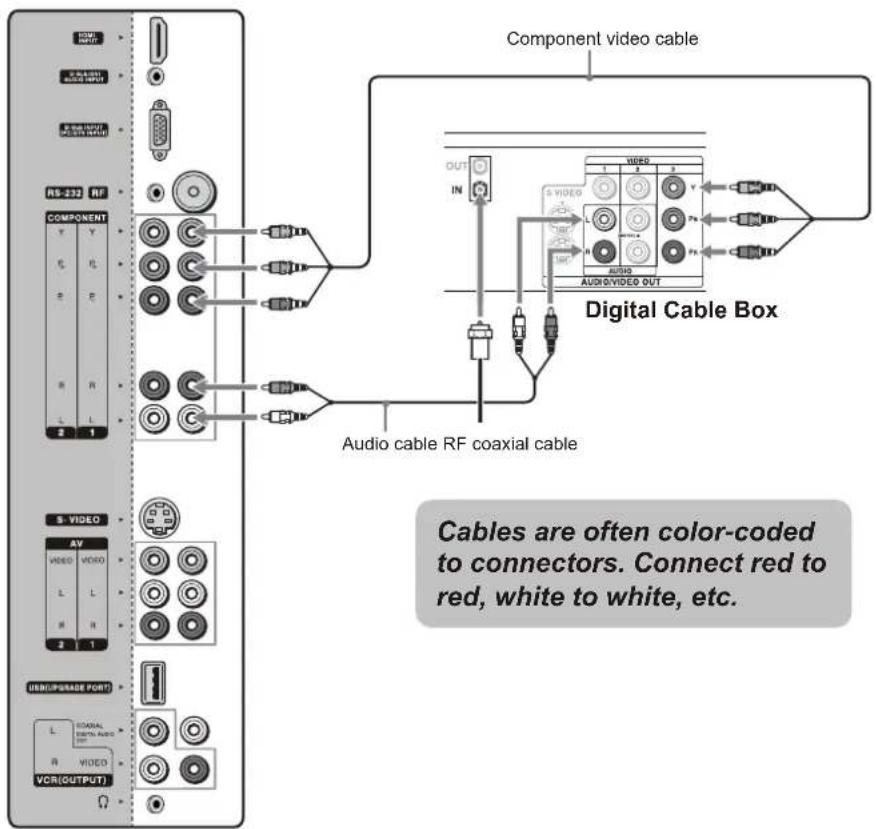
Basic Connections
Connecting Satellite Receiver
Connect the satellite antenna cable to the satellite receiver's SATELLITE IN jack. Use AV cables to connect the satellite receiver's AUDIO and VIDEO OUT jacks to the TV's AUDIO and VIDEO IN jacks.
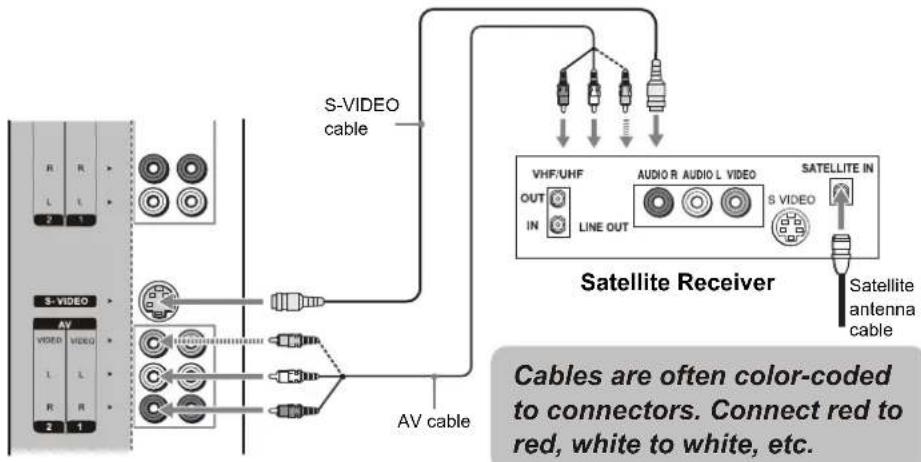
If your satediteeepieet with S-VIDEO, use a VIDEO cable (yellow) instead of the S-VIDEO cable.
Connecting Digital Satellite Receiver
Connect the RF coaxial cable from the satellite dish to the input of the digital satellite receiver.
Use a component video cable to connect the YPbPr jacks of your digital satellite receiver to the TV's component jacks.
Component video connection is necessary to view digital broadcasts in 1080i, 720p, 480i and 480p. This TV displays most format types of picture.
The component Jacks do not provide audio, so audio cables must be connected to provide sound.
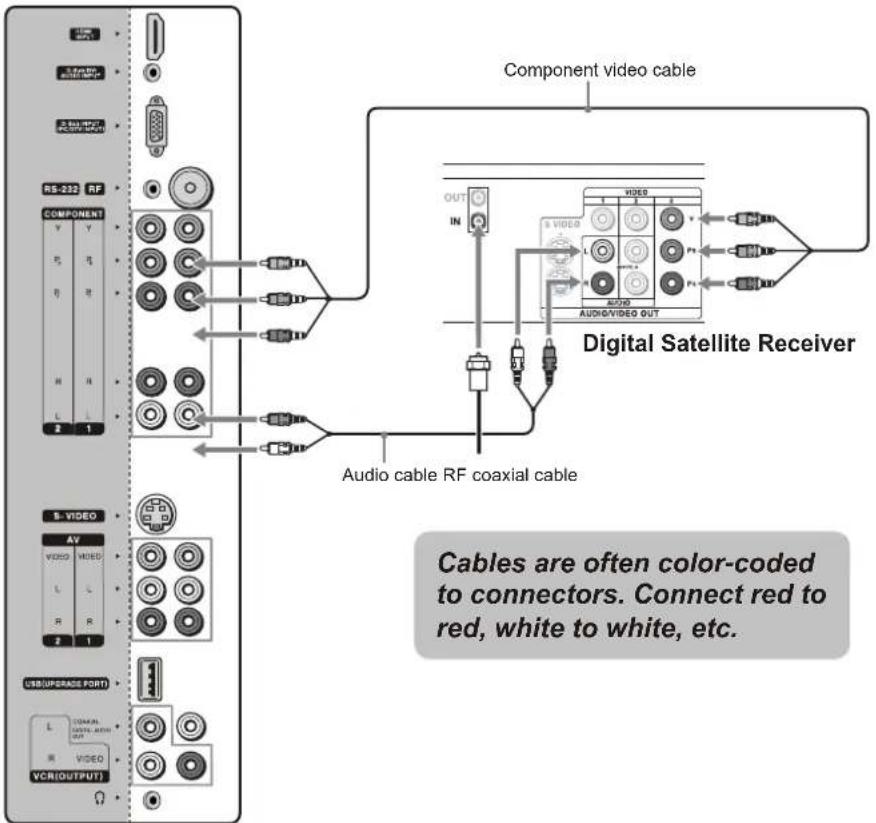
Using External Equipment
Introduction
You can connect many types of external equipment to your TV, like a DVD player, VCR, Digital TV tuner, PC, HDMI equipment, game console and camcorder. To view external source images, select the input source from INPUT on the remote control unit or on the Display.
Notes and Cautions:
- Disconnect all power sources before making any connections.
- Carefully check the terminals for position and type before making any connections.
- The packing contents of this TV may not include the cables or adaptors mentioned in this chapter.
Refer to your external equipment operation manual carefully before making connections. - Loose connectors can result in image or color problems. Make sure that all connectors are securely inserted into their terminals.
Refer to your external equipment operation manual for the signal type.
The illustration of the external equipment may be different depending on your model.
Equipment with HDMI Connection
For best results, use this connection if your equipment has a High-Definition Multimedia Interface (HDMI).
Use a HDMI cable, connect the equipment's HDMI OUT jack to the TV's HDMI IN jack.
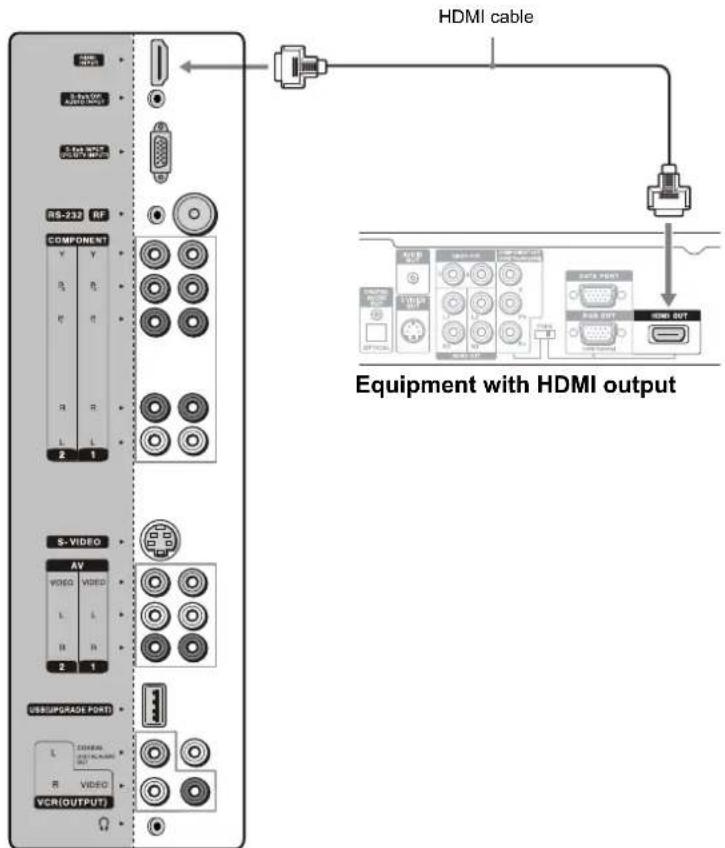
The HDMI jack provides both video and audio signals, so it is not necessary to connect the audio cable.
Using External Equipment
Equipment with DVI Connection
If you are connecting equipment with DVI connector to this TV, you will need to use an adapter. You can use a commercial HDMI-to-DVI cable or an HDMI adapter. Both are available at your local electronics store. When you use the adapter, you will also need to use separate audio cables for sound as DVI connector is for video signals only.
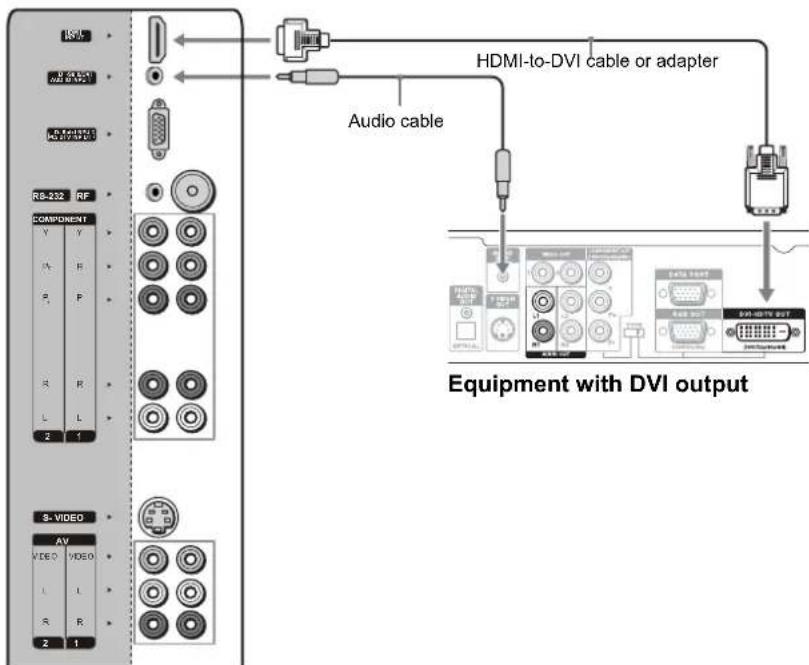
Equipment with Coaxial Digital Audio
You can use the TV's Coaxial Digital Audio OUT jack to connect a digital audio device, such as an audio amplifier. Use an coaxial audio cable to connect the TV's Coaxial Digital Audio OUT jack to the device's Coaxial Digital Audio IN jack.
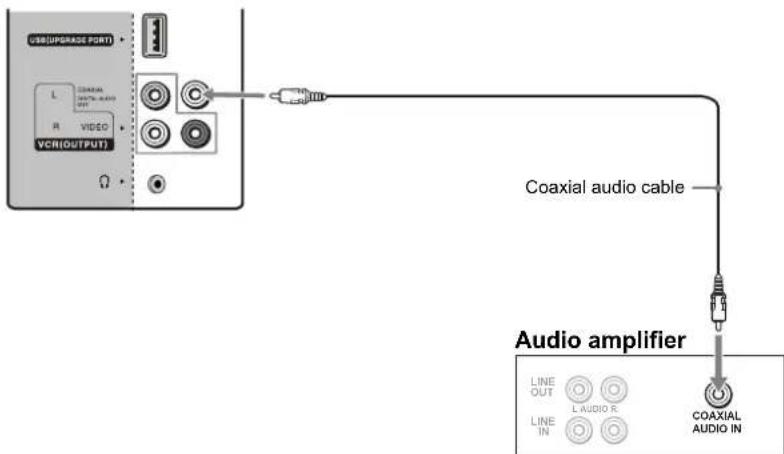
The Digital Audio OUT jack is available only when a digital TV channel is received.
Using External Equipment
Connecting a VCR for Playing Back
Use AV cables to connect the VCR's AV output jacks to the TV's AV input jacks. If your VCRs have S-VIDEO jacks, for best picture quality, use an S-VIDEO connection instead of the video cable (yellow) on your combined A/V cable. Use a S-VIDEO cable to connect the VCR's S-VIDEO OUT jack to the TV's S-VIDEO IN jack. S-VIDEO does not provide audio, so audio cables must be connected to provide sound.
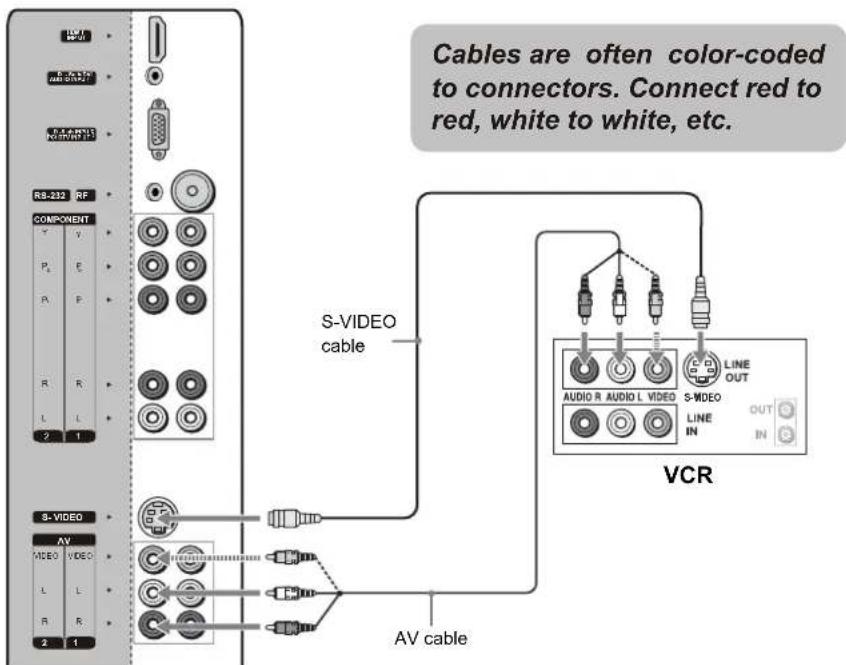
The S-video terminal share the same audio jacks with video2 and has priority over the video2 jack.
Connecting a VCR for Recording
Use AV cables to connect the VCR's AV input jacks to the TV's VCR output jacks.
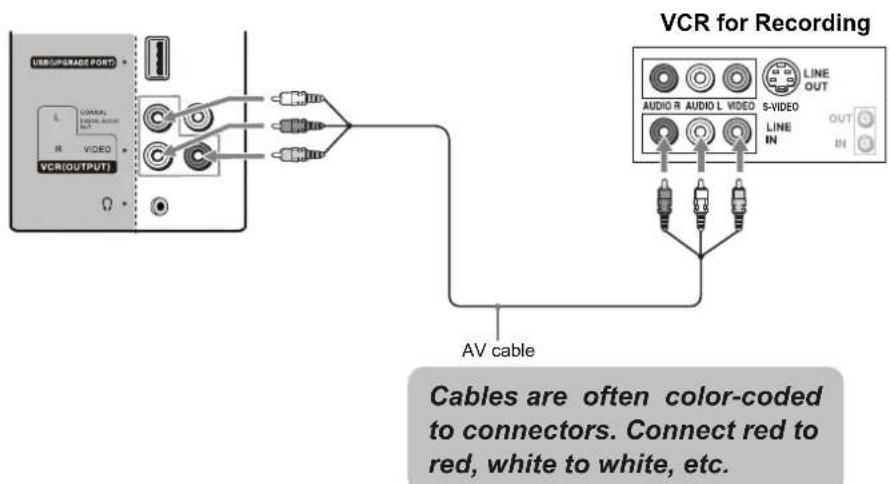
Only analog TV programs, AV1 and AV2 input sources can be output through the AV output jacks.
Using External Equipment
Connecting a DVD Player with Component Video Connectors
Use a component video cable to connect the DVD player's YPbPr jacks to the TV's YPbPr jacks. Use an audio cable to connect the DVD player's AUDIO OUT jacks to the TV's AUDIO IN jacks. Be sure to use the same row of inputs that you used for the video connection.
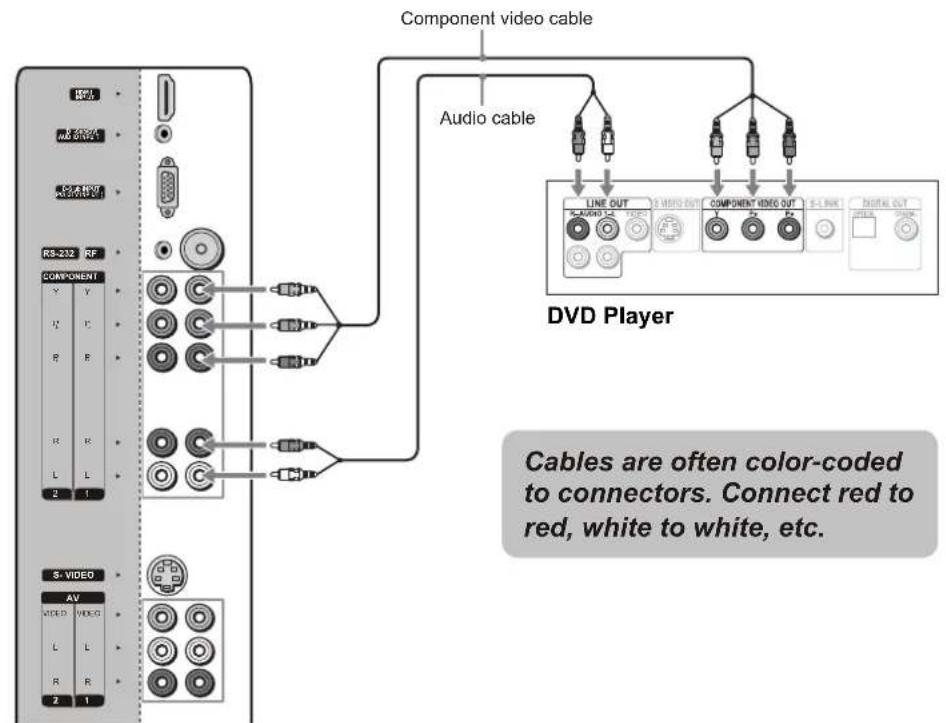
The YPbPr jacks on your DVD player are sometimes labeled YCbCr, or Y, B-Y and R-Y. If so, connect the cables to like colors.
Connecting a DVD Player with S-Video and Audio Connectors
Use an AV cable to connect the DVD player's AUDIO OUT jacks to the TV's AUDIO IN jacks. Use a S-VIDEO cable to connect the DVD player's S-VIDEO OUT jack to the TV's S-VIDEO IN jack.
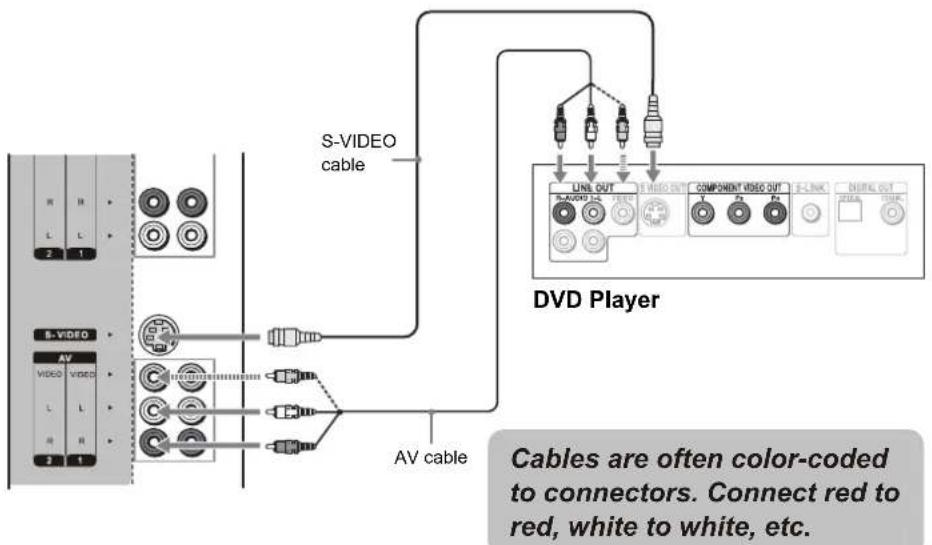
If your DVD player is not equipped with S-VIDEO, use a VIDEO cable (yellow) instead of the S-VIDEO cable.
Using External Equipment
Connecting a PC
If you connect your PC to the TV, you can watch your personal computer's display on the TV.
When your PC is connected to the TV with the D-Sub cable and audio cable, you can view and listen to the PC's video and audio output on the TV.
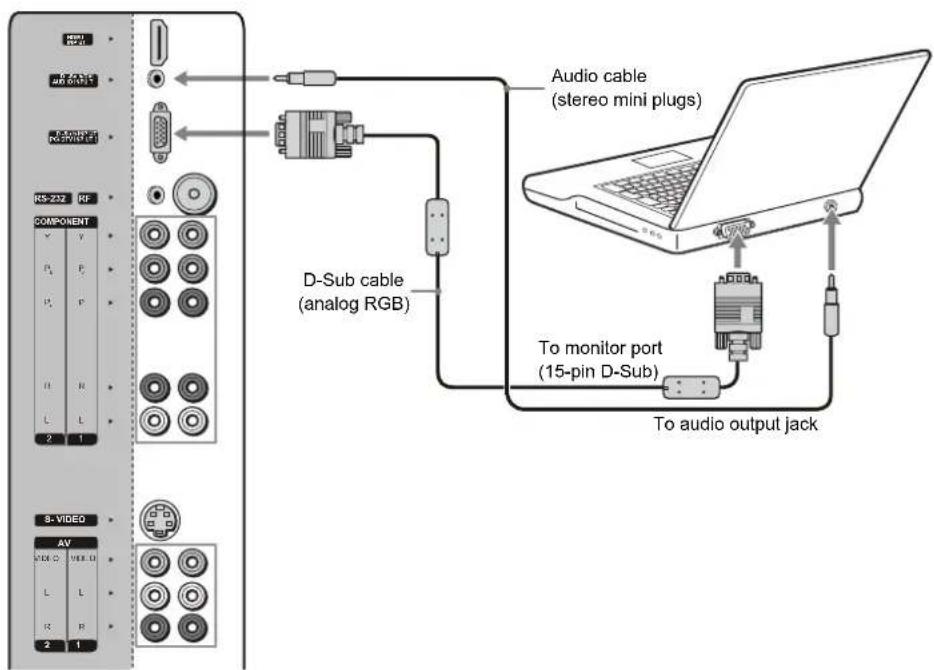
Connecting a Camcorder or "PlayStation"
Use an AV cable to connect the camcorder or "PlayStation" AV output jacks to the TV's AV input jacks.
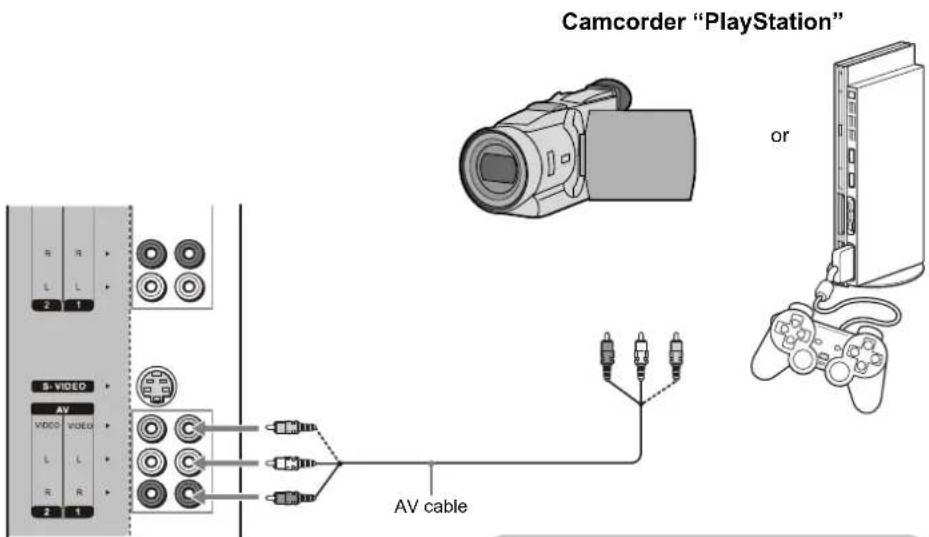
Cables are often color-coded to connectors. Connect red to red, white to white, etc.
Using External Equipment
Connecting a Second TV or Monitor
The TV has a special signal output capability which allows you to hook up a second TV or monitor.
Connect the second TV or monitor to the TV's VCR output jacks.
See the Operating Manual of the second TV or monitor for further details regarding that device's input settings.
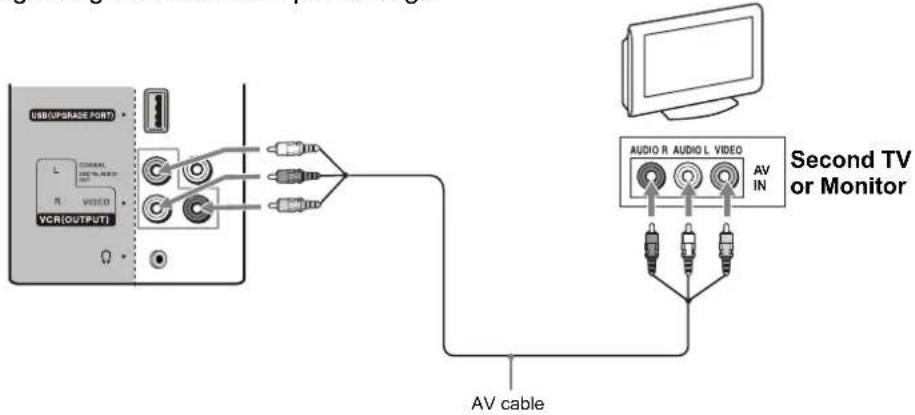
Cables are often color-coded to connectors. Connect red to red, white to white, etc.
Only analog TV programs, AV1 and AV2 input sources can be output through the AV output jacks.
Connecting Headphones
Insert the plug of the headphone into the TV's Headphone jack.
When using headphones, adjust the headphone volume so as to avoid excessive levels, as hearing damage may result.
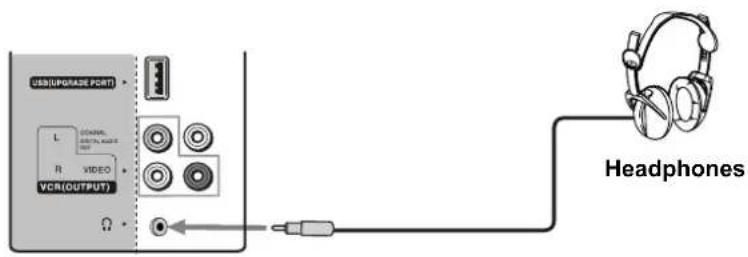
If your headphones do not match the jack, use a suitable plug adaptor.
Insert Batteries into the Remote Control
Insert two size AA batteries by matching the diagram inside the battery compartment.
and on the batteries to the
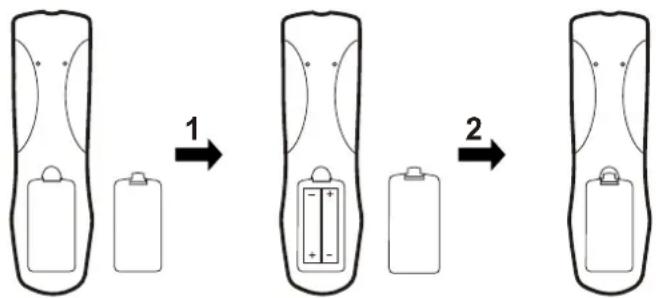
Precaution on battery use
Improper use of batteries can result in a leakage of chemicals and/or explosion. Be sure to follow the instructions below.
- Place batteries with their terminals corresponding to the (+) and (-) indications.
- Different types of batteries have different characteristics. Do not mix batteries of different types.
- Do not mix old and new batteries. Mixing old and new batteries can shorten the life of new batteries and/or cause old batteries to leak chemicals.
- Remove batteries as soon as they are non-operable. Chemicals that leak from batteries can cause a rash. If chemical leakage is found, wipe with a cloth.
- The batteries supplied with the product may have a shorter life expectancy due to storage conditions.
- If the remote control is not used for an extended period of time, remove the batteries from the remote control.
Using the Remote Control
Use the remote control by pointing it towards the remote sensor window of the set. Objects between the remote control and sensor window may prevent proper operation.
Cautions regarding use of remote control
- Do not expose the remote control to shock. In addition, do not expose the remote control to liquids, and do not place in an area with high humidity.
- Do not install or place the remote control under direct sunlight. The heat may cause deformation of the unit.
- The remote control may not work properly if the remote sensor window of the main unit is under direct sunlight or strong lighting. In such a case, change the angle of the lighting or TV set, or operate the remote control closer to the remote sensor window.
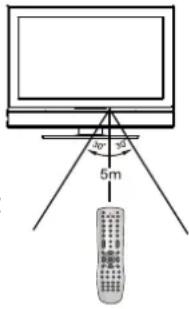
This above illustration is for reference only. The remote sensor may be in different locations on different models.
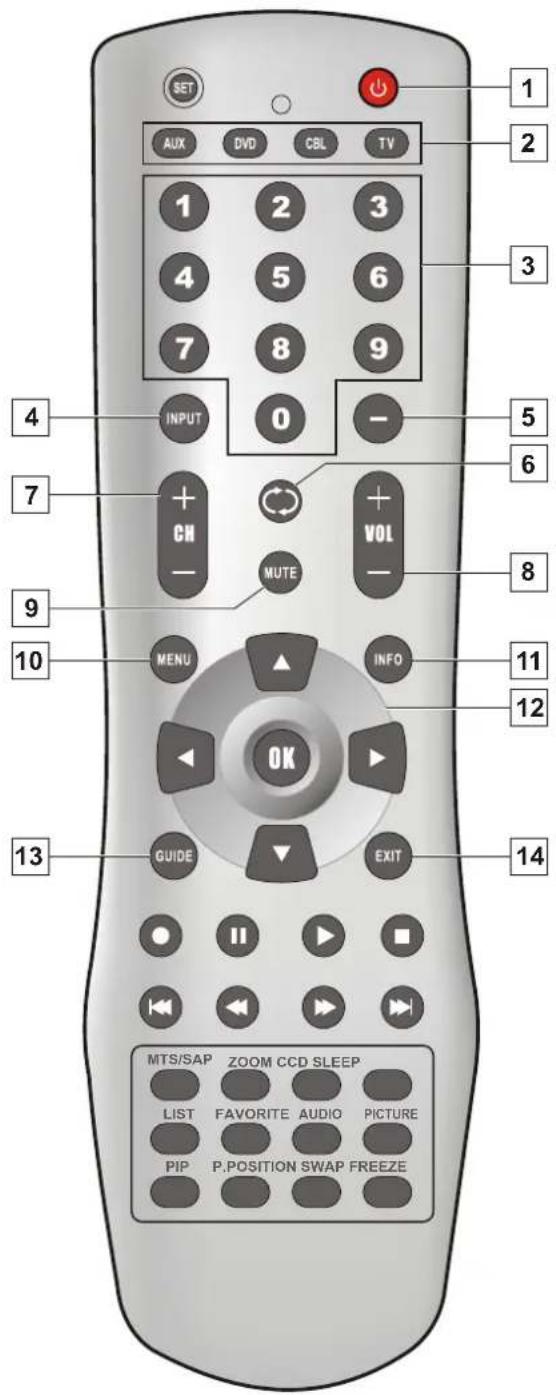
Button Descriptions
Button Description
1 POWER turn the unit on or off.
AUX, DVD, To select additional products to be controlled with remote control.
This remote control is an universal remote control. If your remote control does not work correctly when you operate the unit, please try to press TV button.
3 0-9 number Use these number buttons to select channel or buttons input password.
4 INPUT To display the INPUT source list or to quickly select input source.
5 Dash (-) To enter a program number for multiple program channels such as 2-1,2-2,etc.
6 FLASHBACK To switch between the currently tuned channel and the previously tuned channel.
7 CH+, CH- To select channels upward or downward.
8 VOL+, VOL- To adjust volume.
9 MUTE To mute the sound.
10 MENU To access the Menu main page.
11 INFO To access the program guide.
12 ▲,▼, To move upward or downward in menu operation;
, To move left or right in menu operation; To adjust selected menu item in menu operation;
OK To confirm or alter the settings of the selected menu item.
13GUIDE To access the program guide.
14 EXIT To exit menu.
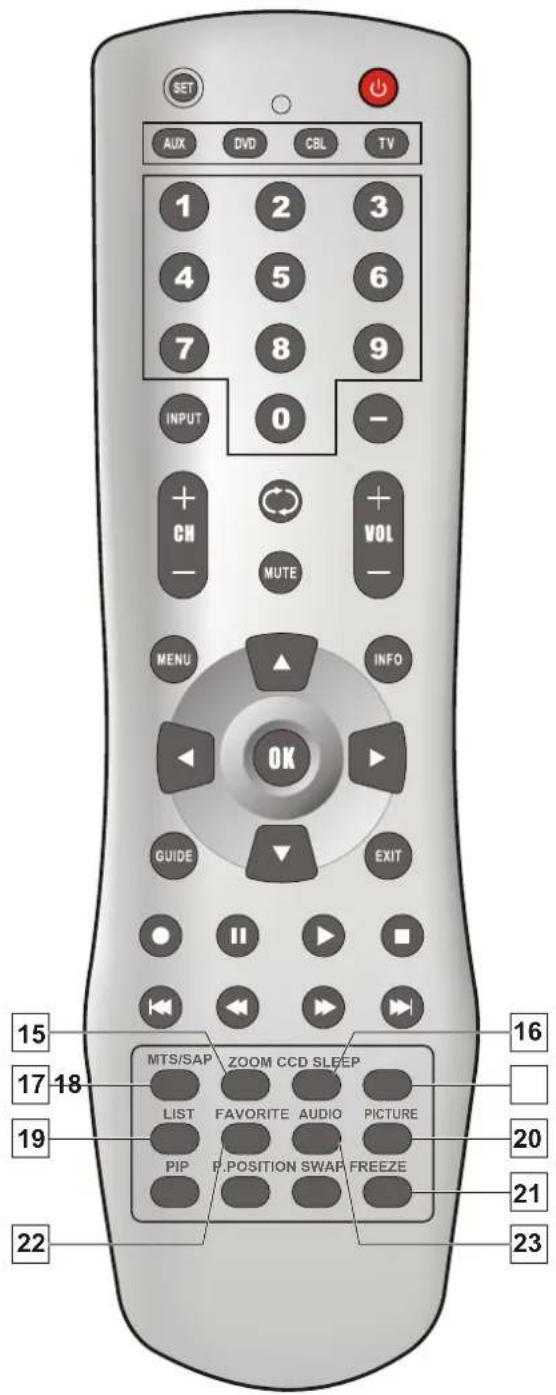
Button Descriptions
Button Description
| 15 | ZOOM | To select a screen aspect ratio. |
| 16 | CCD | To select closed caption mode. |
| 17 | MTS/SAP | To select a stereo, sap or mono for analog channels; also used to select audio track for digital channels. |
| 18 | SLEEP | To set sleep timer. |
| 19 | LIST | To access the master channel list. |
| 20 | PICTURE | To select a preset picture mode. |
| 21 | FREEZE | To freeze current picture. |
| 22 | FAVORITE | To access the favorite channel list and select from 3 different favorite lists. |
| 23 | AUDIO | To select a preset sound mode. |
Running Initial Setup
Perform the following steps before you press POWER on the remote control to turn on your TV set.
- Insert the batteries into the remote control unit.
- Connect the antenna cable to the TV.
- Plug in the AC power cord to the AC outlet.
After you finish connecting the TV, you can run the Initial Setup to create a list of available analog and digital channels. The Initial Setup screen appears when you turn on the TV for the first time after purchase. We strongly
recommend you to perform initial setup according to the steps below.
Setting Language
Press / to select the desired language listed on the screen, and then press OK to confirm and continue.
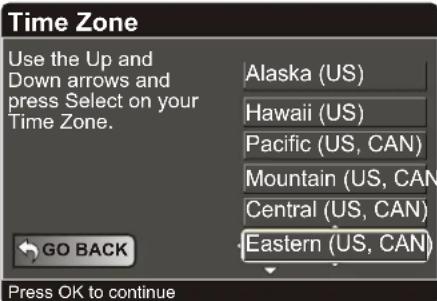
Setting Time Zone
Press / to select a proper time zone according to your area, and then press OK to confirm and continue.
If you want to return to previous screen, please highlight [GO BACK] item and press OK to return.
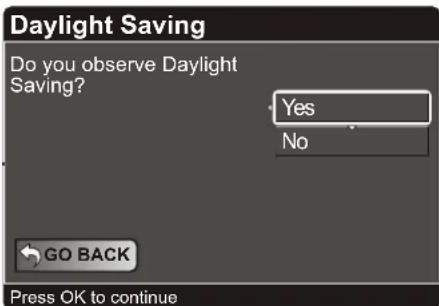
Setting Daylight Saving
Press / to highlight [Yes] item if you want to observe daylight saving, or you may select [No] to abandon daylight saving and then press OK to confirm and continue.
If you want to return to previous screen, please highlight [GO BACK] item and press OK to return.
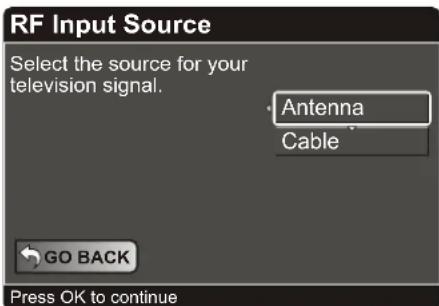
Selecting RF Input Source
Press / to select [Antenna] or [Cable] according to what kind of connection is made with your TV, and then press OK to confirm and continue. If you choose [Antenna], the TV starts Auto Program automatically.
If you choose [Cable], there are 3 kinds of CATV system, including STD, HRC and IRC. Select the one matches to your TV. Select [Automatic] when you do not know which one to select. When you select [Automatic], the unit automatically detects the type of your cable system. If the unit fails to detect the type of your cable system, please consult with your cable TV company about the type of your cable system, and then choose the correct type before Auto Program.
If you want to return to previous screen, please highlight [GO BACK] item and press OK to return.
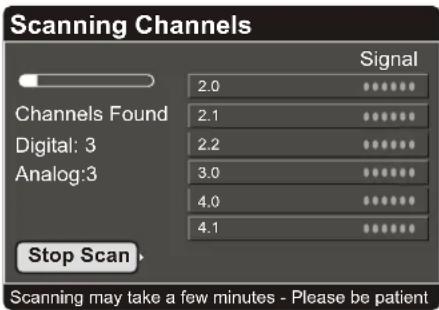
Start Auto Program...
Once you have finished selecting RF input source, the unit starts auto program.
Auto Program may take a while to complete. A progress bar is displayed while available channels are being scanned. If you select [Stop Scan] to cancel the Auto Program before all receivable channels are scanned, you need to run Auto Program at a later time.
Auto Program will create a list of receivable channels for the current input. You will be required to run Auto Program for RF input to create a list of available channels.
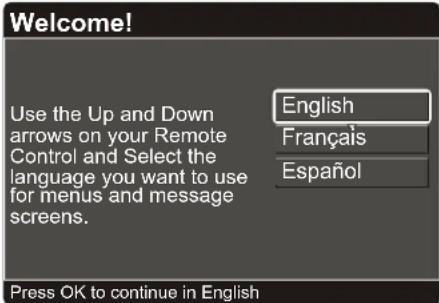
(Example)
Setting a Secret Number
For additional protection to your TV and the user's settings from being accidentally changed, we recommend you to set a secret number firstly as below.
- Press MENU

- Highlight [Locks]

Use or button.
- Press OK

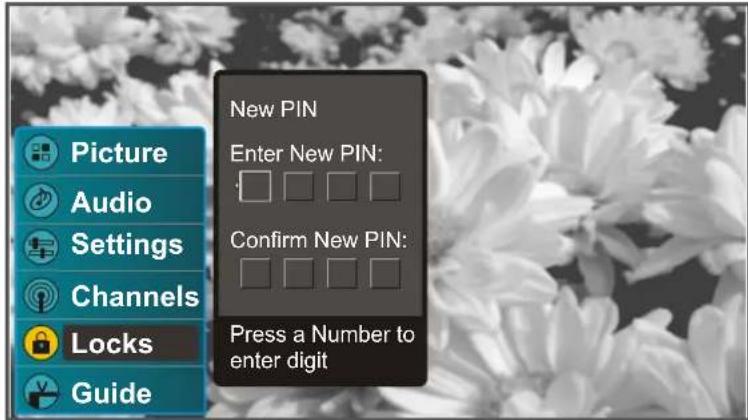
The TV allows you to set a secret number when you access the [Locks] menu first time.
You may use 0-9 number buttons to enter a new four-digit secret number, and then confirm the new secret number by entering it again.
Once the secret number is set successfully, the TV requests you to enter secret number if you are going to:
- Access to the [Locks] menu.
- Scan channels automatically.
Find channel manually.
View a blocked program. - Reset all settings to defaults by using the [RESET ALL] item in [Settings] menu.
The secret number is very important, please keep it carefully. As a precautionary measure, make a note of your secret number and keep it in a familiar place.
Menu Navigation
- Press to display the Main menu.
Press to highlight the menu items.
Press to enter the sub-menu field.
Press to select items in the submenu.
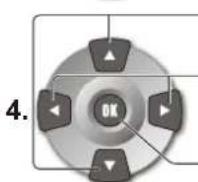
Press to adjust the selected items or move the on-screen cursor in the sub-menu.
Press to confirm your operation or alter the settings for some items such as [Cinemotion].
-
Press to return to previous screen.
-
Press to return to normal picture.
Turning On/Off
Turning On
Firstly, Plug in the AC power cord to the AC outlet.
Press POWER on the TV or press POWER on the remote control.
Never attempt to move the TV The initial setup starts when the TV powers on for the first time. If the TV has been unless the AC power cord has turned on before, it displays current input signal directly.
been disconnected.
Turning Off
Press POWER on the TV or press POWER on the remote control.
The TV enters standby mode and the image on the screen disappears.
The TV will still consume some power as long as the AC power cord is still inserted into the wall outlet.
If you are not going to use this TV for a long period of time, be sure to remove the AC power cord from the power outlet.
Introducing Channel Number
This television is capable of receiving the full range of cable-TV channels available today, from the most digital and HDTV channels, to the traditional analog channels.
As the transition toward full digital TV continues, some cable-TV systems in the USA will have a mixture of analog and digital channels in their lineups. Most situations the ATSC PSIP channel number is composed of a major channel number and a minor channel number. The major channel number is same for both analog and digital channels (It is equal to the NTSC channel number for existing broadcasters). An analog channel usually has a minor channel number of zero, while a digital channel usually has a minor channel number of 1, 2 or larger.
Selecting Channels
You can select analog channels in serveral ways.
Method 1 - Using CH + or CH - on the remote control or on the TV
Press the CH+ or CH- to cycle among all available channels. Only those channels marked with a tick symbol can be selected by the CH+ or CH- button.
Method 2 - Using FLASHBACK on the remote control
Press FLASHBACK to switch to the previously tuned channel.
Press FLASHBACK again to switch back to the currently tuned channel.

Method 3 - Using 0-9 and OK on the remote control
For analog TV channels
Press the 0-9 number buttons to input a channel number and confirm with OK to select up to 125 channels for VHF/UCHF/CATV.
Selecting Channels
For digital TV channel
Press the 0-9 number buttons and dash(-) to input a digital channel number, the TV goes to the selected channel directly. (e.g., channel 8-3, just press 8, -and 3 one by one)
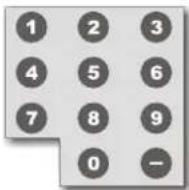
If you enter channel number with 0-9 only (without pressing OK), channel selection will be made if there is no operation for a few seconds.
Method 4 - Using master channel list
Press the LIST button to display the master channel list, you may select channel with the and OK buttons.

FAVORITE
Method 5 - Using favorite channel list
Press the FAVORITE button to display a desired favorite channel list, you may select channel with the and OK buttons.
Adjusting Volume
Using VOL+ or VOL- on the remote control or on the TV Press the VOL+ or VOL- to increase or decrease the volume.
Using MUTE on the remote control

Press MUTE to mute the sound. Press it again to cancel the mute.
Using FREEZE button
Press FREEZE to temporarily capture a program's picture. You can use this feature to write down information such as phone numbers, recipes, etc. You may press any key to cancel FREEZE and return to normal viewing.

The TV automatically cancel FREEZE and return to normal viewing in about a minute.
Using ZOOM button
Press ZOOM repeatedly to choose a proper screen aspect ratio. The following mode may available for your choice.

Normal
Select to match the source's image.(4:3 to 4:3, 16:9 to 16:9)
The zoom mode options may differ from different formats of the input signal.
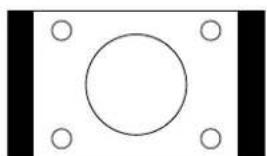
Example:
Source

Normal
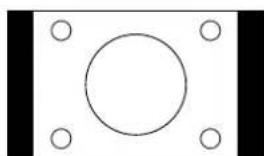
Final
When you choose NORMAL to view a 4:3 program, two black bars keep on the two sides of the screen.
For additional protection to the screen, when you are viewing a 4:3 program, please DO NOT use the NORMAL feature for a long period of time.
Using ZOOM button
Direct
Select to detect the resolution of the signal and display an image with the same number of pixels on the screen.
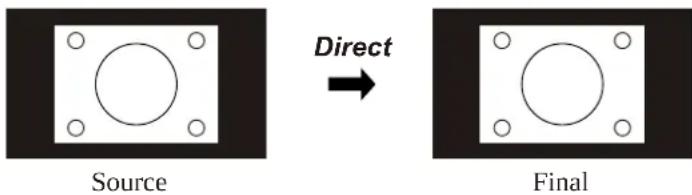
Example:
Full Screen
Select to enlarge the 4:3 picture horizontally only, to fill the display area.
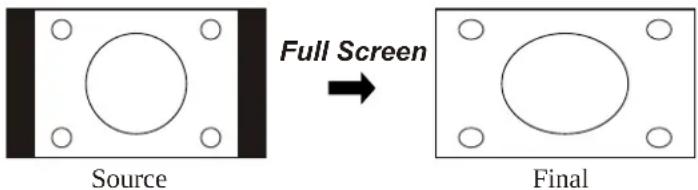
Example:
Panoramic
Select to enlarge the 4:3 picture to fill the 16:9 screen, keeping the original image as much as possible.
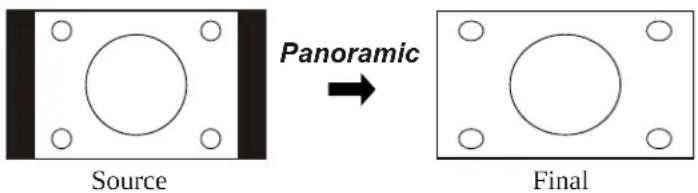
Example:
ZOOM 1
Select to enlarge the picture horizontally and vertically to an equal aspect ratio that fills the wide screen.
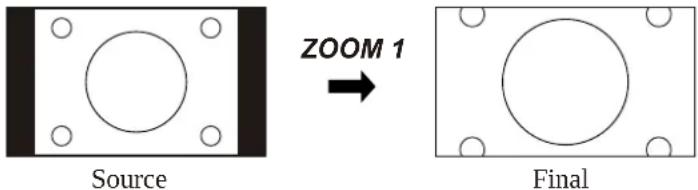
Example:
ZOOM 2
Select to view wide-screen DVDs in full screen.
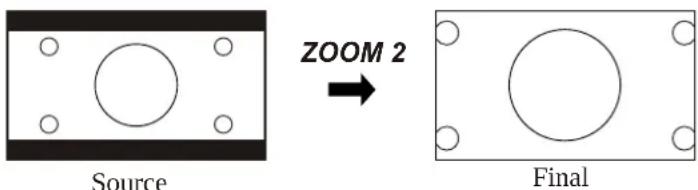
Example:
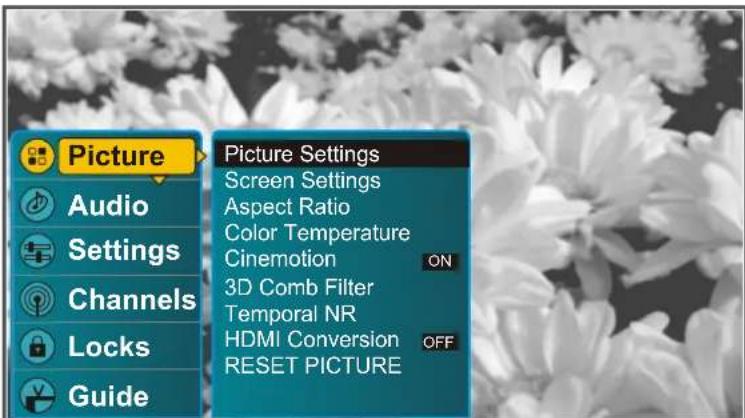
Depending on the signal tuned, you may see different MENU options on your screen. As an example, Menus displayed below are based on TV mode.
Picture Control
Accessing Picture Menu
- Press MENU

- Highlight [Picture]

Use or button.

- Press OK
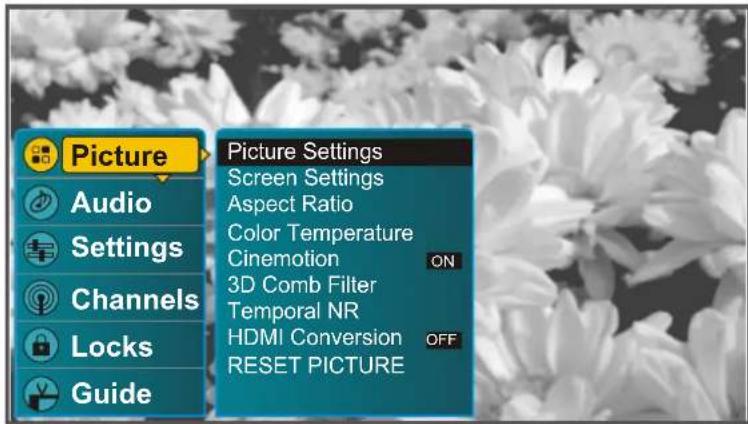
To highlight an option and to change settings, press . Press OK to confirm the selection or alter the settings. Press EXIT to exit.
Selecting Picture Options
Option Description
| Picture Settings | Select to access a picture adjustment window, see [Adjusting Picture Settings] on next page. |
| Screen Settings | Select to access a screen adjustment window for VGA or Component input, see [Adjusting Screen Settings] on next page. |
| Aspect Ratio y. | Select to access a window in which you can choose a proper aspect ratio for 4:3 or 16:9 program. Select from [Normal], [Direct], [Full Screen], [Panoramic], [ZOOM 1] and [ZOOM 2]. |
| Color Temperature | Choose from the following color temperatures: |
| Cool Select to give the white colors a blue tint. | |
| Neutral Select to give the white colors a neutral tint. | |
| Warm Select to give the white colors a red tint. | |
| Cinemotion | Select [ON] to optimize the screen display automatically detecting film content and applying a reverse 3-2 pull down process. Moving picture will appear clearer and more natural looking. Select [OFF] to disable the detection. |
| 3D Comb Filter | Select to provides high quality images with minimal dot crawl and cross color noise. Select from [Off], [Low], [Medium] and [High]. |
| Temporal NR (Analog) | Select to reduce the noise level of connected equipment. This also reduces the noise level to the signal from the RF jack. Select from [Off], [Low], [Medium] and [High]. |
| HDMI Conversion | Select to change color space for some irregular HDMI signal. Select [ON] when you find abnormal color while viewing HDMI programs. Be sure to select [OFF] for normal HDMI signal. |
| RESET PICTURE | Select to reset picture settings and adjustments to the defaults. |
Picture Control
Adjusting Picture Settings
| Picture Settings: TV | |
| Preset | Custom |
| Brightness | 25 |
| Contrast | 25 |
| Saturation | 25 |
| Tint | 25 |
| Sharpness 4 | |
| DONE | |
| Choose among different preset adjustments for your TV picture | |
Option Description
Preset
Select to choose a picture mode to best match environment of the TV, which can vary due to factors like room brightness, type of program watched or the type of image input from external equipment.
StandardSelect for a highly defined image in a normally bright room.
Vivid Select for enhanced picture contrast and sharpness.
Movie Select for a movie.
Pro Select for a normal picture.
Custom Select to customize the picture as desired.
To quickly change the picture mode, press the PICTURE button repeatedly.
| Brightness | Select to adjust picture brightness. |
| Contrast | Select to adjust picture contrast. |
| Saturation | Select to adjust color saturation for current picture. |
| Tint | Select to adjust natural flesh tones. |
| Sharpness | Select to adjust clarity of outline detail. |
Adjusting Screen Settings
| Adjustment Settings | |
| Horizontal | 0 |
| Vertical | 0 |
| Phase | 17 |
| Auto Sync DONE | |
| Use left and right arrows to change horizontal position | |
Option Description
| Horizontal | Select to adjust horizontal position for the image. |
| Vertical | Select to adjust vertical position for the image. |
| Phase | Adjust when characters have low contrast or when the image flickers. |
| Auto Sync | Select to automatically adjust the PC image. |
The [Screen Settings] window can't be accessed unless the TV works in D-Sub or Component mode.
In Component mode, the [Auto Sync] item is unavailable.
In Component mode, when the unit receives 480i signal, the [Vertical] item is ineffective unless its value is larger than 0. Please do not adjust the [Vertical] item to a negative value.
Audio Control
Accessing Audio Menu
- Press MENU

- Highlight [Audio]......
Use or button.

- Press OK

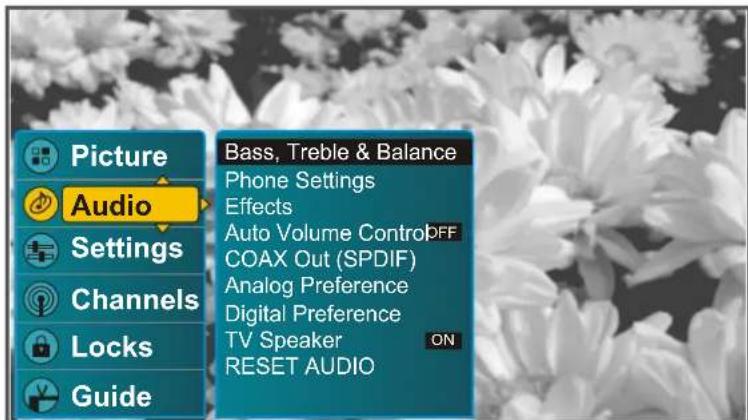
To highlight an option and to change settings, press . Press OK to confirm the selection or alter the settings. Press EXIT to exit.
Selecting Audio Options
Option Description
| Bass, Treble & Balance | Select to access an audio adjustment window. | |
| Bass | Adjust to increase or decrease lower-pitched sounds. | |
| Treble | Adjust to increase or decrease higher-pitched sounds. | |
| Balance | Adjust to emphasize left or right speaker balance. | |
| Phone Settings | Select to access a phone settings window. All adjustments in this window have an effect on the headphone only. | |
| Volume | Adjust to increase or decrease phone volume. | |
| Bass | Adjust to increase or decrease lower-pitched sounds. | |
| Treble | Adjust to increase or decrease higher-pitched sounds. | |
| Balance | Adjust to emphasize left or right speaker balance. | |
| Effects | None | Select to turn off the sound effect. |
| Hall | Select for a concert program. | |
| Theater | Select for a movie program. | |
| Music | Select for a music program. | |
| Speech | Select for a spoken dialog program. | |
| Auto Volume Control | ON | Select to equalize overall volume levels across all channels. |
| OFF | Select to turn off Auto Volume Control. | |
| COAX Out (SPDIF) | AUTO | Select to output audio signal as its original format. |
| PCM | Select to output audio signal by PCM form. | |
| Analog Preference use | Use this item to select a stereo mode as a default mode when you switch your TV to a analog program. Select from [Mono], [Stereo] and [SAP]. | |
| Mono | Select for mono reception. Use to reduce noise during weak stereo broadcasts. | |
| use | Stereo | Select for stereo reception when viewing a program broadcast in stereo. |
| by | SAP | Select to automatically switch the TV to second audio programs when a signal is received. If no SAP signal is present, the TV remains in Stereo mode. |
| Digital Preference | Use this item to select a language as a default language when you switch your TV to a digital program. | |
| TV Speaker | Select to turn the TV speakers ON or OFF. | |
| RESET AUDIO | Select to reset audio settings to the defaults. | |
Setting Channels
Accessing Channels Menu
- Press MENU

- Highlight [Channels]...
Use or button.

- Press OK

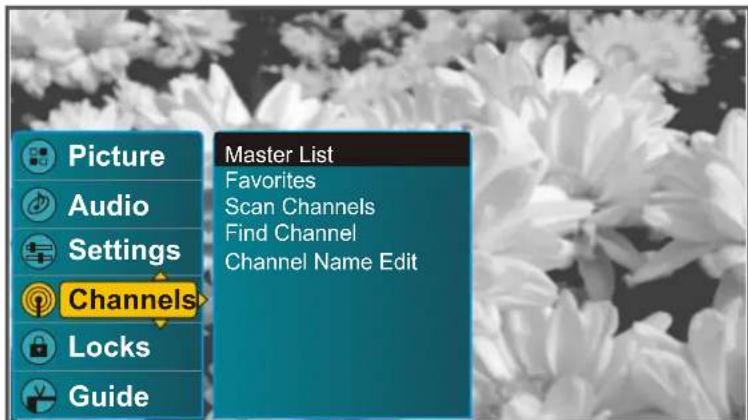
To highlight an option and to change settings, press . Press OK to confirm the selection or alter the settings. Press EXIT to exit.
Selecting Channel Options
| Option Description | |
| Master List | Select to display all available channels scanned by Auto Program in initial setup. See [Setting Channel List] on this page. |
| Favorites | Allows you to setup favorite channels in 3 different categories. See [Setting Favorite Channels] on next page. |
| Scan Channels | Allows you to run Auto Program manually. You may need to run Auto Program manually if you interrupt the Auto Program process in initial setup. Please refer to [Running Initial Setup] for the detailed steps. You will be asked to input a correct secret number before you access the [Channel Scan] screen. |
| Find Channel | Allows you to find channel manually by input the RF channel number. Please contact your local station or cable operator for this RF channel number information. You will be asked to input a correct secret number before you access the [Find Channel] screen. |
| Channel Name Edit | Allows you to assign labels (such as station call letters) to a selected channel. See [Editing Channel Name] on next page. |
Setting Channel List
In the [Master Channel List] window, you may mark or unmark the desired channels. Only those channels marked with a tick symbol can be selected by the CH+ or CH- button. The unmarked channel(s) can be selected only by 0-9 number buttons.
Mark All: select to mark all channels.
Unmark All: select to unmark all channels.
Digital Only: Select to mark digital channels only.
Be sure to select [Done] if you finish setting channel list.
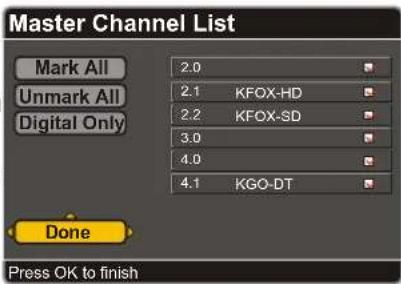
Also, you may access the master channel list by pressing the LIST button.
Setting Channels
Setting Favorite Channels
The unit allows you to setup 3 groups (FAV 1, FAV 2 and FAV 3) of favorite channels. You may set up to 16 channels for each favorite channel list.
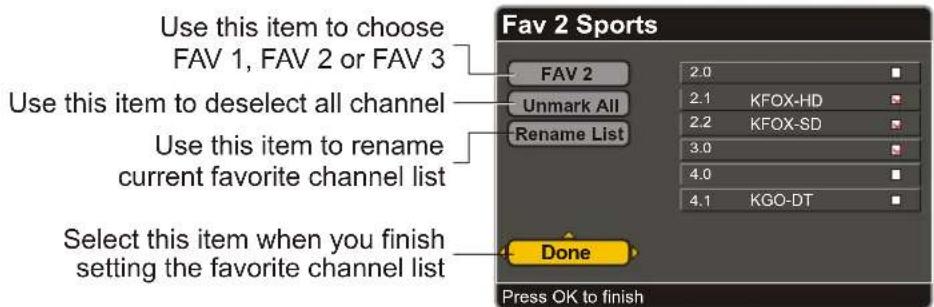
Rename Favorite Channels List
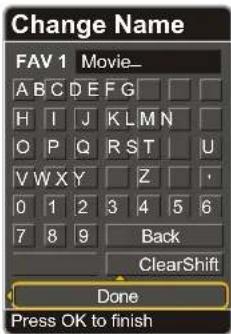
The unit has assigned a name for each favorite list. For example, the preset name of FAV 2 is Sports. The unit also allows you to rename each list as desired.
Press to move through the label characters (A-Z, 0-9, etc.). Then press OK to select the highlighted character. Repeat to add characters to the label.
Back: select to move cursor backward for one character.
Shift: select to change uppercase or lowercase for A-Z.
Clear: select to clear current inputs.
Select [Done] when you finish labeling current list.
Using the FAVORITE button
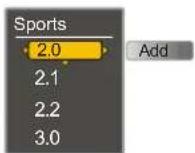
Press FAVORITE button repeatedly to quickly select [FAV 1], [FAV 2] or [FAV 3]. The screen displays current favorite list name and those favorite channels under current list so that you can easily accessing them by press or buttons.
If current channel has been assigned to current list, the unit allows you to remove current channel from current list by selecting [Remove] item. Also, if current list does not include current channel, the unit allows you to add current channel into current list by selecting [Add] item.
Editing Channel Name
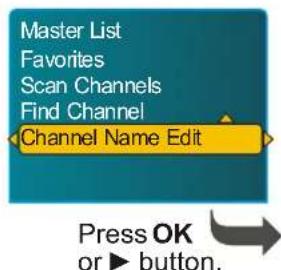
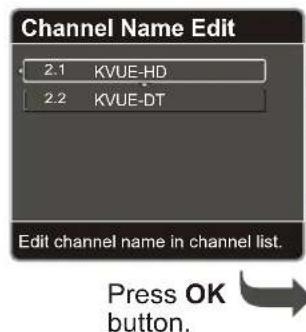
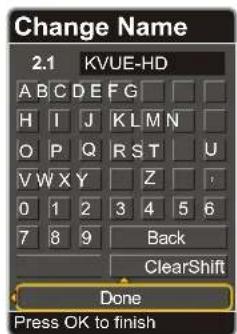
The unit allows you to assign a label to all available channels as desired by using this feature. In the [Channel Name Edit] window, you need to select a desired channel you want to rename. Please use and OK buttons to input a desired label name. Be sure to select [Done] item when you finish input.
Using the Program Guide
Accessing Program Guide
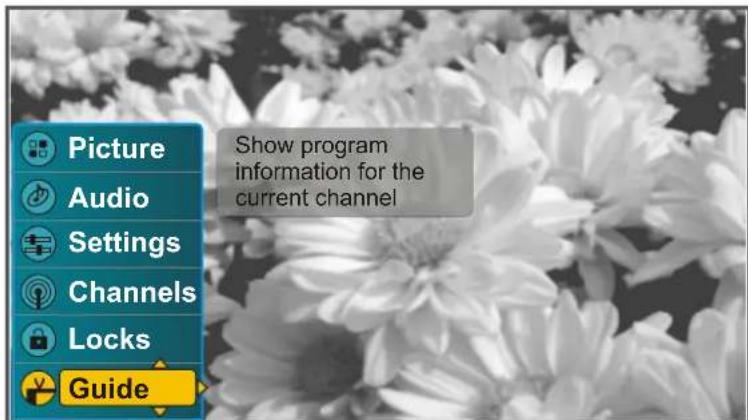
- Press MENU

- Highlight [Guide]....


- Press OK

Using the Program Guide
This TV is equipped to show program information if it is available from the station. The Program Guide provides some information for current viewing program and next program if next program information is available. The information may include channel number, channel name, program title, broadcast time, brief introduction, etc. Normally, you may access program guide by:
Using the [Guide] menu.
Using the GUIDE button.
Using the INFO button.
Press the GUIDE button while watching a program, a simplified information windows appears with channel number, channel name, program title, etc. If you want to view more detailed information such as program introduction, press the or GUIDE button.
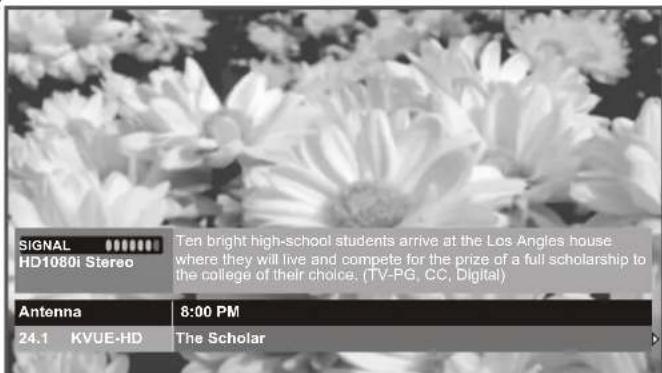
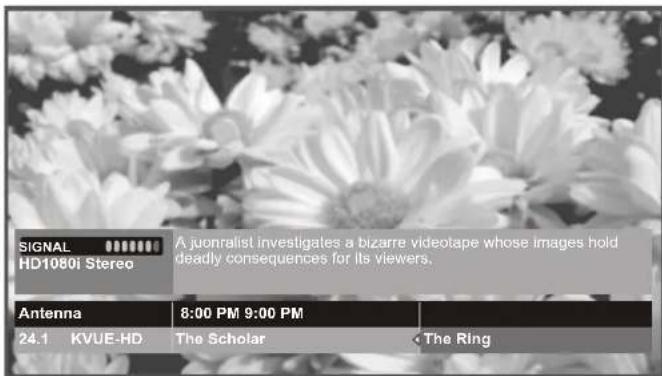
If the information of next program is available, a triangle appears on the bottom-right part of the screen, you may press the button to access.
Setting System
Accessing Settings Menu
- Press MENU

- Highlight [Settings]....
Use or button.

- Press OK

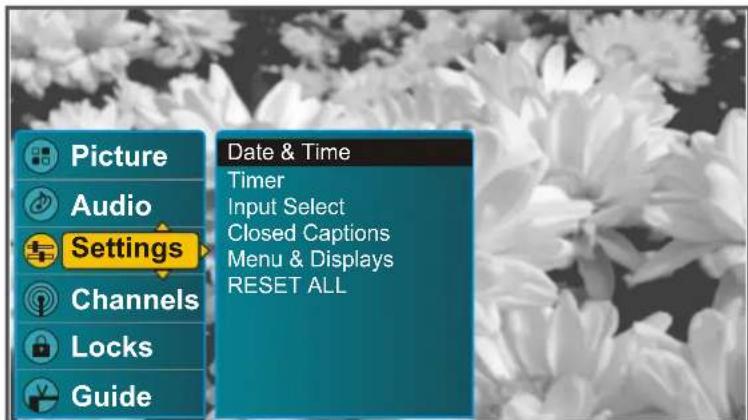
To highlight an option and to change settings, press . Press OK to confirm the selection or alter the settings. Press EXIT to exit.
Setting Date & Time
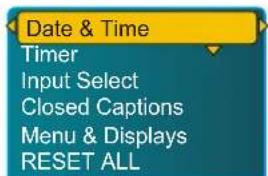
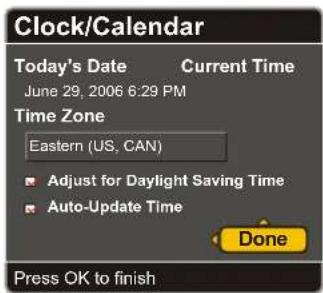
Press OK or button.

Once the AC power is cut off completely, the [Today's Date] and [Current Time] items need to set again when you turn on the next time.
Option Description
Today's Date
Select to set date.
Current Time
Select to set current time.
Time Zone
Select a proper time zone according to your local area.

When the [Auto-Update Time] is set to ON, the [Today's Date] and [Current Time] items can't be accessed.
Adjust for Daylight Saving Time
Select to observe daylight saving time.
Auto-Update Time
Select to automatically update time from the service provider if this information is broadcasted with the program as well.
Setting Timer
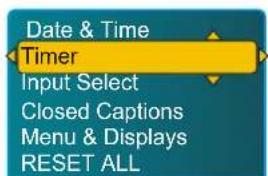


By using the SLEEP button, the TV allows you to set the amount of time (15 minutes, 30 minutes, 45
Press OK or button.
Option Description
minutes, 60 minutes or 90 minute timer is on
Select to activate current timer.
that you want the TV to remain o start Time before shutting off automatically.
Select to set a start time so that the TV automatically turns on at the selected time.
If you select [Leave TV on], thDuration unit cancel the sleep timer setting.
Select to set a duration time that you want the TV to remain on before shutting off automatically.

When the TV automatically turns on at the select time, if the user operates the TV by pressing any button, the TV automatically cancels the duration time and remains on unless the user turns off the TV.
Once the timer is activated and performed, the Timer setting will be canceled automatically. The user need to set the Timer again if you want to use this feature next time.
Setting System
Input Select
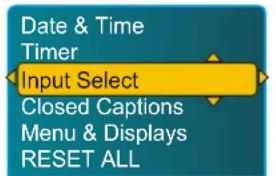
Press OK or button.
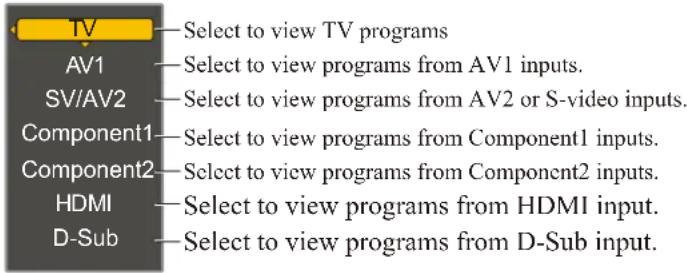
To quickly change the input type, press the INPUT button repeatedly.
Setting Caption Vision
Option Description
| Basic Selection | Allows you to select basic closed caption options. |
| CC1, CC2. Displays a printed version of the dialog or sound effects of CC3, CC4 a program. (Should be set to CC1 for most programs.) | |
| Text1,Text2Displays network/station information presented using Text3,Text4either half or the whole screen (if available). | |
| Advanced Selection | Allows you to select advanced digital closed caption options. Select from the available options. |
| Advanced Appearance | Allows you to make additional settings for digital closed caption options. You may set the following items as desired: Text Style, Text Color, Text Opacity, Text Size, Text align Edge Color, Edge Style, Background Color, Background Opacity, Frame Color and Frame Opacity. |
| Caption Preference | Allows you to set digital closed captioning to Basic (digital EIA-608) or Advanced (digital EIA-708). Select from [Always Basic], [Always Advanced] and [Automatic]. |
| RESET CC | Select to reset Closed Captions to the default settings. |
Using the CCD button
Press the CCD button repeatedly to select [Off], [On] or [On when muted].
Option Description
| On | Select to turn on the Closed Captions. |
| Off | Select to turn off the Closed Captions. |
| On when muted | Select to turn on the Closed Captions when the TV is muted. |
Setting Menu & Display
Option Description
| Menu Language | Allows you to select an on-screen menu language. Select from [English], [French] and [Spanish]. |
| Input Labels Edit | Select to edit input labels as desired or according to the connected device. See [Editing Input Labels] on next page. |
| Screen Saver | Select to set screen saver. See [Setting Screen Saver] on next page. |
| RESET DISPLAY | Select to reset display settings to the defaults. |
Setting System
Editing Input Labels
- Highlight [Menu & Displays] item in [Settings] menu.
Press OK or button to access the sub-menu.
Date & Time
Timer
Input Select
Closed Captions
Menu & Displays
RESETALL
Menu Language
Input Labels Edit
Screen Save
RESET DISPLAY
- Highlight [Input Labels Edit] item.
Press OK or button to enter.
Menu Language
Input Labels Edit
Screen Saver
RESET DISPLAY
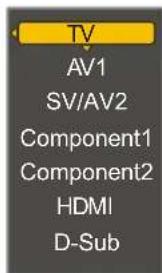
TV
AV1
SV/AV2
Component1
Component2
HDMI
D-Sub
- Highlight a desired Input Label you want to edit. As an example, highlight [TV].
Press OK or button to enter.
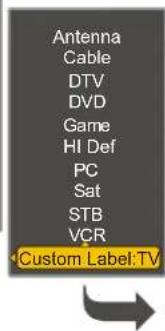
- Highlight [Custom Label] item.
Press OK button to enter.
- The Label editing window appears. Please use
and OK buttons to input a desired label name. Be sure to select [Done] item when you finish input.

Input Source
TV-
ABCDEFG
H J KLMN
OPQRSTU
VWXY Z
0123456
7 8 9 Back
ClearShift
Done
Press OK to finish
Setting Screen Saver
Option Description
Activation Delay Select to set a delay time before the screen saver is activated when there is no input signal.
Background Color Select to set a background color when the screen saver is activated.
Test Select to preview the screen saver.
RESET SCREEN Select to reset the settings of the screen saver to the defaults. Saver
Running Reset System
WARNING: Running the [RESET ALL] item will clear all of your customized settings.
Please make sure that you want reset all settings to the factory defaults before you perform this operation. You will be asked to input a correct secret number when you select [RESETALL] item in the [ SETTINGS] menu.
When the system is reset successfully, all customized settings will be cleared and the unit runs initial setup wizard.
RESET ALL Settings
Are you sure you want to RESET ALL SETTINGS to the factory defaults?
The channel list will be cleared. You must run the Setup Wizard after a reset.


Press OK to leave all settings as-is
Parental Lock Control
Accessing Locks Menu
- Press MENU

- Highlight [Locks]


- Press OK

- Enter a correct PIN. Use 0-9 number buttons.

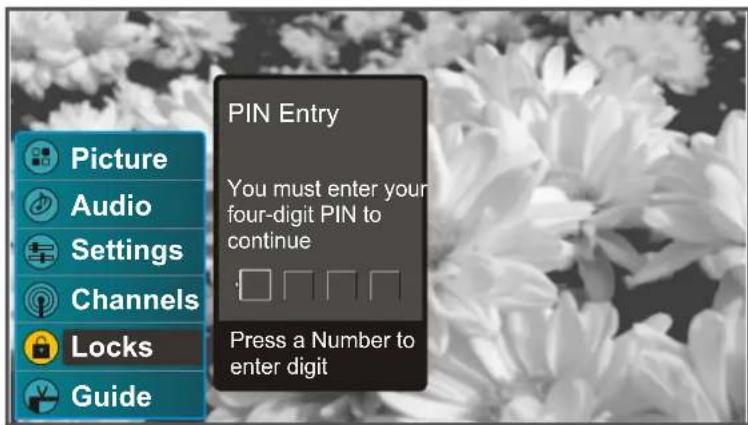
If it is the first time to access the [Locks] menu, the unit allows you to set a secret number as desired, please refer to [Setting a Secret Number] in chapter [Getting Start].
Once the correct PIN is entered, the [Locks] menu displays as below.
To highlight an option and to change settings, press . Press OK to confirm the selection. Press EXIT to exit.
Selecting Locks Options
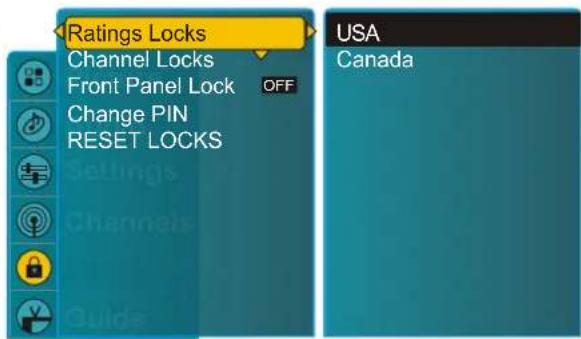
| Option Description | |
| Ratings Locks | The rating control gives parents a great degree of control over broadcasts accessed by their children. It allows parents to select programs judged suitable for child viewing while blocking ones judged not suitable. It does so automatically once you activate this feature in your TV. See [Selecting Locks Options] on next page. |
| Channel Locks | Select to access [Channel Locks] window, in which you may lock channels as desired. In this window, you may select [Lock All] to lock all available channels, or select [Unlock All] to unlock all channels. Also, you may use the▲▼▲▼ and OK buttons to lock individual channel one by one as desired. The Lock channels will be marked with a symbol. Be sure to select [Done] when you finish setting. |
| Front Panel Lock | ON Select to enable the panel buttons. |
| OFF Select to disable the panel buttons. | |
| Change PIN | Select to change PIN as desired. The old PIN is necessary if you want to change the PIN. |
| RESET LOCKS | Select to reset the locks settings to the defaults. The customized lock settings will be cleared if you select [RESET]. |
Parental Lock Control
Selecting Locks Options

To ensure maximum blocking capability, the age-based ratings should be used.
US Custom Rating Options
Option Description
USA-TV
Block programs by their rating, content or both.
Age-Based Options
TV-Y All children.
TV-Y7 Directed to children age 7 and older.
TV-G General audience.
TV-PG Parental guidance suggested.
TV-14 Parents strongly cautioned.
TV-MA Mature audience only.
Content-Based Options
FV Fantasy violence.
D Suggestive dialog.
L Strong language.
Sexual situations.
V Violence.
G All children and general audiences.
PG Parental guidance suggested.
PG-13 Parental guidance for children under 13.
R Restricted viewing, parental guidance is suggested for children under 17.
NC-17 No one 17 and under admitted.
X X is an older rating that is unified with NC-17 but may be encoded in the data of older movies.
USA-Movie
Canadian Custom Rating Options
Option Description
CAN-French
G General programming.
8 ans+ Not recommended for ages under 8.
13 ans+ Not recommended for ages under 13.
16 ans+ Not recommended for ages under 16.
18 ans+ Programming restricted to adults.
CAN-English
C All children.
C8+ Children 8 years and older.
G General programming.
PG Parental guidance.
14+ Viewers 14 and older.
18+ Adult programming.
The content ratings will increase depending on the level of the age-based rating. For example, a program with a TV-PG V (Violence) rating may contain moderate violence, while a TV-14 V (Violence) rating may contain more intense violence.
Viewing Locked or Blocking Programs
You can view a locked or blocked program by entering the secret number.
-
Tuned to a locked or blocked program.
-
Enter your secret number using the 0-9 buttons.
Parental Lock will be canceled temporarily until you turn your TV off.
Troubleshooting
If, after reading these operating instructions, you have additional questions related to the use of your television, please call the services center in your local area.
Before calling service, please check the symptoms and follow suggested solutions.
Remote Control
| Problem Possible Solutions | |
| Remote control does not operate | ·The batteries could be weak. Replace the batteries. ·Check the orientation of the batteries. ·Make sure the power cord is plugged in. |
| Remote control does not operate other brand equipment | ·If you replaced the batteries to the remote recently, the code numbers for the video equipment may need to be reset. ·There may be more than one code for the equipment that you are attempting to operate. ·There is a possibility that this equipment can only be operated by its original remote control. |
Video and Audio
| Problem Possible Solutions | |
| No picture (screen not lit), No sound | ·Make sure the power cord is plugged in. ·Press POWER on the TV or on the remote control. ·Press the input source select button to cycle through the connected video sources. ·Try another channel; it could be station trouble. |
| Dark, poor or no picture (Screen lit), good sound | ·Select a proper picture mode. ·Adjust the brightness in the video setting. ·Check the antenna/cable connections. |
| No color/dark picture/color is not correct | ·Adjust the color saturation in the video setting. |
| Only snow and noise appear On the screen | ·Check the antenna/cable connections. ·Try another channel; it could be station trouble. |
| Dotted lines or stripes | ·Adjust the antenna. ·Move the TV away from noise sources such as cars, neon signs, or hair dryers. |
| Double images | ·Using a highly directional outdoor antenna or a cable may solve the problem. |
| “Black box” on screen | ·You have selected a text option in the Setup setting and no text is available. Please try to turn off the Close Caption feature or select CC1 instead of Text1-4. |
| Good picture, no sound | ·The sound may be muted. Press MUTE again to cancel. ·Make sure the speaker option is set to On in the Audio settings. ·Make sure the stereo mode is set to stereo or mono. |
| Audio noise | ·Communication problems may occur if infrared communication equipment (e.g., infrared cordless headphones) is used near the TV. Move the infrared communication equipment away from the TV until the noise is eliminated. |
Troubleshooting
General
| Problem Possible Solutions | |
| One or some channels can't be displayed | These channels may be locked. Please unlock them (see Lock settings).These channels may be set to hidden in the master channel list. You may mark them with the tick symbol to cancel hidden or select them with 0-9 number buttons. |
| Lost password | On the password screen, enter the following master password: 1397. You may use the master password to set a new password as desired. Please remember your new password and keep it carefully. |
| Some items can't be accessed | If a setting option appears in gray, this indicates that the settings option is unavailable in current input mode. |
| TV cabinet creaks | When the TV is in use, there is a natural rise in temperature, causing the cabinet to expand or contract and may be accompanied by a slight creaking noise. This is not a malfunction. |
| Control buttons do not operate | Disconnect the power cord and wait for a few seconds. Then re-plug the power cord and turn on the unit again. |
Notes:
If your problem is not solved, turn your unit off and then on again.
Cautions:
Never attempt to repair a defective TV yourself.
| Care and Maintenance | |
| About Temperature | Do not use in hot and cold rooms (locations) ·When the unit is used in rooms (locations) with low temperature, the picture may leave trails or appear slightly delayed. This is not a malfunction, and the unit will recover when the temperature returns to normal. ·Do not leave the unit in a hot or cold location. Also, do not leave the unit in a location exposed to direct sunlight or near a heater, as this may cause the cabinet to deform and the screemalfunction. ·Storage temperature: 0°C to +50°C ·Working temperature: 5°C to +40°C |
| About After-Image | The extended use of fixed image program material can cause a permanent after-image on the screen. This background image is viewable on normal programs in the form of a stationary fixed image. This type of irreversible screen deterioration can be limited by observing the following steps: A. Reduce the brightness/contrast setting to a minimum viewing level. B. Do not display the fixed image for extended periods of time. C. Turn the power off when not in actual use. Important Information Regarding Use of Video Games, Computers, Captions or Other Fixed Image Displays. ·Do not allow a still picture to be displayed for an extended period, as this can cause a permanent after-image to remain on the screen. Examples of still pictures include logos, video games, computer images, teletext and images displayed in 4:3 mode. CAUTIONS: ·The permanent after-image on the screen resulting from fixed image use is not an operating defect and as such is not covered by the warranty. ·This product is not designed to display fixed images for extended periods of time. |
| Cleaning and Maintenance | To clean this unit, wipe with a soft, dry cloth. If the surfaces are extremely dirty, use a soft cloth dipped in a soap and water solution or a weak detergent solution. ·Use eyeglass cleaner to remove stubborn dirt from the screen. ·Never use alcohol, paint thinner or benzine to clean this unit. ·Before using a chemically treated cloth, read the instructions that came with the cloth carefully. |
Specifications
| Type: LCD TV | ||
| Panel: 37" TFT LCD | ||
| TV system: American TV standard ATSC/NTSC System | ||
| Receiving Channel: | ||
| CAT | VHF/UHF: VHF 2-13ch, UHF 14-69ch | |
| V: 1-125ch | ||
| Digital Terrestrial Broadcast: 2-69ch | ||
| Digital cable: 1-135ch | ||
| Audio multiplex: BTSC System | ||
| Audio out: | 8W × 2 | |
| Power Requirement: | AC 110-240 V, 50/60 Hz | |
| Power Consumption: | 200 W | |
| Dimensions (W X H X D in inches): | 37.2 × 28.9 × 12.2 | |
| Weight: | 70.4 lbs/32 kg | |
| Terminals: | ||
| N | Composite Video/Audio(L/R): | 2 |
| S-video: | 1 | |
| Component Video/Audio(L/R): | 2 | |
| HDMI interface: | 1 | |
| D-Sub/Audio: | 1 | |
| Antenna: 1 | ||
| OUT | Composite Video/Audio(L/R): | 1 |
| Coaxial Digital Audio Out: | 1 | |
| Headphone jack: | 1 | |
| Control | RS-232: | 1 |
| USB Port: | 1 | |
- As part of policy of continuous improvement, the manufacturer reserves the right to make design and specification changes for product improvement without prior notice. The performance specification figures indicated are nominal values of production units. There may be some deviations from these values in individual units.
Programming your Remote Control
Introduction
Your remote lets you control four devices with one easy-to-use, compact unit. After installing batteries, you can program the remote to control your VCR or DVD, Cable or Satellite Receivers, Amplifier or Tuner, and Auxiliary devices. To do so, follow the instructions in "Programming a Device". For best results, please read and follow all the remaining instructions. Keep this guide for future reference.
The universal remote control unit can't be programmed to control a TV with other brand. It has been preset to control this TV set, and this preset is unchangeable.
A Quick Look at Programming a Device
To control VCR or DVD, Cable or Satellite Receivers, Amplifier or Tuner, and Auxiliary devices, follow these steps. Before proceeding, find the codes for the devices you want to program in [Manufacturer's Codes] and write them down or highlight them.
To program a DVD Player, portable DVD player, or mobile DVD player, use the DVD key.
- Turn on the device (for example, DVD player) and, if needed, load media (for example, a DVD).
- Press a device key (VCR/DVD, CBL/SAT, or AUX).
- Press and hold SET until the red LED blinks twice; then release.
- Enter the first five-digit code for your device. The LED blinks once as each digit is entered. If the code is correct, the LED blinks twice.
If the LED does not blink twice, repeat steps 2 to 4 and try entering the code again. - Aim the remote at the device and press Power. The device should turn off. If it does not, repeat steps 3 to 5, trying each code for your brand until you find one that works. If you cannot find a code that works, see "Searching for Your Code".
- Repeat steps 1 to 5 for the other devices you want to control. For future reference, write down each working device code below:
AUX Code:
CBL Code:
CD Code:
DVD Code:
SAT Code:
TNR Code:
VCR Code:
- Press SET to save and exit
Searching for your Code
If your device does not respond to the remote after trying all codes listed for your brand, or if your brand is not listed, try searching for your code:
- Press a device key once.
- Press and hold SET until the red LED blinks twice; then release.
- Enter 9-9-1, then the device group number (0 = Cable, 1 = TV, 2 = VCR, 3 = Audio). The LED blinks twice.
- Aim the remote at the device and press Power. The remote sends IR codes from its library to the selected device, starting with the most popular code first. If the device responds, go to step 7.
- If the device does not respond, press CH+ . The remote will try the next code. Continue until the device responds.
Press CH- to try the previous code.
- To search for other device codes, repeat steps 1 to 5.
- Press SET to save and exit.
Programming your Remote Control
Checking the Codes
If you have set up the remote using the procedure in "Searching for Your Code", you may need to find out which four-digit code is operating your equipment. For example, to find out which code is assigned to your DVD:
- Press DVD once.
- Press and hold SET until the red LED blinks twice; then release.
- Enter 9-9-0. The LED blinks twice.
- To view the code for the first digit, press 1. Count the LED blinks (for example, three blinks = 3), and write down the number in the appropriate code listing in step 6 under "Programming a Device".
If a code digit is 0, the LED does not blink.
- Repeat step 4 for the four remaining digits, using 2 for the second digit, 3 for the third digit, 4 for the fourth digit, and 5 for the fifth digit.
- To check for other device codes, repeat steps 1 to 5, substituting the device key for DVD.
Changing Volume Lock
The remote comes preset to allow independent volume control of each selected device (Global Volume Unlock). However, you may change the Volume Lock setting to Global Volume Lock so that one device's volume will control volume in all other modes. After that, you can perform Individual Volume Unlock on a selected device to set its volume control for independent operation or Global Volume Unlock to remove all volume locking.
Locking Volume Control to One Mode (Global Volume Lock)
- Press and hold SET until the red LED blinks twice; then release.
- Enter 9-9-3 and then press the mode key for the device you want to control volume (for example, DVD). The LED blinks twice. Now when you press VOL+, VOL-, or Mute, the selected device (for example, DVD) will control the volume regardless of the current mode.
Unlocking All Volume Control (Restoring Global Unlock)
- Press and hold SET until the red LED blinks twice; then release.
- Enter 9-9-3 and then press VOL+. The LED blinks four times.
Volume is now independently controlled for all programmed devices.
Unlocking a Single Device's Volume Control
- Press a device key (VCR/DVD, CBL/ SAT, or AUX).
- Press and hold SET until the red LED blinks twice; then release.
- Enter 9-9-3 and then press VOL-. The LED blinks four times.
Volume is now independently controlled for the selected devices.
Troubleshooting
Problem Solution
LED does not blink when you Replace new batteries. press a key.
LED blinks when you press a key, Make sure the remote is aimed at your device and is but device does not respond. not more than 15 feet away.
LED blinks one long blink. An entry error has occurred (for example, wrong key). Try entry sequence again.
Remote does not control devices Try all listed codes for the device. Make sure the or commands are not working device operates with an infrared remote control. properly.
CARE
- Keep the remote dry. If it gets wet, wipe it dry immediately.
- Use and store the unit only in normal temperature environments.
- Handle the remote gently and carefully. Don't drop it.
- Wipe the remote with a damp cloth to keep it looking like new.
Manufacturer's Codes
Audio Amplifiers
Manufacturer Codes
| Bose 30674 | |
| GE 30078 | |
| JVC 30331 | |
| Marantz 30321 | |
| Nakamichi 30321 | |
| NEC 30264 | |
| Optimus 30395 | |
| Realistic 30395 | |
| Sansui 30321 | |
| Shure 30264 | |
| Sony 30689 | |
| Soundesign | 30078 |
| Victor | 30331 |
| Wards | 30078 |
| Yamaha | 30354, 30133 |
Audio Amp/Tuners
Manufacturer Codes
| ADC 30531 | |
| Aiwa | 31405, 31243, 30121 |
| Anam | 31609, 31074 |
| Audiotronic | 31189 |
| Bose | 31229 |
| Capetronic | 30531 |
| Carver | 31189 |
| Coby | 31263 |
| Denon | 31360, 31142, 30904 |
| Fonmix | 31360 |
| Glory Horse | 31263 |
| Harman/Kardon | 30110 |
| Hitachi 31273 | |
| Inkel 30027 | |
| Integra | 30135 |
| JBL | 30110 |
| JVC 30074, 31263 | |
| Kenwood | 31313, 31570, 30027 |
| KLH | 31428 |
| Magnavox | 31189, 31269, 30531 |
| Marantz 31189, 31269, 30039 | |
| MCS 30039 | |
| Onkyo | 30842, 30135 |
| Optimus 31023, 30670, 30531, 31074 | |
| Panasonic | 31518, 30039 |
Manufacturer's Codes
Audio Amp/Tuners
Manufacturer Codes
Philips 31189, 31269
Pioneer 31023, 30150, 30014, 30630, 30531
Proscan 31254
Qisheng 31609
Quasar 30039
RadioShack 31263
RCA 31023, 31609, 31254, 30531, 31074
Sharper Image 31263
Silsonic 30176
Sony 31258, 31759
Sounddesign 30670
Stereophonics 31023
Sunfire 31313
Teac 31074, 31267
Technics 31308, 31518, 30039
Thorens 31189
Victor 30074
Wards 30014
Yamaha 30176,31276,31176
Cable Converters
Manufacturer Codes
ABC 00003,00008,00014
Americast 00899
Bell & Howell 00014
Bell South 00899
Clearmaster 00883
ClearMax 00883
Coolmax 00883
Daeryung 01877,00877,00477,00008
Digi 00637
Director 00476
Dumont 00637
Gehua 00476
General Instrument 00476, 00810, 00276, 00003, 00014
GoldStar 00144
Hamlin 00009, 00273
Hitachi 00014
Jerrold 00476,00810,00276,00003,00012,00014
KNC 00008
LG 00144
Memorex 00000
Motorola 00476,00810,00276,01254,01376
MultiVision 00012
Manufacturer's Codes
Cable Converters
Manufacturer Codes
Pace 01877, 00237
Panasonic 00000, 00008, 00107
Panther 00637
Paragon 00000
Philips 00317, 01305
Pioneer 01877,00877,00144,00533
Pulsar 00000
Quasar 00000
RadioShack 00883
Regal 00279, 00273
Runco 00000
Samsung 00000, 00144
Scientific Atlanta 01877, 00877, 00477, 00008
Sony 01006
Starcom 00003, 00014
Supercable 00276
Supermax 00883
Tocom 00012
Torx 00003
Toshiba 00000
Trans PX 00276
Tristar 00883
TS 00003
V2 00883
Viewmaster 00883
Vision 00883
Vortex View 00883
Zenith 00000,00525,00899
CD Players
Manufacturer Codes
Aiwa 30157
Burmester 30420
California Audio Labs 30029
Carver 30157, 30179
Denon 30873
DKK 30000
DMX Electronics 30157
Dynamic Bass 30179
Fisher 30179
Garrard 30420
Genexxa 30032
Manufacturer's Codes
CD Players
Manufacturer Codes
Harman/Kardon 30157, 30173
Hitachi 30032
Integra 30101
JVC 30072
Kenwood 30826, 30626, 30028, 30037, 30036, 30190
Krell 30157
Linn 30157
Magnavox 30157
Marantz 30626, 30029, 30157
MCS 30029
Miro 30000
Mission 30157
MTC 30420
NSM 30157
Onkyo 30868, 30101
Optimus 31063, 30000, 30032, 30037, 30420, 30179, 31075, 30145
Panasonic 30029
Parasound 30420
Philips 30626, 30157
Pioneer 31063,31062,30032
Polk Audio 30157
Proton 30157
QED 30157
Quad 30157
Quasar 30029
RadioShack 31075
RCA 31062,30032,30420,30179,30053
Realistic 30420, 30179
Rotel 30157,30420
SAE 30157
Sansui 30157
Sanyo 30179
SAST 30157
Sharp 30861, 30037
Silsonic 30888, 30036
Sonic Frontiers 30157
Sony 30490, 30000, 30100
Soundesign 30145
TAG McLaren 30157
Tascam 30420
Teac 30420
Technics 30029
Manufacturer's Codes
CD Players
Manufacturer Codes
Victor 30072
Wards 30157, 30053
Yamaha 30888,30036
Zonda 30157
DVD Players
Manufacturer Codes
Aiwa 20641, 21912
Akai 20770
Allegro 20869
Apex Digital 20672, 20717, 20797, 21061, 20796, 21056, 21937,
20794, 21020, 21915
Blaupunkt 20717
Blue Parade 20571
Broksonic 20695
Changhong 20627, 21061
CineVision 20869
Coby 21086
Curtis Mathes 21087
CyberHome 21024, 21023, 21129, 20816, 21117
Daewoo 20833, 21172, 20869
Denon 20490
DVD2000 20521
Emerson 20591, 20675
Enterprise 20591
Fisher 21919
Funai 20675
Gateway 21158, 21073
GE 20522, 20717
Go Video 20744, 20833, 21099, 20783, 21075, 20869, 21730
Greenhill 20717
Harman/Kardon 20582, 20702
Hitachi 20573, 20664, 21919
Hiteker 20672
Initial 20717
Integra 20627, 21924
JBL 20702
JVC 20558,20623,20867
Kenwood 20490, 20534
KLH 20717, 21020, 21149
Koss 20651, 21980
Manufacturer's Codes
DVD Players
Manufacturer Codes
Lasonic 20798
LG 20591, 20869, 20801
Liquid Video 21980
Lite-On 21158, 21058
Loewe 20511
Magnavox 20503, 20539, 21976, 21914, 20675
Marantz 20539
Memorex 20695
Microsoft 20522
Mintek 20717
Mitsubishi 21521, 20521
Nesa 20717
Norcent 21003
Onkyo 20503, 20627, 21924, 20792
Oritron 20651, 21980
Panasonic 20490, 21762, 21990
Philips 20503, 20539, 20646, 21914
Pioneer 20525, 20571
Polaroid 21086, 21061
Polk Audio 20539
Portland 20770
Proscan 20522
Qwestar 20651
RCA 20522, 20571, 20717, 20822
Rio 20869
Rotel 20623
Sampo 20752, 20698
Samsung 20490, 20573, 21932, 21075, 20820
Sansui 20695
Sanyo 20695
Sharp 20630, 20752
Sharper Image 2117
Sherwood 20770
Shinco 20717
Shinsonic 20533
Sonic Blue 20869, 21099
Sony 20533, 20864, 21033, 21904, 21903
SVA 20717
Sylvania 20675
Symphonic 20675
Manufacturer's Codes
DVD Players
Manufacturer Codes
Teac 20717, 21984, 20809
Technics 20490
Theta Digital 20571
Toshiba 20503, 20695
Urban Concepts 20503
Xbox 20522
Yamaha 20490, 20539, 20545
Zenith 20503, 20591, 20869
Satellite Receivers
Manufacturer Codes
AlphaStar 00772
Chaparral 00216
Crossdigital 01109
DirecTV 00392,00566,00639,01142,00247,00749,01749, 00724,00819,01856,01076,01109,00099,01392, 01640,01442,01414,01108
Dish Network System 01005,00775,01505
Dishpro 01005,00775,01505
Echostar 01005,00775,01505
Expressvu 00775
GE 00566
General Instrument 00869
GOI 00775
Goodmans 01246
Hisense 01535
Hitachi 00819,00222,01250
HTS 00775
Hughes Network 01142,00749,01749,01442
Systems
I-Lo 01535
JVC 00775
LG 01414,01226
Magnavox 00724, 00722
Memorex 00724
Mitsubishi 00749
Motorola 00869
NEC 01270
Next Level 00869
Panasonic 00247,00701
Paysat 00724
Philips 01142,00749,01749,00724,01076,00722,00099,01442
Proscan 00392, 00566
Proton 01535
Manufacturer's Codes
Satellite Receivers
Manufacturer Codes
RadioShack 00869
RCA 00392, 00566, 00855, 00143, 01392
Samsung 01276, 01109, 01108
Sanyo 01219
SKY 00856
Sony 00639, 01640
Star Choice 00869
Tivo 01142, 01442
Toshiba 00749, 01749, 00790, 01285
UltimateTV 01640, 01392
Uniden 00724, 00722
US Digital 01535
USDTV 01535
Voom 00869
Zenith 00856, 01856
VCRs
Manufacturer Codes
ABS 21972
Admiral 20048, 20209
Aiko 20278
Aiwa 20037, 20479
Alienware 21972
America Action 20278
American High 20035
Amoisonic 20479
Anam 20162, 20037, 20240, 20278
Anam National 20162
Asha 20240
Audiovox 20037, 20278
Beaumark 20240
Bell & Howell 20104
Broksonic 20184, 20121, 20209, 20002, 20479
Calix 20037
Canon 20035
Carver 20081
CCE 20072, 20278
Changhong 20048, 20081
Citizen 20037, 20278
Colt 20072
Craig 20037, 20047, 20240, 20072
Curtis Mathes 20060, 20035, 20162
Cybernex 20240
CyberPower 21972
Manufacturer's Codes
VCRs
| Manufacturer | Codes |
| Daewoo | 20045, 20104, 20278 |
| Dell | 21972 |
| Denon 20042 | |
| DirecTV | 20739 |
| Durabrand | 20039, 20038 |
| Electrohome | 20037 |
| Electrophonic | 20037 |
| Emerex 20032 | |
| Emerson 20035, 20037, 20184, 20240, 20045, 20121, 20043, 20209, 20002, 20278, 20479 | |
| Fisher 20047, 20104 | |
| Fuji 20035, 20033 | |
| Fujitsu 20045 | |
| Gateway 21972 | |
| GE 20060, 20035, 20240 | |
| General 20045 | |
| Go Video 20432 | |
| GoldStar 20037, 20209, 20038, 20225 | |
| Haojie 20240 | |
| Harman/Kardon 20081, 20038 | |
| Harwood 20072 | |
| Hewlett Packard 21972 | |
| HI-Q | 20047 |
| Hitachi | 20037, 20042, 20055 |
| Howard Computers | 21972 |
| HP | 21972 |
| Hughes Network Systems | 20042, 20739 |
| iBUYPOWER | 21972 |
| JVC | 20045, 20067 |
| KEC | 20037, 20278 |
| Kenwood 20067, 20038 | |
| KLH | 20072 |
| Kodak 20035, 20037 | |
| Kolin | 20043 |
| LG | 20037, 20045, 20042, 20209, 20038 |
| Logik | 20072 |
| LXI | 20037 |
| Magnavox | 20035, 20039, 20081 |
| Magnin | 20240 |
| Marantz | 20035, 20081 |
| Marta | 20037 |
Manufacturer's Codes
VCRs
| Manufacturer | Codes |
| Matsushita | 20035, 20162 |
| Media Center PC | 21972 |
| MEI | 20035 |
| Memorex | 20035, 20162, 20037, 20048, 20039, 20047, 20240, 20104, 20209, 20479 |
| MGA | 20240, 20043 |
| MGN Technology | 20240 |
| Microsoft | 21972 |
| Mind 21972 | |
| Minolta | 20042 |
| Mitsubishi 20067, 20043 | |
| Motorola 20035, 20048 | |
| MTC 20240 | |
| Multitech 20072 | |
| NEC 20035, 20037, 20048, 20104, 20067, 20038 | |
| Newave 20037 | |
| Nikko 20037 | |
| Noblex 20240 | |
| Northgate 21972 | |
| Olympus 20035 | |
| Optimus 21062, 20162, 20037, 20048, 20104, 20432 | |
| Orion 20184, 20209, 20002, 20479 | |
| Panasonic 21062, 20035, 20162, 20616, 20225 | |
| Penney 20035, 20037, 20240, 20042, 20038 | |
| Pentax 20042 | |
| Philco 20035, 20479 | |
| Philips | 20035, 20081, 20739, 20618 |
| Pilot | 20037 |
| Pioneer | 20042, 20067 |
| Polk Audio | 20081 |
| Profitronic | 20240 |
| Proscan | 20060 |
| Protec | 20072 |
| Pulsar | 20039 |
| Qisheng 20060 | |
| Quasar | 20035, 20162 |
| Radix 20037 | |
| Randex | 20037 |
| RCA 20060, 20035, 20240, 20042, 20880 | |
| Realistic | 20035, 20037, 20048, 20047, 20104 |
| ReplayTV 20616 | |
| Runco | 20039 |
| Sampo | 20037, 20048 |
Manufacturer's Codes
VCRs
| Manufacturer | Codes |
| Samsung | 20240, 20045, 20432 |
| Sanky | 20048, 20039 |
| Sansui 20067, 20209, 20479 | |
| Sanyo | 20047, 20240, 20104 |
| Scott | 20184, 20045, 20121, 20043 |
| Sears | 20035, 20037, 20047, 20042, 20104 |
| Sharp 20048, 20209 | |
| Shintom | 20072 |
| Shogun 20240 | |
| Singer | 20072 |
| Sonic Blue | 20616 |
| Sony | 20035, 20032, 20033, 20636, 21972 |
| STS | 20042 |
| Sylvania 20035, 20081, 20043 | |
| Systemax 21972 | |
| Tagar Systems 21972 | |
| Tashiko 20037 | |
| Tatung 20045, 20067 | |
| Technics 20035, 20162 | |
| Teco 20035, 20037, 20048, 20038 | |
| Teknika 20035, 20037 | |
| Tivo 20636, 20618, 21503, 20739 | |
| TMK 20240 | |
| Toshiba 20045, 20042, 20067, 20043, 21503, 21008, 21972 | |
| Totevision 20037, 20240 | |
| Touch 21972 | |
| Unitech 20240 | |
| Vector | 20045 |
| Vector Research | 20038 |
| Victor | 20067 |
| Video Concepts | 20045 |
| Videomagic | 20037 |
| Videosonic | 20240 |
| Viewsonic 21972 | |
| Wards | 20060, 20035, 20048, 20047, 20081, 20240, 20042, 20072 |
| White Westinghouse | 20209, 20072 |
| XR-1000 | 20035, 20072 |
| Yamaha | 20038 |
| Zenith | 20039, 20033, 20209, 20479 |
| ZT Group | 21972 |
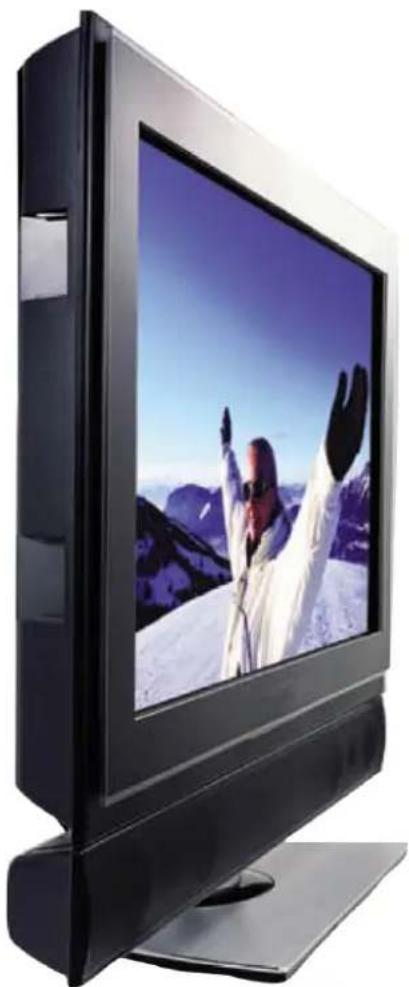
| Picture Settings: TV | |
| Preset | Custom |
| Brightness | 25 |
| Contrast | 25 |
| Saturation | 25 |
| Tint | 25 |
| Sharpness 4 | |
| DONE | |
| Choose among different preset adjustments for your TV picture | |
Option Description
Prédéfini
| Adjustment Settings | |
| Horizontal | 0 |
| Vertical | 0 |
| Phase | 17 |
| Auto Sync DONE | |
| Use left and right arrows to change horizontal position | |
PG Guidance parentale recommandee.
Pioneer 31063,31062,30032
Polk Audio 30157
Proton 30157
QED 30157
Quad 30157
Quasar 30029
RadioShack 31075
RCA 31062,30032,30420,30179,30053
Realistic 30420, 30179
Rotel 30157,30420
SAE 30157
Sansui 30157
Sanyo 30179
SAST 30157
Sharp 30861, 30037
Silsonic 30888, 30036
Sonic Frontiers 30157
Sony 30490, 30000, 30100
Soundesign 30145
TAG McLaren 30157
Tascam 30420
Teac 30420
Technics 30029
| Codes du fabricant | |
| Lecteurs CD | Manufacturer Codes |
| Victor 30072 | |
| Wards 30157, 30053 | |
| Yamaha 30888, 30036 | |
| Zonda 30157 | |
| Lecteurs DVD | Manufacturer Codes |
| Aiwa 20641, 21912 | |
| Akai 20770 | |
| Allegro 20869 | |
| Apex Digital 20672, 20717, 20797, 21061, 20796, 21056, 21937, 20794, 21020, 21915 | |
| Blaupunkt 20717 | |
| Blue Parade 20571 | |
| Broksonic 20695 | |
| Changhong 20627, 21061 | |
| CineVision 20869 | |
| Coby 21086 | |
| Curtis Mathes 21087 | |
| CyberHome 21024, 21023, 21129, 20816, 21117 | |
| Daewoo 20833, 21172, 20869 | |
| Denon 20490 | |
| DVD2000 20521 | |
| Emerson 20591, 20675 | |
| Enterprise 20591 | |
| Fisher 21919 | |
| Funai 20675 | |
| Gateway 21158, 21073 | |
| GE 20522, 20717 | |
| Go Video 20744, 20833, 21099, 20783, 21075, 20869, 21730 | |
| Greenhill 20717 | |
| Harman/Kardon 20582, 20702 | |
| Hitachi 20573, 20664, 21919 | |
| Hiteker 20672 | |
| Initial 20717 | |
| Integra 20627, 21924 | |
| JBL 20702 | |
| JVC 20558, 20623, 20867 | |
| Kenwood 20490, 20534 | |
| KLH 20717, 21020, 21149 | |
| Koss 20651, 21980 | |
Codes du fabricant
Lecteurs DVD
Manufacturer Codes
Lasonic 20798
LG 20591, 20869, 20801
Liquid Video 21980
Lite-On 21158, 21058
Loewe 20511
Magnavox 20503, 20539, 21976, 21914, 20675
Marantz 20539
Memorex 20695
Microsoft 20522
Mintek 20717
Mitsubishi 21521, 20521
Nesa 20717
Norcent 21003
Onkyo 20503, 20627, 21924, 20792
Oritron 20651, 21980
Panasonic 20490, 21762, 21990
Philips 20503, 20539, 20646, 21914
Pioneer 20525, 20571
Polaroid 21086, 21061
Polk Audio 20539
Portland 20770
Proscan 20522
Qwestar 20651
RCA 20522, 20571, 20717, 20822
Rio 20869
Rotel 20623
Sampo 20752, 20698
Samsung 20490, 20573, 21932, 21075, 20820
Sansui 20695
Sanyo 20695
Sharp 20630, 20752
Sharper Image 21117
Sherwood 20770
Shinco 20717
Shinsonic 20533
Sonic Blue 20869, 21099
Sony 20533, 20864, 21033, 21904, 21903
SVA 20717
Sylvania 20675
Symphonic 20675
| Codes du fabricant | ||
| Lecteurs DVD | Manufacturer Codes | |
| Teac 20717, 21984, 20809 | ||
| Technics 20490 | ||
| Theta Digital 20571 | ||
| Toshiba 20503, 20695 | ||
| Urban Concepts 20503 | ||
| Xbox 20522 | ||
| Yamaha 20490, 20539, 20545 | ||
| Zenith 20503, 20591, 20869 | ||
| Récepteurs satellite | Manufacturer Codes | |
| AlphaStar 00772 | ||
| Chaparral 00216 | ||
| Crossdigital 01109 | ||
| DirecTV | 00392, 00566, 00639, 01142, 00247, 00749, 01749, 00724, 00819, 01856, 01076, 01109, 00099, 01392, 01640, 01442, 01414, 01108 | |
| Dish Network System | 01005, 00775, 01505 | |
| Dishpro | 01005, 00775, 01505 | |
| Echostar | 01005, 00775, 01505 | |
| Expressvu | 00775 | |
| GE | 00566 | |
| General Instrument | 00869 | |
| GOI | 00775 | |
| Goodmans | 01246 | |
| Hisense | 01535 | |
| Hitachi | 00819, 00222, 01250 | |
| HTS | 00775 | |
| Hughes Network Systems | 01142, 00749, 01749, 01442 | |
| I-Lo | 01535 | |
| JVC | 00775 | |
| LG | 01414, 01226 | |
| Magnavox | 00724, 00722 | |
| Memorex | 00724 | |
| Mitsubishi | 00749 | |
| Motorola | 00869 | |
| NEC 01270 | ||
| Next Level | 00869 | |
| Panasonic | 00247, 00701 | |
| Paysat | 00724 | |
| Philips | 01142, 00749, 01749, 00724, 01076, 00722, 00099, 01442 | |
| Proscan 00392, 00566 | ||
| Proton | 01535 | |
Codes du fabricant
Admiral 20048, 20209
Aiko 20278
Aiwa 20037, 20479
Alienware 21972
America Action 20278
American High 20035
Amoisonic 20479
Anam 20162, 20037, 20240, 20278
Anam National 20162
Asha 20240
Audiovox 20037, 20278
Beaumark 20240
Bell & Howell 20104
Broksonic 20184, 20121, 20209, 20002, 20479
Calix 20037
Canon 20035
Carver 20081
CCE 20072, 20278
Changhong 20048, 20081
Citizen 20037, 20278
Colt 20072
Craig 20037, 20047, 20240, 20072
Curtis Mathes 20060, 20035, 20162
Cybernex 20240
CyberPower 21972
Codes du fabricant
Magnétoscopes
Manufacturer Codes
Daewoo 20045, 20104, 20278
Dell 21972
Denon 20042
DirecTV 20739
Durabrand 20039,20038
Electrohome 20037
Electrophonic 20037
Emerex 20032
Emerson 20035, 20037, 20184, 20240, 20045, 20121, 20043,
20209, 20002, 20278, 20479
Fisher 20047, 20104
Fuji 20035, 20033
Fujitsu 20045
Gateway 21972
GE 20060, 20035, 20240
General 20045
Go Video 20432
GoldStar 20037, 20209, 20038, 20225
Haojie 20240
Harman/Kardon 20081, 20038
Harwood 20072
Hewlett Packard 21972
HI-Q 20047
Hitachi 20037, 20042, 20055
Howard Computers 21972
HP 21972
Hughes Network 20042, 20739
Systems
iBUYPOWER 21972
JVC 20045, 20067
KEC 20037,20278
Kenwood 20067, 20038
KLH 20072
Kodak 20035, 20037
Kolin 20043
LG 20037, 20045, 20042, 20209, 20038
Logik 20072
LXI 20037
Magnavox 20035, 20039, 20081
Magnin 20240
Marantz 20035, 20081
Marta 20037
Codes du fabricant
Magnétoscopes
Manufacturer Codes
Matsushita 20035, 20162
Media Center PC 21972
MEI 20035
Memorex 20035, 20162, 20037, 20048, 20039, 20047, 20240, 20104, 20209, 20479
MGA 20240, 20043
MGN Technology 20240
Microsoft 21972
Mind 21972
Minolta 20042
Mitsubishi 20067, 20043
Motorola 20035, 20048
MTC 20240
Multitech 20072
NEC 20035, 20037, 20048, 20104, 20067, 20038
Newave 20037
Nikko 20037
Noblex 20240
Northgate 21972
Olympus 20035
Optimus 21062, 20162, 20037, 20048, 20104, 20432
Orion 20184, 20209, 20002, 20479
Panasonic 21062, 20035, 20162, 20616, 20225
Penney 20035, 20037, 20240, 20042, 20038
Pentax 20042
Philco 20035, 20479
Philips 20035, 20081, 20739, 20618
Pilot 20037
Pioneer 20042, 20067
Polk Audio 20081
Profitronic 20240
Proscan 20060
Protec 20072
Pulsar 20039
Qisheng 20060
Quasar 20035, 20162
Radix 20037
Randex 20037
RCA 20060, 20035, 20240, 20042, 20880
Realistic 20035, 20037, 20048, 20047, 20104
ReplayTV 20616
Runco 20039
Sampo 20037, 20048
Codes du fabricant
Magnétoscopes
Manufacturer Codes
Samsung 20240, 20045, 20432
Sanky 20048, 20039
Sansui 20067, 20209, 20479
Sanyo 20047, 20240, 20104
Scott 20184, 20045, 20121, 20043
Sears 20035, 20037, 20047, 20042, 20104
Sharp 20048, 20209
Shintom 20072
Shogun 20240
Singer 20072
Sonic Blue 20616
Sony 20035, 20032, 20033, 20636, 21972
STS 20042
Sylvania 20035, 20081, 20043
Systemax 21972
Tagar Systems 21972
Tashiko 20037
Tatung 20045, 20067
Technics 20035, 20162
Teco 20035, 20037, 20048, 20038
Teknika 20035, 20037
Tivo 20636, 20618, 21503, 20739
TMK 20240
Toshiba 20045, 20042, 20067, 20043, 21503, 21008, 21972
Totevision 20037, 20240
Touch 21972
Unitech 20240
Vector 20045
Vector Research 20038
Victor 20067
Video Concepts 20045
Videomagic 20037
Videosonic 20240
Viewsonic 21972
Wards 20060, 20035, 20048, 20047, 20081, 20240, 20042, 20072
White Westinghouse 20209, 20072
XR-1000 20035,20072
Yamaha 20038
Zenith 20039, 20033, 20209, 20479
ZT Group 21972