
PFN40B - Fan Royal Sovereign - Free user manual and instructions
Find the device manual for free PFN40B Royal Sovereign in PDF.

| Brand | Royal Sovereign |
| Model | PFN40B |
| Product Type | Pedestal fan (tower) |
| Power Supply | 120 V, 60 Hz, 50 W |
| Speeds | 3 (low, medium, high flow) |
| Oscillation | Yes (button on top of motor) |
| Dimensions (L x W x H) | 640 x 690 x 1250 mm |
| Weight | 3.2 kg |
| Tube Material | Height-adjustable chrome-plated metal |
| Safety Grilles | Front and rear, with side locks and plastic nut |
| Blade | Plastic, secured by locking nut |
| Base | Cross-shaped, two sections assembled with screws |
| Cleaning | Soft damp cloth, dry before restarting |
| Safety | Do not use outdoors or near water; unplug before cleaning |
| Warranty | 1 year, repair or replacement of defective parts |
| Country of Manufacture | Not specified |
Frequently Asked Questions - PFN40B Royal Sovereign
User questions about PFN40B Royal Sovereign
0 question about this device. Answer the ones you know or ask your own.
Ask a new question about this device
Download the instructions for your Fan in PDF format for free! Find your manual PFN40B - Royal Sovereign and take your electronic device back in hand. On this page are published all the documents necessary for the use of your device. PFN40B by Royal Sovereign.
USER MANUAL PFN40B Royal Sovereign
natural_image
Modern white floor fan with radial blades and a stand (no text or symbols visible)Page en Français
Read and retain these instructions for future reference For any customer support needs, please choose the support tab on www.royalsovereign.com
www.royalsovereign.com
Royal Sovereign International, Inc.
16" OSCILLATING PEDESTAL FAN
Model PFN-40B Series
INTRODUCTION
Thank you for choosing Royal Sovereign to provide you and your family with all of the “Home Comfort” requirements for your home, apartment or office. This Tower Fan can be set-up in just minutes and can be easily moved from room to room. This manual will provide you with valuable information necessary for the proper care and maintenance for your new Tower Fan. Please take a few moments and read the instructions thoroughly.
CONTENTS
Precautions 4
Parts & Fan Assembly 5-6
Operation 6
Cleaning and Maintaining 6
Specifications 7
Warranty 8
Exclusions 8
Page en Français 9
PRECAUTIONS FOR USE
Electrical Specifications and Power Cord
Check to ensure that the electrical service being used is adequate for the model you've chosen. The electrical rating of your new fan is defined on the serial sticker on the unit. Please refer to the rating when checking electrical requirements to ensure they meet the electrical codes of your location.
- Do not use this appliance if it malfunctions or is dropped or damaged in any manner.
- Do not use outdoors. Do not place on or near a hot gas, electric burner, a microwave, or a heated oven.
• To protect against fire, electric shock or injury, do not place cord, plug, or appliance in water or other liquid. - The wrong use conflicting with the safeguards voids the customer of the right for warranty service.
- Do not modify any part of this product.
• Always place the fan on a stable, dry, level surface when operating.
- Do not insert any fingers, pencils or any other objects into the product or block the airflow in any way.
- Ensure that the power supply you use has an appropriate voltage rating.
- Do not use this unit with any extension cords or adapter plugs.
- If the cord or plug is damaged in any way, please call the Royal Sovereign Service Department
- Turn the unit off and unplug, when cleaning the heater or when the heater will not be used for an extended time period.
General Use
- Do not block air outlets with any obstacles.
- Do not insert any objects into the fan.
- Do not pour water on the housing or control panel.
- Do not place heavy items or sit on the fan.
- Never pull or damage the power cord in any way.
- This appliance is not intended for use by persons (including children) with reduced mental capabilities, unless they have been given supervision or instruction concerning the use of appliance by a person responsible for their safety.
PARTS
- Safety grill (Front and Rear)
- Oscillating Button
- Control Motor Unit (Plastic Nut included)
- Chrome Metal Tube (located in the white metal tube)
- Nut and Bolt
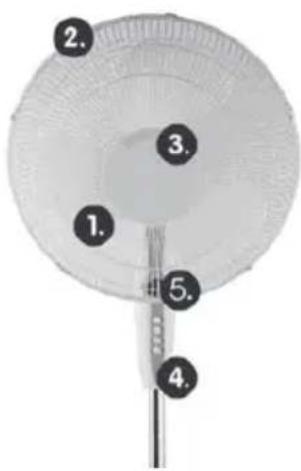
FAN ASSEMBLY
- Remove all items and locate the motor unit.
- Locate the rear safety grill and position over the protruding pins by aligning the threaded holes at the bottom.
- Tighten the plastic nut to secure the rear safety grill. (Figure 1)
- Locate the fan blade and line up with the metal spindle of the motor unit.
- Tighten the locking nut in the counter clock wise direction. (Figure 2)
**Note: Avoid over-tighten as the bolt is secured in the clock wise direction, the locking nut will tighten gradually with the operation of the appliance. - The front safety grill has 4 clips that need to be aligned with the bottom hole for a security nut and bolt.
- Align the top locking clip to the top of the rear safety grill and lock the side locking clips and align the bottom hole for a security nut and bolt. (Figure 3)
- Fasten the nut and bolt through the holes of safety grills.
- You will need a screw driver to assemble the cross base. The upper cross base piece overlaps with the lower cross base piece before you can secure it with screws to the base of the fan stand (see Figure 4)
- The chrome metal tube is height adjustable in the stand. Loosen the collar holding the chrome metal tube in place and extend to the desired length. The motor housing will drop on to the chrome tube, where it will need to be fastened with the thumb screw provided (see Figure 5)

OPERATION
- Place the fan on a dry and firm level surface.
- Unwind the power cord and plug the cord set into electrical outlet. Be sure plug fits tightly in outlet.
- Turn the fan ON by pressing "1", "2", "3" for selecting desired speed. "o" - OFF 1 — Low wind 2 — Medium wind 3 — High wind
- Press the button on top of motor unit for OSCILLATION
CLEANING AND MAINTAINING
- Always unplug the appliance when cleaning your fan. Wipe the unit with a soft wet cloth. Don't use solvents or abrasives.
- Allow sufficient drying time before operating again.
• To prevent damage, do not attempt to dismantle the fan with a sharp instrument
• We recommend that the fan be cleaned and packed in its original packaging and stored in a cool, dry place.
SPECIFICATIONS
| Model PFN-40B | |
| Voltage/Frequency AC 120V, 60Hz | |
| Input power 50W | |
| Dimension (L) X (W) x (H) 640 x 690 x 1250 mm | |
| Weight 3.2Kg / 7.04 lb | |
WARANTY
Royal Sovereign warrants each fan to be free from defects in material and workmanship. Our obligation under this warranty is limited to the repair or replacement, free of charge, when delivered to an authorized Royal Sovereign service center, of any defective part(s) thereof, other than parts damaged in transit. This warranty is in effect to the original purchaser, for a period of one year from the date of purchase and is not transferable. This warranty shall apply only if the fan is used in accordance with the factory provided instructions which accompany it.
EXCLUSIONS
This warranty excludes and does not cover defects, malfunctions or failures of your Royal Sovereign Fan, caused by repairs by unauthorized persons or service centers, mishandling, improper installation, modification or unreasonable use including incorrect voltage, acts of God, or failure to provide reasonable and necessary maintenance. This warranty is in lieu of any and all expressed warranties. In no event shall Royal Sovereign be liable for consequential or incidental damages. This limitation would not apply if you live in a location that does not permit the exclusion of limitation of incidental or consequential damages.
ROYAL SOVEREIGN INTERNATIONAL, INC.
2 Volvo Drive Rockleigh, NJ 07647 USA
TEL: +1) 800-397-1025 FAX: +1) 201-750-1022
RS HOLLAND B.V.
Industrieweg 6K, 4104AR, Culemborg, The Netherlands
Tel: 31 (0)345·473·097 Fax: 31 (0)345·519·811
RS CANADA INC.
1025 Westport Crescent, Mississauga, Ontario, Canada L5T1E8
TEL: +1) 905-461-1095, 866 961 6673 FAX: +1) 905-461-1096
RS INTERNATIONAL AUSTRALIA PTY. LTD.
30 Prime Drive, Seven Hills, NSW 2147, AUSTRALIA
TEL: 61 2-9674-2127 FAX: 61 2-9674-2027
www.royalsovereign.com
GUIDE DE L'UTILISATEUR
PFN-40B

natural_image
Modern white floor fan with radial blades and a stand (no text or symbols visible)VENTILATEUR OSCILLANT 16 PO SUR PIED
Page en Français
9
www.royalsovereign.com
Royal Sovereign International, Inc.
VENTILATEUR OSCILLANT 16 PO SUR PIED
30 PRIME DRIVE, SEVEN HILLS, NSW 2147, AUSTRALIE
TÉL.: 61 2 9674-2127 TÉLÉC.: 61 2-9674-2027
www.royalsovereign.com
Brand : Royal Sovereign
Model : PFN40B
Category : Fan