SM2070 - Steam mop KENMORE - Free user manual and instructions
Find the device manual for free SM2070 KENMORE in PDF.

| Product Type | Steam Mop |
| Brand | Kenmore |
| Model | SM2070 |
| Power Source | Mains, 120 V (polarized plug) |
| Steam Type | Adjustable: low volume (-) and high volume (+) |
| Preheat Time | Approximately 25 seconds |
| Water Tank | With max fill line, flip-top cap |
| Recommended Water | Distilled or demineralized water |
| Included Pads | 2 gray cotton pads, 2 striped fringe pads |
| Included Accessories | Measuring cup |
| Handle | Metal tube with snap-lock |
| Use Surface | Sealed hard floors only (not for unsealed, waxed, or delicate surfaces) |
| Usage | Household use only |
| Warranty | 1 year limited (does not cover pads) |
| Replacement Parts | Gray pads (731005104), striped pads (731005105), measuring cup (731005106) |
| Safety | No auto shut-off, but precautions: do not leave unattended, unplug before maintenance, hot surface |
| Indicator Lights | White flashing power light (heating), solid white (ready), red flashing (empty tank) |
| Pad Cleaning | Machine wash at 40°C max, air or low heat dry, no bleach or fabric softener |
| Customer Service | US: 1-877-531-7321, CA: 1-844-608-3081, Mon-Fri 8am-5pm ET |
Frequently Asked Questions - SM2070 KENMORE
User questions about SM2070 KENMORE
0 question about this device. Answer the ones you know or ask your own.
Ask a new question about this device
Download the instructions for your Steam mop in PDF format for free! Find your manual SM2070 - KENMORE and take your electronic device back in hand. On this page are published all the documents necessary for the use of your device. SM2070 by KENMORE.
USER MANUAL SM2070 KENMORE
Vacuum Cleaner Help Line
8:00am-5:00pm EST, M-F
De 8 AM a 5 PM, de lunes a Viernes
Before Using Your New Steam Mop. 2
Packing List. 2
Important Safety Instructions 3-5
Steam Mop Warranty 5
Parts and Features 6-7
Assembly Instructions 8-9
Operating Instructions 9-12
1. Maintenance and Care 12-14
Troubleshooting 15
Requesting Assistance or Service Back Cover
Read this Use & Care Guide. It will help you assemble and operate your new Kenmore steam mop in the safest and most effective way.
For more information about steam mop care and operation, call the Steam Mop Help Line at 1-877-531-7321 (US) / 1-844-608-3081 (CA). You will need the complete model and serial numbers when requesting information.
Your steam mop's model and serial numbers are located on the Model and Serial Number Plate. Use the space below to record the model number and serial number of your new Kenmore steam mop.
Model No.
Serial No.
Date of Purchase
Keep this book and your sales check (receipt) in a safe place for future reference.
PACKING LIST
Your KENMORE STEAM MOP is packaged with the following parts and components included separately in the carton:
1 Handle 2 Striped Cotton Mop Pads
1 Main Body 1 Measuring Cup
1 Floor Head 1 Use & Care Guide
2 Gray Cotton Mop Pads
IMPORTANT SAFETY INSTRUCTIONS
Read all instructions in this guide before assembling or using your steam mop.

WARNING!
Your safety is important to us. To reduce the risk of fire, electrical shock, injury to persons or damage when using your steam mop, follow basic safety precautions including the following:
- Read this Use & Care Guide carefully and follow the instructions closely.
- Do not use the steam mop without attaching the mop pads or adding water to the water tank. When you use the steam mop for the first time, it might take longer than the normal 25 seconds to start steaming.
- Do not expose to rain.
- Store indoors.
- Do not allow it to be used as a toy.
- Not for space heating purposes.
- Make sure the household voltage is the same as that indicated on the rating label of the unit.
- This appliance is not intended for use by persons (including children) with reduced physical, sensory or mental capabilities, or lack of experience and knowledge, unless they have been given supervision or instruction concerning use of the appliance by a person responsible for their safety. Children shall not play with the appliance.
-
Keep the appliance away from children when it is energized or cooling down.
-
Keep hair, loose clothing, fingers, and all parts of body away from openings and moving parts.
Always switch off and unplug from the socket after use or before cleaning the appliance or any maintenance task. - Do not unplug by pulling and jerking the cord with force.
- Do not handle the plug or the appliance with wet hands.
- Use only the attached parts which are supplied by the manufacturer.
- This appliance is intended for household use only. Do not use the appliance outdoors. Commercial use will void warranty.
- Do not leave the appliance unattended while it is connected to the main power outlet.
- If the supply cord is damaged, it must be replaced by the manufacturer, its service agent or similarly qualified persons in order to avoid any hazard.
- Do not step on or wrap the cord around arms or legs when using the appliance.
- Do not pull, lift or carry the appliance by its supply cord.
IMPORTANT SAFETY INSTRUCTIONS
In order to avoid damages to the cord, do not pull the cord around sharp corners and edges.
- Do not run steam mop over cord. Keep cord away from heated surfaces.
- Do not use extension cords or outlets with inadequate current-carrying capacity.
- Do not use the appliance if it has been dropped, if there are visible signs of damage or if it appears faulty or if it is leaking.
- Do not position the appliance above you when cleaning the stairs.
- Unplug the steam mop before filling the water container and do not over fill.
- The water container cap must not be opened during use.
- Do not immerse the appliance in water or other liquids.
- Do not add chemicals, detergents, perfumes or liquids other than water into the water tank of the appliance.
- Keep the appliance dry to protect against electric shock.
- Do not use the appliance to clean or direct steam towards animals, people or plants.
-
Do not use on any unsealed hard floor surfaces. It is always recommended to test an isolated area of the surface to be cleaned before proceeding. It is also recommended to check the use and care instructions from the floor manufacturer.
-
Do not use this appliance in enclosed spaces containing vapors from oil-based paints, paint thinner, mothproofing substances, flammable dust, or other explosive or toxic vapors.
- Do not use on leather, wax-polished furniture or floors, synthetic fabrics, velvet, or other delicate, steam-sensitive materials.
- Always wear appropriate footwear when using the steam mop and when changing accessories. Do not wear slippers or open-toed shoes.
- Liquid or steam must not be directed towards equipment containing electrical components, such as ovens.
- To avoid circuit overload. Do not operate another appliance on the same socket (circuit) as the steam mop.
- If the circuit breaker activates while using the steam function, discontinue product use immediately and call 1-877-531-7321 (US) / 1-844-608-3081 (CA) for assistance.
IMPORTANT SAFETY INSTRUCTIONS

CAUTION
Steam mop generates hot steam and components in contact with water will also reach high temperatures. Please be extra careful when using the unit to avoid scalding. Surfaces are also in high temperature during use. Avoid contact with the surfaces and steam. Do not let children get close to the steam mop or use it without any supervision.

WARNING
Scalding Risk.

CAUTION
Hot Surface.
SAVE THESE INSTRUCTIONS
Proper assembly and safe use of your steam mop are your responsibilities. Your steam mop is intended for Household Use. Read this Use & Care Guide carefully for important use and safety information. This guide contains safety statements under warning and caution symbols.
STEAM MOP WARRANTY
LIMITED WARRANTY
FOR ONE YEAR from the date of sale (or, for deliveries in the State of California, one year from the date of delivery), this product is warranted against defects in material or workmanship.
WITH PROOF OF SALE a defective product will be replaced free of charge.
The Kenmore brand is used under license. Direct all claims for warranty service to: 1-877-531-7321 (US) / 1-844-608-3081 (CA).
This warranty does not cover the microfiber pads, which are expendable parts that can wear out from normal use within the warranty period.
This warranty is void if this product is ever used for anything other than private household purposes. This warranty gives you specific legal rights, and you may also have other rights which vary from state to state.
Cleva North America, Inc., Greenville SC 29607
PARTS AND FEATURES
It is important to know your steam mop's parts and features to assure its proper and safe use. Review these before using your steam mop.
REPLACEMENT PARTS
| Item Part No.(US) Part No.(CA) | |
| Gray Cotton Mop Pads 731005104 731005104 | |
| Striped Mop Pads 731005105 731005105 | |
| Measuring Cup 731005106 731005106 |
To order a replacement part, call 1-877-531-7321 (US) / 1-844-608-3081 (CA).
PARTS AND FEATURES
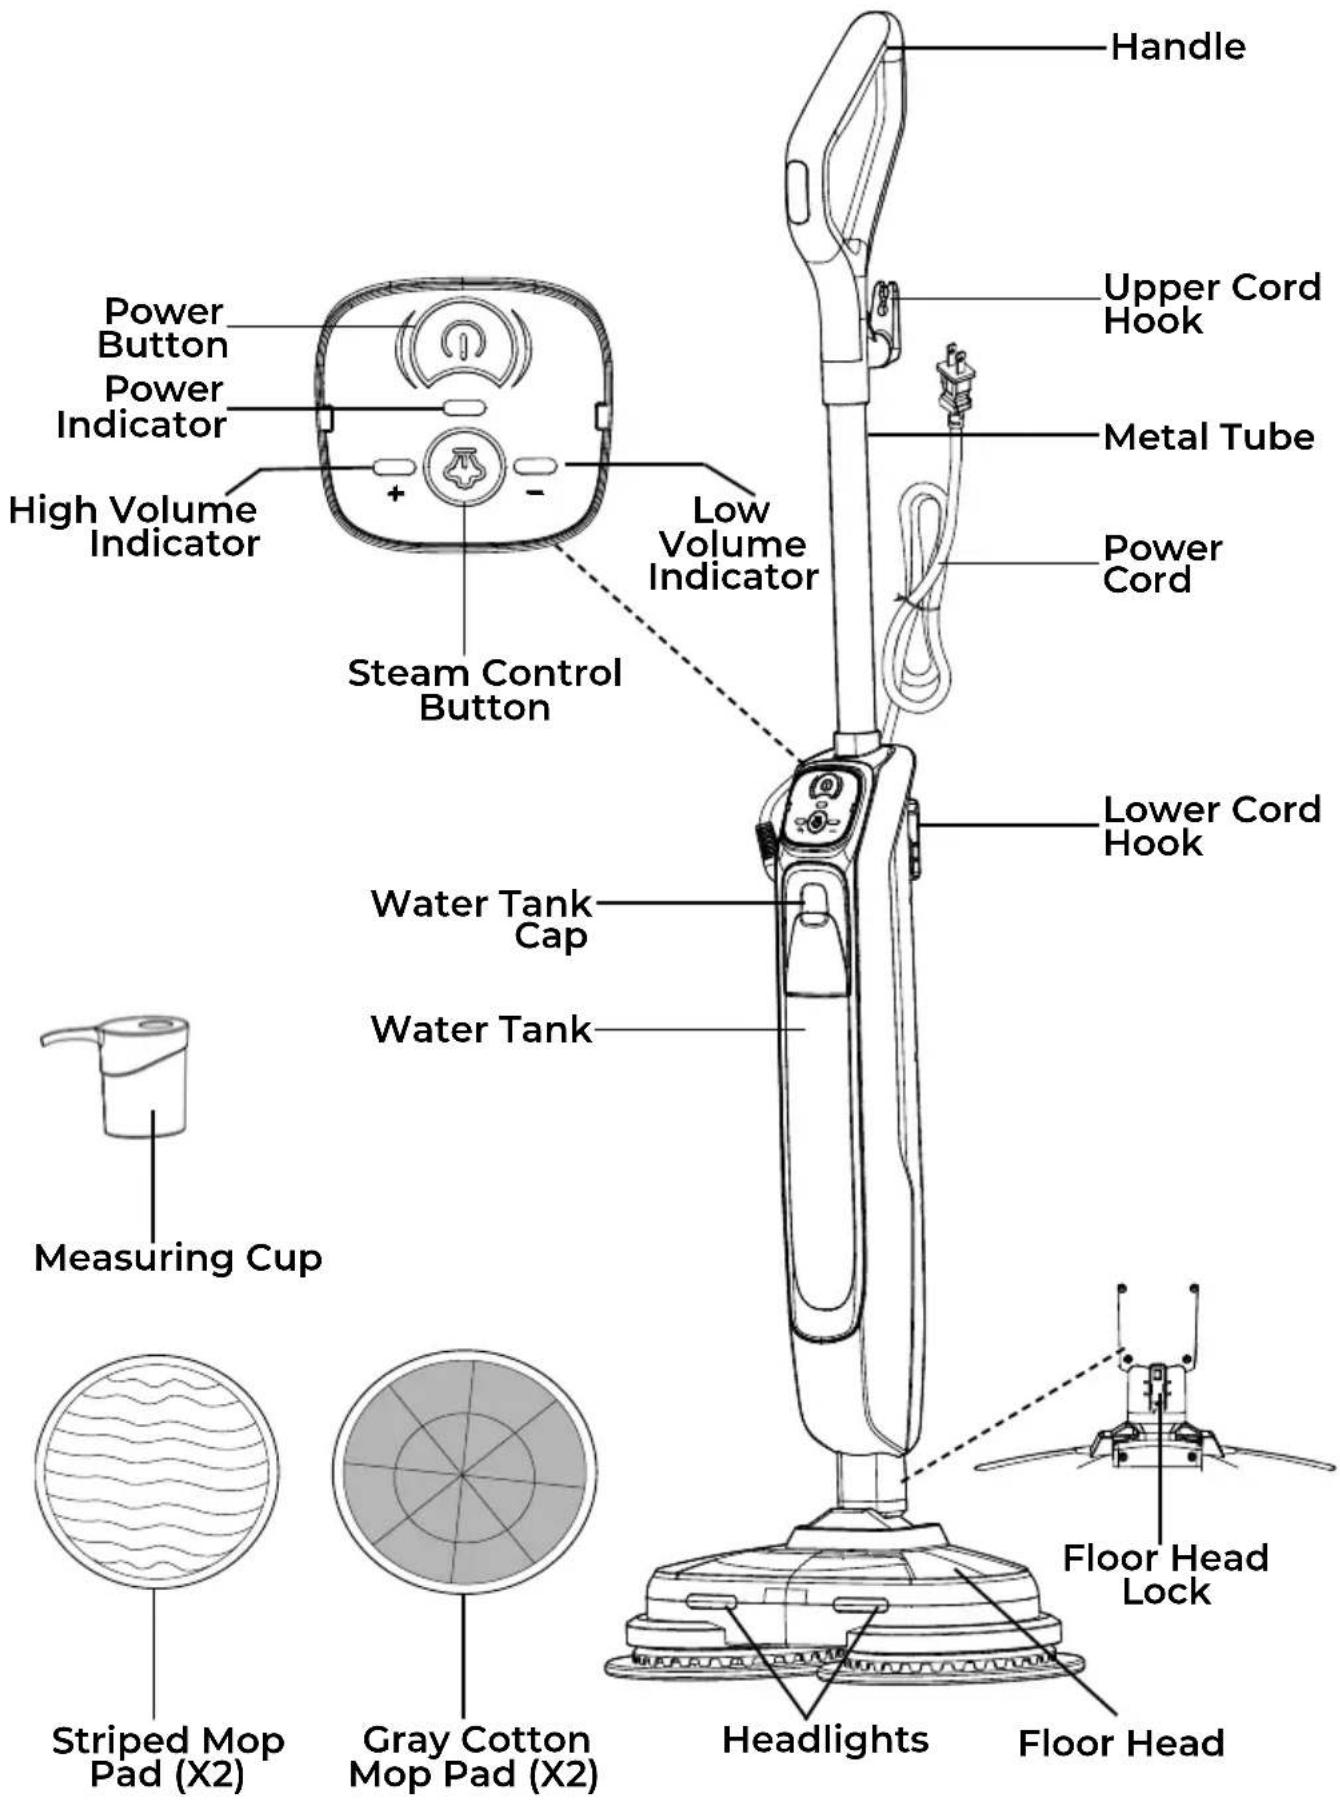

Please pay special attention to these hazard alert boxes, and follow any instructions given. WARNING statements alert you to such hazards as fire, electric shock, burns and personal injury. CAUTION statements alert you to such hazards as personal injury and/or property damage.
ASSEMBLY INSTRUCTIONS
Before assembling the steam mop, check the PACKING LIST (page 2). Use this list to verify that you have received all the components of your new Kenmore Steam Mop.

WARNING
Do not plug in your steam mop until you are familiar with all instructions and operating procedures.
- Insert the main body into the floor head until it clicks into place.
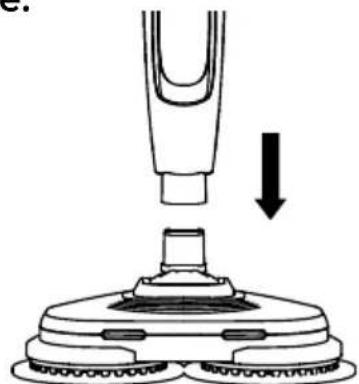
- Align the metal tube to the main body of steam mop and insert it until there is a "click". Make sure the metal tube is locked in position and secure.
- Align and attach the plastic parts of the mop pads to the
round holes of rotation discs as shown, pressing until the pads are secured.
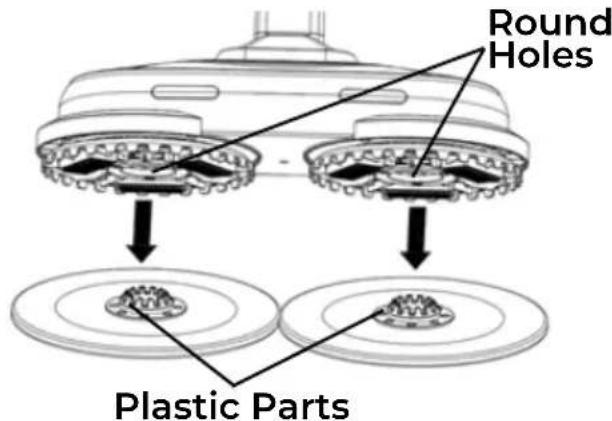
NOTE: For optimal cleaning, use the striped mop pads. For superior liquid absorption, choose the gray cotton pads. Select the pad that best suits your cleaning task.
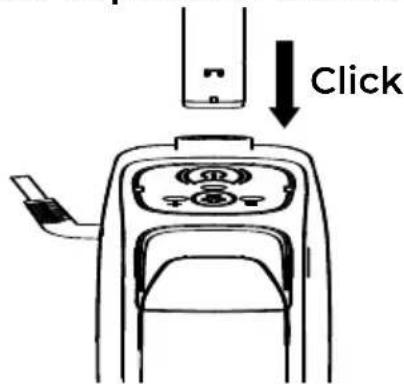
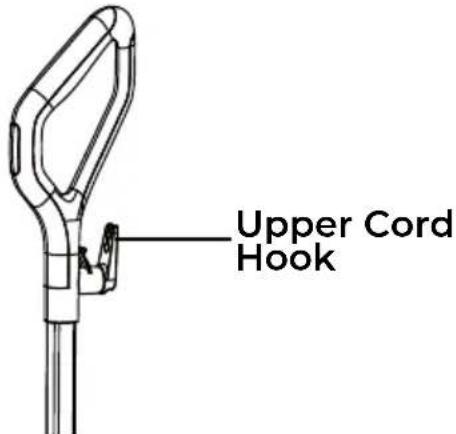
- Make sure the upper cord hook is in the proper position as shown. Wrap the power cord loosely around the upper and lower cord hooks.
ASSEMBLY INSTRUCTIONS
NOTE: Make sure to wrap the power cord around the upper cord hook first, and then around the lower cord hook to avoid damaging the power cord.

WARNING
Electrical Shock and Personal Injury Hazard
Wrapping the cord too tightly with excessive stress on the cord may cause cord damage. A damaged cord is an electrical shock hazard and could cause personal injury or damage.
OPERATING INSTRUCTIONS
POWER CORD - RELEASE & USE
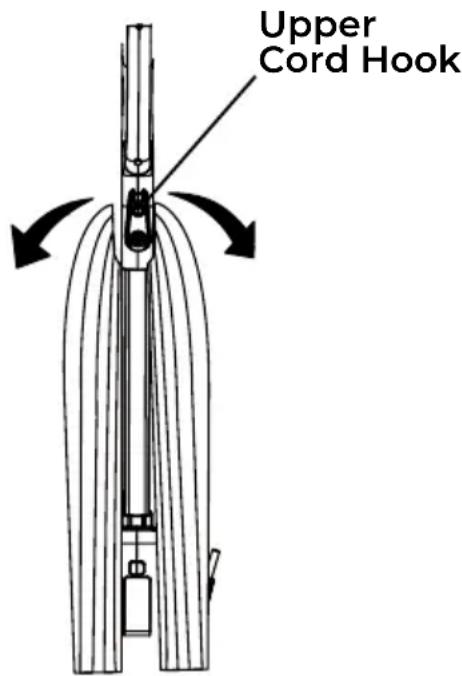
Turn the upper cord hook to either side and down to release the power cord.

WARNING
To reduce the risk of electric shock, this appliance has a polarized plug (one blade is wider than the other). This plug will fit in a polarized outlet only one way. If the plug does not fit fully in the outlet, reverse the plug. If it still does not fit, contact a qualified electrician to install the proper outlet. Do not change the plug in any way.
POWER CORD - RELEASE & USE

WARNING
Personal Injury and Product Damage Hazard
- When any abnormality/failure occurs, stop using the product immediately and disconnect the power plug.
- DO NOT use outlets above counters. Damage from cord to items in surrounding area could occur.
FILLING THE CLEAN WATER TANK
- Unplug the steam mop before filling the water tank. Pull the tank cap down, then use the measuring cup and fill water into the tank. Make sure not to exceed the Max line.
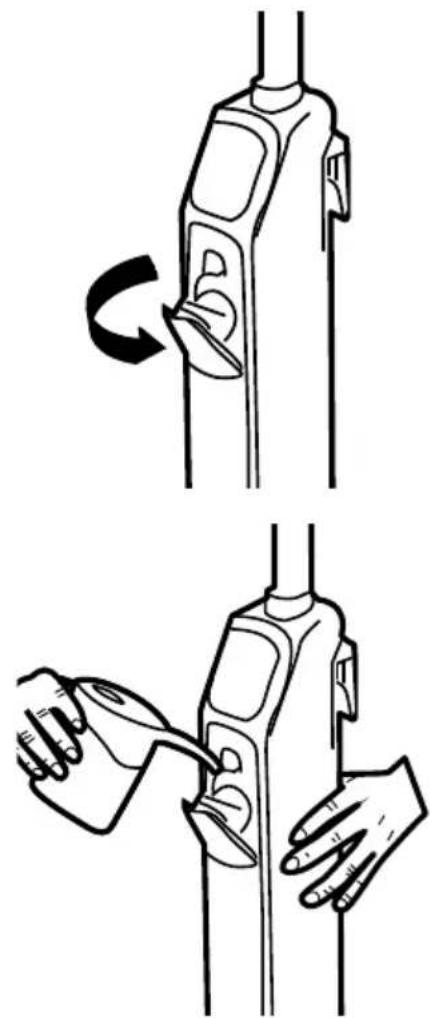
- When finished, close the tank cap firmly.
NOTE: In order to reduce mineral build-up and prolong the lifespan of steam mop, the use of distilled or de-mineralized water is highly recommended.

CAUTION
Do not add any chemicals, detergents or perfumes into the water tank.

WARNING
Always unplug the steam mop when adding water or changing mop pads.
OPERATION MODES
STEAM CLEANING HARD FLOORS
NOTE: Always sweep or vacuum the floor to remove the dirt and debris before steam cleaning.
NOTE: Prior to use, wash the microfiber pad to remove lint.

WARNING
Do not use the steam mop without mop pads attached to the floor head.
- Turn down the upper cord hook to unwrap the power cord completely. Plug the power cord into a nearby electrical outlet located near the floor.
- Once plugged in, the unit starts to preheat around 25 seconds. The power indicator will flash white until it stays on steadily, indicating that preheating is complete.
- Tilt the main unit gently, the headlights will activate. Press the power button, the mop starts to work in Low volume mode by default, with low speed and low steam volume. The Low volume indicator "-" will illuminate green.
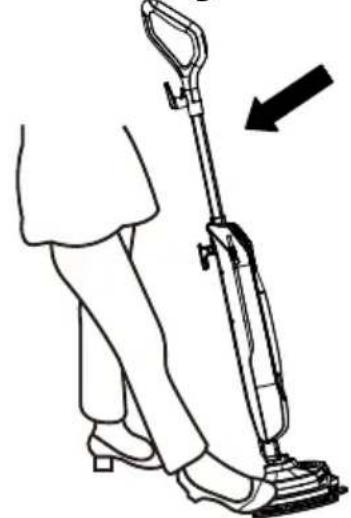
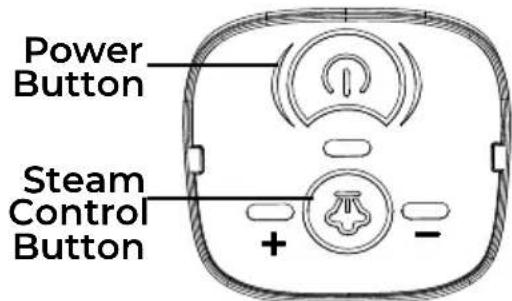
- If desired, press the Steam Control Button to switch to High volume mode. The High volume indicator “+” will illuminate green.
- Move the mop slowly back and forth, paying particular attention to high-traffic areas.

CAUTION
Do not allow the steam mop to remain in one spot for any length of time as damage to the floor surface may occur.

WARNING
If the water tank is empty, the power indicator will be red flashing. The steam mop will stop producing steam. Make sure the unit is unplugged before refilling the water tank.
- After steaming, press the power button to turn off the steam mop. Then, return it to the upright position and unplug the power cord.
NOTE: Empty the water tank before storing the steam mop for an extended period. Refer to the "EMPTYING THE WATER TANK" section on page 13.
OPERATION MODES

CAUTION
Always unplug the steam mop when removing the floor head or handle.
- Please wait 2 to 3 minutes for the steam mop to cool down before removing the mop pads. NEVER leave the steam mop with wet or dirty mop pads on any floor. Wash the mop pads after use.
- Always ensure the steam mop has fully cooled down before removing the floor head.

WARNING
- Steam cleaning is safe for all sealed hard floor surfaces, but should not be used on unsealed (not waxed) surface.
- Steam mops are designed to be used on horizontal surfaces only.
MAINTENANCE AND CARE
Always follow all safety precautions when performing maintenance to the steam mop.

WARNING
Electrical Shock and Personal Injury Hazard
Disconnect electrical supply before servicing or cleaning the steam mop. Failure to do so could result in electrical shock or personal injury from steam mop suddenly starting.

CAUTION
Always ensure the appliance has fully cooled down before performing any maintenance tasks.
EMPTYING THE WATER TANK
- Unplug the mop from the main power and ensure the unit has cooled.
- Open the water tank cap and drain any excess water from the tank.

- Close the water tank cap.
REMOVING & CLEANING MOP PADS
- Unplug the mop from the main power and ensure the unit has cooled.
- When the mop pads have cooled completely, remove them by pulling them off the discs.
- Wash the mop pads with mild detergent at max temperature 104^ (40^)

IMPORTANT! Do not use bleach or fabric softener to wash the microfiber pad. They may damage the soft mop pads or leave a coating that will reduce their cleaning performance and absorbency. Dirt mop pads should be line-dried or tumble-dried on a low setting, as this will extend the life of the microfiber fabric. Loose fibers can indicate wearing of the microfiber fabric.
DO NOT pull the loose fibers, as this can cause the weave to come undone. Simply trim the loose fibers with scissors.
NOTE: The mop pads shall be maintained regularly. Mop pads should be washed after every use.
REMOVING & CLEANING MOP PADS

WARNING
- Wash the mop pads separately from other fabrics to avoid picking up lint.
- We recommend only using liquid detergent, as powder detergents can leave behind a residue on the microfiber.
- In order to prolong the life of the mop pads, we recommend that you air dry them.
REPLACING DIRT MOP PADS
For best cleaning results, we recommend replacing the mop pads every 3 to 4 months following normal use. As with any fabric, dirt particles, grease, friction, and repeated washing can cause the fibers to break down, and you may notice an increase in the effort needed to push or pull the mop.
STORAGE
- Turn off the power and unplug the power cord.
- Empty any remaining water from the water tank and wipe the exterior with a dry cloth.
-
Remove and wash the mop pads for future use. Leave out to air dry.
-
Store the product in a protected, dry place. Retain the measuring cup for future use.
- Keep out of reach of children.
TROUBLESHOOTING
Review this table to find do-it-yourself solutions for minor performance problems. Any service needed, other than maintenance described in this Use & Care Guide, should be performed by a qualified service agent.

WARNING
Disconnect electrical supply and ensure the appliance has cooled before performing maintenance or troubleshooting. Failure to do so could result in electrical shock or personal injury.
| PROBLEM | POSSIBLE CAUSE SOLUTION | |
| The steam mop will not turn on. | Unplugged at wall outlet. | Make sure the unit is fully plugged into a working wall outlet. |
| Defective power cord. | Check the power cord for damage or looseness. Contact customer support if necessary. | |
| Blown fuse or tripped breaker. | Replace fuse and reset the breaker. | |
| Not plugged in properly. | Ensure the power cord is connected to the outlet correctly. | |
| Internal fuse is blown. | Call 1-877-531-7321 (US) / 1-844-608-3081 (CA) for assistance. | |
| The steam mop is not producing steam. | Water tank may be empty. | Make sure there is water inside the water tank. |
| Heating up time is not finished. | Wait for approx. 25 seconds after plugged in. | |
| Steam path may be blocked. | Clear blockages from the channels. | |
| Improper liquid used. Use | only distilled water. | |
| The mop pad is not picking up dirt. | Microfiber pad is dirty. Make sure the mop pad is clean. | |
| The power indicator flashes red. | Water tank is empty. Fill water into the tank. | |
TABLA DE CONTENIDOS
Cleva North America, Inc., Greenville SC 29607
PIEZAS Y CHARACTERISTICAS
Cleva North America, Inc., Greenville SC 29607
PIÉCES ET FONCTIONNALITÉS
Kenmore and the Kenmore logo are registered trademarks of Transform SR Brands LLC and are used under license by Cleva North America, Inc., Greenville, SC 29607