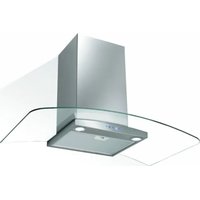
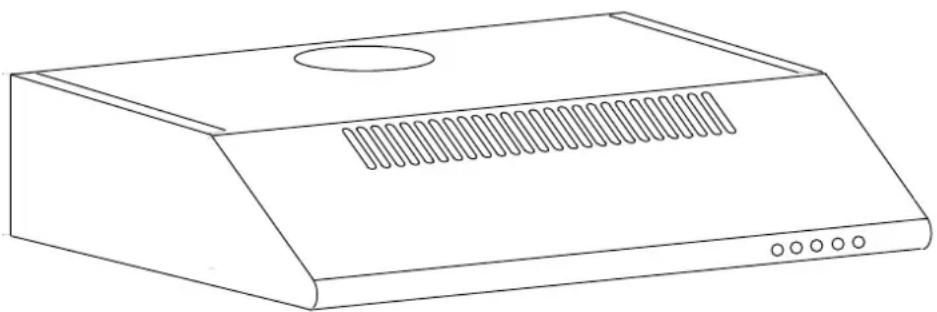
GHC632WH - Basket Glem Gas - Free user manual and instructions
Find the device manual for free GHC632WH Glem Gas in PDF.
| Brand | Glem Gas |
| Model | GHC632WH |
| Product type | Range hood |
| Usage | Domestic, indoor |
| Installation | Wall-mounted or under-cabinet |
| Version | Evacuation (external) or recirculation (with charcoal filter) |
| Dimensions (W x D x H) | 60 cm x 52 cm x 15 cm (estimated) |
| Power supply | 220-240 V ~ 50 Hz |
| Number of speeds | 3 (low, medium, high) |
| Lighting | LED, 2 x 2 W max |
| Grease filter | Aluminum, washable (every 3-4 weeks) |
| Charcoal filter | Activated, replace every 3 months (recirculation mode) |
| Minimum distance above the cooktop | 65 cm (electric) / 75 cm (gas) |
| Exhaust duct diameter | 125 mm recommended |
| Maintenance | Regular cleaning of filters, carbon replacement |
| Safety | Disconnect before maintenance, respect distances |
| Spare parts | Filters, LED lamps – Customer service: piecesdetachees@airlux.com |
| Warranty service | garantie@airlux.com |
Frequently Asked Questions - GHC632WH Glem Gas
User questions about GHC632WH Glem Gas
0 question about this device. Answer the ones you know or ask your own.
Ask a new question about this device
Download the instructions for your Basket in PDF format for free! Find your manual GHC632WH - Glem Gas and take your electronic device back in hand. On this page are published all the documents necessary for the use of your device. GHC632WH by Glem Gas.
USER MANUAL GHC632WH Glem Gas
natural_image
Line drawing of a kitchen air conditioner unit with ventilation slots and a circular vent (no text or symbols)RECOMMANDATIONS ET SUGGESTIONS 8
CARACTÉRISTIQUES TECHNIQUES 10
INSTALLATION 11
UTILISATION 16
ENTRETIEN DE L'APPAREIL 17
ELIMINATION ET RECYCLAGE 19
AVERTISSEMENTS
DANS CERTAINES CIRCONSTANCES, LES APPAREILS ÉLECTRIQUES PEUVENT CONSTITUER UN DANGER.
- NE PAS VÉRIFIER L'ÉTAT DES FILTRES LORSQUE LA HOTTE FONCTIONNE.
- NE PAS TOUCHER LES AMPOULES APRÈS UTILISATION DE L'APPAREIL.
- NE PAS DÉBRANCHER L'APPAREIL AVEC LES MAINS MOUILLÉES.
- ÉVITER LES FLAMMES LIBRES, ELLES ENDOMMAGENT LES FILTRES ET CONSTITUENT UN RISQUE D'INCENDIE.
- SURVEILLER CONSTAMMENT LA FRITURE DES ALIMENTS. L'HUILE SURCHAUFFÉE PEUT ÊTRE UNE SOURCE D'INCENDIE.
- DÉBRANCHER LA PRISE ÉLECTRIQUE AVANT TOUTE MAINTENANCE.
- ATTENTION : LES PARTIES ACCESSIBLES PEUVENT DEVENIR CHAUDES. LORSQUE L'APPAREIL EST UTILISÉ AVEC DES APPAREILS DE CUISSON.
- NE PAS UTILISER CE PRODUIT À L'EXTÉRIEUR.
- CET APPAREIL PEUT ÊTRE UTILISÉ PAR DES ENFANTS ÂGÉS D'AU MOINS 8 ANS ET PAR DES PERSONNES AYANT DES CAPACITÉS PHYSIQUES, SENSORIELLES OU MENTALES RÉDUITES OU MANQUANT D'EXPÉRIENCE ET DE CONNAISSANCES, À CONDITION QU'ELLES SOIENT SOUS SURVEILLANCE OU AVOIR REÇU DES INSTRUCTIONS ADAPTÉES À L'UTILISATION EN TOUTE SÉCURITÉ DE L'APPAREIL ET COMPRIS LES RISQUES IMPLIQUÉS. LES ENFANTS NE DOIVENT PAS JOUER AVEC L'APPAREIL. LE NETTOYAGE ET L'ENTRETIEN PAR L'UTILISATEUR NE DOIVENT PAS ÊTRE EFFECTUÉS PAR DES ENFANTS SANS SURVEILLANCE.
- UNE VENTILATION ADÉQUATE DE LA PIÈCE DOIT ÊTRE ASSURÉE LORSQUE LA HOTTE EST UTILISÉE EN MÊME TEMPS QUE DES APPAREILS UTILISANT DU GAZ OU D'AUTRES COMBUSTIBLES (NON APPLICABLE EN MODE RECYCLAGE).
- IL EXISTE UN RISQUE D'INCENDIE SI LE NETTOYAGE N'EST PAS EFFECTUÉ CONFORMÉMENT AUX INSTRUCTIONS.
- NE PAS FAIRE FLAMBER SOUS LA HOTTE.
- LORSQU'UNE HOTTE INSTALLÉE EN VERSION ÉVACUATION FONCTIONNE EN MÊME TEMPS QUE DES CHEMINÉES, IL FAUT S'ASSURER QU'AUCUNE PRESSION NÉGATIVE DANGEREUSE SUPÉRIEURE À 4 PA (4×10 -5 BAR) NE SE PRODUIT DANS LA PIÈCE D'INSTALLATION.
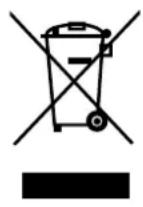
MISE AU REBUT DES ANCIENS APPAREILS
CONFORMÉMENT À LA DIRECTIVE EUROPÉENNE 2012/19/UE ET À LA LÉGISLATION LOCALE SUR LES DÉCHETS D'ÉQUIPEMENTS ÉLECTRIQUES ET ÉLECTRONIQUES USAGÉS, CET APPAREIL EST MARQUÉ AVEC LE SYMBOLE DE LA POUBELLE BARRÉE.
CET ÉTIQUETAGE INDIQUE QUE L'APPAREIL NE DOIT PAS ÊTRE JETÉ AVEC LES DÉCHETS MÉNAGERS.
RECOMMANDATIONS ET SUGGESTIONS
INSTALLATION
natural_image
Technical line drawing of a device interior with a fan and labeled component A (no text or symbols beyond label)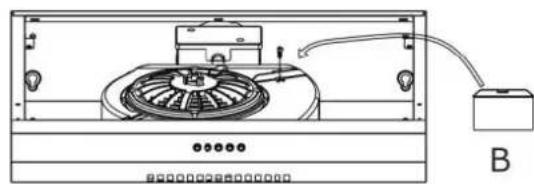
natural_image
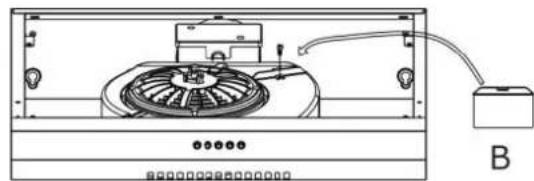
Technical line drawing of a mechanical device with internal components and a labeled component B (no text or symbols present)
natural_image
Line drawing of a kitchen chimney with ventilation slots and a circular component labeled 'C' (no text or symbols beyond label)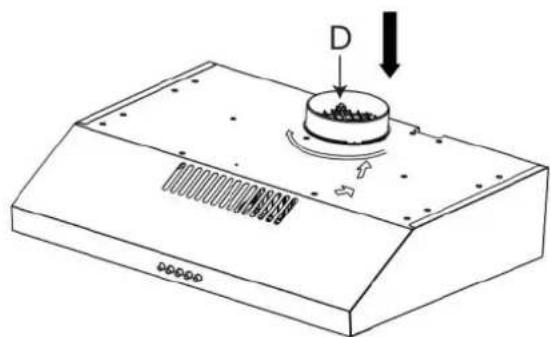
natural_image
Technical line drawing of a kitchen chimney with a circular component and directional arrows (no text or symbols)natural_image
Technical diagram of an electronic device showing internal components and wiring (no text or labels)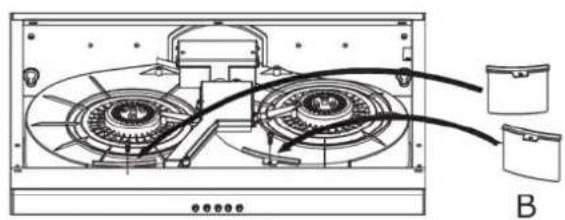
natural_image
Technical diagram of an electronic device showing internal components and wiring (no text or labels)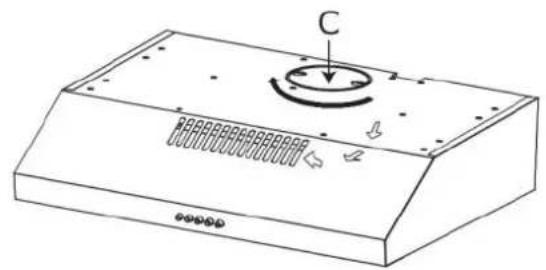
natural_image
Line drawing of a kitchen chimney with ventilation slots and a circular component labeled 'C' (no text or symbols beyond label)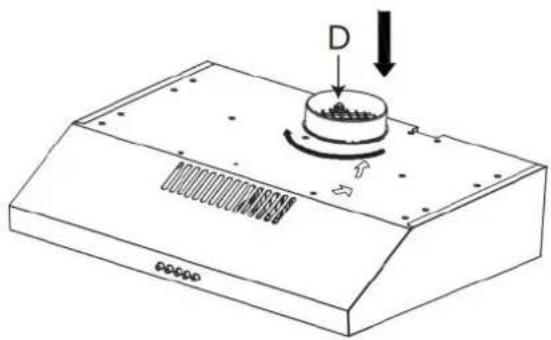
natural_image
Technical line drawing of a kitchen chimney with a circular component and directional arrows (no text or symbols)VÉRIFIEZ TOUJOURS QUE LE(S) CLAPET(S) MONTÉ(S) EST/SONT ADAPTÉ(S).
natural_image
Pure schematic diagram of a room layout with directional arrows and components, no text or symbols present.natural_image
Diagram of a device with directional arrows indicating movement or force (no text or symbols present)RACCORDEMENT ÉLECTRIQUE
natural_image
Diagram showing a cylindrical component being lowered into a base, with no text or symbols present.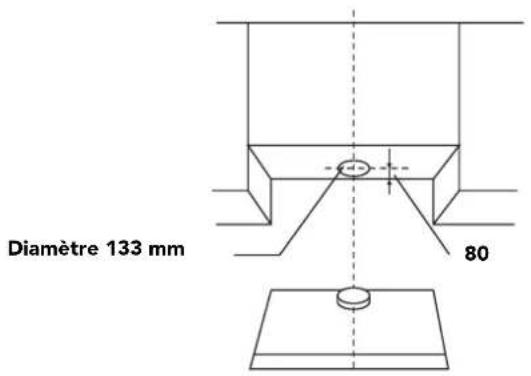

REPLACEMENT DES LEDS
CONFORMITÉ AVEC LA NORME ROHS
natural_image
Recycling symbol with four arrows forming a triangle (no text or labels)GLEMGAS
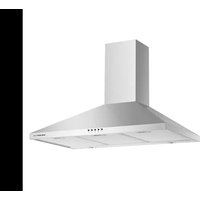
USER MANUAL
CLASSIC HOOD
natural_image
Line drawing of a standard front-end air conditioner unit (no text or symbols)Thank you for choosing Airlux. Before using your new product, please read this manual thoroughly to ensure that you know how to operate the features and functions that your new appliance offers in a safe way.
Warning notices: Before using this product, please read this manual carefully and keep it for future reference. The design and specifications are subject to change without prior notice for product improvement. Consult with your dealer or manufacturer for details. The diagram above is just for reference. Please take the appearance of the actual product as the standard.
CONTENTS
WARNING 23
RECOMMENDATIONS AND SUGGESTIONS 24
TECHNICAL SPECIFICATIONS 26
INSTALLATION 27
OPERATION 32
APPLIANCE MAINTENANCE 33
DISPOSAL AND RECYCLING 35
WARNING
IN CERTAIN CIRCUMSTANCES ELECTRICAL APPLIANCES MAY BE A DANGER HAZARD.
- DO NOT CHECK THE STATUS OF THE FILTERS WHILE THE RANGE HOOD IS OPERATING.
- DO NOT TOUCH THE LIGHT BULBS AFTER APPLIANCE USE.
- DO NOT DISCONNECT THE APPLIANCE WITH WET HANDS.
- AVOID FREE FLAME, AS IT IS DAMAGING FOR THE FILTERS AND A FIRE HAZARD.
- CONSTANTLY CHECK FOOD FRYING. OVERHEATED OIL MAY BECOME A FIRE HAZARD.
- DISCONNECT THE ELECTRICAL PLUG PRIOR TO ANY MAINTENANCE.
- CAUTION: ACCESSIBLE PARTS MAY BECOME HOT WHEN USED WITH COOKING APPLIANCES.
- DON'T USE THIS PRODUCT OUTDOORS.
- THIS DEVICE MAY BE USED BY CHILDREN OF AT LEAST 8 YEARS OF AGE AND BY PERSONS WITH REDUCED PHYSICAL, SENSORY OR MENTAL CAPACITIES OR WITHOUT EXPERIENCE OR KNOWLEDGE, IF THEY ARE PROPERLY SUPERVISED OR IF THEY HAVE BEEN GIVEN INSTRUCTIONS RELATING TO THE SAFE USE OF THE DEVICE AND THE RISKS INVOLVED HAVE BEEN UNDERSTOOD. CHILDREN MUST NOT PLAY WITH THE DEVICE. CLEANING AND USER MAINTENANCE SHALL NOT BE MADE BY CHILDREN WITHOUT SUPERVISION.
- THERE SHALL BE ADEQUATE VENTILATION OF THE ROOM WHEN THE RANGE HOOD IS USED AT THE SAME TIME AS APPLIANCES BURNING GAS OR OTHER FUELS (NOT APPLICABLE TO RECYCLING MODE).
- THERE IS A FIRE RISK IF CLEANING IS NOT CARRIED OUT IN ACCORDANCE WITH THE INSTRUCTIONS.
- DO NOT FLAMBÉ UNDER THE RANGE HOOD.
- WHEN AN EXHAUST-TYPE RANGE HOOD IS OPERATED SIMULTANEOUSLY WITH FIREPLACES IT SHALL BE ENSURED THAT NO DANGEROUS NEGATIVE PRESSURE GREATER THAN 4 PA (4×10 -5 BAR) CAN ARISE IN THE INSTALLATION ROOM.
DISPOSAL OF OLD APPLIANCE
IN ACCORDANCE WITH EUROPEAN DIRECTIVE 2012/19/EU AND LOCAL LEGISLATION REGARDING USED ELECTRICAL AND ELECTRONIC GOODS, THIS APPLIANCE IS MARKED WITH THE SYMBOL OF THE CROSSED-OUT WASTE CONTAINER.
THIS MARKING INDICATES THAT THE APPLIANCE MUST NOT BE DISPOSED OF TOGETHER WITH OTHER HOUSEHOLD WASTE AFTER IT HAS BEEN USED.
THE USER IS OBLIGED TO HAND IT OVER TO WASTE COLLECTION CENTRE COLLECTING USED ELECTRICAL AND ELECTRONIC GOODS. THE COLLECTORS, INCLUDING LOCAL COLLECTION POINTS, SHOPS AND LOCAL AUTHORITY DEPARTMENTS PROVIDE RECYCLING SCHEMES.
PROPER HANDLING OF USED ELECTRICAL AND ELECTRONIC GOODS HELPS AVOID ENVIRONMENTAL AND HEALTH HAZARDS RESULTING FROM THE PRESENCE OF DANGEROUS COMPONENTS AND THE INAPPROPRIATE STORAGE AND PROCESSING OF SUCH GOODS.
RECOMMENDATIONS AND SUGGESTIONS
INSTALLATION
- The manufacturer will not be held liable for any damages resulting from incorrect or improper installation.
- Please read this instruction manual before installing and using this range hood. Please keep this instruction manual in a safe place for future reference.
- This range hood can be used either in the Ducted Mode (ducting fumes to the outside) or in the Recirculation Mode (internal recycling). The choice of modes can be left to the customers.
- Only a qualified and trained service technician can undertake the work of installation and servicing.
- Check that the main voltage corresponds to the one indicated on the rating plate fixed inside the hood.
- Do not connect the hood to exhaust ducts carrying combustion fumes (boilers, fireplaces, etc.)
- If the hood is used in conjunction with non-electrical appliances (e. g. gas burning appliances), a sufficient degree of ventilation must be guaranteed in the room in order to prevent the backflow of exhaust gas. The kitchen must have an opening directly with the open air in order to guarantee the entry of clean air.
- The minimum distance between the supporting surface for the cooking vessels on the hob and the lowest part of the range hood: when the range hood is located above a gas appliance, this distance shall be at least 75 cm, when the range hood is located above an electrical appliance, this distance shall be at least 65 cm. If the instructions for installation for the hob specify a greater distance, this has to be taken into account. The distance can be reduced for:
- non-combustible parts of range hoods, or
- parts operating at safety extra low voltage, provided these parts do not give access to live parts if deformed.
- NOTICE: Two or more people are required to install or move this appliance. Failure to do so can cause physical injuries.
USE
- The range hood has been designed only for domestic use to eliminate kitchen fumes.
- Never use the hood for purposes other than what it has been designed for.
- Never leave high naked flames under the hood when it is in operation.
- Adjust the flame intensity to direct it onto the bottom of the pan only; making sure that it does not engulf the pan sides.
- Deep fat fryer must be continuously monitored during use: overheated oil can burst into flame.
- The hood should not be used by children or persons not instructed in its correct use.
MAINTENANCE
- Proper maintenance of the range hood will assure proper performance of the unit.
- Disconnect the hood from the main supply before carrying out any maintenance work.
- Clean and/or replace aluminum grease filters and activated charcoal filters after specified period of time.
- Clean the hood using a damp cloth and a neutral liquid detergent.
- DISPOSAL: Do not dispose this product as unsorted municipal waste. Collection of such waste separately for special treatment is necessary.
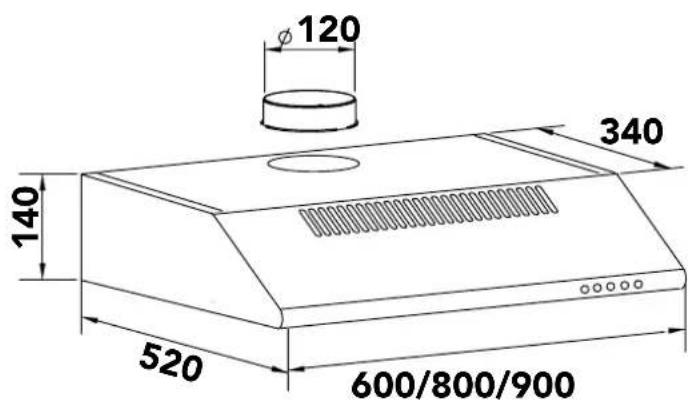
CHARACTERISTICS
DIMENSIONS
INSTALLATION
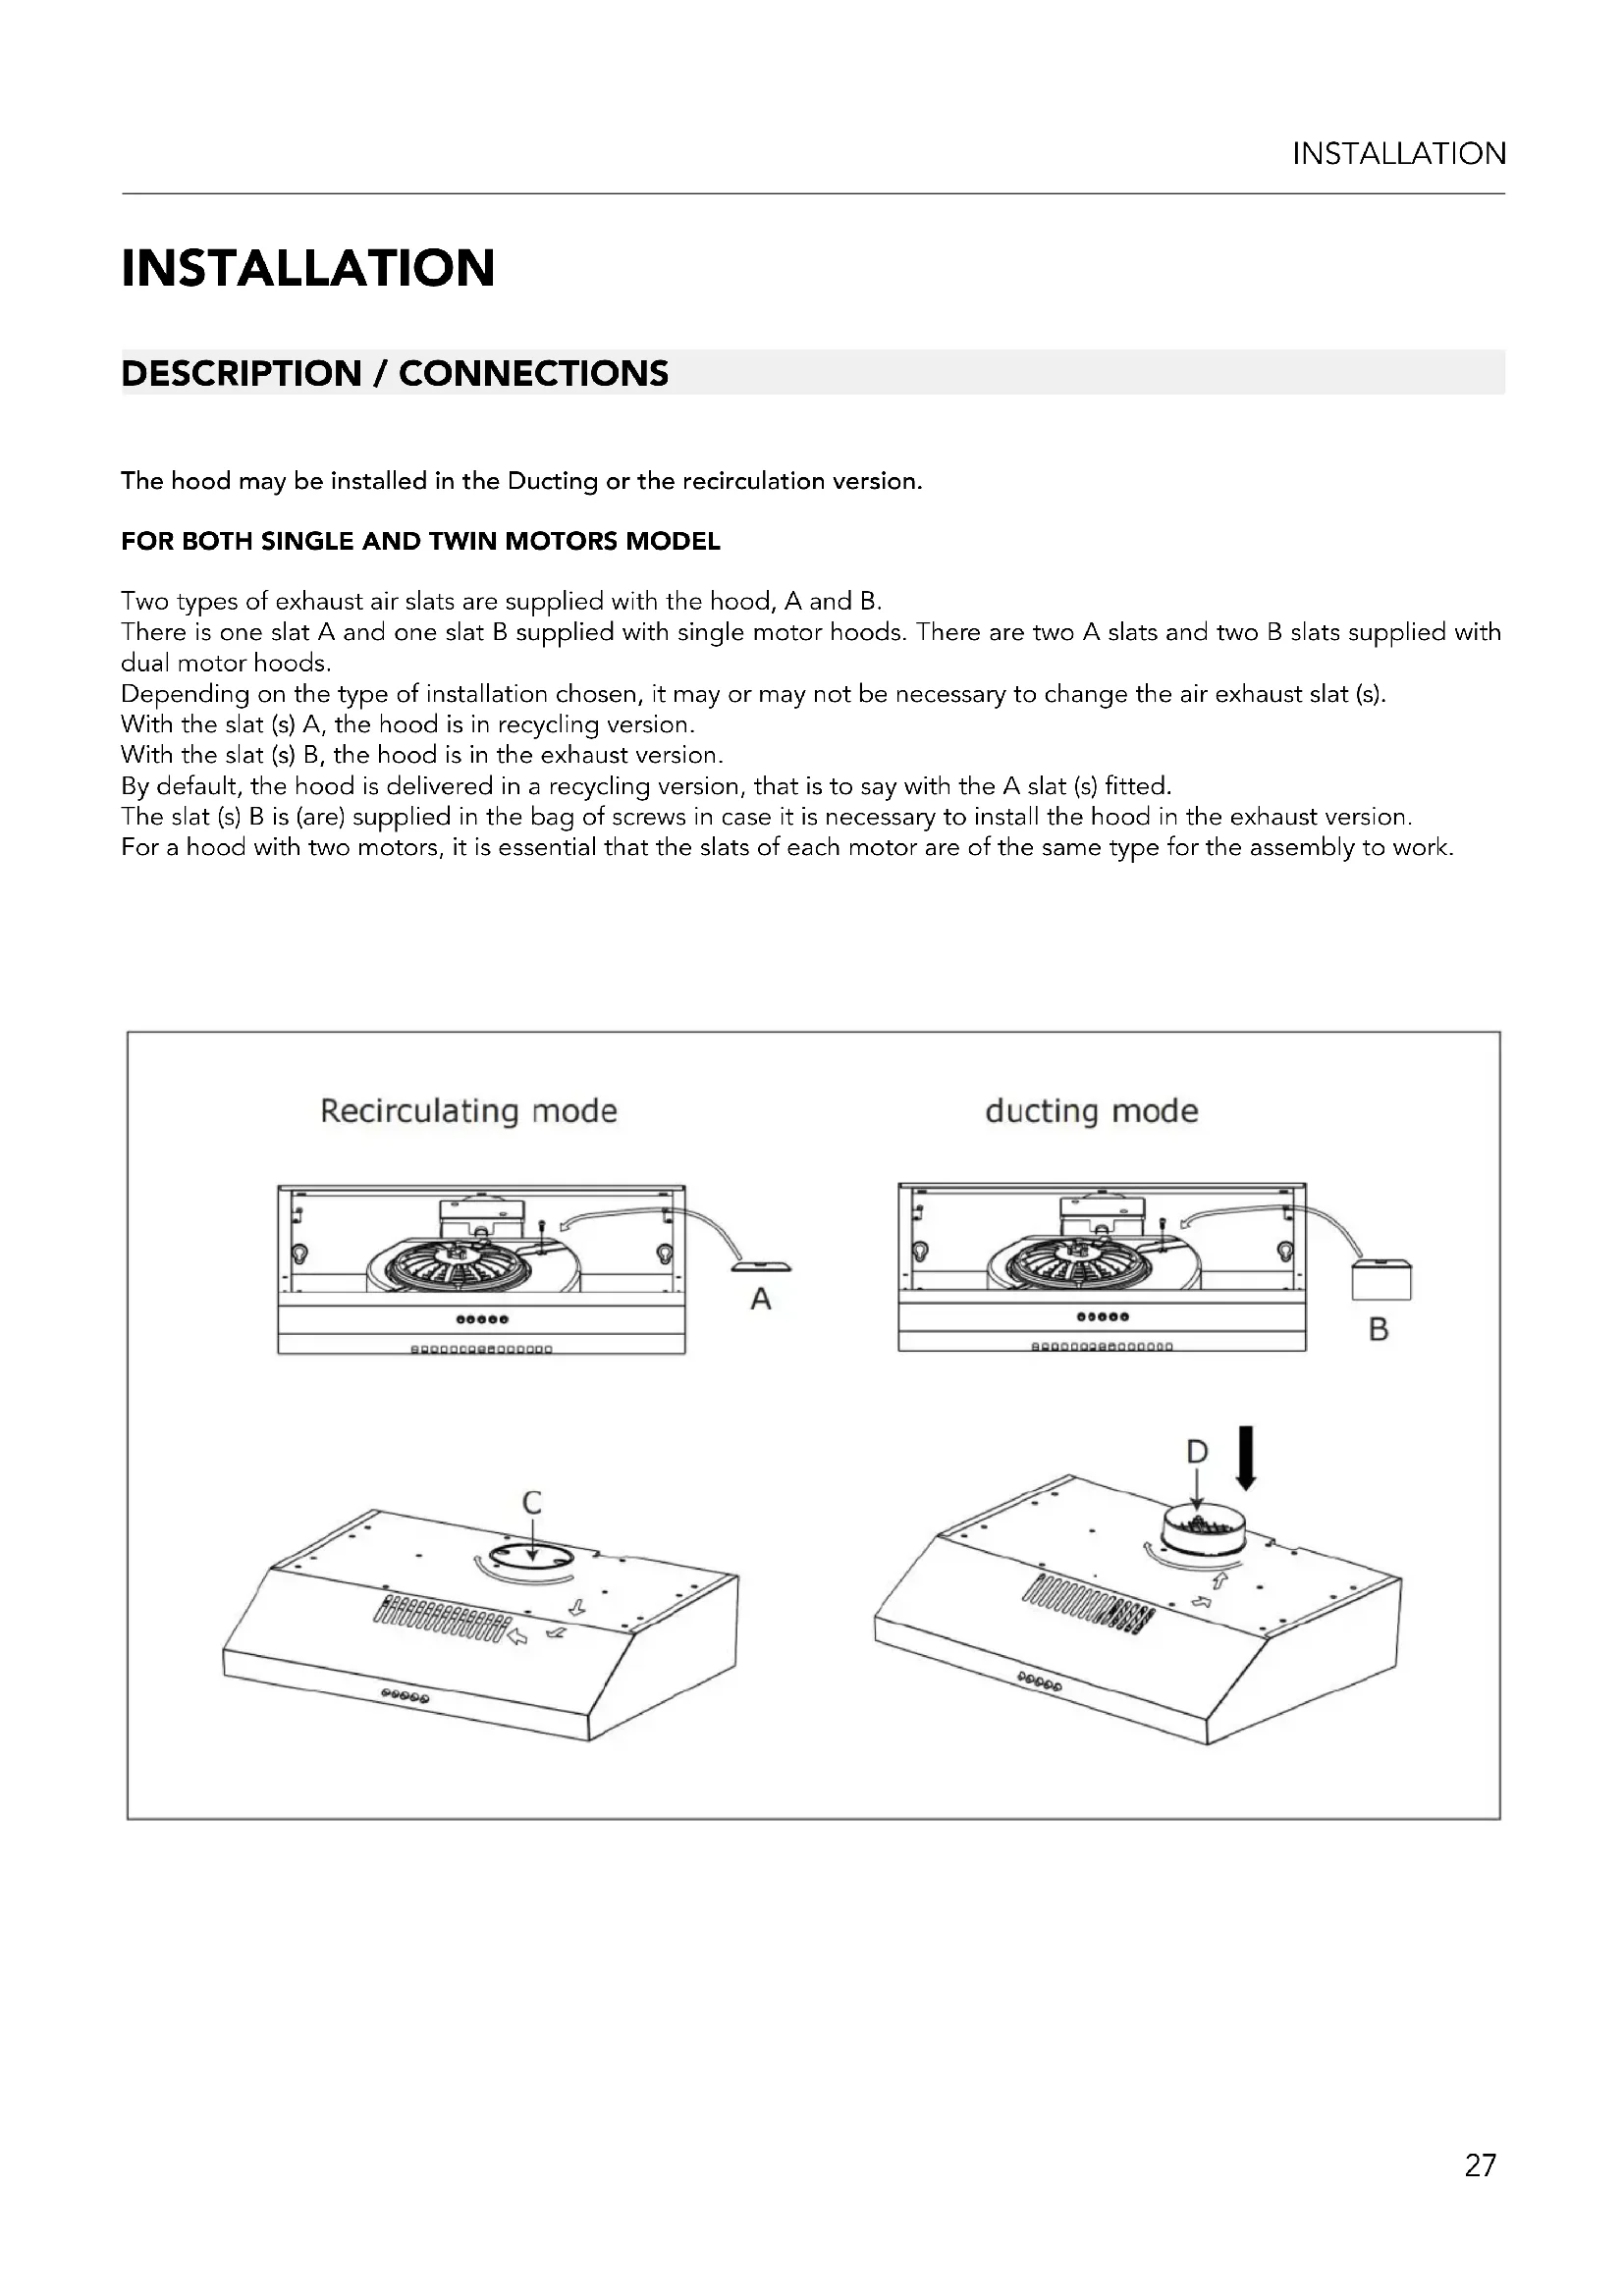
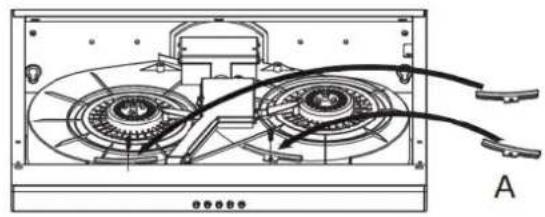
DESCRIPTION / CONNECTIONS
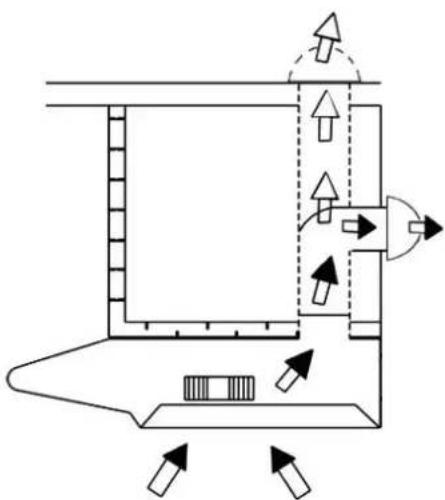
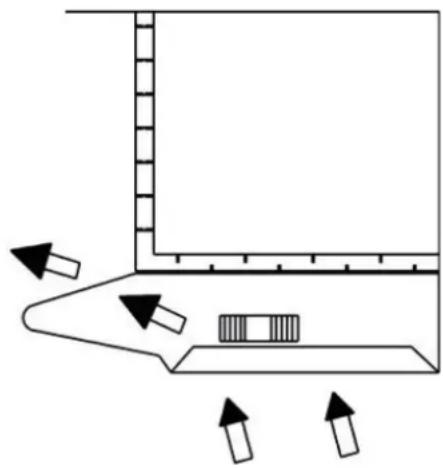
The hood may be installed in the Ducting or the recirculation version.
FOR BOTH SINGLE AND TWIN MOTORS MODEL
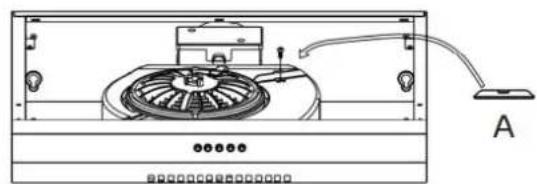
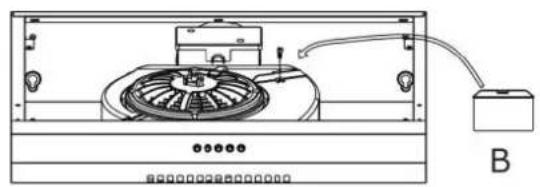
Two types of exhaust air slats are supplied with the hood, A and B.
There is one slat A and one slat B supplied with single motor hoods. There are two A slats and two B slats supplied with dual motor hoods.
Depending on the type of installation chosen, it may or may not be necessary to change the air exhaust slat (s).
With the slat (s) A, the hood is in recycling version.
With the slat (s) B, the hood is in the exhaust version.
By default, the hood is delivered in a recycling version, that is to say with the A slat (s) fitted.
The slat (s) B is (are) supplied in the bag of screws in case it is necessary to install the hood in the exhaust version.
For a hood with two motors, it is essential that the slats of each motor are of the same type for the assembly to work.
Recirculating mode
natural_image
Technical line drawing of a mechanical device with a central fan and labeled component A (no text or symbols beyond label)ducting mode
natural_image
Technical line drawing of a device interior with fan and power outlet (no text or symbols)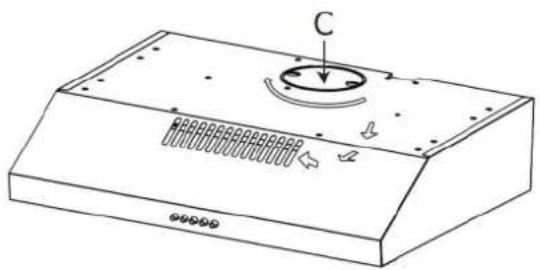
natural_image
Technical line drawing of a kitchen chimney with ventilation slots and a circular component labeled 'C' (no text or symbols beyond label)
natural_image
Technical line drawing of a kitchen chimney with a circular component and directional arrows (no text or symbols)Recirculation

natural_image
Technical diagram of an electronic device showing internal components and wiring (no text or labels)Ducting

natural_image
Technical diagram of an electronic device showing internal components and wiring connections (no text or labels)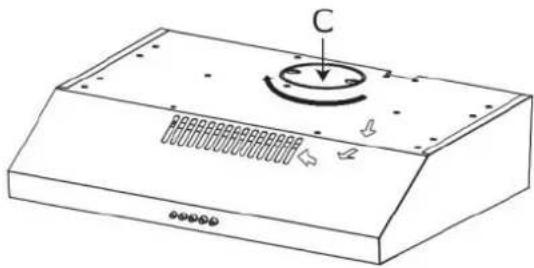
natural_image
Line drawing of a kitchen air conditioner unit with labeled component C (no text or symbols beyond label)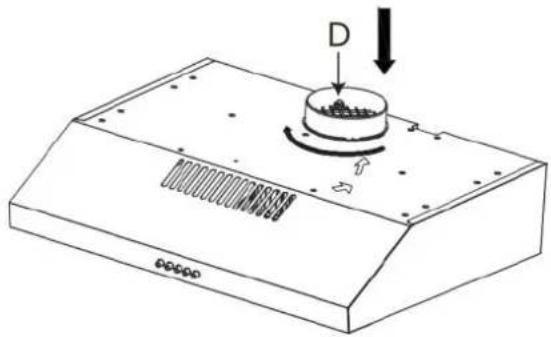
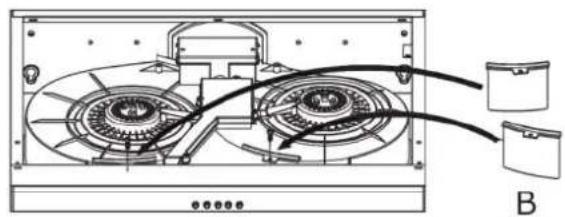
SYSTEMICALLY CHECK THAT THE MOUNTED SLAT(S) IS (ARE) CORRECT.
By default, the slat installed on each motor is slat A, intended for operation in recycling version.
To switch to the evacuation version, first remove aluminum filter, then replace the slat A with the slat B kept in the bag with the spare parts.
Remove the air outlet hatch and install the air outlet adapter with the nonreturn valve.
Carbon filters are not necessary in the exhaust version. If they are mounted, remove them.
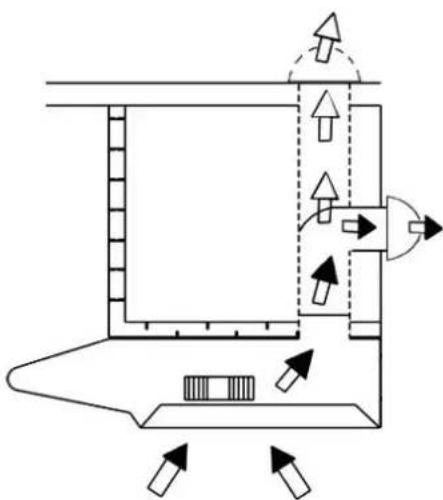
DUCTING VERSION
The hood draws the cooking fumes saturated with fumes and odor, through the grease filters and expels it to the outside through an outlet pipe. With
this version the charcoal filters are not required.
-
Decide where the ductwork will run between the hood and the outside.
-
A straight, short duct run will allow the hood to perform most efficiently.
-
Long duct runs, elbows, and transitions will reduce the performance of the hood. Use as few of them as possible. Larger ducting may be required for best performance with longer duct runs.
-
The air must not be discharged into a flue that is used for exhausting fumes from appliances burning gas or other fuels. Regulations
natural_image
Pure schematic diagram of a mechanical or electrical component with directional arrows and no text or symbolsconcerning the discharge of air have to be followed. Check with the local authority and building codes for exhaust ducting requirements.
- Install a roof/wall cap. Connect round metal ductwork to cap and work back towards hood location.
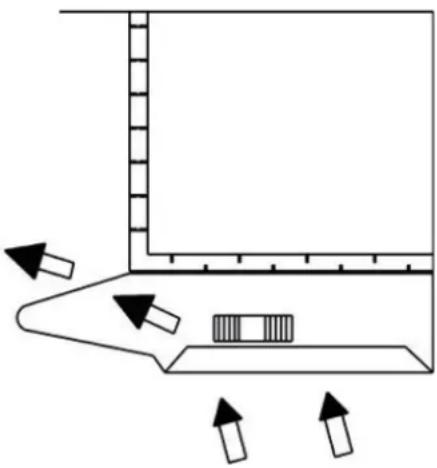
INSTALLATION - RECIRCULATION VERSION
The hood draws cooking fumes saturated with fumes and odor through the grease filters and charcoal filters and returns clean air into the room. For constant efficiency, the charcoal filters must be replaced periodically.
Caution: No need for plastic or rigid metal ducting.
- Install the charcoal filter.
- Please note that the air is re-circulated into the room through the front vents.
Decide from the outset on the type of installation (recirculation or ducting). For greater efficiency, we recommend you install the hood in the ducting version.
natural_image
Diagram showing a mechanical or electrical component with directional arrows indicating movement or force (no text or symbols present)ELECTRICAL CONNECTION
- Electrical wiring must be done by a qualified person(s) in accordance with all applicable codes and standards. Turn off electrical power at service entrance before wiring.
- If the supply cord is damaged, it must be replaced by the manufacturer, its service agent or similarly qualified persons in order to avoid a hazard.
- Do not use the plug and an extension cord other than the ones initially supplied with the hood.
Before beginning installation, to better handle the hood, we advise removing the filter.
Before fixing, the outlet exhaust duct for air evacuation to the outside must be installed.
Use an outlet exhaust duct with:
- minimum indispensable length;
-Minimum possible bends (maximum angle of bend: 90°);
-certified material (according to local, building & fire regulations); and as smooth as possible inside.
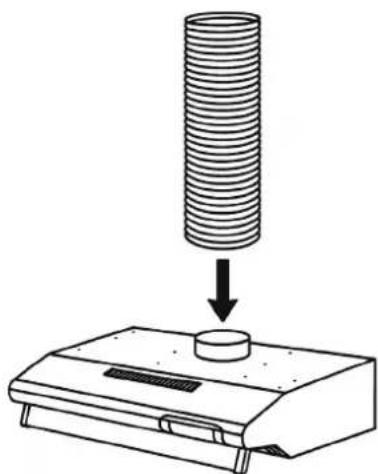
It is also advisable to avoid any drastic changes in duct cross-section (recommended diameter: 125mm).

natural_image
Diagram showing a cylindrical component being lowered into a base, with no text or symbols present.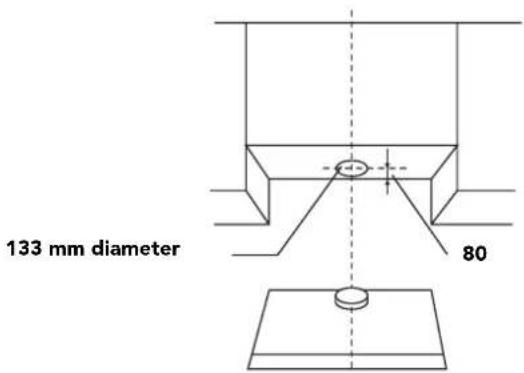
Drill the hole in the kitchen unit for the air outlet (133 mm diameter).
Proceed with fixing the hood: Based on your requirements, you can fit the hood on the wall or on a wall unit of your kitchen. IMPORTANT: Respect the distance between the hob and the lower part of the hood, which must be at least :
- 650 mm for an electric hob
- and 750 mm for a gas hob.
A) Fixing to the wall
-
Draw a line on the wall in vertical line with your hob.
-
Mark the 2 holes to be drilled in the wall, respecting the distances indicated;
-
Make the 2 holes and fit the 2 screw anchors 10X45 provided or another ones, but always adapted to the type of wall. Take
2 of the screws ST5x50 provided and insert them in the topmost screw anchors without.
- Connect a flexible tube to the hood outlet adapter, using a metal hose clamp. Tube and hose clamps are not provided.

- Make the electrical connection.
OPERATION
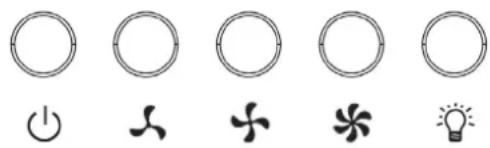
The hood is operated using the push button on/off of the front panel. The light switch turns the lamps on and off. The fan switch turns the fan on to three speed settings:

Commandes disponibles
On / Off
- Low
- Medium
- High
Light
The hood is operated using the on/off push buttons located on the front panel.
The dedicated switch allows the lighting to be turned on or off.
The extraction speed is adjusted using one of the three push buttons, depending on the desired power level.
Recommended Usage & Optimization Tips
| Cooking Type Recommended Speed Practical Tips | ||
| Reheating / Keeping warm | Speed 1 (Low) Ideal for low steam emissions, with minimal noise. | |
| Boiling / Gentle steaming | Speed 1 to 2 | - Pre-activation: Turn on the hood 2 to 5 minutes before cooking to establish an effective airflow.- Post-use: Let the hood run for 10 to 15 minutes after cooking to remove residual humidity and odors. |
| Slow cooking / Grilling Speed 2 (Medium) | Keep the hood running for another 10 minutes after cooking to eliminate odors. | |
| Frying / High-heat cooking / Wok Speed 3 (Maximum) | Use a lid on pans to reduce grease splatter and improve hood efficiency. | |
- Prevent grease buildup: Clean the filters regularly to maintain optimal airflow and reduce noise.
- Choose ducted version if possible: Offers better extraction performance than recirculation mode.
- Minimize noise: Regular maintenance of filters, motor, and ducts reduces vibrations and operating noise.
MAINTENANCE
Regular maintenance of your range hood is essential to ensure proper operation, extend the lifespan of the appliance, and maintain good air quality in your kitchen.
Grease filters collect cooking particles and must be cleaned frequently to prevent motor clogging and reduced extraction efficiency. Charcoal filters, used in recirculation mode, must be replaced periodically to ensure effective odor absorption.
Neglecting maintenance can result in increased energy consumption, excessive noise, and a higher risk of fire due to the accumulation of flammable grease.
| Filter Type Frequency Maintenance Method | ||
| Grease filter (aluminum or stainless steel) | Every 3 to 4 weeks | - Remove the filters- Clean with hot water + dish soap or baking soda- Washable by hand or in a dishwasher (low temperature recommended)- Let dry completely before reinstalling |
| Activated charcoal filter (recirculation only) | Every 3 months (or more often depending on usage) | - Not washable (unless regenerable model)- Replace when saturated (reduced odor absorption, visible grease) |
For grease filters, soaking them in hot water with white vinegar and baking soda is a very effective and natural cleaning method.
LED REPLACEMENT
LED square lamp for AHC620 GHC620 BTHC620.
This range hood requires led lamp (AC 230V 50hz, 1X2W Max).
Replacement step as below:
A. Remove the aluminum filter.
B. Find the lamp wire terminal along the lamp wire and disconnect the lamp wire with lamp wire terminal.
C. Put your thumbs on the lamp, and gently push the lamp out of the light board from behind the lamp.
D. Take a new lamp and install it on the light board, reconnect the lamp wire with wire terminal, install the aluminum filter.
LED round lamp for AHC632 GHC632 BHC630 DTHC630 AHC 830 AHC930.
This range hood requires led lamp (AC 230V 50hz, 2x2W Max).
Replacement step as below:
A. Remove the aluminum filter.
B. Open the wire cover, find the lamp wire terminal along the lamp wire and disconnect the lamp wire with lamp wire terminal.
C. Put your thumbs on the lamp and gently push the lamp out of the light board from behind the lamp.
D. Take the new lamp and install it on the light board, reconnect the lamp wire with wire terminal, install the aluminum filter.
HOOD CLEANING
General maintenance of the hood helps preserve its efficiency and prevents grease buildup that could impair performance.
Exterior: Clean regularly with a soft, damp cloth and a non-abrasive degreaser.
Stainless steel surfaces: Use a dedicated stainless steel cleaner to avoid streaks and maintain shine.
Interior: Wipe down the inner surfaces periodically to prevent grease deposits.
Motor and ducts: Clean once a year to prevent clogging and maintain proper airflow.
Always disconnect the appliance from the power supply before performing any maintenance.
RISKS OF INADEQUATE MAINTENANCE
Failing to maintain your range hood properly can lead to several issues, including:
Grease buildup : Increased fire hazard
Reduced extraction efficiency
Higher energy consumption
Increased noise levels
Persistent unpleasant odors in the kitchen
DISPOSAL AND RECYCLING
IMPORTANT INSTRUCTIONS FOR ENVIRONMENTAL PROTECTION
This appliance complies with European Directive 2012/19/EU on Waste Electrical and Electronic Equipment (WEEE). To ensure proper disposal of this appliance, please return it to an appropriate collection point for WEEE recycling. By disposing of it correctly, you help prevent potential harm to the environment and human health that may result from improper disposal.
This symbol indicates that the product must not be disposed of with household waste. The used appliance must be returned to a designated collection point for the recycling of electrical and electronic devices. To locate these collection systems, please contact your local waste management authority or your retailer.
Each of us plays an important role in recovering and recycling old appliances. Proper disposal of used appliances helps prevent negative environmental and health impacts.
COMPLIANCE WITH ROHS STANDARD
This appliance requires specialized waste disposal and must not be disposed of with regular household waste. For detailed information on how to treat, recover, and recycle this product, please contact: Your local waste collection service, or the store where you purchased the appliance.
They can provide specific instructions for proper and environmentally friendly disposal.
COLLECTION AND RECYCLING OF PACKAGING MATERIALS
The packaging materials of this product are made from recyclable materials, in accordance with environmental regulations. Do not dispose of packaging with household waste. Take the materials to designated packaging waste collection points, as specified by local authorities.
natural_image
Recycling symbol with three arrows forming a triangle (no text or labels)GLEMGAS
BEDIENUNGSANLEITUNG
KLASSISCHE HAUBE

natural_image
Line drawing of a standard front-end air conditioner oven with ventilation slots and a circular vent (no text or symbols)natural_image
Technical line drawing of a device interior with labeled component A (no text or symbols beyond label)ducting mode
natural_image
Technical line drawing of a device with fan and control panel (no text or symbols)
natural_image
Technical line drawing of a kitchen chimney with ventilation slots and a circular component labeled 'C' (no text or symbols beyond label)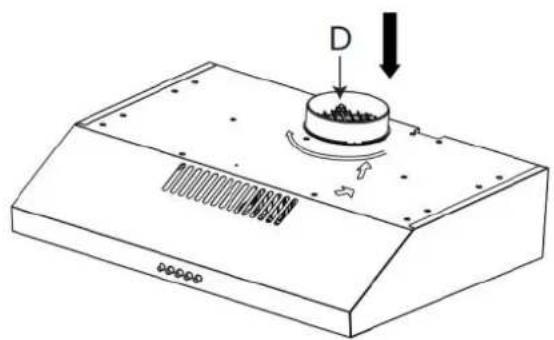
natural_image
Technical line drawing of a kitchen chimney with a circular component and directional arrows (no text or symbols)Recirculation
natural_image
Technical diagram of an electronic device showing internal components and wiring (no text or labels)Ducting
natural_image
Technical diagram of an electronic device showing internal components and wiring connections (no text or labels)
natural_image
Line drawing of a kitchen air conditioner unit with labeled component C (no text or symbols beyond label)
SYSTEMATISCHE KONTROLLE DER MONTIERTEN LAMELLEN
natural_image
Pure schematic diagram of a room layout with directional arrows and components, no text or symbols present.natural_image
Diagram of a computer monitor with directional arrows indicating sound or motion (no text or symbols)natural_image
Diagram showing a cylindrical object being lowered into a base, with no text or symbols present.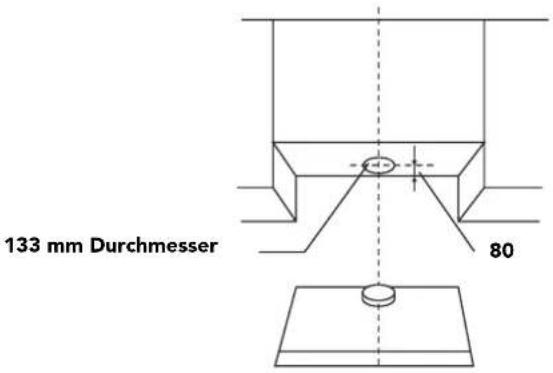
natural_image
Recycling symbol with three chasing arrows forming a triangle (no text or labels)GLEMGAS
GEBRUIKSAANWIJZING
KLASSIEKE KAP
natural_image
Line drawing of a kitchen air conditioner unit with ventilation slots and ventilation grille (no text or symbols)The hood may be installed in the Ducting or the recirculation version.
FOR BOTH SINGLE AND TWIN MOTORS MODEL
Two types of exhaust air slats are supplied with the hood, A and B.
There is one slat A and one slat B supplied with single motor hoods. There are two A slats and two B slats supplied with dual motor hoods.
Depending on the type of installation chosen, it may or may not be necessary to change the air exhaust slat (s).
With the slat (s) A, the hood is in recycling version.
With the slat (s) B, the hood is in the exhaust version.
By default, the hood is delivered in a recycling version, that is to say with the A slat (s) fitted.
The slat (s) B is (are) supplied in the bag of screws in case it is necessary to install the hood in the exhaust version.
For a hood with two motors, it is essential that the slats of each motor are of the same type for the assembly to work.
Recirculating mode

natural_image
Technical line drawing of a mechanical device with labeled component A (no text or symbols beyond label)ducting mode

natural_image
Technical line drawing of a device with fan and control panel (no text or symbols)
natural_image
Technical line drawing of a kitchen chimney with ventilation slots and a circular component labeled 'C' (no text or symbols beyond label)
natural_image
Technical line drawing of a kitchen chimney with a circular component and directional arrows (no text or symbols)Recirculation

natural_image
Technical diagram of an electronic device showing internal components and wiring (no text or labels)Ducting

natural_image
Technical diagram of an electronic device showing internal components and wiring connections (no text or labels)
natural_image
Line drawing of a kitchen air conditioner unit with labeled component C (no text or symbols beyond label)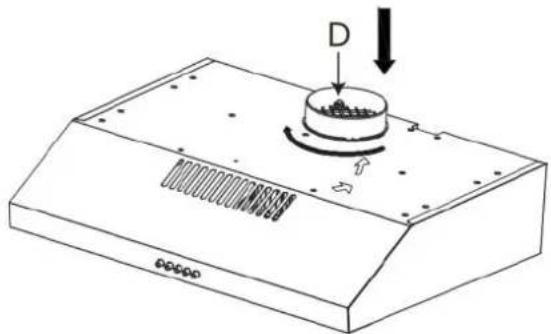
natural_image
Technical line drawing of a kitchen chimney with a circular component and directional arrows (no text or symbols)SYSTEMICALLY CHECK THAT THE MOUNTED SLAT(S) IS (ARE) CORRECT.
By default, the slat installed on each motor is slat A, intended for operation in recycling version.
To switch to the evacuation version, first remove aluminum filter, then replace the slat A with the slat B kept in the bag with the spare parts.
Remove the air outlet hatch and install the air outlet adapter with the nonreturn valve.
Carbon filters are not necessary in the exhaust version. If they are mounted, remove them.
DUCTING VERSION
The hood draws the cooking fumes saturated with fumes and odor, through the grease filters and expels it to the outside through an outlet pipe. With
this version the charcoal filters are not required.
-
Decide where the ductwork will run between the hood and the outside.
-
A straight, short duct run will allow the hood to perform most efficiently.
-
Long duct runs, elbows, and transitions will reduce the performance of the hood. Use as few of them as possible. Larger ducting may be required for best performance with longer duct runs.
-
The air must not be discharged into a flue that is used for exhausting fumes from appliances burning gas or other fuels. Regulations
natural_image
Pure schematic diagram of a mechanical or electrical component with directional arrows and no text or symbolsconcerning the discharge of air have to be followed. Check with the local authority and building codes for exhaust ducting requirements.
- Install a roof/wall cap. Connect round metal ductwork to cap and work back towards hood location.
INSTALLATION - RECIRCULATION VERSION
The hood draws cooking fumes saturated with fumes and odor through the grease filters and charcoal filters and returns clean air into the room. For constant efficiency, the charcoal filters must be replaced periodically.
Caution: No need for plastic or rigid metal ducting.
- Install the charcoal filter.
- Please note that the air is re-circulated into the room through the front vents.
Decide from the outset on the type of installation (recirculation or ducting). For greater efficiency, we recommend you install the hood in the ducting version.
natural_image
Diagram of a computer monitor with directional arrows indicating sound or motion (no text or symbols)ELECTRICAL CONNECTION
- Electrical wiring must be done by a qualified person(s) in accordance with all applicable codes and standards. Turn off electrical power at service entrance before wiring.
- If the supply cord is damaged, it must be replaced by the manufacturer, its service agent or similarly qualified persons in order to avoid a hazard.
- Do not use the plug and an extension cord other than the ones initially supplied with the hood.
Before beginning installation, to better handle the hood, we advise removing the filter.
Before fixing, the outlet exhaust duct for air evacuation to the outside must be installed.
Use an outlet exhaust duct with:
- minimum indispensable length;
-Minimum possible bends (maximum angle of bend: 90°);
-certified material (according to local, building & fire regulations); and as smooth as possible inside.
It is also advisable to avoid any drastic changes in duct cross-section (recommended diameter: 125mm).
natural_image
Diagram showing a cylindrical component being lowered into a base, with no text or symbols present.
Drill the hole in the kitchen unit for the air outlet (133 mm diameter).
Proceed with fixing the hood: Based on your requirements, you can fit the hood on the wall or on a wall unit of your kitchen. IMPORTANT: Respect the distance between the hob and the lower part of the hood, which must be at least :
- 650 mm for an electric hob
- and 750 mm for a gas hob.
A) Fixing to the wall
- Draw a line on the wall in vertical line with your hob. Mark the 2 holes to be drilled in the wall, respecting the distances indicated; Make the 2 holes and fit the 2 screw anchors 10X45 provided or another ones, but always adapted to the type of wall. Take 2 of the screws ST5x50 provided and insert them in the topmost screw anchors without. Connect a flexible tube to the hood outlet adapter, using a metal hose clamp. Tube and hose clamps are not provided.

Make the electrical connection.
OPERATION
The hood is operated using the push button on/off of the front panel. The light switch turns the lamps on and off. The fan switch turns the fan on to three speed settings:
Commandes disponibles
On / Off
- Low
- Medium
- High
Light
The hood is operated using the on/off push buttons located on the front panel.
The dedicated switch allows the lighting to be turned on or off.
The extraction speed is adjusted using one of the three push buttons, depending on the desired power level.
Recommended Usage & Optimization Tips
| Cooking Type Recommended Speed Practical Tips | ||
| Reheating / Keeping warm | Speed 1 (Low) Ideal for low steam emissions, with minimal noise. | |
| Boiling / Gentle steaming | Speed 1 to 2 | - Pre-activation: Turn on the hood 2 to 5 minutes before cooking to establish an effective airflow.- Post-use: Let the hood run for 10 to 15 minutes after cooking to remove residual humidity and odors. |
| Slow cooking / Grilling Speed 2 (Medium) | Keep the hood running for another 10 minutes after cooking to eliminate odors. | |
| Frying / High-heat cooking / Wok Speed 3 (Maximum) | Use a lid on pans to reduce grease splatter and improve hood efficiency. | |
- Prevent grease buildup: Clean the filters regularly to maintain optimal airflow and reduce noise.
- Choose ducted version if possible: Offers better extraction performance than recirculation mode.
- Minimize noise: Regular maintenance of filters, motor, and ducts reduces vibrations and operating noise.
MAINTENANCE
Regular maintenance of your range hood is essential to ensure proper operation, extend the lifespan of the appliance, and maintain good air quality in your kitchen.
Grease filters collect cooking particles and must be cleaned frequently to prevent motor clogging and reduced extraction efficiency. Charcoal filters, used in recirculation mode, must be replaced periodically to ensure effective odor absorption.
Neglecting maintenance can result in increased energy consumption, excessive noise, and a higher risk of fire due to the accumulation of flammable grease.
| Filter Type Frequency Maintenance Method | ||
| Grease filter (aluminum or stainless steel) | Every 3 to 4 weeks | - Remove the filters- Clean with hot water + dish soap or baking soda- Washable by hand or in a dishwasher (low temperature recommended)- Let dry completely before reinstalling |
| Activated charcoal filter (recirculation only) | Every 3 months (or more often depending on usage) | - Not washable (unless regenerable model)- Replace when saturated (reduced odor absorption, visible grease) |
For grease filters, soaking them in hot water with white vinegar and baking soda is a very effective and natural cleaning method.
LED REPLACEMENT
LED square lamp for AHC620 GHC620 BTHC620.
This range hood requires led lamp (AC 230V 50hz, 1X2W Max).
Replacement step as below:
A. Remove the aluminum filter.
B. Find the lamp wire terminal along the lamp wire and disconnect the lamp wire with lamp wire terminal.
C. Put your thumbs on the lamp, and gently push the lamp out of the light board from behind the lamp.
D. Take a new lamp and install it on the light board, reconnect the lamp wire with wire terminal, install the aluminum filter.

LED round lamp for AHC632 GHC632 BHC630 DTHC630 AHC 830 AHC930.
This range hood requires led lamp (AC 230V 50hz, 2x2W Max).
Replacement step as below:
A. Remove the aluminum filter.
B. Open the wire cover, find the lamp wire terminal along the lamp wire and disconnect the lamp wire with lamp wire terminal.
C. Put your thumbs on the lamp and gently push the lamp out of the light board from behind the lamp.
D. Take the new lamp and install it on the light board, reconnect the lamp wire with wire terminal, install the aluminum filter.
HOOD CLEANING
General maintenance of the hood helps preserve its efficiency and prevents grease buildup that could impair performance.
Exterior: Clean regularly with a soft, damp cloth and a non-abrasive degreaser.
Stainless steel surfaces: Use a dedicated stainless steel cleaner to avoid streaks and maintain shine.
Interior: Wipe down the inner surfaces periodically to prevent grease deposits.
Motor and ducts: Clean once a year to prevent clogging and maintain proper airflow.
Always disconnect the appliance from the power supply before performing any maintenance.
RISKS OF INADEQUATE MAINTENANCE
Failing to maintain your range hood properly can lead to several issues, including:
Grease buildup : Increased fire hazard
Reduced extraction efficiency
Higher energy consumption
Increased noise levels
Persistent unpleasant odors in the kitchen
natural_image
Recycling symbol with three chasing arrows forming a triangle (no text or labels)