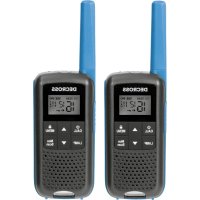
DC43 - Radio transceiver DECROSS - Free user manual and instructions
Find the device manual for free DC43 DECROSS in PDF.

| Product Type | Portable two-way radio |
| Brand | DECROSS |
| Model | DC43 |
| Power supply | 3 AAA batteries (1.5V alkaline or 1.2V rechargeable NiMH) |
| Battery charging | USB Type-C port (5V ~ 1A), for NiMH batteries only |
| Number of channels | 16 |
| Privacy codes | 121 codes |
| VOX function | Hands-free transmission with adjustable sensitivity (L1: low, L2: medium, L3: high) |
| Channel scanning | Automatic search with option to skip channels |
| Dual watch | Alternate monitoring of two channels |
| Call tones | 5 selectable tones |
| End of transmission beep | Roger Beep enable/disable |
| Keypad lock | Prevents accidental changes to settings |
| Built-in flashlight | LED, activation via dedicated button |
| Power saving | Automatic standby mode after 5 seconds of inactivity |
| Storage temperature | -20°C to 35°C, low humidity |
| RF safety | Compliance with ISED guidelines: keep at 25 mm from face when using front |
| Battery maintenance | Remove batteries for prolonged storage; do not mix types; charge NiMH every 3 months |
Frequently Asked Questions - DC43 DECROSS
User questions about DC43 DECROSS
0 question about this device. Answer the ones you know or ask your own.
Ask a new question about this device
Download the instructions for your Radio transceiver in PDF format for free! Find your manual DC43 - DECROSS and take your electronic device back in hand. On this page are published all the documents necessary for the use of your device. DC43 by DECROSS.
USER MANUAL DC43 DECROSS
Any Changes or modifications not expressly approved by the party responsible for compliance could void the user's authority to operate the equipment.
This device complies with part 15 of the FCC Rules. Operation is subject to the following two conditions: (1) This device may not cause harmful interference, and (2) this device must accept any interference received, including interference that may cause undesired operation.
Note: This equipment has been tested and found to comply with the limits for a Class B digital device, pursuant to part 15 of the FCC Rules. These limits are designed to provide reasonable protection against harmful interference in a residential installation. This equipment generates, uses and can radiate radio frequency energy and, if not installed and used in accordance with the instructions, may cause harmful interference to radio communications. However, there is no guarantee that interference will not occur in a particular installation. If this equipment does cause harmful interference to radio or television reception, which can be determined by turning the equipment off and on, the user is encouraged to try to correct the interference by one or more of the following measures:
— Reorient or relocate the receiving antenna.
— Increase the separation between the equipment and receiver.
- Connect the equipment into an outlet on a circuit different from that to which the receiver is connected.
— Consult the dealer or an experienced radio/TV technician for help.
Safety Information for Radios
Your wireless handheld portable transceiver contains a low power transmitter. When the talk button is pushed, it sends out radio frequency (RF) signals. The device is authorized to operate at a duty factor not to exceed 50% . In August 1996, the Federal Communications Commissions (FCC) adopted RF exposure guidelines with safety levels for handheld wireless devices.
Important
FCC RF Exposure Requirements: For body-worn operation, this radio has been tested and meets the FCC RF exposure guidelines when used with accessories supplied or designated for this product. Use of other accessories may not ensure compliance with FCC RF exposure guidelines. Use only the supplied antenna. Unauthorized antennas, modifications or attachments could damage the transmitter and may violate FCC regulations.
Normal Position
Hold the transmitter approximately 25mm from your face and speak in a normal voice, with the antenna pointed up and away.
ISEDC Warning
This product meets the applicable Industry Canada technical specifications. / Le présente matériel est conforme aux specifications techniques applicables d'Industrie Canada.
This device complies with ISEDC license-exempt RSS standard (s).
ENGLISH
Operation is subject to the following two conditions: (1) this device may not cause interference, and (2) this device must accept any interference, including interference that may cause undesired operation of the device.
ISEDC Radiation Exposure Statement
For face up operation, this model device has been tested and meets the ISED RF exposure guidelines when used with an accessory designated for this product or when used with an accessory that Contains no metal and that positions the handset a minimum of 25mm from the face.
For body worn operation, this model device has been tested and meets the ISED RF exposure guidelines when used with an accessory designated for this product or when used with an accessory that Contains no metal.
Your wireless handheld portable transceiver contains a low power transmitter. When the talk button is pushed, it sends out radio frequency (RF) signals. The device is authorized to operate at a duty factor not to exceed 50% .
Any Changes or modifications not expressly approved by the party responsible for compliance could void the user's authority to operate the equipment.
Use the approved charger to charge the battery. The remaining lithium-ion battery is limited to 30% pursuant to the new lithium battery shipment regulation approved by International Air Transport Association (IATA). Before use, charge the battery. It is recommended that the radio remain powered off during charging.
Use of battery not recommend or replaced with incorrect type of battery may result in a risk of fire and explosion or personal injury.
ENGLISH
Disposal of a battery into fire or a hot oven, or mechanically crushing or cutting of a battery, that can result in an explosion.
Leaving a battery in an extremely high temperature surrounding environment that can result in an explosion or the leakage of flammable liquid or gas.
A battery subjected to extremely low air pressure that may result in an explosion or the leakage of flammable liquid or gas.
Maximum ambient temperature around the power supply equipment including charger must not exceed 40^(104^) and device operating temperature not exceed 55^(131^) .
Simplified EU declaration of conformity
We hereby, declares that the product, is in compliance with Directives 2014/53/EU, 2011/65/EU, and 2012/19/EU.
The full text of the EU declaration of conformity is available at the following internet address: www.decross.eu
European Union (EU) Waste of Electrical and Electronic Equipment (WEEE) directive:

The adjacent symbol of a crossed out dustbin on wheels indicates this product is subject to Directive 2012/19/EU. This directive states at the end of the life this product must not be disposed of through regular household refuse but must be returned to special collection sites, recycling depots or waste management companies.
INFORMATION CONCERNING SAR FOR CE
| Max. SAR Level(s) Measured Limit (Wt /Kg) | |
| 0.878 Wt/kg 10g Head SAR | 2.0Wt/Kg for the head and body; |
| 0.975 Wt/kg 10g Body SAR | |
CHANNEL AND FREQUENCIES
| Channe | Frequency (MHz) | Max Power Output |
| 1 | 446.00625 0.5 W | |
| 2 | 446.01875 0.5 W | |
| 3 | 446.03125 0.5 W | |
| 4 | 446.04375 0.5 W | |
| 5 | 446.05625 0.5 W | |
| 6 | 446.06875 0.5 W | |
| 7 | 446.08125 0.5 W | |
| 8 | 446.09375 0.5 W | |
| 9 | 446.10625 0.5 W | |
| 10 | 446.11875 0.5 W | |
| 11 | 446.13125 0.5 W | |
| 12 | 446.14375 0.5 W | |
| 13 | 446.15625 0.5 W | |
| 14 | 446.16875 0.5 W | |
| 15 446.18125 0.5 W | ||
| 16 446.19375 0.5 W | ||
Channels: 16 PMR (Note:only Channels 1 to 8 are available by default. Channels 9 to 16 need to be activated by user before they can be selected. Channels 9 to 16 should only be used in countries where these frequencies are allowed by government authorities. Channels 9 to 16 are not allowed in Russia)
OPERATION
INTRODUCTION
EN
FREES
1 + u1 - 1 = ( 1 + u) u1 < 1 = u
Key Functions
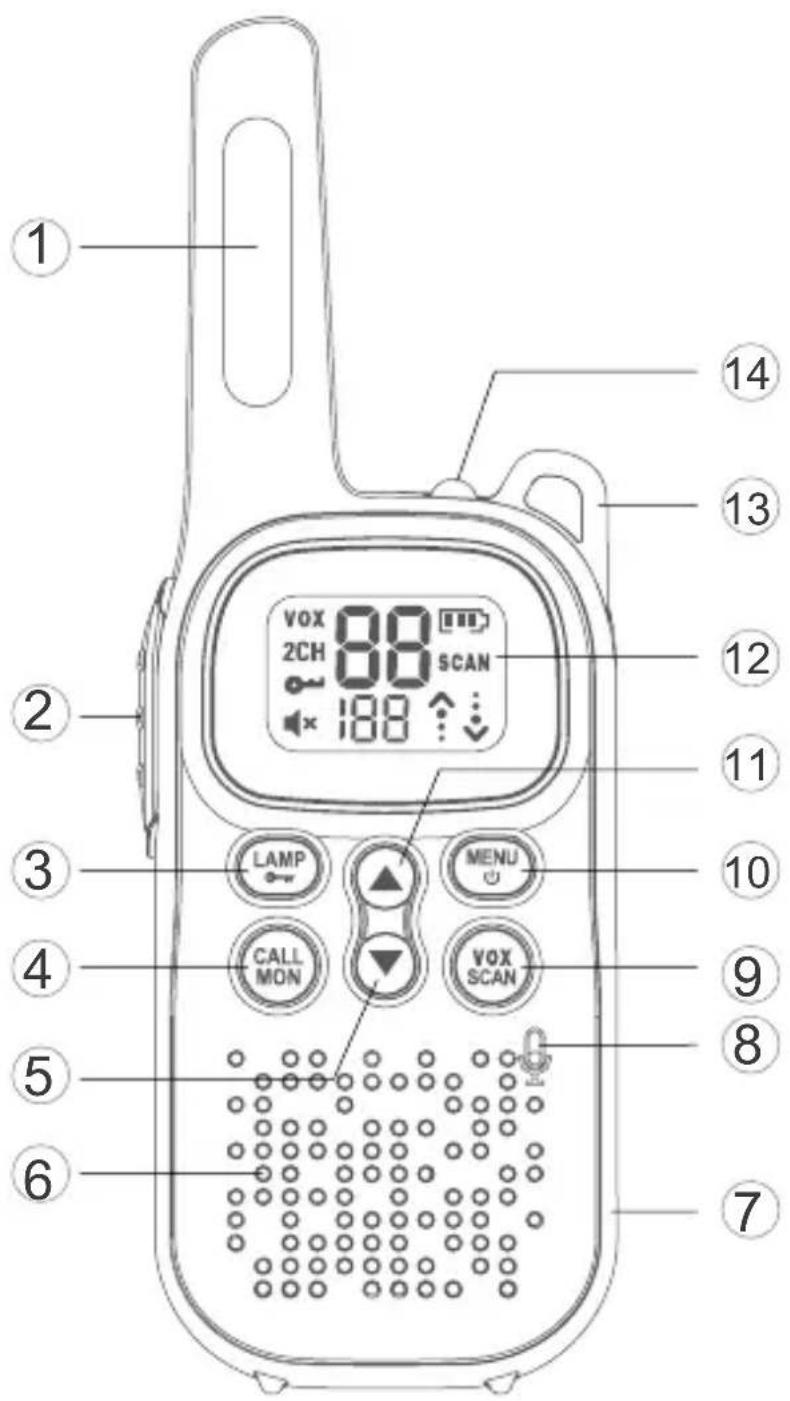
1 Antenna
② Push To Talk (PTT)
③ Flashlight/Keypad Lock Button
4 Call Tone / Monitor Button
(5) [▼] Button
6 Speaker
7 USB Type-C Charging Jack
8 Microphone
9 Vox/ Scan Button
10 Menu / Power On, Off Button
11 [▲] Button
12 Display
13 Lanyard hole
14 Flashlight
DISPLAY SCREEN GUIDE
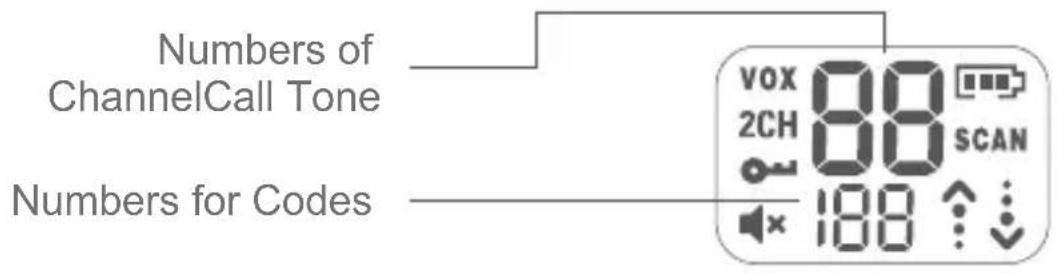
| VOX | Vox | Battery Meter | |
| 2CH | Dual Channel Monitor | SCAN | Scan |
| Lock | Status (Transmit / Receive) | ||
| Volume Mute |
GETTING STARTED
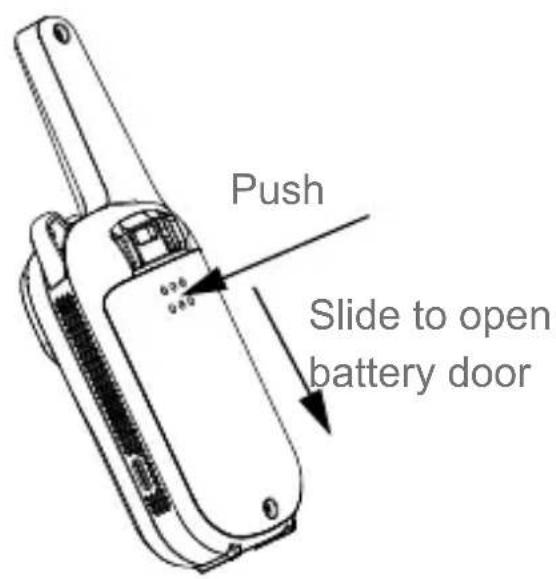
Installing the three 1.5V AAA alkaline or 1.2V AAA NiMH rechargeable batteries
- With the back of the radio facing you, push and slide down to remove the cover.
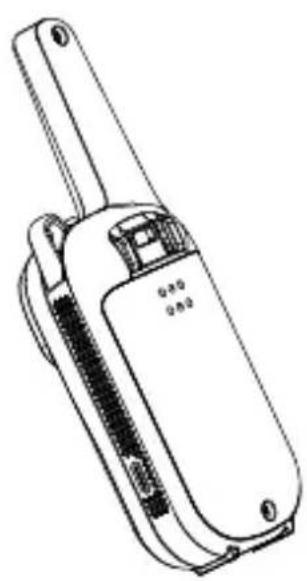
ENGLISH
- Installing the three AAA alkaline or NiMH battery with + and - polarity as shown inside.
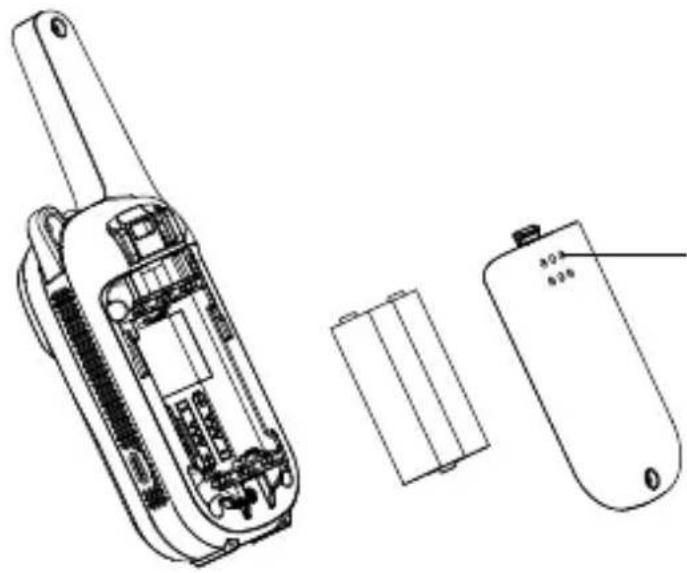
Installing the three AAA alkaline or NiMH batteries.
- Close the battery cover firmly.
Close the battery cover firmly.
Radio Battery Meter
Battery full bars indicates battery high. When battery meter shows 1 bar, device is on low battery mode and will indicate low battery alert in the forms of alert tone and blinking bar display.
Note:
- Remove the battery from radio for storage purposes.
- Be careful when removing the batteries. Do not use sharp or conductive tools to remove either of these batteries.
- Remove the batteries before storing your radio for extended periods of time. Batteries corrode over time and may cause permanent damage to your radio.
- Do not mix old and new batteries and Do not mix alkaline, standard (carbon-zinc) or rechargeable (ni-cad, ni-mh, etc.) batteries.
Battery Capacity Maintenance(Applicable to NiMH rechargeable batteries only)
- Charge the NiMH batteries once every 3 months when not in use.
- Before placing the radio in storage, remove the battery.
- Store the NiMH batteries in temperature between -20^ to 35^ and in low humidity. Avoid damp conditions and corrosive materials.
Using the USB Type-C Charger(Applicable to NiMH rechargeable batteries only)
The USB Type-C charger is a handy port that allows you to conveniently charge your NiMH battery. Use certified adaptor(5V~1A). Do not attempt to charge alkaline batteries.
- Make sure your radio is turned OFF.
- Plug the USB Type-C cable into the USB Type-C charging port on your radio. Connect the other end of the USB Type-C charger to wall power outlet.
- The battery meter on LCD will move to indicate the battery is charging.
ENGLISH
Note:
- It is recommended to power OFF your radio while charging.
- When moving between hot and cold temperatures, do not charge the NiMH batteries until the battery temperature acclimates (usually about 20 minutes).
- For optimal battery life, remove the radio from the charger within 16 hours. Do not store the radio while connected to the charger.
Turning your Radio On and Off
- Press and hold on the 【MENU/POWER】 button to turn your radio ON/OFF. In the ON position, the radio chirps and briefly shows all feature icons available on the radio.
- The display screen then shows the current channel, code and all features that are enabled. The radio is in Two-Way mode.
Setting the Volume
- First press either [] or [] to trigger volume change. You will see current volume level on screen.
- Press [] to increase the volume. Press [] to decrease the volume.
- When the volume reached level 0 the mute icon appears permanently on screen.
Do not hold the radio close to your ear. If the volume is set to an uncomfortable level, it could hurt your ear.
RECEIVING AND TRANSMITTING
To communicate, all radios in your group must be set to the same channel and sub code.
- To talk, press and hold the PTT button. When transmitting, the icon is shown. Release the PTT button when you are finished talking. Do not use the radios closer than five feet apart.
- When receiving, the icon is shown.
For maximum clarity, hold the radio 2 to 3 centimeters away from your mouth and speak directly into the microphone. Do not cover the microphone while talking.
Talk Range
Your radio is designed to maximize performance and improve transmission range. Do not use the radios closer than five feet apart.
Monitor Button
Press and hold 【CALL/MON】 button for 3 seconds to enter monitor mode and listen for weak signals on the current channel.
You can also listen to the volume level of the radio when you are not receiving. This allows you to adjust the volume, if necessary.
Push-to-Talk Timeout Timer
To prevent accidental transmissions and save battery life, radio will stop transmitting if you press PTT button for 60 seconds continuously.
RECEIVING AND TRANSMITTING
Setting the Channel
The channel is the frequency of the radio uses to transmit.
- Press the【MENU/POWER】 button until the channel number starts to flash.
- Press [] or [] button to change the channel number.
- Press the PTT button to exit menu or 【MENU/POWER】 button to continue setup.
Selecting the Interference Eliminator Code
Sub-Codes help minimize interference by blocking transmission from unknown sources. Your radio has 121 Sub-Codes. To set the code for a channel:
- Press the 【MENU/POWER】 button until the code number starts to flash.
- Press [] or [] button to select code number.
- Press the PTT button to exit menu or 【MENU/POWER】 button to continue setup.
Setting and Transmitting Call Tones
Your radio can transmit different call tones to other radios in your group when you pressed 【CALL/MON】 button. The radio has 5 call tones. To set a call tone:
- Press【MENU/POWER】 button until 'CA' appears. The current call tone setting flash.
- Press [] or [] button to change and listen to the call tone.
- Press the PTT button to exit menu or 【MENU/POWER】 button to continue setup.
VOX
Transmission is initiated by speaking into the microphone of the radio instead of pushing the PTT button.
- Briefly press the 【VOX/SCAN】 button briefly to enter vox mode. Press the button again to exit.
- Press menu button until "vox" appears on display level(1-3 setting). Press [] or [] button to select the sensitivity to change [VOX/SCAN] sensitivity.
- Press the PTT button to exit menu.
L3=High Sensitivity / L2=Medium Sensitivity / L1=Low Sensitivity
Keypad Tones
Your radio emits a beep each time one of the buttons is pressed (except the PTT and call button).
Press and hold the [ ] button while turning the radio ON to switch the keypad tone ON/OFF.
Roger Tone
You can set your radio to transmit a unique tone when you finish transmitting. Press and hold the button while turning the radio ON to turn the Roger Beep ON. Repeat the step to turn Roger Beep OFF.
Keypad Lock
To avoid accidentally changing your radio settings:
-
To lock the radio, press and hold 【LAMP/LOCK】 button until the key lock indicator icon on display appear.
-
To unlock the radio, press and hold 【LAMP/LOCK】 button until key lock indicator icon on display disappear.
Note:
When radio in keypad lock mode, user can only turn the radio ON/OFF, receive/transmit, turn the flashlight ON/OFF, and monitor channels. All other functions are locked.
Scanning Channels
Use scan to search all channels for transmissions from unknown
ENGLISH
parties, to find someone in your group who has accidentally changed channels or to quickly find unused channels for your own use. To Start Scanning:
- Press and hold the 【VOX/SCAN】 button for 3 seconds to enter scan mode. The SCAN icon will appear in the display and the radio will begin to scroll through the channel and code combinations.
- When the radio detects channel activity matching the channel and code combination, it stops scrolling and you can hear the transmission.
- To respond and talk to the person transmitting, press the PTT button within 5 seconds after the end of the transmission.
- The radio will resume scrolling through the channels five seconds after the end of any received activity.
- To stop scanning, briefly press the【VOX/SCAN】 button.
Scanning Notes
- If you press the PTT button while the radio is scrolling through inactive channels, the transmission will be on the "home channel". Scanning will resume 5 seconds after the end of your transmission. You may press the 【VOX/SCAN】 button to stop scanning at any time.
- If the radio stops on an undesired transmission, you may immediately resume the scan by briefly pressing [] or [] button.
- If the radio repeatedly stops on an undesired transmission, you may temporarily remove that channel from the scan list by pressing and holding [] or [] for 3 seconds. You may remove more than one channel in this way.
- To restore the removed channel(s) to the scan list, turn the radio off and then turn back on, or exit and re-enter the scanning mode by pressing 【VOX/SCAN】 button.
- You cannot remove the home channel from the scan list.
LED Lamp
Your radio has a built-in-LED Lamp.
Briefly press the 【LAMP/LOCK】 button once to ON the lamp, press again to OFF the lamp.
Automatic Power Save
For better battery life, your radio is designed to switch to Power Save mode when it has been no transmissions after 5 seconds. The radio can receive transmissions in this mode.
Dual Channel Monitor
Enable you to scan current channel and another channel alternately To set another channel and start Dual Watch.
- Press【MENU/POWER】button until '2CH' appears on the display. The current setting (OF, 1-16) will flash.
- Press [] or [] to select channels.
- Press the PTT button to exit menu or button to continue setup.
- Press the PTT button or wait until the time out menu to activate Dual Watch. The screen will alternate between Home Channel and Dual Watch Channel. To end Dual Watch mode, re-enter Dual Watch menu to select the OFF setting.
Key Functions

You can set your radio to transmit a unique tone when you finish transmitting. Press and hold the [A] button while turning the radio ON to turn the Roger Beep ON. Repeat the step to turn Roger Beep OFF.
Tastensperre
Battery full bars indicates battery high. When battery meter shows 1 bar, device is on low battery mode and will indicate low battery alert in the forms of alert tone and blinking bar display.
Noter:
Alternatively, you can use the following method to record the volume of a radio.
- Alternatively, you can use the following method to record the volume of a radio.
- Alternatively, you can use the following method to record the volume of a radio.
- Alternatively, you can use the following method to record the volume of a radio.
(1) ΘTO yCTPOIcTBO He DoJIxH O Co3dA BAtb BpeDnBIX NOMex, n (2) ΘTO yCTPOIcTBO DoJIxH O PrINHMaTb JIO6bIe NOLyuaEMbIe NOMEXN, BKJIIOUa IOMEXN, KOTOpbIe MOrYr Bbl3BaTb HeXeJIaTeJbHyO pa6OToY.
Приимechаим. 3TO obopydOBaHne 6bIIO npoteCTnpoBaHO n npi3HaHO COOTBcTCTBHyOuIM OgranHueHm dJIa cIooPbIX yCTpOJCTB KJIacCa B B COOTBcTCTBn C qactb10 15 npabIN FCC. 3TN opranHuHn IpeDna3NaUeHbI dJIa obecneueHn pa3ymHO 3aunTBtI OT BpeDhbIX NOMEX pR INCNoJIb3OBaHn B JxNbIX NOMEuHnX. 3TO obopydOBaHne TReHepnpuyET, INCNoJIb3yET n MOKET n3IpyaTb paDnoUacTOnHyU 3HeprnIO, ecNI OHO He yCTaHOBNeHO n He NCNoJIb3yETcB B COOTBeTCTBn C IHCTpyKzmaMn, MOKET COZdaBaTb BpeDhIE NOMEx dJIpaDIOCBa3N. Ondako Het rapaHTn, YTO B ONpeJeHHbIX ycIOBuaX NOMexn He BO3NkHyT pRn OBuHNOJ kCpIyatauIN. EcNI 3TO obopydOBaHne COZdaet BpeDhie NOMEx n dJIpaDIO- INI IN TeJIeBn3IOHNOrO npHeMa, YTO MOxHO ONpeJeNTb, BbIKIQUHB IN BKIIQUHB ObopydOBaHne, INIb3OBaTeJIHO peKOMeHdyETcN ONbITaTbcYCTpaHHTb NOMExn ODHM INI HeCKOJIbKIMN IN3 CJIeDyUoUsxCnocob:
—Переорпентropоваты ини песмecт综合体 рпемhoe устю виаHTehny.
— YBéniuchte paCCToHne MeJdy o6OpyIDoBaHNem I npHemHKOM.
—Подклюаite obopydOBaHne K po3eTke dpyroJ ueN, OTnUHOI OT Toi, K KOtOpOJ noDkLIOueH npHeMnK.
— OśpaṭιTecb 3a NOMOüKДиIepyИЛN ONbITHOMy CneuaJIInCTy nopádno/TeJIeBnIeHNIO.
Информацnia по Т电商ке 6e3opachoctnпрп рабoteс радиocтанцямn
Baw npTaHbI 6ecnpoBODHO TpaHcNBep coDepxHT MaIOMOuHbI nepeDaTUnK. KOrda KhoNka pa3roBopa HaxaTa, OH nocblaet paIIOUacTOThbIe (PChrHaJIb. YcTroPCTBO pa3peSeHo EKcPlyatnpoBaTb npn Harpy3Ke He 60Jee 50% BpemeHn (npnEM/ nepeDau). B abryte 1996 roDa FedepaJIbHaJ KOMnCCnno CBa3N (FCC) npInJa peKOMeHdauCn no paIIOUacTOTHOMy n3JnyeHnIO C yka3aHHeM yPoBHei 6e3OpacHocTn dJIy npTaTINHBbIX 6ecnpoBOndbIX yCTpOYCTB.
BaxkHo
Tpe6obAHn PhedepaIbHOJ KOMCCN C8a3n no paIIOuACTOTHOMy n3JIyuHeHIO. Pn HOseHn Ha Tele 3Ta paIIOCTaHcHnja 6blna IpOteCTIPOBaHa n COOTBeTCTByeT peKOMeHdaUcHm PhedepaIbHOJ KOMCCN NO CBa3n NO paIIOUCACTOTHOMy n3JIyuHeHIO npn IcNoJIb3OBaHn akceccyapOB, NoCTabJIeMbIX nII npEJaHa3HaueHHbIX dIpykTa. NcNoJIb3OBaHne dpyrnx npHaJdJeXHoCTeM MoKeT He rapaHTIPOBaTb COOTBeTCTBnE peKOMeHdaUcHm PhedepaJIbHOJ KOMCCN IO CBa3n NO paIIOUCACTOTHOMy n3JIyuHeHIO. NcNoJIb3yIte TOJIbKO pnilaraEmyIo aHTeHHy. HecanKzioHnpoBaHHbIe aHTeHHbl,
MOnnФикaци Илnpncno6JIeHЯ MOryT nobpeiNbпepdaTchN HapuHTb npabnla FCC.
HopmaJIbHoe nOJoxeHne
Держichte пeredaTчн Ka paCCTOЯпnpimepho 25 MM ot liuca n roBOpITE HopMaJIbHbIM rJIOCOM, HanpaBnB aHTeHHy BBepx N B cToPOHy.
IpeynpejdeHne ISEDC
3TOT npOdyKT COOTBeTCTByeT npIMeHmblM TexHnuecknM
cneuФkaunM MnHnCTepCTBa npOMbIshJeHHocTn KaHaDbI.
3To yctpoiCTBO COOTBeTCTByeT cTaHdapTy RSS 6e3 IInceH3nn ISEDC.
Bo n36exaHne cIyauHoro n3MeHnHaCTpoEk paIIOCTaHcN:
IcnoJIb3yIte cKaHIpOBaHne IJI NaONCKa IIO BCEM KaHaJAM NpepaO T HeN3BecTHbIX CTOPOH, YTO6bl HaITN KORo-TO B BaWei rpyPnE, KTO CnyauHOCMeHnI KaHaJIbI, INI YTO6bl 6bICTPO HaHTN HeNCNoJIb3YeMbIe KaHaJIbI DJIa CO6CTBeHHoro IcNoJIb3OBaHnI. YTO6bl Haatb cKaHnpOBaHne:
- Haxmte u ydepknbai Te 【VOX/SCAN】B TeueHne 3 cekyHd, YTO6bI BOITn B pexim ckaHnpOBaHn. Ha dinCpIee NORBNTcR 3HaQOK SCAN, n paunr NaHET npokpyuNbTb KOMbHaCnK aHaJIOB n KOIDOB.
PYCCKN
- Korda paadnoctaHcna o6hapyKNaBaet aKTINBHOCTb KaHaJa, coBnadaUoIyO c KOMbHaCnei KaHaJa n KoJa, npOKpyTKa ppeKpa-uaETcra N Bbl MoXeTe CJIbIaTb NepeDaCy.
3.Чтобы OTВЕТИТь И NOROTOВОРИТь CЧЕЛОВЕКOM, KOTOPБI BeДЕТ пеpe-daч, нажмITE Кногку PTTВ TeueHne 5 cekyнд посе OKOHuaHЯ пеpeдач. - PaДио BO306HOBNT npOKpyTKy KaHaNoB chepe3 nTb ceKHyd nocJe OKOHuaHЯ JIO6Oi PrHnMaEMoA kTtNBHOCTN.
5.Чтобъ OCTановь сkaнроване, краTKOBpeMeHNO нажмп Te KhoIGNky【VOX/SCAN】.