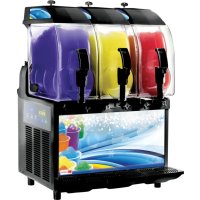
IPro 3E - Slush machine Crathco - Free user manual and instructions
Find the device manual for free IPro 3E Crathco in PDF.


User questions about IPro 3E Crathco
0 question about this device. Answer the ones you know or ask your own.
Ask a new question about this device
Download the instructions for your Slush machine in PDF format for free! Find your manual IPro 3E - Crathco and take your electronic device back in hand. On this page are published all the documents necessary for the use of your device. IPro 3E by Crathco.
USER MANUAL IPro 3E Crathco
© 2018 - SPM Drink Systems
BOCCOLA RIGIDA EVAPORATORE
We would like to congratulate you for choosing this high-quality product, that will certainly meet all your expectations.
We thank you for the preference reserved to our company and we invite you to carefully read the following instruction manual before machine's start up.
Published by:
SPM DRINK SYSTEMS S.p.a.
Via Panaro n^ 2
41057 Spilamberto (MO)
Edition: 12/2018
Revision: 01
© 2018 - SPM Drink Systems
All copying rights are reserved to SPM DRINK SYSTEMS; copying, even partial, is illegal.
The descriptions and illustrations refer to the specific machine at issue. SPM Drink Systems reserves the right to modify at any time the equipment for mass production.
This manual:
- is integral part of the supply and must be carefully read, in order to be properly used, in compliance with the essential safety requirements;
- has been drafted by following the dispositions 2006/42/CE and reports the technical information that are necessary to correctly run all the procedures, under safety conditions;
- must be carefully kept (protected by a transparent, watertight wrapping, in order to avoid any damage) and must go with the machine during its life, including potential changes of ownership. In case of loss or damage, it's possible to ask for a copy to SPM DRINK SYSTEMS, pointing out the information stated on the identification label:
SPM DRINK SYSTEMS declines all responsibility for a wrong usage of the machine and/or damages caused by operations not provided for in this manual.
INDEX
- IMPORTANT WARNINGS AND ADVICES 28
- EQUIPMENT KIT 28
- TRANPORT TIPS 28
- LIFTING TIPS 28
- TECHNICAL SPECIFICATIONS 29
- POSITIONING 30
- CONNECTION TO THE POWER SUPPLY MAINS 31
- START-UP PROCEDURES 32
- ELECTRONIC CONTROL BOARD 33
Manual mode 3
Automatic mode 34
Setting mode 34
- MECHANICAL CONTROL BOARD 38
Mechanical timer 39 - OPERATING INSTRUCTIONS 40
- DAILY CLEANING AND SANITIZING PROCEDURES 41
- SPECIAL MAINTENTANCE. 47
Condenser cleaning 47
Control and replacement of seals 48
Winter storage 48
14.DISCLAIMER 48
15. TROUBLESHOOTING GUIDE 49
16. SCHEMA ELETTRICO -WIRING DIAGRAM 75
1. IMPORTANT WARNINGS AND ADVICES
This installation and operation manual is an integral part of the equipment and must be kept for future consultation.
Unless otherwise stated, this manual is intended to be addressed to operators (staff members) who uses the equipment on a daily basis).
and to servicemen (staff members qualified to carry out the installation and/or
maintenance). The parts of the manual addressed only to servicemen are pointed out accordingly. Please read carefully the
warnings listed here below before installation and start-up of the equipment.
This equipment has been designed to produce slushes, sorbets and similar products.
Upon receipt of the equipment, make sure that its part number matches the one specified in the order, which can be found on all the delivery documents.
This equipment is exclusively destined to the purpose for which it was designed. The manufacturer cannot be held responsible for any damage due to improper use.
This equipment is not intended for use by persons (including children) with reduced physical, sensory or mental capabilities, or lack of experience and knowledge, without supervision or instruction concerning its use by a person responsible for their safety. Children should be supervised to ensure that they do not play with the machine.
This equipment is not suitable for outdoor use. This machine is not suitable for installation in locations where water jets are used. This equipment must be installed in places where it can be controlled by qualified staff.
2. EQUIPMENT KIT
In the packaging of this equipment you will find also:
- operator's manual,
- 1 tube of Vaseline grease lubricant to be used for machine maintenance;
EC declaration of conformity; - 1 drip tray and 1 suction gasket for each bowl.
3. TRANPORT TIPS
To prevent the oil held in the hermetic compressor running into the cooling circuit, the device must be carried, stored and handled in the upright position, following the direction instructions on the packing. If the device is accidentally or intentionally (for transportation reasons) kept in any other position, it must be set again in the correct position at least twenty minutes before start-up procedures, in order to let the oil flow back into the compressor.
4. LIFTING TIPS
Each machine is equipped with a special wooden pallet that allows the handling with standard forklift trucks.

Caution

Never lift the machine alone, but always seek the assistance of another operator.
To prevent and avoid any damage to the machine, all loading and unloading operations should be carried out with special care. The equipment can be lifted, with either a manual or engine-powered lifting truck, by positioning the forks in the base section of the unit.
The following operations should always be avoided:
- to turn upside down the machine;
- to drag the machine with ropes or others;
- to lift the machine with slings or ropes
- to shake or rattle the machine and its packaging.
The machine must be stored in a dry place with temperatures from 0^ to 40^ . No more than 2 machines should be stacked on top of each other, taking care to maintain the vertical position, as shown by the arrows on the carton.
5. TECHNICAL SPECIFICATIONS
Technical and electrical specifications
All the machine's technical and electrical specifications are stated on the identification plate, positioned in the internal part of the equipment; a sample is shown here below.
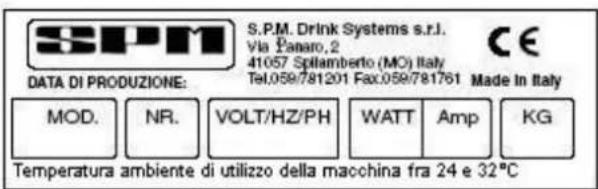
The plate specifies:
Model: XX
- n°: XX
- Electrical specifications: Volt/ Hz
Max. absorption (Watt)
Max. current (Amp)
Dimensions and weight:
IPro 1
- Height 87 cm.
- Width 20 cm.
- Depth 58 cm.
Weight 39 kg.
IPro 2
- Height 87 cm.
- Width 40 cm.
- Depth 58 cm.
Weight 60 kg.
IPro 3
- Height 87 cm.
- Width 60 cm.
- Depth 58 cm.
Weight 81 kg.
Noise emissions
The continuous, equivalent, weighted level of acoustic pressure is below 70 dB.
In the event of breakdown:
In most cases, any technical problem can be settled with slight interventions (please see the troubleshooting guide at the end of this manual); we therefore recommend you to carefully read this handbook before contacting the manufacturer or service centre.
Disposal

Caution

All the parts of the packaging must be kept beyond the range of children, as they might represent a potential safety/health risk.
Important
In respect of the environment, please dispose the packaging as illustrated.

This symbol: means that the machine cannot be disposed as common waste. It must be handled in compliance with the provisions of European directive 2002/96/CE (Waste Electrical and Electronic Devices - WEEE) and the resulting national legislation, in order to prevent any potential damage to the environment and to create health risks.
In order to correctly dispose of the device, please contact the distributor from which you purchased it or our after-sales service.
6. POSITIONING
FOR SERVICEMAN ONLY
The installation and subsequent servicing operations must be carried out by skilled members who have been trained to use the device and in compliance with the regulations in force.
a) Remove the packing (fig.1), preserve it in order to reuse for winter storage and make sure the machine is in perfect condition.
!CAUTION!
All the parts of the packaging must be kept beyond the range of children, as they might represent a potential safety/health risk.
b) Rest the machine on a sturdy, flat surface making sure it is well ventilated by leaving a gap of 8 inches around it and do not install it near heat sources (fig.2); we recommend you to maintain a room temperature between 75 and 100^ .
c) Check that the power mains voltage meets the specifications on the equipment identification plate and that the output available meets the device's power requirements. Fit the plug into an earthed socket, removing all multiple adaptors.
FOR FURTHER PRECAUTIONS, READ THE SECTION "CONNECTION TO THE ELECTRICITY MAINS" CAREFULLY.
d) The installation must be carried out in accordance with the manufacturer's instructions. Failure to comply with the positioning and installation instructions may impair the machine's operation.
Important
You are legally required to provide a suitable grounding system for the equipment. Before carrying out any cleaning and/or special maintenance on the device, make sure it is disconnected from the mains by unplugging it. In the event of a breakdown or malfunctioning, switch off the device and remove the plug.
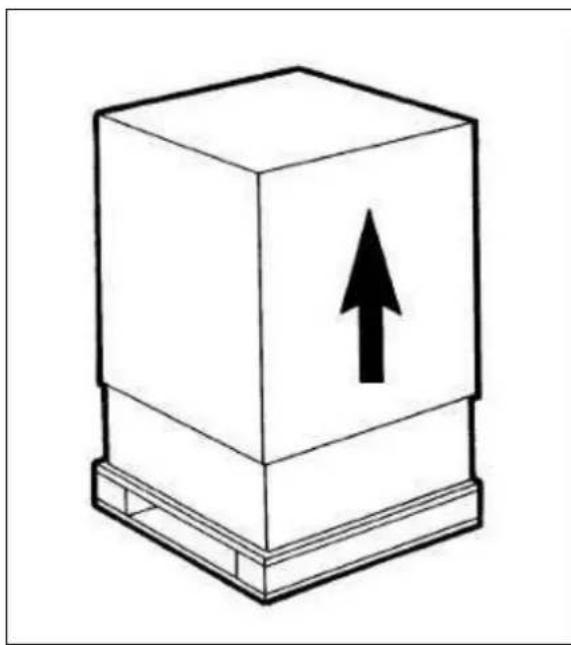
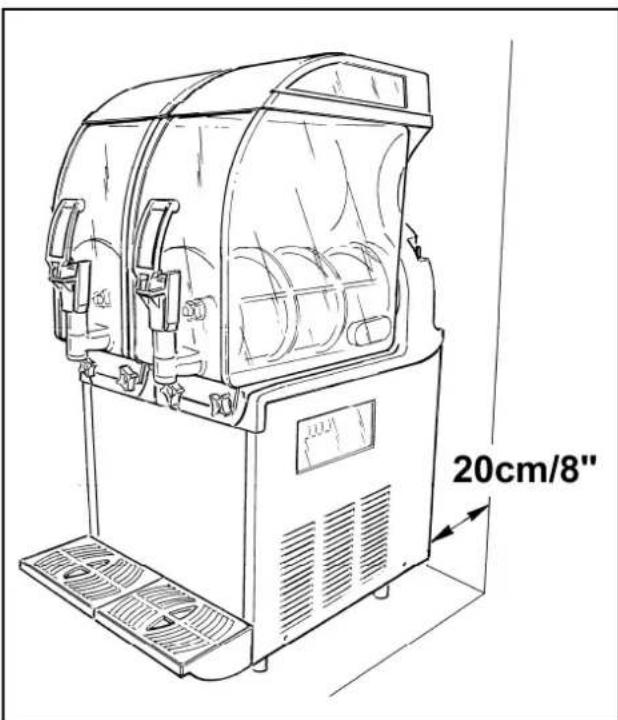
Fig.1
Fig. 2
7. CONNECTION TO THE POWER SUPPLY MAINS
FOR SERVICEMAN ONLY
Before fitting the plug in the power supply socket, for your own safety, as already mentioned in the previous paragraph, please read the following precautions.
- The machine's electrical safety is only guaranteed when it is connected to a suitable earth system, structured as provided by the national safety current regulations (fig.3). Therefore, the manufacturer cannot be held responsible for any damage due to failure of the grounding system of the machine.
- Do not obstruct the ventilating grill and heat dispersion grill, since an insufficient ventilation may not only reduce the efficiency of the machine, causing it to function inadequately, but may also cause serious damage to the machine.
- Always verify electrical specifications on the data plate of each machine. Data plate specifications always replace the information of this manual.
- For a safe and correct installation, it is essential to provide a suitable socket controlled by a thermal cut-out switch whose contacts are at least 3mm apart, in accordance with the current national safety regulations (see fig.3).
- Never use extensions or multiple adaptors.
- Check the power lead along its entire length to make sure it is not crushed in any way.
- To unplug the device, first disconnect the power supply with the switch, then grip the plug and gently pull it out.
Important
IF THE POWER CABLE IS DAMAGED, IT MUST BE REPLACED BY THE MANUFACTURER, ITS AFTER SALE SERVICE OR BY QUALIFIED PERSONNEL, TO PREVENT ANY POSSIBLE RISK.
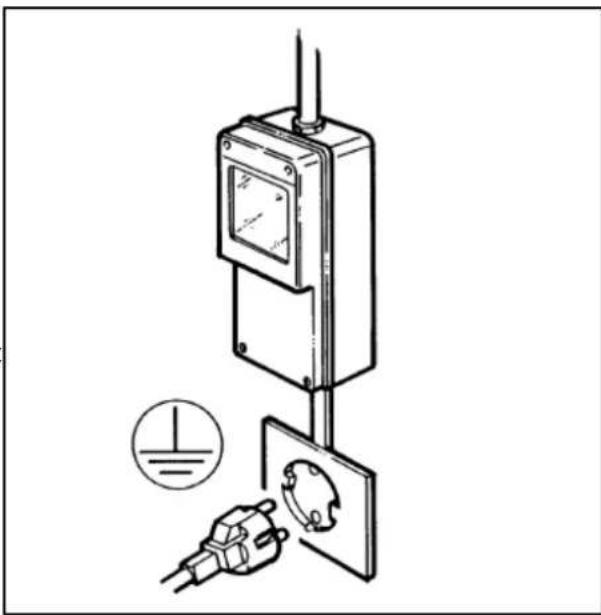
Fig. 3
- If required by local regulations, it is possible to have the appliance permanently connected to electrical power supply, ref. National Electrical Code (NEC) and NFPA 70. If this is the case, it is necessary to remove the right side panel, disconnect the power cable from the machine wiring, remove it from the machine and replace it with the permanent cable by respecting the local codes.
8. START-UP PROCEDURES
IMPORTANT!
BEFORE STARTING THE MACHINE, CARRY OUT
THE CLEANING AND SANITISING PROCEDURES
DESCRIBED IN CHAPTER 11.
- Dilute and mix the product in a separate container according to the manufacturer's instructions (see fig.4); never pour dry powder, crystals, or concentrate into a dry bowl.

Caution

Make sure that the mixture has a sugar content between 12% and 14% ; a lower concentration could seriously damage the mixing parts, as well as the gear motors.
NEVER USE ONLY WATER.
- Remove the luminous cover after unblocking it by turning its special key clockwise (see fig.5).
- Remove the secondary transparent cover (fig.6).
- Pour the mix obtained into the bowl (see fig.7).
- Restore the secondary transparent cover and then the luminous one making sure to have it pushing against the security system
- Secure it by rotating its key counter clockwise.
Note
IPRO is equipped with a very efficient safety mechanism designed to protect the operator; it is activated when cover is lifted. This device automatically and immediately stops all moving parts.
If the main cover is not correctly positioned, the unit will not work.
- Insert the plug into the electrical power outlet.
- Activate the main switch.
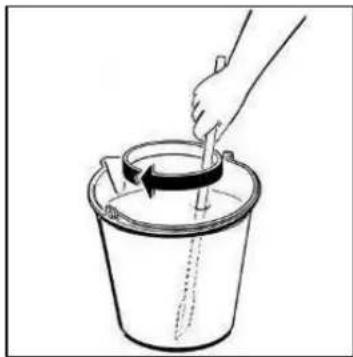
Fig. 4
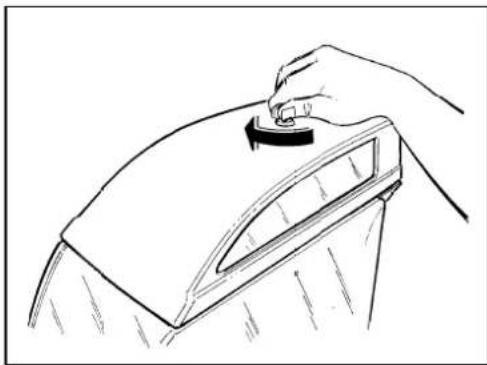
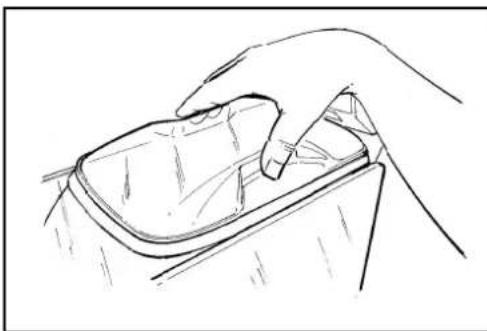
Fig. 5
Fig. 6
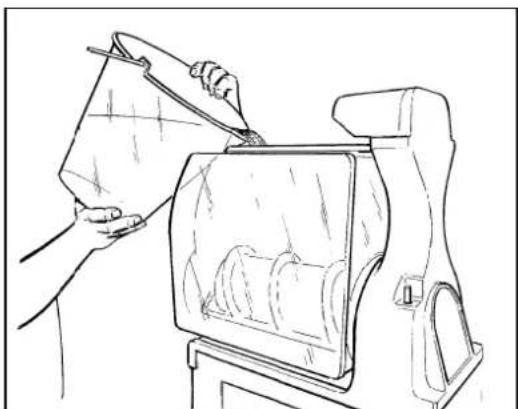
Fig. 7
9. ELECTRONIC CONTROL BOARD
Manual mode
After connecting the unit plug with the electricity main, the unit is ready to be switched on. The control panel appears like the one in figure 8.
Touching the ON/OFF symbol with a finger on the capacitive display, it will be completely switched on and it will appear such us the one in figure 9; the unit is now ready to work in manual mode.
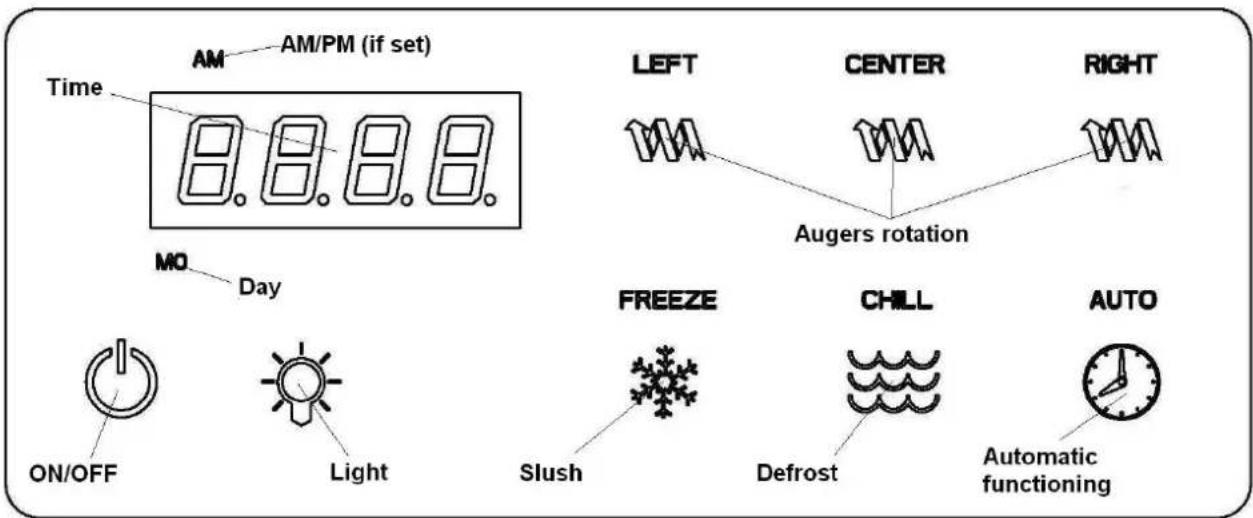
On the capacitive display you will find the following buttons:
ON/OFF: it turns on and off the unit.
LIGHT: it switches on and off the LED lights on the bowl cover if pressed once, it locks all the panel's buttons if kept pressed for 5 seconds.
AM/PM: if the 12 hours mode is activated, this two symbols indicate if it is morning or afternoon.
DAY: indicates the day of the week.
LEFT-CENTER-RIGHT: these three buttons start rotating the correspondent auger.
FREEZE: this button activates the freezing mode.
CHILL: this button activates the chilling mode.
AUTO: if this button is switched on, the unit starts working in automatic mode following the set parameters.
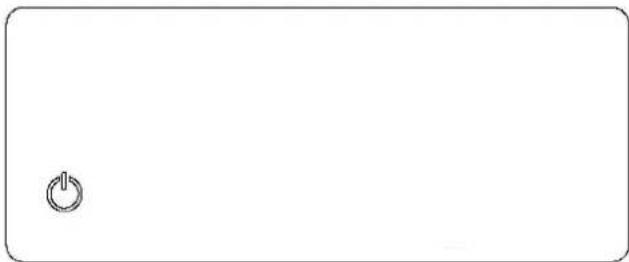
Fig. 8
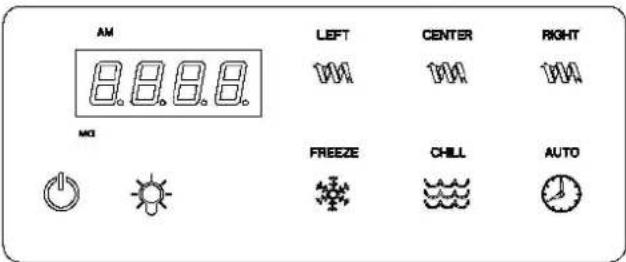
Fig. 9
!CAUTION!
The FREEZE, CHILL and the AUTO buttons, could be switched on only if one of the three augers is rotating; obviously this will activate only the correspondent refrigerating.
Automatic mode
Pushing the AUTO button the unit will start working in the automatic mode with the set parameters; this mean that the unit will automatically switch from the freezing mode to the chilling one respecting day by day the set parameters.
During this phase the FREEZE and the CHILL buttons will be visible but not functioning.
!Important!
Defrost or wash modes are not to be used in lieu of proper cleaning or sanitization procedures at the frequency of federal, state or local regulatory agencies.
Setting mode
In order to activate the setting mode it is necessary to put the finger on the ON/OFF button for 6/7 seconds; an acoustic signal will advise the user about the setting procedure activation.
Now the display looks like the one below and this is the buttons description:
INCREASE: increases the set parameter.
DECREASE: decreases the set parameter.
ENTER: this button confirms the set parameter.
DAY+: this button allows to slide the day of the week in order to select the right one.
12H/24H: allows to select the preferred mode.
START/STOP: allows to switch from the freezing mode time begin to the stop one.
EXIT: allows to exit from the setting mode.
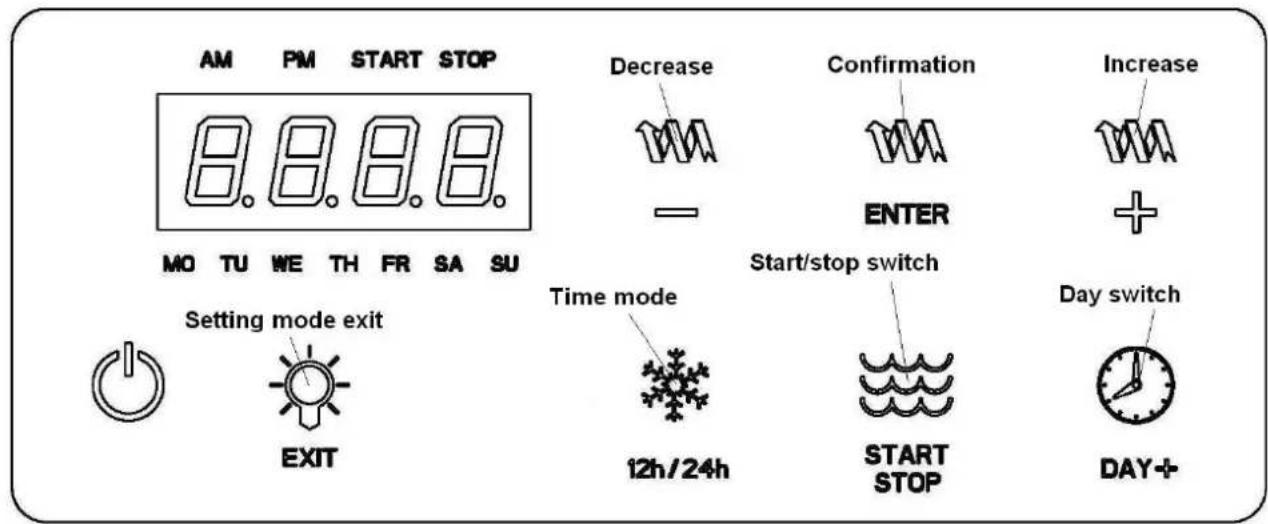
Once entered the setting mode it will be possible to set the following parameters:
TIME, DAY AND TIME MODE
Once entered the setting mode the first parameter that it is possible to set is the current day; i twill be necessary to push the DAY+ button until the right day is shown.
After setting the day it is possible to set the 12h/24h mode by switching from one mode to the other with the 12h/24h button.
Once selected these two parameters it is possible to set also the current time, the hours are now blinking on the display and using the + and - buttons it is possible to modify it and, once set, to fix it with the ENTER button.
After fixing the hours the minutes will start blinking and as for the hours it is possible to change that value with the + and - buttons and fix the right setting at the end with the ENTER. After the minutes confirmation the unit will automatically switch to the setting of each day of the week for the automatic functioning.
At this point of the setting procedure only the first day of the week, Monday (MO) will appear on the display together with the START one to underline that it is now possible to set the hours for the Monday CHILL mode starting time. The hours are now blinking on the display and it is possible to modify it with the + and - buttons; Once the desired hour is set, it is possible to fix it with the ENTER button.
After fixing the hours it will be possible to fix the minutes and confirm them in the same way. After the minute confirmation START will disappear replaced by STOP in order that it is now possible to set the end time of the CHILL mode and the beginning of the FREEZE one. Once fixed both the hours and the minutes the day will switch from Monday to Tuesday (TU); also in this case it will be possible to set the beginning and the end of the Tuesday CHILL mode.
In this way it will be possible to set all the days of the week until the last one, Sunday (SU) after which the setting procedure will restart from the beginning with the current time. With the EXIT button it will be possible to exit the setting mode.
NOTE: once the week time table has been set, the unit will automatically maintain it.
NOTE: when the AUTO button is switched on, the automatic mode parameters are active and the FREEZE and CHILL buttons are visible but not functioning. In order to switch back from the AUTO mode to the MANUAL one it is necessary to press the button again.
NOTE: the time table of the automatic mode is the same for all the three bowls.
NOTE: it is possible to switch on the FREEZE and the CHILL mode only if at least one of the three augers is rotating.
"FILTER CLEANING" Alarm
A filter cleaning alarm will activate when the unit is running hot due to insufficient internal air circulation. When this occurs the FILTER message will start blinking on the capacitive display as shown in picture 10. To determine the condition that caused the alarm, see list of conditions below:
Condition A: the filter is dirty and needs to be cleaned.
Corrective Action: clean and replace filter following instructions(Removing and Cleaning Filter).
- Condition B: the unit is positioned too close to a wall or other object restricting air flow and causing the machine to run at a higher temperature.
Corrective Action: reposition unit to maximize ventilation space (Installation Instructions).
- Condition C: the unit has been installed near a heat source, causing the machine to run at a high temperature (installation near a heat source should be avoided).
Corrective Action: reposition unit to maximize ventilation space.
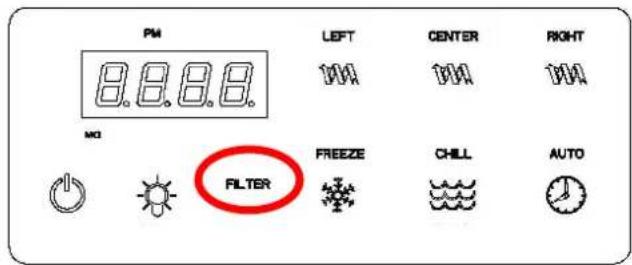
Fig. 10
"SYSTEM OVER TEMPERATURE" alarm
A system over temperature message CUT/OUT will appear (fig.11) as a safety precaution when the unit has overheated to protect the compressor.
- The system automatically goes to "OFF" status where the compressor's operations is stopped, while augers will keep working to avoid forming ice blocks.
- When this occurs a CUT/OUT message will appear on capacitive display to alert the operator of this condition (fig.11).
- When this alarm activates, turn off all switches. Then determine the condition and the necessary corrective action.
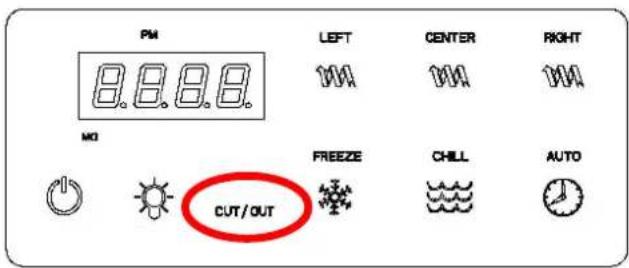
Fig. 11
10. MECHANICAL CONTROL BOARD
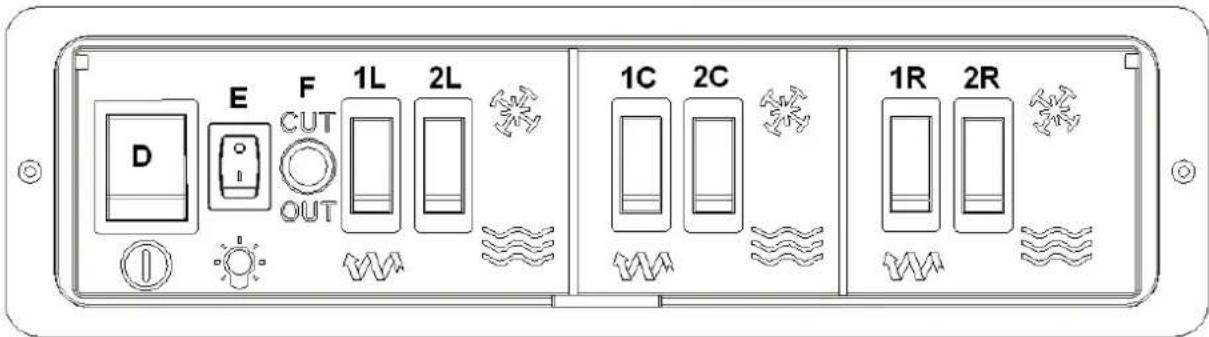
a) Activate the general switch (D);
b) Each bowl is controlled by two switches which are activated as follows:
-
to make ice slush or sorbets: first select the switch (1) (L for left bowl, C for the central one and R for the right one) to activate the mixer components, then select the corresponding switch (2) to activate the cooling system in the freeze mode.
-
in order to activate the defrost mode: select the switch (1) (L for left bowl, C for the central one and R for the right one) to activate the mixer components, then select the corresponding switch (L) to activate the cooling system at a positive temperature.
c) The (E) switch controls the covers' LED lights.
! Warning ! If the machine is turned off at night, with the bowls filled, or just partially filled, a layer of solid ice may form on the surface, due to the natural separation of the unmixed product. In this case, before turning the machine back on, it is necessary to verify for the product complete melting in order to prevent damage to the mixing auger.
!CAUTION!
IPRO is equipped with an insulated bowl that will preserve the product temperature for many hours so once it will be necessary to operate in defrost/chill mode, we recommend to extend the duration of this operating mode until the product complete melting.
!Important!
Defrost or wash modes are not to be used in lieu of proper cleaning or sanitization procedures at the frequency of federal, state or local regulatory agencies.
CUT/OUT alarm and safety pressure switched intervention
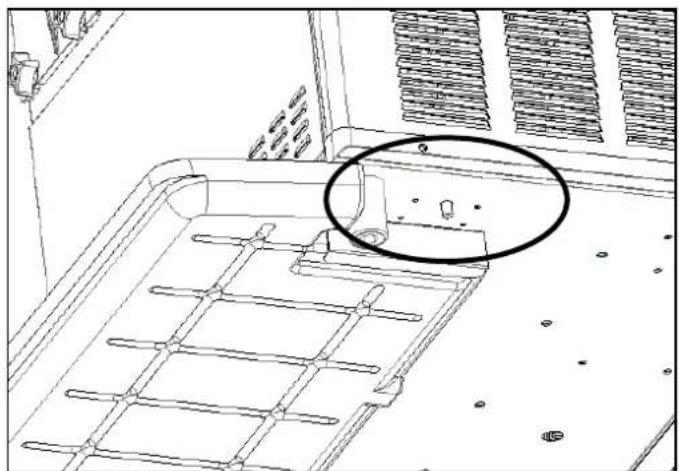
If the unit is equipped with the safety pressure switch, the red light F on the unit right side, advices the user when the safety pressure switch has been activated and needs to be manually re-activated.
The manually re-start button is seated under the unit near the right side as indicated by the picture below.
Mechanical timer
If the unit is provided with a mechanical timer to automatically control the defrost mode, proceed with the timer regulation as described below:
Time regulation
- Set the hours by turning the external ring clockwise (fig.A);
CAUTION: the external ring is divided in two sectors of 12 hours each, respectively marked with AM for time hours between 0 and 12 and with PM for time hours between 12 and 24; verify to have correctly set the desired time hour on the desired side of the ring.
- Set the minutes by turning the minutes hand on the internal ring clockwise (fig.B);
The timer is powered when the plug is connected to the mains, in case the unit is disconnected, it has an internal battery that will keep the right time for 150 hours.
Timer activation
CAUTION: the timer is able to modify the unit behaviour only when the unit itself is operating in freeze or defrost mode.
In order to activate the timer into a precise time period, it is sufficient to move the correspondent tabs from the internal OFF to the external ON position (fig.C).
When the timer is activated (white tabs on the external ring on the ON position, fig.C), the unit will operate in defrost mode also if the switch number 2 is in the freeze position.
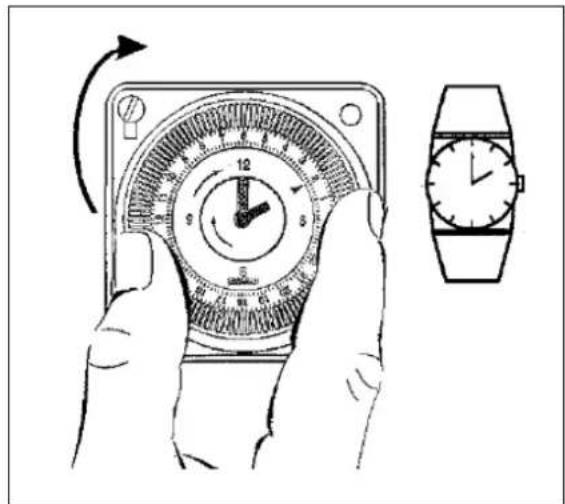
Fig. A
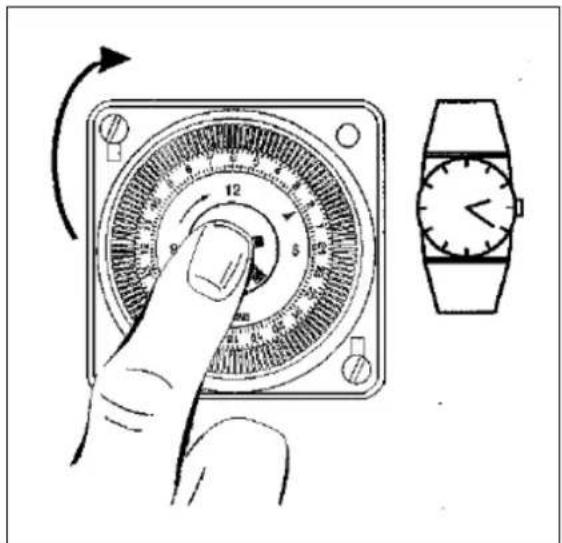
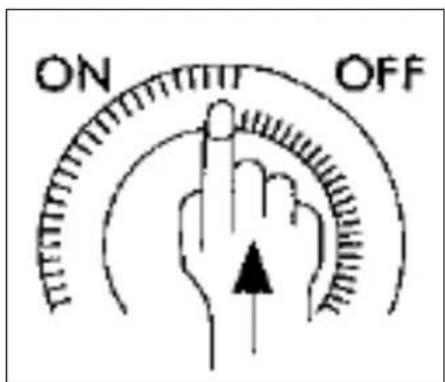
Fig. B
Fig. C
11. OPERATING INSTRUCTIONS
a) To dispense the product, position the cup under the tap and pull the dispensing lever (see figure 12).
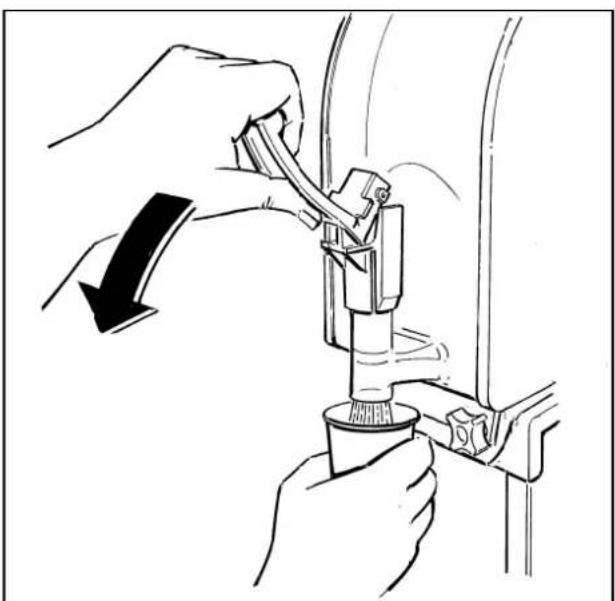
Fig. 12
b) Adjusting the consistency: to alter the consistency of the product, turn the screws located on the back of the machine in the following way: clockwise to make the product less dense, counter clockwise to make the product denser (see figure 13).
Important
This device only changes the consistency of the product to be dispensed. It does not affect the cooling temperature of the product.

Caution

When the level of the slush inside the bowl is below the mixing spiral, to prevent the product from becoming too thick, it is necessary to refill the bowl.
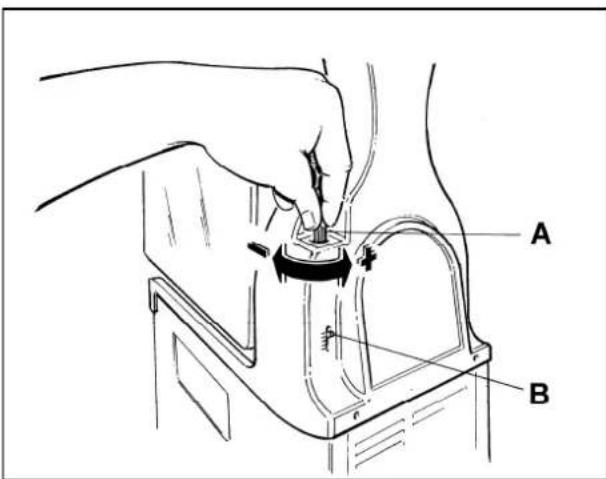
Fig. 13
12. DAILY CLEANING AND SANITIZING PROCEDURES
In order to maintain the machine in like-new operating condition and to respect current regulations, it's absolutely necessary to frequently and carefully perform the cleaning and sanitizing operations as described below.
In case of prolonged shutdown (winter storage), the machine must be disassembled, washed and sanitized according to the instructions in this manual before start-up to ensure the best possible cleanliness.
Caution
Electric shock hazard. Do not splash water on switches or allow water to flow onto electrical components inside the machine.
Caution
To prevent bacteria growth, use only sanitizers approved for plastic and rubber objects, failure to do so could create a health hazard.
NOTE: it is responsibility of the operator to be aware of and conform to the requirements of current local, state and federal laws concerning the frequency of cleaning and conservation of products used.
The cleaning instructions explained in this section are essential procedures to remove bacteria and maintain a sanitarily clean machine.
We recommend to perform the cleaning and sanitizing procedures every day, when using perishable products, at the frequency of federal, state or local regulatory agencies.
The machine and the mix manufacturers decline all responsibility to damage that directly or indirectly derives from people, animals, as consequence of failure to comply with all cleaning and sanitation instructions indicated in this manual.
DRINK SYSTEMS
- Empty the bowl of any remaining product.
- After unlocking the main cover with its key, remove it.
- Fill the bowl with lukewarm water to help melt off any sugar residuals and drain this water before proceeding with the next step.
Caution
To avoid electrical shock or contact with moving parts, before proceeding with the disassembling operations, make sure all switches are in "OFF" position and that the main power supply is disconnected.
- Unscrew and slip off the knobs (fig.14) then lower the bowl to eliminate any product residue through the dispensing tap.
- Slightly move up and down the bowl as shown in figure 15 while pulling it outwards, this operation will help fully removing it from its seating.
- Simultaneously apply pressure to the two securing tabs (Q), and lift the dispensing tap (I) to pull it out of its fixed position (see figure 16).
- Disassemble the dispensing tap by keeping the indicated part (R) pressed down and slipping off the dispensing lever (L) (see figure 17).
- Thoroughly wash each single part with hot water and mild dish washing detergent, rinse well, and reassemble the parts.
Caution
To prevent bacteria growth, remove all o-rings when cleaning.
Failure to do so could create a health hazard.
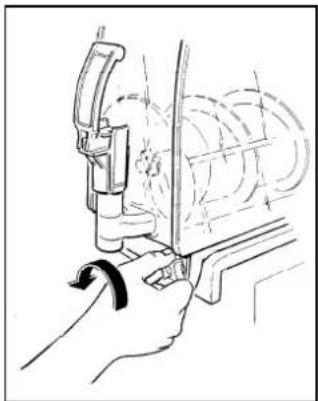
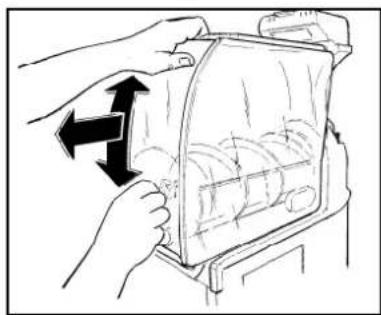
Fig. 14
Fig. 15
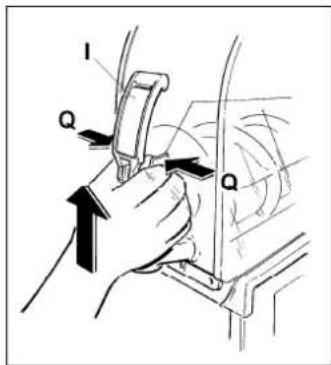
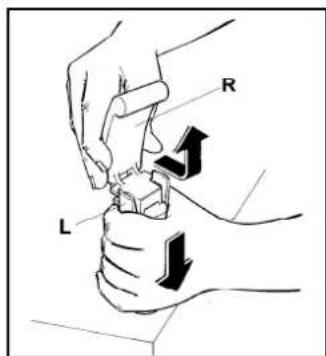
Fig. 16
Fig. 17
- Unscrew the securing bolt (S) in the direction of the arrow (threading on the left), pull off of the mixing unit (U), and remove the sealing washers (X) and (T) (see figure 18).
Caution
Avoid the use of abrasive cleaners which can damage the finish. Do not put the parts in a dishwasher. Dishwasher may damage some parts such as the clear plastic bowls and auger gears.
- Thoroughly wash all the removed components with hot water and mild dishwashing detergent, but do not use abrasive detergents or powders that can damage the bowl.
- Bring KAY-5® Sanitizer/Cleaner with a 100ppm dilution (1 Oz packet of KAY-5® +2 ½ gallons of water) (the sanitizing product shall comply with 40 CFR §180.940).
IMPORTANT!
The type and concentration of sanitizing agent shall comply with 40 CFR §180.940
- Rinse well and then place all the components in the sanitizer solution; for proper sanitizing the parts must remain fully plunged as recommended by the sanitizer manufacturer (KAY-5 sanitizer suggest at least 1-2 minutes).
IMPORTANT
Carefully follow the instructions of the sanitizer manufacturer with regard to timing and method of use.
- Once the correct times for sanitising have been respected, remove and dry all components on a clean surface. DO NOT RINSE.
- Thoroughly wash the evaporator and the drip tray surfaces with a sponge soaked with the sanitizer (see fig.19), leave at least 1-2 minutes and let it dry, do not rinse.
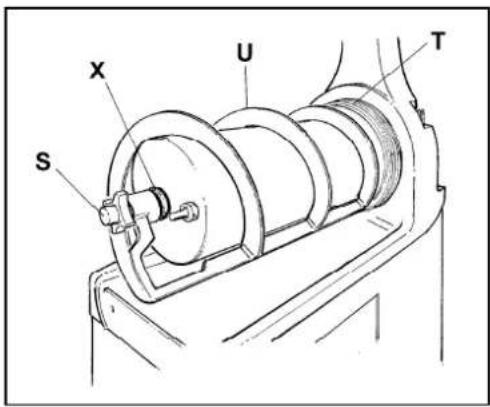
Fig. 18
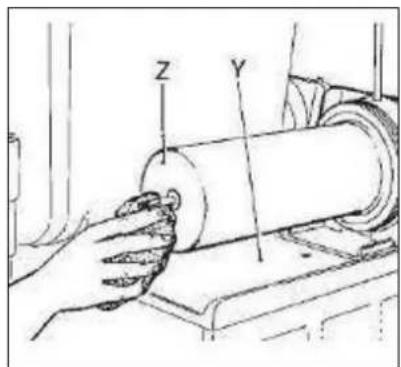
Fig. 19
Once performed all these cleaning and sanitizing procedures, it's possible to reassemble all the components.
The correct assembly of the device is essential to prevent leakage of product and damage of the machine. To assemble the machine you will need an approved lubricant (such as Vaseline).
Make sure all parts have been washed and sanitized before assembling. Persons assembling the machine must first wash and sanitize their hands and forearms with an approved sanitizer.
-
Mount the mixing system back together (fig.18), according to the following procedures:
-
Spread the suction gaskets (X) with Vaseline grease to reduce friction and thus limit wear (fig.20).
- Mount the bowl seal (T) making sure it faces the right direction (fig.21).
- Assemble the scraper auger (U), making sure the head is perfectly engages with the driving shaft.
-
Secure all the parts into place by screwing the bolt (S) in a counter clockwise direction.
-
Mount the bowl back on, positioning it into place, and making sure that it has a tight hold on its gasket (see figure 23). To facilitate this procedure, we also suggest that the rear part of the bowl be moistened at the point in which it fits together with its sealing (fig.22).
- Secure the bowl by tightening the two knobs, without exerting excessive pressure.
IMPORTANT
Do not over tighten the bowl knobs. Excessive force could damage the thread and/or the bowl itself.
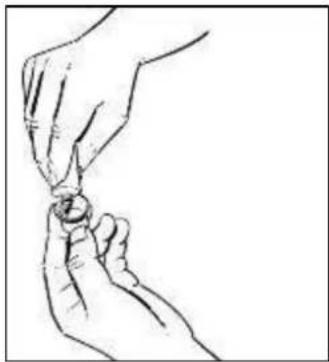
Fig. 20
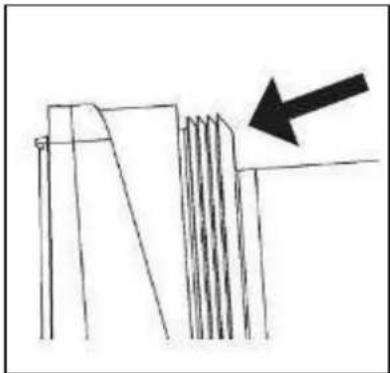
Fig. 21
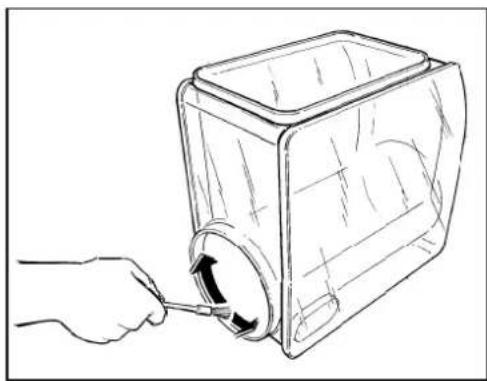
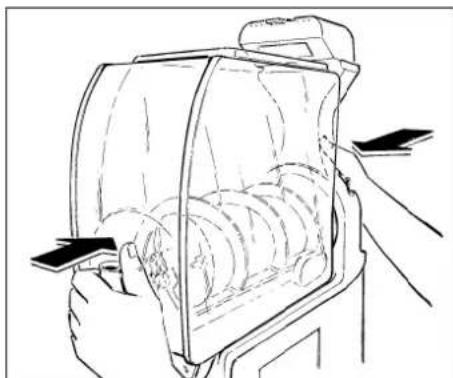
Fig. 22
Fig. 23
- Reassemble the parts of the dispensing tap, making sure that the gaskets (J) are lubricated with Vaseline grease so that the tap slides smoothly back into its fixed position, until it's completely inserted (see figure 24).
!Important! The not perfect sliding of the tap compromises its own seal.
- Remove the drip tray and pulling it forward (see figure 25). Wash each part thoroughly, then reassemble the parts by inversely following the procedures described above.
- Plug the unit back into appropriate power supply.
- After the cleaning and reassembly as per above instructions, fill the bowl with a mix of water and an approved sanitizer (KAY-5® Sanitizer), according to the measures specified.
- Start the mixing part of the machine to sanitize all the parts following the cleaning solution specifications.
-
Drain the cleaning solution as follows:
-
Unscrew the two knobs;
-
Then lower the bowl to drain out any remaining product through the dispensing valve.
-
Screws the knobs to fix the bowls.
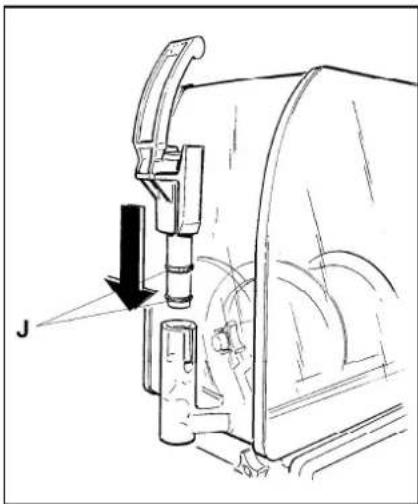
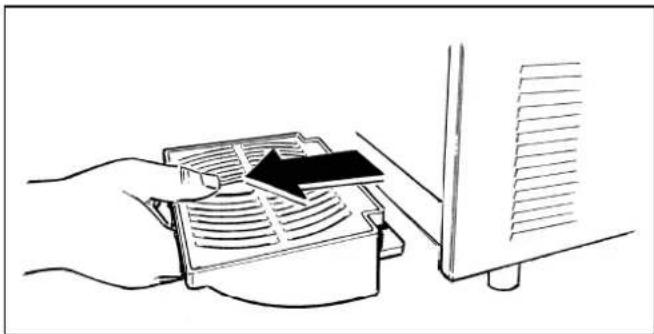
Fig. 24
Fig. 25
SANITIZING
Whenever the machine has remained unused for some days after been cleaned and sanitized as described in the chapter 11, the sanitizing procedures described below must be performed just prior to start-up the machine.
-
Remove the main cover and the secondary transparent one.
-
Fill the tank with water and sanitizer for objects for food use (use KAY-5®
Sanitizer/Cleaner with a 100ppm dilution (1 Oz packet of KAY-5 ^+ 2 12 gallons of water) (the sanitizing product shall comply with 40 CFR 180.940 ), carefully following the doses prescribed by the manufacturer of the same.
- After restoring the main cover, switch on the machine and let the auger rotating leaving the sanitizing solution for the time specified by its producer.
IMPORTANT Do not leave the sanitizer in the tank for longer periods than those prescribed by the manufacturer
-
Drain the solution by opening the plunger to allow the bowl to empty. Open and close the plunger at least 10 times during draining to sanitize the product way out area also.
-
Thoroughly rinse repeating these operations with clean water instead of sanitizer solution.
-
The machine is ready to be used.
Before proceeding with any maintenance operation, it is compulsory to switch off the machine and unplug it from the mains.
Condenser cleaning
In order to guarantee good cooling system performance, the condenser must be well cleaned every month.
How to reach it:
- Switch off the power supply and disconnect the power cable;
- Unscrew the knob (K) in order to remove the back panel (see figure 26).
- Remove the panel and the filter and clean it properly with water or vacuum cleaner.
- Replace the clean filter inside the back panel and reinstall the panel on the machine.
!ATTENTION!
Failure to maintain a clean filter and condenser will cause damage to the unit and consequently void the warranty.
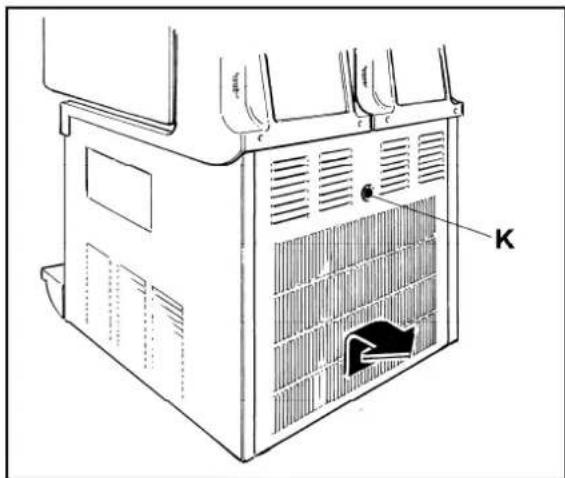
Fig. 26
Control and replacement of seals
BOWL GASKET (LOCATED AT THE REAR OF BOWL)
Replace it every 12 months according to the conditions of use and level of maintenance.
DISPENSE VALVE O-RING
The dispense valve o-rings should be replaced as necessary when wear is evident. Lubricate them each time they are replaced or the dispense valve is removed for cleaning.
SUCTION GASKET
Replace every 3 months according to the conditions of use and level of maintenance. This part should be lubricated during the re-assembly after every cleaning with Vaseline.
EVAPORATOR HARD SEAL
Replace every 9 to12 months according to the conditions of use and level of maintenance.
14. DISCLAIMER
The manufacturer declines all responsibility for any damage that directly or indirectly might be brought on to people, things, animals, as a consequence of failure to comply with all instructions given in this manual with the warnings concerning installation procedures, use and maintenance of the machine.
The manufacturer cannot be held responsible for possible mistakes due to printing, copying or translating errors contained in this manual. In addition, the manufacturer reserves the right to modify what deemed necessary or useful for the machine, as well as for the benefit of the user, yet at the same time maintaining the essential operative and safety characteristics of said machine.
Winter storage
To protect the unit during seasonal shutdown, it's important to properly store the machine using the following procedures:
- Disconnect all power to the freezer.
- Disassemble, wash and sanitize all parts that come into contact with the mix as described in chapter 11.
- Clean also all the exterior panels.
- Reassemble all these parts.
- Cover the machine with the original package to protect it from dust or other contaminating elements.
- Place the machine in dry location.
15. TROUBLESHOOTING GUIDE
NOTE: the following procedures must be performed by a qualified service technician.
| Problem Possible cause Solution | ||
| The machine does not cool, or cools only partially and the compressor is running | · The space around the machine is inadequate for ventilation · The refrigeration system is working in DEFROST mode · The condenser filter is clogged with airborne particles · Fan motor is not running · Refrigerant is leaking | · Allow at least 20cm between the machine and anything next to it; keep it away from heat sources · Return to FREEZE mode · Clean the filter · Check the fan motor's electrical connections and, if disconnected, reconnect. If still not operating, replace the motor · Locate the leak, eliminate it and recharge the system |
| The machine does not cool, or cools only partially and the compressor is not running | · Electrical components of the compressor are not functioning · Some electrical connections are not complete · The compressor is malfunctioning · No current is coming to the electronic board | · Replace the malfunctioning components · Check the contacts and correct those incomplete · Replace the compressor · Check the electrical connections to the pc board as well as the transformer feeding the PC board and correct |
| The machine over-freeze, making the auger movement slow or stopped | · The product brix is too low · The screw setting for the consistency control system is set too far toward the "+" position · The limit micro-switch arm is bent away from the gear motor and prevents contact · The level of the product in the bowl is too low · The compressor PC board contact don't open | · Check the product brix and correct · Reset the screw toward the "-" position to produce a thinner consistency product · Using pliers, straighten the limit switch arm · Add more product or turn the refrigeration "Off" · Replace the PC board |
| The machine is noisy | · The fan motor blades are hitting internal components | · Check and correct |
| The main power switch is "ON" but the unit s not running | · The fuses are blown · Some electrical connections are not complete · The control board is faulty · The gear motor is malfunctioning | · Replace the fuses · Check the contacts and correct those incomplete · Replace the control board · Replace the gear motor |
| The bowl is leaking | · One of the bowl seal is not in place | · Replace or reposition the seal |
| The dispensing valve is leaking | · The dispensing valve has been incompletely or incorrectly replaced in its position · The free movement of the valve is impeded · Dispensing valve o-rings are damaged | · Reassemble and replace · Clean and lubricate the valve and the valve cylinder with the lubricant provided with the machine · Replace the o-rings |
| Product is flowing into drip tray through drainage pipe | · The bell shaped seal between the front of the cylinder and the auger hub has not been reinstalled properly · The bell shaped shaft seal or the spindle bushing seal is damaged or worn | · Find the seal and put it back in place · Replace the damaged/worn seal and check the condition of the drive shaft |
| The auger is not turning | · Some electrical connections are not complete · The control board is faulty · The gear motor is malfunctioning | · Check the contacts and correct those incomplete · Replace the control board · Replace the gear motor |
| The auger is creating noise as it rotates | · The bell shaped shaft seal has been replaced without lubrication or is damaged · The auger has been incompletely or incorrectly reassembled | · Replace or clean and lubricate with the lubricant provided with the machine · Check and correct |
DRINK SYSTEMS
| “FILTER” or “CUT/OUT” message appears on the capacitive touch panel | ·The filter is dirty and needs to be cleaned ·The unit is positioned too close to a wall or other object restricting air flow and causing the machine to run at a higher temperature ·The filter is not properly installed ·The unit has been installed near a heat source, such as a coffee machine, ice maker or cold beverage machine which expels hot air from its vents, causing the machine to run at a high temperature. | ·Clean and replace filter following instructions ·Reposition unit to maximize ventilation space (see installation figures) ·Properly install filter see ·Reposition unit to maximize ventilation space (see installation figures) |
| Board error code | Possible cause | Solution |
| E14 or E24 or E34 message appears on the capacitive touch panel display. 1, 2 e 3 are respectively the left, centre and right bowls. | The product consistency is too high An ice block is obstructing the auger rotation | Reduce the product consistency Remove ice blocks |
| E15 or E25 or E35 message appears on the capacitive touch panel display. 1, 2 e 3 are respectively the left, centre and right bowls. | An ice block is blocking the auger rotation The gear motor is defective | Remove ice blocks Replace the gear motor |
| E11 or E21 or E31 message appears on the capacitive touch panel display. 1, 2 e 3 are respectively the left, centre and right bowls. | The temperature probe of the corresponding bowl is short circuited. | Check and replace the probe |
| E12 or E22 or E32 message appears on the capacitive touch panel display. 1, 2 e 3 are respectively the left, centre and right bowls. | The temperature probe of the corresponding bowl is disconnected. | Check and connect the probe |
| E01 or E04 or E05 or E06 message appears on the capacitive touch panel display. | The control board is defective | Replace the board |
| E02 message appears on the capacitive touch panel display. | The condenser temperature probe is short circuited. | Check and replace the condenser probe |
| E03 message appears on the capacitive touch panel display. | The condenser temperature probe is disconnected. | Check and connect the condenser probe |
Cher Client,
© 2018 - SPM Drink Systems
with certified quality
management system
UN EN ISO 9001

Crathco
Service/Tech Calls
Grindmaster-Cecilware
4003 Collins Lane, Louisville, KY 40245 USA
Phone: 502.425.4776 Toll Free: 800.695.4500
Fax: 502.425.4664
Web: gmcw.com Email: info@gmcw.com