
OCEAISH1000W3 - Heating OCEANIC - Free user manual and instructions
Find the device manual for free OCEAISH1000W3 OCEANIC in PDF.
| Product type | Fixed electric dry-core radiator |
| Brand | Oceanic |
| Model | OCEAISH1000W3 |
| Reference | HT10PMB1 |
| Rated power | 1000 W |
| Supply voltage | 230 V ~ |
| Frequency | 50 Hz |
| IP protection rating | IPX4 |
| Electrical class | II |
| Pilot wire | 6 orders (Comfort, Comfort -1, Comfort -2, Eco, Frost-free, Standby) |
| Operating modes | Comfort, Eco, Frost-free, Pilot |
| Programmer | Weekly schedule (3 predefined programs + customizable) |
| Open window detection | Yes, switchable |
| Keyboard lock | Yes, activation by pressing M button for 3 seconds |
| Temperature range | Comfort/Pilot: 5°C to 29°C; Eco: 1.5°C to 25.5°C |
| Display | LCD screen with icons |
| Installation | Vertical wall mounting, do not install below an outlet |
| Electrical connection | Direct to wall box, without plug, with 30 mA RCD, without earth wire |
| Maintenance and cleaning | Unplug and let cool. Vacuum cleaner for grills, damp cloth for exterior. Do not immerse. |
| Safety | Do not cover; do not use with external programmer; child protection (0-3 years under supervision, 3-8 years limited) |
| Country of manufacture | Not specified |
Frequently Asked Questions - OCEAISH1000W3 OCEANIC
User questions about OCEAISH1000W3 OCEANIC
0 question about this device. Answer the ones you know or ask your own.
Ask a new question about this device
Download the instructions for your Heating in PDF format for free! Find your manual OCEAISH1000W3 - OCEANIC and take your electronic device back in hand. On this page are published all the documents necessary for the use of your device. OCEAISH1000W3 by OCEANIC.
USER MANUAL OCEAISH1000W3 OCEANIC
ACCESSIONS (non fournis)
PLEASE READ SAFETY INSTRUCTIONS CAREFULLY BEFORE USING THE UNIT AND SAVE IT.
- This appliance can be used by children aged from 8 years and above and persons with reduced physical, sensory or mental capabilities or lack of experience and knowledge if they have been given supervision or instruction concerning use of the appliance in a safe way and understand the hazards involved. Children shall not play with the appliance. Cleaning and user maintenance shall not be made by children without supervision.
- Children of less than 3 years should be kept away unless continuously supervised.
- Children aged from 3 years and less than 8 years shall only switch on/off the appliance provided that it has been placed or installed in its intended normal operating position and they have been given supervision or instruction concerning use of the appliance in a safe way and understand the hazards involved.
- Children aged from 3 years and less than 8 years shall not plug in, regulate and clean the appliance or perform user maintenance.
-
CAUTION — Some parts of this product can become very hot and cause burns. Particular attention has to be given where children and vulnerable people are present.
-
If the power cord is damaged, it must be replaced by the manufacturer, its service agent or similarly qualified persons in order to avoid a hazard.
- The appliance should not be placed immediately below a socket.

WARNING : In order to avoid overheating, do not cover the heater.
- Do not use this heater with a programmer, timer, separate remote control system or any other device that turns on the heater automatically because there is a risk of fire if the device is covered or placed incorrectly. Use only a remote control device connected by the pilot cable.
- The device must be powered by a Residual Current Device (RCD) with a rated operating differential current of not more than 30mA .
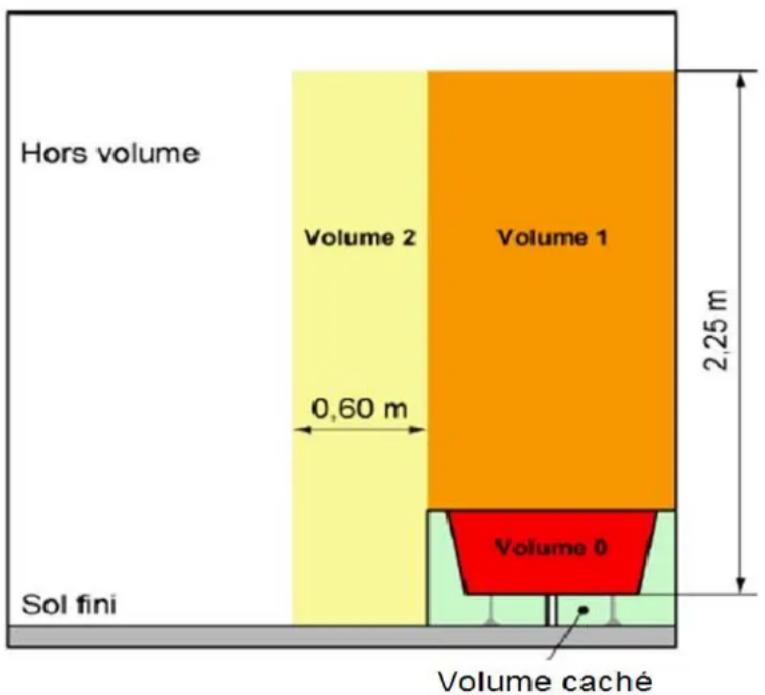
- Warning: if this appliance is installed in a bathroom, it must be installed at least 60~cm from a bath or shower (volume 2), in accordance with the requirements of the French electrical installation standard NFC 15 -100.
- The device must be connected to a circuit independent electric protected by a bipolar circuit breaker according to the standard electrical installation NF C 15-100.
- Means for disconnection from the supply mains having a contact separation in all poles must be incorporated in the fixed wiring in accordance with the wiring rules.
- With respect to the details of how to install the appliance onto the wall, refer to the "INSTALLATION" section.
- Regarding the detailed information on the connection of the electric cable, refer to the section "ELECTRICAL CONNECTION".
INSTALLATION
RECOMMENDATIONS IMPORTANT READ BEFORE INSTALLATION
- Do not install the unit directly below a socket.
- Do not use the appliance outdoors.
- Do not install the unit in an air current that could disrupt its regulation.
- Do not place the unit near a barrier limiting the airflow around it.
- Attach the heater vertically to the wall as described below.
- Choose screws and plugs suitable for the wall material and weight of the unit.
RECOMMENDATIONS FOR WALL MOUNTING
Do not make any changes to the unit or its mounting bracket on the wall!
Before installing the device, check the condition of the wall on which it will be fixed: the wall must be in good condition, it must not show any damage (cracks, sagging, humidity, ...).
Do not drill holes near old holes, even when they are
closed.
It is imperative that you consult a building professional to use the anchoring system (screws, dowels, etc.) appropriate for the material that constitutes your wall, as well as the weight of the appliance. Observe the diameter of the fixing screws indicated in this manual.
Do not modify the holes for securing the unit or its mounting bracket to the wall.
Drill the wall with a drill of the appropriate size for the anchoring system. Remove debris and dust.
Regularly check the mounting points of the device on the wall. Tighten them if necessary.
INSTALLATION IN THE BATHROOM
Warning: this product shall be used in volume 2 and out of volume only according to the national wiring rules (For France NF C 15-100)
Note: The drawing is for reference only.
We suggest that you contact a professional electrician for assistance.
ELECTRICAL CONNECTION
CAUTION: Before working, turn off the electricity at the main circuit breaker.
- The installation must be carried out in the rules of the art and meet the standards in force in the country (NF C 15-100 in France).
- The unit must be connected to a standard wall box placed at least 25~cm from the floor.
- The appliance must not be connected to an outlet with a power plug.
- The appliance must be supplied through a residual current device (RCD) having a rated residual operating current not exceeding 30mA .
- The appliance must not be connected to the earth wire (yellow and green wire).
ELECTRICAL CONNECTION
Blue or light gray wire connect to Neutral (230V) Brown or red wire connect to Phase (230V) Black wire connect to pilot wire. (Optional function to use in case of control by pilot wire box)
WARNING! (Do not connect the black wire to the ground).
- In the absence of pilot wire, insulate the bare end of the black wire to prevent electrical contact with the other wires or ground.
WALL-MOUNTED KITS (not provided)
| Description | Drawing | Spec | QTY |
| Screw | 4 x 30 mm | 4 | |
| Wall plug | Φ8 | 4 |
INSTALLATION
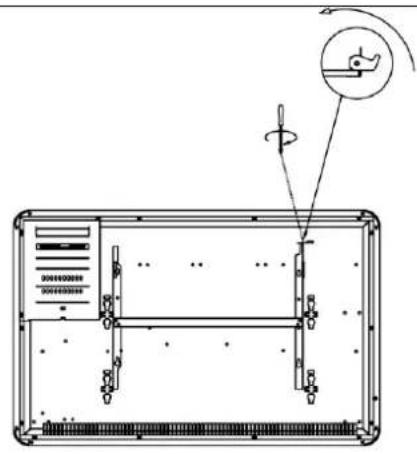
To hang the heater on the wall:
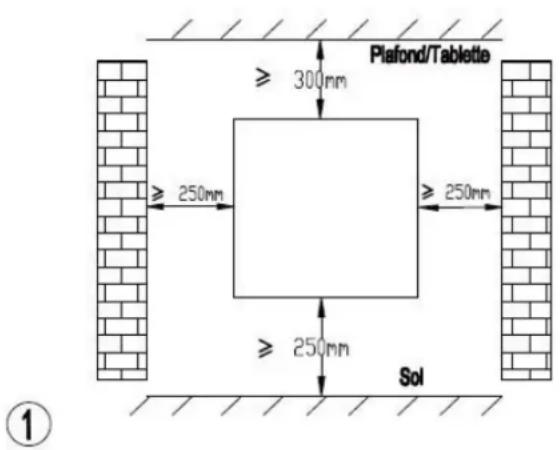
Choose a suitable location for the radiator (respect the minimum distances)
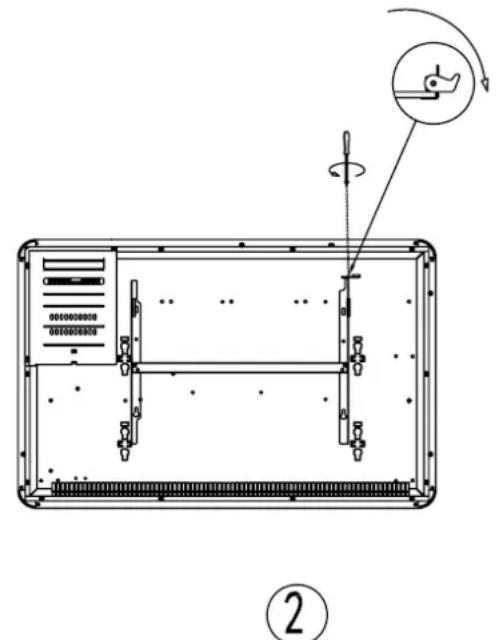
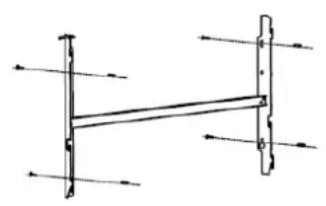
Loosen the bracket fixing screw without unscrewing it completely. Slide the metal latch out of the hole. Remove the bracket by pulling down.
③
Position the wall bracket where you want it. Make sure the spirit level is horizontal.
Mark the location of the 4 wall fixing screws.
Drill the wall to fix the appropriate anchoring system.
Fix the bracket to the wall.
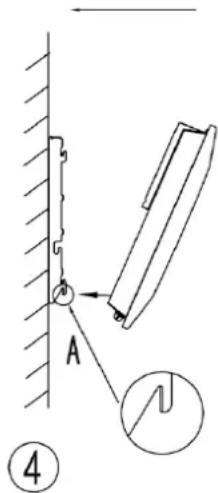

Place the heater against its wall mount bracket:
A: Position the radiator so that its lower holes align with the hooks on the mounting bracket.
B: Push the heater down until the hooks fit into the holes.
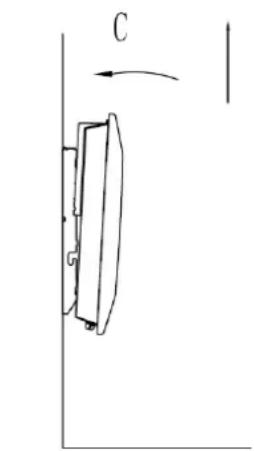
C: Position the radiator so that its upper holes align with the hooks on the mounting bracket.
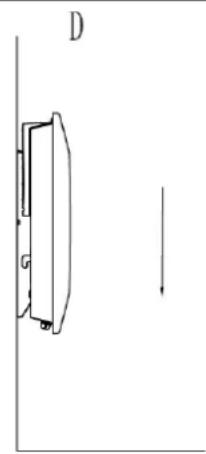
D: Pull the unit down.
(5)
Slide the metal latch into the hole.
Tighten the screw to lock the radiator on the bracket.
LCD DISPLAY
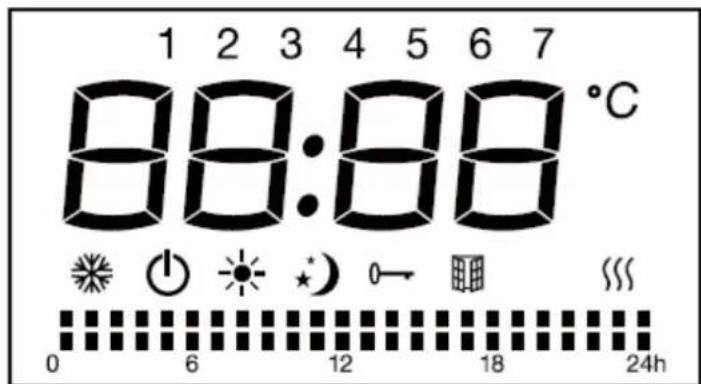
Functions of the icons on the LCD:
| Symbol | Function |
| ① | Mode Standby (the appliance doesn’t work but with power on) |
| ® | Mode Anti-freeze (the appliance maintains the temperature around 7°C) |
| ● | Mode Comfort (set the desired temperature) |
| ◎ | Mode ECO (ECO maintains the temperature that is 3.5 °C lower to comfort temperature. This mode reduces the temperature without disturbing the desired temperature in comfort mode) |
| P | Mode P (under this mode, control the appliance via external pilot device) |
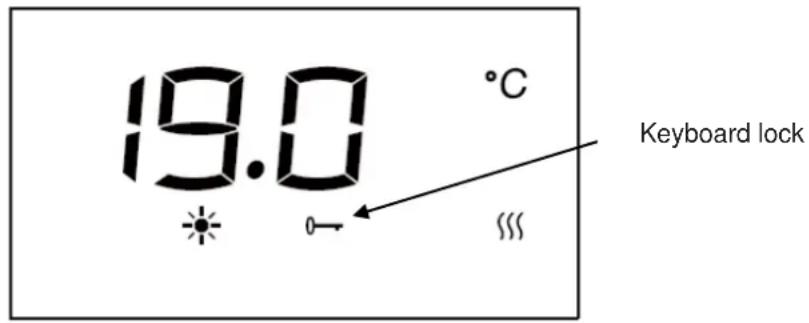
| → | keyboard lock |
| Window detector function | |
| Heating indicator (When appliance is heating up, this icon will show on the screen. The icon will disappear when detected temperature reach the set temperature.) | |
| °C | Temperature (centigrade) |
| I | Mode Comfort active |
| I | Mode ECO active |
CONTROL PANEL


oceanic
| Button | Function |
| ① | Standby |
| PRG | To choose the weekly personalized program |
| ② | To select Window detector function |
| M | Mode comfort Mode eco Mode anti-freeze P1 / P2 / P3 / P |
OPERATION
1. Setting the time and turning on the device
For the first time you use the device, after connection to the power supply:
Press to toggle between hours / minutes / day of the week (1-7). Press the button
to set the hours / minutes / day of the week. Press the button to complete the setting and return to standby mode, otherwise after 10 seconds without action the unit will automatically return to standby mode.
If the device is in operation (changing the time setting):
Press both and buttons at the same time and enter the time setting. Press to toggle between hours / minutes / day of the week (1-7). Press the button to set the hours / minutes / day of the week. Press any button other than or to save the setting, otherwise after 10 seconds without action the setting is automatically saved.
2. Touch M
Press M button to toggle among the modes: Comfort mode, Economic mode, Antifreeze mode P1/P2/P3/P.
In Pilot mode P, set the heating using the external timer. When the external programmer is set to another mode, the display shows:
| External Mode Setting | Icon Displayed |
| Comfort mode | P |
| Comfort mode | P-1 |
| Comfort mode | P-2 |
| Economic mode | P |
| Antifreeze mode | P |
| Standby mode | P① |
Pre-installed programs P1/P2/P3:
| P 1 | Mon-Sun | 01:00 00:00 00:00 | 24:00 00:00 08:00 | |||
| P 2 | day workables | 01:00 00:00 00:00 | 09:00 00:00 05:00 | 24:00 00:00 19:00 | ||
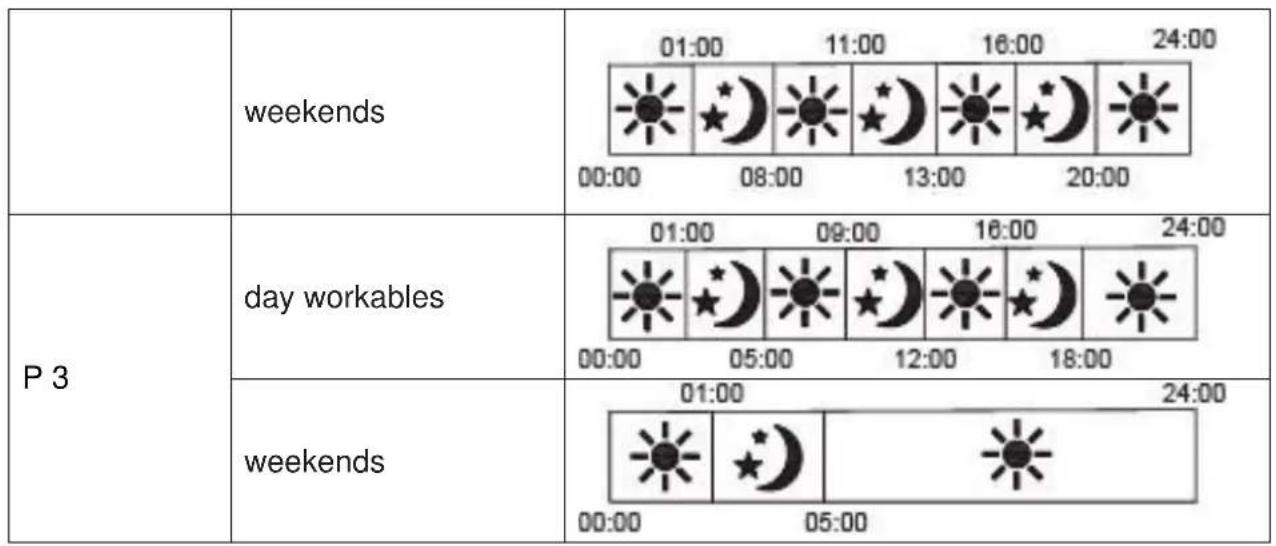
3. Touch PRG
Press the PRG button to choose one of the programs.
In PRG mode, Press PRG button to select between "day (1 for Monday -7 for Sunday)" and "heating mode of different periods (00:00-24:00)".
Select the desired day (1-7) by pressing / buttons.
Press the PRG button to set the "heating mode of different period (00:00-24:00)"
Press button to choose hours, and to choose among function: comfort , economic . After 30 seconds it will automatically finish.
For example: to select the day 1, temperature of 23^ , comfort mode for 24 hours:
- Press PRG, then / buttons to choose day 1.
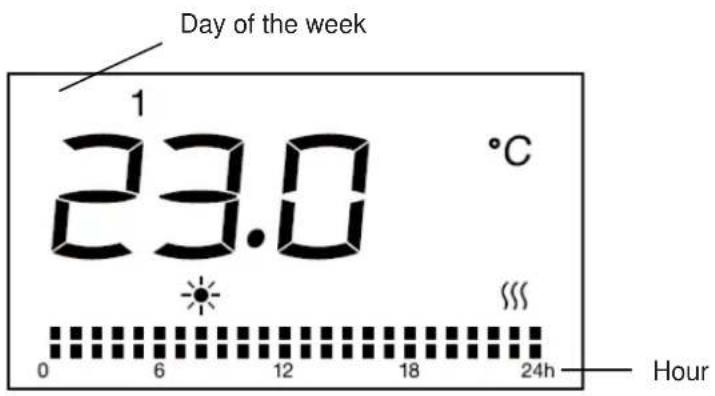
- Press the PRG button again, press to choose the hour, to choose comfort mode and then repeat for the entire 24 hours.
- After 30 seconds without action, the setting is saved.
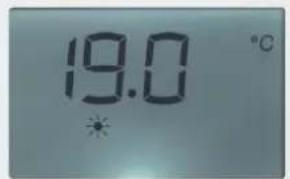
4. Temperature setting
In comfort modes, or pilot P or Eco (excluding anti-freeze mode), press or to select the desired set temperature. The temperature range for comfort mode and pilot mode is between 5^ and 29^ and for Eco mode is between 1.5^ and 25.5^ . The temperature difference between the ECO mode and the COMFORT mode is 3.5^ . Each time you press the buttons to adjust the temperature, you increase or decrease the temperature by 0.5^ . Press any other button except / to finish the setting, otherwise after 5 seconds without action the setting is saved. When the room temperature is higher than the selected temperature, the heater will stop heating.
5. Keyboard lock
Press M button for three seconds to activate the keyboard lock function, in order to unlock, press M again for three seconds.
Remarks:
- The keyboard lock function doesn't lock the standby button.
- The keyboard lock function will automatically be deactivated under below circumstances.
1) the appliance is put into standby mode by pressing standby button.
2) the appliance suffers power disconnection.
You need to set again by pressing M for 3 seconds if you need this function.
6. Window detector function
Press to enter window detector function. Then press “ / ” to choose “ON” or “OFF”. If “ON” is selected, the window detection function is activated and icon will show on the screen. When temperature decreases detected, the appliance will automatically enter anti-freeze mode with icon flashing. If temperature rises up, the appliance will go back to previous mode with icon on. You can choose “OFF” to inactivate the window detection function. Remarks: the window detector function is not available under anti-freeze mode.
7. In case of power failure
All the above settings for temperature, time, the date of week and the programs remain valid until the electric power is not cut.
In case of power failure, the device keeps in memory only the parameters, temperature and operating mode. When power is restored, the clock must be set again to operate the various programs correctly.
TECHNICAL CHARACTERISTICS
| Model / Ref | HT10PMB1/OCEAISH1000W3 | HT15PMB1/OCEAISH1500W3 | HT20PMB1/OCEAISH2000W3 |
| Nominal voltage | 230 V ~ | 230 V ~ | 230 V ~ |
| Rated frequency | 50 Hz | 50 Hz | 50 Hz |
| Nominal power | 1000 W | 1500 W | 2000 W |
| Class | II | II | II |
| IP | IPX4 | IPX4 | IPX4 |
| Pilot wire | 6 orders | 6 orders | 6 orders |
| Model identifier(s): HT10PMB1 (Ref: OCEAISH1000W3) | ||||||
| Item | Symbol | Value | Unit | Item | Unit | |
| Heat output | Type of heat input, for electric storage local space heaters only (select one) | |||||
| Nominal heat output | Pnom | 0,8 | kW | manual heat charge control, with integrated thermostat | NA | |
| Minimum heat output (indicative) | Pmin | NA | kW | manual heat charge control with room and/or outdoor temperature feedback | NA | |
| Maximum continuous heat output | Pmax,c | 0,8 | kW | electronic heat charge control with room and/or outdoor temperature feedback | NA | |
| Auxiliary electricity consumption | fan assisted heat output | NA | ||||
| At nominal heat output | eImax | 0 | kW | Type of heat output/room temperature control (select one) | ||
| At minimum heat output | eImin | 0 | kW | single stage heat output and no room temperature control | [no] | |
| In standby mode | eIsB | 0 | kW | Two or more manual stages, no room temperature control | [no] | |
| with mechanic thermostat room temperature control | [no] | |||||
| with electronic room temperature control | [no] | |||||
| electronic room temperature control plus day timer | [no] | |||||
| electronic room temperature control plus week timer | [yes] | |||||
| Other control options (multiple selections possible) | ||||||
| room temperature control, with | [no] | |||||
| presence detection | ||||||
| room temperature control, with open window detection | [yes] | |||||
| with distance control option | [no] | |||||
| with adaptive start control | [no] | |||||
| with working time limitation | [no] | |||||
| with black bulb sensor | [no] | |||||
| Contact details | OCEANIC 120-126 quai de Bacalan CS 11584 33000 BORDEAUX | |||||
| Model identifier(s): HT15PMB1 (Ref: OCEAISH1500W3) | ||||||
| Item | Symbol | Value | Unit | Item | Unit | |
| Heat output | Type of heat input, for electric storage local space heaters only (select one) | |||||
| Nominal heat output | Pnom | 1,1 | kW | manual heat charge control, with integrated thermostat | NA | |
| Minimum heat output (indicative) | Pmin | NA | kW | manual heat charge control with room and/or outdoor temperature feedback | NA | |
| Maximum continuous heat output | Pmax,c | 1,1 | kW | electronic heat charge control with room and/or outdoor temperature feedback | NA | |
| Auxiliary electricity consumption | fan assisted heat output | NA | ||||
| At nominal heat output | elmax | 0 | kW | Type of heat output/room temperature control (select one) | ||
| At minimum heat output | elmin | 0 | kW | single stage heat output and no room temperature control | [no] | |
| In standby mode | elsb | 0 | kW | Two or more manual stages, no room temperature control | [no] | |
| with mechanic thermostat room temperature control | [no] | |||||
| with electronic room temperature control | [no] | |||||
| electronic room temperature control plus day timer | [no] | |||||
| electronic room temperature control plus week timer | [yes] | |||||
| Other control options (multiple selections possible) | ||||||
| room temperature control, with | [no] | |||||
| presence detection | ||||||
| room temperature control, with open window detection | [yes] | |||||
| with distance control option | [no] | |||||
| with adaptive start control | [no] | |||||
| with working time limitation | [no] | |||||
| with black bulb sensor | [no] | |||||
| Contact details | OCEANIC 120-126 quai de Bacalan CS 11584 33000 BORDEAUX | |||||
| Model identifier(s): HT20PMB1 (Ref: OCEAISH2000W3) | ||||||
| Item | Symbol | Value | Unit | Item | Unit | |
| Heat output | Type of heat input, for electric storage local space heaters only (select one) | |||||
| Nominal heat output | Pnom | 1,5 | kW | manual heat charge control, with integrated thermostat | NA | |
| Minimum heat output (indicative) | Pmin | NA | kW | manual heat charge control with room and/or outdoor temperature feedback | NA | |
| Maximum continuous heat output | Pmax,c | 1,5 | kW | electronic heat charge control with room and/or outdoor temperature feedback | NA | |
| Auxiliary electricity consumption | fan assisted heat output | NA | ||||
| At nominal heat output | elmax | 0 | kW | Type of heat output/room temperature control (select one) | ||
| At minimum heat output | elmin | 0 | kW | single stage heat output and no room temperature control | [no] | |
| In standby mode | elsb | 0 | kW | Two or more manual stages, no room temperature control | [no] | |
| with mechanic thermostat room temperature control | [no] | |||||
| with electronic room temperature control | [no] | |||||
| electronic room temperature control plus day timer | [no] | |||||
| electronic room temperature control plus week timer | [yes] | |||||
| Other control options (multiple selections possible) | ||||||
| room temperature control, with | [no] | |||||
| presence detection | ||||||
| room temperature control, with open window detection | [yes] | |||||
| with distance control option | [no] | |||||
| with adaptive start control | [no] | |||||
| with working time limitation | [no] | |||||
| with black bulb sensor | [no] | |||||
| Contact details | OCEANIC 120-126 quai de Bacalan CS 11584 33000 BORDEAUX | |||||
IN CASE OF PROBLEMS
| Problem | Solution |
| The appliance does not heat | Ensure that the circuit breakers are switched on the installation, or the shredder did not cut the power supply (if the installation has one). |
| Select the COMFORT mode. | |
| Increase the temperature setting. | |
| The device heats permanently | Ensure that the device is not in a draft. |
| Reduce the temperature setting. |
CARE AND CLEANING
- Before cleaning the appliance, switch off the appliance supply and wait until it is completely cooled.
- Use a damp cloth to clean the housing of the device.
- Clean grilles and air outlet regularly. Never immerse the appliance in water or allow water to
ENVIRONMENTAL PROTECTION

This symbol is known as the 'Crossed-out Wheelie Bin Symbol'. When this symbol is marked on a product or battery, it means that it should not be disposed of with your general household waste. Some chemicals contained within electrical/electronic products or batteries can be harmful to health and the environment. Only dispose of electrical/electronic/battery items in separate collection schemes, which cater for the recovery and recycling of materials contained within. Your co-operation is vital to ensure the success of these schemes and for the protection of the environment.
Oceanic
120-126 Quai de Bacalan
CS 11584
33000 Bordeaux
IMPORTED BY :
A.M.C.
123, QUAI JULES GUESDE
94400 VITRY SUR SEINE
France
oceanic
www.oceanic.eu

- ACCESSIONS (non fournis)
- PLEASE READ SAFETY INSTRUCTIONS CAREFULLY BEFORE USING THE UNIT AND SAVE IT.
- INSTALLATION
- RECOMMENDATIONS IMPORTANT READ BEFORE INSTALLATION
- RECOMMENDATIONS FOR WALL MOUNTING
- INSTALLATION IN THE BATHROOM
- ELECTRICAL CONNECTION
- WALL-MOUNTED KITS (not provided)
- LCD DISPLAY
- CONTROL PANEL
- OPERATION
- Setting the time and turning on the device
- Touch M
- Touch PRG
- Temperature setting
- Keyboard lock
- Remarks:
- Window detector function
- In case of power failure
- TECHNICAL CHARACTERISTICS
- IN CASE OF PROBLEMS
- CARE AND CLEANING
- ENVIRONMENTAL PROTECTION
- oceanic
Brand : OCEANIC
Model : OCEAISH1000W3
Category : Heating