Neptune Full Sun ODTV6504 - TV Peerless-AV - Free user manual and instructions
Find the device manual for free Neptune Full Sun ODTV6504 Peerless-AV in PDF.
User questions about Neptune Full Sun ODTV6504 Peerless-AV
0 question about this device. Answer the ones you know or ask your own.
Ask a new question about this device
Download the instructions for your TV in PDF format for free! Find your manual Neptune Full Sun ODTV6504 - Peerless-AV and take your electronic device back in hand. On this page are published all the documents necessary for the use of your device. Neptune Full Sun ODTV6504 by Peerless-AV.
USER MANUAL Neptune Full Sun ODTV6504 Peerless-AV
Full Sun Outdoor Smart TVs
SYSTEM INSTALLATION AND ELECTRICAL REQUIREMENTS
Electrical Code
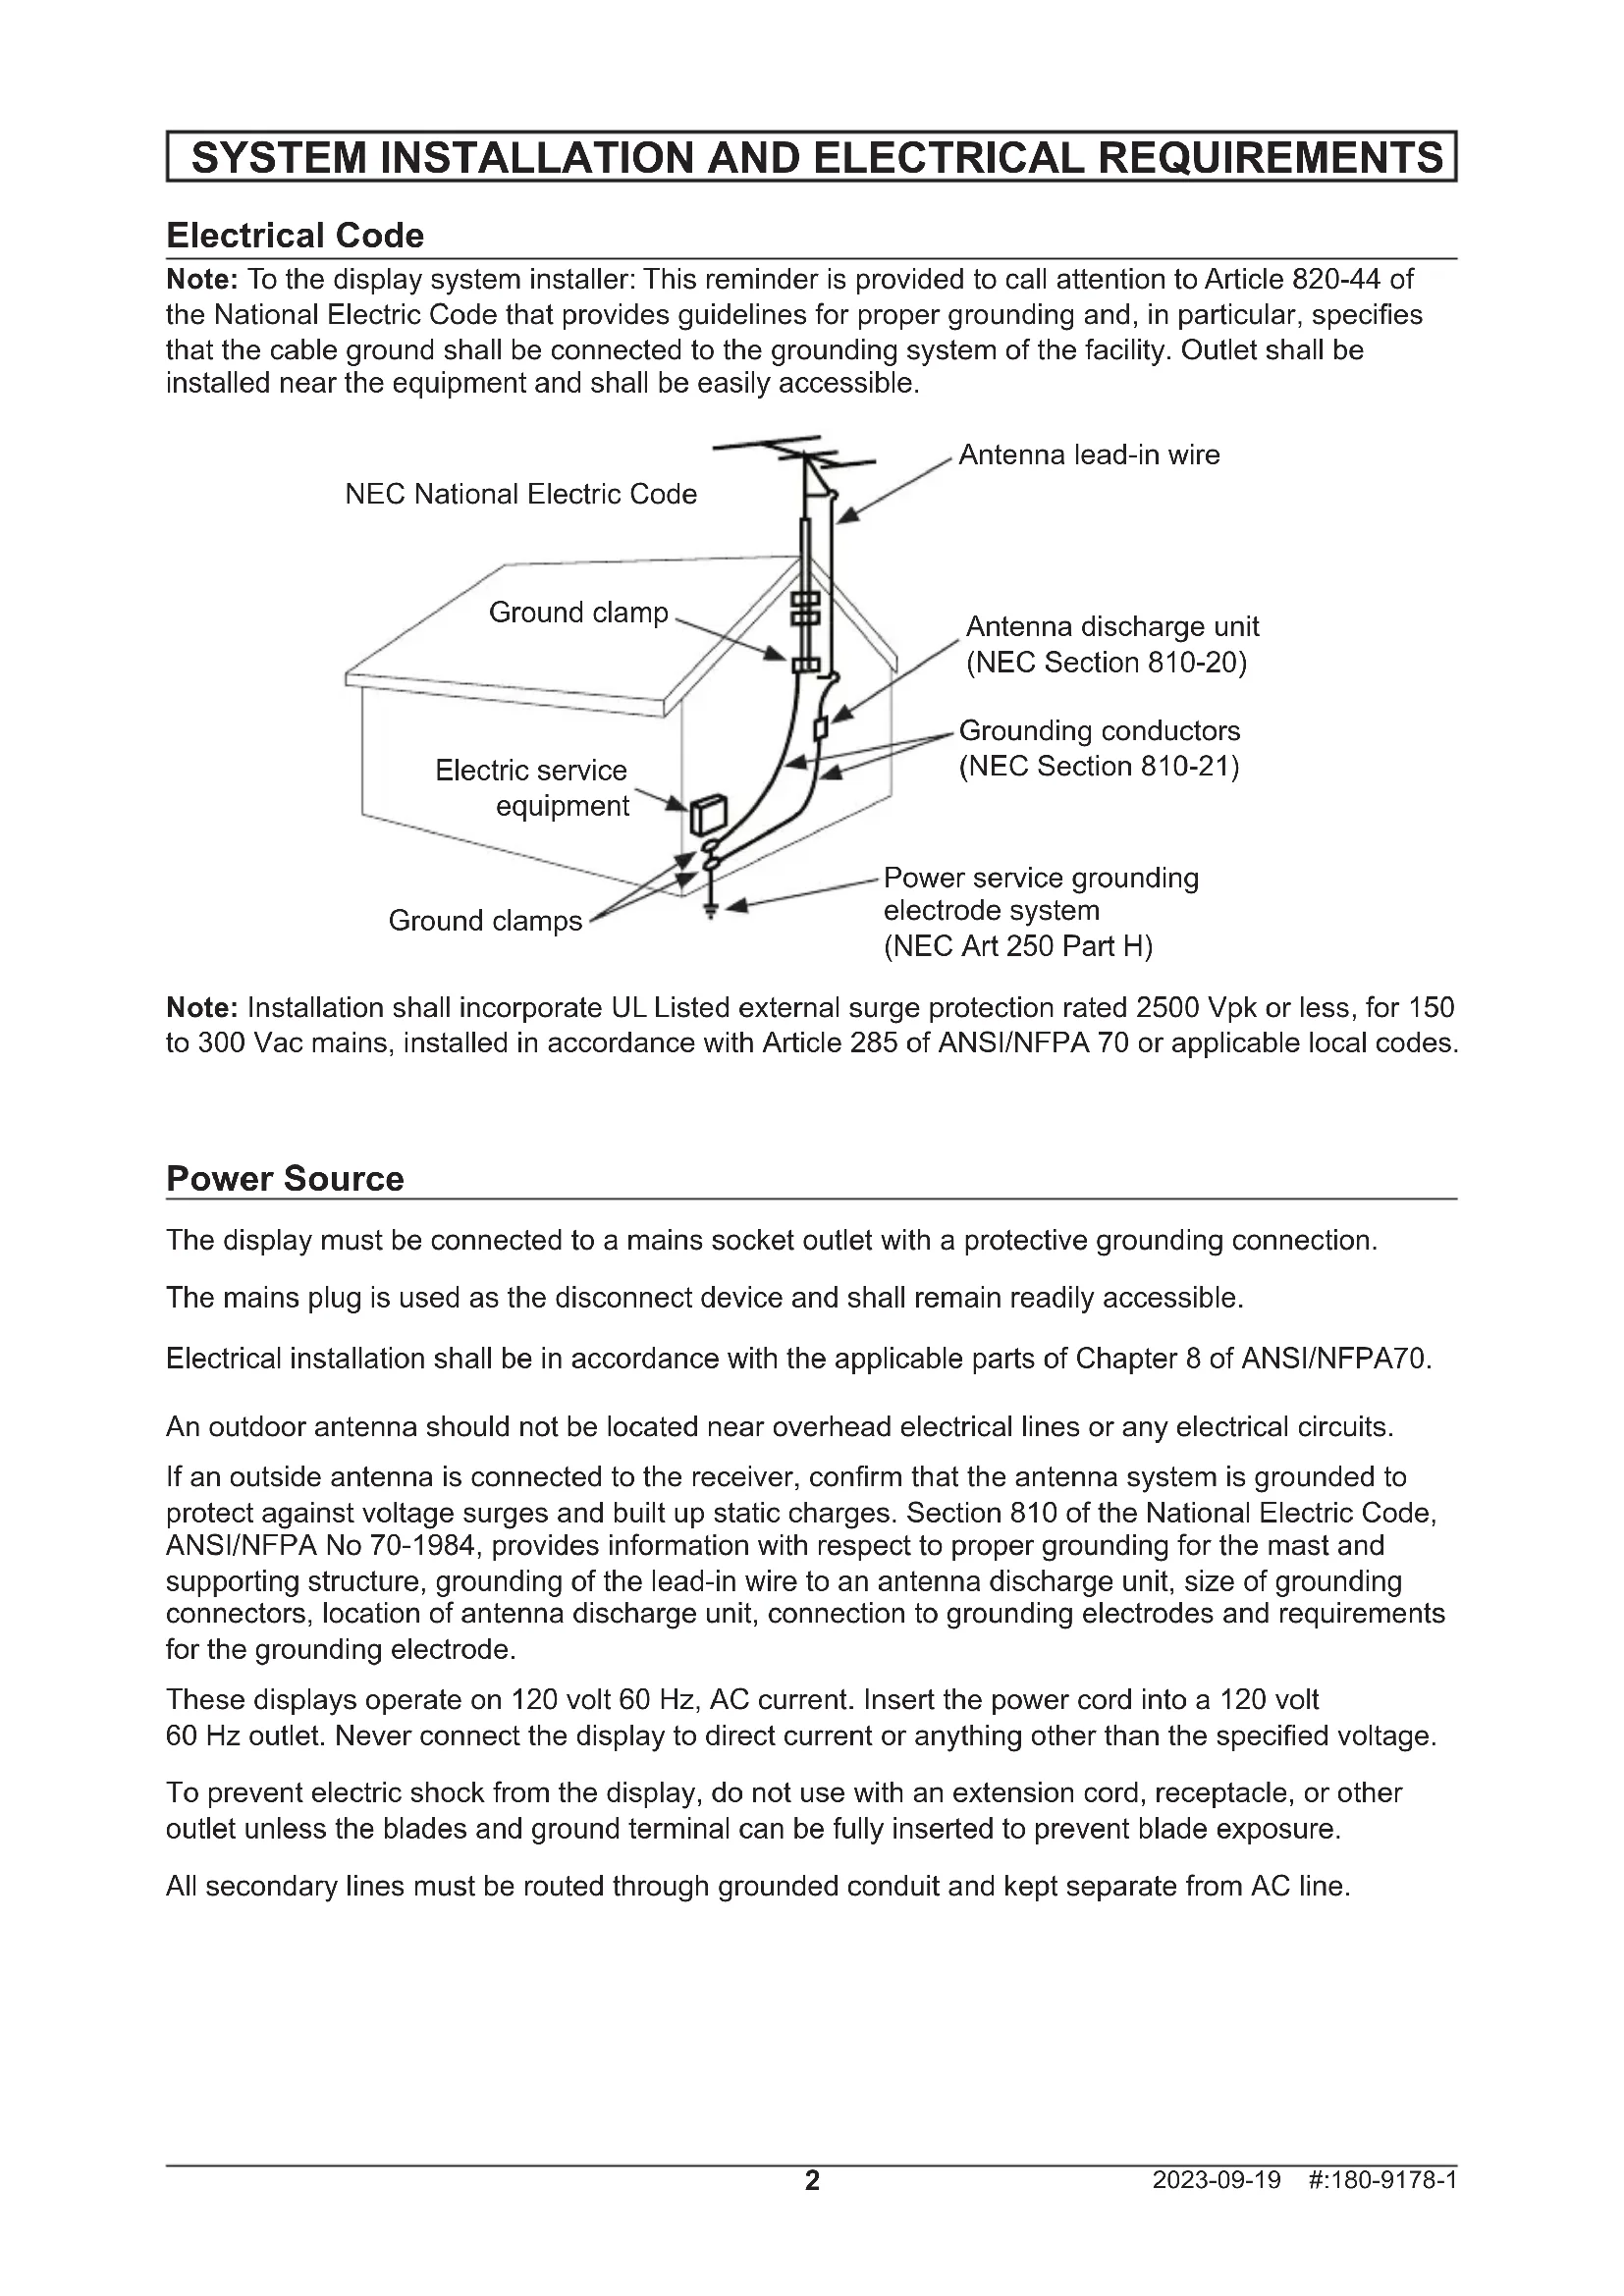
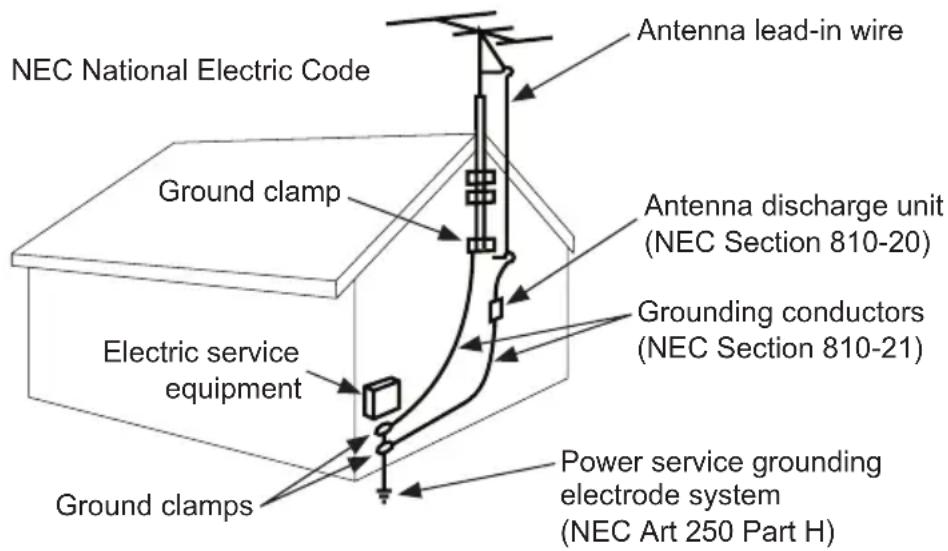
Note: To the display system installer: This reminder is provided to call attention to Article 820-44 of the National Electric Code that provides guidelines for proper grounding and, in particular, specifies that the cable ground shall be connected to the grounding system of the facility. Outlet shall be installed near the equipment and shall be easily accessible.
Note: Installation shall incorporate UL Listed external surge protection rated 2500 Vpk or less, for 150 to 300 Vac mains, installed in accordance with Article 285 of ANSI/NFPA 70 or applicable local codes.
Power Source
The display must be connected to a mains socket outlet with a protective grounding connection.
The mains plug is used as the disconnect device and shall remain readily accessible.
Electrical installation shall be in accordance with the applicable parts of Chapter 8 of ANSI/NFPA70.
An outdoor antenna should not be located near overhead electrical lines or any electrical circuits.
If an outside antenna is connected to the receiver, confirm that the antenna system is grounded to protect against voltage surges and built up static charges. Section 810 of the National Electric Code, ANSI/NFPA No 70-1984, provides information with respect to proper grounding for the mast and supporting structure, grounding of the lead-in wire to an antenna discharge unit, size of grounding connectors, location of antenna discharge unit, connection to grounding electrodes and requirements for the grounding electrode.
These displays operate on 120 volt 60Hz , AC current. Insert the power cord into a 120 volt 60Hz outlet. Never connect the display to direct current or anything other than the specified voltage.
To prevent electric shock from the display, do not use with an extension cord, receptacle, or other outlet unless the blades and ground terminal can be fully inserted to prevent blade exposure.
All secondary lines must be routed through grounded conduit and kept separate from AC line.
FCC CAUTION
To assure continued compliance and possible undesirable interference, ferrite cores may be used when connecting this display to video equipment; maintain at least 400mm (15.75 inches) spacing to other peripheral devices.
FCC STATEMENT
This equipment has been tested and found to comply with the limits for a Class B digital device, pursuant to Part 15 of the FCC Rule. These limits are designed to provide reasonable protection against harmful interference in a residential installation. This equipment generates, uses and can radiate radio frequency energy and, if not installed and used in accordance with these instructions, may cause harmful interference to radio communications; however, there is no guarantee that interference will not occur in a particular installation. If this equipment does cause harmful interference to radio or television reception, which can be determined by turning the equipment off and on, the user is encouraged to try to correct the interference by one or more of the following measures:
- Reorient or relocate the receiving antenna.
- Increase the separation between the equipment and receiver.
- Connect the equipment into an outlet on a circuit different from that to which the receiver is connected.
- Consult the dealer or an experienced radio/display technician for help.
This device complies with Part 15 of the FCC Rules. Operation is subject to the following two conditions:
- This device may not cause harmful interference.
- This device must accept any interference received, including interference that may cause undesired operation.
Relevant Information
Record your display's model and serial number here for future reference. Keep this user manual in an accessible location in the event service is required.
Note: Your display's serial number can be found on the box and underneath the rear cover plate.
Model Number
Serial Number
GENERAL SAFETY PRECAUTIONS
Read before operating equipment
Thank you for purchasing our product. Before using it, please read this user guide carefully and follow the instructions for safe operation. Please keep this manual for future reference and always include it when transferring or transporting this product to a different location.
WARNING
In case of emergency such as fire or electric shock caused by the product, immediately contact 911 or proper emergency police/fire service agencies in your country.
To reduce the risk of electric shock or fire, heed the following:
- In case of product malfunction or unusual events such as electrical burning smell, smoke, or loss of content signals due to internal overheating, immediately turn off, unplug the electrical cord and contact the manufacturer.
- Do not disassemble, modify or service product in any way other than that contained in this instruction. Any unauthorized modifications made to the product automatically void product warranty.
- Do not touch antenna lines or wires, electrical cables or plugs when lightning or thunder is present or with wet hands
- Do not submerge in water.
- Do not destroy, process, or place close to any heat source.
- Do not install near poisonous gas or chemically unstable atmosphere.
- Do not install near strong magnetic or electrical current field.
- Do not install the product in unstable locations or near moving objects, constantly vibrating equipment, or uneven surfaces.
- Do not leave any fire source, such as candles, close to or on the product.
- Do not operate the product if it has been dropped or struck. Severe physical impact to the product may cause components to fall out of place within and break.
- Do not bend or twist electrical cords, electrical plugs, cables, or wires with excessive force.
- Do not block ventilation slots or place any heavy object on the product.
- Use properly rated electrical voltage.
- Do not use any electrical sockets or power strips with many other devices jointly plugged in. Use a single, directly dedicated and rated GFCI electrical outlet for the product for safe operation.
- Do not move or transport with any cables (electrical, content connectivity) plugged in to the source devices.
- Always connect the electrical plug firmly and completely. When disconnecting any cables, always pull on the plug and not the cord.
- Always leave the power off when plugging or unplugging the electrical cords or connection cables.
- Do not defeat the safety purpose of the polarized or grounding type electrical plug. A polarized plug has two blades with one wider than the other. A grounding type plug has two blades and a third grounding prong. The wide blade or the third prong are provided for your safety. If the provided plug does not fit into your outlet, consult an electrician for replacement of the obsolete outlet.
- Protect the electrical cord from being walked on or pinched particularly at plugs, convenience receptacles, and the point where they exit from the apparatus.
To avoid personal injury, this appliance must be grounded and wall mounted according to installation instructions.
WARNING
- Never apply pressure to the exterior of the LCD screen.
- If monitor or glass is broken, do not come in contact with the liquid crystal and handle with care.
- Do not climb on the product.
- Do not install within five feet from a body of water.
- Do not use if temperature exceeds the operating limits; Maximum operating temperature is -22^ 122^ (-30^ 50^)
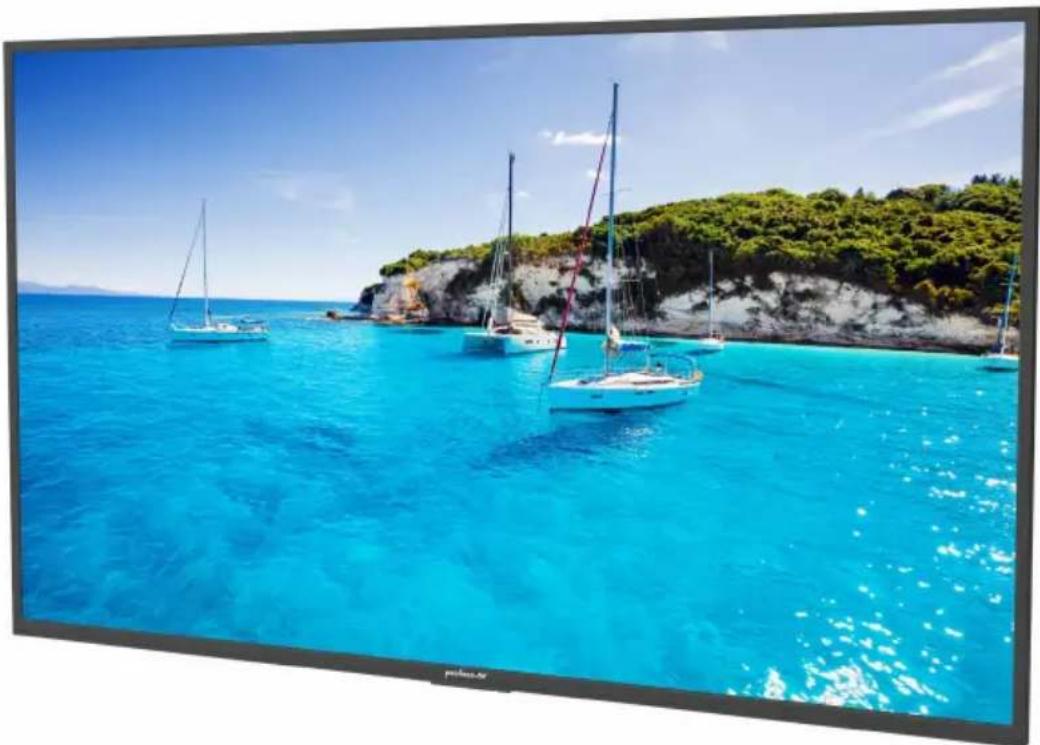
- The product is intended for outdoor operation. Although sunlight will not affect the longevity of the TV, best practice is to place the TV out of direct sunlight for maximum performance.
- Do not install in enclosure or recessed cavity with less than 2 inches of airflow around the display. Air inside fully encased display must be ventilated.
- The product is to be secured to building before operation.
- Product must be carried and supported by at least two persons.
- Periodically clean dust off the electrical plug to keep it clean and dry, ensuring proper and safe operation.
- Only use attachments/accessories specified by the manufacturer.
- TV to be installed in Landscape orientation only.
CONTENTS
System Installation and Electrical Requirements 2
Electrical Code 2
Power Source 2
FCCCaution 3
FCC Statement. 3
Relevant Information 3
General Safety Precautions 4
Set Up Instructions 7
Parts List 7
Removing I/O Terminal Cover 8
Connecting Cords 9
Installing IR Repeater 9
freePath Technology 9
Replacing I/O Terminal Cover. 10
Cable Management 11
Prepare the Display for Mounting 12
Connect to the Power Source 13
Operating Instructions 15
Power On/Off the Display 15
Onboard Controls 15
Remote Control Buttons 16
Menu Operation. 18
Get Started with webOS TV 18
Network Connection 18
How to Operate the TV 20
Use of TV Functions through Voice 21
Text Language 22
Start Applications through Quick Access 23
Connection of External Devices 24
Connection of Home IoT Devices 25
Smart Device Connection 26
Maintenance 27
Care of the Screen 27
Mobile Telephone Caution 27
End of Life Directives 27
Warranty 84
SET UP INSTRUCTIONS
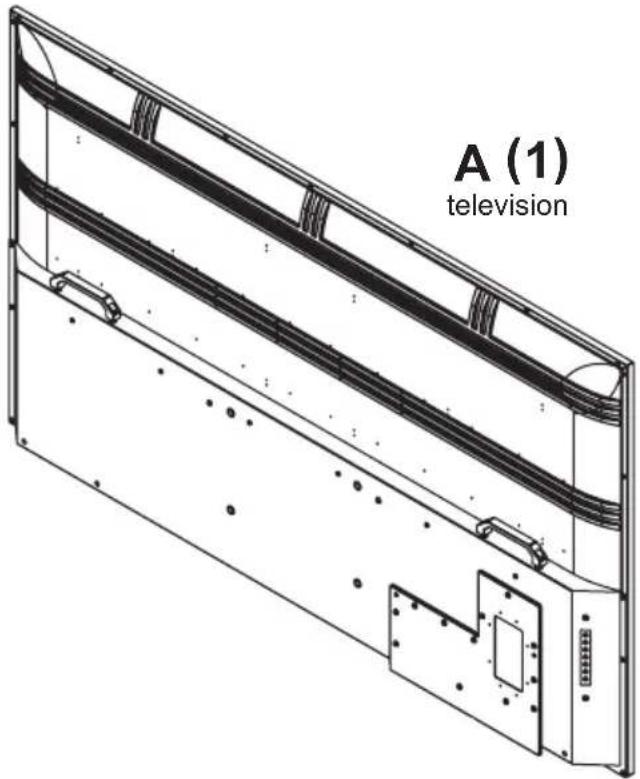
Parts List
Description Qty
A television 1
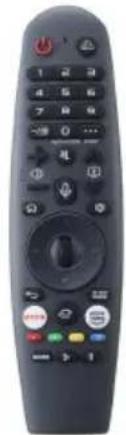
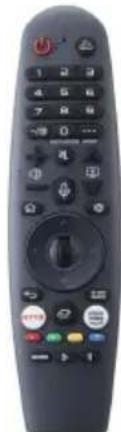
B magic remote control 1
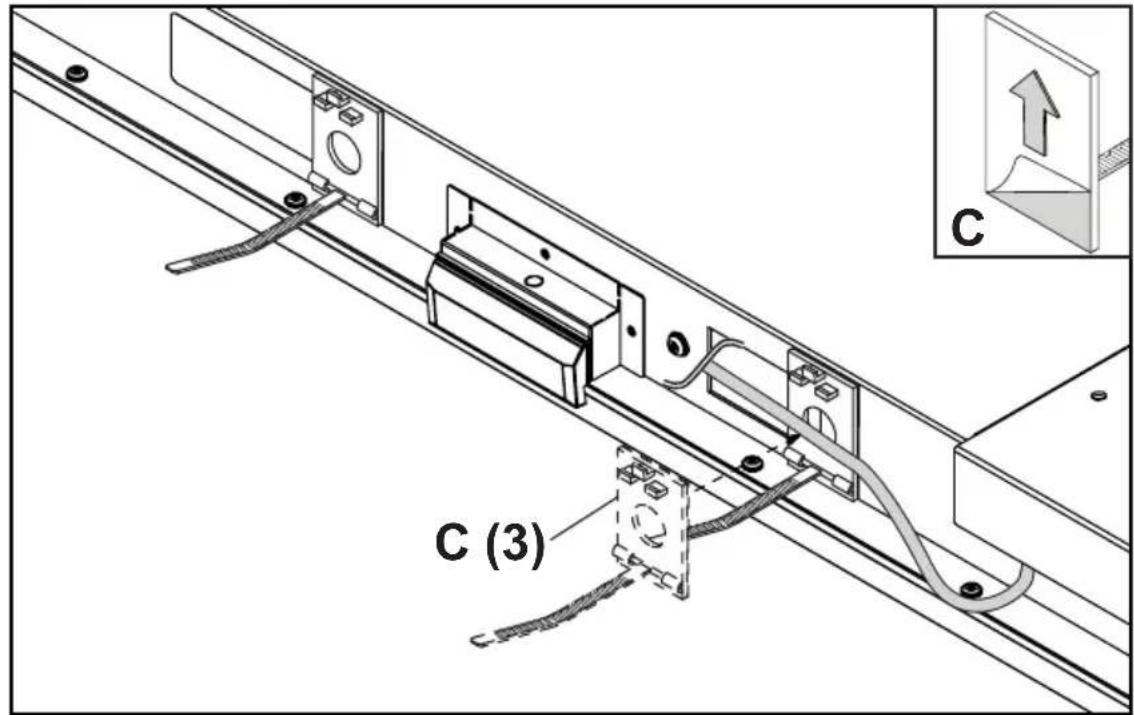
C adhesive cable holder 3
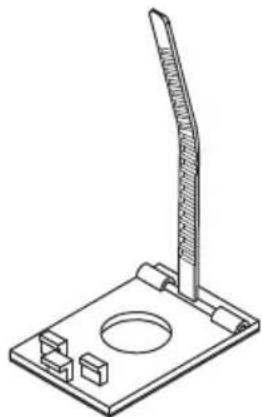
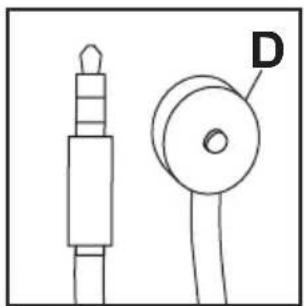
D IR repeater 1
E user guide (not shown) 1
F technical support insert (not shown) 1
G warranty registration card (not shown) 1
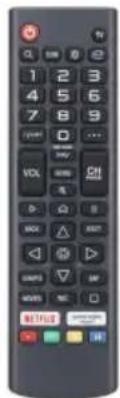
H waterproof remote control 1
C (3)
adhesive cable holder
B (1)
magic remote control
H (1)
waterproof remote control

D (1)
IR repeater
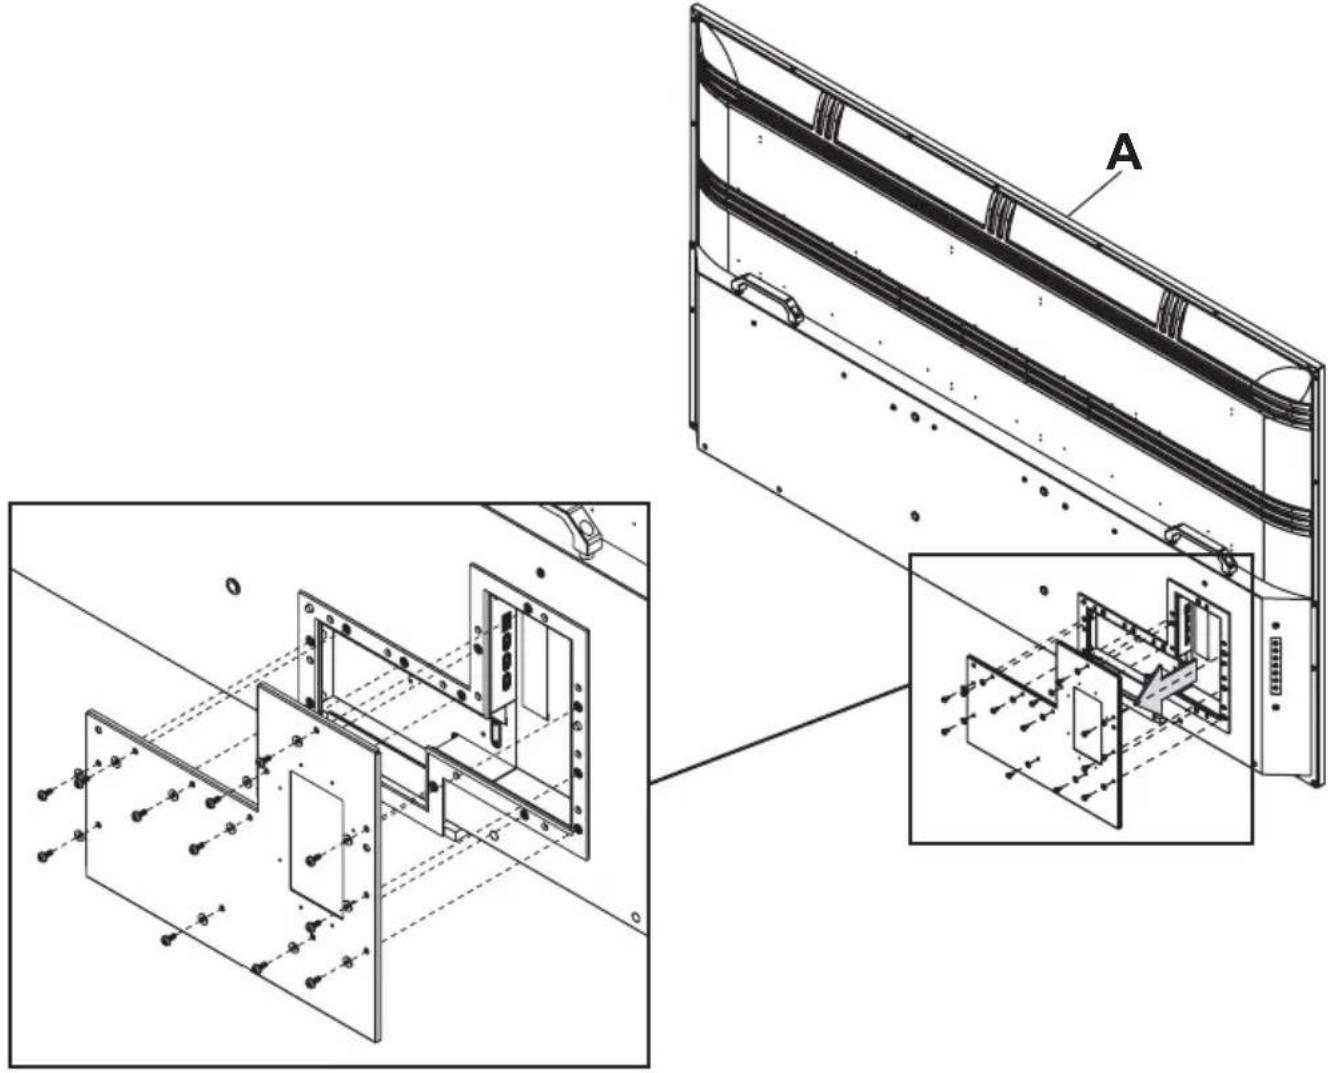
Remove I/O terminal cover and screws to access source connection panel.
Connecting Cords
Connect source devices to appropriate display input. Make all connections prior to powering on the display.
| Connector Function Description | on | |
| Optical | Used for connecting digital audio output signal to an amplifier (fixed level). | |
| HDMI Connect to a device with HDMI output. | ||
| AV Connect to a device with AV / CVBS output. | ||
| USB Supports audio / video / photos / text. | ||
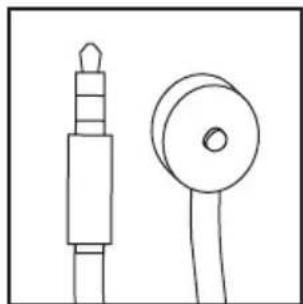
| Headphone | Connect headphones for audio output (variable level). | |
| RF | Antenna input for use with ATSC 2.0 OTA signals. | |
| LAN / RJ45 U | used for internet connectivity. | |
| IR Repeater | Used for connecting the optional IR repeater to control third party products. | |
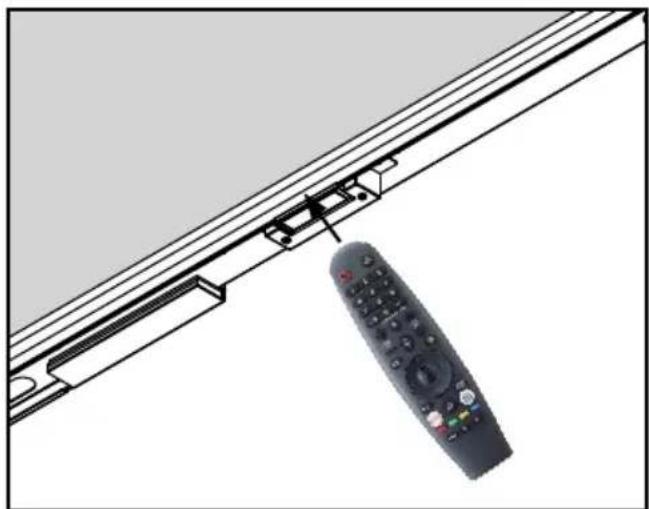
Installing IR Repeater (Optional)
Insert the 3.5mm end of the included 5V IR repeater into the IR Repeater port on the input panel of the display. IR Repeater port may not be compatible with other third party repeaters.
freePath Technology™ Input Compartment Cover
The freePath Technology™ I/O terminal cover allows for better WiFi signal penetration for the network connectivity of the Smart TV.
Replacing I/O Terminal Cover
- Run cables through bottom of I/O terminal cavity across foam gasket. All cables must exit toward bottom of display to retain seal when I/O terminal cover is installed. Do not run cabling through the top or sides of I/O terminal cavity. Leave approximately 1/2'' (13mm) between cables to retain seal when I/O Terminal Cover is installed.
- Replace I/O terminal cover onto I/O terminal guides, keeping cables between the bottom gaskets.
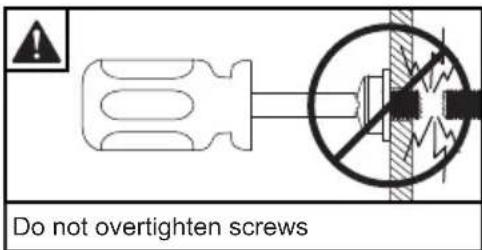
- Replace and tighten screws until I/O terminal cover gasket is fully compressed to back of display.
CAUTION
Failure to follow these instructions can result in the product being damaged or destroyed, voiding the warranty.
guides
guides
Replace
CAUTION
- Ensure cord bend radius does not exceed limits set by the manufacturer.
- Ensure cords are seated properly in the cable channels to avoid potential damage to cords when I/O terminal cover is installed.
- Do not run cables through the top or sides of I/O terminal cavity. All cables must exit toward bottom of display to retain seal when I/O terminal cover is installed.
Cable Management
Secure cables to display with adhesive cable holders.
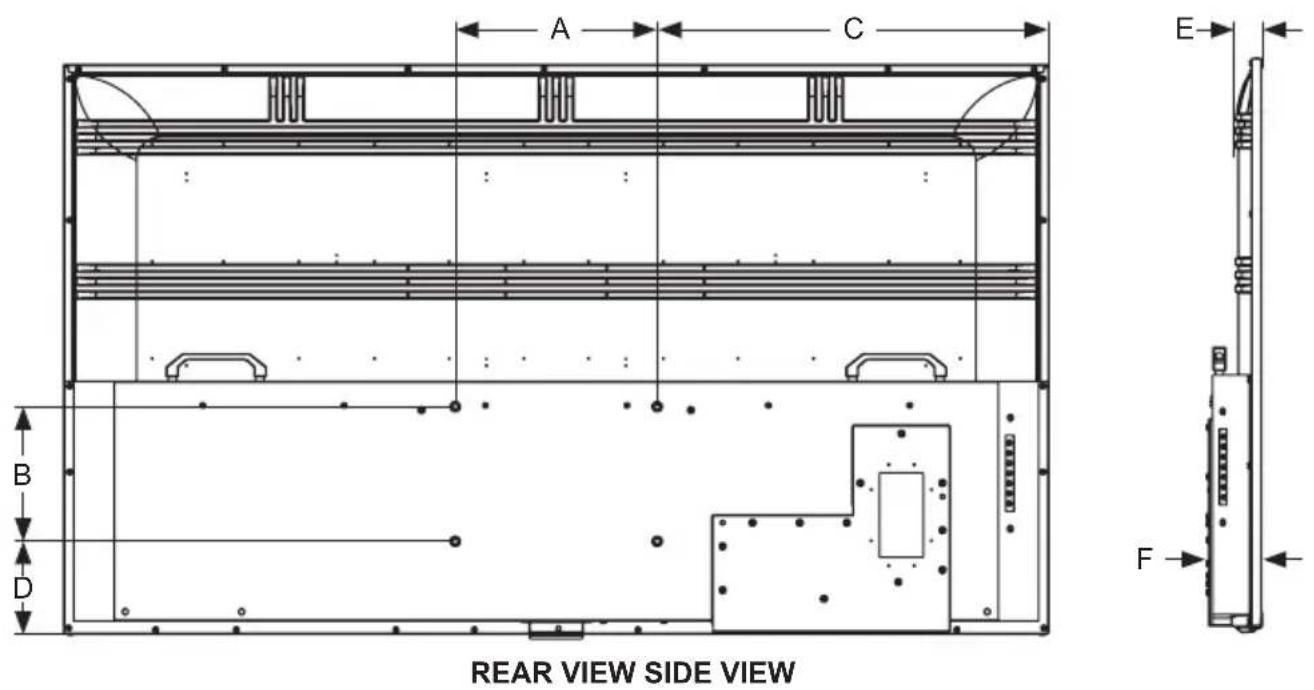
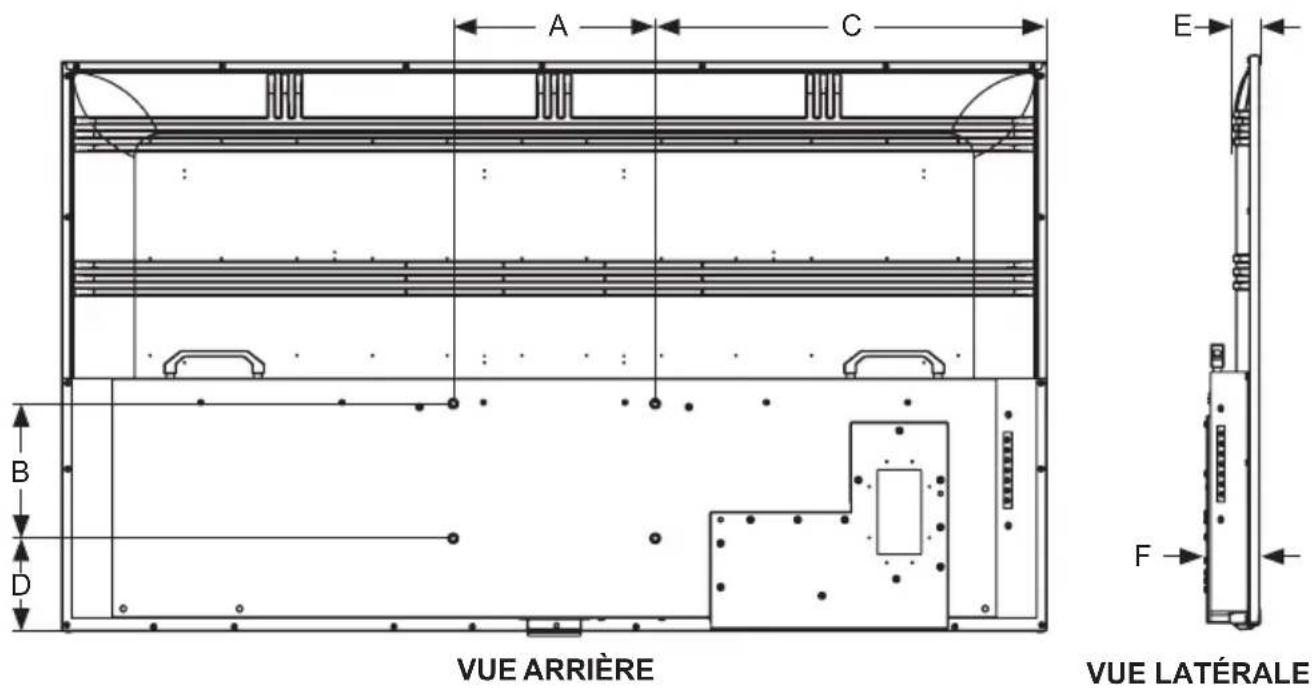
Prepare the Display for Mounting
Install cords to your display before mounting. Input panel may be obstructed once the display is mounted.
For your safety, only install on an outdoor-rated mount that is suitable for the application and supports the weight of the display. When mounting a display outdoors, use environmentally rated mounts to ensure longevity in harsh environments.
Examine the chart below to determine the mounting specifications for your display.
| Required Mounting Screws |
| Four M8 screws (20mm long) |
| Display Size | A B C D E F | |||||
| 55" | 11.81" (300mm) | 7.87" (200mm) | 18.65" (474mm) | 4.61" (117mm) | 1.61" (41mm) | 3.11" (79mm) |
| 65" | 11.81" (300mm) | 7.87" (200mm) | 22.89" (582mm) | 5.42" (138mm) | 1.61" (41mm) | 3.11" (79mm) |
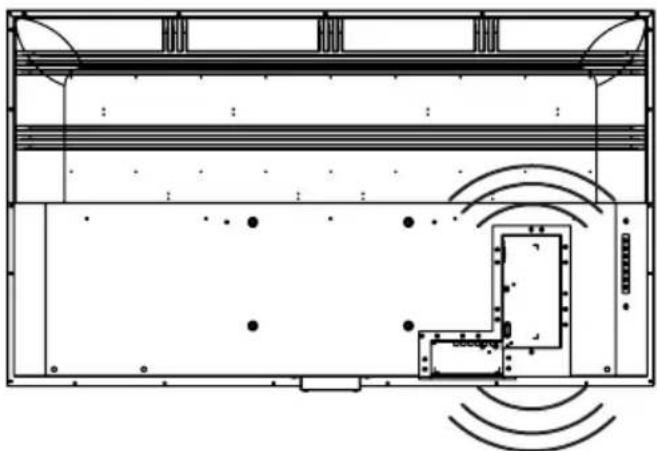
Prepare the Display for Mounting
| Display Size | A B C D E | ||||
| 55" | 49.09" (1247mm) | 28.54" (725mm) | 47.69" (1211mm) | 26.85" (682mm) | 54.64" (1388mm) |
| 65" | 57.59" (1463mm) | 33.31" (846mm) | 56.24" (1428mm) | 31.62" (803mm) | 64.53" (1639mm) |
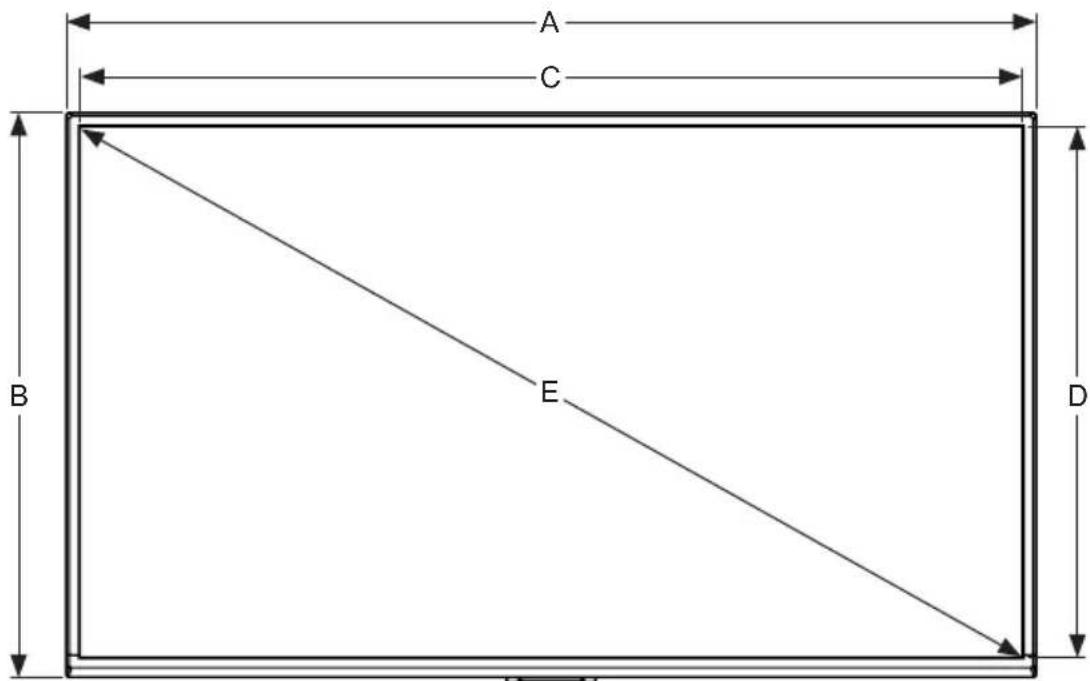
FRONT VIEW
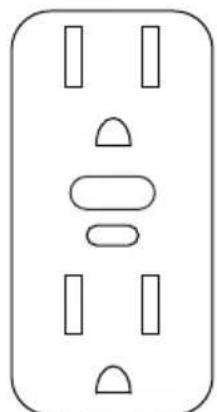
Connect to the Power Source
Connect power cord to GFCI outlet.

ENG This page intentionally left blank.
OPERATING INSTRUCTIONS
Power On/Off the Display
Power on your display by using the remote control or the rear power button on the side of the display. The display will power on but image may not appear for several seconds as it completes its power up sequence.
Point the remote control at the IR sensor located below the Peerless-AV logo at the center of the display, and press the power button.
Onboard Controls
Direct Mode: Allows for quick access to source selection, volume settings and channel selection.
Menu Mode: Press the Menu button to access Menu Mode and activate the On Screen Display (OSD). For a description of OSD operation refer to the next section.
The keypad buttons are assigned as indicated in the table below.
| Menu Mode Direct Mode | |
| On/Off On/Off | |
| OK Input Select | |
| Menu Menu | |
| Up Channel Up | |
| Down Channel Down | |
| Right Volume Up | |
| Left Volume Down | |
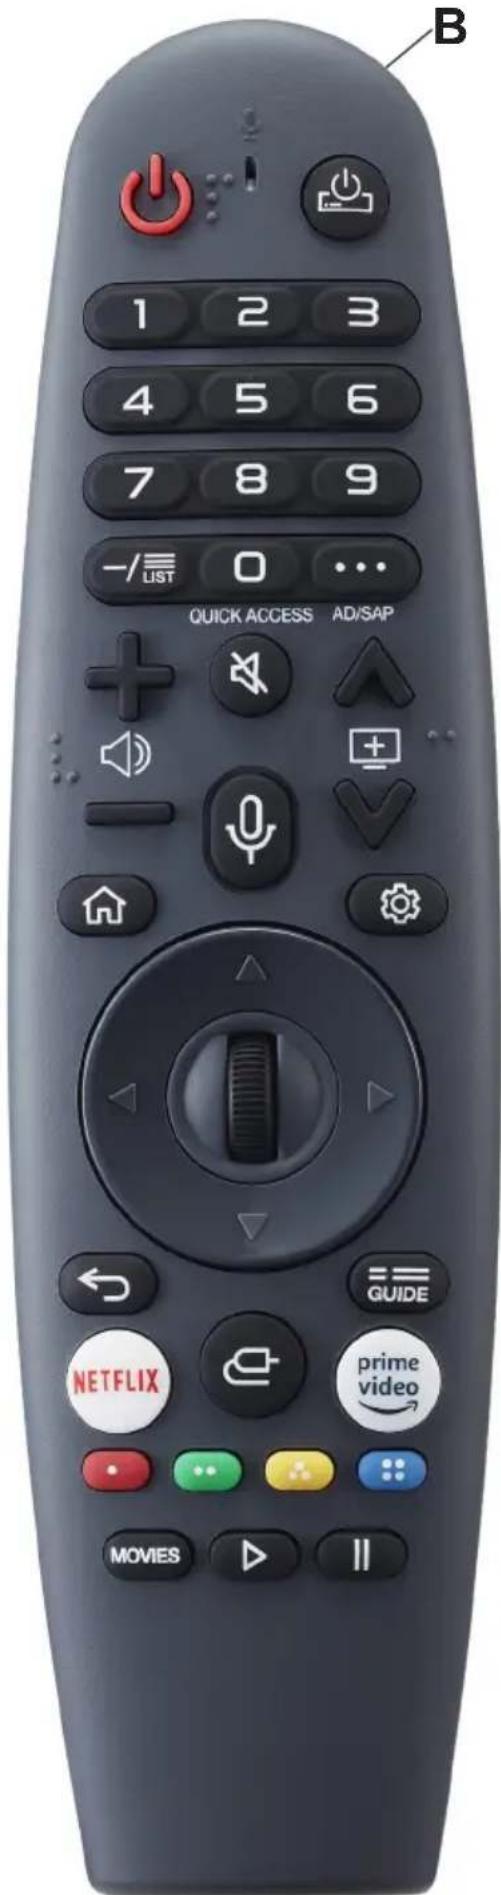
| Button Description | |
| Power Turns | TV On / Off |
| STB Power | You can turn your set-top box on or off by adding the set-top box to the universal remote control for your TV |
| Search | Activates Voice Recognition (network connection required for voice recognition) |
| Sprocket Accesses Quick Settings / All Settings | |
| Input Toggles | between available inputs |
| 0 ~ 9 Used for navigating television channels | |
| -/List | Inserts a dash between numbers / Displays list of tuned channels |
| "..." More actions to supplement what is on screen | |
| Vol +/- Adjusts audio levels up and down | |
| FAV | Recalls tuned channels that have been set to favorite |
| Guide | Recalls guide for channels that have been tuned in |
| Mute Mutes / Unmutes audio output | |
| Channel +/- Moves up and down the tuned channel list | |
| Play Plays current programming | |
| Home | Accesses Home Menu / Recalls all content options for user to choose |
| Pause Pauses current programming | |
| Back Returns programming to previous screen | |
| Exit Exits screen displayed | |
| Arrows Used to navigate On-screen display | |
| Select | Used to select when navigating On-screen display |
| AD/SAP Toggles secondary audio program if available | |
| Movies | Displays streaming movies available through active apps |
| Stop Stops current programming | |
| Netflix Starts Netflix app | |
| Prime Video Starts Amazon Prime Video app | |
| Red | Corresponds to various color functions in menu |
| Green Corresponds to various color functions in menu | |
| Yellow Corresponds to various color functions in menu | |
| Blue | Corresponds to various color functions in menu |
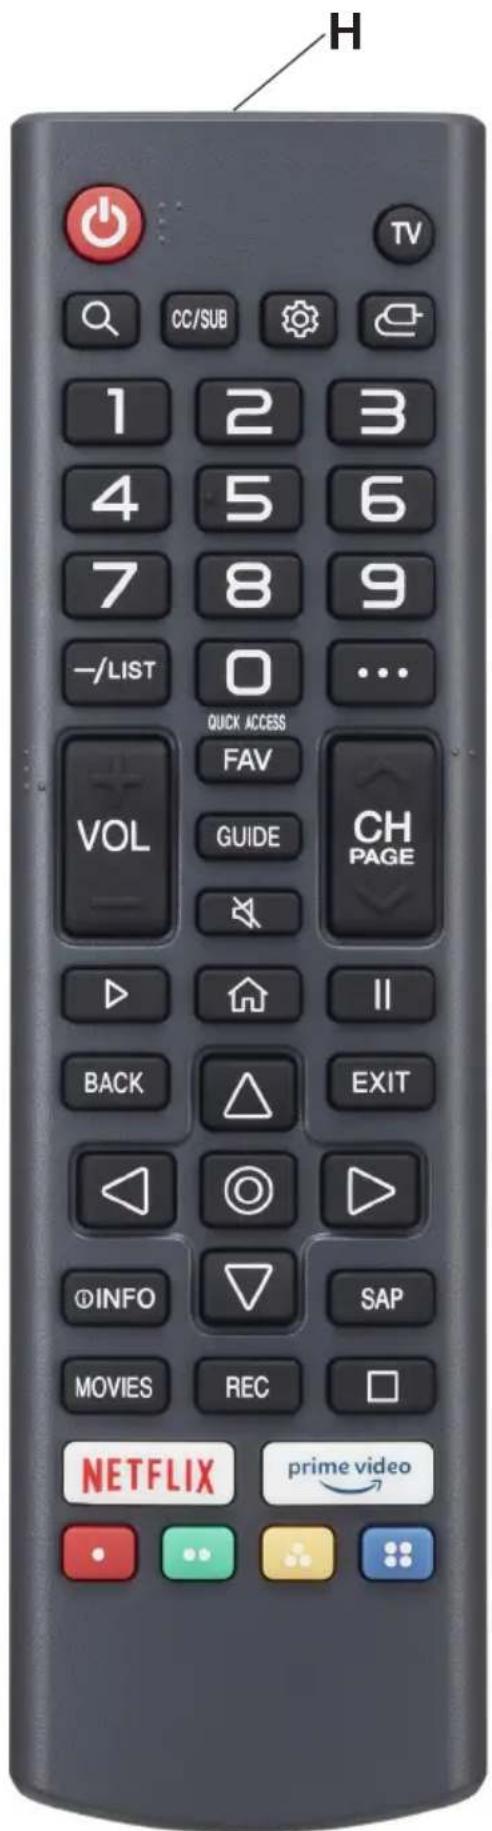
| Button Description | |
| Power Turns | TV On / Off |
| TV Switches | to the Tuner Input of the TV |
| Sprocket Accesses | Quick Settings / All Settings |
| Input Toggles | between available inputs |
| 0 ~ 9 Used for | navigating television channels |
| -/List | Inserts a dash between numbers / Displays list of tuned channels |
| "..." More actions to supplement what is on screen | |
| Vol +/- Adjusts | audio levels up and down |
| FAV | Recalls tuned channels that have been set to favorite |
| Guide | Recalls guide for channels that have been tuned in |
| Mute Mutes / | Unmutes audio output |
| Channel +/- Moves up and down the tuned channel list | |
| Play Plays current programming | |
| Home | Accesses Home Menu / Recalls all content options for user to choose |
| Pause Pauses | current programming |
| Back Returns | programming to previous screen |
| Exit Exits screen displayed | |
| Arrows Used to navigate On-screen display | |
| Select | Used to select when navigating On-screen display |
| CC/Sub Toggles | closed captioning if available |
| Movies | Displays streaming movies available through active apps |
| Stop Stops current programming | |
| Netflix Starts | Netflix app |
| Prime Video | Starts Amazon Prime Video app |
| Red | Corresponds to various color functions in menu |
| Green Corresponds to various color functions in menu | |
| Yellow Corresponds to various color functions in menu | |
| Blue | Corresponds to various color functions in menu |
MENU OPERATION
Get Started with webOS TV
Live TV / Antenna Setup:
- Connect the Antenna to the Television. You can also connect a device that can receive broadcasts such as a cable box instead of an antenna.
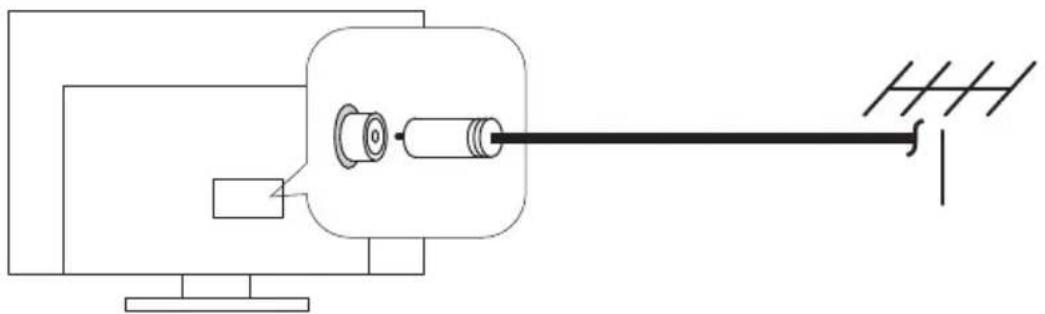
- Start > Programs > Manual Tune / Automatic Tune. Search and arrange only the programs that are being tuned in.
Network Connection:
Configure the settings for network, such as online content and applications.
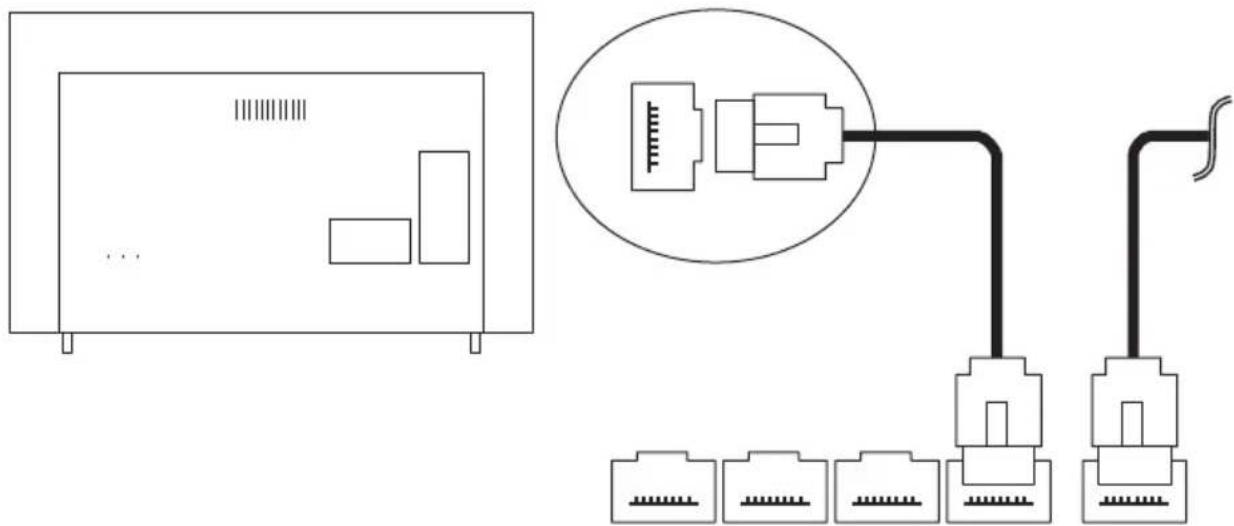
Network settings can be applied over a wired network.
- Connect the LAN port of the TV and the router with a cable. The router must have a live internet connection.
- Press the 'settings' button on the remote control.
- Select Wired Ethernet Connection Settings. To see details, click Settings > Connection Settings > Network > Connection Settings in the User Guide.
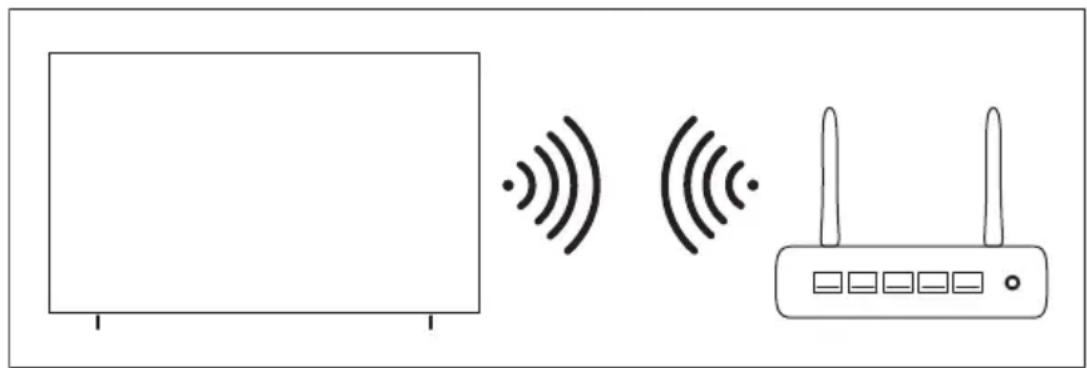
Network Connection:
Network settings can be applied using Wi-Fi.
- Turn on the router connected to the internet.
- Press the 'settings' button on the remote control.
- Select Connection Settings > Network > Wi-Fi Connection.
- When the network search is completed, the list of networks available for connection is displayed.
- Select a network to connect.
- If your wireless LAN router is password protected, enter the password configured for the router. To see more details, click on settings > Connection Settings > Network > Connection Settings in the User Guide.
Network Configuration Information:
- Use a standard LAN Cable (Cat5 or higher, RJ45 connector, 10Base-T or 100Base-T TX LAN port).
- Restarting the modem can fix some network problems. Turn off the power, unplug it and reset it, and then turn it on to solve the problem.
- The manufacturer is not responsible for network connection problems or failures, malfunctions or errors caused by the network connection.
- The network connection may not work properly due to the network settings or the service of your internet provider.
- The DSL Service must use a DSL modem; and the cable service must use a cable modem. Since only a limited number of network connections are available, the TV network settings may not be used depending on the contract with the Internet service provider. (If the contract does not allow more than one device per line, you can only use the PC already connected).
- Wireless network can experience interference from other devices that use the 2.4 GHz frequency (wireless phone, Bluetooth device or microwave oven) although interference can also occur when the 5 GHz frequency is used, but it is less likely to occur.
- The wireless environment can make the wireless network service run slowly.
- Failure to turn off all local networks may cause excessive traffic on some devices.
- The Access Point device must support wireless connections and the wireless connection function must be enabled on the device to have AP (Access Point) connection. Contact the service provider for availability of wireless connections at the Access Point.
- Check the SSID and security settings of the AP. Consult the corresponding documentation for SSID security settings for the AP.
- Invalid configuration of network devices (wired / wireless line sharer, hub) may cause the TV to work slowly or not work accordingly.
- The connection method may vary depending on the AP manufacturer.
To solve a problem related to this function, refer to the Troubleshooting section of the User Guide.
MENU OPERATION
How to Operate the TV
Connecting the Magic Remote Control:
Learn More about the Magic Remote Control; You can select the functions you want easily and conveniently by moving and clicking the cursor on the TV screen, the same way you would use a mouse on a computer screen.
You can purchase the Magic Remote Control separately if it is not included with the equipment.
Magic Remote Control Connection:
You must connect the Magic Remote Control with webOS TV for user registration. Connect the Magic Remote Control previously registered for user as follows:
- Turn on TV. After about 20 seconds, point the remote control at the TV and then turn to the (OK) position.
- The Remote Control will be registered automatically and the link completion message will be displayed in the TV screen.
- If the Magic Remote fails to register, turn the TV off then on again, and then try to register again.
New Registration of the Magic Remote Control:
(If the Magic Remote Control does not appear on the TV, you need to re-register).
- Hold the remote control towards the TV, press and hold the GUIDE button until the instruction appears.
- The previously registered remote is cancelled and then registered again.
Using the Magic Remote Control:
- If you shake the Magic Remote Control left to right or turn while pointing it at the TV, move the remote control in the direction you want, the pointer follows the movement.
- Move the pointer to the desired location and press the (OK) button to execute the function.
- If the pointer has not been used for a certain period of time, it will disappear. When the pointer disappears from the screen, shake the Magic Remote Control left and right, then it will appear again. The pointer will disappear if you press the up, down, left or right buttons, and the control will work like a conventional remote control.
If the pointer does not respond fluently, you can reset the pointer by moving it to the edge of the screen. - Use remote control within the specified range (10 meters). The device may not function properly when it is out of operating distance or when an obstacle blocks the line of sight.
- Depending on peripherals (wireless router, microwave oven, etc.), communication failures may occur.
- Impacts can cause the Magic Remote to malfunction.
- Be careful not to hit nearby furniture, electronic equipment, or other people when using the Magic Remote Control.
MENU OPERATION
Use of TV Functions Through Voice
You can access various functions of the TV quickly and easily through voice recognition.
- Press and hold down the button on the remote control and say the function you want to start or the keyword you want to use for search.
- Once you release the button after the voice input, the corresponding function will start.
Note: Some models may not be supported.
- Your location must correspond to the language to get the exact search results.
- Some functions may not be available if the settings and language settings are different.
- You can change the language settings in Settings > All Settings > System > Language.
Voice Recognition Precautions:
- Voice recognition requires a Magic Remote Control, which may not be compatible with certain models.
- To use all voice recognition functions, you must configure your programs, region, etc. Otherwise, you will not be able to use some functions.
- You must have a network connection to use the voice recognition feature.
- If you have a network connection, you must accept the terms and conditions to use voice recognition.
- To control the cable box connected to the TV with the voice recognition function, go to Settings > All Settings > Devices > External Devices > Universal Control Settings to configure a Universal Remote Control.
- It is recommended to point the Magic Remote Control towards the cable box after voice input.
- The rate of precise voice recognition may vary depending on the characteristics of the user (voice volume, pronunciation, accent and speed of speech) and the environment (noise and volume of the TV).
- To achieve accurate recognition of your speech, you must pronounce the words slowly and accurately, at an appropriate voice volume at a distance of about 10cm from the microphone of the Magic Remote Control.
If your voice is not recognized correctly, speech recognition may work differently than what you originally predicted.
Text Language
Use of Text Language:
- You can enter texts in the text fields using the voice recognition function.
- Select the "Microphone" button on the keyboard screen to switch to voice input mode.
Note: Some models may not be supported.
- Move the pointer of the Magic Remote Control in the text box to open the virtual keyboard.
| ENG | 123 | 45678 | 90 | X | ||||||||
| $%^ | q | w | ertyuop | Enter | ||||||||
| Aa | a | s | dfghjkl? | 0Y | ||||||||
| @ | @ | zxcvbnm | , | . | Clear All | |||||||
| < | > | |||||||||||
- Press the "Microphone" button on the virtual keyboard.
- After the window opens, voice recognition will be displayed as shown below, speak into the remote control microphone slowly and clearly.
Please speak to enter text (English - United States)
Press to change language

- If there are words similar to the ones the user speaks aloud, you may see a list of multiple results as shown below. If you do not get the results you want, press TRY AGAIN to retry. Select a result and it will display in the text box.
VOICE RECOGNITION RESULTS
RETRY
LG Channels
LG Channels
LG Channels
Precautions when using text language:
- Check the network connection before using the Text Language function.
You can change the language in Settings > All Settings > General > Language > Menu Language.
To temporarily switch to another voice recognition language, press the red button in the voice recognition information display window.
- You can only use this function to accept the terms of voice recognition.
- The voice recognition rate may vary depending on the characteristics of the user (voice, pronunciation, intonation and conversation speed) and the environment (noise and TV volume).
- To improve the accuracy of the Text Language, you should speak clearly and loudly within 10cm of the Magic Remote Control's microphone.
- Speech recognition is not available in any password entry field or in the address bar of your Web Browser site (excludes general search).
MENU OPERATION
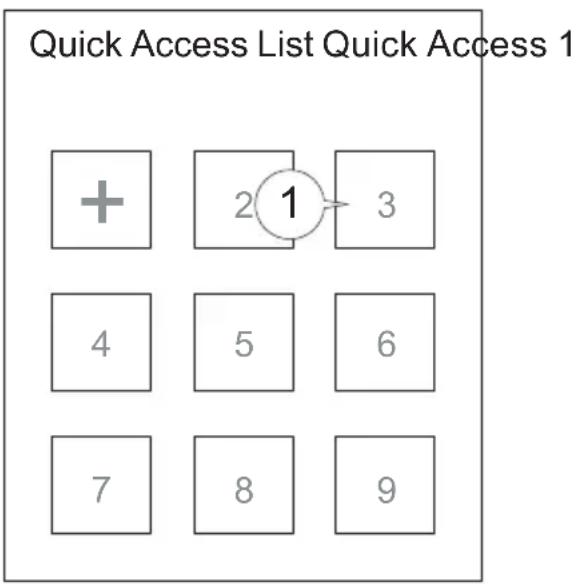
Start Applications through Quick Access
- Press and hold a number button on the remote control to open an application or to activate an external input registered for the button.
Quick Access Settings:
- Launch the application or select the program or input you want to assign.
- Press and hold the number button (1 9) you want to register.
- When the registration pop-up appears, select Yes.
- If you press and hold a number button that has been registered, the registered function will be performed.
- To view the items that can be registered, select a number that has not been registered in the Quick Access edit mode.
- If you are in a mode you cannot execute the Quick Access, no action will be taken.
- If you delete a registered application, the Quick Access will also be canceled.
Verification and Editing Quick Access:
- Press and hold the 0 button on the remote control.
- The Edit Quick Access screen appears.
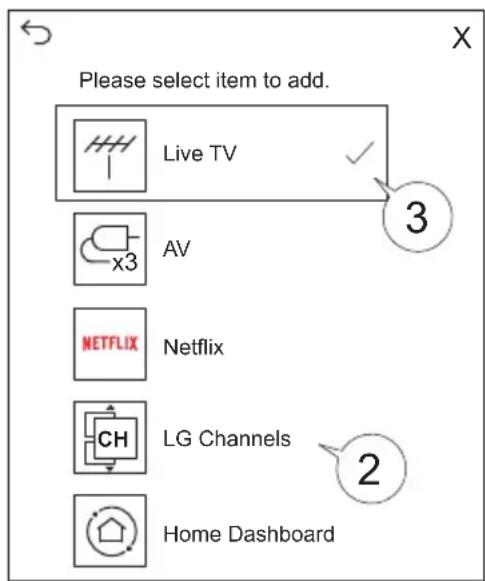
- By selecting a number that has already been registered allows you to cancel the registration.
- When you select a number that has not been registered, the items that can be registered will be displayed.
- An item that has been registered under a different number is indicated by a check mark.
Connection of External Devices
Using the Home Dashboard:
- You can select or control a device (mobile, external device, home IoT devices, etc.) connected to the TV.
- Press the (HOME) button on the remote control and select Start Panel. You can also hold down the (HOME) button on the remote control.

- You can check and select the connected smart device with the ThinQ App. Please refer to the External Device Connection and Smart Device Connection section in the User's Guide for more information.
- Connect to AirPlay enabled device.
- You can check and select the external devices connected via the external input port or the network.
- The currently selected output speaker is displayed and you can navigate to the output speaker setup screen.
- You can view and select attached storage devices.
- You can check and control the connected devices through Home IoT. Consult the section Connecting External Devices that Connect Devices for the desired options.
- Login: you can login or logout from and to the ThinQ account that you create on the mobile device; You can edit the name of the device connected to inputs, Home IoT Devices or adjust related settings.
- Options: Allows editing of inputs, Home IoT devices, notifications, universal control settings, user guide and quitting the app.
- Exit the start Panel.
- Available Settings vary depending on region and model.
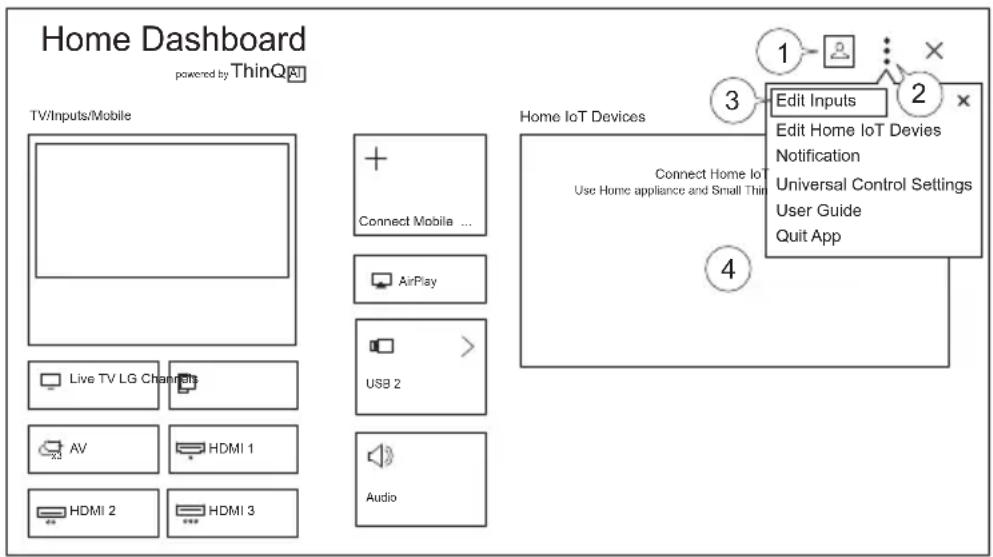
Connection of Home IoT Devices
You can check and control the status of connected Home IoT devices.
- Install the ThinQ Application on your smartphone.
- Login to your ThinQ account and register your own ThinQ device.
- Press the (HOME) button on the remote control and select Home Dashboard.
-
Press "Login" at the top right to select Login.
-
If you are in an area where the ThinQ application is not serviced, the connection of the ThinQ device will not be supported.
- If you are controlling the external device from your mobile app, you may not be able to control the device from your TV. Exit the mobile application to control it from your TV.
- You can log in and out from the ThinQ account that is created on the mobile device.
- Options: You can easily control your device by pressing the desired operation.
- Edit Inputs: You can edit the icon and name of the inputs of the TV.
Edit Home IoT devices: You can rename, show / hide or change the order of the devices connected to IoT Devices Home.
Notification: if you activate it, you can receive notifications about the status of Home IoT Device.
Universal Control Settings: You can control the devices connected to the TV with the Remote Control.
User Guide: A searchable digital User Guide allows for step by step instructions for features and TV use.
4. You can consult the User Guide for Connecting Home IoT Devices. You can connect and display the devices registered to your ThinQ account.
Once the device is connected, the card will be changed to a smaller size and appears at the bottom of the device connection list.
Available settings vary by model and region.
- IoT devices that can be connected to a TV are subject to change without notice.
- Connectable ThinQ devices and available functions may differ between mobile phone and TV.
Smart Device Connection
You can use a variety of functions by connecting the TV to a smart device. Connecting your Smart Device to a TV using the ThinQ App.
- Download the ThinQ app from your smart device's app store. You can download the application easily by scanning the QR code.

Android iOS

- Connect your TV and smart device to the same W-Fi network. You can check the TV's Wi-Fi network in Settings > Network > Wi-Fi Connection.
- Run the ThinQ application installed on your smart device.
- Follow the instructions in the ThinQ app to connect your smart device to the TV. When your ThinQ account information is linked to the TV, you can manage the IoT devices linked to your account using the TV Home Panel.
Controlling your TV with the ThinQ App:
You can touch the buttons on the screen of your smart device to control the TV.
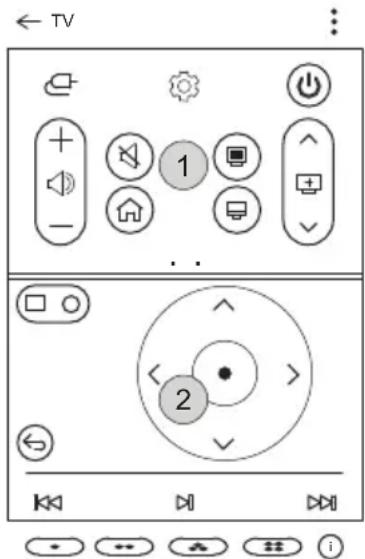
- Some controls may be limited in external input mode.
-
The screen and the functionality of the application are subject to change without notice.
The available functions may vary according to the country and the Operating System. -
When watching a broadcast, you can control the program, volume, etc. or select input with voice commands instead of using the remote control.
- You can use the same functions as the Pointer and the arrow keys on the Magic Remote Control.
Note: TV rating locks / Activation of program locks / Application locks / Input locks - The initial password is set as "0000".
Reset a forgotten password:
If you forget your password, you must reset as follows:
- Press the "Settings" button on the remote control.
- Select Settings > All Settings > General > System Safety.
- Press Channel Up > Channel Up > Channel Down > Channel Up on the remote control. A window will appear where you must enter the numbers "0313" then press Enter and the password will be reset to the default of "0000".
MAINTENANCE
Care of the Screen
Do not rub or strike the screen with anything hard as this may scratch, mark, or even damage the screen permanently. Ensure that the display is installed in a location where it will be safe from abrasives and flying debris, which could damage the LCD panel. Never use ammonia or any product containing ammonia, as it will damage the anti-glare coating on the face of the display. Only use an approved screen cleaner to clean the display face. Dust the display by wiping the screen and the cabinet with a soft, clean cloth. If the screen requires additional cleaning, use a clean, damp cloth. Do not use aerosol cleaners or solvents of any kind. Do not use any chemical such as paint thinner or benzene to clean the product's exterior. It may cause scratches on the surface, erasing proper indications, identification labels, or instructions on the exterior, which may cause misuse and improper operation of the product.
Mobile Telephone Caution
Keep your mobile telephone away from your display to avoid disturbances in the picture or sound, possibly causing permanent damage to your display.
End of Life Directives
In an effort to produce environmentally friendly products, your new display contains materials that can be recycled and reused. At the end of your display's life, specialized companies can minimize display waste by separating reusable materials from non-reusable materials. Please ensure you dispose of your display according to local regulations.

This computer is an appliance. It is an electrically insulated Class II or double insulated electrical appliance, one which has been designed in such a way that it does not require a safety connection to electrical ground.
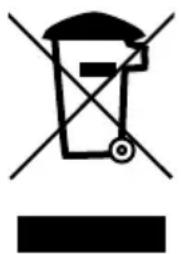
If at any time you need to dispose of this device, please note that waste electrical products should not be disposed of with household waste. Please recycle in places suited for it. Check with your local authority or dealer for recycling advice. (Directive on Waste Electrical and Electronic Equipment).
ENG This page intentionally left blank.
Guía del Nombre
Televisores Inteligentes para Exteriores a Pleno Sol

Códio Eléctrico
| ENG | 123 | 45678 | 90 | X | ||||||||
| $%^ | q | w | ertyulop | Enter | ||||||||
| Aa | a | s | dfghjkl? | 0 | ||||||||
| @ | @ | zxcvbnm | , | . | Clear All | |||||||
| < | > | |||||||||||
Please speak to enter text (English - United States)
Press to change language

telecommandemagic remote control
H (1)
telecommande etanche

D (1)
repéteur IR
| Vis de montage requises |
| Quatre M8 screws (20mm long) |
| Taille d'affichage | A B C D E F | |||||
| 55" | 11.81" (300mm) | 7.87" (200mm) | 18.65" (474mm) | 4.61" (117mm) | 1.61" (41mm) | 3.11" (79mm) |
| 65" | 11.81" (300mm) | 7.87" (200mm) | 22.89" (582mm) | 5.42" (138mm) | 1.61" (41mm) | 3.11" (79mm) |
Please speak to enter text (English - United States)
Press to change language