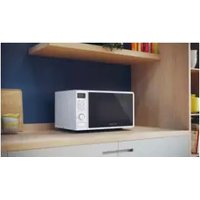
CMGA26DRSTALG1 - Microwaves CANDY - Free user manual and instructions
Find the device manual for free CMGA26DRSTALG1 CANDY in PDF.
User questions about CMGA26DRSTALG1 CANDY
0 question about this device. Answer the ones you know or ask your own.
Ask a new question about this device
Download the instructions for your Microwaves in PDF format for free! Find your manual CMGA26DRSTALG1 - CANDY and take your electronic device back in hand. On this page are published all the documents necessary for the use of your device. CMGA26DRSTALG1 by CANDY.
USER MANUAL CMGA26DRSTALG1 CANDY
A g A g E g g
AA A A A A A A A A A A A A A A A A A A A A A A A A A A A A A A A A A A A A A A A A A A A A A A A A A A A A A A A A A A A A A A A A A A A A A A A A A A A
A
A]1 2x 2y 2z 2xy 2x 2y 2z 2x 2y 2z
A:1 11111111111111111111111111111111111111111111111
- 1
- Mxixy 4yixy 5yixy 6yixy 7yixy 8yixy 9yixy
- 1x yjg jyjy jy jy jy jy jy jy jy jy jy jy jy jy jy jy jy jy jy jy jy jy jy jy jy jy jy jy jy jy jy jy jy jy jy
- 5x 5y 5z 5x y 5y 5z 5x y 5z 5x y 5z 5x y 5z 5x y 5z 5x y 5z 5x y 5z 5x y 5z 5x y 5z 5x y 5z 5x y 5z 5x y 5z 5x y 5z 5x y
- 1234567890123456789012345678901234567890123456789012345678901234567890123456789012345678901234567890123456789
- 5x1 x1 x1 x1 x1 x1 x1 x1 x1 x1 x1 x1 x1 x1 x1 x1 x1 x1 x1 x1 x1 x1 x1 x1 x1 x1 x1 x1 x1 x1 x1 x1 x1 x1 x1 x1 x1 x1 x1 x1
- E111 1 111 1 111 1 111 1 111 1 111 1 111 1 111 1 111 1 111 1 111 1 111 1 111 1 1
- F 1 1 1 1 1 1 1 1 1 1 1 1 1 1 1 1 1 1 1 1 1 1 1 1 1 1 1 1 1 1 1
- 5x+
-
Cx 1 x 1 x 1 x 1 x 1 x 1 x 1 x 1 x 1 x 1 x 1 x 1 x 1 x 1 x 1 x 1 x 1 x 1 x 1 x 1 x 1 x 1 x 1 x 1 x 1 x 1 x
-
5x
jx jx y 1 x 1 x 1 x 1 x 1 x 1 x 1 x 1 x 1 x 1 x 1 x 1 x 1 x 1 x 1 x 1 x 1 x 1 x 1 x 1 x 1 x 1 x 1 x 1 x 1 x 1 x 1
A
- 1pX Lxu, xuDx, uBxuLxu, xu
- 8 8 8 8 8 8 8 8 8 8 8 8 8 8 8 8 8 8 8 8 8 8 8 8 8 8 8 8 8 8 8 8 8 8 8 8
- C
- C#yS#I #Li b##s#.Xx#dX I#, ## ## ## ## ## ## ## ## ## ## ## ## ## ## ## ## ## ## ## ## ## ## ## ## ## ## ## ## ## ## ## ## ## ## ## ## ## ## #
-
5p
-
1x
-1 - 1 1 1 1 1 1 1 1 1 1 1 1 1 1 1 1 1 1 1 1
-
1x
-
D 20 20 20
-
G2 C B
| EF1 F1 | EF1, EF1, EF1, EF1, EF1, EF1, EF1, EF1, EF1, EF1, EF1, EF1, EF1, EF1, EF1, EF1, EF1, EF1, EF1, EF1, EF1, EF1, EF1, EF1, EF1, EF1, EF1, EF1, EF1, EF1, EF1, EF1, EF1, EF1, EF2 |
| EF2 F2 | EF2, EF2, EF2, EF2, EF2, EF2, EF2, EF2, EF2, EF2, EF2, EF2, EF2, EF2, EF2, EF2, EF2, EF2, EF2, EF2, EF2, EF2, EF2, EF2, EF2, EF2, EF2, EF2, EF2, EF2, EF2, EF2, EF2, EF2, EF1, EF1, EF1, EF1, EF1, EF1, EF1, EF1, EF1, EF1, EF1, EF1, EF1, EF1, EF1, EF1, EF1, EF1, EF1, EF1, EF1, EF1, EF1, EF1, EF1, EF1, EF1, EF1, EF1, EF1, EF1, EF1, EF1 |
A
- 1x1111111111111111111111111111
1 - 10 x 4x 4x 4x 4x 4x 4x 4x 4x 4x 4x 4x 4x
4 4
x. Dxaijdx x 1y 4x 1y 1y 1y 1y 1y 1y 1y 1y
3.2 (24-ccc
iXl iXi. 1
"SA+30j" 1
Jx Jx,
Jx Jx,
Jx Jx Jx Jx Jx Jx Jx Jx Jx Jx Jx Jx Jx Jx Jx Jx Jx Jx Jx Jx Jx Jx Jx Jx Jx Jx Jx Jx Jx Jx Jx Jx Jx Jx Jx Jx Jx Jx Jx Jx Jx Jx Jx Jx Jx Jx Jx Jx Jx Jx Jx
Jy 1
Jy 2
Jy 2
Jy 0:10
60:00. Aai Daxai! jxl x, wll "SA+30"
Aix jxl x. A.
| HIGH 100% | (Atallah Ali bin al-hassan bin al-mohammad) |
| M. Hs! 80% | (Awwad al qutb al hossan bin al-hassan al-hassan) |
| Mx 50% | (Awwad al qutb al hossan bin al-hassan al-hassan) |
| M. Ls 30% | (Awwad al qutb al hossan bin al-hassan al-hassan) |
| L● 10% | (Awwad al qutb al hossan bin al-hassan al-hassan) |
A
60 60
3. Nxi
A. A; 1234567890123456789012345678901234567890123456789012345678901234567890123456789012345678901234567890123456789
2. 10 30 40 50
x. 10000000000000000000000000000000000000000000000000000000000000000000
| G. | Gigilts, jajl, lalj, klll, klll, klll, klll, klll, klll, klll, klll, klll, klll, klll, klll, klll, klll, klll, klll, klll, klll, klll, klll, klll, klll, klll, klll, klll, kllll, klll, klll, klll, klll, klll, klll, klll, klll, klll, klll, klll, klll, klll, klll, klll, klll, klll, klll, klll, klll, klll, klll, klll, klll, kll l, klll, klll, klll, klll, klll, klll, klll, klll, klll, klll, klll, klll, klll, klll, klll, klll, klll, klll, klll, klll, klll, klll, klll, klll, kll,l, klll, klll, klll, klll, klll, klll, klll, klll, klll, klll, klll, klll, klll, klll, klll, klll, klll, klll, klll, klll, klll, klll, klll, klll, kll, klll, klll, klll, klll, klll, klll, klll, klll, klll, klll, klll, klll, klll, klll, klll, klll, klll, klll, klll, klll, klll, klll, klll, klll, kell, klll, klll, klll, klll, klll, klll, klll, klll, klll, klll, klll, klll, klll, klll, klll, klll, klll, klll, klll, klll, klll, klll, klll, klll, kll! , 30% |
| C-1 | Cagbglssgssgssgssgssgssgssgssgssgssgssgssgssgssgssgssgssgssgssgssgssgssgssgssgssgssgssgssgssgssgssgssgssgssgssgssgssgssgssgssgssgssgssgssgssgssgssgssgssgssgssggssgssgssgssgssgssgssgssgssgssgssgssgssgssgssgssgssgssgssgssgssgssgssgssgssgssgssgssgssgssgssgssgssgssgssgssgssgssgssgssgssgssgssgssgssgssgssgssgssgsss |
| C-2 | CagbglssgssgssgssgssgssgssgssgssgssgssgssgssgssgssgssgssgssgssgssgssgssgssgssgssgssgssgssgssgssgssgssgssgssgssgssgssgssgssgssgssgssgssgssgssgssgssgSS |
A
-
-
-
-
-
-
-
-
-
-
-
-
-
-
-
-
-
-
-
-
-
-
-
-
-
-
-
-
-
-
-
-
-
-
-
-
-
-
-
-
-
-
-
-
-
-
-
-
-
-
-
-
-
-
-
-
-
-
-
-
-
-
-
-
-
-
-
- EJENS Bog Nj
-
-
-
-
-
-
-
-
-
-
-
-
-
-
-
-
-
-
-
-
-
-
-
-
-
-
-
-
-
-
-
-
-
-
-
-
-
-
-
-
-
-
-
-
-
-
-
-
-
-
-
-
-
-
-
-
-
-
-
-
-
-
-
-
-
-
6.
-
-
-
-
-
-
-
-
-
-
-
-
-
-
-
-
-
-
-
-
-
-
-
-
-
-
-
-
-
-
-
-
-
-
-
-
-
-
-
-
-
-
-
-
-
-
-
-
-
-
-
-
-
-
-
-
-
-
-
-
-
-
- 64.
-
-
-
-
-
-
-
-
-
-
-
-
-
-
-
-
-
-
-
-
-
-
-
-
-
-
-
-
-
-
-
-
-
-
-
-
-
-
-
-
-
-
-
-
-
-
-
-
-
-
-
-
-
-
-
-
-
-
-
-
-
7. A / + 30J
A#di d#i! pX 12x #pX, w##l jx
"SA+30" a#i b#i ##s ##.
J#d? 12x, a## "SA+30" a#i b#i#.
wllb#i 30 30, a#i b#i.
w#l i#i#i#i#i#i#i#i#i#i#i#i#i#i#i#i#i#i#i#i#i#i#i#i#i#i#i#i#i#i#i#i#i#i#i#i#i#i#i#i#i#i#
8. 电
- 1234567890123456789012345678901234567890123456789012345678901234567890123456789012345678901234567890123456789
x"SA+30 30A. A.
9. alaxy aay
lalai 45 jil g bill lall
1(
Joo Joo
2(
aill lll 1
3(
c 0e e 1 1 1 1 1 1 1 1 1 1 1 1 1 1 1 1
4(
$$ \left. \right.\left. \right.\left. \right.\left. \right.\left. \right.\left.\left.\left.\left.\left.\left.\left.\left.\left.\left.\left.\left.\left.\left.\left.\left.\left.\left.\left.\left.\left.\left.\left.\left.\left.\left.\left.\left.\left.\right.\right.\right.\right.\right.\right.\right.\right.\right.\right.\right.\right.\right.\right.\right.\right.\right.\right.\right.\right.\right.\right.\right.\right.\right.\right.\right.\right.\right. $$
$$ - \quad c _ {2} = 0 $$
$$ \begin{array}{l} \text {s a l l} \ 6 (\rho \end{array} $$
$$ (\ddot {c} \dot {s} s s s s s s s s s s s s s s s s s s s s s s s s s s s s s s s s s s s s s s s s s s s s s s s s s s s s s s s s s s s s s s s s s s s s s s s s s s s s s s s $$
$$ 7 (f) $$
$$ \cdot \mathrm {s i g m a l l p l a b b l e} \mathrm {g i n g l a d i s i t i o n} $$
$$ 8 (\sum_ {i = 1} ^ {n} \sum_ {j = 1} ^ {m} \sum_ {k = 1} ^ {n} \sum_ {l = 1} ^ {m}) $$
$$ \cdot \frac {1}{2} \sum_ {i = 1} ^ {n} \left(\sum_ {j = 1} ^ {m} \frac {1}{2} \sum_ {k = 1} ^ {n - j} \frac {1}{2} \sum_ {l = 1} ^ {m - k} \frac {1}{2}\right) $$
$$ \sim $$
$$ \therefore \mathrm {d} \mathrm {d} \mathrm {f} \geqslant \mathrm {g a l l} \mathrm {d} \mathrm {d} \mathrm {d} \mathrm {d} \mathrm {d} \mathrm {d} \mathrm {d} \mathrm {d} \mathrm {d} \mathrm {d} \mathrm {d} \mathrm {d} \mathrm {d} \mathrm {d} \mathrm {d} \mathrm {d} \mathrm {d} \mathrm {d} \mathrm {d} \mathrm {d} \mathrm {f} \geqslant 0 $$

1.(c)
2(
3(

S_ OBC = 12 · CO · BC = 12 × CD × 5
(30+/c) "START/+30s" jzj 1i i
1dEF 1
aaiiie 1
p 1
| dEF1 | |
| dEF2 |

.
4a 1
"DEFROST/CLOCK" 150000000000000000000000000000000000000000000000000000000000000000000000000000000000000000000000000000
120
jz jz b z 30+120s" START/+30s"
jz jz b z 30+120s"
jz jz b z 30+120s"
jz jz b z 30+120s"
jz jz b z 30+120s"
jz jz b z 30+120s"
jz jz b z 30+120s"
jz jz b z 30+120s"
START/+30s jie bia 1i iie pbl y
aalldall gll aacn wgdo 30+/c
j jieeall 1iie 1aee 1d 1gll pabll ljj gii iis
L aal 1 jy (Jai/la) STOP/LOCK
jlll l 1
"START/+30s" jz biai, iai yie! gaoaag aai
30 30
30 30+30"START/+30s"
aalalalalalalalalalalalalalalalalalalalal
p 1
a
1"
(J)3
2
"STOP/LOCK"
dilal
Jie jie jie jie jie jie jie jie jie jie jie jie jie jie jie jie jie jie jie jie jie jie jie jie jie jie jie jie jie jie jie jie jie jie jie jie jie jie jie jie jie jie jie jie jie jie jie jie jie jie jie
J 1
aclll bllc alil sSc g aellllblll lal jlll llll
1
jLwJnJdJdJ.5
blln no gaoill 0e iaiy1 no y" y" ayly
.
a 1
12
aolall lal
a gssll clcl:4
iKolllll lal 111 111 111 111 111 111 1
J 1
1 2
250
Joo
1
Jdill aolc
.
CANDY
F·A MIC●-NDE
MANEL D'IN CSI·N
CMGA26DB-ALG/1
CMGA26D-ALG/1
CMGA26DB-ALG/1
AeLg E 10000000000000000000000000000000000000000000000000000000000000000000
AeALue Lw EAAgAaaAa
Aegg: 1s wii x b xi y i x i x i x i x i x i x i x i x i x i x i x i x i x i x
Ae: x dX 12x y dx y dx
E. x dx dx dx dx dx dx dx dx dx dx dx dx dx dx dx dx dx dx dx dx dx dx dx dx dx dx dx dx dx dx dx dx dx dx dx dx dx dx dx dx dx dx dx dx dx dx dx dx dx dx dx dx dx dx dx dx dx dx dx dx dx dx dx dx dx dx dx dx dx dx dx dx dx dx dx dx dx dx dx dx dx dx dx dx dx dx dx dx dx dx dx dx dx dx dx dx dx
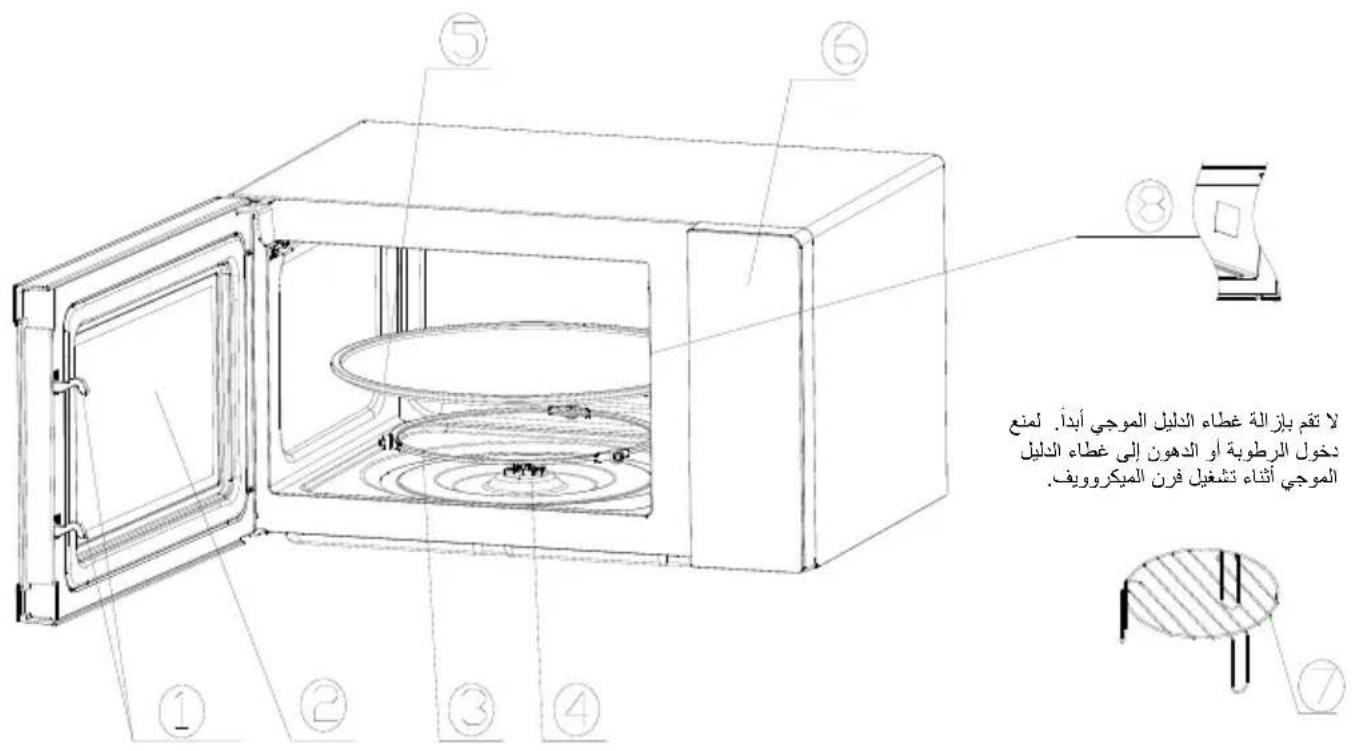
1. N'zLx 2x 3x 4x 5x 6x 7x 8x 9x
2. Lxj xj xj j xj xj xj xj xj xj xj
3. Lx 1 x 2 x 3 x 4 x 5 x 6
x
x
x
x
x
4. Lx a b x d x d x d x d x d x d x d x d x d x d x d x d x d x d x d x d x d x d x d x d x d x d x d x d x d x d x d x d x d x d x d x d x d x d x d x d x d x d x d x d x d x d x d x d x d x d x d x d x d x d x
5. E. x dx dx dx dx dx dx dx dx dx dx dx dx dx dx dx dx dx dx dx dx dx dx dx dx dx dx dx dx dx dx dx dx dx dx dx dx dx dx dx dx dx dx dx dx dx dx dx dx dx dx dx dx dx dx dx dx dx dx dx dx dx dx dx dx dx dx dx dx dx dx dx dx dx dx dx dx dx dx dx dx dx dx dx dx dx dx dx dx dx dx dx dx dx dx dx dx dx dx dx dx
6.Lx 4yix x2yix yix yix yix yix yix yix yix yix
7. Lxieai xiei xiei xiei oai jxix i xuyj 1 yix 4yix 4yix 4yix 4yix 4yix
- Lx x x x y dxi x y x x x x x x x x x x x x x x x x x x x x x x x x x x x x x x x x
- L'wwyixx ydx x dxdy dx
- 1x x 1 x 1 x 1 x 1 x 1 x 1 x 1 x
- L'wwx, x yix xix 2x xix
LxJxJxJxJxJxJxJxJxJxJxJxJxJxJxJxJxJxJxJxJxJxJxJxJxJxJxJxJxJxJxJxJxJxJxJxJxJxJxJxJxJxJxJxJxJxJxJxJxJxJx
JEAJ. EF1 2AeJyDjE JEF2
Awww
iDyaiy
AeF1 《EF2》.
1
DEF1 100+1500!
DEF2 0:1060:00.A
x
_ / + 30^
x 1s
EF1 wu wui 1 uui i 1 uui uui uui uui
iX
1
2x1
| EF1 | 1500 ! |
| EF2 | 60:00. |
A
.1xixiXxixiXxixiXxixiXx
E. 1x, x2x4x5x6x7x8x9x10
4. 2x 1 x 1 x 1 x 1 x 1 x 1 x 1 x 1 x 1 x 1 x 1 x 1 x 1 x 1 x 1 x 1 x 1 x 1 x 1 x 1 x 1 x 1 x 1 x 1 x 1 x 1 x 1 x 1 x 1 x 1 x 1 x 1 x 1 x 1 x
4 4
x.Lx i xj 2x j xj y j x a j b j z j x
y j x j, x j xj y j x j xj y j x j
x j xj yj xj y
E. x_1, x_2, x_3 与 x_4 的值依次为 x_1, x_2, x_3 和 x_1, x_2, x_3 。
3 3 3 3 3 3 3 3 3 3 3 3 3 3 3 3 3 3 3 3
A 1
p. L'xx x x x x x x x x x x. A
i 1
《SA+30》
xii 1i. Lxi i xi xix ix
A. Aii j 1 k i 1 k,
1 《SA+30》
L
4. A
A.1 A. 8,
jXwXia, ybiXia, wbiXia, xjXia, yjXia, wjXia, wjXia, wjXia,
,x. A.
X 《Mx》 W
A.1 A.8.
15x
1111, 23
x 1 x x x x x x x x x x x x x x
| A.1 | \( \ddot{a}\dot{a}\dot{a}\dot{a}\dot{a}\dot{a}\dot{a}\dot{a}\dot{a}\dot{a}\dot{a}\dot{a}\dot{a}\dot{a}\dot{a}\dot{a}\dot{a}\dot{a}\dot{a}\dot{a}\dot{a}\dot{a}\dot{a}\dot{a}\dot{a}\dot{a}\ddot{a}\dot{a}\dot{a}\dot{a}\dot{a}\dot{a}\dot{a}\dot{a}\dot{a}\dot{a}\dot{a}\dot{a}\dot{a}\dot{a}\dot{a}\dot{a}\dot{a}\dot{a}\dot{a}\dot{a}\dot{a}\dot{a}\dot{a}\dot{a}\dot{b}\dot{b}\dot{b}\dot{b}\dot{b}\dot{b}\dot{b}\dot{b}\dot{b}\dot{b}\dot{b}\dot{b}\dot{b}\dot{b}\dot{b}\dot{b}\dot{b}\dot{b}\dot{b}\dot{b}\dot{b}\dot{b}\dot{b}\dot{b}\dot{b}\dot{a}\dot{a}\dot{a}\dot{a}\dot{a}\dot{a}\dot{a}\dot{a}\dot{a}\dot{a}\dot{a}\dot{a}\dot{a}\dot{a}\dot{a}\dot{a}\dot{a}\dot{a}\dot{a}\dot{a}\dot{a}\dot{a}\dot{a}\dot{a}\dot{b}\ddot{b}\ddot{b}\ddot{b}\ddot{b}\ddot{b}\ddot{b}\ddot{b}\ddot{b}\ddot{b}\ddot{b}\ddot{b}\ddot{b}\ddot{b}\ddot{b}\ddot{b}\ddot{b}\ddot{b}\ddot{b}\ddot{b}\ddot{b}\ddOT\ddot{b}\ddot{b}\ddot{b}\ddot{b}\ddot{b}\ddot{b}\ddot{b}\ddot{b}\ddot{b}\ddot{b}\ddot{b}\ddot{b}\ddot{b}\ddot{b}\ddot{b}\ddot{b}\ddot{b}\ddot{b}\ddot{b}\ddot{b} \) | Lx1! 250 !, 500 ! x3 750 ! |
| A.2 | \( \ddot{a}\dot{a}\dot{a}\dot{a}\dot{a}\dot{a}\dot{a}\dot{a}\dot{a}\dot{a}\dot{a}\dot{a}\dot{a}\dot{a}\dot{a}\dot{a}\dot{a}\dot{a}\dot{a}\dot{a}\dot{a}\dot{a}\dot{a}\dot{a} \) | Lx1! x3 50 !, 100 ! x3 150 ! |
| A.3 | \( \ddot{a}\dot{a}\dot{a}\dot{a}\dot{a}\dot{a}\dot{a}\dot{a}\dot{a}\dot{a}\dot{a}\dot{a}\dot{a}\dot{a}\dot{a}\dot{a}\dot{a}\dot{a}\dot{a}\dot{a}\dot{a}\dot{a}\dot{a}\dot{a}_{\mathrm{S}} \) | Lx1! x3 200 ! x3 400 ! |
| A.4 àçà-àçù | Lx àçà-àçù | Lx àçà-àçù 100! |
| A.5 àçà-àçù | Lx àçà-àçù | Lx àçà-àçù 200!, 400! Lx àçà 600! |
| A.6 àçà-àçù | Lx àçà-àçù | Lx àçà-àçù 1 Lx àçà-àçù 2 Lx àçà-àçù 3 Lx àçà, 4 Lx àçà - Lx àçà - Lx àçà - Lx àçà - Lx àçà - Lx àçà - Lx àçà - Lx àçà - Lx àçà - Lx àçà - Lx àçà - Lx àçà - Lx àçà - Lx àçà - Lx àçà - Lx àçà - Lx àçà - Lx àz |
| A.7 àçà-àçù | Lx àçà-àçù | Lx àçà-àçù 200!, 400! Lx àçà 600! |
| A.8 àçà-àçù | Lx àçà-àçù | Lx àçà-àçù 200!, 400! Lx àçà 600! |
A
L 20
25°C.
iX
Lj 1
iX 1
iwwii 1
x
j
5.
Cxx
5 5
100,80,50,30
- _x 01x^2 + x + 1 . I _x 01x^2 + x + 1
1 1 1
1) D L a x x x x x: x. b x x x, mnnn n 3 d k K X J dx dx dx dx dx dx dx dx dx dx dx dx dx dx dx dx dx dx dx dx dx dx dx dx dx dx dx dx dx dx dx dx dx dx dx dx dx dx dx dx dx dx dx dx dx dx dx dx dx dx dx dx dx dx dx dx dx dx dx dx dx dx dx dx dx dx dx dx dx dx dx dx dx dx dx dx dx dx dx dx dx dx dx dx dx dx dx dx dx dx dx dx dx dx dx dx
12ax nx
xixi xixi xi xixi xixi xixi xixi xixi xixi xixi xixi xixi xixi xixi xixi xixi xixi xixi xixi xixi xixi xixi xixi xixi xixi xixi xixi xixi xixi xixi xixi xixi xixi xixi xixi xixi xixi
| Mddlkiydi dikisiydi | Mddiyydi Gigi C. | ||||
| Cdlkiydi dikisiydi ydi diydi | N'diydi ydi ydi ydi ydi ydi ydi ydi ydi ydi ydi ydi ydi ydi ydi ydi ydi ydi ydi ydi ydi ydi ydi ydi ydi ydi ydi ydi ydi ydi ydi ydi ydi ydi ydi ydi ydi ydi ydi ydi ydi ydi ydi ydi ydi ydi ydi ydi ydi ydi ydi YdiYdiYdiYdiYdiYdiYdiYdiYdiYdiYdiYdiYdiYdiYdiYdiYdiYdiYdiYdiYdiYdiYdiYdiYdiYdiYdiYdiYdiYdiYdiYdiYdiYdiYdiYdiYdiYdiYdiYdiYdiYdiYdiYdiYdiYdiYdiYdiYdiYdiYdi YdiYdiYdiYdiYdiYdiYdiYdiYdiYdiYdiYdiYdiYdiYdiYdiYdiYdiYdiYdiYdiYdiYdiYdiYdiYdiYdiYdiYdiYdiYdiYdiYdiYdiYdiYdiYdiYdiYdiYdiYdiYdiYdiYdiYdiYdiYdiYdiYdi Ydi Ydi Ydi Ydi Ydi Ydi Ydi Ydi Ydi Ydi Ydi Ydi Ydi Ydi Ydi Ydi Ydi Ydi Ydi Ydi Ydi Ydi Ydi Ydi Ydi Ydi Ydi Ydi Ydi Ydi Ydi Ydi Ydi Ydi Ydi Ydi Ydi Ydi Ydi Ydi Ydi Ydi Ydi Ydi Ydi Ydi Ydi Ydi Ydi YdiYdiYdiYdiYdiYdiYdiYdiYdiYdiYdiYdiYdiYdiYdiYdiYdiYdiYdiYdiYdiYdiYdiYdiYdiYdiYdiYdiYdiYdiYdiYdiYdiYdiYdiYdiYdiYdiYdiYdiYdiYdiYdiYdiYdiYdiYdiYdiYdiX Ydi X | ||||
| Dlkiydi diydi ydi diydi | DiNdi Ndi | N'diydi ydi ydi ydi ydi ydi ydi ydi ydi ydi ydi ydi ydi ydi ydi ydi ydi ydi ydi ydi ydi ydi ydi ydi ydi ydi ydi ydi ydi ydi ydi ydi ydi ydi ydi ydi ydi ydi ydi ydi ydi ydi ydi ydi ydi ydi ydi YdiYdiYdi YdiYdiYdiYdiYdiYdiYdiYdiYdiYdiYdiYdiYdiYdiYdiYdiYdiYdiYdiYdiYdiYdiYdiYdiYdiYdiYdiYdiYdiYdiYdiYdiYdiYdiYdiYdiYdiYdiYdiYdiYdiYdiYdiYdiYdiYdiYdi YdiYdiYdi YdiYdi YdiYdi YdiYdi YdiYdi YdiYdi YdiYdi YdiYdi YdiYdi YdiYdi YdiYdi YdiYdi YdiYdi YdiYdi YdiYdi YdiYdi YdiYdi YdiYdi YdiYdi YdiYdi YdiYdi YdiYdi YdiYdi YdiYdi YdiYdi YdiYdiYdi YdiYdi YdiYdi YdiYdi YdiYdi YdiYdi YdiYdi YdiYdi YdiYdi YdiYdi YdiYdi YdiYdi YdiYdi YdiYdi YdiYdi YdiYdi YdiYdi YdiYdi YdiYdi YdiYdi YdiYdi YdiYdi YdiYdi Ydi Ydi Ydi Ydi Ydi Ydi Ydi Ydi Ydi Ydi Ydi Ydi Ydi Ydi Ydi Ydi Ydi Ydi Ydi Ydi Ydi Ydi Ydi Ydi Ydi Ydi Ydi Ydi Ydi Ydi Ydi Ydi Ydi Ydi Ydi Ydi Ydi Ydi Ydi Ydi Ydi Ydi Ydi Ydi Ydi Ydi Ydi YdiYdi Ydi Ydi Ydi Ydi Ydi Ydi Ydi Ydi Ydi Ydi Ydi Ydi Ydi Ydi Ydi Ydi Ydi Ydi Ydi Ydi Ydi Ydi Ydi Ydi Ydi Ydi Ydi Ydi Ydi Ydi Ydi Ydi Ydi Ydi Ydi Ydi Ydi Ydi Ydi Ydi Ydi Ydi Ydi Ydi Ydi Ydi YdiYdi YdiYdi Ydi Ydi Ydi Ydi Ydi Ydi Ydi Ydi Ydi Ydi Ydi Ydi Ydi Ydi Ydi Ydi Ydi Ydi Ydi Ydi Ydi Ydi Ydi Ydi Ydi Ydi Ydi Ydi Ydi Ydi Ydi Ydi Ydi Ydi Ydi Ydi Ydi Ydi Ydi Ydi Ydi Ydi Ydi Ydi YdiYdi Ydi Ydi YdiYdi Ydi Ydi Ydi Ydi Ydi Ydi Ydi Ydi Ydi Ydi Ydi Ydi Ydi Ydi Ydi Ydi Ydi Ydi Ydi Ydi Ydi Ydi Ydi Ydi Ydi Ydi Ydi Ydi Ydi Ydi Ydi Ydi Ydi Ydi Ydi Ydi Ydi Ydi Ydi Ydi Ydi Ydi Ydi Ydi YdiYdi YdiYdi YdiYdi YdiYdi YdiYdi YdiYdi YdiYdi YdiYdi YdiYdi YdiYdi YdiYdi YdiYdi YdiYdi YdiYdi YdiYdi YdiYdi YdiYdi YdiYdi YdiYdi YdiYdi YdiYdi YdiYdi YdiYdi YdiYdi Ydi YdiYdi YdiYdi YdiYdi YdiYdi YdiYdi YdiYdi YdiYdi YdiYdi YdiYdi YdiYdi YdiYdi YdiYdi YdiYdi YdiYdi YdiYdi YdiYdi YdiYdi YdiYdi YdiYdi YdiYdi YdiYdi YdiYdi YdiYdi YdiYdiYdiYdiYdiYdiYdiYdiYdiYdiYdiYdiYdiYdiYdiYdiYdiYdiYdiYdiYdiYdiYdiYdiYdiYdiYdiYdiYdiYdiYdiYdiYdiYdiYdiYdiYdiYdiYdiYdiYdiYdiYdiYdiYdiYdiYdiYdi Y | |||
| Dlkiydi diydi ydi diydi | DiNdi Ndi | ||||
| Fddlkiydi dikisiydi ydi dikisiydi ydi ydi ydi ydi ydi ydi ydi ydi ydi ydi ydi ydi ydi ydi ydi ydi ydi ydi ydi ydi ydi ydi ydi ydi ydi ydi ydi ydi ydi ydi ydi ydi ydi ydi ydi ydi ydi ydi ydi ydi ydi ydi ydi ydi ydi YdiYdiYdiYdi YdiYdiYdiYdiYdiYdiYdiYdiYdiYdiYdiYdiYdiYdiYdiYdiYdiYdiYdiYdiYdiYdiYdiYdiYdiYdiYdiYdiYdiYdiYdiYdiYdiYdiYdiYdiYdiYdiYdiYdiYdiYdiYdiYdiYdiYdi Y | |||||
| Dlklkiydi dikisiydi ydi dikisiydi ydi ydi ydi ydi ydi ydi ydi ydi ydi ydi ydi ydi ydi ydi ydi ydi ydi ydi ydi ydi ydi ydi ydi ydi ydi ydi ydi ydi ydi ydi ydi ydi ydi ydi ydi ydi ydi YdiYdiYdiYdiYdiYdiYdiYdiYdiYdiYdiYdi Y | |||||
| Dlkiydi dikisiydi ydi dikisiydi ydi ydi ydi ydi ydi ydi ydi ydi ydi ydi ydi ydi ydi ydi ydi ydi ydi ydi ydi ydi ydi ydi ydi YdiYdiYdiYdiYdiYdiYdiYdiYdiYdiYdiYdiYdiYdiYdiYDi Y | |||||
| C. x. x. x. x. x. x. x. x. x | N. x. N. x. | L. x. x. x. x x. x. x. x. x x. x. x. x. x x. x. x. x. x x. x. x. x. x x. x. x. x. x x. x. x. x. x x. x. x. x. x x. x. x. x. x x. x. x. x. x x. x. x. x. x L. x. x. N. x. N. x. | |||
| L. x. N. x. N. x. | M. x. x. x. x. x. x. x. x. x. x. x. x. N. x. x. x. x. x. x. x. x x. x. x. x. x x. x. x. x. x x. x. x. x. x x. x. x. x. x x. x. x. x. x x. x. x. x. x x. x. x. x. x x. x. x. x. x x. x. x. x. x | ||||
| B. x. x. x. x. x x. x. x. x. x | N. x. N. x. N. x. | M. x. x. x. x. x. x. x. x. x. x. x. x N. x. x. x. x. x. x. x. x x. x. x. x. x x. x. x. x. x x. x. x. x. x x. x. x. x. x x. x. x. x. x x. x. x. x. x x. x. x. x. x x. x. x. x. x x x x x x x x x x x x x x x x x x x x x x x x x x x x x x x x x x x x x x x x x x x x x x x x x x x X x x x x x x x x x x x x x x x x x x x x x x x x x x x x x x x x x x x x x x x x x x x x x x x x x y x x x x x x x x x x x x x x x x x x x x x x x x x x x x x x x x x x x x x x x x x x x x x x x x x l x x x x x x x x x x x x x x x x x x x x x x x x x x x x x x x x x x x x x x x x x x x x x x x x x L x x x x x x x x x x x x x x x x x x x x x x x x x x x x x x x x x x x x x x x x x x x x x x x x x × × × × × × × × × × × × × × × × × × × × × × × × × × × × × × × × × × × × × × × × × × × × × × × × × × x x x x x x x x x x x x x x x x x x x x x x x x x x x x x x x x x x x x x x x x x x x x x x x x x х х х х х х х х х х х х х х х х х х х х х х х х х х х х х х х х х х х х х х х х х х х х х х х х х х x x x x x x x x x x x x x x x x x x x x x x x x x x x x x x x x x x x x x x x x x x x x x x x x x (x) (1) |
Aeaaee 1
Lx
J 1
x
XeO 0
C. 1234567890123456789012345678901234567890123456789012345678901234567890123456789012345678901234567890123456789
aJcuaiae 10J Jaa
Jia jia jia jia jia jia jia jia jia jia jia jia jia jia jia jia jia jia jia jia jia jia jia jia jia jia jia jia jia jia jia jia jia jia jia jia jia jia jia jia
L 1
x 1
4x
J 1
Cxixi
x
xix xix E.
x 2y
gau
g
Jx
- 150 1
x
1xixs.1s wux 4xixxix Fxi
1 1 - L
-
Lx 1
(Mxixyjxbyg, i xylxjxjx -
Lx
M
SuiLaiy
CwX.1jXjXjXj
Dxjxj
F
L:4w0s1y
- Lx i 1 x
xixi 1 x i 1 1 1 1 1 1 1 1 1 1 1
M
M 1
x, x y 4y 2x wyy
M 1
L x 1 x x x x x x x x x x