THBDH011DPN - Heating THOMSON - Free user manual and instructions
Find the device manual for free THBDH011DPN THOMSON in PDF.
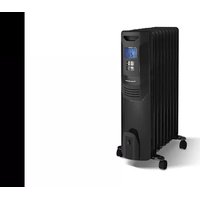
| Product Type | Oil-Filled Radiator |
| Model | THBDH011DPN (11 elements) |
| Rated Power | 2500 W |
| Minimum Power | 1300 W |
| Supply Voltage | 220-240 V ~ 50/60 Hz |
| Electrical Class | Class I (mandatory earthing) |
| Display | LCD Screen |
| Control | Digital with + and - buttons |
| Adjustable Thermostat | Yes, by degree |
| Timer | Auto shut-off (1-24 h) and delayed start |
| Continuous Mode | Yes |
| Safety Feature | Tip-over switch |
| Overheat Protection | Yes (do not cover) |
| Casters | Yes, included with bolt and nut fixing |
| Carrying Handle | Yes |
| Cable Storage | Yes |
| Safety Distance | 100 cm from walls, furniture and curtains |
| Oil Type | Special oil (precise quantity, non-refillable) |
| Usage | Indoor household use only |
| Cleaning | Damp cloth, dry before reuse |
| Maintenance | Unplug before cleaning; oil repair by professional |
| Warranty | Does not cover wear, improper use, unauthorized modifications |
| Manufacturer Contact | SCHNEIDER CONSUMER GROUP, 12 rue Jules Ferry, 93110 Rosny-sous-Bois, France |
Frequently Asked Questions - THBDH011DPN THOMSON
User questions about THBDH011DPN THOMSON
0 question about this device. Answer the ones you know or ask your own.
Ask a new question about this device
Download the instructions for your Heating in PDF format for free! Find your manual THBDH011DPN - THOMSON and take your electronic device back in hand. On this page are published all the documents necessary for the use of your device. THBDH011DPN by THOMSON.
USER MANUAL THBDH011DPN THOMSON
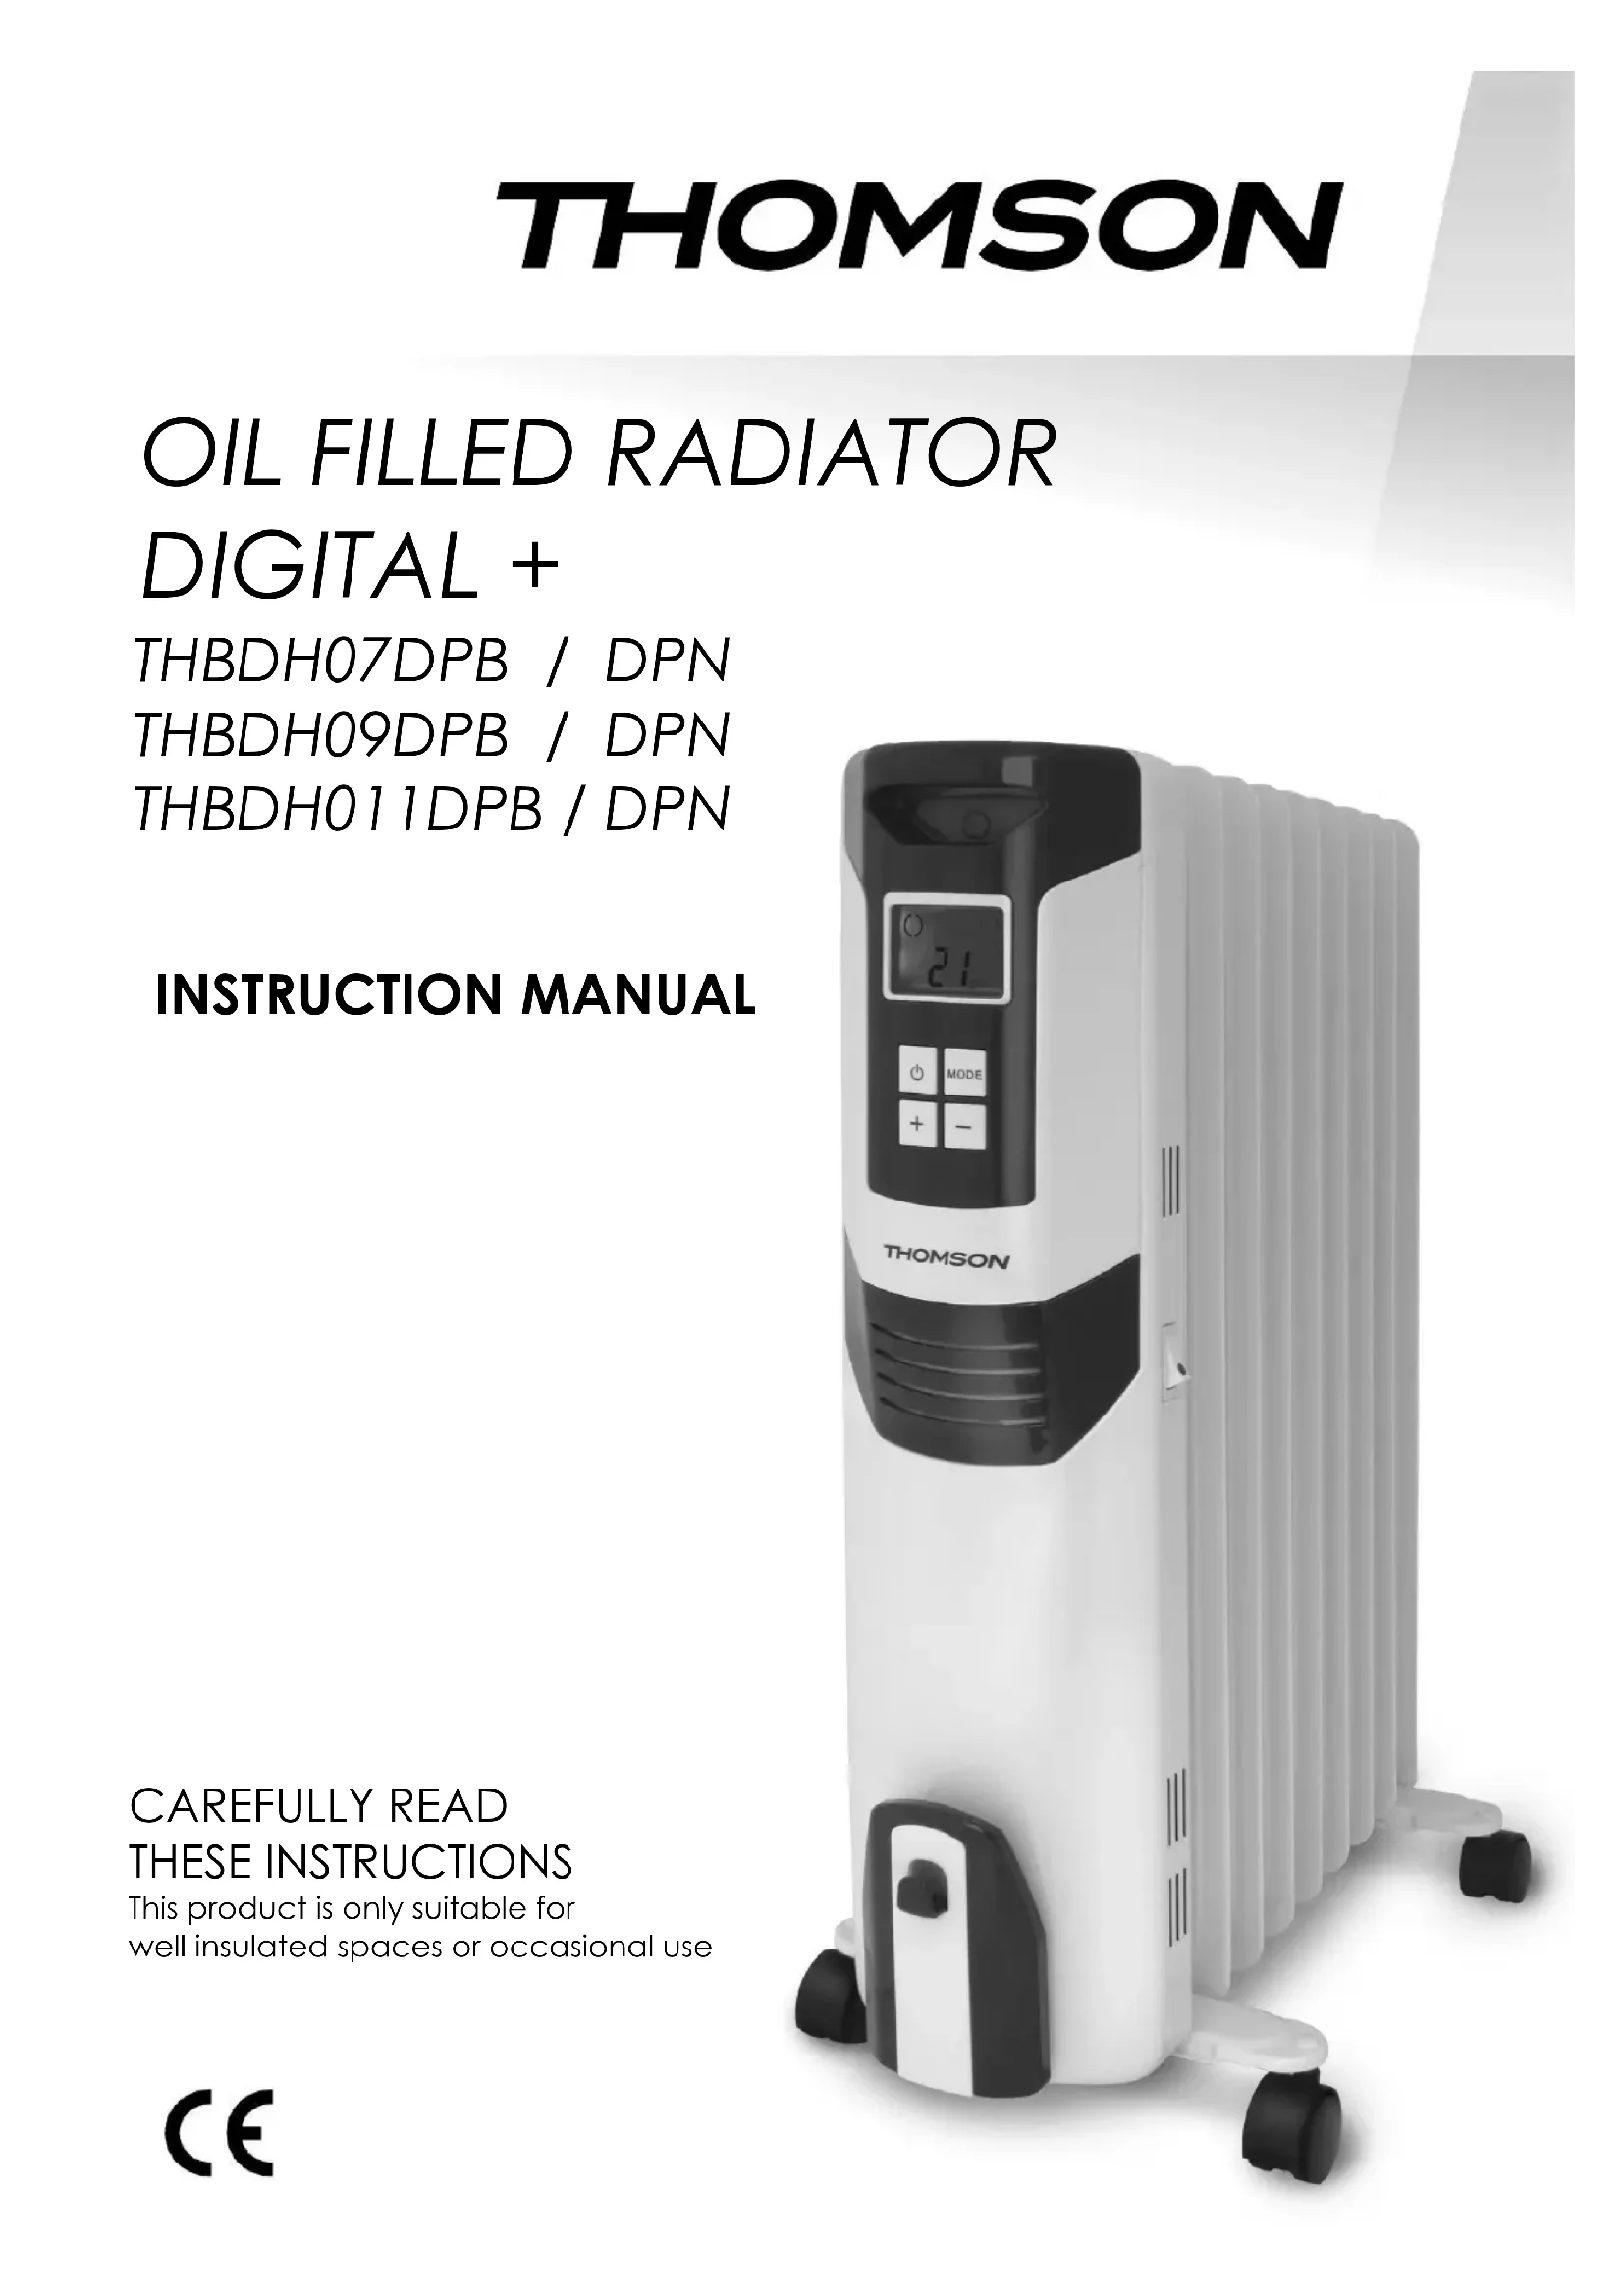
This product is only suitable for
well insulated spaces or occasional use
SAFETY RECOMMENDATIONS
Warning! The heater must not be switched on, only when the wheels are fully mounted.
- Read the instructions before using the appliance for the first time.
- The appliance must be installed following national regulations for use.
- It is necessary to be vigilant and supervise the appliance while children are close by.
- This appliance is only designed for domestic and indoor use. Do not use outdoors. Use the heater only as indicated in the instructions. Any other use that does not conform to the supplier's instructions may cause material damage or personal injury
- Any other use not in accordance with manufacturer's instructions may result in property damage or personal injury. Do not use this appliance for other purposes than intended by the manufacturer.
- Use this appliance in a well aerated and ventilated room. Do not cover the appliance or air flow.
-
Never try to open the fins filled with oil, remove the control knobs, push objects into the ventilation. The manufacturer can't be held responsible.
-
Do not leave this appliance unsupervised while it is on. When not being used, always ensure that the product is securely in the 'Off' position (O) and unplugged from the socket.
- Great care must be taken when being used by or in the presence of children of older persons.
- If the power cable is damaged, it must be replaced by the manufacturer, their after-sales service or a similarly qualified person to avoid any hazards.
- Do not place the cable under a carpet or any heavy object, and do not cover.
- To avoid accidents, keep away from areas where people may trip. Do not place on unstable surfaces
- To avoid any risk of fire or electric shock, it is essential that the appliance not be exposed to rain or moisture, and not be opened. The appliance contains electric parts that may electrocute or burn you.
- Do not place this appliance close to flammable fabrics, surfaces or liquids in order to avoid any risk of fire. Keep it well away from any source at risk of causing hazards and maintain it at a safe distance (whether this is the front, rear or sides). Do not use this
appliance in locations such as garages, warehouses etc. where dangerous or flammable products are stored (paint, fuel, alcohol etc.).
- The appliance must not be placed just underneath an electric socket.
- This product is hot when it is on. To avoid any injuries or burns, do not touch it directly and use gloves or other means.
- Do not use this heating appliance close to a bath, shower or swimming pool
- Check that the voltage corresponds to that of the power supply (230v mains socket) To avoid any risk of electric shock, plug the appliance in with the pins fitted correctly into the socket.
- In the event that you need an extension cable, ensure that it is suitable for the appliance's power level.
- While the appliance remains plugged into the socket (wall socket) it is not disconnected from the power supply, even if it is switched off. The appliance must be completely unplugged before cleaning, services, maintenance or even moving from one place to another.
- The power socket must always be equipped with an earth connection. If your domestic
electrical installation is not earthed, you should not connect the appliance.
- WARNING: To avoid overheating, do not cover the heater.
- This heater is filled with a precise quantity of special oil. Repairs requiring opening of the oil tank should be done only by the manufacturer or its service who should be contacted in case of oil leakage. Regulations regarding the disposal of oil when the heater is discarded must be respected.
- This appliance can be used by children aged from 8 years and above and persons with reduced physical, sensory or mental capabilities or lack of experience and knowledge if they have been given supervision or instruction concerning use of the appliance in a safe way and understand the hazards involved. Children shall not play with the appliance. Cleaning and user maintenance shall not be made by children without supervision.
- It is advisable that you supervise children to ensure they do not play with the appliance.
- Appliances are not designed to be used in conjunction with a separate timer or with a control system used at a distance.
- This appliance is designed to be used for
domestic and indoor use only
- WARNING: To avoid overheating, do not cover the heater.
This symbol means that you must not cover the appliance
- Children under 3 years must be kept away unless constantly monitored.
- Children aged between 3 and 8 years can only turn on or off the unit provided it has placed or installed in its normal operating position expected and were trained and supervised in instructions for using the machine safely and understand the potential hazards.
- Children aged between 3 and 8 years must not connect, adjust or clean the machine or perform user maintenance.
- Regarding detailed information on how to attach the wheels to the heater, refer to the section "ASSEMBLY"
WARNING - Some parts of this product may become hot and cause burns. Particular attention must pay in presence of children and vulnerable people.
Warning: Plug the appliance in correctly and do not leave within reach of children without supervision.
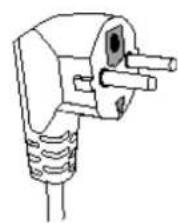
EARTHING
This appliance must be earthed. This appliance is equipped with an earthed plug.
It must be plugged into a correctly installed and earthed wall socket.
WARNING: Incorrect use of the earth connection can lead to the risk of electric shock.
Notes: If you have any questions regarding earthing or connecting to a power supply, please consult a qualified person.
In the event of short-circuit, earthing reduces the risk of electric shock by enabling the current to escape through the earth cable.
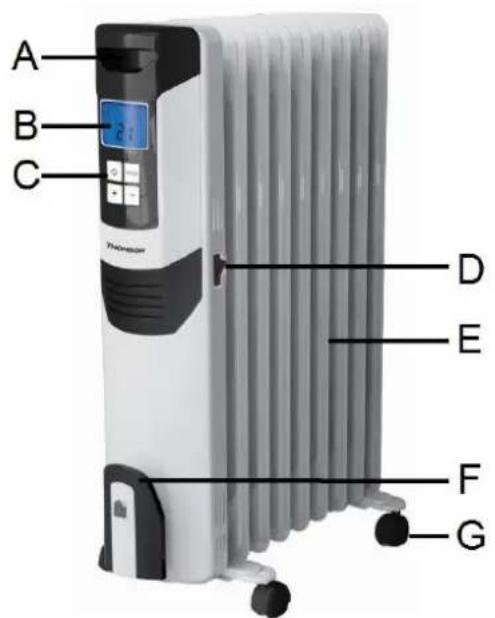
DESCRIPTIONS
A- Handle
B-LCD display
C- Control panel
D-ON/OFF power switch
E- Heating fins
F-Cable storage
G-Wheels
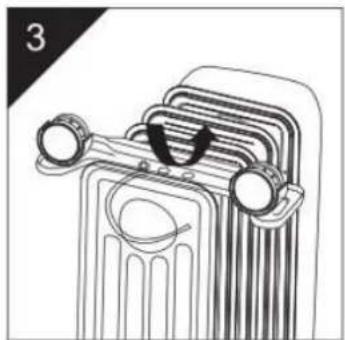
ASSEMBLY
Unpack the heater and the accessories.
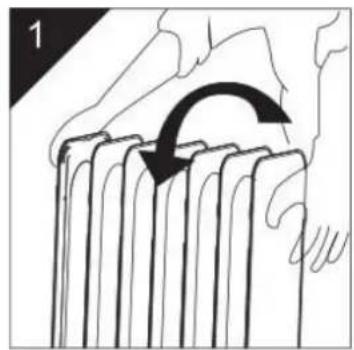
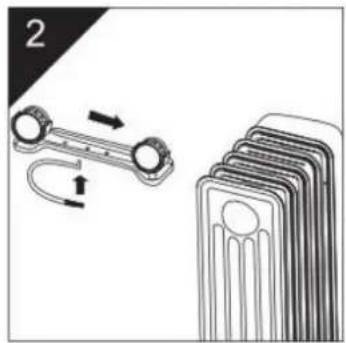
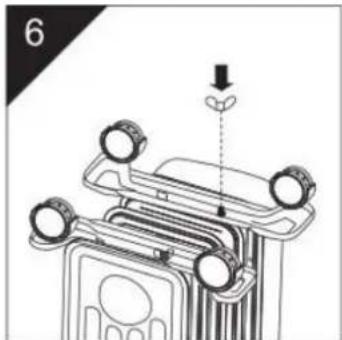
-Turn the radiator upside-down
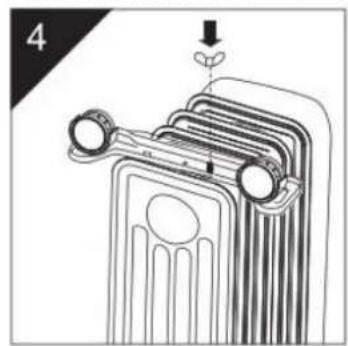
-Fit the wheels assemblies onto the radiator by placing the U-shaped bolts between the outermost fins on each side of the radiator.
-Pleases fit the wheel bases as the picture. Other position may affect the stability of the radiator
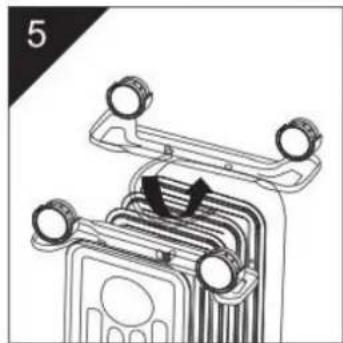
- Securely fasten the wheels assemblies onto the radiator by screwing the wing nuts onto the bolts
-Turn the radiator up right
Only operate the radiator in normal upright position with wheels assemblies attached to the bottom.
Cable storage (refer to photo page 7 point F) must be at the lower part of the product.
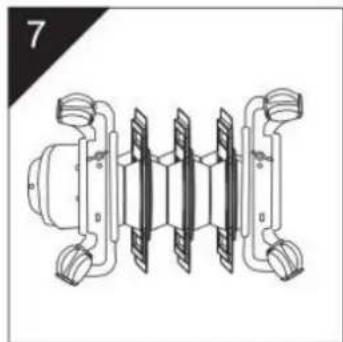
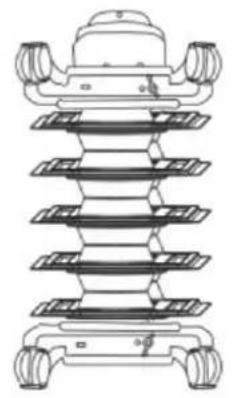
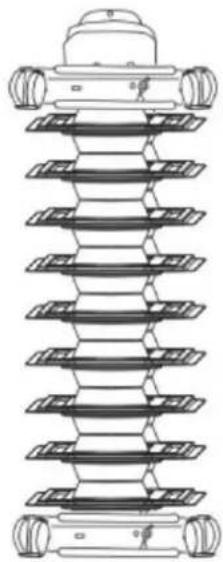
IMPORTANT: To ensure maximum stability, the bases are in different forms depending on the number of elements of the radiator.
They must always be positioned with the wheels oriented towards the external radiator. See the 3 drawings below and follow the indicated mounting direction for your heater.

TECHNICAL SPECIFICATIONS
| Oil filled radiator DIGITAL + | Power 2 | Power 2 |
| 7 fins THBDH07DPB/DPN | 1500W | 800W |
| 9 fins THBDH09DPB/DPN | 2000W | 1100W |
| 11 fins THBDH011DPB/DPN | 2500W | 1300W |
220-240V~50/60Hz
CLASS I
This product conforms to the requirements set by directives 2014/35/EC (repealing directive 73/23/EEC amended by directive 93/68/EEC) and 2014/30/EC (repealing directive 89/336/EEC)
OPERATING:
PRECAUTIONS FOR USE
- Before using this appliance, ensure that it is placed on a flat, stable surface.
- Place the heater at least 100cm from the wall, furniture or curtains.
- Check that the voltage corresponds to that of the power supply (230v mains socket)
- This heater contains oil, and slowly cool down after being turned off.
- Leave the heater to cool and unplug it before moving it, and use the handle to move it.
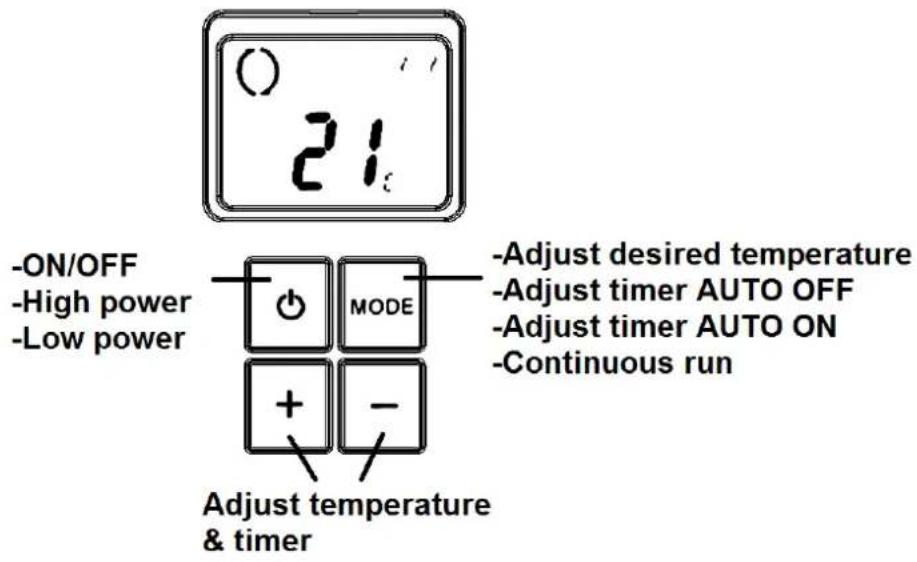
This heater is equipped with Digital Controls that provide the ability to set the temperature to the exact degree desired. To operate, simply follow these instructions.
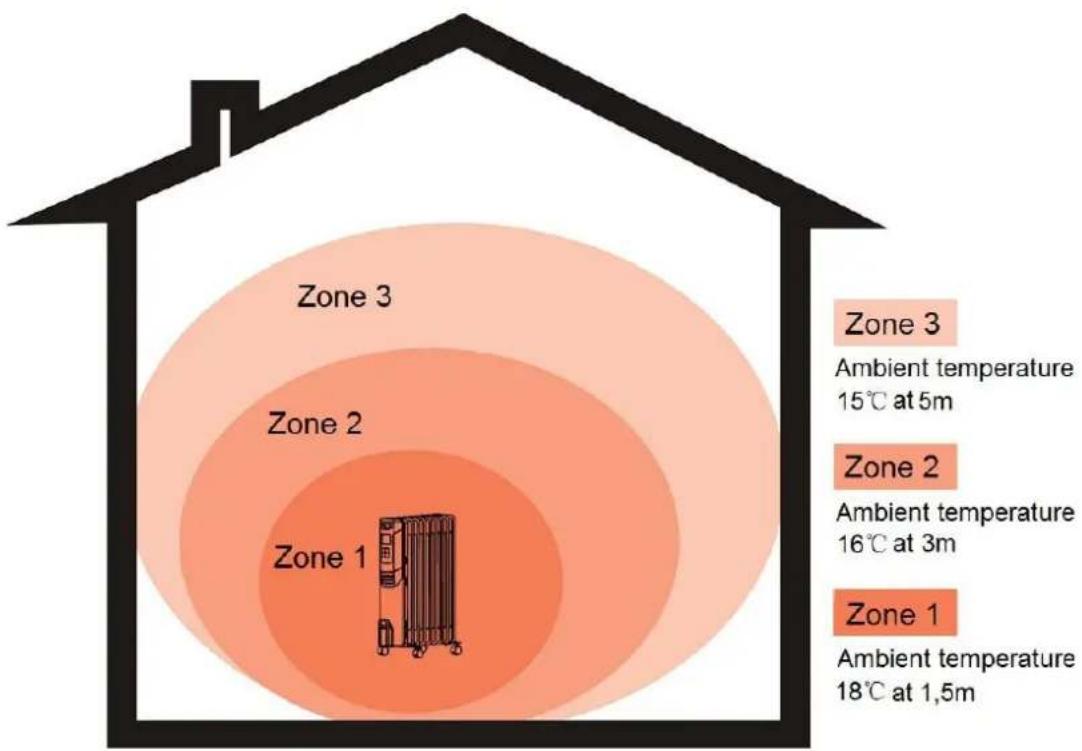
The display shows the temperature of the area around the product (diagrams below) There may be a difference of temperature indication, between that of the heating zone and that of the part. This difference is reduced during a continuous operation of the radiator.
NOTE: The temperature display will not reflect the accurate room temperature until the heater has been operating for at least 30 minutes.
- Place the product in an upright position on a flat, steady, stable, heat-resistant surface. Make sure there is nothing flammable or heat sensitive within 1 meter. Operating the product in any other position could cause a hazard.
- Take out the power cord from the cable storage, and insert the mains plug into a suitable wall socket. Press the power switch (red color) to position I. Always ensure the mains cable is fully unwound and outside of the cable storage when the product is in use.
- Press the power button (6) once to start the heater on High Power( n ), Continuous Run. If left at this setting, the unit will run continuously on High Power
- Press the power button (6) again to change to Lower Power (2), Continuous Run. If left at this setting, the unit will run continuously on Lower Power
- Press the power button ( ) a third time to turn the heater OFF.
ADJUST TEMPERATURE
- Press the MODE button until the temperature icon flashes.
- Use the "+" and "-" button to set the desired temperature.
- The temperature icon will stop blinking and the current ambient temperature will appear after the desired temperature is set.
- The heater will turn-off shortly after the room temperature is higher than the desired temperature. The temperature display will flash.

Temperature Icon
- The heater will turn back on when the room temperature drops below the desired temperature. The temperature display will then stop flashing and keep displaying the room temperature.
Note: The LCD display shows the ambient temperature near the heater, to achieve optimal indoor temperature, it is advisable to increase the target temperature during the first hour of use of the device, then you can adjust the temperature.
TIMER (AUTO-OFF)
This function should only be set if you desire that the heater be automatically shut off after a certain period of time (1 to 24 hours from the time the function is set)
NOTE: Always set the desired temperature prior to setting the Auto-o Timer so that the heater will shut off at the desired temperature setting.
Press the MODE button until the timer icon blinks.
The hour display and Auto Off icon will appear.
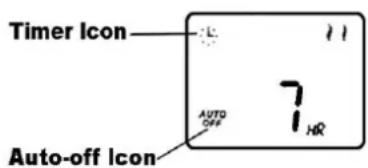
Use the "+" and "-" button to set the heater operation time between 1 and 24 hours. This function will activate once the timer icon stops blinking. The heater will automatically turn-off when time runs out.
TIMER (AUTO-ON)
This function provides a delayed start option and should only be set if you desire that the heater be automatically turned ON after a certain period of time (1 to 24 hours from the time the function is set). NOTE: Always set the desired temperature prior to setting
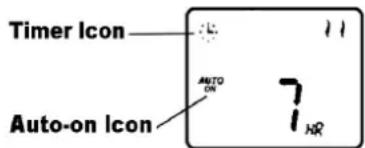
the timer so that the heater will turn on at the desired temperature setting.
Press the MODE button until the timer icon blinks. The hour display and Auto On icon will appear.
Use the "+" and "-" button to set the heater start time between 1 and 24 hours. This function will activate once the timer icon stops blinking. The heater will automatically turn on when time expires.
CONTINUOUS RUN
Press the MODE button until the continuous run icon" appears.
When set to continuous run mode, the auto-on/auto-off settings and the temperature setting will be canceled. In continuous run, the heater will operate to the thermostat maximum temperature setting and display room temperature.
Note: When not in use, please turn the mechanical power switch off and disconnect from mains wall socket.
PRECAUTIONS FOR USE AND MAINTENANCE
- Always unplug the appliance and keep it away from any socket before cleaning.
2.To clean the outer surface of the appliance, use a lightly damp cloth. Then, dry it thoroughly with a soft, dry cloth before using again. - Do not use any cleaning or chemical products of any kind. Do not let water enter the openings on the heater. Do not use wax or products that create a shine as they can react to heat and cause discoloration.
- When the appliance is not being used for prolonged periods, ensure that it is fully unplugged from the socket and store in its packaging for simple storage and later use. Clean your radiator as mentioned above and remove the wheels bases
The European directive 2012/19/EU on Waste Electrical and Electronic Equipment (WEEE), requires that old household electrical appliances must not be disposed in the normal unsorted municipal waste stream. Old appliances must be collected separately in order to optimize the recovery and recycling of the
materials they contain and reduce the impact on human health and the environment. The crossed out "wheeled bin" symbol on the product reminds you of your obligation, that when you dispose of the appliance it must be separately collected.
Consumers should contact their local authority or retailer for information concerning the correct disposal of their old appliance.
The warranty does not cover the wear parts of the product, nor the problems or damage resulting from:
(1) surface deterioration due to normal wear and tear of the product;
(2) defects or deterioration due to contact with liquids and corrosion caused by rust or the presence of insects;
(3) any incident, abuse, misuse, alteration, disassembly or unauthorized repair
(4) improper maintenance, improper use concerning the product or connection to an incorrect voltage;
(5) any use of accessories not supplied or not approved by the manufacturer.
The guarantee will be cancelled if the nameplate and / or serial number of the product are removed.
Information requirements for electric local space heaters
| Model identifier: THBDH07DPB/N | ||||||
| Item | Symbol | Value | Unit | Item | Unit | |
| Heat output | Type of heat input, for electric storage local space heaters only (select one) | |||||
| Nominal heat output | Pnom | 1,5 | kW | manual heat charge control, with integrated thermostat | no | |
| Minimum heat output(indicative) | Pmin | 0,7 | kW | manual heat charge control with room and/or outdoor temperature feedback | no | |
| Maximum continuous heat output | Pmax,c | 1,5 | kW | electronic heat charge control with room and/or outdoor temperature feedback | no | |
| Auxiliary electricity consumption | fan assisted heat output | no | ||||
| At nominal heat output | eImax | n a | kW | Type of heat output/room temperature control (select one) | ||
| At minimum heat output | eImin | n a | kW | single stage heat output and no room temperature control | no | |
| In standby mode | elsb | 0,0015 | kW | Two or more manual stages, no room temperature control | no | |
| with mechanic thermostat room temperature control | no | |||||
| with electronic room temperature control | no | |||||
| electronic room temperature control plus day timer | yes | |||||
| electronic room temperature control plus week timer | no | |||||
| Other control options (multiple selections possible) | ||||||
| room temperature control, with presence detection | no | |||||
| room temperature control, with open window detection | no | |||||
| with distance control option | no | |||||
| with adaptive start control | no | |||||
| with working time limitation | no | |||||
| with black bulb sensor | no | |||||
| Contact details | SCHNEIDER CONSUMER GROUP12, rue Jules Ferry, 93110 Rosny-sous-Bois, FRANCE | |||||
| Model identifier: THBDH09DPB/N | ||||||
| Item | Symbol | Value | Unit | Item | Unit | |
| Heat output | Type of heat input, for electric storage local space heaters only (select one) | |||||
| Nominal heat output | Pnom | 2.0 | kW | manual heat charge control, with integrated thermostat | no | |
| Minimum heat output(indicative) | Pmin | 0.9 | kW | manual heat charge control with room and/or outdoor temperature feedback | no | |
| Maximum continuous heat output | Pmax,c | 2.0 | kW | electronic heat charge control with room and/or outdoor temperature feedback | no | |
| Auxiliary electricity consumption | fan assisted heat output | no | ||||
| At nominal heat output | eImax | n a | kW | Type of heat output/room temperature control (select one) | ||
| At minimum heat output | eImin | n a | kW | single stage heat output and no room temperature control | no | |
| In standby mode | elsb | 0.0015 | kW | Two or more manual stages, no room temperature control | no | |
| with mechanic thermostat room temperature control | no | |||||
| with electronic room temperature control | no | |||||
| electronic room temperature control plus day timer | yes | |||||
| electronic room temperature control plus week timer | no | |||||
| Other control options (multiple selections possible) | ||||||
| room temperature control, with presence detection | no | |||||
| room temperature control, with open window detection | no | |||||
| with distance control option | no | |||||
| with adaptive start control | no | |||||
| with working time limitation | no | |||||
| with black bulb sensor | no | |||||
| Contact details | SCHNEIDER CONSUMER GROUP12, rue Jules Ferry, 93110 Rosny-sous-Bois, FRANCE | |||||
| Model identifier: THBDH011DPB/N | ||||||
| Item | Symbol | Value | Unit | Item | Unit | |
| Heat output | Type of heat input, for electric storage local space heaters only (select one) | |||||
| Nominal heat output | Pnom | 2.5 | kW | manual heat charge control, with integrated thermostat | no | |
| Minimum heat output(indicative) | Pmin | 1.25 | kW | manual heat charge control with room and/or outdoor temperature feedback | no | |
| Maximum continuous heat output | Pmax,c | 2.5 | kW | electronic heat charge control with room and/or outdoor temperature feedback | no | |
| Auxiliary electricity consumption | fan assisted heat output | no | ||||
| At nominal heat output | eImax | n a | kW | Type of heat output/room temperature control (select one) | ||
| At minimum heat output | eImin | n a | kW | single stage heat output and no room temperature control | no | |
| In standby mode | elsb | 0.0015 | kW | Two or more manual stages, no room temperature control | no | |
| with mechanic thermostat room temperature control | no | |||||
| with electronic room temperature control | no | |||||
| electronic room temperature control plus day timer | yes | |||||
| electronic room temperature control plus week timer | no | |||||
| Other control options (multiple selections possible) | ||||||
| room temperature control, with presence detection | no | |||||
| room temperature control, with open window detection | no | |||||
| with distance control option | no | |||||
| with adaptive start control | no | |||||
| with working time limitation | no | |||||
| with black bulb sensor | no | |||||
| Contact details | SCHNEIDER CONSUMER GROUP12, rue Jules Ferry, 93110 Rosny-sous-Bois, FRANCE | |||||
KEEP THESE INSTRUCTIONS
Imported by SCHNEIDER CONSUMER GROUP 12, rue Jules Ferry, 93110 Rosny-sous-Bois, FRANCE THOMSON is a trademark of Technicolor SA used under license by SCHNEIDER CONSUMER GROUP.