Charly little - Fan STADLER FORM - Free user manual and instructions
Find the device manual for free Charly little STADLER FORM in PDF.
Download the instructions for your Fan in PDF format for free! Find your manual Charly little - STADLER FORM and take your electronic device back in hand. On this page are published all the documents necessary for the use of your device. Charly little by STADLER FORM.
USER MANUAL Charly little STADLER FORM
READ AND SAVE THESE INSTRUCTIONS
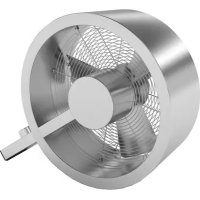
Download instruction manual: www.stadlerformusa.com/manualsCongratulations! You have just purchased the exceptional CHARLY fan. He will give you great pleasure and improve the indoor air for you. As with all domestic electrical appliances, particular care is needed with this model also, in order to avoid injury, fire damage or damage to the appli- ance. Please study these operating instructions carefully before using the appliance for the first time and follow the safety advice on the appliance itself. Description of the appliance The appliance consists of the following main components:
3. Fixing screw for foot and connector
5. Fixing screw for motor housing and foot
10. Fixing screw for fan blades and motor housing
13. Fixing clips (8 pieces Charly floor, 7 pieces Charly little)
15. Controller for switching on/off and setting the three fan speeds (off,
Important safety instructions Please read through the operating instructions carefully before you use the appliance for the first time and keep them safely for later reference; if nec- essary pass them on to the next owner.
- Stadler Form refuses all liability for loss or damage which arises as a result of failure to follow these operating instructions.
- The appliance is only to be used in the home for the purposes described in these instructions. Unauthorised use and technical modifications to the appliance can lead to danger to life and health.
- This appliance can be used by children aged from 8 years and above and persons with reduced physical, sensory or mental capabilities or lack of experience and knowledge if they have been given supervision or instruc- tion concerning use of the appliance in a safe way and understand the hazards involved. Children shall not play with the appliance. Cleaning and user maintenance shall not be made by children without supervision.
- Never leave any parts of the packing within the reach of children.
- Check the condition of the appliance after removing it from the pack- aging. Ensure that all component parts of the appliance are within the packaging and have not been damaged (see description of the appliance).
- Assemble the appliance in accordance with the instructions for As- sembly. Follow the instructions for assembly exactly and ensure that all screws are firmly tightened so as to avoid damage and hazards. English• This appliance has a polarized plug (one blade is wider than the other). To reduce the risk of electric shock, this plug is intended to fit in a polarized outlet only one way. If the plug does not fit fully in the outlet, reverse the plug. If it still does not fit, contact a qualified electrician. DO NOT attempt to defeat this safety feature.
- WARNING: To Reduce The Risk Of Fire Or Electric Shock, Do Not Use This Fan With Any Solid-State Speed Control Device.
- Never insert objects into the grille of the fan. Do not cover the appliance during operation.
- Always disconnect the power cord from the socket before removing the protection grille.
- Only connect the cable to alternating current. Observe the voltage infor- mation given on the appliance.
- Do not use damaged extension cords.
- Do not run the power cord over sharp edges and make sure that it does not get trapped.
- Do not pull the plug from the socket with wet hands or by holding on to the power cord.
- Do not use the appliance in immediate vicinity of a bath tub, a shower or a swimming pool (observe a minimum distance of 10 ft / 3 m). Place the appliance such that a person in the bath tub cannot touch the appliance.
- Do not place the appliance near a heat source. Do not subject the power cord to direct heat (such as a heated hotplate, open flames, hot iron sole plates or heaters for example). Protect power cords from oil.
- See to it that the appliance is properly positioned to ensure a high stabil- ity during its operation and make sure that no one can trip over the power cord.
- The appliance is not splash-proof.
- For indoor use only.
- Do not store the appliance outdoors.
- Store the appliance in a dry place inaccessible to children (pack the ap- pliance).
- If the supply cord is damaged, it must be replaced by the manufacturer, or its service agent, or a qualified person in order to avoid a hazard.
- Prior to any maintenance, cleaning and after each use, switch off the ap- pliance and unplug the mains cable from the socket.
- Repairs to electrical appliances must only be carried out by a qualified electrical technician.
- This product employs overload protection (fuse). A blown fuse indicates an overload or short-circuit situation. If the fuse blows, unplug the prod- uct from the outlet. Replace the fuse as per the user servicing instructions (follow product marking for proper fuse rating) and check the product. If the replacement fuse blows, a shortcircuit may be present and the product should be discarded or returned to an authorized service facility for examination and/or repair. Assembly (see page 2 and 3) Attention: The protection grille must be properly closed prior to switch- ing on the appliance so as to avoid any damage or hazards. Ensure that all screws and securing nuts are firmly tightened. Only connect the power cable to the socket once assembly has been completed. A. Remove fixing screw (3) on underside of connector (1). Insert connector(1) into foot (2) and secure with fixing screw for foot and connector (3). B. Undo fixing screw (5) on connector (1). Locate motor housing (4) on con- nector (1) and secure with fixing screw for motor housing and foot (5). C. Remove securing nut for grille (6) from motor housing (4) and locate pro- tection grille rear (7) on motor housing (4). When locating, ensure that the handle (8) on protection grille rear (7) is on the top. Now screw se- curing nut for grille (6) back on to motor housing (4) so as to fix protection grille rear (7) in position. D. Attach fan blades (9) to motor housing (4) and secure in position with fixing screw for fan blades and motor housing (10) (loosely attached to fan blade). Tighten screw to secure fan blades (9). E. Locate protection grille front (11) on protection grille rear (7). In doing so, take care to ensure that positioning clip (12) on protection grille front is fitted on protection grille rear as shown in illustration on page 2-3. Close the two grilles by fastening the 8 fixing clips (13) (or 7 in the case of Charly little). Ensure that all fixing clips (13) are fastened. F. Secure the two grilles (7 and 11) with securing screw (14). Setting-Up/Operation
1. Place Charly at the desired position on a flat surface. Connect the mains
cable (17) to a suitable plug socket.
2. Switch on the Charly fan at the controller (15) and set the desired speed
(Positions 1-3, from gentle breeze to powerful circulation).
3. Push the oscillating knob (16) down to switch on the oscillation and pull
the oscillating knob up to switch off the oscillation.
4. The direction of airflow can be set in 4 positions. By carefully moving
the motor housing (4) up and down, the direction can be adjusted (click- ing noise). Cleaning Prior to any maintenance, cleaning and after each use, switch off the appli- ance and unplug the mains cable (17) from the socket. Attention: Never submerge the appliance in water (danger of short-circuit).
- For external cleaning, rub with a damp cloth and then dry thoroughly.
- To clean the fan blades, remove securing screw (14), undo all fixing clips (13) and carefully lift off protection grille front (11). Now you can wipe the fan blades (9) with a damp cloth and dry well afterwards. After cleaning, replace protection grille front (11) on appliance (fit top positioning clip: 12), fasten all fixing clips (13) and fasten securing screw (14) tightly. Repairs
- Repairs to electrical appliances must only be carried out by a qualified electrical technician. If improper repairs are carried out, the warranty lapses and all liability is refused.
- Never operate the appliance if the adaptor or plug is damaged, after it has malfunctioned, if it has been dropped or has been damaged in any other way (cracks/breaks in the casing).
- Do not push any object into the appliance.
- If the appliance is beyond repair, make it unusable immediately by cutting through the cable and hand it in at the collection point provided for the purpose.User Servicing Instructions A. Grasp plug and remove from the receptacle or other outlet device. Do not unplug by pulling on cord. B. Slide open fuse access cover on top of attachment plug towards blades. C. Remove fuse carefully. D. Risk of fire. Replace fuse only with 5 Amp, 125 Volt fuse. E. Slide closed the fuse access cover on top of attachment plug. Attention: Risk of fire. Do not replace attachment plug. Contains a safety device (fuse) that should not be removed. Discard product if the attachment plug is damaged. Disposal
- Do not dispose of electrical appliances in the domestic waste. Please use the communal collection points.
- Ask your local authority if you do not know where the communal collec- tion points are located.
- If electrical appliances are disposed of thoughtlessly, exposure to the ele- ments may cause hazardous substances to find their way into the ground- water and from there into the food chain, or to poison the flora and fauna for many years to come. Specifications Article number Charly floor C-050A Charly little C-040A Rated voltage 120 V / 60 Hz Rated power Charly floor 36 - 56 W Charly little 25 - 33 W Dimensions Charly floor 17.1 x 19.1 x 11 inch / 450 x 485 x 280 mm Charly little 13.9 x 15.6 x 10 inch / 352 x 395 x 255 mm (width x height x depth) Weight Charly floor 10 lbs / 4.5 kg, Charly little 7.2 lbs / 3.5 kg Sound level Charly floor < 56 dB(A), Charly little < 52 dB(A) Complies with regulations cETLus All rights for any technical modifications are reserved1 year Limited Warranty A. This 1 year limited warranty applies to repair or replacement of prod- uct found to be defective in material or workmanship. This warranty does not apply to damage resulting from commercial, abusive, unreasonable use or supplemental damage. Defects that are the result of normal wear and tear will not be considered manufacturing defects under this warranty. SWIZZ STYLE IS NOT LIABLE FOR INCIDENTAL OR CONSEQUEN- TIAL DAMAGES OF ANY NATURE. ANY IMPLIED WARRANTY OF MERCHANTABILITY OR FITNESS FOR A PARTICULAR PURPOSE ON THIS PRODUCT IS LIMITED IN DURATION TO THE DURATION OF THIS WARRANTY. Some jurisdictions do not allow the exclusion or limitation of incidental or consequential damages or limitations on how long an implied warranty lasts, so the above limitations or exclusions may not apply to you. This warranty gives you specific legal rights, and you also may have other rights which vary from jurisdiction to jurisdiction. This warranty applies only to the original purchaser of this product from the original date of purchase. B. At its option, Swizz Style will repair or replace this product if it is found to be defective in material or workmanship. Defective product should be returned to the place of purchase in accordance with store policy. Thereaf- ter, while within the warranty period purchaser should contact Swizz Style at 1-877-663-7893 Monday – Friday 9 am – 4 pm EST for product return information. C. This warranty does not cover damage resulting from any unauthorized attempts to repair or from any use not in accordance with the instruction manual. D. If the product has replaceable filters, these are not covered under this warranty, except for material or workmanship defects. E. The following must accompany all products returned for service: 1) Proof of purchase 2) Brief description of the problem 3) Full contact information (including return shipping address) 4) Check or money order for $10 ($15 if in Canada) for return handling, packaging and shipping charges. All funds are in US dollars. F. Swizz Style is not responsible for items lost, stolen or damaged during return shipping.Félicitation ! Vous venez d‘acheter le superbe ventilateur CHARLY. Nous espérons que cet appareil vous donnera entière satisfaction et améliorera l’air intérieur pour vous. Comme pour tous les appareils ménagers électriques, il est important d‘entretenir cet appareil correctement afin d’éviter les blessures, les incen- dies ou les dommages. Veuillez lire attentivement le présent mode d’emploi avant la mise en service et respecter les conseils de sécurité indiqués sur l’appareil. Description de l’appareil L’appareil est composé des éléments principaux suivants: