
UVC121660.7 - Vacuum Cleaner Emerio - Free user manual and instructions
Find the device manual for free UVC121660.7 Emerio in PDF.
| Brand | Emerio |
| Model | UVC121660.7 |
| Category | Vacuum cleaner |
| Vacuum type | Cordless vacuum (handheld / stick) |
| Power source | Rechargeable battery via mains adapter |
| Battery type | Removable lithium-ion |
| Charging time | 3 to 4 hours |
| Charging indication | LED indicators: flashing red (charging), solid blue (charged) |
| Number of speeds | 2 (low and high) |
| Dust bin capacity | Approximately 0.5 L (estimate) |
| Filtration system | Sponge filter + high-efficiency filter |
| Filter cleaning | Rinse with cold water, air dry |
| Included accessories | Floor brush, 2-in-1 crevice tool, long crevice tool, extension tube, wall mount, accessory hook |
| Features | Battery level indicator, speed selection, automatic shut-off in case of brush roll blockage |
| Safety | Overheat protection, shut-off in case of obstruction |
| Warranty | 2 years |
| Maintenance | Regular bin emptying, filter cleaning every 2 weeks, brush roll cleaning |
| Usage | Household use only, dry surfaces |
Frequently Asked Questions - UVC121660.7 Emerio
User questions about UVC121660.7 Emerio
0 question about this device. Answer the ones you know or ask your own.
Ask a new question about this device
Download the instructions for your Vacuum Cleaner in PDF format for free! Find your manual UVC121660.7 - Emerio and take your electronic device back in hand. On this page are published all the documents necessary for the use of your device. UVC121660.7 by Emerio.
USER MANUAL UVC121660.7 Emerio
natural_image
Blue and black compact vacuum cleaner with red handle (no visible text or symbols)Handy vacuum cleaner (EN)
Before use make sure to read all of the below instructions in order to avoid injury or damage, and to get the best results from the appliance. Make sure to keep this manual in a safe place. If you give or transfer this appliance to someone else make sure to also include this manual.
In case of damage caused by user failing to follow the instructions in this manual the warranty will be void. The manufacturer/importer accepts no liability for damages caused by failure to follow the manual, a negligent use or use not in accordance with the requirements of this manual.
- Read operator's manual.
- This appliance can be used by children aged from 8 years and above and persons with reduced physical, sensory or mental capabilities or lack of experience and knowledge if they have been given supervision or instruction concerning use of the appliance in a safe way and understand the hazards involved.
- Children shall not play with the appliance.
- Cleaning and user maintenance shall not be made by children without supervision.
- Detachable supply unit
WARNING: For the purposes of recharging the battery, only use the detachable supply unit provided with this appliance.
- This appliance contains batteries that are non-replaceable.
- Ensure that the mains cable is not hung over sharp edges and keep it away from hot objects and open flames.
- Do not immerse the appliance or the mains plug in water or other liquids. There is danger to life due to electric shock!
-
To remove the plug from the plug socket, pull the plug. Do not pull the power cord.
-
Never attempt to open the housing of the appliance, or to repair the appliance yourself. This could cause electric shock.
- Never leave the appliance unattended during use.
- This appliance is not designed for commercial use. For household use only.
- Do not use the appliance for other than intended use.
- Do not wind the cord around the charger and do not bend it.
- Close supervision is necessary for any appliance being used by or near children. Do not leave the system unattended while connected. Keep hair, loose clothing, fingers and all parts of body away from opening and moving parts.
- Do not use to pick up flammable or combustible liquids such as gasoline or use in areas where they may be present.
- Do not pick up anything that is burning or smoking such as cigarettes, matches or hot ashes.
- Use extra care when cleaning on stairs.
- Do not use the appliance without the dust cup filter in place.
- The use of accessory attachment not recommended by the appliance manufacturer may cause injuries.
- Do not put any objects into openings. Do not use with any opening blocked. Keep free of dust, lint, hair and anything else that may reduce air flow.
- Use only on dry surfaces.
- Important: If the suction opening in the unit is blocked, switch off the appliance and remove the blocking substance before you start the unit again.
- Do not operate the appliance too close to heaters, radiators or cigarette butts.
- Before you start vacuuming, make sure to remove large or sharp objects that might damage the dust cup filter.
- The appliance is only to be used with the power supply unit provided with the appliance.
-
The charger must be removed from the socket before removing the battery.
-
Use the included charger to charge the vacuum cleaner and do not use the charger for other purposes.
- Do not open the charger.
- Batteries:
Never attempt to open for any reason.
Do not expose the battery to water.
Do not expose the battery to heat.
Do not store in locations where the temperature may exceed 40^ C.
- In an emergency situation contact professional help immediately.
- Leaks from the battery cells can occur under extreme conditions. Do not touch any liquid that leaks from the battery. If the liquid that gets on skin wash immediately with soap and water. If the liquid gets into the eyes, flush them immediately with clean water for a minimum of 10 minutes and seek medical attention. Wear gloves to handle the battery and dispose of immediately in accordance with local regulations.
- When the battery pack is not in use, keep it away from paper clips, coins, keys, nails, screws or other small metal objects that could make a connection from one terminal to another
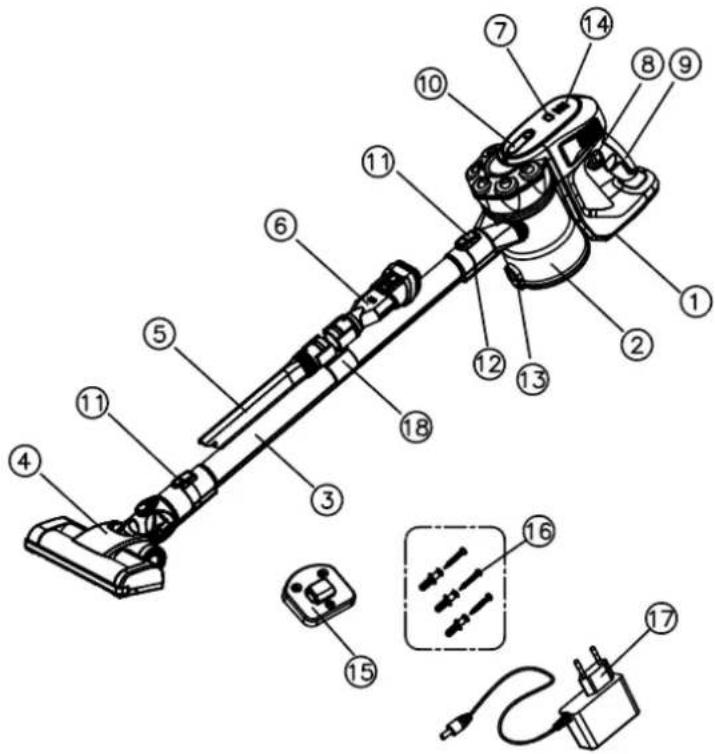
PARTS DESCRIPTION
- Battery pack
- Dust cup
- Extension tube
- Floor brush
- Long crevice nozzle
- 2 in 1 crevice nozzle
- Speed button
- On/off button
- Handle
- Dust cup release button
- Accessory release button
- Suction hole opening
- Dust release button
- Battery indicator lights
- Wall-mounted bracket
- Expansion bolts and screws
- Charging adapter
- Accessory hook
HOW TO WALL-MOUNT BRACKET
- Measure the distance between the holes situated at the back of the bracket and drill three holes in the wall with the same distance.
- Put the expansion bolts into the holes and then use the screws to fix the bracket onto the wall.
- Pay attention to the height of the bracket mounted.
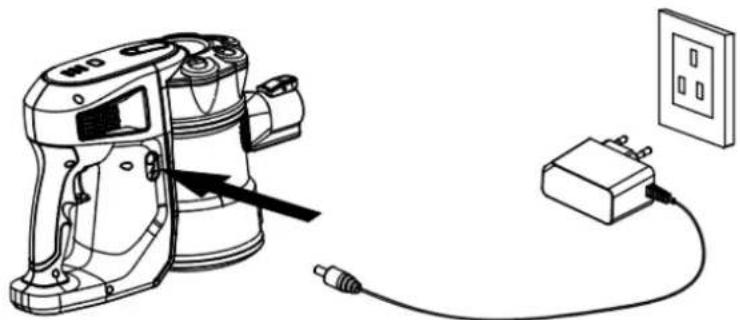
BATTERY CHARGING:
- Push the release button (A) and take the battery pack out.
- Insert the charging adapter into the power inlet (B) of the battery, and then into the power socket.
- When charging, the indicator light (C) will be red and blinking. Once fully charged, the indicator light will keep bright in blue.
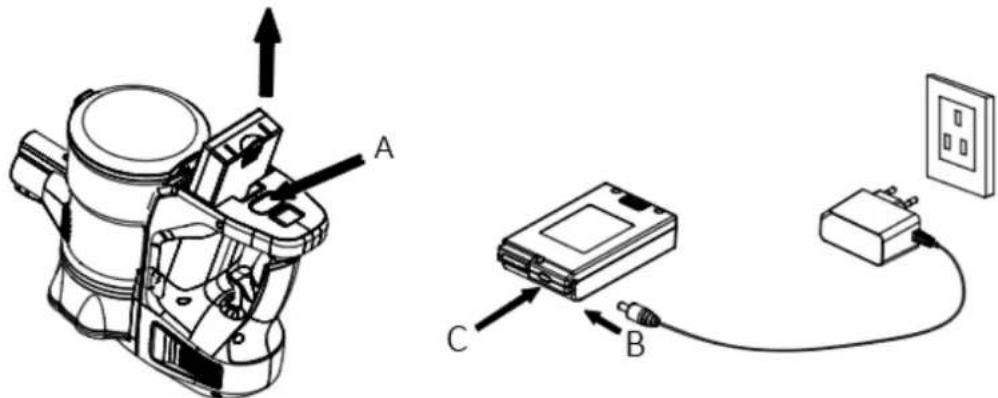
- You can also charge the battery through the main body. The three battery indicator lights will indicate one by one to show the battery capacity. When the battery is fully charged, all three lights will keep bright in blue.
natural_image
Line drawing of a portable device connected to an electrical outlet (no text or symbols)- The battery may need 3-4 hours to be fully charged. Unplug from the socket after fully charged. Note: Do not let the appliance uncharged for a long time, because the inner accumulators may be damaged.
OPERATION
Caution: the appliance must be fully charged before using for the first time.
- Assemble the battery pack into the main body. It will "click" to secure.
- Attach the dust cup into the main body. It will "click" to secure.

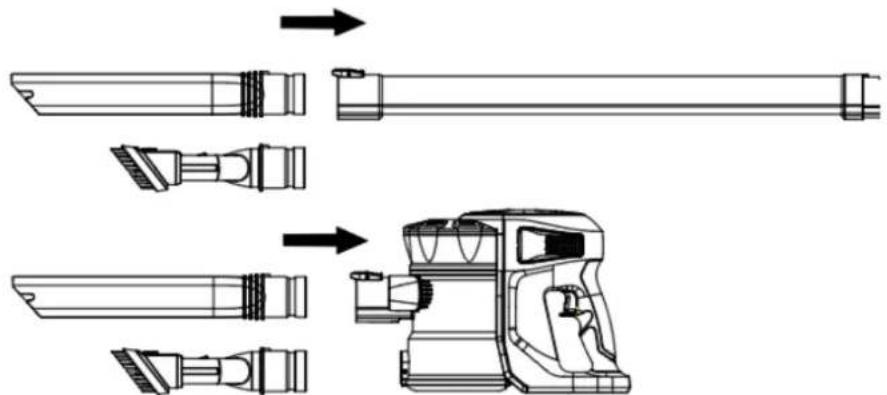
- Insert the extension tube into the suction hole opening; make sure it fits firmly.
- Attach the floor brush to the other side of the extension tube.
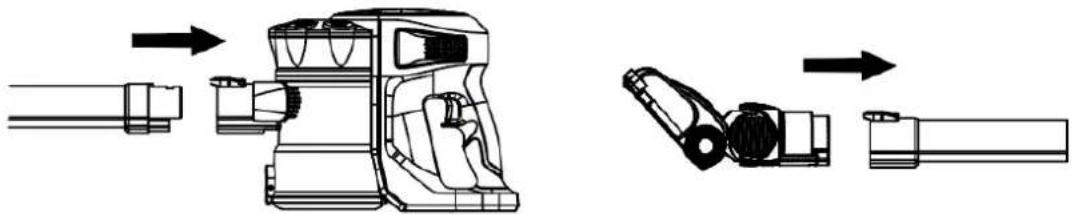
natural_image
Technical line drawing of a mechanical device showing assembly steps (no text or symbols)- If you want to use the attachment long crevice nozzle or 2 in 1 crevice nozzle, attach it to the suction hole opening directly or to the other side of the extension tube instead of the floor brush according to your own desire. Once the click sound is heard, the nozzle is properly locked.
- Press the on/off button to turn on the appliance. The battery indicator lights will illuminate showing the battery capacity.
- Press the speed button to adjust low/high speed.
NOTE: During use, please pay attention to the dust capacity and do not exceed the "MAX" level indicated on the dust cup. This appliance is for dry suction only.
- After use, press the on/off button to turn off the appliance.
Caution: The suction hole opening must be open and free of any obstructions at all times. Otherwise, the motor will overheat and could become damaged.
Note: In the event of a maintenance issue with the product such as a jammed brush roller, all three blue indicator lights inside floor brush will flash on around 10 seconds then off until the issue is resolved, in this case turn the appliance off until the issue is rectified.
CLEANING AND MAINTENANCE
- Do not immerse the main unit, battery pack, charging adapter, and floor brush in water or any other liquids.
- Use only a soft dry cloth to clean the appliance.
- Do not use aggressive chemicals or abrasives.
- Do not use the device if the filter is broken or worn out.
- The unit does not contain parts serviceable by you, do not disassemble it and do not try to repair it yourself.
1. How to empty the dust cup:
1) Press the dust cup release button to take the dust cup out.
2) Press the dust release button to empty dust form the container.
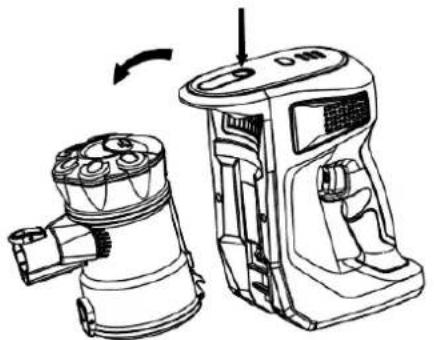
natural_image
Technical line drawing of a mechanical device with two views: one showing internal components and the other showing external housing (no text or symbols)
natural_image
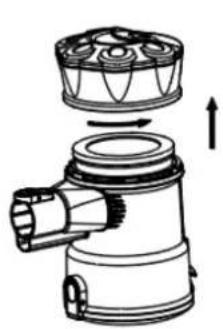
Line drawing of a mechanical valve or pump component (no text or symbols)2. How to clean the dust cup filter:
1) Remove the dust cup from the main body.
2) Twist anti-clockwise to remove the filter cover.
3) Take out the sponge filter and high-efficient filter.
4) Rinse them under the running cold water, and then air dry completely before placing them back in the dust cup. AIR DRY ONLY. Clean the filter every two weeks or so (depending on usage). Do not use soap or other cleaning solvents.
natural_image
Technical illustration of a mechanical device with internal components and directional arrow (no text or symbols)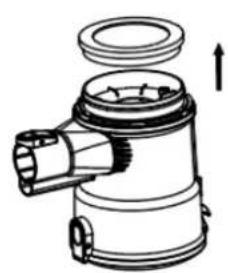
natural_image
Technical line drawing of a mechanical component with no visible text or symbols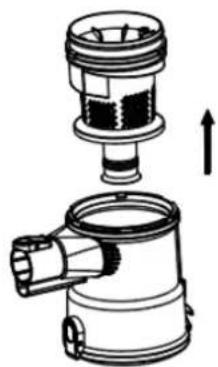
natural_image
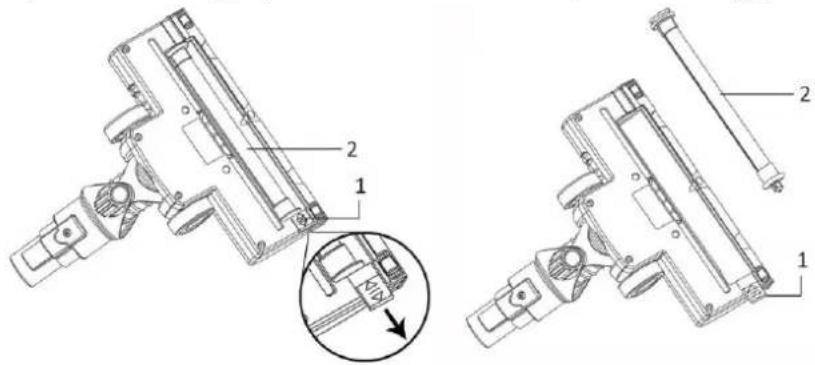
Technical illustration of a mechanical component with an upward arrow indicating motion (no text or symbols present)3. How to clean the brush roller
1) Push the lock (1) out to unlock the brush roller (2) from the floor brush. Take it out and remove any dirt (hair and other fibers) tangled around the roller.
2) Wipe it clean only, do not use any soap or harsh cleaning solvents,
3) If brush roller becomes damp, allow to dry naturally before replacing.
4) After cleaning, replace the brush roller and push the lock (1) to the original position.
TECHNICAL DATA: DC 22.2 V
GUARANTEE AND CUSTOMER SERVICE
Before delivery our devices are subjected to rigorous quality control. If, despite all care, damage has occurred during production or transportation, please return the device to your dealer. In addition to statutory legal rights, the purchaser has an option to claim under the terms of the following guarantee:
For the purchased device we provide 2 years guarantee, commencing from the day of sale. If you have a defective product, you can directly go back to the point of purchase.
Defects which arise due to improper handling of the device and malfunctions due to interventions and repairs by third parties or the fitting of non-original parts are not covered by this guarantee. Always keep your receipt, without the receipt you can't claim any form of warranty. Damage caused by not following the instruction manual, will lead to a void of warranty, if this results in consequential damages then we will not be liable. Neither can we hold responsible for material damage or personal injury caused by improper use if the instruction manual is not properly executed. Damage to accessories does not mean free replacement of the whole appliance. In such case please contact our service department. Broken glass or breakage of plastic parts is always subject to a charge.
Defects to consumables or parts subjected to wearing, as well as cleaning, maintenance, replacement of said parts or shipping and transportation costs to and from any place of repair are not covered by the warranty and are to be paid.
ENVIRONMENT FRIENDLY DISPOSAL
Recycling – European Directive 2012/19/EU
This marking indicates that this product should not be disposed with other household wastes. To prevent possible harm to the environment or human health from uncontrolled waste disposal, recycle it responsibly to promote the sustainable reuse of material resources. To return your used device,
please use the return and collection systems or contact the retailer where the product was purchased. They can take this product for environmental safe recycling.

BATTERY MUST BE RECYCLED OR DISPOSED OF PROPERLY. DO NOT OPEN. DO NOT DISPOSE
OR IN FIRE OR SHORT CIRCUIT.
Emerio Switzerland AG
Oberneuhofstrasse 1
6340 Baar
Switzerland
SICHERHEITSHINWEISE
natural_image
Technical line drawing of a mechanical component with labeled section A (no text or symbols beyond label)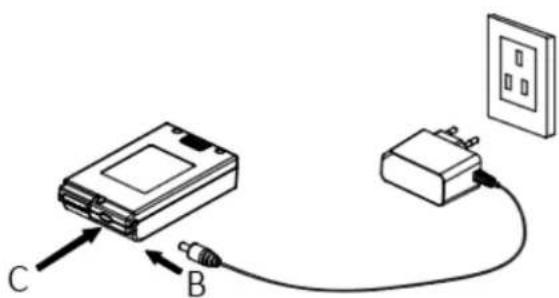
natural_image
Line drawing of a portable device connected to an electrical outlet with cable (no text or symbols)natural_image
Technical line drawing of a mechanical device with internal components and an arrow indicating motion (no text or symbols)
natural_image
Technical line drawing of a mechanical device with an arrow indicating assembly or transformation (no text or symbols present)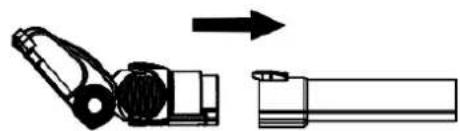
natural_image
Diagram showing a mechanical assembly with an arrow indicating direction, no text or symbols presentnatural_image
Technical line drawing of a mechanical device with three views: top, side, and front (no text or symbols)natural_image
Three-step diagram showing mechanical assembly of a valve or pump component, with no visible text or symbols.Emerio Switzerland AG
Oberneuhofstrasse 1
6340 Baar
Switzerland
CONSIGNES DE SÉCURITÉ
MONTAGE DU SUPPORT MURAL
natural_image
Technical line drawing of a mechanical component with labeled section A (no text or symbols beyond label)
natural_image
Line drawing of a portable device connected to an electrical outlet (no text or symbols)natural_image
Technical line drawing of a mechanical device showing assembly steps (no text or symbols)natural_image
Technical line drawing of a mechanical device with two views, one showing internal components and the other showing external housing (no text or symbols)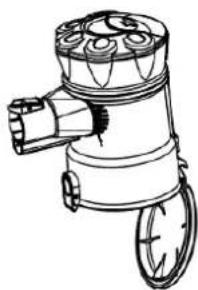
natural_image
Line drawing of a mechanical component with cylindrical and flanged ends (no text or symbols)natural_image
Technical illustration of a mechanical device with internal components and directional arrow (no text or symbols)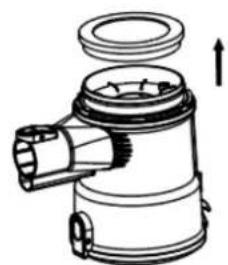
natural_image
Technical line drawing of a mechanical component with no visible text or symbols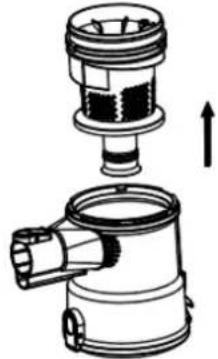
natural_image
Technical illustration of a mechanical component with an upward arrow indicating assembly (no text or symbols present)DONNÉES TECHNIQUES DC 22.2 V
GARANTIE ET SERVICE APRÈS-VENTE
Emerio Switzerland AG
Oberneuhofstrasse 1
6340 Baar
Switzerland
natural_image
Line drawing of a portable device connected to an electrical outlet with cable (no text or symbols)natural_image
Technical line drawing of a mechanical device with internal components and an arrow indicating motion (no text or symbols)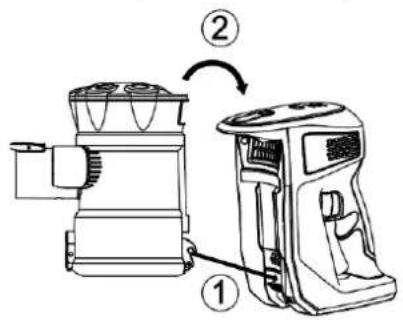
natural_image
Technical line drawing of a mechanical device with an arrow indicating assembly or transformation (no text or symbols present)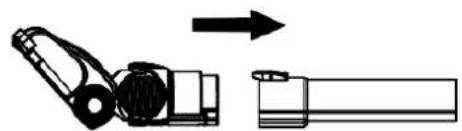
natural_image
Diagram showing a mechanical assembly with an arrow indicating direction (no text or symbols present)natural_image
Technical line drawing of a mechanical device with two views, one showing internal components and the other showing external housing (no text or symbols)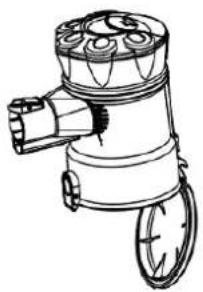
natural_image
Line drawing of a mechanical component with no visible text or symbolsnatural_image
Technical illustration of a mechanical device with internal components and directional arrows (no text or symbols)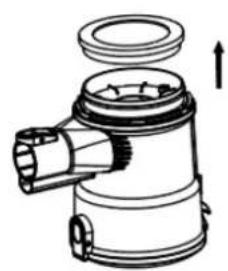
natural_image
Technical line drawing of a mechanical component with no visible text or symbols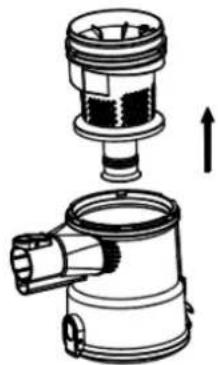
natural_image
Technical illustration of a mechanical assembly showing a cylindrical component being inserted into a housing, with an upward arrow indicating motion (no text or symbols present)DATI TECNICI DC 22.2 V
GARANZIA E SERVIZIO DI ASSISTENZA
Emerio Switzerland AG
Oberneuhofstrasse 1
6340 Baar
Switzerland

- PARTS DESCRIPTION
- HOW TO WALL-MOUNT BRACKET
- BATTERY CHARGING:
- OPERATION
- CLEANING AND MAINTENANCE
- How to empty the dust cup:
- How to clean the dust cup filter:
- How to clean the brush roller
- GUARANTEE AND CUSTOMER SERVICE
- ENVIRONMENT FRIENDLY DISPOSAL
- SICHERHEITSHINWEISE
- CONSIGNES DE SÉCURITÉ
- MONTAGE DU SUPPORT MURAL
- GARANTIE ET SERVICE APRÈS-VENTE
- GARANZIA E SERVIZIO DI ASSISTENZA
Brand : Emerio
Model : UVC121660.7
Category : Vacuum Cleaner