IC6Class54 - Speaker Ecler - Free user manual and instructions
Find the device manual for free IC6Class54 Ecler in PDF.
| Brand | Ecler |
| Model | IC6Class54 |
| Product type | Ceiling speaker |
| Category | Speaker |
| Configuration | 2-way |
| Low impedance | 16 Ω |
| High impedance | 70 V / 100 V |
| Rated power (16 Ω) | 75 W |
| Selectable powers 70 V | 1.5 W / 3.7 W / 7.5 W / 10 W / 15 W |
| Selectable powers 100 V | 3 W / 7.5 W / 15 W / 20 W / 30 W |
| Bass transducer | Woven Kevlar® |
| Tweeter | Silk dome |
| Compliance standard | EN54-24 |
| Mounting type | Quick installation with screw-in tabs |
| Included accessories | Cutting template, stop cover, connection box, ceramic terminals, cable feedthroughs |
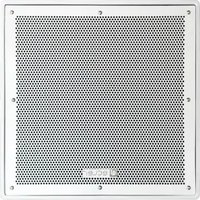
| Grille material | Painted steel, ready to paint |
Frequently Asked Questions - IC6Class54 Ecler
User questions about IC6Class54 Ecler
0 question about this device. Answer the ones you know or ask your own.
Ask a new question about this device
Download the instructions for your Speaker in PDF format for free! Find your manual IC6Class54 - Ecler and take your electronic device back in hand. On this page are published all the documents necessary for the use of your device. IC6Class54 by Ecler.
USER MANUAL IC6Class54 Ecler
Congratulations! You are the owner of a carefully designed and manufactured piece of equipment. We thank you for trusting in us and choosing our IC6CLASS-54 speaker for drop ceilings.
In order to get the optimum operation and efficiency from this unit, it is VERY IMPORTANT - before you plug anything in - to read this manual very carefully and bear in mind all considerations specified within. We strongly recommend that maintenance be carried out by our Authorized Technical services.
2. PRECAUTIONS

Never use this unit in proximity to water. Do not expose the unit to water splashing. Avoid placing the unit next to heat sources such as spotlights or heaters.
Use only the accessories specified by the manufacturer, adapted for each application.
3. INTRODUCTION
IC6CLASS-54 are built from a careful selection of components in a design that provides high quality sound and fast installation with a minimum of tools.
The IC6CLASS-54 has been designed according to the EN54-24 standard (Fire detection and fire alarm systems, components of voice alarm systems).
Main characteristics:
2-way in-ceiling speaker
16Ω impedance, for easy installation of several units in parallel
- Integrated high impedance transformer for use on 70/100V line distributed systems.
- High or low impedance selector with 5 power taps, on the front of the unit once the speaker is installed in the ceiling.
Woven Kevlar® woofer
- Silk dome tweeter
- The elements for EN54-24 standard compliance include:
Protection back can
Ceramic wire connectors
Thermal fuse
Assembly wiring and grommet
- Quick installation system using screw tabs with a minimum of tools
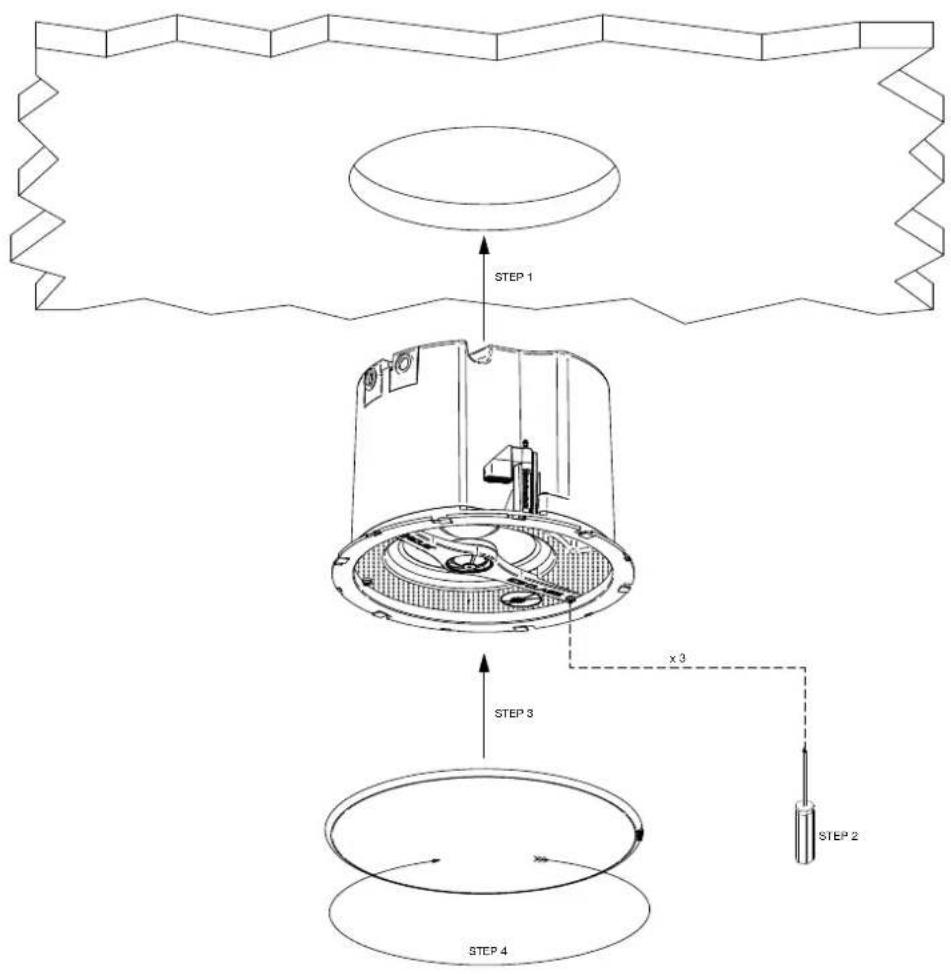
4. LOCATION, ASSEMBLY AND CONNECTIONS
For proper product installation, circular holes have to be made in selected places and the appropriate wiring has to be prepared for each unit.
Here are the steps to follow for proper installation:
- Make the mounting hole in the drop ceiling, after marking its outline with the supplied cutting template
- Remove the connection box using a slight pressure on the back can of the speaker.
- Pierce the rubber grommet of the connection box, passing the end of the speaker connection cable through.
- Strip the two wires of the speaker cable end and connect them to a screw terminal inside the connection box, respecting the polarity between the speaker (IN + and -), the other speakers of the system and the amplifier feeding them.
Note: there are two grommets and two connectors inside the connection box, connected in parallel to link another speaker if necessary.
- Reinsert the connection box into the back can of the speaker.
- Insert the speaker's frame into the hole, taking care that the 3 revolving fasteners remain in the retracted position
- Tighten each of the 3 screws accessible from the front of the unit. The revolving fasteners rotate and at the end of the tightening, the frame is fixed at its final position
- Using a flat screwdriver, set one of the following taps with the power selector on the front of the speaker:
| Connection to a 70V line | Connection to a 100V line | |
| Tap #1 | 16 Ω - 75 W | 16 Ω - 75W |
| Tap #2 | 1,5 W 3 W | |
| Tap #3 | 3,7 W 7,5 W | |
| Tap #4 | 7,5 W 15 W | |
| Tap #5 | 10 W 20 W | |
| Tap #6 | 15 W 30 W |
- Test the operation by powering up the sound system.
- Finally, install the grill on the speaker frame and turn it slightly so that the revolving fasteners of the frame and the grille are fitted together. During assembly, hold the grate by the edges (not the perforated, centre part) to avoid damaging it.
5. PAINT
IC6CLASS-54 is ready to be painted and thus can match any cosmetic criteria of the environment in which it is installed.
Once the installation is complete, the front grill is the only visible part of the unit, simply paint it to get the desired result. Paint it carefully, avoiding excess paint from clogging the small holes in its central area.
ES
- NOTA IMPORTANTE 0 8
- PRECAUCIONES 0 8
- INTRODUCCION 0 8
4.UBICACION,MONTAJE Y CONEXIONADO 0 8
5 PINTADO 0 9
6.CARACTERISTICAS TECNICAS 1 8 - DIAGRAMA 1 9
1. NOTA IMPORTANTE
Power selector 3W/7.5W/15W/20W/30W
Frequency response (-6dB) 45Hz - 22kHz
Sensitivity 1W/1m 86dB
External diameter 270mm
Internal diameter 224.5mm
Recommended cut out diameter 227mm
Required depth 175mm
Weight
3.1kg
- DIAGRAM
-
DIAGRAMME
-
DIAGRAMA DIAGRAMM