
LuV200R - Vacuum Cleaner LG - Free user manual and instructions
Find the device manual for free LuV200R LG in PDF.
User questions about LuV200R LG
0 question about this device. Answer the ones you know or ask your own.
Ask a new question about this device
Download the instructions for your Vacuum Cleaner in PDF format for free! Find your manual LuV200R - LG and take your electronic device back in hand. On this page are published all the documents necessary for the use of your device. LuV200R by LG.
USER MANUAL LuV200R LG
| Model | LuV200R | ||
| Language | E n g l i s h /Spanish/French | ||
| Page | 74 | ColorCOVER/body) | 1/ 1 |
| Material | 1 10 g | Size(W*H) | 1 90* 260 |
| Date | 2 0 10/ 0 2/ 08 | Designer | Zhihua |
| Part No. | MFL62800201 | Description | M A N U A L , O W N |
ERS
Chage Record
| No. | Change content | ECO No. | Date | Designer | Confirm |
| 1 | change contents | ACTU001754 | 10.03.05 | lixiqing | cuiyongtao |
| 2 | |||||
| 3 | |||||
| 4 | |||||
| 5 | |||||
| 6 | |||||
| 7 | |||||
| 8 | |||||
| 9 |
OWNER'S MANUAL
VACUUM CLEANER
Please read this manual carefully before operating your set and retain it for future reference.
LuV200R
CONTENTS
1 LG VACUUM CLEANER WARRANTY
LG VACUUM CLEANER WARRANTY3
2 IMPORTANT SAFETY INFORMATIONS
IMPORTANT SAFETY INFORMATION54
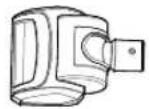
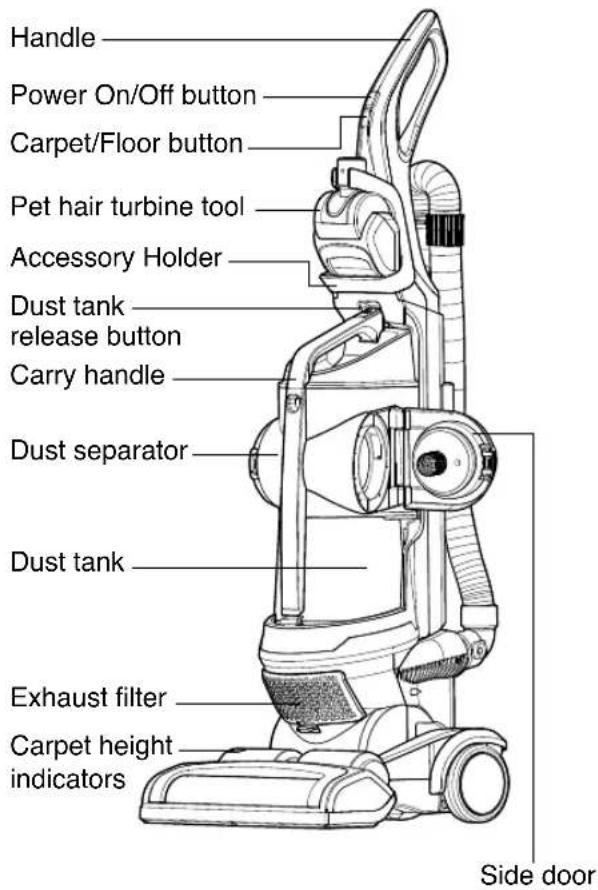
3 PARTS AND FEATURES
PARTS AND FEATURES 6
4 ASSEMBLY
7 Unpacking the Vacuum Cleaner
7 Assembly Parts
8 Attaching handle
8 Attaching the Hose
9 Accessory Storage
9 Cord storage
5 OPERATION
10 Control Operation
10 Body Release Operation
11 Adjusting the Pile Height
12 Accessory
12 Accessory Use Chart
13 Installing Attachments
13 Tips and Tricks
13 Using the Pet hair turbine tool
13 Stairways and Landings
14 Agitator Motor Overload Protection
14 Thermal Overload Protection
6 CARE & CLEANING
15 Storing the Vacuum Cleaner
15 Dust Tank Components
16 Emptying the Dust Tank
16 Cleaning the Dust Tank
17 Cleaning the Foam Pre Filter
17 Cleaning the HEPA Filter
18 Pet Hair Turbine tool
18 Agitator Maintenance
19 Replacing the Agitator Belt
20 Removing Clogs
21 Cleaning the Exterior of the Vacuum Cleaner
7 TROUBLESHOOTING
TROUBLESHOOTING 22
LG VACUUM CLEANER WARRANTY
LG Electronics Inc. will repair or replace your product, at LG's option, if it proves to be defective in material or workmanship under Personal household use, during the warranty period set forth below, effective from the date of original consumer purchase of the product. This limited warranty is good only to the original purchaser of the product and effective only when used in U.S.A and Canada.
| WARRANTY PERIOD: | HOW SERVICE IS HANDLED: |
| Five Year From the date of the original purchase | Any part of the vacuum cleaner which fails due to a defect in materials or workmanship. During this full five-year warranty, LG will also provide, free of charge, all labor and shop service to replace the defective part. (Except-Agitator motor 3 years warranty) |
THIS WARRANTY IS IN LIEU OF ANY OTHER WARRANTYES, EXPRESS OR IMPLIED, INCLUDING WITHOUT LIMITATION, ANY WARRANTY OF MERCHANTABILITY OR FITNESS FOR A PARTICULAR PURPOSE. TO THE EXTENT ANY IMPLIED WARRANTY IS REQUIRED BY LAW, IT IS LIMITED IN DURATION TO THE EXPRESS WARRANTY PERIOD ABOVE. LG WILL NOT BE LIABLE FOR ANY CONSEQUENTIAL, INDIRECT, OR INCIDENTAL DAMAGES OF ANY KIND, INCLUDING LOST REVENUES OR PROFITS, IN CONNECTION WITH THE PRODUCT. SOME STATES DO NOT ALLOW LIMITATION ON HOW LONG AN IMPLIED WARRANTY LASTS OR THE EXCLUSION OF INCIDENTAL OR CONSEQUENTIAL DAMAGES, SO THE ABOVE LIMITATIONS OR EXCLUSIONS MAY NOT APPLY TO YOU.
This warranty covers only defects in material and workmanship.
LGE will NOT pay for:
- Expendable items that can wear out, including but not limited to filters, belts.
- A service technician to instruct the user in correct product assembly, operation or maintenance.
- A service technician to clean or maintain this product.
- Damage to or failure of this product if it is not assembled, operated or maintained according to all instructions supplied with this product.
- Damage to or failure of this product resulting from accident, abuse, misuse or use for other than its intended purpose.
- Damage to or failure of this product caused by the use of detergents, cleaners, chemicals or utensils other than those recommended in all instructions supplied with this product.
- Damage to or failure of parts or systems resulting from unauthorized modifications made to this product.
This warranty is extended to the original purchaser for products purchased for home use within the USA. In Alaska, the warranty excludes the cost of shipping or service calls to your home. Some states do not allow the exclusion or limitation of incidental or consequential damages, so this exclusion or limitation may not apply to you. This warranty gives you specific legal rights, and you may also have other rights which vary from state to state. To know what your legal rights are, consult your local or state consumer affairs or your state's Attorney General.
CUSTOMER ASSISTANCE INFORMATION:
| To Prove Warranty Coverage | Retain your Sales Receipt to prove date of purchase. A copy of your Sales Receipt must be submitted at the time warranty service is provided. |
| To Obtain Nearest Authorized Service Center or Sales Dealer, or to Obtain Product, Customer, or Service Assistance | Call 1-800-243-0000 (Phone answered 24 hours - 365 days a year) and choose the appropriate prompt from the menu; or visit our website at: http://us.lgservice.com. (In Canada- Call 1-888-542-2623, website http://ca.lgservice.com) |
IMPORTANT SAFETY INFORMATION
When using an electrical appliance, basic precautions should always be followed, including the following:
READ ALL INSTRUCTIONS BEFORE USE
IMPORTANT SAFETY INSTRUCTIONS
Read and follow all instructions before using your Vacuum cleaner to prevent the risk of fire, electric shock, personal injury, or damage when using the Vacuum cleaner. This guide do not cover all possible conditions that may occur. Always contact your service agent or manufacturer about problems that you do not understand.

This is the safety alert symbol. This symbol alerts you to potential hazards that can kill or hurt you and others. All safety messages will follow the safety alert symbol and either the word "WARNING" or "CAUTION".

WARNING
This symbol will alert you to hazards or unsafe practices which could cause serious bodily harm or death.

CAUTION
This symbol will alert you to hazards or unsafe practices which could cause bodily injury or property damage.

WARNING
-
To reduce the risk of fire, electric shock, or injury:
-
Disconnect electrical supply before servicing or cleaning the unit or when cleaner is not in use.
Failure to do so could result in electrical shock or personal injury.
- Do not use vacuum cleaner to pick up anything that is burning or smoking such as cigarettes, or hot ashes. Doing so could result in death, fire or electrical shock.
- Do not vacuum flammable or explosive substances such as gasoline, benzene, thinners, propane (liquids or gases).
The fumes from these substances can create a fire hazard or explosion. Doing so could result in death or personal injury.
- Do not handle plug or vacuum cleaner with wet hands. Doing so could result in death or electrical shock.
- Do not unplug by pulling on cord. Doing so could result in product damage or electrical shock. To unplug, grasp the plug, not the cord.
- Keep hair, loose clothing, fingers, and all parts of the body away from openings and moving parts.
Failure to do so could result in electrical shock or personal injury.
- Do not pull or carry by cord, use cord as a handle, close a door on cord, or pull cord around sharp edges or corners. Do not run vacuum cleaner over cord. Keep cord away from heated surfaces.
Failure to do so could result in electrical shock or personal injury or fire or product damage.
- Do not allow to be used as toy. Close attention is necessary when used by or near children.
Personal injury or product damage could result.
- Do not use the vacuum cleaner if the power cord or plug is damaged or faulty.
Personal injury or product damage could result. In these cases, contact LG Electronics Service Agent to avoid hazard. - Do not use vacuum cleaner if it has been under water.
Personal injury or product damage could result. In these cases, contact LG Electronics Service Agent to avoid hazard. - Do not continue to vacuum if any parts appear missing or damaged.
The fumes from these substances can create a fire hazard or explosion. Doing so could result in death or personal injury.
Personal injury or product damage could result. In these cases, contact LG Electronics Service Agent to avoid hazard.
- Do not use an extension cord with this vacuum cleaner.
Fire hazard or product damage could result.
- Using proper voltage.
Using improper voltage may result in damage to the motor and possible injury to the user. Proper voltage is listed on the bottom of vacuum cleaner.
- Turn off all controls before unplugging.
Failure to do so could result in electrical shock or personal injury. - Do not change the plug in any way.
Failure to do so could result in electrical shock or personal injury or product damage. Doing so result in death. If plug does not fit, contact a qualified electrician to install the proper outlet. - Use extra care when cleaning or stairs.
- Do not leave appliance when plugged in. Unplug from outlet when not in use and before servicing.
- Hold plug when rewinding onto cord reel.
Do not allow plug to whip when rewinding.

WARNING
- Repairs to electrical appliances may only be performed by qualified service engineers. Improper repairs may lead to serious hazards for the user.
- Do not put fingers near the gear. Failure to do so could result in personal injury.
-
Do not use out doors or on wet surfaces. Failure to do so could result in electrical shock or personal injury.
-
Do not put anything, between Vacuum cleaner body and agitator head space.
Personal injury or product damage or living thing's damage could result.
- The cords, wires and/or cables supplied with this product contain chemicals, including lead or lead compounds, known to the state of California to cause cancer and birth defects or other reproductive harm. Wash hands after using.

CAUTION
- Do not put any objects into openings.
Failure to do so could result in product damage. - Do not use with any opening blocked: keep free of dust, lint, hair and anything that may reduce air flow.
Failure to do so could result in product damage. - Do not use vacuum cleaner without dust tank and/or filters in place.
Failure to do so could result in product damage. - Always clean the dust tank after vacuuming carpet cleaners or fresheners, powders and fine dust.
These products clog the filters, reduce airflow and can cause damage to the cleaner. Failure to clean the dust tank could cause permanent damage to the cleaner. - Do not use vacuum cleaner to pick up sharp hard objects, small toys, pins, paper clips, etc. They may damage the cleaner or dust tank.
- Store the vacuum cleaner indoors.
Put the vacuum cleaner away after use to prevent tripping over it.
- The vacuum cleaner is not intended to use by young children or infirm people without supervision.
Failure to do so could result in personal injury or product damage.
- Only use parts produced or recommended Electronics Service Agents.
Failure to do so could result in product damage. - Use only as described in this manual. Use only with LG recommended or approved attachments and accessories.
Failure to do so could result in personal injury or product damage. - To avoid personal injury and to prevent the machine from falling when cleaning stairs, always place it at the bottom of stairs.
Failure to do so could result in personal injury or product damage. - Make sure the filters (exhaust filter and motor safety filter) are completely dry before replacing in the machine.
Failure to do so could result in product damage. - Do not dry the filter in an oven or microwave. Failure to do so could result in fire hazard.
- Do not dry the filter in a clothes dryer.
Failure to do so could result in fire hazard. - Do not dry near an open flame.
Failure to do so could result in fire hazard. - Always turn vacuum cleaner off before connecting or disconnecting the hose.
Personal injury or product damage could result. - Proper assembly and safe use of your vacuum cleaner are your responsibilities.
SAVE THESE INSTRUCTIONS
Thermal protector :
This vacuum cleaner has a special thermostat that protects the vacuum cleaner in case of motor overheating. If the vacuum cleaner suddenly shuts off, turn off the switch and unplug the vacuum cleaner.
Check the vacuum cleaner for possible source of overheating such as a full dust tank, a blocked hose or clogged filter. If these conditions are found, fix them and wait at least 30 minutes before attempting to use the vacuum cleaner. After the 30 minute period, plug the vacuum cleaner back in and turn on the switch. If the vacuum cleaner still does not run, contact a qualified electrician.
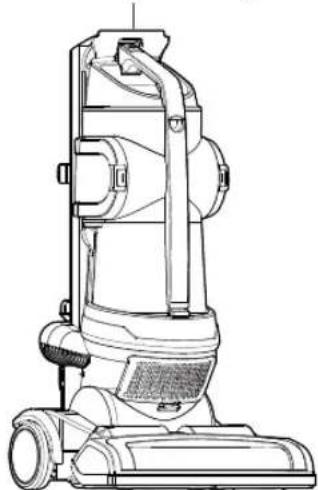
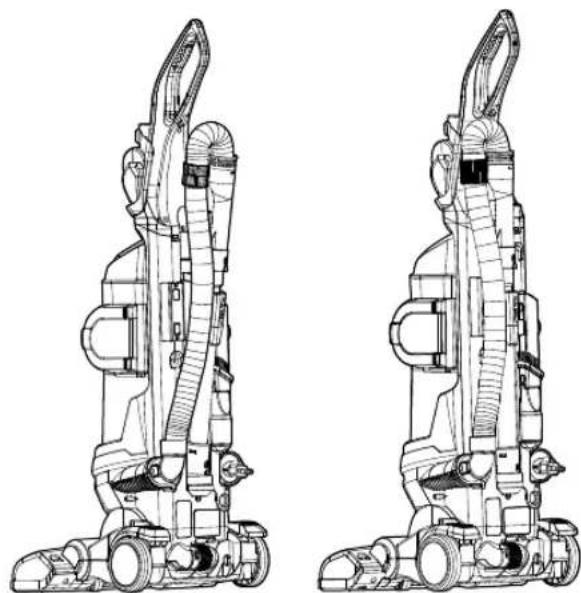
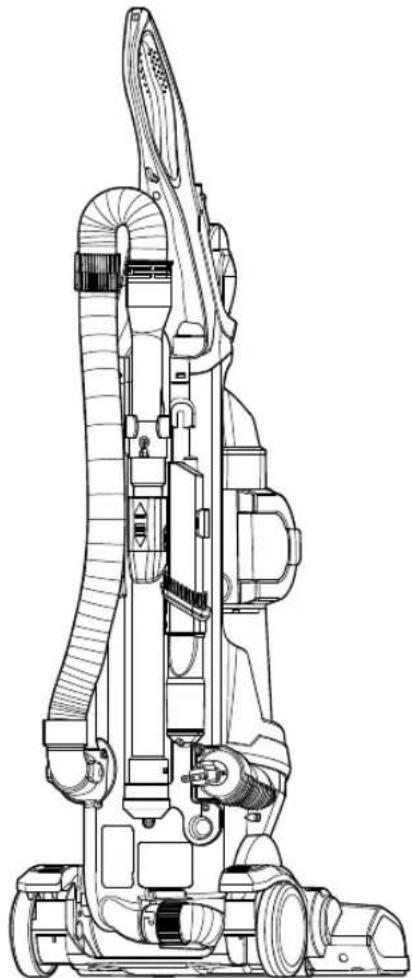
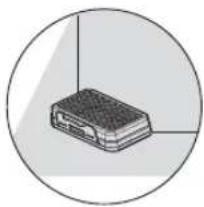
It is important to know your vacuum cleaner's parts and features to assure its proper and safe use. Review these before using your vacuum cleaner.
| HEPA Filter ADQ72913302 | ||
| Foam Pre Filter (ADV72987202) | Filter Frame | MDQ62256901 |
| Foam Filter | MDJ61980603 | |
| MAS61843401Agitator Belt | ||
To order these parts call 1-800-243-0000 (U.S.A) 1-888-542-2623 (Canada)
Accessory ToolsCommon Replacement Parts
Pet hair turbine tool

Dusting brush & Crevice tool
To reduce the risk of shipping damage, your vacuum cleaner is shipped partially unassembled.
Unpacking the Vacuum Cleaner
Carefully unpack the vacuum cleaner and make sure that you have all parts before discarding of any packaging.
Remove any tape, cardboard inserts and protective film before assembly.
Items that are packed in the box:
- Vacuum Cleaner Body
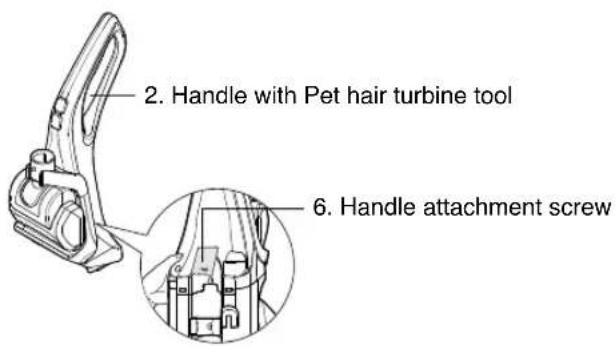
- Handle with Pet hair turbine tool
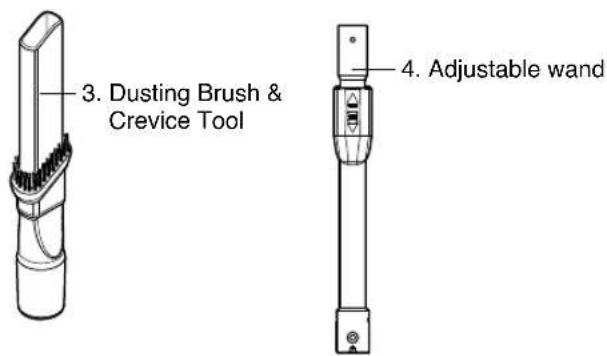
- Dusting Bush & Crevice Tool
- Adjustable Wand
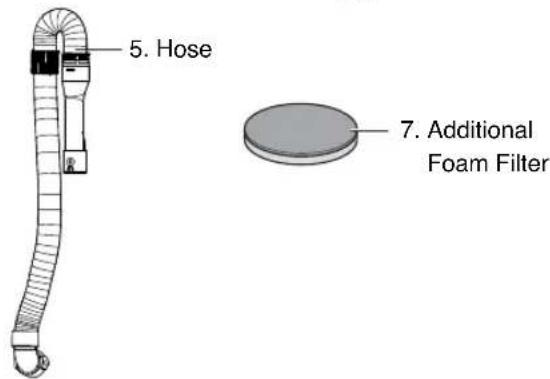
5.Hose - Handle attachment screw
- Additional Foam Filter
Assembly Parts
- Vacuum Cleaner Body
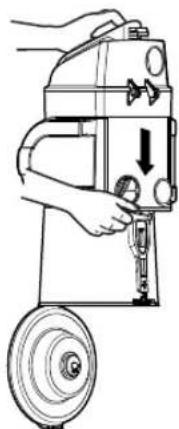
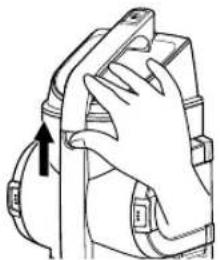
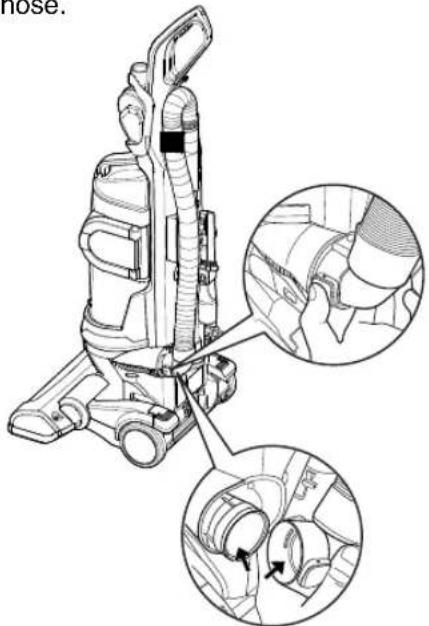
Attaching handle Attaching the Hose
- Slide handle onto the main body.
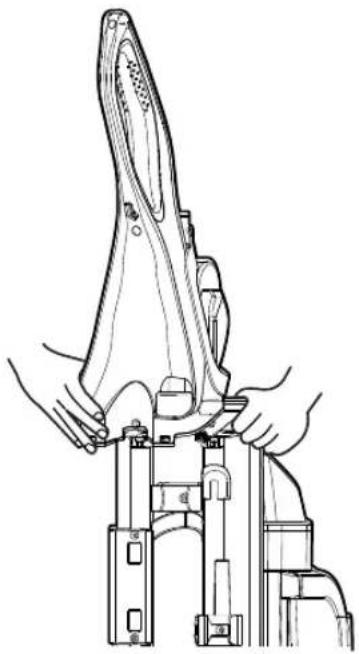
- Insert screw into the back side of the handle and tighten using a Phillips head screwdriver.

WARNING
Tighten screw as much as you can. Personal injury or product damage can occur.
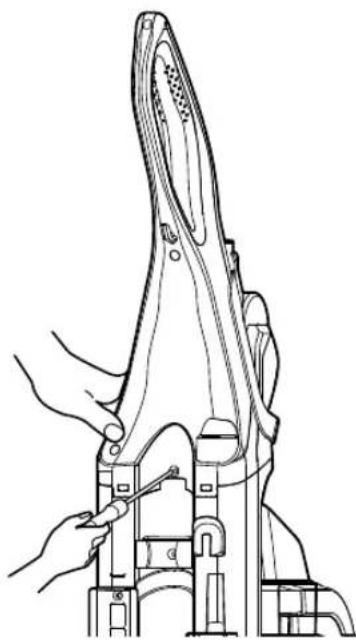
- Insert the wand into the handle hose.
- Attach the opposite side of the hose onto the main body.
- Align the hose with the holder on the side of the vacuum and place the end of the wand onto the main body.

WARNING
Personal Injury and Product Damage Hazard!
DO NOT use outlets above counters.
Damage to items in the surrounding area could occur.
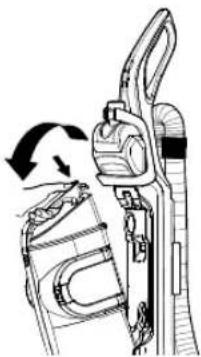
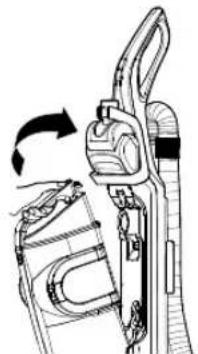
Accessory Storage
Your vacuum cleaner features convenient on-board storage for the Dusting bush & Crevice tool.
- Insert the Dusting bush & Crevice tool onto the main body.

CAUTION
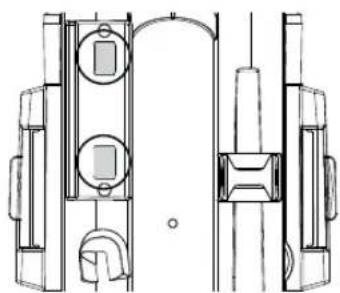
Hose storage consist of two strong magnetic. Keep away electronic equipment or dangerous steel things from hose storage.
Cord Storage
To release the cord:
Grasp the plug and pull cord to desired cord length.
To store the cord:
Hold plug and press on the cord rewind button on the rear side of handle.
To prevent cord from whipping, hold plug until cord is rewound.
NOTE: To reduce the risk of electric shock, this appliance has a polarized plug (one blade is wider than the other).
This plug will fit in a polarized outlet only one way. If the plug does not fit fully in the outlet, reverse the plug.
If it still does not fit, contact a qualified electrician to in stall the proper outlet.
Do not change the plug in any way.

WARNING
Personal Injury Hazard
Do not set the vacuum on the stairs, always keep the unit on the floor.
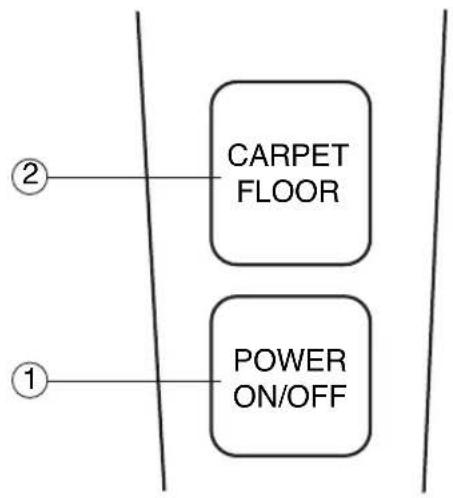
Control Operation
1. Power On/Off:
To turn the vacuum on and off.
2. Carpet/Floor:
To toggle between the agitator being on or off.
Note: Carpet = Agitator on, Floor = Agitator off The agitator will not spin when the Vacuum is in the upright position.
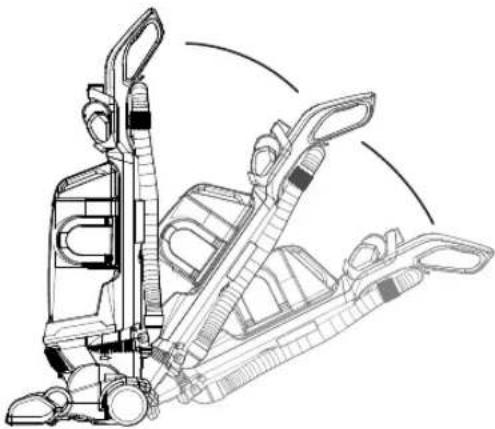
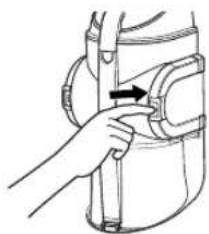
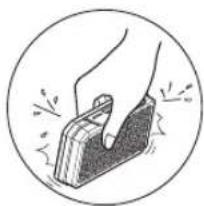
Body Release Operation
To begin vacuuming, press the pedal on the left side of the vacuum release.
NOTE: When the vacuum is in the upright position the agitator will not run.
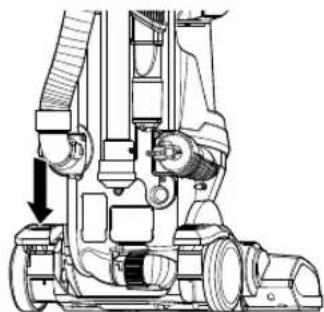

WARNING
Do not place anything between the main body and vacuum head.
Personal injury or product damage can occur.
Adjusting the Pile Height
To adjust the pile height:
When it is necessary to raise and lower the front of the vacuum for various carpet pile heights, press the right foot pedal to adjust the pile height. Each press will raise the agitator one notch.
Suggested pile height settings:
You may need to raise the height to make some jobs easier, such as vacuuming area rugs and longer pile rugs.
For maximum cleaning performance, the following carpet height settings are recommended:
- L - for all types of carpet
- Higher settings - for very deep pile carpet where easier pushing effort is desired, while maintaining good cleaning performance.
There are 4 settings:
$$ \begin{array}{l} H = H i g h \ M = \text {M e d i u m} \ \mathrm {M L} = \text {M e d i u m L o w} \ L = \text {L o w} \ \end{array} $$
NOTE: If the vacuum is difficult to push, press the Height adjustment to the next higher setting.
Attention: Special care is required when vacuuming certain types of carpet or flooring. Always check the carpet or floor covering manufacturer's recommended cleaning instructions before vacuuming.
OPERATION
Accessory
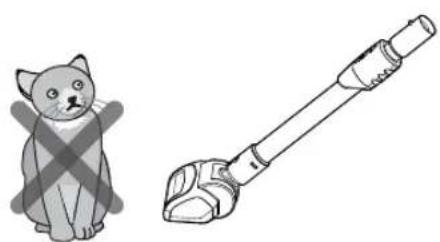
Pet hair turbine tool
This air-turbine powered brush is great for stairs and interiors, as well as removing pet hair, lint, etc. from fabrics and carpets.
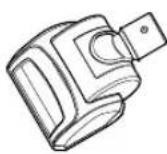
Do NOT use on pets.
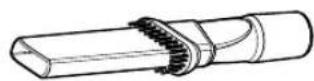
Dusting Brush
Use the dusting brush in place for cleaning furniture, walls, etc.

Crevice Tool
The crevice tool can be used for tight corners, between cushion and various other hard to reach places.
Accessory Use Chart
| ACCESSORY | CLEANING AREA | ||||||
| Between Cushions | Upholstered Surfaces* | Furniture and Hard Surfaces* | Drapes* | Stairs Cushions | Carpeted Floors/ Rugs | Walls | |
| Pet hair turbine tool | ● | ● | ● | ||||
| Dusting Brush | ● | ● | ● | ● | ● | ● | |
| Crevice Tool | ● | ||||||
- Always make sure attachments are clean before using on fabrics.
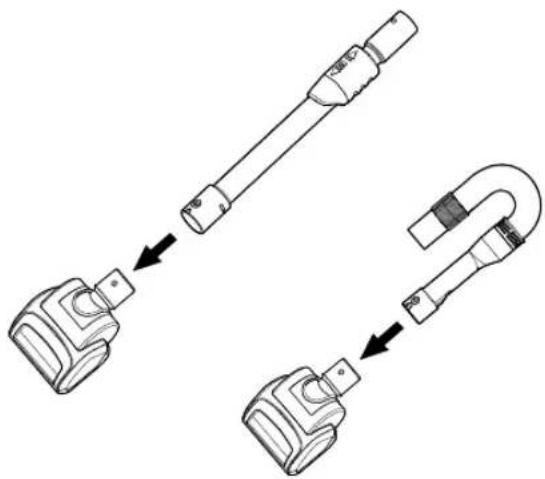
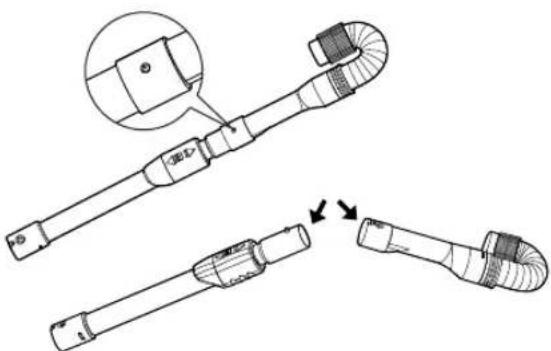
Installing Attachments
Using the Wand and Hose
Release the wand and hose
- Hold the wand on the body and tilt the wand.
- Lift the wand out and up.

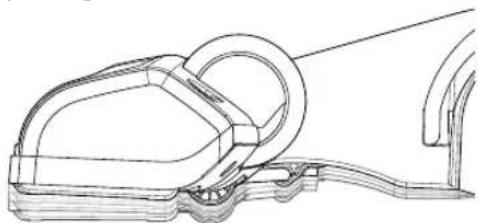
Using the Crevice tool
Slide the crevice tool over the end of the wand or fit it into the handle.
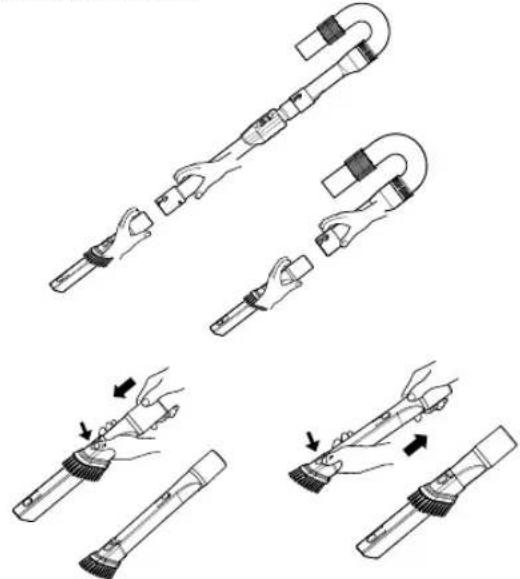
Dusting brush Crevice tool
Tips and Tricks
Carpet Edges and Corners
For tight corners, carpet edges and along base boards, use the dusting brush.
Use the crevice tool for especially hard to reach areas.
Using the Pet hair turbine tool
The Pet hair turbine tool attaches to the wand like the other attachments. It features air-turbine powered brush to provide extra cleaning power on carpets and fabrics. It is great for cleaning stairs, cushions and vehicle upholstery.
When using the Pet hair turbine tool, check frequently for the buildup of hair, fibers, lint and other debris in the brush area.
Excessive buildup can reduce performance and could damage the Pet hair tool.
See the Care and Cleaning section for cleaning instructions.
Stairways and Landings
Use the Crevice or Pet hair turbine tool on stairs and landings. Make sure that the vacuum cleaner is placed so that it cannot tip or fall.
See page 12 for instructions on selecting and using attachments.
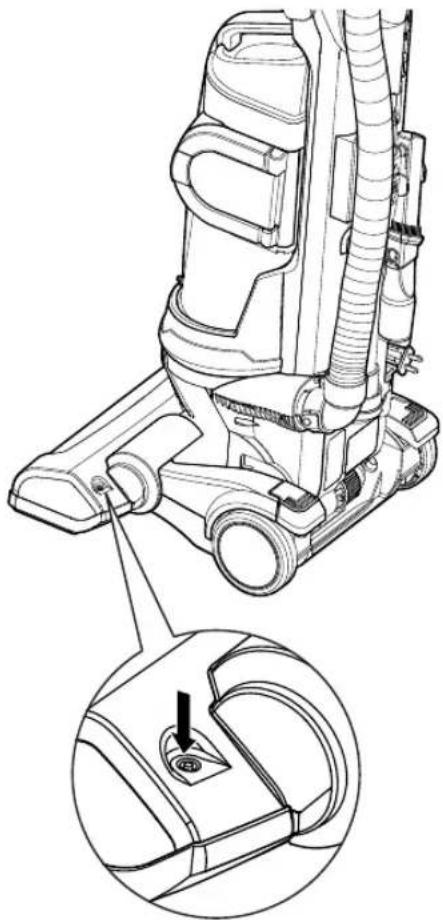
Agitator Motor Overload Protection
The agitator has a built-in protection against motor damage should the agitator jam. If the agitator slows down or stops, the agitator overload protector shuts off the agitator motor. The suction motor will remain on at this time.
To correct problem: Turn off and unplug vacuum cleaner, remove obstruction and press the reset button.
Thermal Overload Protection
This vacuum cleaner has a thermal overload protector which automatically activates to protect the vacuum cleaner from overheating. If a clog disturbs the normal flow of air to the motor, the thermal protector turns the motor off automatically to allow the motor to cool in order to prevent possible damage to the vacuum cleaner.
To correct the problem: Turn the vacuum cleaner off and unplug the power cord.
Check for and remove clogs, if necessary.
Also check and clean any dirty filters.
Wait approximately 30 minutes and plug the vacuum cleaner in and turn back on to see if the motor protector has reset.
The thermal protector system will not reset until the vacuum cleaner has completely cooled down.
Always follow all safety precautions when cleaning and servicing the vacuum cleaner.
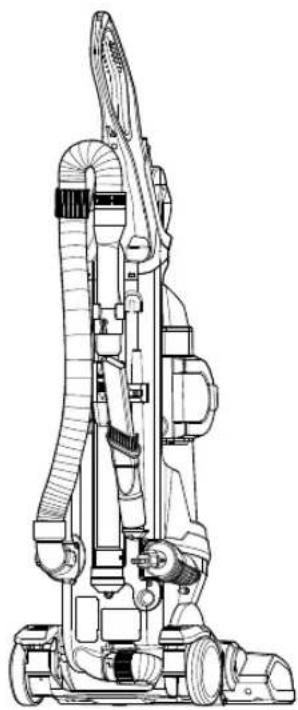
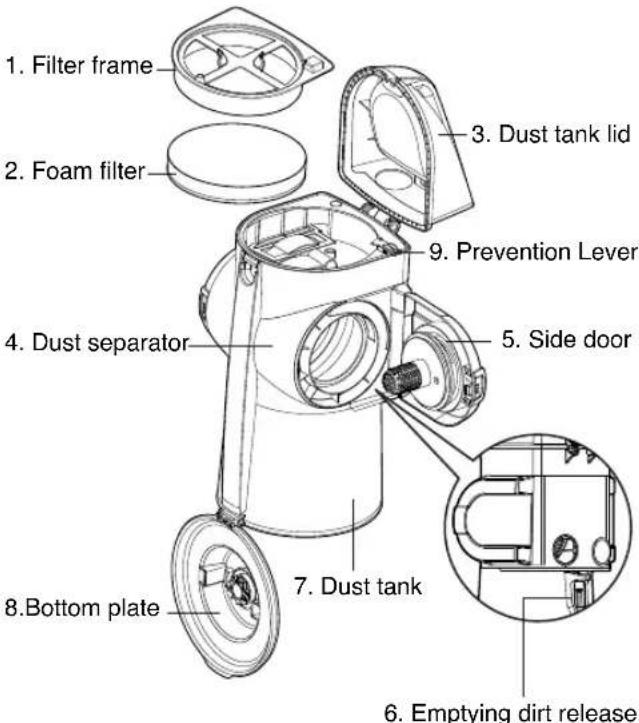
Storing the Vacuum Cleaner Dust Tank Components
When not in use, press on the cord rewind button to store the cord. Store the dusting brush & crevice tool in their proper place on the back of the vacuum cleaner.
The dust tank consists of several key components. Always make sure that all parts are properly reinstalled after emptying the dust tank.
NEVER operate the vacuum cleaner without all filters in place!
NEVER operate the vacuum cleaner with wet filters or components!
Key components
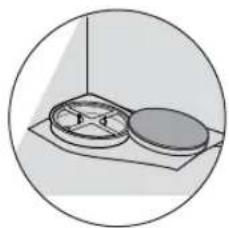
1~2. Foam Pre Filter:
Captures medium to fine particles.
It consists of Filter frame & Foam Filter.
These are washable.
- Dust tank lid:
Open to access Foam pre filter.
- Dust separator:
Separate dust from air coming in.
- Side door:
Open to remove dirt from dust separator.
- Emptying dirt release:
Press down to open the bottom plate.
- Dust tank:
Where dirt is collected.
- Bottom plate:
Open to empty the dust tank.
- Prevention Lever:
Prevent using without Foam pre filter.
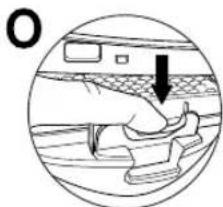
Emptying the Dust Tank

WARNING
Electrical shock and personal injury hazard. Always unplug power cord from electrical outlet before performing any service on vacuum cleaner. Failure to do so could result in electrical shock or personal injury from vacuum cleaner suddenly starting.
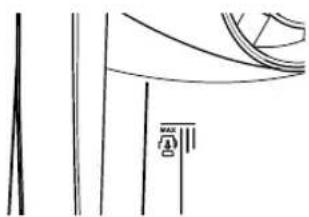
For best performance, always empty the dust tank when the dirt level reaches the MAX line.
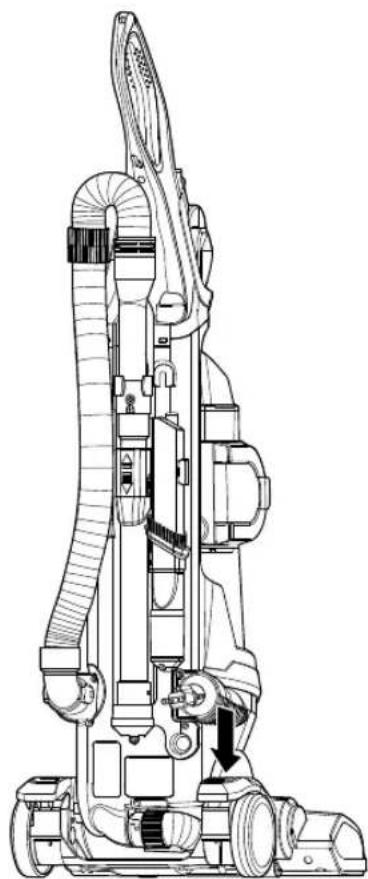
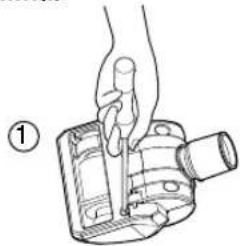
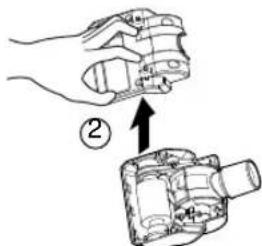
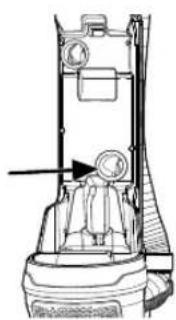
TO REMOVE DUST TANK:
Press the dust tank release button, tilt the dust tank back, then lift it out of the vacuum cleaner.
TO EMPTY DUST TANK:
Press the emptying dirt release and open the bottom plate, as shown.
TO REINSTALL THE DUST TANK:
Place it in the holder, then tilt forward until it clicks into place. Make sure the dust tank is properly seated!
Warning: Do not touch the gears or switches located on the main body below the dust bin.
Cleaning the Dust Tank
For optimal performance, check filters regularly and clean when necessary.
To Clean the Dust Tank:
- Remove the dust tank from the vacuum cleaner.
- Press the dirt release and open the bottom plate.
- Wipe out the dust tank with a soft cloth or paper towel.
- Release the latch on the Side door on both the right and left sides.
- Remove any hair, fibers or other debris from the dust separator.
Do not remove the cones attached to the side door for cleaning.
NEVER operate the vacuum cleaner with wet filters or components!
Cleaning the Foam Pre Filter

CAUTION
A wet filter can cause permanent damage to the vacuum cleaner.
Be sure filters are completely dry before reinstalling.
For optimal performance, check the filters every 3 months and clean when necessary.
Don't close the dust tank lid without the Foam Filter.
To Clean the Foam pre filter:
- Remove the dust tank from the vacuum cleaner.
- Lift up on the dust tank lid release and open the lid.
- Lift out the Foam pre filter.
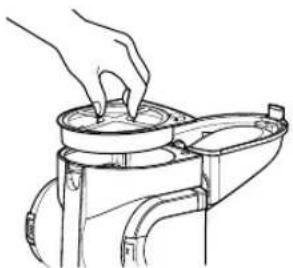
- Separate the foam filter from the filter frame.

- Shake out any excess dirt or debris and rinse the foam filter & filter frame with clean water.

- Dry completely away from sunlight.
NEVER operate the vacuum cleaner with wet filters or components!
If you notice a loss of suction and cleaning the Foam filter does not help, you need to replace the Foam filter. You can purchase additional foam filters from LG by calling 1-800-243-0000(U.S.A), 1-888-542-2623 (Canada) and asking for parts on page 6.
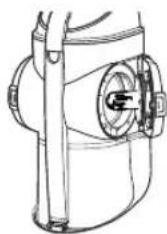
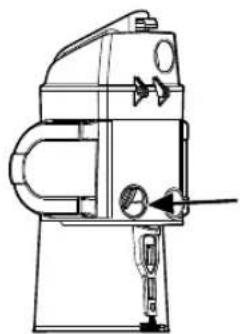
Cleaning the HEPA Filter
For optimal performance, check the filter every 6 months and clean when necessary.
To Clean the HEPA Filter:
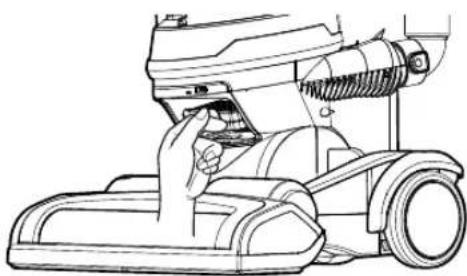
- Remove the exhaust filter cover.
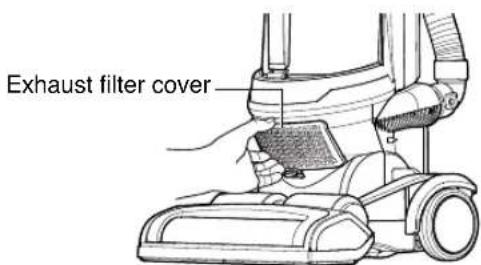
- Lift out the filter by pressing the hook.
- Wash the filter cleanly in flowing water.
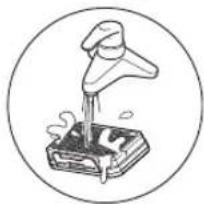
- Remove moisture.
- Dry completely away from sunlight.
- Make sure to push down on the filter until it locks in place before closing the exhaust filter cover.
Pet Hair Turbine tool
To clean the Pet hair turbine tool
- Remove the four screws on the bottom of the Pet hair turbine tool.
- Lift off the cover.
- Remove any debris.
To reassemble:
- Carefully press cover onto tabs until they snap into place.
- Insert and tighten screws removed in Step 1. Do NOT overtighten the screws.
Do Not use the pet hair turbine tool on any animal.
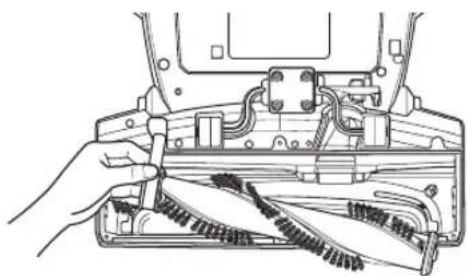
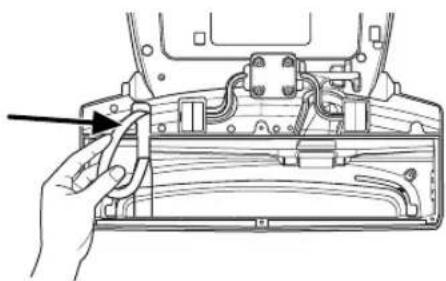
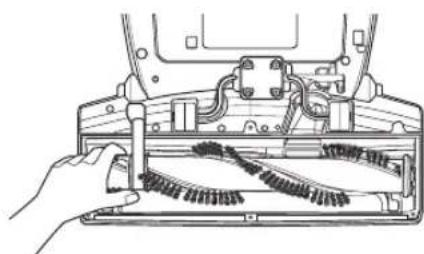
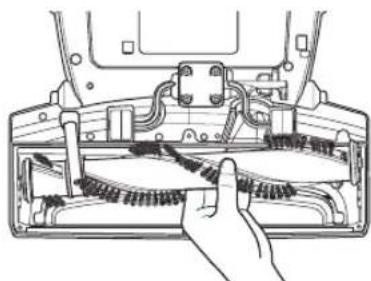
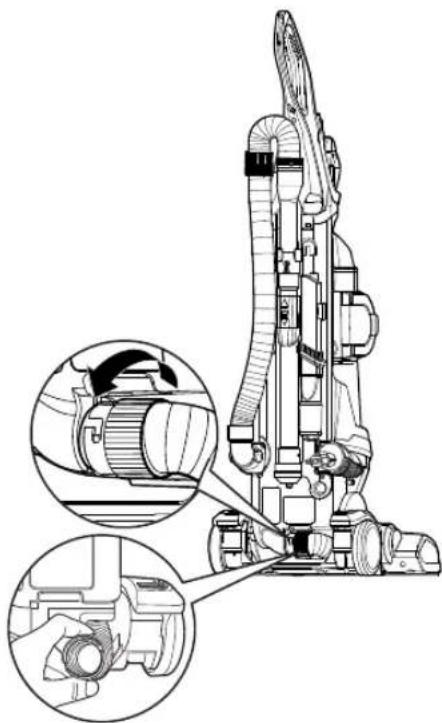
Agitator Maintenance
WARNING
Electrical shock and personal injury hazard. Always unplug the vacuum cleaner before servicing. Failure to do so could result in electrical shock or personal injury.
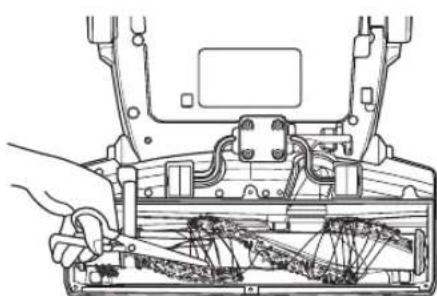
Frequently check the agitator brush area for hair, string and lint buildup.
Remove the Agitator Brush Cover:
- Unplug the vacuum cleaner. Press the left foot pedal to release the head. Lower the handle until the vacuum cleaner is lying flat on the floor.
- Turn the vacuum cleaner over, so that the agitator is facing up.
- Set the agitator on a cloth or a smooth surface. Remove the six screws on the bottom of the head and remove the cover.
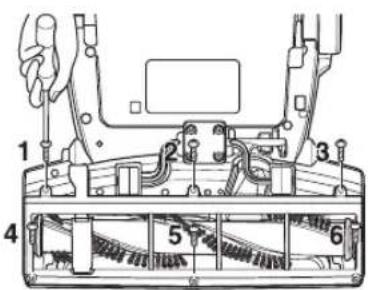
- Carefully remove any accumulated string, hair, etc. from the agitator and the agitator area. To reinstall the cover. Reverse the steps above.
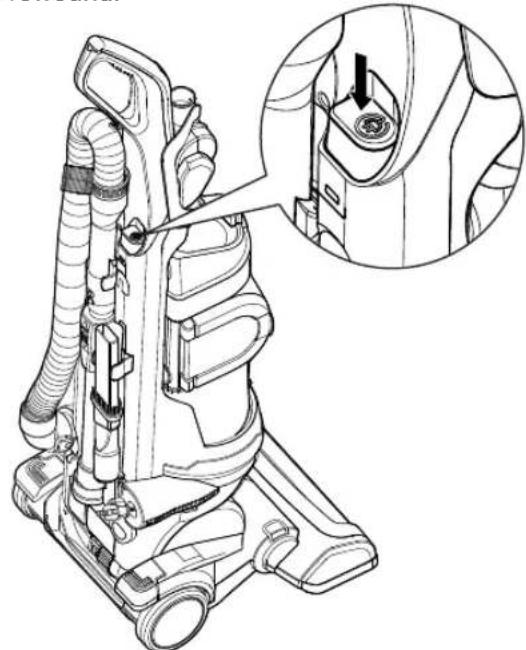
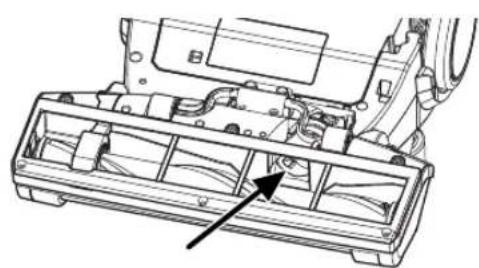
Replacing the Agitator Belt

WARNING
Electrical shock and personal injury hazard. Always unplug the vacuum cleaner before servicing. Failure to do so could result in electrical shock or personal injury.
If the belt breaks, follow the steps below to replace the agitator belt.
To Replace the Belt:
-
Remove the agitator brush cover as described on page 18.
-
Lift the agitator straight out.

- Unhook the old belt from the drive pulley. Make sure no pieces of the broken belt are trapped in the agitator or drive pulley area.
- Hook the new belt over drive pulley of agitator motor.
- Fit the agitator through the belt, making sure the belt is aligned with the pulley section of the agitator.
- Lower the agitator into place, making sure the oval shaped tabs fit into the indents on the head.
- Reinstall the agitator brush cover as described above.
For a replacement belt, order LG service center belt part # MAS61843401.
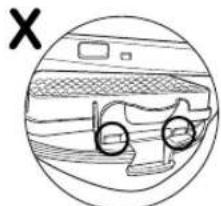
Removing Clogs

WARNING
Electrical shock and personal injury hazard. Always unplug the vacuum cleaner before servicing. Failure to do so could result in electrical shock or personal injury.
If you notice a loss in suction, first check the filters as described on pages 17 and 18. If the filters are clean, there may be a clog.
The arrows show areas where clogs are most likely to occur.
To check for clogs:
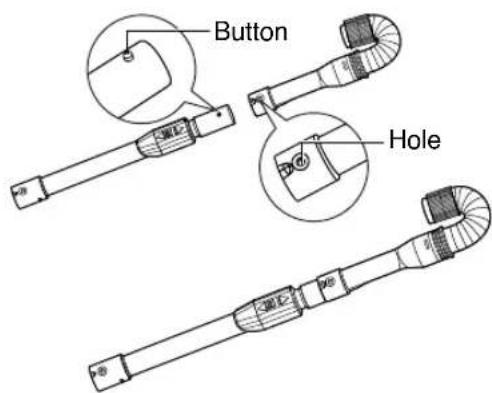
- Check the hose where it connects to back of the body by pressing the two buttons on the end of the hose.
- Release the hose assembly from the vacuum cleaner. Separate the hose and wand by pressing the button on the top of wand and check the hose and wand for clogs.
- Remove the dust tank and check the dust tank inlet and body inlet where it connects to the vacuum cleaner body.
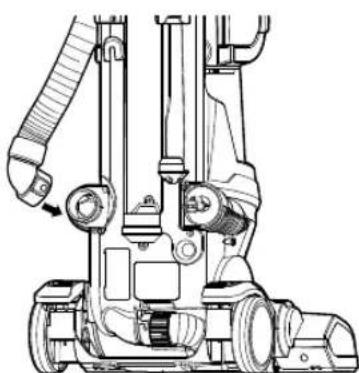
- Check the hose where it connects body to head by turning the connector on the bottom of the body.
- Turn the vacuum cleaner over, Check the agitator inlet.
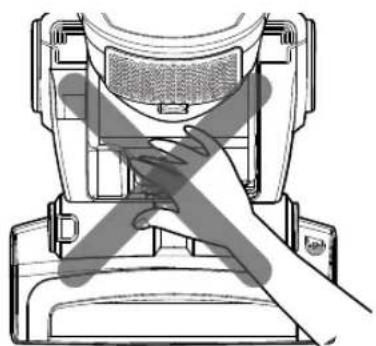
Cleaning the Exterior of the Vacuum Cleaner

WARNING
Electrical shock and personal injury hazard. Always unplug the vacuum cleaner before servicing. Failure to do so could result in electrical shock or personal injury.
Wipe the exterior of the vacuum cleaner with a clean, soft cloth that has been dipped in water and wrung dry.
DO NOT allow water to enter any openings in the vacuum cleaner.
DO NOT clean tools in dishwasher or clothes washer. Wash tools in warm soapy water, rinse and allow to air dry completely.
DO NOT use tools if they are wet.
Review this chart to find do-it-yourself solutions for minor performance problems.
Any service or repair needed, other than as described in this User's Guide, should be performed through your local LGE service center.

WARNING
Electrical shock and personal injury hazard.
Always unplug the vacuum cleaner before servicing.
Failure to do so could result in electrical shock or personal injury.
| PROBLEM | POSSIBLE CAUSE POSSIBLE SOLUTION | |
| Vacuum cleaner will not run | ·Unplugged at wall outlet. ·Agitator motor overload protection activated. ·Thermal overload protection activated. | ·Make sure cord is plugged into a functioning outlet. ·Unplug the vacuum cleaner and check the agitator for obstructions and reset the unit. [See Page 14] ·Allow the vacuum cleaner to cool down. [See page 14] |
| Poor dirt pickup | ·Full or clogged dust tank. ·Dust tank improperly installed. ·Clogged hose or wand. ·Belt broken/not installed properly. ·Agitator motor overload protection activated. ·Hole in hose. ·Worn agitator. | ·Empty dust tank and clean filters. [See page 16,17,18] ·Make sure all dust tank components and filters are installed correctly. ·Check for clogs. [See page 20] ·Check belt and replace if needed. [See page 19] ·Unplug the vacuum cleaner and check the agitator for obstructions. Press the reset button. [See page 14] ·Inspect hose carefully. Replace if needed. ·Contact service. |
| Agitator does not turn | ·Switch is off. (unit is in bare floor mode) ·Cleaner is in upright position. ·Agitator motor overload protection is tripped. (brush is jammed) ·Belt is broken. | ·Turn on agitator power switch. [See page 10] ·Press the Body release and tilt unit back. [See page 10] ·Unplug the vacuum cleaner and check the agitator for obstructions and reset the unit. [See Page 14] ·Replace belt. [See page 18,19] |
| Dust escapes the dust tank | · Dust tank improperly installed. · The dust tank lid not closed. · The bottom plate is not latched. | · Make sure all dust tank components and filters are installed correctly. · Check the dust tank lid. · Make sure the bottom plate is closed and latched. |
| Cleaner picks up moveable rugs or is hard to push | · Wrong pile height setting. | · Adjust pile height. [See page 11] |
| Agitator on Pet hair turbine tool will not run when attached | · Dirty agitator or agitator supports. · Obstruction in turbine air path. · Low suction from vacuum cleaner. | · Clean the inside of the pet hair turbine tool. [See page 18] · Clean the inside of the pet hair turbine tool. [See page 18] · Check for clogs. [See page 20] |
| Accessory has no suction when using with the handle | · Cleaner is not in upright position. | · Keep the cleaner in upright position. |
| Plug cord will not rewind or pull to desired cord length. | · The plug cord is tangled. | · Try to rewind the plug cord again after pulling it all the way out. · Firmly pull plug cord to release it from cord reel. |
MANUAL DE USUARIO
ASPIRADORA
The model and serial number of the vacuum cleaner is located on the back of the vacuum cleaner. Record it below should you ever need service.
MODEL
SERIAL
LG Electronics U.S. Ltd., LG House, 250 Bath Road, Slough, Berkshire SL1 4DX
1-800-243-0000 USA, Consumer User
1-888-865-3026 USA,Commercial User
1-888-542-2623 CANADA
LG Customer Information Center