
MSB4560 - Soundbar MAGNAVOX - Free user manual and instructions
Find the device manual for free MSB4560 MAGNAVOX in PDF.
| Product Type | Soundbar with wireless subwoofer |
| Brand | Magnavox |
| Model | MSB4560 |
| Dimensions (soundbar) | 999 × 77 × 57 mm (W×H×D) |
| Weight (soundbar) | 1.8 kg |
| Dimensions (subwoofer) | 226 × 250 × 305 mm (W×H×D) |
| Weight (subwoofer) | 3.9 kg |
| Total power | 76 W RMS (+/- 0.5 dB, 10% THD) |
| Power supply (soundbar) | 120 V~, 60 Hz, 15 W |
| Power supply (subwoofer) | 120 V~, 60 Hz, 15 W |
| Standby power consumption | ≤ 0.5 W |
| Bluetooth | Version 3.0 + EDR, profiles A2DP, AVRCP |
| Audio inputs | AUX (RCA), OPTICAL (Toslink), LINE IN (3.5 mm) |
| Speakers (soundbar) | 2 × 51 mm (2") woofers, 2 × 25.4 mm (1") tweeters |
| Speaker (subwoofer) | 133 mm (5.25") woofer |
| Frequency response (soundbar) | 150 Hz - 20 kHz |
| Frequency response (subwoofer) | 20 Hz - 150 Hz |
| Supported audio formats | Dolby Digital, Linear PCM (32/44.1/48 kHz) |
| Sound modes | Music, Movie, News, Classic |
| Special features | Night mode, auto standby, factory reset |
| Remote control | CR2025 battery included |
| Maintenance and cleaning | Clean with a dry cloth. Do not use liquid or aerosol products. |
| Safety | Do not expose to water or moisture. Do not open the enclosure. Keep batteries away from children. |
| Spare parts and repairability | Contact customer service for any repairs. Do not attempt to repair yourself. |
| General information | Warranty valid only if safety instructions are followed. Complies with FCC and IC. |
Frequently Asked Questions - MSB4560 MAGNAVOX
User questions about MSB4560 MAGNAVOX
0 question about this device. Answer the ones you know or ask your own.
Ask a new question about this device
Download the instructions for your Soundbar in PDF format for free! Find your manual MSB4560 - MAGNAVOX and take your electronic device back in hand. On this page are published all the documents necessary for the use of your device. MSB4560 by MAGNAVOX.
USER MANUAL MSB4560 MAGNAVOX
Magnavox is a registered trademark of Philips Electronics North America Corporation and is used by Funai Electric Co., Ltd. and Funai Corporation, Inc. under license from Philips Electronics North America.
1.1 Notice of Compliance....2
1.2 Trademark 3
2 Important....3
2.1 Important safety instructions....3
2.2 Care of the environment....5
3 Your SoundBar....5
3.1 Main unit....5
3.1.1 front panel of main unit....5
3.1.2 Back connectors of main unit....6
3.2 Remote control....6
3.2.1 Replace battery....6
3.3 Wireless Subwoofer 7
3.3.1 Back panel of Subwoofer 7
3.3.2 Pair up with the subwoofer....7
4 Connect and set up....8
4.1 Position the SoundBar 8
4.2 Wall mount the SoundBar (optional)....8
4.3 Connections....9
4.3.1 Connect to TV....9
4.3.2 Connect audio from other device....9
5 Use your SoundBar 10
5.1 Adjust the volume 10
5.2 Choose your sound....10
5.3 Play audio through Bluetooth 10
5.4 Night mode 11
5.5 Auto standby....11
5.6 Apply factory settings 11
6 Product technical data 12
7 Troubleshooting 13
1 Notice
This section contains the legal and trademark notices.
1.1 Notice of Compliance
The device complies with the FCC rules, Part 15. Operation is subject to the following two condition:
① This device may not cause harmful interference, and
② This device must accept any interference received, including interference that may cause undesired operation.
FCC rules
This equipment has been tested and found to comply with the limits for a Class B digital device, pursuant to part 15 of the FCC Rules. These limits are designed to provide reasonable protection against harmful interference in a residential installation. This equipment generates, uses and can radiate radio frequency energy and, if not installed and used in accordance with the instruction manual, may cause harmful interference to radio communications. However, there is no guarantee that interference will not occur in a particular installation. If this equipment does cause harmful interference to radio or television reception, which can be determined by turning the equipment off and on, the user is encouraged to try to correct the interference by one or more of the following measures:
- Relocate the receiving antenna.
- Increase the separation between equipment and receiver.
- Connect the equipment into an outlet on a circuit different from that to which the receiver is connected.
- Consult the dealer or an experienced radio/TV technician for help.
FCC Radiation Exposure Statement: This
equipment complies with FCC radiation exposure limits set forth for an uncontrolled environment. This equipment should be installed and operated with a minimum distance of 20cm between the radiator and your body. This transmitter must not be co-located or operated in conjunction with any other antenna or transmitter.
FCC Warning: Any changes or modifications made to this device that are not expressly approved by Funai Corporation, Inc. may void the user's authority to operate the equipment.
Model number: MSB4560
Trade Name: MAGNAVOX
Canada:
CAN ICES-3(B)/NMB-3(B)
The device meets the exemption from the routine evaluation limits in section 2.5 of RSS 102 and compliance with RSS-102 RF exposure, users can obtain Canadian information on RF exposure and compliance.
This transmitter must not be co-located or operating in conjunction with any other antenna or transmitter. This equipment should be installed and operated with a minimum distance of 20 centimeters between the radiator and your body.
This device complies with Industry Canada licence-exempt RSS standard(s). Operation is subject to the following Two conditions: (1) this device may not cause harmful interference, and (2) this device must accept any interference received, including interference that may cause undesired operation.
1.2 Trademarks

DOLBY. DIGITAL
Manufactured under license from Dolby Laboratories. Dolby and the double-D symbol are trademarks of Dolby Laboratories.

Bluetooth®
The Bluetooth® word mark and logos are registered trademarks owned by Bluetooth SIG, Inc. and any use of such marks by Funai Electric Co., Ltd. is under license. Other trademarks and trade names are those of their respective owners.
2 Important
Read and understand all instructions before you use your SoundBar. If damage is caused by failure to follow instructions, the warranty does not apply.
2.1 Important safety instructions
- Read these instructions.
- Keep these instructions.
- Heed all warnings.
- Follow all instructions.
- Do not use this apparatus near water.
• Clean only with dry cloth. - Do not block any ventilation openings. Install in accordance with the manufacturer's instructions.
- Do not install near any heat sources such as radiators, heat registers, stoves, or other apparatus (including amplifiers) that produce heat.
- Do not defeat the safety purpose of the polarized or grounding-type plug. A polarized plug has two blades with one wider than the other. A grounding type plug has two blades and a third grounding prong. The wide blade or the third prong are provided for your safety. If the provided plug does not fit into your outlet, consult an electrician for replacement of the obsolete outlet.
- Protect the power cord from being walked on or pinched, particularly at plugs, convenience receptacles, and the point where they exit from the apparatus.
- Only use attachments/accessories specified by the manufacturer.

- Use only with the cart, stand, tripod, bracket or table specified by the manufacturer, or sold with the apparatus.
When a cart is used, use caution when moving the cart/apparatus combination to avoid injury from tip-over.
- Unplug this apparatus during lightning storm or when unused for long periods of time.
• Refer all servicing to qualified service personnel. Servicing is required when the apparatus has been damaged in any way, such as power-supply cord or plug is damaged, liquid has been spilled or objects have fallen into the apparatus, the apparatus has been exposed to rain or moisture, does not operate normally, or has been dropped. - Battery usage CAUTION - To prevent battery leakage which may result in bodily injury, property damage, or damage to the unit:
• Installall batteries correctly, + and - as marked on the unit.
- Remove batteries when the unit is not used for a long time.
- The batteries (battery pack or batteries installed) shall not be exposed to excessive heat such as sunshine, fire or the like.
- Perchlorate Material - special handling may apply. See www.dtsc.ca.gov/hazardouswaste/perchlorate.
- Warning- DO NOT INGEST BATTERY, CHEMICAL BURN HAZARD.
- CAUTION: Danger of explosion if battery is incorrectly replaced. Replace only with the same or equivalent type.
-
This product/remote control contain a coin/button cell battery. If the coin/button cell battery is swallowed, it can cause severe internal burns in just 2 hours and can lead to death. Keep new and used batteries away from children. If the battery compartment does not close securely, stop using the product and keep it away from children. If you think batteries might have been swallowed or placed inside any part of the body, seek immediate medical attention
-
Apparatus shall not be exposed to dripping or splashing.
- Do not place any sources of danger on the apparatus (for example, liquid filled objects, lighted candles).
- Where the MAINS plug or an appliance coupler is used as the disconnect device, the disconnect device shall remain readily operable.
- Do not place this apparatus on the furniture that is capable of being tilted by a child and an adult leaning, pulling, standing or climbing on it. A falling apparatus can cause serious injury or even death.
- This apparatus should not be placed in a built-in installation such as a bookcase or rack unless proper ventilation is provided. Make sure to leave a space of 7.8 inches (20cm) or more around this apparatus.
- Never use a gas duster for this apparatus. The gas trapped inside of this unit may cause ignition and explosion.
- Magnavox is not liable for improper wall mounting that result in accident, injury or damage.
• Install the Soundbar on the sturdy vertical wall.
- Do not install the Soundbar onto a ceiling or slanted wall, it may easy to fall down and result in severe injury.
- Do not use the screws that are shorter than the specified length, it may cause the Soundbar to fall down easily.
- Do not mount the Soundbar on a wall while the Soundbar is plugged in or turned on, it may result in an electrical shock injury.
Class II equipment symbol

This symbol indicates that the unit has a double insulation system.

- This 'bolt of lightning' indicates uninsulated material within your unit may cause an electrical shock. For the safety of everyone in your household, please do not remove product covering.
- The 'exclamation point' calls attention to features for which you should read the enclosed literature closely to prevent operating and maintenance problems.
- WARNING: To reduce the risk of fire or electric shock, this apparatus should not be exposed to rain or moisture and objects filled with liquids, such as vases, should not be placed on this apparatus.
- CAUTION: To prevent electric shock, match wide blade of plug to wide slot, fully insert.
2.2 Care of the environment

Your product is designed and manufactured with high quality materials and components, which can be recycled and reused.
Never dispose of your product with other household waste. Please inform yourself about the local rules on the separate collection of electrical and electronic products and batteries.
The correct disposal of these products helps prevent potentially negative consequences on the environment and human health.
The batteries supplied do not contain the heavy metals mercury and cadmium. Nevertheless, in many areas batteries may not be disposed of with your household waste. Please ensure you dispose of batteries according to local regulations.
For perchlorate material, special handling may apply. Visit www.dtsc.ca.gov/hazardouswaste/perchlorate.
3 Your SoundBar
Congratulations on your purchase.
3.1 Main unit
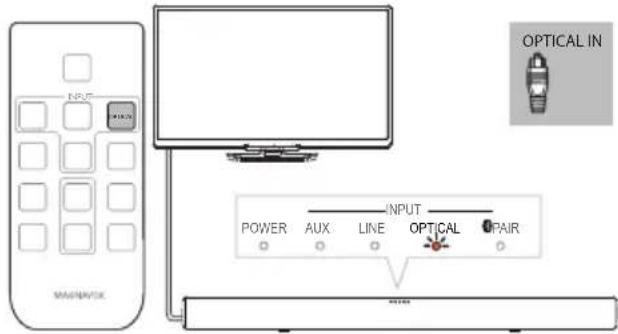
3.1.1 Front panel of main unit
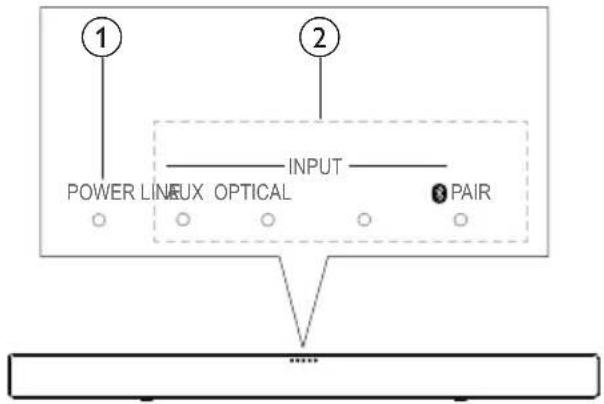
① POWER ( Standby indicator )
When the SoundBar is on standby, the standby indicator is red.
② Source indicators
When Dolby Digital audio is input, all the source indicators blink three times.
- AUX INPUT: Lights up when you switch to analog input source.
• LINE INPUT: Lights up when you switch to line in source(3.5mm jack).
• OPTICAL INPUT: Lights up when you switch to optical input source. Blinks three times when night mode is on, and blinks once when night mode is off.
- 3/PAIR INPUT: Lights up when you switch to bluetooth mode and bluetooth devices are paired. Blinks when bluetooth pairing is activated and pairing failed.
3.1.2 Back connectors of main unit
Connect other devices to your SoundBar.
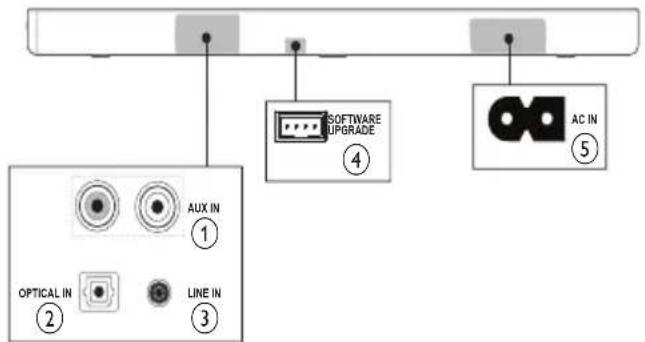
① AUX IN
Connect to an analog audio output on the TV or an analog device
② OPTICAL IN
Connect to an optical audio output on the TV or a digital device.
③ LINE IN
Connect to TV or a MP3 player.
④ SOFTWARE UPGRADE
⑤ AC IN
Connect to the power supply.
3.2 Remote Control

① ⏻ (Standby-On)
Switch the SoundBar on or off.
② Source buttons
- AUX INPUT: Switch your audio source to the AUX connection.
• LINE INPUT: Switch your audio source to the Line in (3.5mm jack) connection.
• OPTICAL IN: Switch your audio source to the optical connection.
- Bluetooth INPUT: Switch your audio source to the bluetooth connection.
③ MUTE
Mute or restore volume.
④ Sound setting buttons
Toggle switch the sound mode presets.
⑤ VOL +/-
Increase or decrease volume.
⑥ PAIR
Activate the bluetooth pairing or disconnect the currently bluetooth connection.
3.2.1 Replace battery
1 Open the battery compartment.
2 Insert one CR2025 battery, with the polarity (+/-) as indicated.
3 Close the battery compartment.
Warning
Danger of explosion if battery is incorrectly replaced. Replace only with the same or equivalent type.
• The product/remote control may or may not contain a coin/button type battery, which can be swallowed. Keep the battery out of reach of children at all times!
- The battery contains perchlorate material, handle it with care. For information see www.dtsc.ca.gov/hazardouswaste/perchlorate.
3.3 Wireless Subwoofer
3.3.1 Back panel of Subwoofer
The SoundBar comes with a wireless subwoofer.
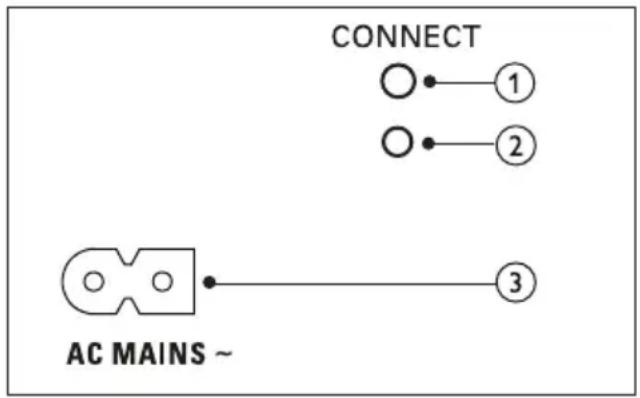
① CONNECT (connect)
Press to to enter the pairing mode for the subwoofer.
② Subwoofer indicator
- When the power is turned on, the indicator lights up.
- During wireless pairing between the subwoofer and the main unit, the indicator blinks white quickly.
- When the pairing succeeds, the indicator lights up white.
- When the pairing fails, the indicator blinks white slowly.
- When wireless connection is disconnected for one minute, the indicator turns off.
③ AC MAINS\~
Connect to the power supply.
3.3.2 Pair up with the subwoofer
The wireless subwoofer automatically pairs up with the SoundBar for wireless connection when you turn on the SoundBar and the subwoofer. If no audio from the wireless subwoofer can be heard, manually pair up the subwoofer.
1 Turn on the SoundBar and the subwoofer.
- if the connection to the SoundBar is lost, the indicator on the subwoofer blinks white slowly.
2 Press the CONNECT button on the subwoofer to enter the pairing mode.
- The indicator on the subwoofer blinks white quickly.
3 On your remote control, press AUX button, then long Press PAIR button for 3 seconds.
- All the indicators on the front panel of main unit blink back and forth.
- The LED on subwoofer will blinks quickly during paring.
4 If the paring succeeds, the indicators will show as below.
- The five indicators on the front panel of main unit light up for two seconds, then light off.
- The indicator on the subwoofer will stop blink and stay on white.
5 If the pairing fails, repeat the steps 1 to 3.
- The five indictors on the front panel of main unit blink twice.
- the indicator on the subwoofer blinks white slowly.
4 Connect and set up
This section helps you connect your SoundBar to a TV and other devices, and then set it up.
For information about the basic connections of your SoundBar and accessories, see the quick start guide.
Note
- For identification and supply ratings, see the type plate at the back or bottom of the product.
• Before you make or change any connections, make sure that all devices are disconnected from the power outlet.
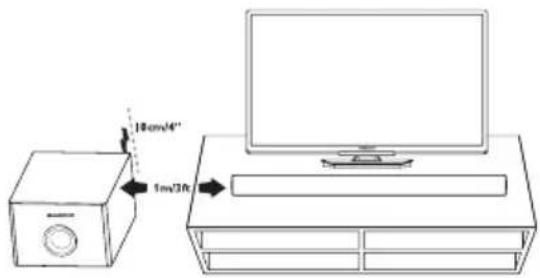
4.1 Position the SoundBar
Place the subwoofer at least 1 meter (3 feet) away from your SoundBar, and ten centimeters away from the wall.
For best results, place your subwoofer as shown below.
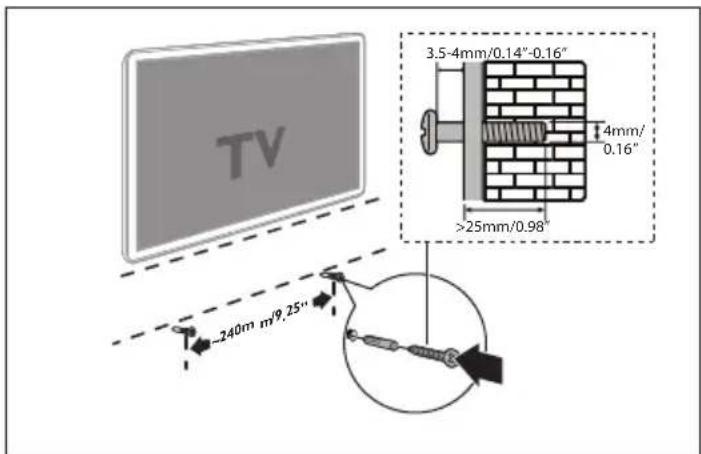
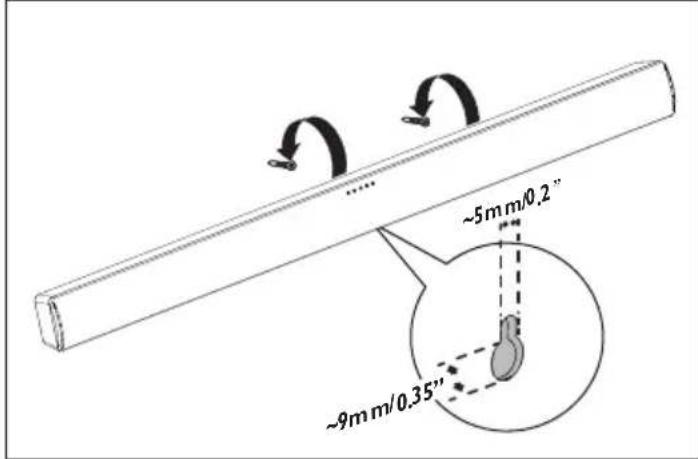
4.2 Wall mount the SoundBar (optional)
Use screws (not supplied) that are suitable for the wall material and strength. As a plaster board wall is especially fragile, attach the screws securely to a wall beam.
I) Drill two holes on the wall.
2) Secure the dowels and screws in the holes.
3) Hang the SoundBar on the fastening screws.
Warning
- Improper wall mounting may result in accident, injury or damage. If you have any query, contact Consumer Care in your country.
- Before wall mounting, make sure the wall can support the weight of your SoundBar.
- Magnavox is not liable for improper wall mounting that result in accident, injury or damage.
• Install the Soundbar on a sturdy vertical wall. - Do not install the Soundbar onto a ceiling or slanted wall.
- Do not use screws that are shorter than the specified length, it may cause the Soundbar to fall down easily.
- Do not mount the Soundbar on a wall while the Soundbar is plugged in or turned on, it may result in an electrical shock injury.
4.3 Connections
4.3.1 Connect to TV
Connect your SoundBar to a TV through line in cable. You can listen to audio from TV programs through your SoundBar.
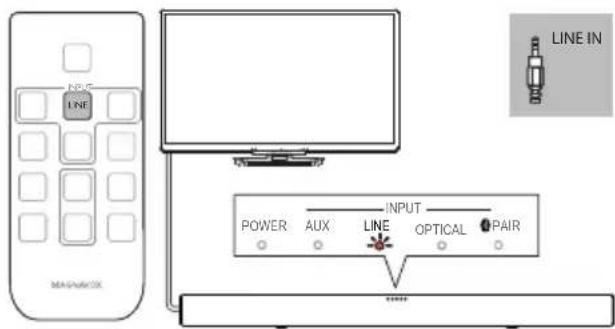
Note
•During play, do not plug out the line in cable.
- On your TV, it is recommended to set the volume in the range of 60% maximum volume to avoid the distortion of audio output.
If your TV supports OPTICAL OUT feature, connect your Soundbar to TV through a digital optical cable(Not supplied).
4.3.2 Connect audio from other device
Play audio other devices through your Soundbar speakers.
Note
•During play, do not plug out the audio cable.
Connect audio through a digital optical cable(Not supplied).

Connect audio through analog audio cables(Not supplied).

5 Use your SoundBar
This section helps you use the SoundBar to play audio from connected devices.
Before you start
- Make the necessary connections described in the quick start guide and the user manual.
- Switch the SoundBar to the correct source for other devices.
5.1 Adjust the volume
1 Press +/- (Volume) to increase or decrease a volume level.
- To mute sound, press ✕ on remote control.
→ When the mute on, the POWER indicator on the front panel of main unit blinks in red.
→ When the mute off, the POWER indicator stop blink and light off. - To restore the sound, press ✕ again or press VOL +/-
2 To increase or decrease volume, press VOL +/- on remote control.
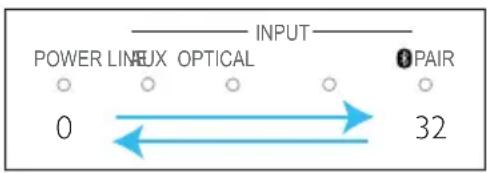
- When press VOL+, the indicators on the front panel light up from left to right.
- when press VOL-, the indicators on the front panel light up form right to left.
- All indicators on the front panel blink twice when the volume is set to either minimum or maximum.
Note
•The volume might be influenced by MP3 or Bluethooth player.
5.2 Choose your sound
Select predefined sound modes to suit your video or music.
Press sound setting buttons on remote control to select a sound mode.
→ When a button is pressed, the POWER indicator blinks once.
- MUSIC: Recreate the original recording environment of you music, in the studio or at a concert.
• MOVIE: Enjoy a cinematic audio experience, specially enhanced for movies. - NEWS: Hear every word with optimized speech and clear vocals.
- CLASSIC: Flat and pure sound mode. Ideal for listening to classical music.
5.3 Play audio through bluetooth
Through Bluetooth, connect the SoundBar with your Bluetooth device (such as an iPad, iPhone, iPod touch, Android phone, or laptop), and then device through your SoundBar speakers.
What you need
- A Bluetooth device which supports version as 3.0 + EDR.
- The operational range between the SoundBar and a Bluetooth device is approximately 10 meters (30 feet).
1 Press ⚙ on the remote control to switch the SoundBar to Bluetooth mode.
→ ThePAIR INPUT indicator on the front panel of main unit blinks slowly.
2 On the Bluetooth device, switch on Bluetooth, search for and select MAGNAVOX MSB4560 (see the user manual of the Bluetooth device on how to enable Bluetooth).
3 When the Bluetooth connection succeeds, the Bluetooth indicator lights up.
- If no any bluetooth device is connected in two minutes, press PAIR on remote control to activate the paring mode again.
4 Select and play audio files or music on your bluetooth device.
- During play, if a call is coming, music play is paused. Play resumes when the call ends.
5 To exit Bluetooth, select other source.
- When your switch back to Bluetooth mode, Bluetooth connection remains active.
Note
- The music streaming may be interrupted by obstacles between the device and SoundBar, such as wall, metallic casing that covers the device, or other devices nearby that operate in the same frequency.
- If you want to connect your SoundBar with another Bluetooth device, press PAIR button to disconnect the currently connection.
5.4 Night Mode
Night Mode is a digital Audio feature equipped with Dolby digital decoder. When you watch movie late at night, lowering volume level during loud sound scenes, dynamic range will be pressed down and you miss some dialogue and narration. With this “Night Mode” you can control volume level down but still can enjoy fair level of audio tone and voice.
1 In any mode, Long press CLASSIC on remote control for 3 seconds to switch night mode on or off. → The OPTICAL INPUT indicator on the front panel of main unit blinks three times when the night mode is on. → The OPTICAL INPUT indicator on the front panel of main unit blinks once when the night mode is off.
Note
•This product supports Dolby Digital and LPCM.
• DTS is not supported.
• Sampling frequency: 32KHz, 44.1KHz, 48KHz
5.5 Auto Standby
When playing media from a connected device, the SoundBar automatically switches to standby after 20 minutes if no audio play from a connected device.
5.6 Apply factory settings
You can reset your SoundBar to the default settings programmed at the factory.
1 On your remote control, press LINE INPUT button.
2 Press MUSIC, VOL- and NEWS on remote control within 3 seconds to perform factory default settings.
→ when the factory setting restore is complete, the system shuts down into standby mode and restart.
6 Product technical data
Specifications and design are subject to change without notice.
| Specifications |
| AmplifierRMS Total output power: 76 W RMS (+/- 0.5 dB, 10% THD)Frequency response: 20 Hz-20 kHz / ±3 dBSignal-to-noise ratio: >65 dB (CCIR) / (A-weighted)Input sensitivity:AUX: 1700mVLINE IN: 850mV |
| BluetoothBluetooth profiles: A2DP, AVRCPBluetooth version: 3.0 + EDR |
| Main unitPower supply: 120V~, 60 HzPower consumption: 15 WStandby power consumption: ≤ 0.5 WSpeaker impedance: 8 ohmSpeaker drivers: 51mm(2”)woofer, 25.4mm(1”) tweeterFrequency response: 150 Hz-20 kHzDimensions (WxHxD): 999× 77 × 57 mmWeight: 1.8 kg |
| SubwooferPower supply: 120V~, 60 HzPower consumption: 15 WImpedance: 4 ohmSpeaker drivers: 133 mm (5.25") wooferFrequency response: 20 Hz-150 HzDimensions (WxHxD): 226 × 250 × 305 mmWeight: 3.9 kg |
| Remote control batteries1 × CR2025 |
7 Troubleshooting
To keep the warranty valid, never try to repair the product yourself.
Malfunctions may occur with any electrical equipment. This must not always involve a defect of the device.
Therefore, check the following table to see if you can eliminate the problem yourself.
| Malfunction Possible cause/ Elimination | |
| The SoundBar does not work. | · Disconnect the SoundBar from the power supply for a few minutes, then reconnect. |
| No sound from SoundBar speakers. | · Connect the correct audio cable from your SoundBar to your TV or other devices.· On your SoundBar remote control, press the Source buttons to select the correct audio input.· Make sure that the SoundBar is not muted. Press VOL +/- to restore the sound (see 'Adjust the volume' on page 10).· Switch or set to other audio signal of your connected external device (This product support for Dolby Digital and LPCM). |
| No sound from the wireless subwoofer. | · Wirelessly connect the subwoofer to the Sound-Bar (see 'Pair up with the subwoofer' on page 7). |
| A device cannot connect with the SoundBar via Bluetooth. | · The device does not support the compatible profiles required for the SoundBar.· You have not enabled the Bluetooth function of the device. See the user manual of the device on how to enable the function.· The device is not correctly connected. Connect the device correctly.· The SoundBar is already connected with another Bluetooth device. Disconnect the connected device, then try again. |
| Quality of audio play from a connected Bluetooth device is poor. | · The Bluetooth reception is poor. Move the device closer to the SoundBar, or remove any obstacle between the device and the SoundBar. |
| The connected Bluetooth device connects and disconnects constantly. | · The Bluetooth reception is poor. Move the device closer to the SoundBar, or remove any obstacle between the device and the SoundBar.· For some Bluetooth, the Bluetooth connection can be deactivated automatically to save power. This does not indicate any malfunction of the SoundBar. |
| No reaction to the remote control | · The battery has been exhausted, please change a new one.· Ensure the battery placed correctly. |
Tabla de Contenido
1 Aviso....2
1.1 Aviso de cumplimiento....2
1.2 Marca comercial....3
2 Importante....3
3.2 Control remoto....6
Advertencia
Avertissement
- Important....3
- Your SoundBar....5
- Connect and set up....8
- Use your SoundBar 10
- Product technical data 12
- Troubleshooting 13
- Notice
- Notice of Compliance
- FCC rules
- Canada:
- Trademarks
- DOLBY. DIGITAL
- Bluetooth®
- Important
- Important safety instructions
- Care of the environment
- Your SoundBar
- Main unit
- Front panel of main unit
- PAIR
- Back connectors of main unit
- Remote Control
- Replace battery
- Warning
- Wireless Subwoofer
- Back panel of Subwoofer
- ① CONNECT (connect)
- ② Subwoofer indicator
- ③ AC MAINS\~
- Pair up with the subwoofer
- Connect and set up
- Note
- Position the SoundBar
- Wall mount the SoundBar (optional)
- Connections
- Connect to TV
- Connect audio from other device
- Use your SoundBar
- Before you start
- Adjust the volume
- Choose your sound
- Play audio through bluetooth
- Night Mode
- Auto Standby
- Apply factory settings
- Product technical data
- Troubleshooting
- Tabla de Contenido
- Aviso....2
- Importante....3
- Advertencia
- Avertissement
Brand : MAGNAVOX
Model : MSB4560
Category : Soundbar